Gastrorag DK100 User manual

I N S T R U C T IO N M A N U A L
MAN U A L DE I N S T RUC C I O N E S
Dispensador de Café
Coffee Maker
DK100


Lo felicitamos por su compra de un Dispensador de Café
Gastrorag. Estamos seguros de que nuestro producto
satisfará sus más altas exigencias y se convertirá en un
asistente confiable en su cocina. Por favor, lea este manual
detenidamente antes de operar.
Si sigue estas instrucciones, su dispensador de café le será
útil durante mucho tiempo.
¡Gracias por su elección!
Best wishes,
GASTRORAG TEAM
Los mejores deseos,
EQUIPO DE GASTRORAG
Thank you for your choice!
for
a very long time.
If you follow the instructions, our coffee maker will serve you
Please read this manual carefully before operating.
demands and become a reliable assistant in your kitchen.
maker. We are sure that our product will meet your highest
We congratulate you on your purchase of Gastrorag Coffee
Please read the instruction manual carefully before using
and well keep this in a safe place for future reference.
Some figures in this manual may not match with the real
object, just for reference only.
Por favor lea detenidamente el manual de instrucciones
antes de usar el producto y guárdelo en un lugar seguro
para futuras referencias.
Es probable que algunas figuras en el manual no coincidan
con el artículo real, estás son solo una referencia.
Contents
Design 6
Before first use 7
Turning on the appliance 7
Caution 9
Cleaning and maintenance 10
Important safety instructions 11
Environment friendly disposal 13
Warranty 14
Contenido
Design 16
Antes de su primer uso 17
Encender el aparato 17
Precaución 19
Limpieza y mantenimiento 20
Instrucciones de Seguridad 21
Amigable con el medioambiente 24
Garantía 24
EN
5
Electrical parameters:
120 V, 60 Hz
Power:
1500 W
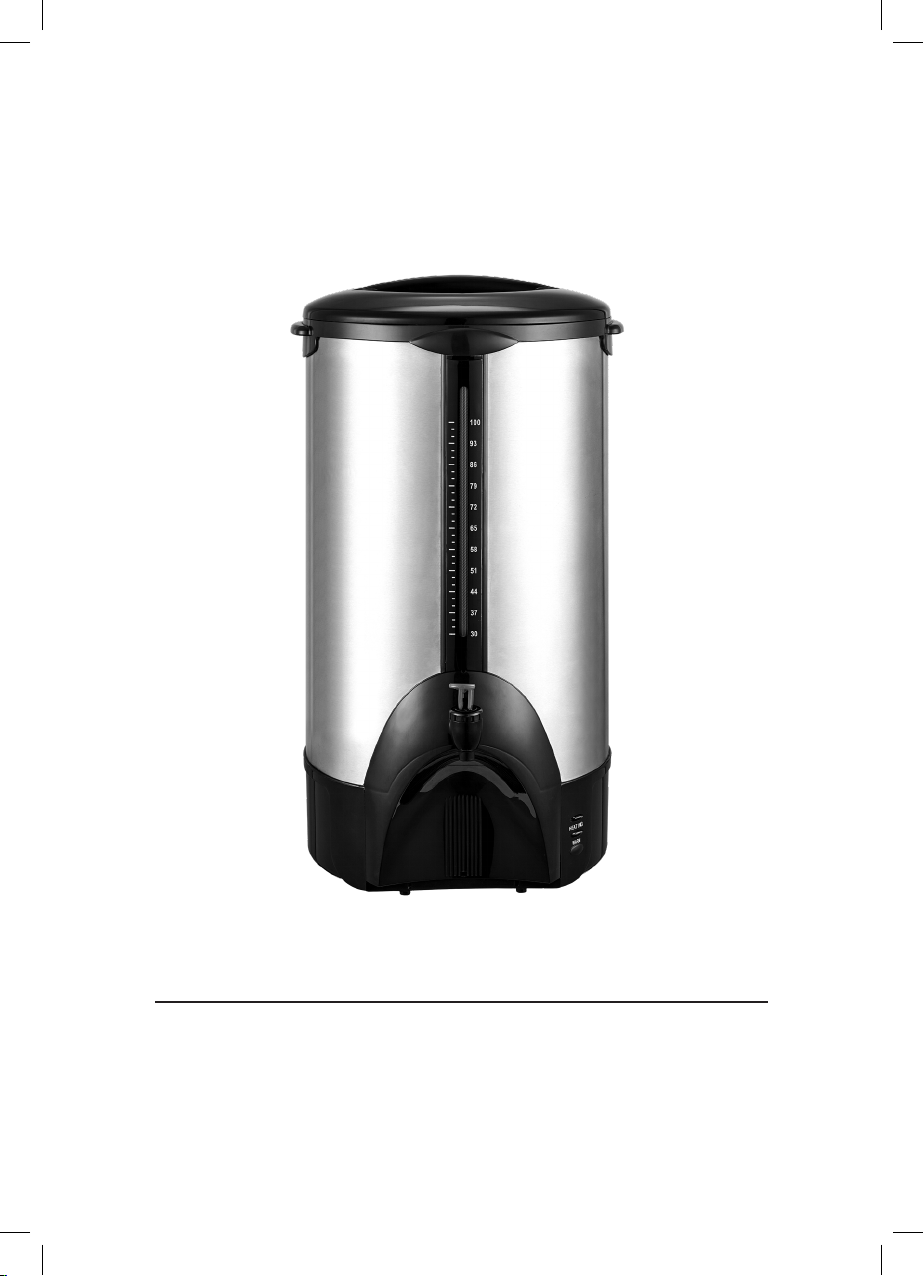
Gastrorag DK100 Coffee maker
Technical specifications
1 cup = 5 fl oz
100 cups / 500 fl oz
Volume:
EN
6
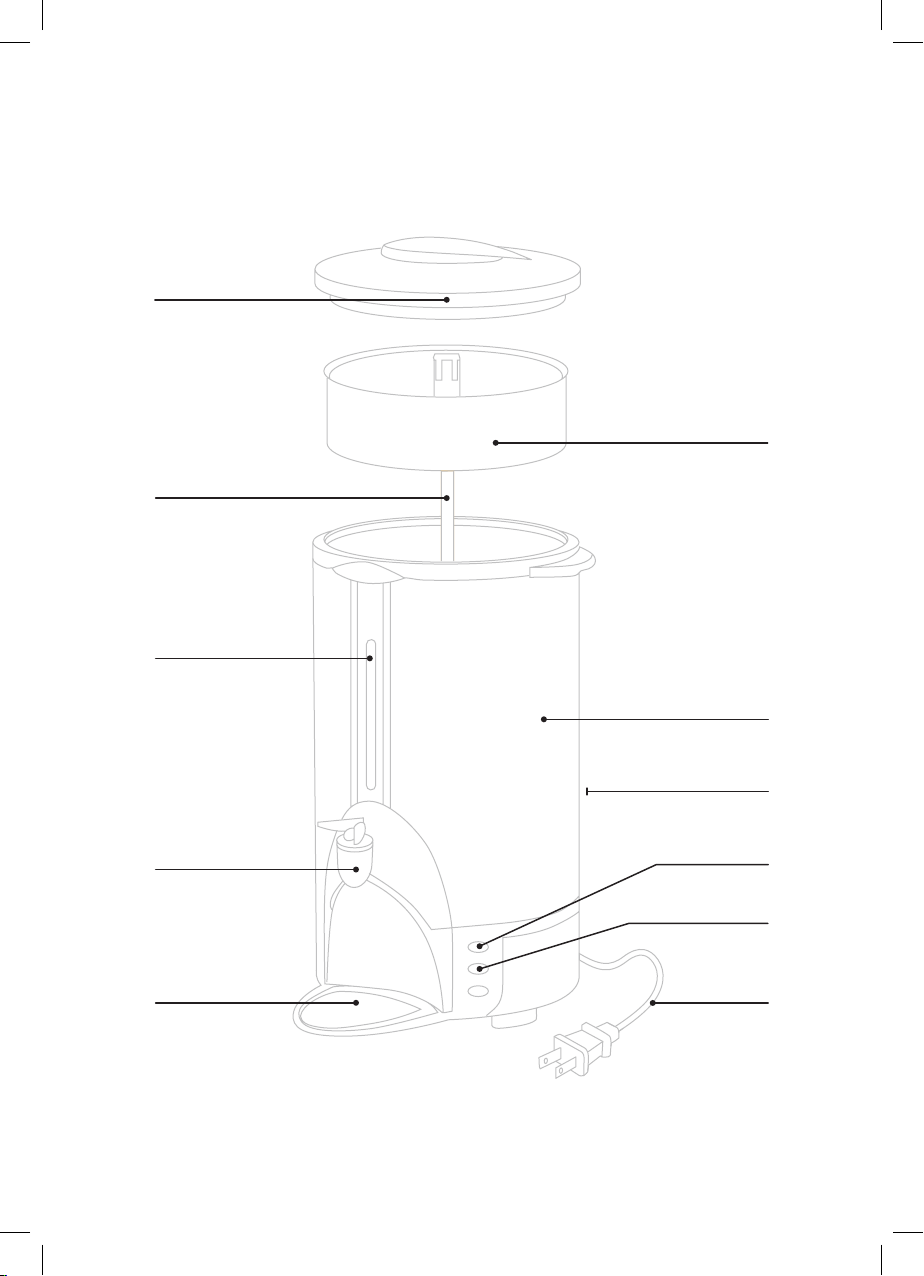
Design
Design
Water Level
Indicator
Tank
Power Switch
(on the back side)
Power Cord
Warm Light
Heating Light
Water Faucet
Drip-saver Pan
Lid
Coffee Basket
(Infuser)
Water Pipe

EN
7
indicating that the appliance is turned on.
switch. At the same time, the boiling indicator should light up,
5. Connect the appliance to the supply system using the power
4. Turn on the power (plug in the power outlet).
while making coffee.
heating element. Close the infuser with a lid. Do not remove the lid
the water pipe in the tank so that the base of the tube fits inside the
3. Insert the water pipe into the infuser. Install the coffee basket with
basket by at least 1 inch.
basket.The coffee level should be below the edge of the coffee
distributed over the filter. Do not put too much coffee in the coffee
into thefilter of the coffee basket. Coffee should be evenly
2. Pour 2/5 ounces of medium-ground coffee or 1/5 ounces of tea
readings.
of the tank can be monitored with the help of the measuring glass
The water level must not exceed the maximum level. The filling level
the volume of the tank (see the section Technical Specifications).
the tank with hot water.
The volume of water should be at least half
tank. Fill the tank with cold drinking water.
It is not allowed to fill
1. Remove the lid. Remove the infuser and water pipe from the water
BREWING COFFEE/TEA
Turning on the appliance
Maintenance and Care section.
3. C
lean this appliance in accordance with the instructions in the
protective film from the stainless steel surfaces.
2. Remove the accessories from the packaging. Remove the
of 25-35 inches with a flat horizontal surface.
1. Unpack the appliance and place it on a stable stand with a height
Before first use
Turning on the appliance

EN
8
of the appliance. Press it and the appliance is ready to use.
3. T
urn the appliance over. There is a spring switch on the bottom
cool to room temperature.
2. E
mpty the tank (if there is any water) and allow the appliance to
1. U
nplug the power cord.
following:
appliance. To return to the usual operating mode, you must do the
water in the tank, safety thermostat will automatically turn off the
In case of a "dry" start up, i.e. without water or with insufficient
(WITH NO WATER IN THE TANK)
OPERATING MODE AFTER THE ‘DRY’ START UP
HOW TO RETURN THE APPLIANCE TO
coffee basket is not filled with ground coffee.
process described above (see the section Brewing coffee), but the
Getting boiling hot water for brewing hot drinks is the same as the
BOILING HOT WATER FOR BREWING HOT DRINKS
prepare the next portion of coffee.
tank, infuser, water pipe and lid. The appliance is ready to
infuser from the water tank. Pour out used coffee. Rinse the
switch and disconnect the plug from the outlet. Remove the
disconnect the appliance from the supply using the power
3 cups and the coffee is not visible in the measuring glass,
When the volume of coffee in the tank is reduced to about7.
heating indicator light comes on.
drink. In this case, the boiling indicator light goes off and the
the appliance will automatically enter the mode of heating the
process of brewing coffee will begin. When the coffee is ready,
hW
en the water temperature in the tank reaches 185°F, the
6.
Turning on the appliance

EN
9
Caution
Caution
Remove all protective wrappings before boiling.
TURNING OFF THE APPLIANCE
1. Disconnect the appliance from the supply system using the
power switch.
2. Turn off the power (unplug the power plug).
THIS MANUAL INCLUDES THE FOLLOWING WARNING
SYMBOLS THAT CAN BE FOUND ON THE DEVICE.
Indicates a potentially hazardous situation/action which,
if not avoided, may result in serious injury or death
Indicates a potentially hazardous situation/action which,
if not avoided, may result in heavy burns due to contact
with hot surfaces or liquids
Indicates a potentially hazardous situation/action which,
if not avoided, may result in personal injury, equipment
or environmental damage
They indicate important information. Please read it carefully.
For commercial use only!

EN
10
Otherwise, spontaneous operation of the thermal relay and
equipment shutdown during operation are possible.
heating element clean.
•
Rinse the tank thoroughly with clean water. Always keep the
water) and let it work for 15-30 minutes. Drain the solution.
•
Dissolve the cleaning agent in water (1 pack per 5 quarts of
•
Fill the tank with hot water.
Cleaning is done in the following way:
deposits from the inside of the tank and from the heating element.
2. You can use a special cleaning agent to remove dark coffee
water.
tank and the heating element with a soft sponge or brush. Drain the
1. Pour some clean, hot water into the tank. Clean the inside of the
TANK CLEANING
and thoroughly rinsed with clean water at the end of work.
water pipe and lid should be washed daily with warm soapy water
regularly with a clean, damp cloth or sponge. The coffee basket,
solvents to clean equipment. Wipe the main part of the appliance
objects, aggressive cleaning agents, gasoline, acids, alkalis and
It is not allowed to use abrasive materials, piercing and cutting
down to room temperature before cleaning it.
Always make sure that the appliance is unplugged and cooled
Cleaning and maintenance
Cleaning and maintenance
instructions on the packaging.
1. P
repare the decalcifying solution in accordance with the
tools. Decalcifying is as follows:
machine. It is recommended to decalcify regularly using
special
In areas with hard water, scale may build up inside
the coffee
DECALCIFYING
Table of contents
Languages:
Other Gastrorag Coffee Maker manuals


