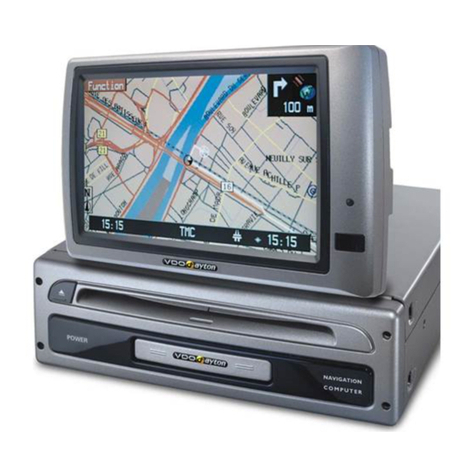
GATEQ ENAV-6520i User manual

ENAV-6520i

Content
Chapter I Use Safety and Notice.......................... 1
1 . 1 W a r n i n g ! .......................................................1
U s e s a f e t y w a r n i n g : ................................................1
I n s t a l l a t i o n s a f e t y w a r n i n g : ..........................................2
1 . 2 N o t i c e ! .........................................................2
U s e n o t i c e s : .......................................................2
1.3 N ot ic es on d is c use : .............................................4
C h a p t e r I I P a ck a g e L i s t .........................................4
Chapter III Appeareance and Function Keys...................5
3.1 Introduction on remote function keys...............................5
3.2 Introduction on key-press/interface function.........................6
3.3 Output interfaces of back panel...................................8
Chapter IV. Direction on Basic Function.....................10
4.1 Turn on/off o perat io n funct ion....................................10
4 . 1 . 1 .T u r n o n ....................................................1 0
4 . 1 . 2 .T u r n o f f ....................................................1 0
4 . 2 P l a c e d i s c .....................................................1 0
4 . 3 S c r e e n f l e x e s ..................................................11
4 . 4 Vo l u m e c o n t r o l .................................................11
4 . 5 M u t e ..........................................................11
4 . 6 M o d e S h i f t .....................................................11
4 . 7 B a c k l i g h t a d j u s t m e n t ............................................11
4.8 Un ive rsa l sys tem f uncti on se t....................................11
4.8.1.V i d e o s e t m e n u .............................................1 2
4 . 8 . 2 .A u d i o s e t m e n u .............................................1 3
4 . 8 . 3 .T i m e s e t ...................................................1 3
4 . 8 . 4 .R a d i o s e t ..................................................1 4
4.8.5.S y s t e m s e t .................................................1 4
Chapter V. Direction of Multimedia Operations......15
5. 1 D irec t ion on r a dio op e rati o n.....................................1 5
5.2 Direction on DVD/VCD play operation.............................16
5.3 Direction on CD /MP3 play operation .............................18
..... 5.4 Direction on picture play operation 20
5. 5 Dir ect ion o n CDC o pera ton .....................................2 1
5.6 Direction on external connection signal source play....22
5.7 Special set for disc play system..................................23
5 . 7 . 1 .U n i v e r s a l s e t ...............................................2 3
5 . 7 . 2 .I n i t i a l s e t ...................................................2 4
Chapter VI. Simple trouble analysis ..........................26
6.1 Can not turn on/off machine normally.............................26
6 . 2 N o s o u n d o u t p u t ...............................................2 6
6 . 3 C a n n o t r e a d d i s c ..............................................2 6
6. 4 R a d i o c an not wor k w e l l .........................................26
6.5 Sc ree n can n ot re tur n back......................................26
6. 6 D i s c c a n n o t ge t o u t ............................................26
Chapter VII.Technical specification...........................27
Chapter VIII. Installation Direction............................28
W a r n i n g ..........................................................2 8
O t h e r n o t i c e s : ....................................................2 8
8.1 Mai n m a c h i e n i n stalla t i o n ........................................2 8
8 . 2 G P S A n t e n n a i n s t a l l a t i o n .......................................3 0
8.3 Initiatio n after installation........................................31
................................
Please read the operation direction carefully before use the product.
The content of the publication will change according to the update of
equipment. Gateq Ltd. preserves right to add and rectify the content without
further notice.
© Gateq 2007

Chapter I Use Safety and Notices
Warning!
Notice!
1.1 Warning!
Please read the operation direction carefully before using the machine,
which will lead you to use the product safely and effectively.
Important notice: you should not disassemble the machine without the
permit of our company. The company is not responsible for any losses
caused by the above reason.
The mark is very important direction in installation. The violation of the
direction may influence human safety, even cause human injury.
The mark means very important direction in installation. The violation of
the direction may damage the product seriously.
(a) Use safety warning:
1. Do not view your screen and take operation when driving. Please
park your car in safety place if the operation is necessary, or else it
may cause traffic accident.
2. Please apply 12V (10.8-16V) vehicle power supply, or else it may
cause fire or electric shock.
3. Please well place small parts, such as remote battery, so as to
avoid children swallowing it. Please send the person ate the parts
to see doctor as soon as possible.
4. Do not insert foreign matter in panel or disk inlet.
5. Do not disassemble and change and remold the machine privately.
Please contact local service provider if you needs maintenance.
6. Please turn off your machine immediately if any of the following
cases happen, and contact local service provider. The continue
Use may cause accident, fire, and electric shock.
?Foreign matter entrance ?Smoke ?Water or drink is pulled on
?There is unmoral smell
?There is trouble (no picture or no sound).
7. Do not put the remote of the machine in your car randomly, or else
the fallen of remote may clock foot brake and cause accident.
8. Do not touch the liquid in LCD if it broken, or else it may cause
skin phlogosis; please gargle and go to see doctor as soon as
possible if you get the liquid in your mouth; please clean the liquid
carefully and go to see doctor as soon as possible if there is liquid
getting in your eye or touching your skin.
(b) Installation safety warning:
1. Do not place or install the machine on the place that may ward off
the eyeshot of driver, hamper steering wheel, gearlever, and brake
pedal, endanger passenger, or disturb air chamber system, or else
it may cause traffic accident and human injury.
2. Please cut off the connection with the battery cathode, or else it
may cause electric shock and short circuit.
3. If it is necessary to drill hole in the bracket of vehicle, please check
the position of pipeline, gasoline tank, and electric line before
installation.
4. Do not cut the power supply wire of the machine for the power of
Other device/equipment.
5. Please check whether the other electric devices are in normal
function after installation.
6. Please read the notices on the vehicle that will be installed the
machine carefully.
(c) Use notice:
1. Please keep suitable volume when driving, and not affect the driver
to understand the condition of road and traffic.
2. Do not put our hand or fingers in disc inlet or other moving parts,
especially for children.
3. Do not use the machine for long time if the vehicle engine stopped,
to prevent use up the battery.
4. Do not place the machine under direct sunshine or high
Temperature, or else it may cause trouble or distortion.
1.2 Notice!

5. Do not use the machine under the environment that is of too much
water or powder, especially keep water away from the machine in
rainy day or when washing vehicle.
Notice: the working temperature of the machine is -20~70℃.
6. Sudden temperature change, such as starting air condition when
the weather is too hot or cold, may make the optical lens of the
machine get drip, which may influence normal read of laser. You
should put the disc out after a while in that circumstance.
7. Music and sound may interrupt when there is vibration. The
machine will recover to work if the vibration disappears. Generally
speaking, disc will not be influenced, but there will be no picture for
A while. The machine will be in normal operation after vibration.
8. Screen
a) Do not get sunshine shine the screen directly. The picture will
obscure by the reflection of sunshine.
b) The screen is most clear when observing from its face, so
please watch the screen in 40 to 60 degrees.
c) Sudden temperature change, such as starting air condition
when the climate is too hot or cold, may make the optical lens of
the machine get drip. You should stop using the machine for a
while in that circumstance, until the drip disappears.
9. Maintenance:
a) The screen is easy to get dust, please clean it often. Please cut
off power when cleaning, apply soft cotton cloth on it. Wet cloth
is forbidden, and it is forbidden to rub and beat it with hard
maters.
b) Do not apply oil, thinner, pesticide, or other volatility
medicament to wipe the machine. The machine shell and panel
may be corroded if there is above materials.
10. The guide function of the machine is only a reference, and it shall
not replace the judgment of driver.
1.3 Notices on disc use:
Chapter II. Package List
Please use the disc with above marks:
1. Do not use any dirty or seriously scratched or distorted discs.
2. Please keep disc away from sharp matters.
3. Do not place disc under direct sunshine or any places with too much
dust or too moisture.
4. Do not use disc in special shape. The 12cm disc is available.
5. Apply soft cotton cloth to wipe the surface of disc from the inner ring
outward. You can use the wet cloth with alcohol if disc is too dirty. Do
not apply solute, such as oil and thinner.
6. Be aware not to touch the information record side of disc when holding
it.
7. Please pay attention to the display icon on the LCD screen when
putting disc in, and do not put disc in if there is another disk in the
Machine.
1. Multimedia guide system for vehicle 1
2. Remote 1
3. Use direction 1
4. External connection GPS antenna 1
5. Attachment pack, including the following parts:
Power supply wire ISO POWER SOKET(A)1
RCA tie wire ISO RCA SOKET WIRE(C3)1 set
SPK wiring harness SPK SOKET WIRE(B)wiring harness 1 set
Installation bolt M5.0X5.12
Installation bolt M4.0X5.0 4
Spring shim M5 1
Flat shim M5 1
6. (Optional) SD card, which includes guide map and program.

3.2 Introduction to key-press/interface function:
(Diagram of BASE side after the panel sliding down)
14 15
Notice:
Chapter III. Appearance and Function Keys
3.1 Introduction on the remote function keys
the actual content may inconsistent with the above, please check for
actual content.
Notice:
1.The definition of the remote keys
in navigation status
refers to the direction on navigation
operation.
2.The definition of the control keys of
remote controller refers to the Table 1.

Definition of the panel key-press and their functions: 3.3 Output interface of back panel
Definition of RCA Input & Output interfaces:
Press it to confirm in “SET UP” menu.
Press it to play/pause while play audio media

Speaker Wire/Power Wire definition of interfaces:
Remark:
1. system will be on parking ON status when Parking line is used. Keys
are unavailable in safety drive mode(parking ON).
2. Please connect it to GND when you don't use 'Parking' line.
Chapter IV. Direction of Basic Functions
4.1 Turn on /off machine
4.1.1 Turn on machine
4.1.2. Turn off machine
4.2 Disc in/out
.
The product applies automatic flexible LCD. The screen will return to
preset when turning on/off:
1) Press power key ( on panel or on remote)for a while can
Open The machine. The system will be on the default status of the
last turn-off. The screen will return to the last position. The machine
enters into Fm1 wave band interface if it is the first time to work.
If you turn off the machine by pulling key out last time, it is
unnecessary to press Power key, the system will turn on
automatically, and the machine returns to radio picture.
1) Press power key for a while when the system is on, and the system
will be off, the screen return to the parallel position of panel.
2) The system will turn off automatically if the vehicle is off, and the screen
panel will be back to the parallel position of panel.
1) Press on panel or on remote when the system is on, the panel wil
get out, and disc eject automatically, you also can insert/pull out SD
card.
2) Press on panel or on remote after placing disc, the screen will
return to the former status.
Notice:
1) You should ensure that there are not obstacles in at least 15cm of the
direction of the screen putting out, so as to prevent obstacles
damaging the machine when the screen panel is putting out.
2) The machine boasts block disc prevention function, the electrical
machine will stop automatically if there is disc in the opening or disc is
getting out.

4.3 Screen flex:
4.4 Volume control
4.5 Mute
4.6 Mode shift
4.7 Backlight adjustment
4.8 Universal system function set:
Press “ ”“ ” on panel or “? ”“? ” on remote can adjust the flexible angle
of screen. The maximum angle is 22°.
Notice: the above keys are unavailable in system set operation.
Press “ ”of VOL on panel or and on remote to control volume.
The screen displays volume icon when controlling volume. The icon will
disappear if there is no action for five seconds.
Press the key on main machine panel or the key on remote shortly
to enter into mute or exit from mute status. The screen displays in mute
status, and CD and USB will pause automatically.
Press the key on main machine panel or remote to enter into radio
mode.
Press the key on main machine panel or key on remote to enter
into the circle shift of read disc ? navigation ? CDC ? USB? AV IN(
external connection signal source).
Press on the right top of the screen or on remote to adjust the
brightness of screen backlight. Touch any place of screen will turn back to
open brightness.
In multimedia play status, press the on panel or on remote to enter
into system set mode, press again the on panel or on remote again
can quit the interface. The system will return to the former interface if there is
no action for five seconds.
The default interface of the system is time display interface, which is:
Notice: the machine is built-in electronic watch and perpetual calendar.
The machine is available for Video, Audio, Radio, Time, and System set.
The selection and set of menu can be taken through panel, touch screen, or
remote.
Press Video key in time display interface to enter into video setting
interface. The interface is:
4.8.1. Video configuration menu:

4.8.2 Audio set menu
4.8.3. Time set
Click the Time on screen to enter into time setting interface, which is:
The method for the parameter set of this interface is the same with 4.8.1
4.8.4. Radio set
4.8.5. System set
Click the Radio on screen to enter into radio setting interface, which is:
The method for the parameter set of this interface is the same with 4.8.2
Click the System on screen to enter into system setting interface, which is:
The method for the parameter set of this interface is the same with 4.8.2

Chapter V. Direction on multimedia play operation
5.1 Direction on radio operation
Press on panel or on remote in any mode to enter into the last
radio status directly.
Normal interface of radio:
5.2 Direction on DVD/VCD playing operation:
1. Press the entrance key on remote or panel, the panel will slide down,
and the system will read disc, recognize the type of disc, and play the
disc automatically.
2. Under other status, press MOD key can shift the play mode of
DVD/VCD;
3. Operate DVD/VCD playing function through touch screen or remote;
The screen displays touch keys in normal play of DVD/VCD, the key
Will disappear automatically if there is no action in eight seconds, and
the interface is:

5.3 Direction on CD /MP3 play operation
1. Under other status, MOD key can shift to read the audio file in
CD/MP3 file or USB disk.
2. Press the entrance/exit key on remote or panel can make panel slide
down. The system will read disc automatically when there is disc in.
3. CD playing function mainly taken by touch screen key or remote.
Read disc picture:
CD play interface & operation method is:

MP3 playing is taken through the buttons of panel or remote.
Mp3 playing interface & operation is:
or
The system is available for JPG/BMP/GIF pictures, you can save pictures
in CD or USB disk.
The picture play interface is:
5.4 Direction on picture play operation

Directions on effective keys and play operations are:
Under other statuses, press MOD key can shift to CDC operation status,
and the interface:
5.5 Direction on CDC operation
5.6 Direction on external connection signal source
The system interface will display the built-in interface of external
connection equipment if the external equipment (such as DVD and
television) accesses signal through AV IN., and you can take operation by
external connection equipment directly. The interface is of blue screen and
displays “No Video Signal” if there is no external connection equipment.

5.7 Special set for disc play system
5.7.1 Universal setting
Except for the universal system set terms specified in 4.8, the system is
available for term set for disc play (DVD/CD/MP3).
Press on remote under disc play interface to enter into setting page
menu, and the interface is:
Press “ ” on main machine panel or “? ”“? ”on remote can
select term, press to confirm.
Notice: press on remote under all set menu can quit set status and
return to the former play interface.
Universal set includes picture mode, angle mark, hidden caption, screen
protection, and home page. Except for screen protection and home page,
the other four terms only are available for DVD play, and for the DVD disc
that records the function.
Set interface and parameters of different terms:
Initial set includes screen display format and default mode.
5.7.2 Initial set

Chapter VI. Simple Troubles Analysis
6.1 Can not turn of/off normally
6.2 No sound output
6.3 Can not read disc
6.4 Radio can not work well
6.5 Display screen can not return
6.6 Disc can not get out
1. Please check the 12V power, system connection plug, and system fuse
if the machine can not turn on normally.
2. If the machine is reposition or turns off automatically, there may be
mistake in system.
3. If the machine turns off automatically, please check whether the vehicle
key is plugged in, or the machine has worked over one hour without
vehicle key.
1. Check whether it is in mute.
2. Check whether the volume is the minimum.
3. Check whether the speaker is normal.
1. Check whether the function is in right mode (DVD, CD, and MP3, ect.)
2. Check whether disc is in.
3. Check whether the information side is too dirty or damaged severely.
4. There may be water spray on laser head if the vehicle parked outside
for too long, so you should get electricity through for over half an hour.
Please check whether the radio antenna is plugged in well.
Check whether there is obstacle in the stroke of the return of the screen,
and whether the disc blocked.
Please contact local maintenance provider.
Set interface and parameters of different terms:

Chapter VIII. Installation Direction
Warning! :
Other notices:
8.1 Main machine installation
Please read the safety notices specified in the Chapter II carefully before
installing the machine. Our company suggests you to invite professional
personnel to install the machine. The installation made by the personnel
without training may cause accident.
Do not install the machine on the place of high temperature or is
moisture, such as:
Close to heater, vent, or air condition;
Place that sunshine shines directly, such as panel
Place that rain may splashes, such as close to vehicle door.
Please install the machine on the place that is of enough tension, or else
the system may out of operation.
Level installation angle of the machine shall not exceed 20°, and the left-
Right angle shall be not over 5°, the diagram is:
Cables shall not be pilled behind fan when installing, so as to prevent
hiding thermovent and effecting thermolysis effect.
You can install the machine according to the following diagram:
Chapter VII. Technical Specification

8.2 GPS antenna installation:
Do not cut the lead of GPS antenna for shorting or increasing the
antenna, changing the lead of antenna may damage its function.
Receive antenna shall be installed on the horizontal position in the
diagram, which shall not hamper the receiving of satellite wireless
Signal. It is recommended to install it on roof or trunk lid. The diagram
Is:
It is suggested to install the GPS antenna close to vehicle window
horizontally if you install the antenna in your vehicle. It is general to
install the antenna on the surface of instrument stand, and fix it with
Supporting metal sheet.
Including:
12 M5X5 bolt accessory parts, 4 M4X5 bolts, and customer can select
side bracket according to its demand.
You can take the frame out of the main machine if necessary, referring
To the diagram:

8.3 Initiation after installation
Notice:
Switch on the power of vehicle to get the first power on for the machine
after all the wires are connected and no mistake after check. The system will
enter into initiation interface automatically, which will last about one minute.
The initiation interface is:
You can take normal operation according to the direction specified in
Chapter VI after initiation.
initiation interface only appeases in the first power on, and will not appear
in the following normal use.

GATEQ ENAV-6520i USER MANUAL
Table of contents
Popular Car Navigation System manuals by other brands

Pioneer
Pioneer AVIC-Z920DAB installation manual
RC Electronics
RC Electronics T3000 manual
MicroStrain
MicroStrain 3DM-GX3 quick start guide
Navicom Dynamics
Navicom Dynamics GyroPilot quick start guide
Sony
Sony NV-U44/R - 3.5" Portable Navigation System Specifications
Blaupunkt
Blaupunkt TRAVELPILOT LUCCA 3.3 operating instructions
