GB GPT-70 User manual

SPECIFICATIONS
Batteries: CAM-10 Use 2 LR44 button cell batteries
Operating Range: 50-600 VAC, 50-60 Hz
Voltage Indicators: Audible & Visual Alert
Operating Temperature: 32-122°F (0-50°C)
Storage Temperature: 0°F (-18°C) to 156°F (70°C)
Humidity: 80% RH maximum below 86˚F(30˚C),
50% RH maximum above 86°F (30°C)
Altitude: Up to 6561 feet (2000 meters)
Safety: For indoor use and in accordance with over
voltage category III, Pollution degree 2
Intended Use: Non-contact AC voltage detection
Serial No: See interior of battery cover
CLEANING
Use clean, dry cloth. Do not use any type of solvent.
BEFORE USE
READ ALL OPERATING INSTRUCTIONS BEFORE USE. FOR
INTENDED USE ONLY. Protection provided by this product
may be impaired if used with accessories not provided by the
manufacture or if used as in a manner other than specified within.
WARNING: To be used by trained person only. High voltage AC
and DC circuits are dangerous. Use extreme caution and use as
intended when testing potentially live circuits. Risk of Electrocution.
WARNING: This product should be used to test or detect
insulated wires and terminals but should not be used to contact
Live Circuits. This tester will not detect voltage in wires that are
electrically shielded by metal conduit or grounded enclosures.
Risk of Electrocution.
OPERATION
Before use, test the batteries of the CAM-10 tester by pressing
the button on the tester marked PRESS. A momentary audible
tone and flash of the light are an indication that the unit is working.
WARNING: Always test on known live circuit before use.
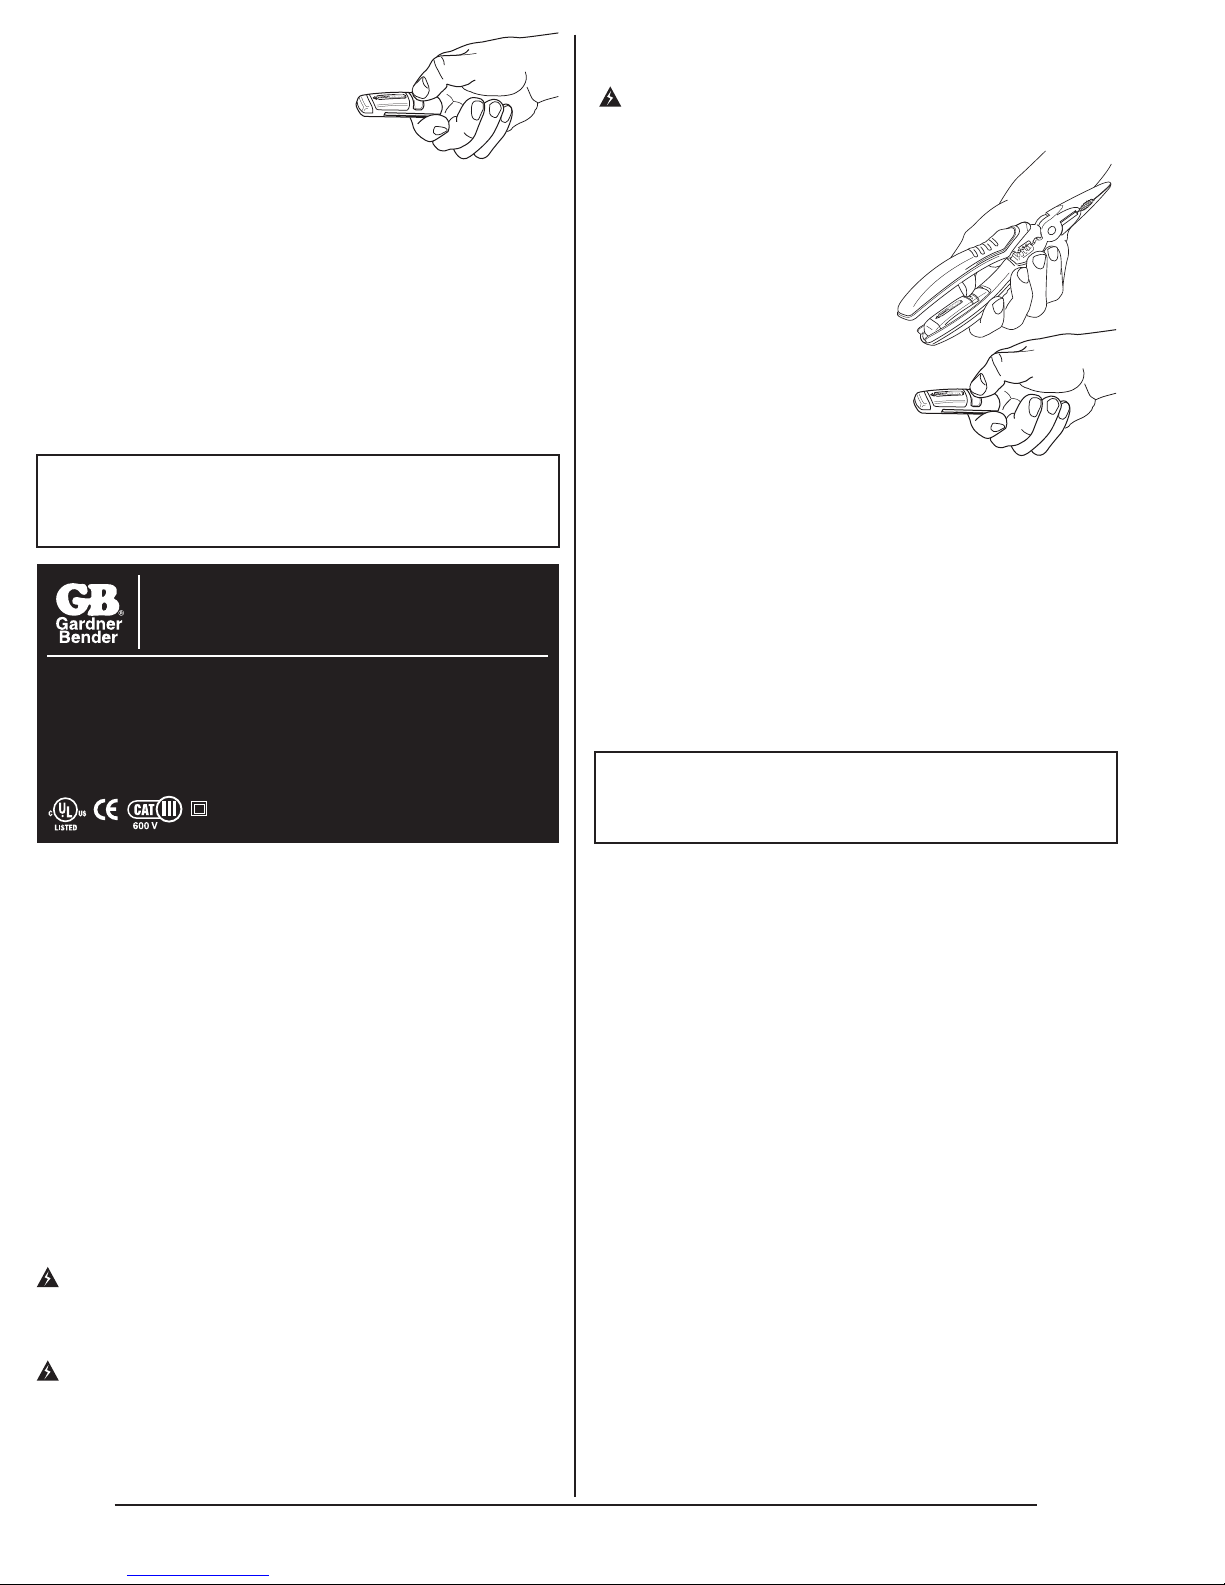
To test for voltage:
1. Hold the pliers with your thumb on the
CAM-10 tester button marked PRESS,
keeping hands and fingers well away
from the sensor (red end).
2. Press down and hold the test button
on the tester. A momentary alert
indicates the unit is working.
3. Place the sensor (red end) near
the wire or device to be tested.
Maintain a minimum distance of 0.5mm
from contacting the wire or device
to be tested. If voltage greater than
50 VAC is present, the tester light
and tone will activate rhythmically at
10 to 15 cycles second.
To detach the tester from the pliers, apply force to the tester
near the Gardner Bender logo and slide the tester from the
holding slot. The tester can be used to test for voltage after it
is detached per instructions within. Hold the tester as shown,
keeping hands and fingers well away from the sensor (red end).
CAM-10 BATTERY REPLACEMENT
Remove the Phillips®head screw from the bottom of the CAM-10
tester. Lift off the battery cover from the top of the tester. Insert
2 LR44 batteries in the orientation indicated on the side of the
battery cover. Replace cover and screw.
ESPECIFICACIONES
Baterías: El modelo CAM-10 usa 2 baterías de botón LR44
Rango operativo: 50-600 VCA, 50-60 Hz
Indicadores de voltaje: Alerta sonora y visual
Temperatura operativa: 0-50°C
Humedad: 80% HR máxima, 50% HR máxima sobre 30°C
Altitud: Hasta 2000 metros.
Seguridad: Para uso en interiores y conforme a la categoría III
de sobrevoltaje
Grado de contaminación 2. IEC 529, IEC 1010
Uso previsto: Detección de voltaje CA sin contacto
LIMPIEZA
Use un paño limpio y seco. No use ningún tipo de solvente.
ANTES DEL USO
LEA TODAS LAS INSTRUCCIONES OPERATIVAS ANTES DEL
USO. SÓLO PARA EL USO PREVISTO.
ADVERTENCIA: Son peligrosos los circuitos de CA y CC de
alto voltaje. Tenga sumo cuidado y utilice de la manera prevista
al probar circuitos potencialmente energizados. Riesgo de
electrocución.
ADVERTENCIA: Este probador no detecta el voltaje en cables
que tienen blindaje eléctrico mediante portacables de metal o
cierres puestos a tierra. Riesgo de electrocución.
OPERACIÓN
Antes de usar, pruebe las baterías del probador
CAM-10 oprimiendo el botón en el probador que está
marcado PRESS. Un tono audible momentáneo y un destello
de luz son indicaciones de que la unidad está funcionando.
ADVERTENCIA: Siempre pruebe en un circuito energizado
conocido antes de usar.
Para probar el voltaje:
1. Sostenga las pinzas o alicates con el
pulgar en el botón del probador CAM-10
marcado PRESS, manteniendo las
manos y los dedos bien alejados
del sensor (extremo rojo).
2. Oprima y mantenga así el botón
de prueba en el probador. Una
alerta momentánea indica que la
unidad está funcionando.
Limited Lifetime Warranty limited solely to repair or replacement; no warranty or
merchantability or fitness for a particular purpose. Product is warrantied to be free
of defects in materials and workmanship for the normal life of the product. In no
event shall Gardner Bender be liable for incidental or consequential damage.
GPT-70, GPT-80, GPT-90
Pliers
CAM-10
Non-contact Voltage Tester
OPERATING
INSTRUCTIONS
Patents Pending
GPT-70, GPT-80, GPT-90
Pinzas
CAM-10
Probador de voltaje sin cantacto
INSTRUCCIONES
OPERATIVAS
Patentes pendientes
SYMBOLS
This equipment has double insulation with respect to live circuits
Attention, consult the accompanying documents
!!
3. Ponga el sensor (extremo rojo)
cerca del cable, dispositivo o circuito
a probar. Si hay voltaje de CA mayor
que 50 VCA, la luz del probador y
el tono se activarán rítmicamente.
Para desconectar el probador de las pinzas
o alicates, aplique fuerza al probador cerca del logotipo de
Gardner Bender y deslice el probador sacándolo de la ranura de
sujeción. El probador puede usarse para probar voltaje después
de desconectarlo, siguiendo las instrucciones contenidas en el
interior. Sostenga el probador como se muestra, manteniendo las
manos y los dedos bien alejados del sensor (extremo rojo).
REEMPLAZO DE LA BATERÍA DEL CAM-10
Retire el tornillo de cabeza Phillips®de la parte inferior del
probador CAM-10. Levante la cubierta de baterías de la parte
de arriba del probador. Inserte 2 baterías LR44 en la orientación
indicada en el costado de la cubierta de baterías. Vuelva a
colocar la cubierta y el tornillo.
CARACTÉRISTIQUES TECHNIQUES
Piles: CAM-10 – Utiliser 2 piles bouton LR44
Plage de tension : 50-600 V c.a., 50-60 Hz
Indicateurs de tension : Alerte visuelle et sonore
Température d’utilisation : 0-50 °C
Humidité : 80 % H.R. maximum, 50 % H.R. à plus de 30 °C
Altitude : Jusqu’à 2000 mètres
Sécurité : Pour une utilisation à l’intérieur et conforme aux
normes de catégorie III sur les surtensions
Degré pollution 2. IEC 529, IEC 1010
Utilisation prévue : Détection de tension c.a. sans contact
NETTOYAGE
Nettoyer avec un chiffon propre et sec. N’utiliser aucun solvant.
AVANT L’UTILISATION
LIRE TOUTES LES INSTRUCTIONS AVANT L’UTILISATION.
N’UTILISER QUE DE LA FAÇON PRÉVUE.
AVERTISSEMENT : Les circuits haute tension c.a. et c.c. sont
dangereux. Faire preuve d’une grande prudence et n’utiliser
que de la façon prévue au moment de vérifier des circuits
possiblement sous tension. Risque d’électrocution.
AVERTISSEMENT : Cet appareil ne détectera pas la tension dans
des fils blindés par un conduit métallique ou des enceintes mises
à la terre. Risque d’électrocution.
UTILISATION
Avant l’utilisation, vérifier les piles du CAM-10 en appuyant
sur le bouton marqué PRESS. Un signal sonore ainsi qu’un
clignotement du voyant indiqueront que l’appareil fonctionne.
AVERTISSEMENT : Toujours essayer l’appareil sur
un circuit reconnu sous tension avant d’utiliser.
Pour vérifier la tension :
1. Tenir la pince, le pouce sur le bouton du
CAM-10 marqué PRESS, en gardant les
mains et les doigts loin du capteur
(extrémité rouge).
2. Garder enfoncé le bouton de
vérification de l’appareil. Une
brève alerte indique le bon
fonctionnement de l’appareil.
3. Placer le capteur (extrémité rouge)
près du fil, du dispositif ou du
circuit à vérifier. Si une tension
c.a. est supérieure à 50 V c.a. est
présente, le voyant du testeur et son
alarme sonore s’activeront.
Pour séparer le testeur de la pince, appuyer sur le testeur
près du logo Gardner Bender puis le faire glisser hors de son
logement. Le testeur peut être utilisé pour vérifier la tension
après qu’il a été détaché, selon les présentes instructions. Tenir
le testeur tel qu’illustré, en gardant les mains et les doigts loin du
capteur (extrémité rouge).
REMPLACEMENT DES PILES DU CAM-10
Retirer la vis à tête Phillips®du bas du testeur CAM-10. Soulever
le couvercle du compartiment à batteries situé sur le dessus de
l’appareil. Insérer 2 piles LR44 dans le sens indiqué sur le côté
du couvercle. Remettre le couvercle et la vis en place.
GPT-70, GPT-80, GPT-90
Pince
CAM-10
Capteur de tension sans contact
MODE
D’EMPLOI
Brevet en attente
Garantía limitada de por vida limitada exclusivamente a la reparación o reemplazo;
no se ofrece garantía de comerciabilidad ni idoneidad para ningún fin en particular.
El producto está garantizado como exento de defectos en materiales y mano de
obra durante la vida útil del mismo. Bajo ninguna circunstancia será Gardner
Bender responsable de daños fortuitos o consecuentes.
Garantie à vie limitée seulement à la réparation ou au remplacement; aucune
garantie d’aptitude à la commercialisation ni à un usage particulier. Ce produit est
garanti être exempt de défaut de matériau et de fabrication pour la durée normale
du produit. Gardner Bender ne serait dans aucun cas tenue responsable des
dommages indirects ou accessoires.
PO Box 3241 lGardner Bender l Milwaukee, WI 53201-3241 l 414.352.4160 l Fax 414.352.2377 l www.gardnerbender.com
6615 Ordan Drive l Mississauga, Ontario L5T 1X2 l 905.564.5749 l Fax 905.564.0305 l RPS-0157 5/07
This manual suits for next models
3
Other GB Test Equipment manuals


