manuals.online logo
Brands
  1. Home
  2. •
  3. Brands
  4. •
  5. GE
  6. •
  7. Dishwasher
  8. •
  9. GE GDT740SIFII Manual

GE GDT740SIFII Manual

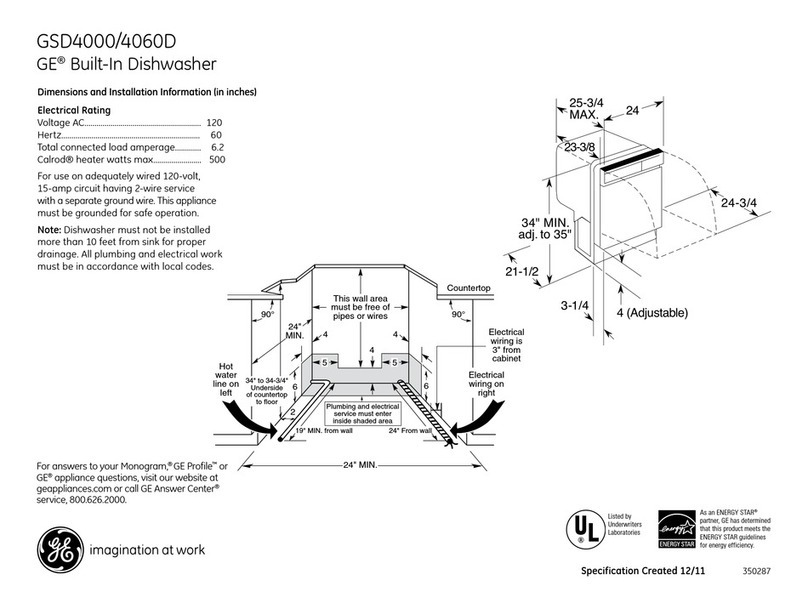
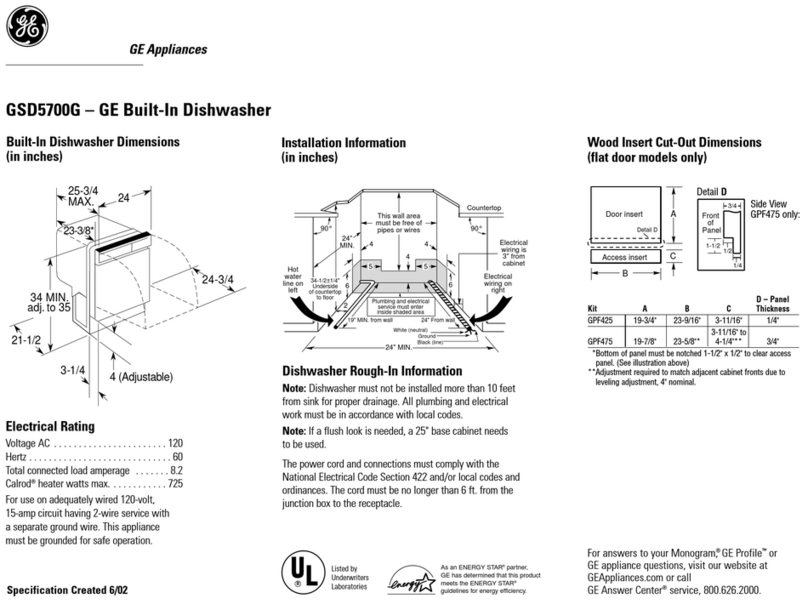
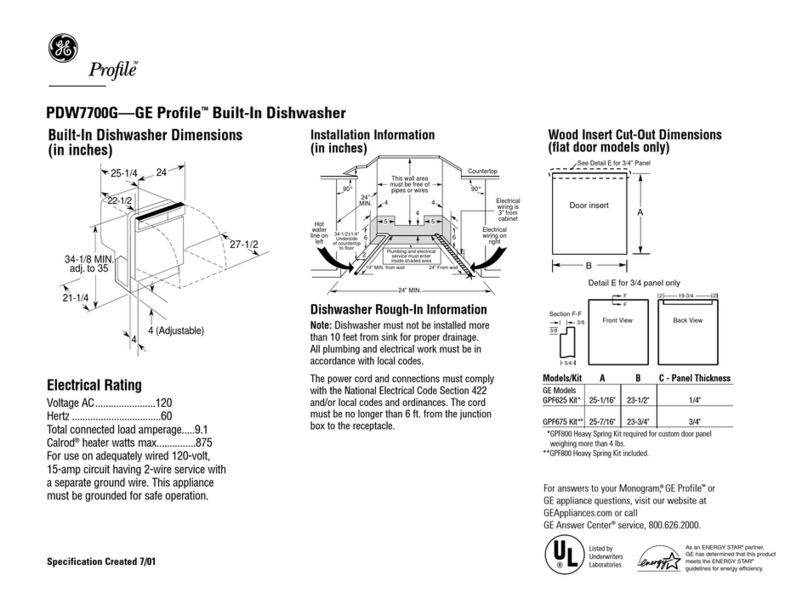
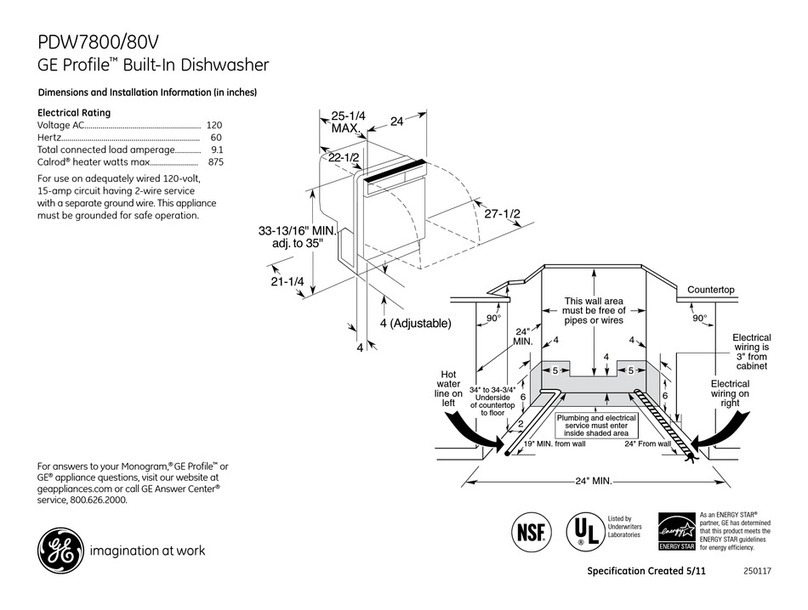
Dimensions and Installation Information (in inches)
For answers to your Monogram,® Profile™
Series or GE®appliance questions, visit our
website at geappliances.com or call GE
Answer Center®service, 800.626.2000.
As an ENERGY STAR®
partner, GE has determined
that this product meets the
ENERGY STAR guidelines
for energy efficiency.
24"
Typical
33-3/8" MIN.
adj to
34-5/8" MAX.
23-3/4"
29-7/8"
27-1/2"
4"(toekick)
Includes 3/4" custom panel
Specification Revised 8/13 350295
Listed by
Underwriters
Laboratories
ERUSOLCNEREHSAWHSIDERAPERP
• The rough cabinet opening must be at least 24" deep, 24"
wide and approximately 34-1/2" high from floor to underside
of the countertop.
24"
Min.
This Wall Area
must be Free
of Pipes or
wires
Plumbing and Electric Service
Must Enter Inside This Area
4"
24"
Min.
6"
Cabinets
Square
and
Plumb
+
34-1/2" 1/4"
Underside of
Countertop
to Floor
Figure A
33-1/2” to 34-3/4”
Underside of
Countertop
to Floor
Electrical Rating
Voltage AC.......................................................... 120
Hertz..................................................................... 60
Total connected load amperage............ 9.9
Calrod®heater watts max..................... 1000
For use on adequately wired 120-volt,
15-amp circuit having 2-wire service
with a separate ground wire. This appliance
must be grounded for safe operation.
Installation Information: Before installing,
consult installation instructions packed with
product for current dimensional data.
††† Add 3/4" for custom panel and additional
room for custom handle
An installation template is packed with these
models and may be obtained in advance.
GDT740SIFII
GE®Stainless Steel Interior Dishwasher with Hidden Controls
Listed by
Underwriters
Laboratories
As an ENERGY STAR®
partner, GE has determined
that this product meets the
ENERGY STAR guidelines
for energy efficiency.
Custom Dishwasher Door Panel Template
Top of Panel Top of Panel
Trim Around Dotted Line
11-5/16"
Trim Around Dotted Line
2-9/32"
25-9/16"
11-5/16"
2-9/32"
25-9/16"
Trim Around Dotted LineTrim Around Dotted Line
Drill 3/32"
Pilot Hole
3/32" Deep
Drill 3/32"
Pilot Hole
3/32" Deep
Drill 3/32"
Pilot Hole
3/32" Deep
Drill 3/32"
Pilot Hole
3/32" Deep
3/4" Thick Custom Panel
Template Instructions for
Top Control Integrated Profile and
Monogram Dishwasher Models
The custom panel should be sized to your installation situation. See Step 1. For easier
installation the custom panel and custom handle should be attached before installing the
dishwasher. Use this template to locate mounting screws and spacers on the custom panel.
IMPORTANT
• A custom handle must be installed onto the custom
panel. Install the custom handle 4-1/2" max. from
the top of the panel.
STEP 2 DRAW CENTERLINE
• Place the custom panel on a flat surface with appearance side
down.
• Locate the vertical center of the panel at the top.
• Use a carpenters square to draw a centerline from top to bottom.
STEP 4 INSTALL MOUNTING SCREWS AND SPACERS
Mark Center
Screw Holes
STEP 5 INSTALL CUSTOM HANDLE
A custom handle must be installed onto the panel
before the panel is secured to the dishwasher door.
• The handle should be installed so that it aligns with
adjacent drawer handles, or 4-1/2" max. from the
top of the panel. Secure the handle in the same
manner as cabinet handles. Screws must be
countersunk into the panel.
STEP 6 INSTALL ASSEMBLED PANEL
• Secure the panel to the door by inserting the top
and bottom mounting screws with spacers into
the matching keyhole slots.
• Make sure all 4 spacers engage the keyhole slots.
• Press the panel against the door and push
downward until the spacers are fully engaged
into the key hole slots. The panel should align
evenly with the top and sides.
• Stand the dishwasher upright.
• Open dishwasher door and drive the supplied
#8 x 1-3/4" truss head screws. Drive one screw at
the top and one on each side as shown, through
the inner door and into the custom panel.
WARNING: Do not overtighten screws. Excessive
tightening of the screws could damage door edges.
STEP 3 ALIGN TEMPLATE TO PANEL
• Trimtemplate on the dotted line along all sides.
• Place the template on the panel aligned with the top edge and
the centerline. Use tape to hold in place.
IMPORTANT:If the template is not aligned with the top edge of the
panel, the 1/2" minimum gap will not be maintained. This 1/2" minimum
gap must be maintained to prevent condensation and damage to the
control panel from screw heads.
• Use an awl to mark the screw hole locations indicated on the
template. Remove the template.
HEIGHT
Panel height must be between 30-1/16" and 30-1/4".
• If the panel height is more than 30-1/4" it will
prevent the door from swinging open.
• If the panel height is less than 30-1/16" it will not
cover the dishwasher door frame.
Minimum 1/2" Gap
for Clearance
Countertop
1/2" min.
PARTS INCLUDED:
(4) Spacers
(4) #8 x 5/8" Phillips truss head stainless steel screws
(3) #8 x 1-3/4" Phillips truss head stainless steel
wood screws
(2) Heavy duty springs
STEP 1 CUSTOM PANEL SIZE REQUIREMENTS
If the panel is less than 3/4" thick, shorter screws must
be used. Use #8 x 1/2" screws for 1/2" thick panels (not supplied).
• Use a 3/32" drill bit to drill pilot holes 3/32" deep in the marked
locations.
Note: The custom panel is secured to the dishwasher door with
the spacers and screws provided. The spacer will slip into the
keyhole slots on the dishwasher door.
• Drive the supplied #8 x 5/8" Phillips truss head steel screws
through the spacer and into the panel.
• Install remaining spacers and screws as indicated in the marked
locations.
4-1/2" Max.
From Top
of Panel
Handle
Custom
Door Panel
Screws Must
Be Countersunk
Into Panel
Custom
Panel
Shoulder Washers
Engage Keyhole
Slots
Dishwasher
Door
Custom
Panel
Screw
Spacer
IMPORTANT: To ensureoptimum door balance
performance, the custom panel must not weigh more
than 14 lbs.
STEP 7 INSTALL DOOR SPRINGS
The dishwasher is shipped from the factory with a
temporary set of balance springs. Use the heavy duty
springs provided and the adjustment holes in the
cable to balance the door after the custom panel
is installed onto the dishwasher.
• With the dishwasher on the wood skid, close and
latch the door.
• Remove and discard both door springs.
• Attach the new heavy duty door springs. Engage
the end with the short hook into the support leg
and the long hook into the cable.
• Open and close the door.
• If the door drops open when released, increase
spring tension. If the door closes when released,
decrease tension.
TIP: If the door does not open easily or falls too
quickly,check spring cable routing. The cable is held
in place by “shoulders” on the pulley.Check to be
sure the cable has not slipped over the pulley
shoulders.
IMPORTANT:Adjustboth balance springs to the
same amount of tension to prevent excessive door
twisting during use.
Correct Spring
Cable Routing
Increase
Tension
Decrease
Tension
Pulley
Shoulder
Use This
Mounting
Hole
23-3/4"
30-1/16" Min.
30-1/4" Max.
• The top of the custom panel must be flush
with the top of the door. The 1/2" minimum gap
between the top of the door and the bottom of the
countertop must be maintained.
WIDTH
Panel width must be 23-3/4".
• If the panel width is less than 23-3/4" it will not
cover the dishwasher frame.
For Reference Only
Not to Scale
Call 1-800-626-2000
For a full-size panel template with complete
panel installation instructions.
For answers to your Monogram,® Profile™
Series or GE®appliance questions, visit our
website at geappliances.com or call GE
Answer Center®service, 800.626.2000.
Specification Revised 8/13 350295
GDT740SIFII
GE®Stainless Steel Interior Dishwasher with Hidden Controls
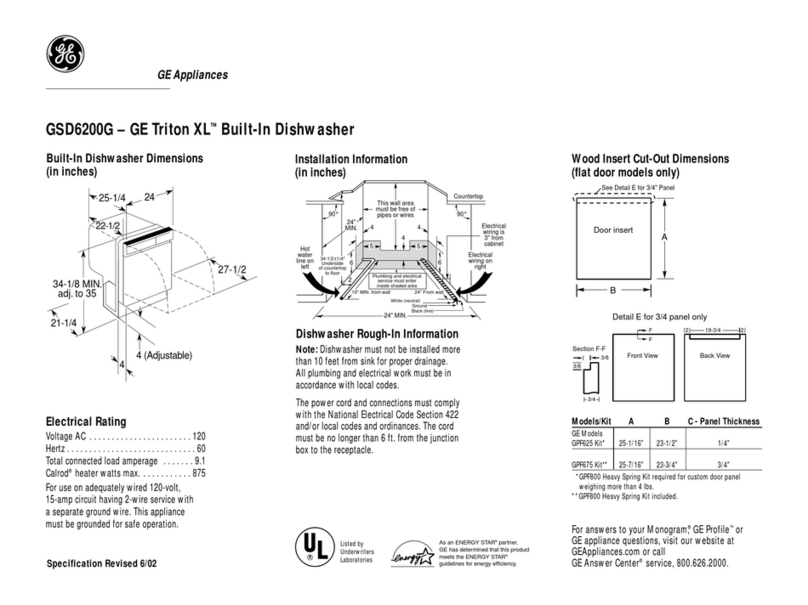
GDT740SIDII
Features and Benefits
• Full stainless steel interior - Enjoy an attractive appearance and long-lasting durability
• GE's most advanced wash system with 102 cleaning jets - Achieve the ultimate clean
from an industry-leading number of jets that deliver complete washing coverage to every
corner of the dishwasher
• Reversing Quad Blade Wash Arm - Dishes come out impressively clean thanks to this
revolutionary lower wash arm, with 25 spray jets reversing direction to hit items from
every angle
• Bottle Wash Jets - Hard-to-reach areas inside tall items get completely clean with four
dedicated jets integrated into the upper rack that shower water deep inside for the
ultimate clean
• Side Jets - Cascading water fills the dishwasher while hydrating soils
• Easy Touch Adjustable Upper Rack with 2 Stem Safe - Quickly adjust the upper rack 2
inches up or down to accommodate tall glassware and 10-1/2" plates with plenty of
room in the bottom rack for large platters and cooking sheets
• 45 dBA - Ultra-quiet operation creates a peaceful kitchen environment even as it delivers
powerful wash performance
• Model GDT740SIFII - Custom panels required
Specification Revised 8/13 350295
GDT740SIFII
GE®Stainless Steel Interior Dishwasher with Hidden Controls

Other GE Dishwasher manuals

GE 165D4700P390 User manual

GE

GE 165D4700P390 User manual

GE PBT650 Series User manual

GE

GE PBT650 Series User manual

GE GSD940 User manual

GE

GE GSD940 User manual

GE GSM2100 User manual

GE

GE GSM2100 User manual

GE 165D3080P049 User manual

GE

GE 165D3080P049 User manual

GE Spacemaker PDW1800N User manual

GE

GE Spacemaker PDW1800N User manual

GE HDB727K User manual

GE

GE HDB727K User manual

GE Profile PDW8100 Series User manual

GE

GE Profile PDW8100 Series User manual

GE Profile PDW7800PCC User manual

GE

GE Profile PDW7800PCC User manual

GE GSD700G User manual

GE

GE GSD700G User manual

GE GLD5808V Manual

GE

GE GLD5808V Manual

GE GSD820 User manual

GE

GE GSD820 User manual

GE Mabe GLD9312 How to use

GE

GE Mabe GLD9312 How to use

GE GSD970 User manual

GE

GE GSD970 User manual

GE GLD5900N Manual

GE

GE GLD5900N Manual

GE GSM2200N10BB User manual

GE

GE GSM2200N10BB User manual

GE GLD7400R User manual

GE

GE GLD7400R User manual

GE GSD4000N User manual

GE

GE GSD4000N User manual

GE GSD3300D00WW User manual

GE

GE GSD3300D00WW User manual

GE Built-In Dishwasher User manual

GE

GE Built-In Dishwasher User manual

GE WD35X10394 User manual

GE

GE WD35X10394 User manual

GE Monogram ZBD6900PII User manual

GE

GE Monogram ZBD6900PII User manual

GE GDWT668V User manual

GE

GE GDWT668V User manual

GE GDF 570 Series User manual

GE

GE GDF 570 Series User manual

Popular Dishwasher manuals by other brands

Hotpoint Instructions Instructions for installation and use

Hotpoint

Hotpoint Instructions Instructions for installation and use

AEG FFE72731PM user manual

AEG

AEG FFE72731PM user manual

Electrolux ESL5206LO manual

Electrolux

Electrolux ESL5206LO manual

Hobart FTM-800 Specifications

Hobart

Hobart FTM-800 Specifications

Hansa ZWM 627 WEA operating instructions

Hansa

Hansa ZWM 627 WEA operating instructions

Dacor Millennia MDW24S installation instructions

Dacor

Dacor Millennia MDW24S installation instructions

Progress PV3571 user manual

Progress

Progress PV3571 user manual

ISE Classic 400 use & care

ISE

ISE Classic 400 use & care

inventum IL010 instruction manual

inventum

inventum IL010 instruction manual

Logik LID60W20 Installation instructions manual

Logik

Logik LID60W20 Installation instructions manual

John Lewis JLDWS1208 instruction manual

John Lewis

John Lewis JLDWS1208 instruction manual

Kenmore 3631442190 Guide operating instructions

Kenmore

Kenmore 3631442190 Guide operating instructions

Bosch SMV46JX00G instruction manual

Bosch

Bosch SMV46JX00G instruction manual

Eswood UC25 user manual

Eswood

Eswood UC25 user manual

Miele PFD 101 operating instructions

Miele

Miele PFD 101 operating instructions

Inalto DWI62CS user manual

Inalto

Inalto DWI62CS user manual

Hotpoint Ariston LI 480 A Instruction booklet

Hotpoint Ariston

Hotpoint Ariston LI 480 A Instruction booklet

Zanussi DWS686 Instruction booklet

Zanussi

Zanussi DWS686 Instruction booklet

manuals.online logo
manuals.online logoBrands
  • About & Mission
  • Contact us
  • Privacy Policy
  • Terms and Conditions

Copyright 2025 Manuals.Online. All Rights Reserved.