GE GSD1920 User manual

GEAppliances
/
Part No. 165D4700PI#3 Pub.No. 49.5857..1 299cG

Congratulations!
YouAreNow PartoftheGEFamily.
Welcome to tim GE f_tmily.
We're proud of our quality
products and we are
commitmd to providing
dependable se_Tice. You'll
see it in this easy-to-use
Owner' s Mmmal and you'll
hem il in the fliendly voices
of our customer se_qce
departmenl.
Best of all, you'll experience
fl_ese values ea(h time you
use your dishwasher. That's
important, because your
new dishwasher will be part
of your t_tmily fbr ma W
years. And we hope you will
be part of ours tbr a long
time tocome.
Weflmnkyou tt)r bwing
GE. Weappreciate your
purchase, and hope you
_ll continue lo rely on us
whenever you need quality
appliances tbr your home.
Important!
Fill out and relnm the Consumer Product
Ownership Regisnafion card that is packed
_4tl_ this product. If you cannot find il,
please send in the duplicam cmd prinled in
the back of this manual.
Write the modeland serial
numbershere.
##
#
Youcan find them on the tub wa// just
inside the door.
Staple sales slip or cancelled check
here.
Proof of the original purchase date is
needed to obtain service under the
warran_

GE& You,
AServicePartnership_
Ask any GEappliance owner and they will
tefl you we stand behind our products with
unmatched quality service. However, did
you know that most questions result from
simple problems that you can easily fix
yourself in just a few minutes ?This
Owner's Manual can tell you how
ReadthisManual
Inside you will find ma W
helpfhl hinls on how to use and
maintain your dishwasher
properly..lust a liule preventive
care on your part Call save you a
Deat deal of time and money
over die life of your dishwasher.
ReviewtheSectionon
TroubleshootingTips
You'll find many answers to
cOlnlnoll piobIeIns here.
If you review our chart of
Troubleshooting Tips fixst,
you may not need to call fbr
seiMce at all.
ff YouNeedService
If you do need sei_ice, you can
relax kno_dng help is only a
phone call away. A list of toll-flee
cus/omer sei_4ce numbers is
included in the back secdon.
Or you Call always call tile
GE Answer Center ®at
800.626.2000, 24 hours a dW,
7 days a week.
Safetvmmr_atie.
OperatingInstructions
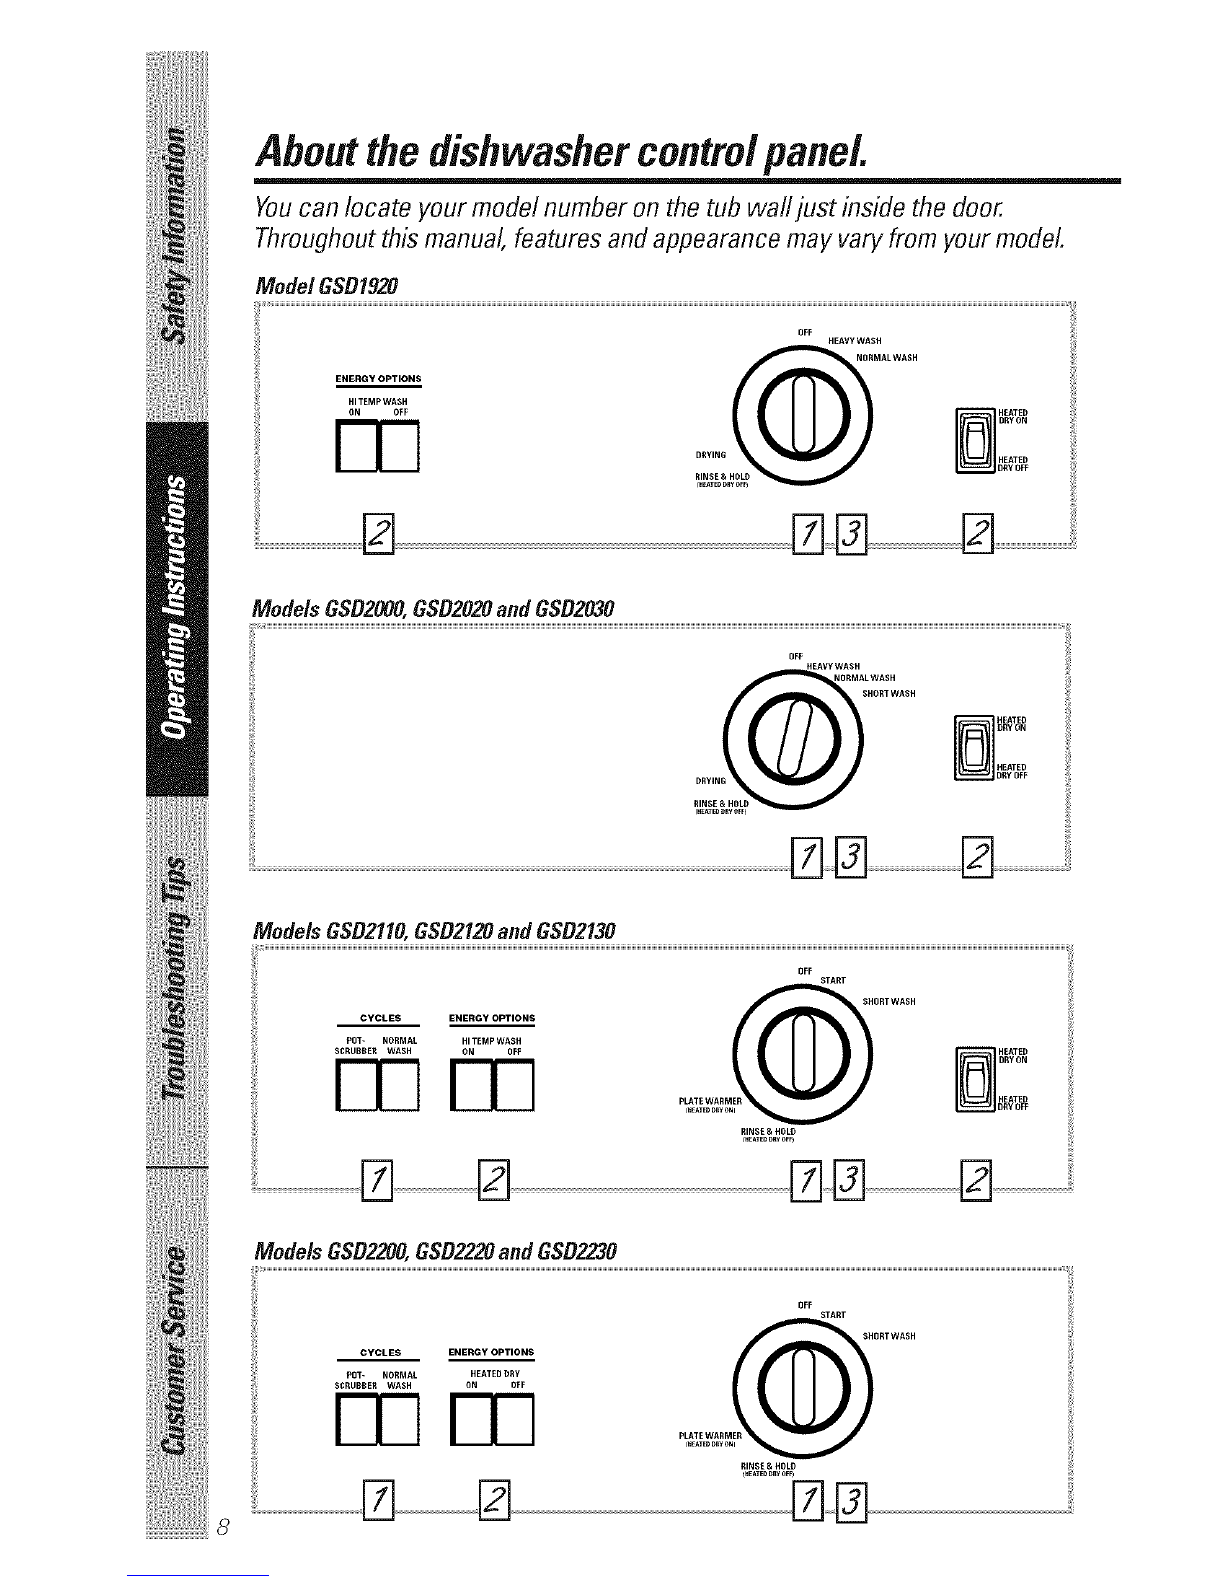
Control Pane/s i, :, ::: : i : :8, 9
DialCycles:
OishwasherRacks : i :! I4,
Careand Cleaning ::i:: :16,17
OptionalAccessories:: :::I8
Troubleshooting _ps
BeforeYou
CallForService ........ 19-24
Customer Service
ProductRegistration ..... 25,26
Warranty ................ 27
ServiceTelephone
Numbers .......... BackCover
3

iMPORTANTSAFETYiNFORMATION.
READALL iNSTRUCTiONSBEFOREUSING
B
For your safety, the information in this manual must be
followed to minimize the risk of fire, explosion, electric
shock, or toprevent property damage, personal injury,
or loss of life.
WATERHEATERSAFETY
Under certain conditions hydrogen gas may be produced in
a water heater that has not been used for two weeks or
more. HYDROGENGAS iS EXPLOSIVE.
If the hot water has not been used tbr t_voweeks or more, prevent
the possibilily of damage or injm_i by turning on all hot water
faucets and allow them to run tbr several minutes. Do fl_is bei()re
using any electi_ica] appliance which is connected to the hot water
system. This simple procedure will allow aW buih-up hydrogen gas
to escape. Since the gas is flammable, do not smoke or use an open
flame or appliance du|ing this process.
il il

Use your dishwasher only for its intended purpose as
described in this Owner's Manual
PROPER/NSTALMTION
ANDMAINTENANCE
This dishwasher must be properly installed and located in
accordance with the Installation Instructions before #is used.
If you did not receive an Installation Instructions sheet with
your dishwasher, you can receive one by calling us toll-free
at the GEAnswer CenteF?800.626.2000.
Connect to a grounded
metal, permanent wiring
system; or run an equipmenI_
gTounding conduclox with
the circuit conduclors and
connect Io the equipmenI_
gTounding lenninal or lead
of lhe appliance.
Improper connection of the
equipment-gTounding
conductor can resuh in a risk
of eleclxic shock. Check with
a qualified elecuician or
sex-vice representative if you
ae in doubt wheflmr the
appliance is properly
gTounded.
Dispose of discarded
appliances and shipping or
packing material properly.
Do not attempt to repair or
replace aW part of your
dishwasher unless it is
specifically recommended in
this manual. All odmr
sex,Tieing should be refened
/o a qualified technician.
To minimize the possibilib: of
elecuic shock, disconnecl
fl_isappliance flx)m fl_e
power supply befbre
attempting any mainlenance.
/VOTE."Turning the
dishwasher offdoes not
disconnect file appliance
fiom the power supply. We
recommend hm4ng a
qualified lechnician sex_ice
your appliance.
5

IMPORTANTSAFETYINFORMATION.
READALL INSTRUCTIONSBEFOREUSING
,!
m
O0NOT_..
Do nol lamper wifl_controls. Do not allow children _oplay
inside, on or wilh this
} Do not abuse, sil on, or stand
on the door or dish rack of appliance or any discarded
the dishwasher, appliance.
Do not discmd a dishwasher
_qd_out first removing the
door of the washing
companmenl.
Do noÁstore or use
combuslible mam_ials,
gasoline or other tlammable
vapors and liquids in fl_e
vicinily of lhis or aW other
appliance.
il il

WHENUSINGYOURDISHWASHER
Use only powder, tabs or
liquid delerg_nls or welting
agents recommended for
use in a dishwasher and
keep them out of the reach
of children. Cascade _'
Automatic Dishwashing
Detergent has been approved
fbr use in all GE dishwashers.
l_)cate sharp items st:)fl_at
they are not likely to damage
dm door seal.
Dmd shmp knives _ith the
handles up to reduce the risk
of cuHype injmies.
Do not wash plastic items
unless marked dishwasher
sate or the equivalent. For
plastic items not so marked,
check the manui_tcmrer's
recommendations.
Non-Dishware Items: Do not
wash items such as elecnonic
air cleaner fihers, fhmace
fihers and paint brushes in
your dishwasher. Damage to
dishwasher and discoloration
or staining of dishwasher
m Wresult.
Do not touch the heating
element during or
immediamly after use.
Do not operate your
dishwasher unless all
enclosure panels me properly
in place.
Close supe_ision isnecessa_T
ifthis appliance is used by or
near children.
Dmd light plastic items so
they will not become
dislodged and drop to the
bott,_i'n of the dishwashe_
they might come into contact
_ith the heating element and
be damaged.
Readandfollow this
SafetyInformationcarefully.
SAVETHESEINSTRUCTIONS

Aboutthe dishwasher contro/pane/.
Youcan locate your model number on the tub wall just inside the door.
Throughout this manual, features and appearance may vary from your model
Model GSD1920
ON OFF HEATED
DRYON
HEATED
DRYDFF
ModelsGSD2000,GSD2020andGSD2030
il il
--_ EATED
DRYON
HEATED
DRY OFF
iiili
ModelsGSD2110,GSD2120andGSD2130
OFF START
_T- NORMAL HITEMPWASH
SCRUBBERWASH ON OFF HEATED
.....
P_TEWARM HEATED
RINSE &HOLD
_.EAT,DDRY_m
8
ModelsGSD2200,GSD2220andGSD2230
OFF START
_X- NORMAL HEATEDDRY
SCRUBBERWASH ON OFF
El3 EEl ........

Models GSD3130,GSD3210, GSD3220and GSD3230
OFF START
POT- NORMAL HITEMP WASH HEATEDDRY
SCRUBBER WASH ON OFF ON OFF
RINSE& HOLD
................................................................... IB 77
Controlo ":--OemuyS--MakesuretheOia/isattheOffposition
[-77Cycles
PDTSCRUBBER/Forheavilysoileddishesorcookwarewith dried-onor baked-onsoils. Everyday
HEAVYWASH dishesmaybeincluded.Thiscyclewill notremoveburned-onfoods.
NORMALWASH Forloadsof everydaydishes,glassesandcookwarewith mediumsoils.
NOTE:Manydisheshavelightersoil than normal.Choosinga cycleotherthan
NORMALWASttwill saveenergyandwater.
SHORTWASH Forquicklywashingloadsof everydaydisheswith mediumsoilsthat havenot
dried on,suchas loadsconsistingmostlyofglasses.
RINSE& HOLDForrinsingpartial loadsthat will bewashedlater. Donot usedetergenL
PLATEWARMER Forwarming cleandishesandservingplates.This cyclewill takeapproximately
31 minutes.
EnergyOptions
HITEMP Providesextraheatforthe best performance.It is usedbestwith
WASH heavily-soileddishes.
HEATEDDRY Turnsthe dryingheateronfor fast drying.This cyclewill extendthetime
ON toyourwash cycle.
HEATEDDRY Shutsoff thedryingheatoptions.Dishesairdrynaturallyandenergyissaved.
OFF
Onsomemodels--I,atch the door and slowly turn the Dial u_the STARTposifion.
Don't turn it past the $TARTposidon, or you could accidentally miss a nnse.
Onsome models_Slowly tmn Dial to d_e desired cycle and latch door to start.
Don't turn it past the desired wash cycle, or you could accidentally miss a nnse.
There is a time delay between stml-up and water till so you will not hear
aW wash action fight awW. 9

About the dial cycles.
.... Short Wash
For quickly washing loads of eveuday dishes with
medium soils thai have not dried on.
_'] _lect the NORMALWASH_ycleand aW opdons.
_2--]Besure the door isunlatched.
r_ Slowlymm the Dial toSHORTWASH.
[_ Lawhdie door lo slarl the wcle.
RINSE & }tOLD
Rinse& Hold
For rinsing pmlial loads that will be washed later. Do not
use detergent.
_] Make sure HEATEDDRYOFFisselecled.
_2-]Be sure the door is unlatched.
I-j] Slowly mrn dm Dial to RINSE& HOLD.
[_ La|ch the door lo slarl the (Tcle.
il il
7O
Plate Warmer
For warming clean dishes and serving plates. This (ycle
will lake approximately 31 minutes.
[-_ Load clean dishware lo be winreed.
_2--]_lect HEATEDDRYON.
_-]I_ sure the door is unlatched.
_ Slowly mm the Dial toPLATEWARMER.
[_ La|ch the door lo slarl the wcle.

Heavy,Normal and ShortWash
OFF HEAt,P/WASH
NORMALWASH
DRYIN6_ SH°RT WAslt
RINSE& HOLD
,._DRYOFF
(GSD2000, GSD2020 and GSD2030 only)
Heavy and Normal Wash
(GSD1920only)
f_Be sme dm door is unlatched.
[_ Slowly turn the dial to the (ycle you wanl. Don't
turn it past d_is position, or you could accidentally
miss a _inse.
] _lect any options.
['_--]Latch the door to start die (Tcle.
Cycle Sequence
POTSCRUBBER 9.Sgal. 62 min. Rinse Rinse Rinse Main Wash Rinse Rinse Rinse
NORMAL WASH 8.0 gal. 62 min. Rinse Rinse Main Wash Rinse Rinse Rinse
RINSE & HOLD 3.9 gal. 12 min. Rinse Rinse Rinse
Drying Options:
HEATEDDRY ON--Available on all wash cycles except RINSE&HOLD--Add
approximately 31 minutes to the cycle.
HEATEDDRY OFF--Duing heater is turned oiE Dishes &y naturally.
//

Usingthe dishwasher.
i ii ChecktheWaterTemperature
The entering water umst be at least 120°F. and not more than
150 °F., fbr effective cleaning and to prevent dish damage. Check
the water temperature with acandy or meat them_ometer. Turn on
the hot water taucet nearest tl_edishwasher, place the them_ometer
in a glass and let the water run continuously into the glass until the
temperature stops rising.
UseJebDry®RinseAgent
Jet-Dry®nnse agent _emoves spots and prevents new fih-n buikl-up
on your dishes glasses, flatr_vare,cookware and plastic.
Fill the rinse agent dispenser
until it reaches the bottom of lip
inside the opening. Replace cap.
To check ifrinse agent is needed,
remove the cap and look into the
dispenser.
A furldispensershouldlastabout
onemonth.
/
If rinse agent spills, wipe up the excess.
il il

ProperUseof Detergent
Use only deIergent specifically made tot use in dishwashers, Cascade '_
Aulomafic Dishwashing Detergent has been approved fin use in all (;E
dishwashers. Keep your detergent flesh and dry. Don'1 put powder
detergent into the dispenser until you're ready to wash dishes.
The amount of detergent to use depends on whether your water is
hard or soft. With hard water, you need extra detergent. With soft
water, you need less detergent,
Protect your dishes and dishwasher by contacting your water
department and asking how hard your water is. Twelve or more grains
is extremely hard water. A water softener is recommended. Wid_out
it, lime can build up in file water valve, which could stick while open
and cause flooding. Too much detergent with soft water can cause a
pemmnent ckmdiness ofglasswme, c_led etching.
You'll find llvo detergent dispensers on the
inside door of your dishwasher. All wash cycles
require detergent in the main cup. Wash cycles
with tsvowashes will also use the open cup. _q_en
using automatic dishwashing detergent tabs,
simply pla(e one tab in the main cup and close.
l_ sure die Dial is OFFbefore adding
detergent. ()therwise, the detergent cup will not
dose and latch properly. Add detergent d_en close the main cup.
NOTE:To open detergent cup 'atler it has /.{
been closed, simply turn die detergent cup
handle counter-clockwise until it releases.
A snapping sound may be heard.
ForgettoAdd a Dish?
A torgonen dish can be added any time before the main wash.
Push the door latch to the left.
()nee the water cahns, open die door. Steam may rise Out of die
""" dishwasher.
i_i! Add tbrgonen dishes.
iii,i,_,i_Ji
ii!!_,i'_':Close_tim door and push_die latch to die tin-right. 73

Loadingthe dishwasherracks.
For best dishwashing results, follow these loading guidelines. Features and
appearance of racks and silverware baskets may vary from your model
UpperRack
The upper rack is fi_rglasses, cups and saucers.
Cups and glasses fit best along the sides. This is
also asecure place tor dishwasher-sate plastics.
The upper rack is good for all kinds of odd-
shaped umnsils. Saucepans, mixing bowls and
other imms should be placed f_tcedown.
SecurefargerdishwashasafeplasticsoveFfingers
whenpossible.
MakeSureSmallplasticitemsaresecuresotheyCan'tfall
ontotheheatingelement.
il il
74
The Wash Tower
Keepthecenterareaclearin the/owerrack.
The wash tower rises through tl_ecenter of the
lower rack during dm wash and rinse portions of
die qcle.
Don'tblockit orloadtaftthingsnexttoit.
Also, be caretul not to let a
portion of an item such as a pot or
dish handle exmnd d_rough the
bottom rack. This could block the
wash ann and cause poor washing
results.

Lower Rack
Whenloadingthe lowerrack,donottoadlargeplattersor
traysin thefrontrightcornerTheymaypreventdetergent
fromcimu/atingduringthewashcycle.
The lower rack is best used fbr plates, saucers,
and cool(ware. Lmge imms such as broiler pans
and racks should go along the sides. Load
platmrs, pots and bowls along the sides, in
comers, or in the back. The soiled side of items
should f_t(e the center of the rack.
throughbottom.
Silverware Basket
Put flatware in file removable basket _4th fink
and knife handles up to p_otect your hands. Place
spoons in the basket with handles d(m_l. Mix
knives, fbrks and spoons so they don't nest
together. Disuibum evenly. Small plastic imms,
such as measuring spoons and lids fiom small
containers, should g_ in tile bottoln of the
silve_rme basket _th silver,rare on lop.
75

Caringforthe dishwasher.
Toclean the control panel use a lightly dampened cloth then dry
thoroughly. Toclean the exterior use a good appliance polish wax.
Never use sharp objects, scouring pads or harsh cleaners on any
part of the dishwasher.
_urfq ) cover screws
Protect Against Freezing
If yore dishwasher is left in an unheated place dining
the winler, ask a service technician to:
Cut offelect_ical power to the dishwasher. Remove
fhses or flip circuit breaker.
:_ Turn off tile water supply and disconnect the water
{ _'inlel line flom tile water valve.
{{_{Drain water from tile inlel line and water valve.
(l[Jsea pan to catc h tile water.)
{_ Reconnect lhe water inlel line to tile water valve.
{_ Remove tile plastic sump cover in tile tub
..........- ' bottoln and use a sponge to soak up water in tile
rubber boot.
il il

@eektheairg@an/time}lear
dishwasherbn'tdrainingwell
Does YourDishwasher Have an Air Gap?
An ai_ gap p_omcts your dishwasher against wam_
backing up into it if a d_ain clogs. The ai_gap is not a
pa_l of the dishwasher. It is not cove_ed by your
wa_wanly.Not all plumbing codes _equi_e ai_ gaps, so
you may not have one.
The air gap is easy to clean.
Turn ellthedishwasher and lifi off the ch_ome
:::::::::::::::::::::covei.
{ 1L.......nsc_ew the plastic cap and cleanwith a toothpick.
77

Aboutoptional accessories.
You can change the door and lower access panel appearance of your
dishwasher by ordering one of these optional accessories:
Color Panels
I/4" Wood Panel TrimKit
3/4" Trimless Panel Kit
These accessories are available at extra cost (VISA, MasterCard, or Discover
cards accepted) by calling 800-626-2002.
Specify accessory number when ordering.
il il
78
Descriptionsof OptionalAccessories
Co/orpane/s--Replacement door panels and lower access panels
are available in the tbllowing colors:
GPFaOOA(Almond)
GPF3OOB(BlaclO
GPF3OOW(White)
Woodpane/ trim k#--This accessoUcontains trim and instructions
for you to supply: and install a 1/4" d_ick decorative wood door and
lower access panel:
GPF325A(Almond)
GPF325B(Black)
GPF325W(White)
NOTE:The GPFIO0dishwasherdoorspring #itmust also be ordered
and installed whenthe doorpanel weighsfour Ihs.or more.
Trim/ess pane/kit--This accesso_T contains parts and instructions
tbr you to supply and install a 3/4" thick decorative wood door and
lower access panel:
GPF375
NOTE."The GPF100dishwasher door spring kit_dll be included with
the trimless panel kitand must be installed _4th it.

Beforeyou carl forservice...
Troubleshooting tips
Review the charts on the following pages first and you may not
need to carl for service.
Possible Causes What ToDo
Dishwasher won't run Fuse is blown, or the Replare ti_se or reset
circuit breaker tripped cilvuil breaker. Rein(we
aW other appliances flom
the cir(ui/.
Noise Some of the sounds Soft food disposal
you'll hear are normal shredding ar/ion.
Drain valve opening to
pump water out.
Timer control as (Tcle
proDesses.
Demrg_nt cup opening.
The motor stopping during
rite duing period.
Make sure evelTthing is
secured in dishwasher.
Utensils are not secure
in the rack or something
small has dropped into
the rack
Motor hums Dishwasher has not been
used on a regular basis. If
you 0o not use your
dishwasher often, set it lo
till and pump out once
eve_T week. This will help
keep the seal moist and
the garbage disposer clear.
iai,iiiiiiiiii!!iii!iiiiiii{{ii:i:i{g{i{iii
;;;;;;;;;;;;;;;;;;;;;;;;;;;;;;;;;;;;;;;;;;;;;
79

Beforeyou call forservice...
Troubleshooting 77ps
Water standing in
the bottom of the tub
Waterwon'tpump
out ofthe tub
Sudsin thetub
PossibleCauses What ToDo
This is normal
Drain is clogged
Correct detergent
wasn't used
Rinse agent
was spilled
A small alnounI of dean
water around the outlet on
the mb bottom at the back
of the tnb keeps the water
seal lubficamd.
Ifyou have an air gap,
clean it.
Check to seeifyour kitchen
sink isdraining well.Ifnot,
youmayneed aplumber.
Ifthe dishwasher drains
into a disposer, run
disposer clear.
Use only aulomatic
dishwasher dem_gents to
avoid sudsing. Cascade"
Automatic Dishwashing
Demrg_nl has been
app_,_ved tbr use in all GE
dishwashers.
To remove suds flom the
tnb, open the dishwasher
and let suds evaporate.
Add 1gallon of cold water
to the rob. Close and latch
tl_e dishwasher. Pump out
water by slowly turning the
Dial undl a drain period
is reached. Repeat if
necessaI T.
Alwayswipeup rinse agent
spillsimmediamly.
2O
Other manuals for GSD1920
1
This manual suits for next models
13
Table of contents
Other GE Dishwasher manuals

GE
GE Profile PDW9880NSS Manual

GE
GE GSD800 User manual

GE
GE PDW9280N00SS User manual

GE
GE GLDA690 User manual

GE
GE Built-In Dishwasher User manual

GE
GE GSC3500V00BB User manual

GE
GE Monogram ZBD4500DSS User guide

GE
GE GE Profile PDW8500J User instructions

GE
GE Spacemaker GSM2200V00WW User manual

GE
GE GSD2600D Installation instructions