manuals.online logo
Brands
  1. Home
  2. •
  3. Brands
  4. •
  5. GE
  6. •
  7. Dishwasher
  8. •
  9. GE Triton XL GSD6900 Series User manual

GE Triton XL GSD6900 Series User manual

Other manuals for Triton XL GSD6900 Series

4

This manual suits for next models

1

Other GE Dishwasher manuals

GE GLD7708V Manual

GE

GE GLD7708V Manual

GE GSD1821 User manual

GE

GE GSD1821 User manual

GE Triton GSD5900G User manual

GE

GE Triton GSD5900G User manual

GE GDWT708V Manual

GE

GE GDWT708V Manual

GE Profile PDWT400R Manual

GE

GE Profile PDWT400R Manual

GE PD 715 Series User manual

GE

GE PD 715 Series User manual

GE GSCl120 User manual

GE

GE GSCl120 User manual

GE GSCM02 User manual

GE

GE GSCM02 User manual

GE Profile GSD4610 User manual

GE

GE Profile GSD4610 User manual

GE Triton EDW2020 User manual

GE

GE Triton EDW2020 User manual

GE GSC3500N User manual

GE

GE GSC3500N User manual

GE Max Profile User manual

GE

GE Max Profile User manual

GE EDW1500 Series User manual

GE

GE EDW1500 Series User manual

GE GDF510PSDSS User manual

GE

GE GDF510PSDSS User manual

GE GSM1800 Series User manual

GE

GE GSM1800 Series User manual

GE GSD1900 User manual

GE

GE GSD1900 User manual

GE PDWF600RBB - Full Console Dishwasher Manual

GE

GE PDWF600RBB - Full Console Dishwasher Manual

GE GE Profile PDW8500J User instructions

GE

GE GE Profile PDW8500J User instructions

GE Profile PDW9980LSS Manual

GE

GE Profile PDW9980LSS Manual

GE GE Nautilus GSD2000FAD User manual

GE

GE GE Nautilus GSD2000FAD User manual

GE QSD500D User manual

GE

GE QSD500D User manual

GE Stainless Steel Tall Tub With Front Controls User manual

GE

GE Stainless Steel Tall Tub With Front Controls User manual

GE Spacemaker GSM1800J How to use

GE

GE Spacemaker GSM1800J How to use

GE 2011 E - Star User manual

GE

GE 2011 E - Star User manual

Popular Dishwasher manuals by other brands

Samsung DW-FN320T user manual

Samsung

Samsung DW-FN320T user manual

LG LDS 5811WW Service manual

LG

LG LDS 5811WW Service manual

Elba EDW-B1462D owner's manual

Elba

Elba EDW-B1462D owner's manual

VESTEL NOVUS Series Service manual

VESTEL

VESTEL NOVUS Series Service manual

Bosch SMS4EMW00E Instructions for use

Bosch

Bosch SMS4EMW00E Instructions for use

Global-Tek GT-CR 2 manual

Global-Tek

Global-Tek GT-CR 2 manual

Smeg Dishwasher 85028 Instructions for installation and use

Smeg

Smeg Dishwasher 85028 Instructions for installation and use

LG LD-4080W Service manual

LG

LG LD-4080W Service manual

Bauknecht GCF 625 operating instructions

Bauknecht

Bauknecht GCF 625 operating instructions

Sharp QW-HX13F47EI-EU user manual

Sharp

Sharp QW-HX13F47EI-EU user manual

Asko D5536XLFI operating instructions

Asko

Asko D5536XLFI operating instructions

Modena WP 7134 WVM User manual book

Modena

Modena WP 7134 WVM User manual book

Beko DFN39340X instruction manual

Beko

Beko DFN39340X instruction manual

AEG FAVORIT 65050 VI1P user manual

AEG

AEG FAVORIT 65050 VI1P user manual

Siemens SN23HI37VE user manual

Siemens

Siemens SN23HI37VE user manual

Maytag MDB4651AWB - Tall Tub Dishwasher User instructions

Maytag

Maytag MDB4651AWB - Tall Tub Dishwasher User instructions

Hotpoint Ariston LL 42 Instruction book

Hotpoint Ariston

Hotpoint Ariston LL 42 Instruction book

Siemens SN45ZW56CS user manual

Siemens

Siemens SN45ZW56CS user manual

manuals.online logo
manuals.online logoBrands
  • About & Mission
  • Contact us
  • Privacy Policy
  • Terms and Conditions

Copyright 2025 Manuals.Online. All Rights Reserved.

Dishwashers
GSD6900 Series
PDW7000 Series
Owner’s Manual
165D4700P336 49-55016-4 07-07 JR
Safety Instructions . . . . . . 2, 3
Operating Instructions
Care and Cleaning . . . . . . . . . 11, 12
Control Panel and Settings . . . 4–6
Loading Place Settings . . . . . . . . 11
Loading the Racks . . . . . . . . . . . . 10
Using the Dish asher . . . . . . . .6–9
roubleshooting ips . . 12–14
Consumer Support
Consumer Support . . . . .Back Cover
Warranty . . . . . . . . . . . . . . . . . . . . 15
ge.com
Write the model and serial
numbers here:
Model # __________________
Serial # __________________
You can find them on the tub all
just inside the door.
GE Profile™
Triton XL™
2
Operating Instructions Safety InstructionsConsumer Support roubleshooting ips
IMPOR AN SAFE Y INFORMA ION.
READ ALL INS RUC IONS BEFORE USING —
SAVE HESE INS RUC IONS
WARNING!
For your safety, the information in this manual must be followed to minimize the risk of fire
or explosion, electric shock, and to prevent property damage, personal injury, or death.
WATER EATER SAFETY
PROPER INSTALLATION AND MAINTENANCE
This dishwasher must be properly installed and located in accordance with the Installation
Instructions before it is used. If you did not receive an Installation Instructions sheet with
your dishwasher, you can receive one by visiting our website at ge.com.
■Contents ashed in Anti-bacterial mode, if
available, may be hot to the touch. Use care
before handling.
■Using a detergent that is
not specifically designed
for dish ashers ill cause
the dish asher to fill ith
suds.
■If your dish asher is connected to a
all s itch, ensure that the s itch is
on prior to use.
■On dish ashers ith electronic controls,
if you choose to turn the all s itch
off bet een ash cycles, allo 5-10
seconds after turning the s itch on before
touching START/RESET to allo the control
to boot.
■Non-Dish are Items: Do not ash items such
as electronic air cleaner filters, furnace filters and
paint brushes in your dish asher. Damage to
dish asher and discoloration or staining of
dish asher may result.
■Close supervision is necessary if this appliance
is used by or near children.
■Load light, plastic items so they ill not
become dislodged and drop to the bottom
of the dish asher—they might come into
contact ith the heating element and be
damaged.
■Connect to a grounded metal, permanent iring
system; or run an equipment-grounding
conductor ith the circuit conductors and
connect to the equipment-grounding terminal
or lead of the appliance.
■Improper connection of the equipment-grounding
conductor can result in a risk of electric shock.
Check ith a qualified electrician or service
representative if you are in doubt hether the
appliance is properly grounded.
■Dispose of discarded appliances and shipping
or packing material properly.
■Do not attempt to repair or replace any part
of your dish asher unless it is specifically
recommended in this manual. All other servicing
should be referred to a qualified technician.
■To minimize the possibility of electric shock,
disconnect this appliance from the po er supply
before attempting any maintenance.
NO E: Turning the dishwasher off does not
disconnect the appliance from the power supply.
We recommend having a qualified technician
service your appliance.
WARNING!
CAU ION: o prevent minor injury or property damage
Under certain conditions, hydrogen gas may be produced in a water heater that has not been used
for two weeks or more. HYDROGEN GAS IS EXPLOSIVE.
If the hot ater has not been used for t o eeks or more, prevent the possibility of damage or injury
by turning on all hot ater faucets and allo them to run for several minutes. Do this before using any
electrical appliance hich is connected to the hot ater system. This simple procedure ill allo any built-
up hydrogen gas to escape. Since the gas is flammable, do not smoke or use an open flame or appliance
during this process.
3
Consumer Support
roubleshooting ipsOperating InstructionsSafety Instructions
ge.com
PROPER DISPOSAL OF T E DIS WAS ER
Junked or abandoned dish ashers are
dangerous…even if they ill sit for “just a
fe days.” If you are getting rid of your old
dish asher, please follo the instructions belo
to help prevent accidents.
Before You hrow Away Your Old
Dishwasher:
■Take off the door of the ashing compartment
or remove the door latch keeper (as sho n).
WARNING! RISK OF CHILD EN RAPMEN
Door latch keeper
READ AND FOLLOW T IS SAFETY INFORMATION
CAREFULLY.
SAVE HESE INS RUC IONS
■Use this appliance only for its intended purpose
as described in this O ner’s Manual.
■Use only po der, tabs, liquid detergents or rinse
agents recommended for use in a dish asher and
keep them out of the reach of children. Cascade®,
Cascade®Complete and Electrasol®Automatic
Dish ashing Detergents, and Jet-Dry®and
Cascade Crystal Clear®rinse agents have been
approved for use in all GE dish ashers.
■Locate sharp items so that they are not likely
to damage the door seal.
■Load sharp knives ith the handles up to reduce
the risk of cut-type injuries.
■Do not ash plastic items unless marked
dish asher safe or the equivalent. For plastic
items not so marked, check the manufacturer’s
recommendations.
■Do not touch the heating element during or
immediately after use.
■Do not operate your dish asher unless all
enclosure panels are properly in place.
■Do not tamper ith controls.
■Do not abuse, sit on or stand on the door or dish
rack of the dish asher.
■Do not allo children to play around dish asher
hen opening or closing door due to the possibility
of small fingers being pinched in door.
■Do not discard a dish asher ithout first removing
the door of the ashing compartment or the door
latch.
■Do not store or use combustible materials, gasoline
or other flammable vapors and liquids in the
vicinity of this or any other appliance.
■Do not allo children to play ith, on or inside this
appliance or any discarded appliance.
WARNING! When using your dishwasher, follow basic precautions,
including the following:
4
Operating Instructions Safety InstructionsConsumer Support roubleshooting ips
About the dishwasher control panel.
You can locate your model number on the tub wall just inside the door.
Throughout this manual, features and
appearance may vary from your model.
Control Settings
Status Indicator Lights
The Status display tells you hat’s happening hile the dish asher is in operation and may flash, indicating a malfunction (see
page 6). The lights ill come ON indicating the sequence of operation the dish asher is in.
LOW Displayed hen the SmartDispense
TM
needs to be refilled ith liquid or gel automatic dish asher
DETERGENT detergent.
SENSING Displayed hile the ExtraClean™ Sensor is measuring the amount of soil and temperature of ater.
The dish asher ill adjust the selected cycle to achieve optimal performance.
WASHING Displayed during pre ash and main ash periods.
RINSING Displayed during rinse periods.
DRYING Displayed during HEA ED DRY.
SANITIZED Displayed hen cycle has met sanitization conditions. Light remains ON until door is opened.
CLEAN Displayed hen a ash cycle is complete. The light ill remain ON until door is opened.
ime Remaining Display (on some models)
During operation, the display sho s the minutes remaining until the cycle is complete. The display may adjust the remaining
time hile the Sensing light is on. The time displayed at the start of each cycle may change from the factory setting as the unit
customizes itself to home use. During a delay start, the display ill sho hours of time remaining until the cycle starts.
Selections
Press the pad for the desired wash cycle.
NO
TE: All cycle times and ater usage information contained in the follo ing section are approximate values only.
Actual results ill depend on several factors, including but not limited to, inlet temperature, household ater pressure
and turbidity of the ash ater.
The light above or next to the selected pad ill be ON to indicate hich WASH CYCLE has been selected.
ANTI- ACTERIA Heavy 8.8 gal., 105 min.
Medium 7.5 gal., 95 min.
Light 6.3 gal., 85 min.
This cycle raises the ater temperature in the final rinse to sanitize your dish are. The cycle
length ill vary depending on the temperature of your inlet ater.
NOTE: The Anti-Bacteria cycle is monitored for sanitization requirements. If the cycle is
interrupted during or after the main ash portion or if the incoming ater temperature is so
lo that adequate ater heating cannot be achieved, the sanitizing conditions may not be
met. In these cases, the sanitized light ill not illuminate at the end of the cycle.
NOTE: NSF-certified residential dish ashers are not intended for licensed food establishments
.
COOKWARE Heavy 10.0 gal., 80 min.
(POTS & PANS) Medium 8.8 gal., 70 min.
Light 7.5 gal., 60 min.
This cycle is meant for heavily soiled dishes or cook are ith dried-on or baked-on soils. This
cycle may not remove burned-on foods. Everyday dishes are safe to be used in this cycle.
NORMAL WASH Heavy 8.8 gal., 70 min.
Medium 7.5 gal., 60 min.
Light 5.0 gal., 50 min.
This cycle is for medium/heavily soiled dishes and glass are.
1
2
1 6
2
453
3
5
Consumer Support
roubleshooting ipsOperating InstructionsSafety Instructions
SPEED CYCLE 7.5 gal., 35 min.
(on some models) This cycle is for everyday dishes and glass are.
CHINA CRYSTAL 7.5 gal., 35 min.
This cycle is for lightly soiled china and crystal.
GLASSES 7.5 gal., 35 min.
(on some models) This cycle is specifically designed for glasses.
RINSE ONLY 2.5 gal., 10 min.
For rinsing partial loads that ill be ashed later. Do not use detergent ith this cycle.
NO E: The CHINA CRYS AL/PLAS ICS (some models) selector is a toggle pad; toggle the pad until the
desired cycle is indicated.
NO E: This dishwasher is equipped with a CleanSensor™with automatic temperature control; therefore, cycle
length and time may vary depending on soil and temperature conditions.
NO E: Only the Anti-Bacteria cycle has been designed to meet the requirements of Section 6, NSF 184 for soil
removal and sanitization efficacy.
Enhancements/Extras
The light above the selected pad will be ON to indicate which ENHANCEMEN /EX RA has been selected.
PRE WASH For use ith heavily soiled and/or dried-on, baked-on soils. This option MUS be
(on some models) selected PRIOR to starting the cycle. This option adds 16 minutes to the cycle time.
NO E: Cannot be selected ith RINSE ONLY cycle.
HEATED DRY Shuts off the drying heat option. Dishes air dry naturally and energy is saved. For
Light OFF faster air dry, you can prop the door open after the CLEAN light illuminates.
HEATED DRY Turns the heater on for fast drying. This ill extend the time to your ash cycle by 8
Light ON minutes for the SPEED CYCLE and 30 minutes for all other cycles. NO E: Cannot be
selected ith RINSE ONLY cycle.
LOCK You can lock the controls to prevent any selections from being made. Or you can lock
the controls after you have started a cycle.
Children cannot accidentally start dishwasher by touching pads with this option
selected.
To unlock the dish asher controls, touch and hold the HEA ED DRY pad for 3 seconds.
The light above the LOCK pad ill turn off. To lock the dish asher, touch and hold the
HEA ED DRY pad for 3 seconds. The light above the LOCK pad ill turn on.
ADDED HEAT or When selected, the cycle ill run longer ith heating elements on to improve both
EXTRA HOT WASH
ash and dry performance. NO E: Cannot be selected ith RINSE ONLY cycle.
(on some models)
DELAY HOURS You can delay the start of a ash cycle for up to 9 hours. Touch the DELAY HOURS pad
to choose the number of hours you ant to delay the start of the cycle; then touch
S AR /RESE . The machine ill count do n and start automatically at the correct time.
Touching S AR /RESE a second time will cancel the DELAY S AR selection. NO E: If
you forget to fully close the door, a reminder signal ill beep until you do so.
RESET To change a cycle after ashing starts, touch the S AR /RESE pad to cancel the
cycle. The S AR /RESE light ill flash hile the ater is pumped out if needed. This
takes approximately 90 seconds. When the light stops flashing, the dish asher
can be reprogrammed and restarted.
ge.com
4
6
Operating Instructions Safety InstructionsConsumer Support roubleshooting ips
About the dishwasher control panel.
Start
Close the dish asher door and select the cycle and
desired enhancements. Touch the S AR /RESE pad to
begin the cycle. Water fill begins, and approximately 60
seconds later the ash action begins.
NO E: The dish asher remembers your last cycle so
you don’t have to reprogram each time. When the
dish asher door is fully closed, the control panel lights
ill display the last settings you selected.
If you don’t ant to change any of the settings, simply
touch the S AR /RESE pad to begin the cycle.
If the door is closed, the indicator lights ill turn
off if the S AR /RESE pad is not selected ithin t o
minutes. To activate the display, open and close the door
or press any pad.
Also, if a po er failure occurs, NORMAL and HEA ED
DRY ill automatically be programmed. Make any ne
selections and touch the S AR /RESE pad to begin
the cycle.
Clean
The CLEAN light is illuminated hen a ash cycle is
complete. The light ill stay ON until the door is opened
and then closed and latched or hen a pad is pressed
ith the door closed. You can turn off the CLEAN light
by pressing any pad hen the door is latched.
5
6
Status Indicator Lights What It Means
S AR /RESE Cycle has been interrupted by pressing the S AR /RESE pad. Light ill stop
flashing after the dish asher automatically drains out the ater.
Flashing display lights.
Using the dishwasher.
Check the Water Temperature
Use Jet-Dry®or Cascade Crystal Clear®Rinse Agent
Jet-Dry®or Cascade Crystal Clear®rinse agents remove spots and prevent ne film buildup on your dishes, glasses,
flat are, cook are and plastic.
Filling the Dispenser
The rinse agent dispenser holds 3.5 oz. of rinse agent. Under normal conditions, this ill
last approximately one month. Try to keep it full, but do not overfill.
Make sure the dish asher door is fully open.
Turn the dispenser cap to the left and lift it out.
Add rinse agent until the indicator indo looks full.
Clean up any spilled rinse agent ith a damp cloth.
Replace the dispenser cap.
Rinse Aid Setting
The amount of rinse agent released into the final ash can be adjusted. The factory
setting is at the midpoint. If there are rings of calcium (hard ater) spots on dishes, try a
higher setting. If you see foam in the dish asher, move the indicator to a lo er setting.
To adjust the setting
Remove the dispenser cap; then turn the adjuster counterclock ise to increase the
amount of rinse agent, clock ise to reduce the amount of rinse agent.
5
4
3
2
1
The entering ater should be at least 120°F and not more
than 150°F for effective cleaning and to prevent dish
damage. Check the ater temperature ith a candy or
meat thermometer. Turn on the hot ater faucet nearest
the dish asher, place the thermometer in a glass and let
the ater run continuously into the glass until the
temperature stops rising.
Indicator
window Dispenser cap
Rinse
agent
adjuster
Dish Preparation Prior to Loading
■No prerinsing of normal food soil is required.
■Scrape off hard soils, including bones, toothpicks, skins
and seeds.
■Remove large quantities of any remaining food.
■Remove leafy vegetables, meat trimmings and
excessive amounts of grease or oil.
■Remove acidic food soils that can discolor stainless
steel.
Consumer Support
roubleshooting ipsOperating InstructionsSafety Instructions
ge.com
Your dish asher comes equipped ith a manual dispenser
and, on some models, an automatic liquid dish asher
detergent dispenser (SmartDispense
TM
). You can use either
of these dispensers, but don’t use both at the same time.
The cover of the main ash section ill open during the
ash cycle. If you are using SmartDispense
TM
, leave the
cover of the main ash section dispenser open before
starting the cycle.
You may use po der, liquid, gel or tablets in the manual
dispenser. It is important to keep po dered detergents and
tablets fresh and dry so they don’t lose effectiveness.
Therefore, do not put detergent into the manual dispenser
until you are ready to ash dishes.
Filling Manual Detergent Dispenser
The amount of detergent to use depends on hether your
ater is hard or soft. With hard ater, you need extra
detergent. With soft ater, you need less detergent.
Protect your dishes and dish asher by contacting your
ater department and asking ho hard your ater is.
T elve or more grains is extremely hard ater. A ater
softener is recommended. Without it, lime can build up in
the ater valve, hich could stick hile open and cause
flooding. Too much detergent ith soft ater can cause a
permanent cloudiness of glass are, called etching.
Use the information in the table belo as a guide to
determine the amount of automatic dish asher detergent
to place in the dispenser. You may use po der, liquid, gel
or tablets in this dispenser.
When using automatic dish ashing detergent tablets,
simply place one tablet in the main ash section and close
the cover.
For heavily soiled loads, use a bit more detergent. For ater
temperatures above 140°F, use a bit less detergent.
For heavily soiled loads, use the Pots and Pans or eavy Wash
cycle.
DO NO USE HAND DISH DE ERGEN
NO E: Using a detergent that is not specifically designed
for dishwashers will cause the dishwasher to fill with suds.
During operation, these suds will spill out of the dishwasher
vents, covering the kitchen floor and making the floor wet.
Because so many detergent containers look alike, store the
dish asher detergent in a separate space from all other
cleaners. Sho anyone ho may use the dish asher the
correct detergent and here it is stored.
While there ill be no lasting damage to the dish asher,
your dishes ill not get clean using a dish ashing
detergent that is not formulated to ork ith dish ashers.
MAIN WASH
PRE
WASH
Soft
Medium
Soft
Medium
Hard
Extremely
Hard
Manual Detergent Dispenser
Detergent Cups to Fill
Fill cup to soft line (1/3 full)
Fill cup to medium soft line (2/3 full)
Fill cup to medium hard line
(completely full)
Fill both main ash cup
and pre ash cup
Number
of Grains
Less than 4
4 to 8
8 to 12
Greater
than 12
SmartDispenseTM
Manual Detergent
Dispenser
7
This dish asher may have a SmartDispense™feature
hich automatically dispenses liquid automatic
dish asher detergent into each cycle based on soil
level and ater hardness.
To utilize the SmartDispense™Detergent Dispenser,
it must first be filled. Although any liquid or gel
automatic dish ashing detergent can be used in
the SmartDispense™system, all liquid or gel
automatic dish ashing detergents are not the same.
Most automatic dish ashing detergents are chlorine
bleach-based (such as Cascade®or Electrasol®)
hile others contain enzymes (such as Cascade
Complete®or Electrasol®Advanced™Gel).
Do not mix any chlorine bleach-based automatic
dishwashing detergent with any dishwashing
detergent containing enzymes as this could cause
the detergents to congeal and lead to blockage of
the SmartDispense™system. Check the detergent
label to determine if the detergent is chlorine
bleach-based or one that contains enzymes. It is
recommended that the same type of detergent be
used hen refilling your SmartDispense™system.
CAU ION! Absolutely do not add
po der detergent, tablets or any liquid soap or
detergent normally used for ashing hands or
dishes in a sink. Only use liquid or gel detergent
specifically designed for use in an automatic
dish asher.
Filling Dispenser
To open the dispenser for filling, push do n and
turn the blue cap counterclock ise until the cap
is loose. Lift cap off.
Set the door at a comfortable angle to fill the
dispenser.
Aim the detergent bottle at the opening in the door
and begin to fill.
The dispenser ill hold 40 oz of liquid dish asher
detergent (standard size bottle).
When full, replace the cap and turn clock ise
until tight to ensure that no ater enters the
SmartDispense™dispenser. If residue is left on
the door, it ill be ashed off in the next cycle.
An indicator light ill turn on to notify you hen the
dispenser needs to be filled again. After filling, the light
ill not turn off until the door is closed. A full dispenser
ill last approximately 1 month for the average user.
NO E: If you are not using SmartDispense™and you
ant to turn the LOW DE ERGEN LED light off, press
the ADDED HEA pad 5 times ithin 3 seconds. You
ill hear 3 beeps, then the light ill go off. You can
turn the light back on by pressing the ADDED HEA
pad 5 times ithin 3 seconds.
8
Operating Instructions Safety InstructionsConsumer Support roubleshooting ips
Using the dishwasher.
SmartDispenseTM Detergent Dispenser (on some models)
Light ill turn on
hen it is time to refill.
Turn clock ise until tight.
Consumer Support
roubleshooting ipsOperating InstructionsSafety Instructions
Prior to the first use, the dish asher needs to
be calibrated for ater hardness. Please follo
directions belo to calibrate the dish asher to
the hardness of your tap ater.
Determine the Hardness of Your ap Water
In the bag containing these instructions, you should
find a ater hardness test strip package. Read the
instructions on the package, remove the test strip and
follo the instructions to determine the hardness level
of your tap ater. You ill use this information to
calibrate your dish asher to dispense the optimal
amount of detergent.
Water hardness test strip indication
Set Control to Calibration Mode
From the standby mode (dish asher not running
a cycle and the panel lights on), enter the ater
hardness selection mode.
Control Calibration
1. Close and latch the door (lights on, dish asher
not running).
2. Press the COOKWARE and DELAY HOURS pads at
the same time for 3 seconds. The display ill sho
a number 1 to 5. This is the ater hardness value
currently set.
3. Press the COOKWARE pad to raise the value or the
NORMAL pad to lo er the value. Set the ater
hardness value (1 to 5) to the number determined
ith the test strip and table at left.
4. Once the ater hardness is set, press the
S AR /RESE pad to save the setting and return
the dish asher to normal operation.
You should recalibrate the dispenser if ater
conditions change, for example, if a ater softener
system is added or removed.
ge.com
SmartDispenseTM Detergent Dispenser
Water ardness Calibration
Control Panel
0 RED
1 RED
2 RED
3 RED
4 RED
1
2
3
4
5
SOFT
HARD
Value to Enter
into Dishwasher
9
Press at the same time for 3 seconds. Display
Control Panel
Press NORMAL
WASH pad to
lo er the value.
Press COOKWARE
pad to raise the
value.
10
Operating Instructions Safety InstructionsConsumer Support roubleshooting ips
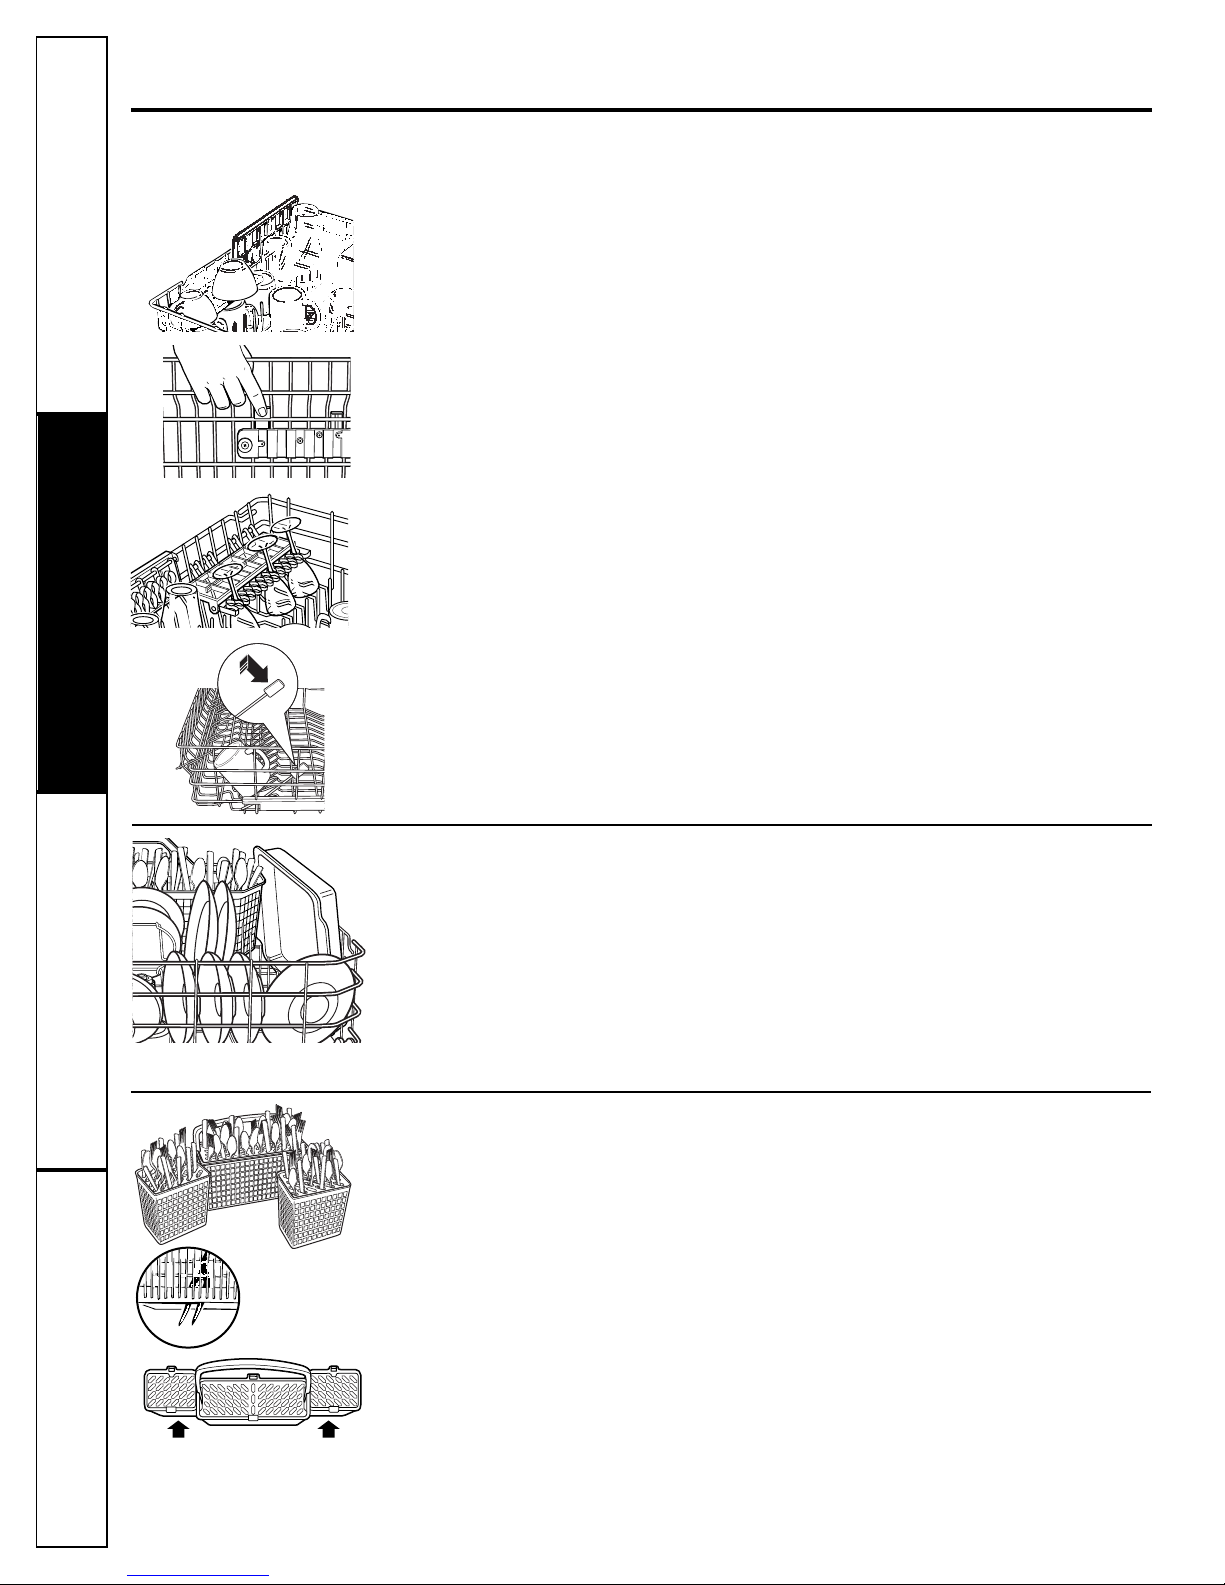
Loading the dishwasher racks.
Lower Rack
The lo er rack is best used for plates, saucers
and cook are. Large items such as broiler
pans and baking racks should go along the
left-hand side. Load platters, pots and bo ls
along the sides, in corners or in the back. The
soiled side of items should face the center of
the rack. If necessary, oversized glasses and
mugs can be placed in the lo er rack to
maximize loading flexibility.
Also, be careful not to let a portion of an item
such as a pot or dish handle extend through
the bottom rack. This could block the ash
arm and cause poor ashing results.
Fold-do n tines (on some models) provide
flexibility for extra-large and hard-to-fit items.
The tines may be left in the up position or
folded do n to customize the lo er rack.
Silverware Basket
A variety of options is available regarding
the three-piece silver are basket in your
dish asher. The complete basket is designed
to fit on the right side of the lo er rack.
Additionally, each end of the basket is
removable to add loading flexibility to
accommodate flat are and lo er rack
capacity needs.
To load flat are, simply push the adjustable
handle to either side. Put flat are in the
basket ith knife handles up to protect
your hands. Place spoons in the basket
ith handles do n. Mix knives, forks and
spoons so they don’t nest together.
The provided lids ith slots can be used
to avoid nesting of silver are. Small plastic
items, such as measuring spoons and
lids for small containers, should go in
the bottom of the silver are basket ith
silver are on top.
The lids of both end and middle baskets can
be closed to contain small items. Long items
can be placed on the utility shelf in the
upper rack.
Don’t let any
item extend
through bottom.
To remove end baskets, grasp the
basket at opposite corners and
slide apart.
For best dishwashing results, follow these loading guidelines. Features and appearance of racks and silverware
baskets may vary from your model.
Upper Rack
Although the upper rack is primarily for
glasses, cups and saucers, pots and pans can
be placed in this rack for effective cleaning.
Cups and glasses fit best along the sides. This
is also a secure place for dish asher-safe
plastics.
The upper rack is adjustable (on some models)
to add flexibility in loading your dish asher.
To lo er, push tabs in and lo er rack. To raise,
just pull up on rack until it snaps.
The utility shelf (on some models) may be
placed in the up or do n position to add
flexibility. A wine glass holder (on some
models) secures ine glasses for best
ashability. Because ine glasses come
in various sizes, after loading, slo ly push
in the rack to make sure they ill clear
the top of the dish asher.
Some models have an Angled Rack System,
hich allo s you to angle your dishes, such
as coffee mugs, for better cleaning and
quicker drying. To position the tines, pull the
lever for ard, drop the tines into position
and release the lever.
The upper rack is good for all kinds of
odd-shaped utensils. Saucepans, mixing
bo ls and other items should be placed face
do n. Fold-do n tines (on some models)
provide flexibility for extra-large and hard-to-
fit items.
Secure larger dish asher-safe plastics over
2 tines hen possible.
Make sure small plastic items are secure so
they can’t fall onto the heater.
Be sure that items do not protrude through
the bottom of the rack and block rotation of
the middle spray arm. This could result in
poor ash performance for items in the
upper rack.
Check to make sure that no items ill block
rotation of the ash arms.