GE Appliances GSD4410 User manual

GEAppliances
GSD4410
GSD4420
GSD4425
GSD4430
GSD4435
GSD4910
GSD4920
GSD4930
GSD4940
Part NO. 165D4700P162 Pub NO 49 5,8Z9

Congratulations/.
YouAre Now Part of the GEFamily.
Welcome to tile GE family.
We're proud of our quality
products and we are
committed to providing
dependable sepAce. You'll
see it in this easy-to-use
C",vner's Manual and you'll
Ileal it in the friendly voices
()tone customer smwice
department.
Best of all, you'll expmience
these values each time yotl
use your dishwasher. That's
important, because your
itew disbwasher _dll be pmt
of your family for many
years. And we hope yo'd will
be part of ours tbr a long
lime to come•
We Oaank you _L)Ibuying
GE. We appreciate your
purchase, and bope you
_11 continue to rely on us
_henever you need quality
appliances for yore" home. Important/.
Staple sales slip or cancelled
check here.
Proof of the original purchase date
is needed to obtain service under
the warrant_
Write the model and serial
numbers here.
#
Youcan find them on the tub wall just
inside the doo_

GE& You,
A Service Partnership.
Ask any GEappllance owner and they will
tefl you we stand behind our products with
unmatched quality service. However, did
you know that most questions result from
simple problems that you can easily fix
yourseff in just a few minutes? This
Owner's Manual can tell you how
ReadthisManual
In,kit '.)u _ili find n_am
hc]l)_u] hint_ {)It h<m to tlS_ ;111(I
Ill_tillt;til; _Otl] (lish\l;t_,h[ ']
I31 o})t')]}. ILls[ _1 ]i[[](' I)11:\ ('Illi_, t '
( ;tl't' OZl \OLII I);tl [ (;ill h;l\ (")Otl ;I
_ltt;lE dc;d _)_ li;ll(' ;u;(t II10]11'%
H_t'i I1;_! ]if_' ()t _()u] (]i_h_;is]lt:r
ReviewtheSectionor,
Troubleshootingtips
_'t+tl ]l l]llll lll;il)_ ;tll',$_Ut'_ tl)
( t >ltlll)()ll I+l(Ih]t IW, }1{ I1'
l[ \Oll It'\ !('_ (/tll ( h;lll i)l ¸
\llll ii1;1_ i11_1 llt,t (I 111 i ill[ Icll
',_'1 _, II I _ ;11 all
/f YouNeedService
_1 \1 Itl 111 I Ill < {_ _¢l& i{ 1' \l III l ;111
phcmr(;dl;l_;{_ \liq,dl.lltrvu
II_ll )1111'I ',t 'IX, il l, IIIiIllh( I _, I _,
INIt hlfI('([ ill (hi, h;[t _-, _AI Ill ii1
( )f _HI (All Ah_,l\'_ t ;IH JUt
{ ;] \11_,_\1.1 ( it.lilt, I " AI
Safety Info _mmtion .4-7 .....
_t
Operating Instructions
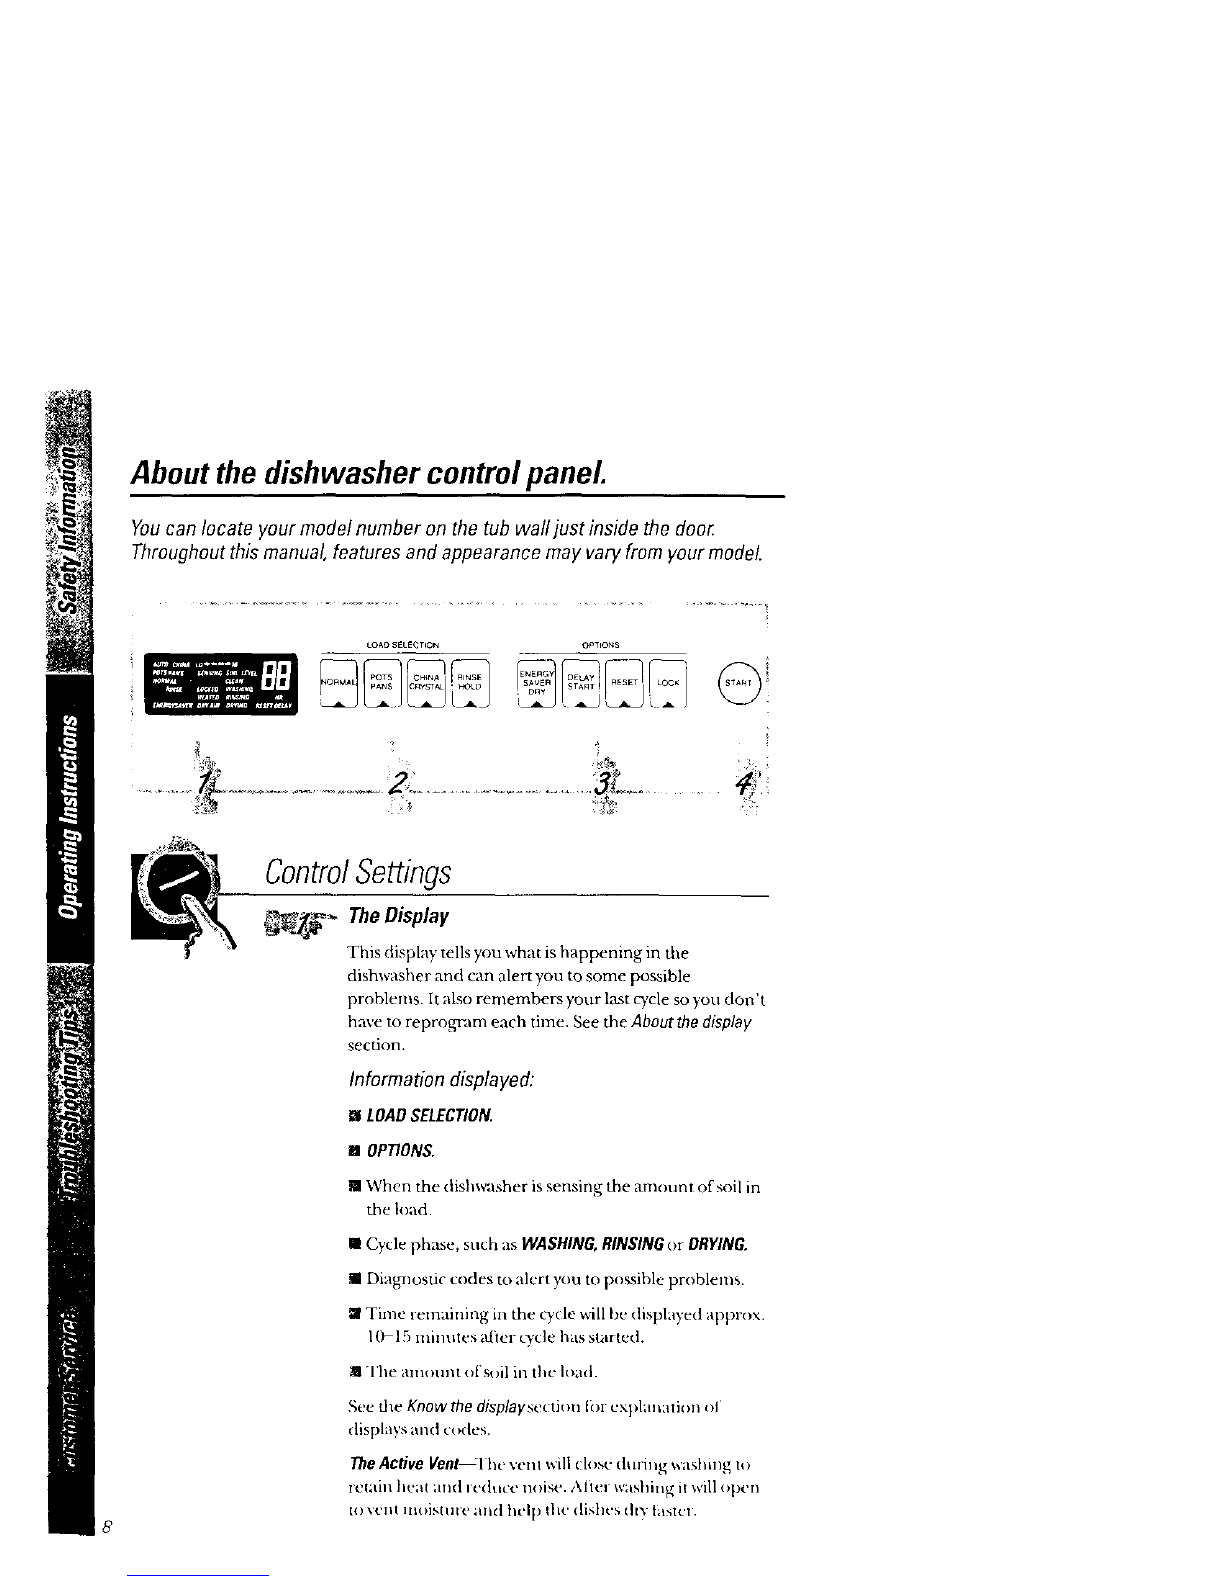
ControlPanel ............... 8
ControlSett_bgs........... 8,9 D=!
_i_play................lo,_ _",!
D_#gnost/cCodes ....... 12-!4 _; i
Soil SenserSystem ......... 15 _ "_,_,
LoadingtheRacks ....... 18,19
Opt_ooalAccessories........ 20 _ 1
Careand C/eanlng ..21 i
Troubleshooting tips
BeforeYou
CarlForService........ 22-26
i
Customer Service
Warranty ............... 27
ServiceTelephone
Numbers ........ BackCover

IMPORTANTSAFETYINFORMATION.
READALLINSTRUCTIONSBEFOREUSING.
AWARNING!
For your safe_ the information in this manual must be
followed to minimize the risk of fire, explosion, electric
shock, or to prevent property damage, personal injury,
or loss of life.
WATERHEATERSAFETY
Under certain conditions hydrogen gas may be produced in
a water heater that has not been used for two weeks or
more. Hydrogen gas can be explosive under these
circumstances.
If the hot water has not been used [i)r two weeks or more, prevent
the possibility of damage or injtn T by turning on all hot water
tlmcets and allow them to nm for seventl n/inu(es. Do tills befote
using any elecuical appliance which is connected to tl_e hot water
system. This simple procedure xdll allow any builvup hydrogen gas
to escape. Since dm gas is t]ammahle, do t/or smoke or use an open
flalne or appliance during ttlis process.

Use this appfiance only for its intended purpose as
described in this Owner's Manual
PROPERINSTALLATION
ANDMAINTENANCE
This dishwasher must be properly instafled and located in
accordance with the Installation Instructions before it is used.
ff you did not receive an Installation Instructions sheet with
your dishwasher, you can receive one by cafling us toil-free
at the GEAnswer CenteP,800.626.2000.
Connect to agrounded
metal, pmlnanen t _fing
system; or run im equipment-
gTounding conductor wifll
the circuit conductors trod
colmect to the equipment-
_ounding terminal or lead
ofdae appliance.
_'_Improper connecUon of dm
equipment-g-ounding
conductor can result ii1 a risk
of elecu-lc shock. Check _th
a qualified elecu ician or
sei_'ice representative ifvou
are in doubt whether tile
appliance is properly
grounded.
_"Dispose of discarded
appliances and shipping or
packing matmdal properly.
_,_Do not attempt to repair or
replace any part of your
dishwasher unless it is
specifically recommended in
this manual. All odmr
selxqcing should be referred
to a qualified technician.
_-.1To minimize the possibility of
electric shock, disconnect
lhis appliance trom d)e
power supply beh)re
attempting any maintenance.
IVOrE: Tuming the
dishwasher offdoes not
disconnect dm appliance
ti'om die power supply. We
rt'{ Olllnleiid ha_ng a
qualified techm(ian scp,'k e
}q )fir applian_, e.

IMPORTANTSAFETYINFORMATION.
READALLINSTRUCTIONSBEFOREUSING.
AWARNING!
DONOT...
!i Do not tamper _dth controls.
Do not abuse, sit on, or stand
on the door or dish rack of
the dishwasher.
Do not allow children to play
inside, on or with this
appliance or any discarded
appliance.
N Do not discard a dishwasher
_thout first removing the
door of the washing
compartment.
Do not store or use
conthustible matmials,
gasoline or other flammable
vapors and liqukls in the
"dcinity of this or any other
appliance.

WHENUSINGYOURDISHWASHER
1.Js_,only powder or liquid Do not umth the heating
detergenL_ or wetting agents element during or
recommended for use in a immediately ,after use.
dishwasher.
Locate shmqp items so that
hey' u e not likely to damage
the door seal.
Do not operate your
dishwasher unless all
enclosure panels are propm ly
in place.
:Load shaq) knives with the Close super,ision is necessa U
handles up to reduce the risk if this applimlce is used by or
of cut4)qae injuries, near children.
Do not wash plastic items
unless marked dishwasher
safe or the equivalent. For
plastic items not so n_arked,
check the roanufacturer's
recoB3mendations.
sa Load light plastic items so
they _dll not become
dislodged and drop to dae
bottom of tile dishwasher-
they might come into conu_ct
with the heating element and
be damaged.
REMEMBER...
Yourcontinued health and safety are important to us.
Please read and follow this Safety Information carefully.
We want you to remain a happy and healthy part of our
GEfamilI_
SAVETHESEINSTRUCTIONS

About the dishwasher controlpanel
Youcan locate your model number on the tub wall just inside the doo_
Throughout this manual, features and appearance may vary from your model.
options
8
ControlSettings
_. The Display
This display tells you what is happening in 1he
dishwasher and can alert you to some possible
problems. It also remembers your last cycle so you don't
have to reprogvam each time. See the Aboutthe display
section.
Information displayed:
mLOAD SELECTION.
mOPTIONS.
When the dishwasher is sensing the amount of soil in
the load.
I Cycle phase, such as WASHING, RINSING or DRYING.
I Diagmostic codes to alert you to possible problems.
Time lemaining in the _)cle _ill be displayed approx.
I1_ 15 minutes at)er cTOe has started.
11 The alllOtlllt ol'soiI in the load.
Set' the Know the displayse{tion Ibr Cxl)lamation oI
displays and _odes.
The Active Velzt_lhc \mill will ell )so duri]lg washing to
ze_ain heat and icduce tloisc. Atit:l washing i_will open
to \cnI ]l:oisIute mid help th(' (lishcs tlC, tilxtcl.

_._ .... LoadSelection
NORMAL Forloadsofeverydaydishes,glassesandcookwarewith
mediumsoils NOTE:Manydisheshavelightersoil than
normal Choosingacycleotherthan NORMALwill save
energyandwater
POTSPANS Forheavilysoileddishesorcookwarewith driedonor
bakedonsoils.Everydaydishesmay beincluded This
cyclewill notremoveburnedonfoods
CHINACRYSTALForlightlysogedchinaandcrystal Water is aeratedfor a
gentlewash
RINSE HOLD Forrinsingpartial loadsthat will bewashedlater Make
sureENERGYSAVERDRYis selected Donetuse
detergentor OELAYSTARTwdhthis cycle
_:_,_ Options
ENERGYSAVER Shutsoff thedryingheatoptions.Dishesairdrynaturally
DRYON andenergyissaved.Youcan propthe dooropenafterthe
word CLEANappearsinthedisplay
ENERGYSAVER Turnsthedryingheateronfor fast drying Thiscyclewill
DRYOFF extendthe braetoyourwashcycle
DELAYSTART Youcandelaythestart of awash cyclefor upto 14hours
Tapor pressandhold [heDELAYSTARTpad tochoose
thenumberofhoursyouwant to delaythestart of lhe
cycle Themachinewill countdownandstart
automaticallyat thecorrecttime. NOTE."If youforgetto
latchthedooraremindersignalwill beepuntilyoudoso
RESET Tochangeacycleafterwashingstarts, touchtheRESET
padto cancelcycle Afterwater ispumpedoutandmotor
stops,youcan reprogramandrestartthe dishwashe£
LOCK WhentheLOCKpadistouchedtwicewithin3seconds.all
padsbecomeinoperativeYoucanlockthe controlsto
preventanyselectzonsfrombeingmadeOryoucanlock
thecontrolsafteryouhavestartedacycleorselected
DELAYSTARTsothecycleorDELAYSTART_snot
tnlernlpte_ ThewordLOCKEDappearsin thedisplay
Children cannot accidentallystart dishwasher
by touching pads.
Tounlockthedishwasherafterd hasbeenlocked,touchthe
LOCKpadnice within3seconds]he wordLOCKEDwill
disappearfromthedisplay
_Start
Iatth the do<>r and mud+ the STARTpad to begin the o'cle.
l'ht+leis a timt +(lelay between sL'trt+up and _at er fill _x_you
will not hem imy \_,,tsh action right il_,ay.
9

Aboutthe display.
Thedistrwasherremembersyour last
cy_lesoyoud#n} ha_ toreprogram
e_h time.
Dishwashing Shortcut
When khe dishw;L_he] is loaded and the door latch is
moved to the ON position, tile conlzol panel wil! display
the kkst sethngs you sclcclcd.
If you don't want to change any of the settings, simply
touch START
NOTE: If there h_usbeen a p(n_er failure, NORMAL _ash
and ENERGY SAVER DRY OFF_dll automatically be
progq_unmed. Make any new selections as desired and
touch START
These graphics show the selection NORMAL cycle with ENERGYSAVER
DRY OFF(Heated Dry) as it appears in the displag
Lycleselected Rinse_le ard m_hutesremainingin lhe_le
_le smrted i_d C'e_o_llevel ¢sbeingsor_ed Oryiag
Sod lewl determined D_shesclean _qd dry

Know thedisplay.
SENSINGSOIL
LEVEL l)ispl_t}cd _dlcn thu dish_v, hu, i', dctcunhlin_ the
;l[ll(lllnl o_ _oiI ill I}It_ ]<_;i({ ;llld _;lll ll];l[i[)_ t]l('_it)lOUlll oJ ¸
w_tt,}1 ti]]l_ llccd_'d.
LO HI
SOILLEVEL _ll<_ d_c ;llll()tllR (_J S(lil itl Ih(' It KI(I fl{)l) ) LO (i)]l(t I)HI
li_l/tcd} m Hll;dl fimi h,_,_ li!4hu d/
Numerals from N }(t+_tUmlU c'_h it/d_(.(_ u
1to 99 minutes
WASHING
R_S_G
DRWNG
CLEAN
I)i_,pl;t_cd dtu in_ pre wash, pre rinse _,nd main wash
I _i_,_ll__,l_ih_i m_ r_lse i!,._ii__l_,,l__11__i_lg _h_,rt_8/_lwash
I_i_ _,, __i_1_ __ I__ I_i_,, _ _il d___ i,,
LOCKED
Numeralsfrom
Ito 14HRS.DELAY
Ill(lit.lit _+I _lliTl<>[_';llt" II't kid it+ plt \_.llt lilKilll]lt qi/t' d ll_,t ,
XtIltIlltl _d }It+lu'_ i]i'l:_ Uttlil 'q,Lt t c_I i \i I_'
RESET I h_' RESETp._d _,a'. t. ,t. }wd
PFRESET Indi* .m,, ._p* ,_,t., t;nlt,z t., ,<_u,_,d

Aboutthe displaydiagnostic codes.
WhatIt Means
_ Electrical power to the
dishwasher has been
RESET interrupted but is now
back on.
What ToDo
IFDISHWASHERWASIN USEWHEN
THEPOWERFAILUREOCCURRED:
IPress the RESETpad and wait
approximately 30 seconds.
2Unlatch and open the door.
Aff the detergent cup is open and
empty and the dishwasher was set
for the NORMAL POTSPANSor
CHINACRYSTALcycle, close
door and put the load through a
RINSEHOLDcycle Atier the
RINSEHOLDcycle is completed,
add detergent and reset the load
for the washing Q'cle you want.
BIf the detergent cup is closed and
the dish'_asher was set for the
NORMALPOTSPANSor
CHINACRYSTALcycle, reset the
dishwasher lor the _lsh cycle
you want.
F!
LI
CIf the dishx_sher was set for the
RINSEHOLDcycle, reset the
dishwasher tbr RINSEHOLD.
IF THE DISHWASHER WAS NOT IN USE
when power t_tilure occulted, use
dish_asher as you normally would.
Slow draining. The
dishwasher is taking
longer than normal to
drain the water out.
This is usually caused
by a blockage in the drain
air gap, a kink in the
drain hose, or a
stopped-up pipe.
This dishwashel is designed to
autoinatically colnpensate for longer
than noz_nal drain times, hut cycle time
will be extended. If this code continues
to appear frequendy:
I(;lean the air gap.
2Check for a kink in the drain hose.
3Check plumbing ti)r slow or
stopped-up dndns.
NOTE:Wa_Tanty sezYice does not
cover household dndn problems.
12

E2
RESET
g3
RESET
What It Means What ToDo
Drain is blocked. This
indicates that the drain
is so dogged that the
dishwasher cannot
continue to operate in
asatisfactory manner.
Dishwasher will stop.
Press the RESETpadto stop the beep.
Locate and remove file blockage in the
drain system, To pump any remaining
water out of the machine:
1Latch the door.
2Select any cycle.
3Touch STARTand then immediately
touch RESET.
NOTE:Warranty service does not
cover household dxn,in problems.
Drain sensor is not
functioning.
Dishwasher will
continue cycle along
with afLxed drain period.
It [3 repeats for the next Qcle, call
tor selwice.
There is too much water
in the dishwasher. Press the RESETpad to stop the beep.
The dishwasber is designed to
automatically pump out extra water as
long as the door is latched. _,_n en you
hear the motor stop running:
IUnlatch the door and see if all the
WaIer iS golle.
2If you see water entering the
dishwasber, close and latch die door.
Shut oil the water supply to the
disbwasher.
3If water is gone and no water is
cnlcling the dishwasher, restart Q'clc.
4I1 'r-el repeaL% shutoffthewater
supply lo the dishwasher, Call tor
SeI_qCe.
13

Aboutthe display diagnosticcodes.
What It Means What ToDo
E5 Not enough water is
entering the dishwasher.
ES
P'-I
L I
OR
The drain pump could be
temporarily blocked
(usually caused by food
particles such as cereal).
The water temperature
in the dishwasher did not
reach the proper wash
temperature. This is
usually caused by lack of
hot water coming from the
household water heater.
Unlatch the door. If there is no water in
the bottom of the dishwasher, check the
water supply to the dishwasher.
Is the dish_r, asher _,qter supply turned on?
•Isthe household _,qtersupply turned on?
"If you use well or cistern _ter, is the
supply adequate?
If the water supply is adequate, try the
cTcleagain. If _Srepeats, call for ser_4ce.
Unlatch the door. ff there is standing
water in the bottom of the dishwasher,
relatch the door, touch START, then
immediately touch RESETto start the
pump. If urS continues to appe,'u, you
may need to do this seve1,ql times to
break up the blockage.
Avoid showez_ or launthTjust prior to
running the dishwasher. (Use the
DELAY STARTfeature to start dishwasher
when the _ter heater is up to nom_d
tempecature.) Adjust household
water heater thermostat to 120°F.
i_tinilrllAnl.
If E6 appears _{th evely' Q'cle and you
know the water fiom the water heater is
hot (120 °F. or more), call tbr sm-dce.
The temperature sensor
in the dishwasher is not
functioning properly.
Dishwasher may continue
to be used, but it will not
heat water automatically,
The tempe_,qture sensor needs to be
replaced. Call tor setx@e.
NOTE:You may contilme to use your
dishwasher. For best results a¢!iustyour
household watel heatei thoaaaostat
to 140°F.
ld
Before YouCall ForService
'lly the _T(le again to see if the _o(le reappears. The dishwasher may
conect itself.
In Electronic controls can be atlk:ctcd by outside interference. Shutting olt
power to the dishwasher (at the tiLse or circuit breakez ) could COITeCt
the problem. Re_tore powcl M_el 15 secoluls and tlT the c),cle again.
• Check tile guide t_)r things _)u can do to COtTeCt the problem.
• See the Trovb/eshoo_9 _ at the back of this manual.

About the soil sensorsystem.
Thedishwasher has an exclusive Soil Sensor System that measures the
amount of soil in the load.After the soil is measured the dishwasher decides
thelength of the main wash cycle and the number of rinses needed.
WATER TOTAL
CYCLE USAGE TIME
SEQUENCES GALLONSMINUTES
Normal Medium PreWash/!
LO-- HI Rinse 76 44-59
Normal Light PreWash/
LO- Hr _PreRinseI 65 36-5!
Pots Extra
Pans Heaw
Pots Heavy
Pans L0= -
_PreWa_h/j Pro Pe Pro Ma n Wash
!PreRinse Rinse 22 37 m122 57 82
PreRinseI
Pans L0-- _ _ins 93 58 73
Pots Light [P,eWaslVi Main Wash
Pans Eo- _fl LPreRin,e ,__ Z' 43-,8
I ]
PreWash/i
China Medium JPreRin_e
Crystal Lo- - H_
China Light
_rystal [o_ H= 5 g 29-39
Rinse !PreRinse
Hold 15 7
Orying Cycle Options
ENERGY SAVER DRY OFF (lqe;it_,d Dry). Avail;ll)]e on _lll w_sh _'cles
t'x_:_'pt RINSEHOLD.Add _8 minl=le_; Io _,_I_"li=n_'.
ENERGY SAVER DRYON l)i?,il_gh_'_ is lum_-d oil l)i_,l_s dI_
75

Using the dishwasher.
Checkthe WaterTemperature
The entenng water must be at least 120°F. and not more than
150°F., for effective cleaning and to prevent dish damage. Check
the water temperature _ith a candy or nleat thel_lometer. Tuna on
the hot water faucet nearest the dishwasher, place the thelTnometer
in aglass and let the water run continuously into the glass until the
temperature stops rising. Adjust your water heater, if needed.
Usinga RinseAgent
Arinse agent, such as JEt-DRY,makes _ter flow off the dishes
quickly thereby reducing water spotting.
Fill the rinse agent dispenser
until it reaches the bottom of lip
inside the opening. Replace cap.
To check ifdnse agent is needed,
remove the cap and look into the
dispenser. On some models, the
dispenser can be checked by
pressing the clear center of the
Jill(ap 2 ol 3 times. If nnse agent
fills the center of the fill cap, you
have enough.
A fulldispensershou/dlastabout3months.
If rinseagentspills,wipeit upimmediately Itcan keep yourdetergent
from working.
16

. • ProperUseof Detergent
Use only detergent specifically made for use in dishwashers. Keep
your detergent fresh and &T- Don't put powder detergent into the
dispenser until you're ready to wash dishes.
The amount of detergent to use depends on whether your water is
hardor so[t. With hard water, you need extra detergent. With soft
water, you need less detergent.
Protect your dishes and dishwasher by contacting your water
department and asking how hard your water is. Twelve or more
grains is extremely hard water. A water softener is recommended.
Without it, lime can build up in the water yah'e, which could stick
while open and cause flooding. Too much detergent with soft _v/ter
can cause a pem_mnt cloudiness ofglassx_vtre,called etchin9.
You'll find two detergent dispensers on the OpenCup
inside door of your dishw_her. All x_a_shcycles
require detergent hathe main cup. Wash cycles
with two washes Mll also use the open cup.
Be sure the control panel lights are not lit
before adding detergent. Othei'_ise, the
detergent cup MI1 riot close and latch MainCup
properly. Add detergent then close the
main cup.
IVOFE:'I'oopen detergent cup after it has
been closed, simply tuna the detergent cup
handle counter<lock,Mse undl it releases.
A snapping sound may be heard.
ForgettoAdd a Dish?
A forgotten dish can be added any time betbre the main wash.
_Push the door latch to the left.
_j_ Once the _watercalms, open the door. Steam nlay rise out oflhe
' dish_-asher.
_Add forgotten dishes.
_Close the door and push the latch to the fat nght.
/VOTE"llyou tim'got to lat01 the d ra reminder signal will beep
undl you do so. 17

Loadingthe dishwasher racks.
For best dishwashing results, follow these loading guidelines. Features and
appearance of racks and silverware baskets may vary from your model
Upper Rack
The upper rack isfor glasses,cups and saucers.
Cups and glassesfit best along ale sides. This is
alsoa secure place for dishwasher-safe plasdcs. A
cup shelf (on some models) may be placed in the
up oi down position to acid flexibility.The upper
i-ackisgood for all kinds ofodd-shaped utensils.
Saucepans, rnLxingbowls and odael items should
be p]aced face dmwa.
Securelargerdishwasher-safeplasticsevertwo fingers
whenpossible.
Makesuresmallplasticitemsaresecureso theycan'tfall
ontotheheadngelement
The Wash Tower
Keepthecenterareaclearin thelowerrack.
The wash tower rises through tbe center of the
]ow,2rrack during the wash alld ]i]lse portions o[
the cTcle.
Oon'tbleckit orloadtaflthingseaxttoi[
Also, be careful not to let a
portion of an iteln su(h as a pot or
dish handle extend dirough the
bottom rack. -I'his could block the
wash ann anti cause poor washing
results.
18

Lower Rack
Whenloadingthelowerrack,donotloadlargeplattersor
traysin thefrontrightcomer.Theymaypreventdetergent
fromcirculatingduringthewashcycle.
The lower rack is best used for plates, saucers,
and cookware. Large items such as broiler pans
and racks should go along the sides. Load
platters, pots and bowls along the sides, in
comers, or in the back. The soiled side of items
should face the center of the rack.
Fold<lown fingers (on some models) provide
flexibility for extra large and hard-to-fit items.
The fingers may be left in the up position or
tMded down to customize the lower rack.
Don'tletany
itemextend
throughbottom.
Silverware Basket
Put flatware in the removable basket with fork
and knife handles up to protect your hands. Place
spoons in the basket with handles down. Mix
knives, forks and spoons so they don't nest
together. Disu-ibute evenly. Small plastic items,
such as measuring spoons and lids from small
containers, should go in the bottom of the
silvervaare basket with silver-,rare on top.
To increase the tlexibility of the lower v,,tck, the
silvel'ware basket may be split. Gn_sp the basket at
opposite comers and slide apart. The basket
secthms should be placed in tim lower rock by
hanging them on the top hoop.
A sectu3ty cell cover (on
some models) hinged in
some handles (an be
lowered to eithel side to
secure lightweight items
t}oIn the efl(CkS ill the
vigorot is %_ash acUon. 19

Aboutoptional accessories.
Wood panel trim kits are available at an extra cost bycalling, toll-free,
800-625-2002.Yourorder will be sent directly to your home. VISA,
MasterCard and Discover cards are accepted.
WoodPanelTrimKits
Wood panel uim kits contain trim and instructions tbr adding a
decol_l tire wood dool- panel and bottonl access panel to n_atch
your kitchen cabinets.
SpeclTythe trim ofyour choice from thefollowlhg options.
', GPF45 1/4"Panel TrtPnKit (for all models except GSD4940)
'GPF463/4"Panel TrimKit
2O
Other manuals for Appliances GSD4410
3
This manual suits for next models
8
Table of contents
Other GE Dishwasher manuals

GE
GE PDWT380R10SS User manual

GE
GE GDF410SGFBB User manual

GE
GE GD 650-670 Series User manual

GE
GE GSC3500D00WW User manual

GE
GE GDT635 User manual

GE
GE GLDA690 User manual

GE
GE GLD4400N Manual

GE
GE GSM18 - Appliances 18 in. Dishwasher User manual

GE
GE Monogram ZBD 1800 User manual

GE
GE 165D4700P126 User manual
Popular Dishwasher manuals by other brands

Jenn-Air
Jenn-Air JDB9600CWT installation instructions

Bosch
Bosch SHX98M09UC - Fully Integrated Dishwasher use and care manual

Beko
Beko BDVO Series user manual

Indesit
Indesit D2FHK26B Daily reference guide

Bosch
Bosch SMU6ECW70S INFORMATION FOR USE

Viking Range
Viking Range Professional & Designer 325E Series Quick reference guide