GE Appliances Profile PVM2170 User manual

49-40644 02-11 GE
GEAppliances.com
Write the model and serial numbers here:
Model # __________________________
Serial # __________________________
You can find them on a label when the
door is open.
Microwave Oven
PVM2170
Owner’s Manual
Safety Instructions........2–6
Operating Instructions
Convenience Features. . . . . . . 12,13
Microwave Terms . . . . . . . . . . . . . . 15
Oven Features . . . . . . . . . . . . . . . .7, 8
Other Features . . . . . . . . . . . . . . . . . 14
PowerLevels....................9
Time Features. . . . . . . . . . . . . . . 10,11
Care and Cleaning .........16
Troubleshooting Tips ......18
Things That Are Normal . . . . . . . . 18
Consumer Support
Consumer Support. . . . . . . . . . . . . . 20
Warranty......................19
GE Profile

IMPORTANT SAFETY INSTRUCTIONS.
READ ALL INSTRUCTIONS BEFORE USING.
2
PRECAUTIONS TO AVOID POSSIBLE EXPOSURE
TO EXCESSIVE MICROWAVE ENERGY
(a) Do Not Attempt to operate this oven with the
door open since open-door operation can result
in harmful exposure to microwave energy. It
is important not to defeat or tamper with the
safety interlocks.
(b) Do Not Place any object between the oven front
face and the door or allow soil or cleaner residue
to accumulate on sealing surfaces.
(c) Do Not Operate the oven if it is damaged.
It is particularly important that the oven door
close properly and that there is no damage to
the:
(1) door (bent),
(2) hinges and latches (broken or loosened),
(3) door seals and sealing surfaces.
(d) The Oven Should Not be adjusted or repaired
by anyone except properly qualified service
personnel.
WARNING: To reduce the risk of burns, electric shock, fire, injury to persons, or exposure to excessive
microwave energy:
When using electrical appliances basic safety precautions should be followed, including the following:
SAVE THESE INSTRUCTIONS
nRead all instructions before using
this appliance. When using electrical appliances, basic
safety precautions should be followed, including the
following:
nRead and follow the specific precautions in the Precautions
to Avoid Possible Exposure to Excessive Microwave Energy
section above.
nThis appliance must be grounded. Connect only to a properly
grounded outlet. See the Grounding Instructions section on
page 6.
nThis microwave oven is UL listed for installation over both
gas (less than 60,000BTU) and electric ranges.
nThis over-the-range oven is designed for use over ranges no
wider than 36.″It may be installed over both gas and electric
cooking equipment.
nDo not operate this appliance if it has a damaged power
cord or plug, if it is not working properly, or if it has been
damaged or dropped. If the power cord is damaged, it must
be replaced by General Electric Service or an authorized
service agent using a power cord available from General
Electric.
nInstall or locate this appliance only in accordance with the
provided installation instructions.
nTo reduce the risk of fire in the oven cavity:
—Donotovercookfood.Carefullyattendappliancewhen
paper, plastic or other combustible materials are placed
inside the oven while cooking.
—Removewiretwist-tiesandmetalhandlesfrompaperor
plastic containers before placing them in the oven.
—Donotusetheovenforstoragepurposes.Donotleave
paper products, cooking utensils or food in the oven when
not in use.
—Donotpoppopcorninyourmicrowaveovenunlessina
special microwave popcorn accessory or unless you use
popcorn labeled for use in microwave ovens.
—Ifmaterialsinsidetheovenignite,keeptheovendoorclosed,
turn the oven off and disconnect the power cord, or shut
off power at the fuse or circuit breaker panel. If the door is
opened, the fire may spread.
—DonotusetheSensorFeaturestwiceinsuccession
on the same food portion. If food is undercooked after the
first countdown, use COOK BY TIME for additional cooking
time.
—Donotusetheoventodrynewspaper.

3
GEAppliances.com
IMPORTANT SAFETY INSTRUCTIONS.
nThermometer—Do not use regular cooking or oven
thermometers when cooking by microwave. The metal and
mercury in these thermometers could cause arcing and
possible damage to the oven. Do not use a thermometer
in food you are microwaving unless the thermometer is
designed or recommended for use in the microwave oven.
nDo not clean with metal scouring pads. Pieces can burn off
the pad and touch electrical parts involving risk of electric
shock.
nDo not store any materials, other than our recommended
accessories, in this oven when not in use.
nDo not store this appliance outdoors. Do not use this product
nearwater—forexample,inawetbasement,
near a swimming pool, near a sink or in similar locations.
nKeep power cord away from heated surfaces.
nDo not immerse power cord or plug in water.
nDo not block or cover any openings on the appliance.
nThis microwave is not approved or tested for marine use.
nUse this appliance only for its intended use as described in
this manual.
nDo not use corrosive chemicals or vapors in this appliance.
nThis microwave oven is specifically designed to heat, dry or
cook food, and is not intended for laboratory or industrial use.
n Someproductssuchaswholeeggsandsealedcontainers—
forexample,closedjars—areabletoexplodeandshould
not be heated in this microwave oven. Such use of the
microwave oven could result
in injury.
nIt is important to keep the area clean where the door
seals against the microwave. Use only mild, non-abrasive
detergents applied with a clean sponge or soft cloth. Rinse
well.
nThis appliance must only be serviced by qualified service
personnel. Contact nearest authorized service facility for
examination, repair or adjustment.
nAs with any appliance, close supervision is necessary when
used by children.
nDo not store anything directly on top of the microwave oven
surface when the microwave oven is in operation.
nDo not mount this appliance over a sink.
nDo not let the cord hand over edge of counter.
nDo not use paper products in oven when appliance is
operated in any cooking mode except microwave only.
ARCING
If you see arcing, press the CANCEL/OFF button and correct the problem.
Arcing is the microwave term for sparks in the oven.
Arcing is caused by:
nThe metal shelf not installed correctly so it
touches the microwave wall.
nMetal or foil touching the side of the oven.
nTurntable ring support not installed correctly.
nFoil not molded to food (upturned edges act
like antennas).
nMetal, such as twist-ties, poultry pins, or gold-
rimmed dishes, in the microwave.
nRecycled paper towels containing small metal
pieces being used in the microwave.
WARNING!
SAVE THESE INSTRUCTIONS

4
IMPORTANT SAFETY INSTRUCTIONS.
READ ALL INSTRUCTIONS BEFORE USING.
FOODS
nDo not pop popcorn in your microwave oven unless
in a special microwave popcorn accessory
or unless you use popcorn labeled for use in
microwave ovens.
nDo not boil eggs in a microwave oven. Pressure will
build up inside egg yolk and will cause it to burst,
possibly resulting in injury.
nOperating the microwave with no food inside for
more than a minute or two may cause damage
to the oven and could start a fire. It increases the
heat around the magnetron and can shorten
the life of the oven.
nFoods with unbroken outer “skin” such as potatoes,
hot dogs, sausages, tomatoes, apples, chicken livers
and other giblets, and egg yolks should be pierced to
allow steam to escape
during cooking.
nSUPERHEATED WATER
Liquids, such as water, coffee, or tea, are able to
be overheated beyond the boiling point without
appearing to be boiling. Visible bubbling or boiling
when the container is removed from the microwave
oven is not always present. THIS COULD RESULT IN
VERY HOT LIQUIDS SUDDENLY BOILING OVER WHEN
THE CONTAINER IS DISTURBED OR A SPOON OR
OTHER UTENSIL IS INSERTED INTO THE LIQUID.
To reduce the risk of injury to persons:
—Donotoverheattheliquid.
—Stirtheliquidbothbeforeandhalfwaythrough
heating it.
—Donotusestraight-sidedcontainerswithnarrow
necks.
—Afterheating,allowthecontainertostandinthe
microwave oven for a short time before removing
the container.
—Useextremecarewheninsertingaspoonorother
utensil into the container.
nFoods cooked in liquids (such as pasta) may
tend to boil more rapidly than foods containing less
moisture. Should this occur, refer to the
Care and cleaning of the microwave oven section
for instructions on how to clean the inside of
the oven.
nAvoid heating baby food in glass jars, even with
the lid off. Make sure all infant food is thoroughly
cooked. Stir food to distribute the heat evenly.
Be careful to prevent scalding when warming
formula. The container may feel cooler than the
formula really is. Always test the formula before
feeding the baby.
nDon’t defrost frozen beverages in narrow-necked
bottles (especially carbonated beverages). Even if the
container is opened, pressure can build up. This can
cause the container to burst, possibly resulting in
injury.
nHot foods and steam can cause burns. Be careful
when opening any containers of hot food, including
popcorn bags, cooking pouches and boxes. To
prevent possible injury, direct steam away from
hands and face.
nDo not overcook potatoes. They could dehydrate
and catch fire, causing damage to your oven.
n Cookmeatandpoultrythoroughly—meattoat
least an INTERNAL temperature of 160°F and poultry
to at least an INTERNAL temperature of 180°F.
Cooking to these temperatures usually protects
against foodborne illness.
WARNING!
SAVE THESE INSTRUCTIONS

5
GEAppliances.com
MICROWAVE-SAFE COOKWARE
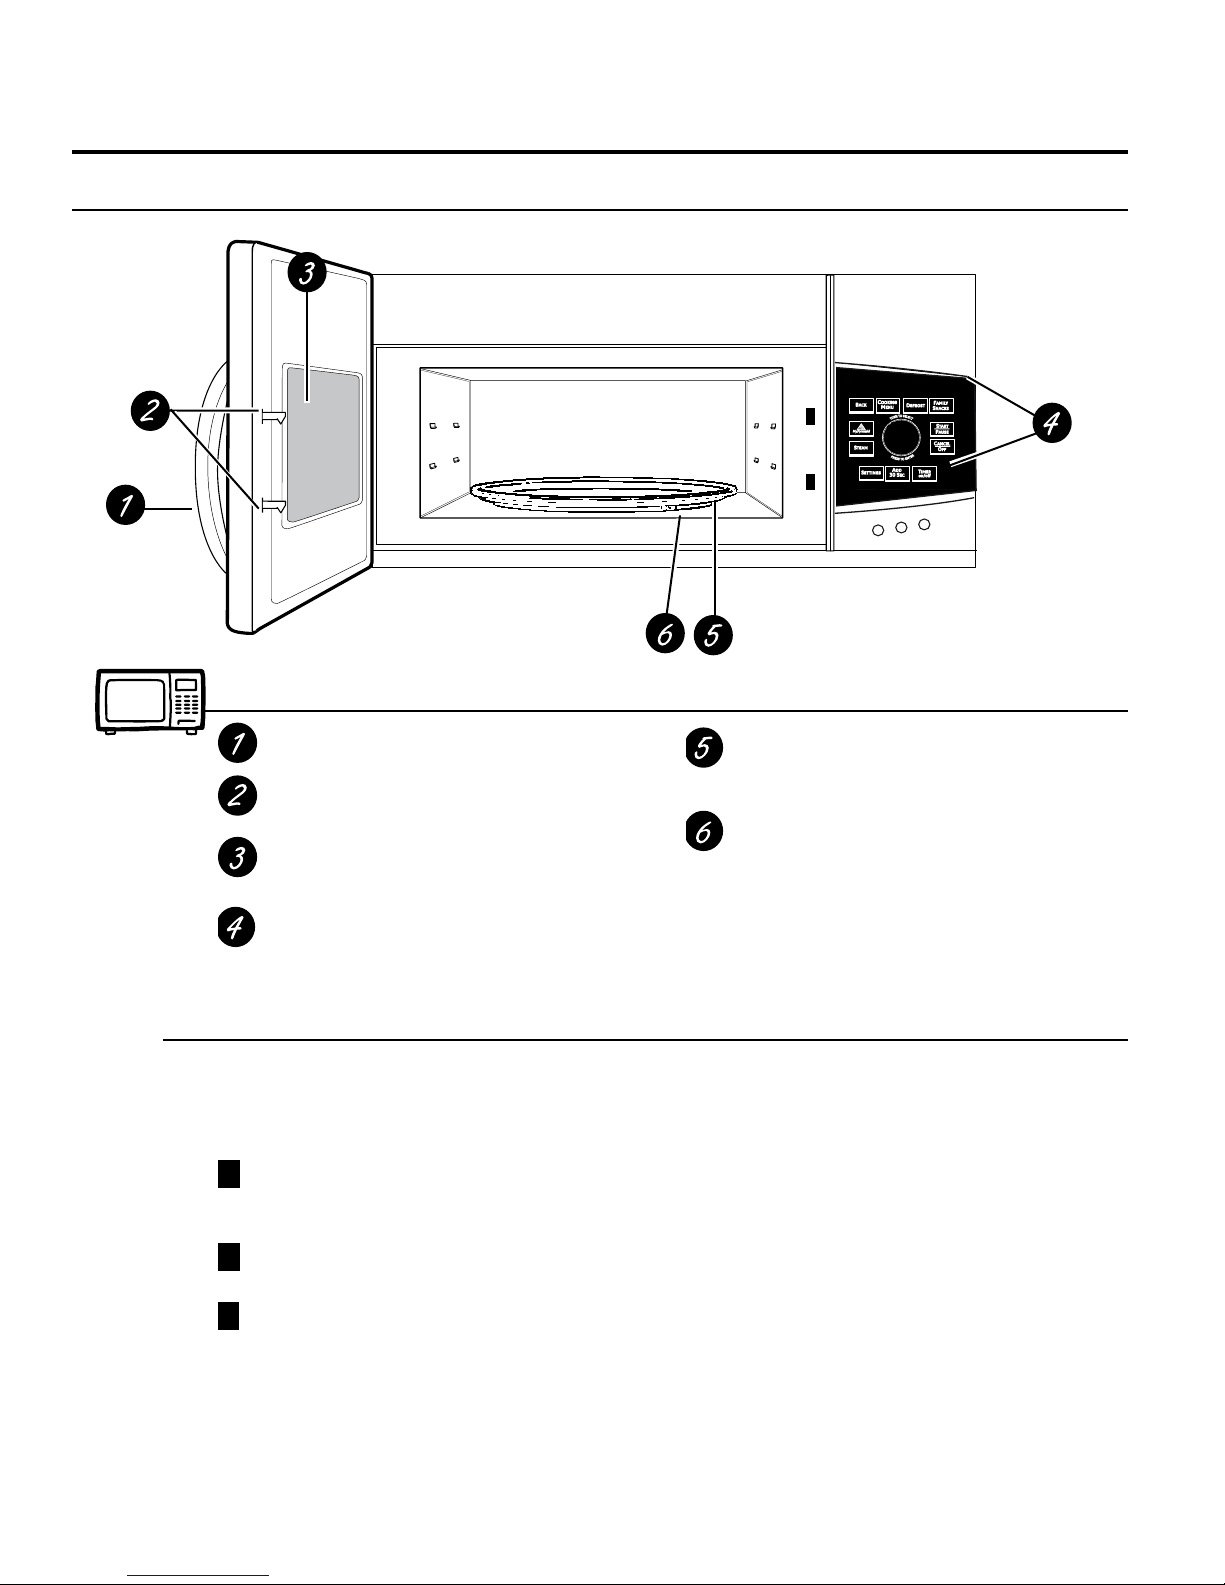
Do not operate the oven in the microwave mode without the turntable and the turntable support
seated and in place. The turntable must be unrestricted so it can rotate.
Make sure all cookware used in your microwave oven is suitable for microwaving. Most glass casseroles,
cooking dishes, measuring cups, custard cups, pottery or china dinnerware which does not have metallic
trim or glaze with a metallic sheen can be used. Some cookware is labeled “suitable for microwaving.”
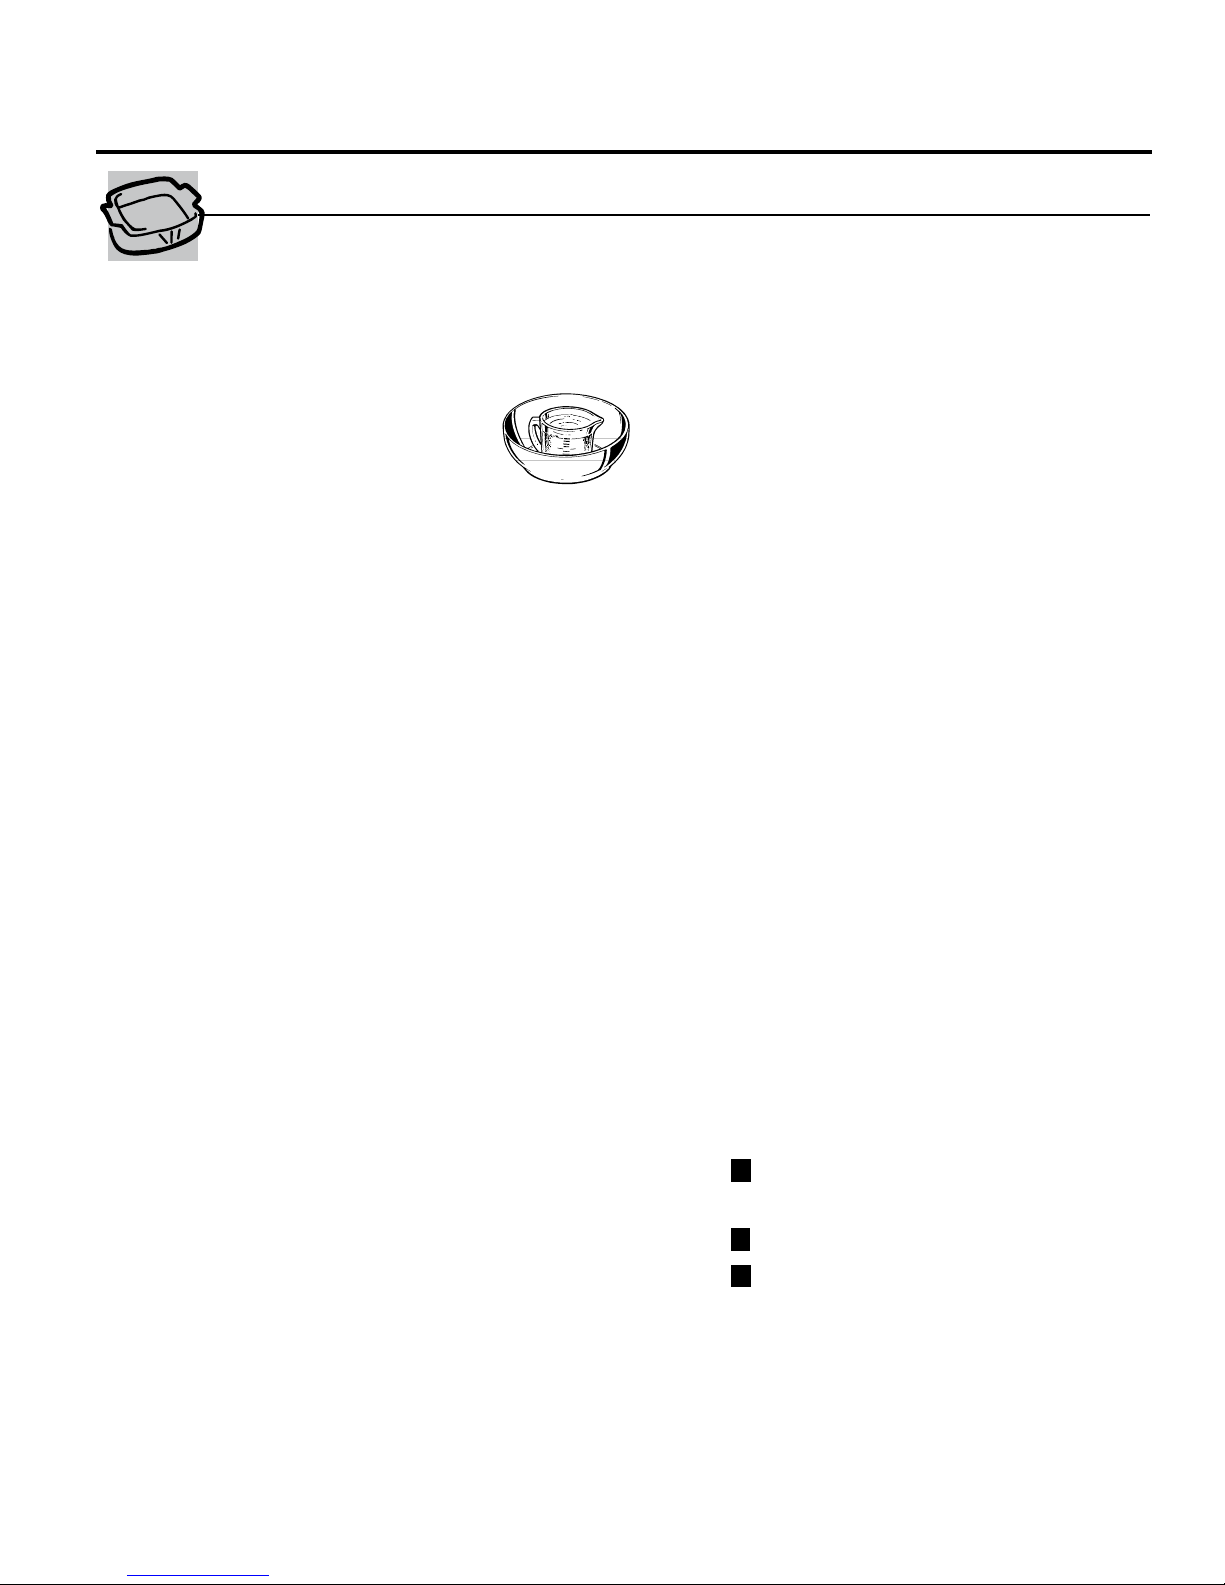
nIf you are not sure if a dish
is microwave-safe,
use this test: Place in the
oven both the dish you
are testing and a glass
measuring cup filled with
1cupofwater—setthe
measuring cup either
in or next to the dish. Microwave 30–45 seconds
at high. If the dish heats, it should not be used for
microwaving.
If the dish remains cool and only the water in
the cup heats, then the dish is microwave-safe.
nOversized food or oversized metal cookware should
not be used in a microwave/convection oven
because they increase the risk of electric shock and
could cause a fire.
nSometimes the oven floor, turntable and walls
can become too hot to touch. Be careful touching
the floor, turntable and walls during and after
cooking.
nIf you use a meat thermometer while microwaving,
make sure it is safe for use in microwave ovens.
nDo not use recycled paper products. Recycled paper
towels, napkins and waxed paper can contain metal
flecks which may cause arcing
or ignite. Paper products containing nylon or nylon
filaments should be avoided, as they
may also ignite.
nSome styrofoam trays (like those that meat
is packaged on) have a thin strip of metal embedded
in the bottom. When microwaved,
the metal can burn the floor of the oven or
ignite a paper towel.
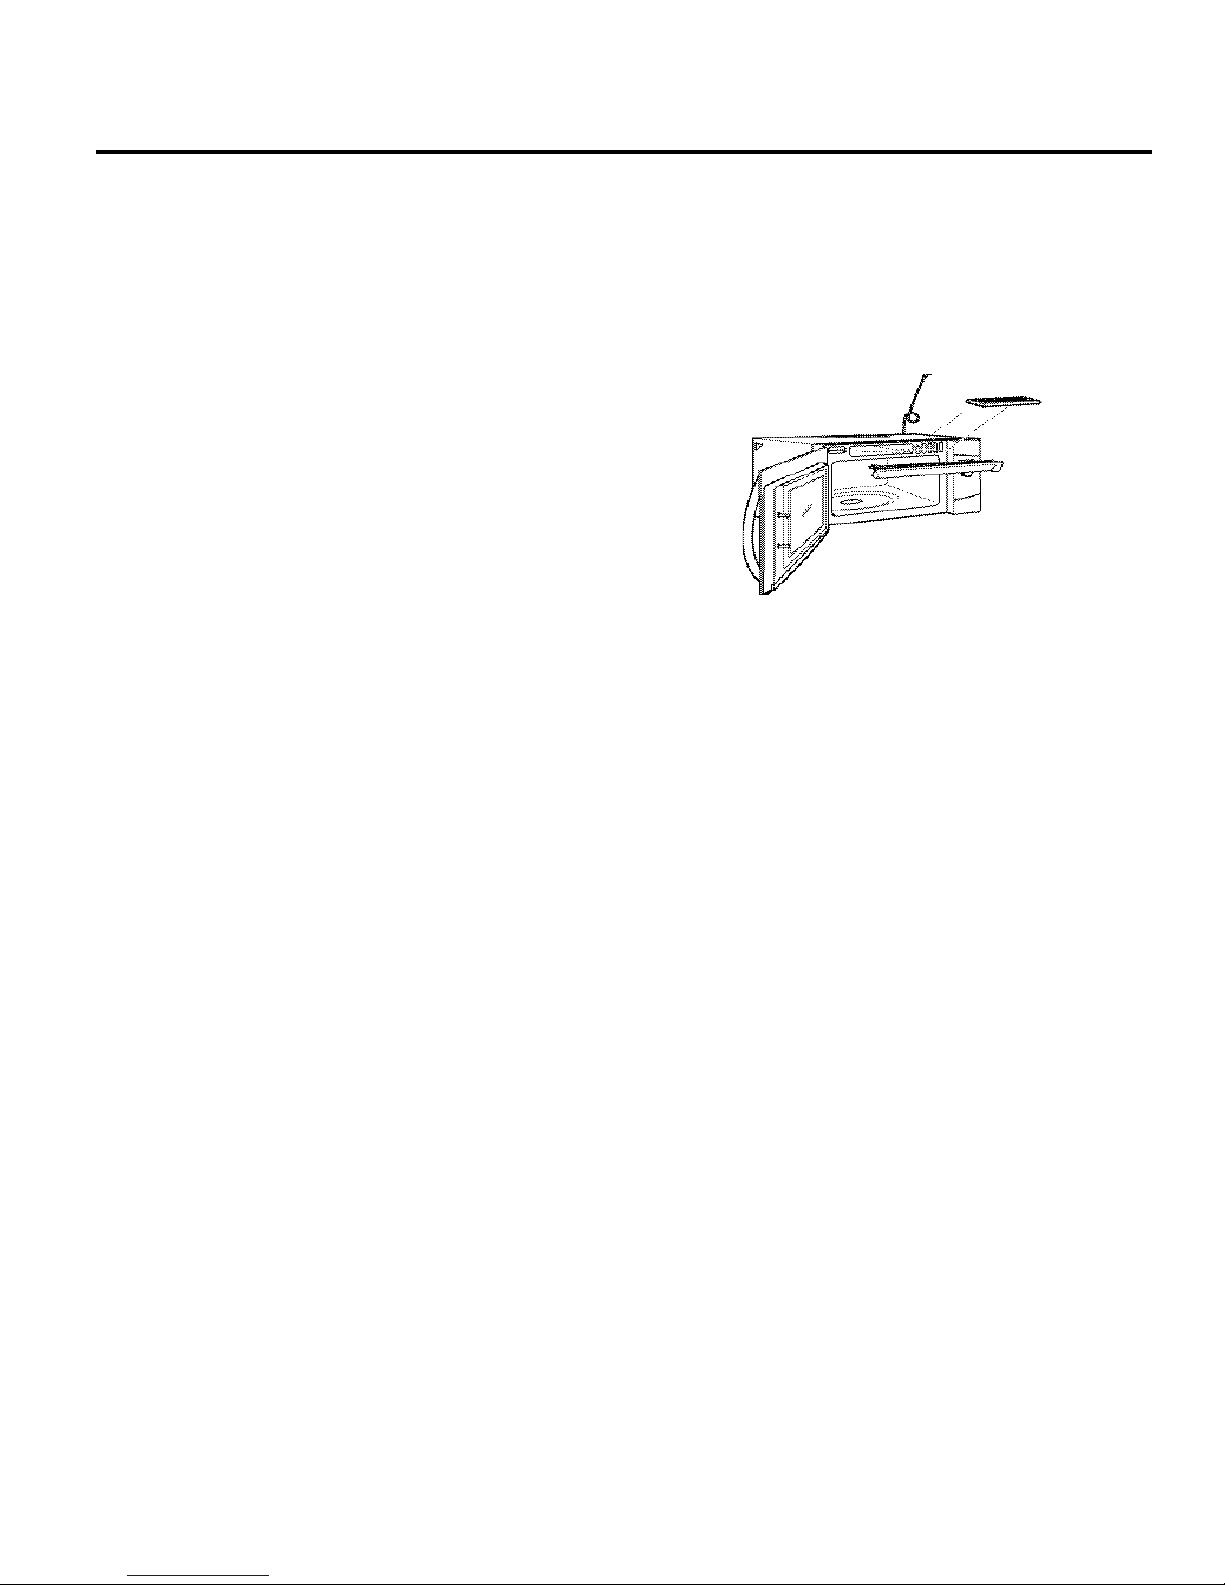
nUse of the shelf accessory:
—Removetheshelffromtheovenwhen
not in use.
—Usepotholderswhenhandlingtheshelfand
cookware. They may be hot.
—Besurethattheshelfispositionedproperlyinside
the oven to prevent product damage.
—Donotcovertheshelforanypartoftheovenwith
metal foil. This will cause overheating of
the microwave/convection oven.
nDo not use your microwave oven to dry newspapers.
nNot all plastic wrap is suitable for use in microwave
ovens. Check the package for proper use.
nPaper towels, waxed paper and plastic
wrap can be used to cover dishes in order to retain
moisture and prevent spattering while microwaving.
Be sure to vent plastic wrap so steam can escape.
nCookware may become hot because of heat
transferred from the heated food. Pot holders
may be needed to handle the cookware.
nWhen microwaving “boilable” cooking pouches
and tightly closed plastic bags, they should be slit,
pierced or vented as directed by package. If they
are not, plastic could burst during or immediately
after cooking, possibly resulting in injury. Also, plastic
storage containers should be at least partially
uncovered because they form a tight seal. When
cooking with containers tightly covered with plastic
wrap, remove covering carefully and direct steam
away from hands and face.
nUse foil only as directed in this manual. When using
foil in the microwave oven, keep the foil at least 1”
away from the sides of the oven.
n Plasticcookware—Plasticcookwaredesignedfor
microwave cooking is very useful, but should be
used carefully. Even microwave-safe plastic may
not be as tolerant of overcooking conditions as
are glass or ceramic materials and may soften or
char if subjected to short periods of overcooking.
In longer exposures to overcooking, the food and
cookware could ignite.
Follow these guidelines:
1Use microwave-safe plastics only and use
them in strict compliance with the cookware
manufacturer’s recommendations.
2Do not microwave empty containers.
3Do not permit children to use plastic cookware
without complete supervision.
How to test for a
microwave-safe dish.
SAVE THESE INSTRUCTIONS

6
IMPORTANT SAFETY INFORMATION.
READ ALL INSTRUCTIONS BEFORE USING.
GROUNDING INSTRUCTIONS
This appliance must be
grounded. In the event of
an electrical short circuit,
grounding reduces the risk of
electric shock by providing an
escape wire
for the electric current.
This appliance is equipped with a power cord having a
grounding wire with a grounding plug. The plug must
be plugged into an outlet that is properly installed and
grounded.
Consult a qualified electrician or service technician if the
grounding instructions are not completely understood,
or if doubt exists as to whether the appliance is properly
grounded.
If the outlet is a standard 2-prong wall outlet, it is your
personal responsibility and obligation to have it replaced
with a properly grounded 3-prong wall outlet.
Do not under any circumstances cut or remove the third
(ground) prong from the power cord.
Do not use an adapter plug with this appliance.
Do not use an extension cord with this appliance.
If the power cord is too short, have a qualified electrician
or service technician install an outlet
near the appliance.
For best operation, plug this appliance into its own
electrical outlet to prevent flickering of lights, blowing of
fuse or tripping of circuit breaker.
WARNING: Improper use of the grounding plug can result in a risk of electric shock.
THE VENT FAN
The fan will operate automatically under certain
conditions (see Automatic Fan feature). Take care to
prevent the starting and spreading of accidental cooking
fires while the vent fan is in use.
nClean the underside of the microwave often.
Do not allow grease to build up on the microwave or
the fan filters.
nIn the event of a grease fire on the surface units below
the microwave oven, smother a flaming pan on the
surface unit by covering the pan completely with a lid,
a cookie sheet or a flat tray.
nUse care when cleaning the vent fan filters. Corrosive
cleaning agents, such as lye-based oven cleaners, may
damage the filters.
nWhen preparing flaming foods under the microwave,
turn the fan on.
nNever leave surface units beneath your microwave
oven unattended at high heat settings. Boilovers
cause smoking and greasy spillovers that may ignite
and spread if the microwave vent fan is operating. To
minimize automatic fan operation, use adequate sized
cookware and use high heat on surface units only
when necessary.
Ensure proper ground
exists before use.
SAVE THESE INSTRUCTIONS
READ AND FOLLOW THIS SAFETY INFORMATION CAREFULLY.
Most pacemakers are shielded from interference from electronic products, including microwaves. However,
patients with pacemakers may wish to consult their physicians if they have concerns.
PACEMAKERS
WARNING!

7
GEAppliances.comOptional kits
Filler Panel Kits
nJX52WH—White
nJX52BL—Black
When replacing a 36” range hood, filler panel kits
fill in the additional width to provide a custom
built-in appearance.
For installation between cabinets only; not for end-
of-cabinet installation. Each kit contains two 3”
wide filler panels.
Filter Kits
nJX81J—Recirculating Charcoal Filter Kit
Filter kits are used when the oven cannot be
vented to the outside.
See back cover to order by phone or at ge.com.
Available at extra cost from your GE supplier.

8
T
IMER
on/off
S
ETTINGS
A
DD
30 S
EC
S
TART
P
AUSE
C
ANCEL
O
FF
D
EFROST
B
ACK
C
OOKING
M
ENU
F
AMILY
T
U
R
N
T
O
S
E
L
E
C
T
P
R
E
S
S
T
O
E
N
T
E
R
S
TEAM
S
NACKS
About the features of your oven.
Throughout this manual, features and appearance may vary from your model.
Features of the Oven
Door Handle.
Door Latches.
Window with Metal Shield. Screen allows
cooking to be viewed while keeping microwaves
confined in the oven.
Control Panel and Dial.
Removable Turntable. Do not operate the oven
in the microwave mode without the turntable
and turntable support seated and in place.
Removable Turntable Support. Do not operate
the oven in the microwave mode without the
turntable and turntable support seated and in
place.
Energy Saver Feature (on some models)
Your GE microwave has an Energy Saver feature. Many electronic appliances, including Microwaves, consume
electric power while they are switched off or in a standby mode. Eliminating standby power can reduce your
operating costs.
To ACTIVATE the Energy Saver Feature—
1Press the Energy Saver button on the unit, and the unit will turn off. (Note: If utilizing this feature, the clock will
not be displayed on the unit.)
To DEACTIVATE the Energy Saver Feature —
1Press the Energy Saver button on the unit, and the unit will turn on. The display will read “On” If the unit has
had power aplied recently (within the last few days), the time will be remembered.
2If prompted, enter the time of day.
NOTE: The time keeping device that keeps your clock running will need to be recharged every few days. It is
recommended that once a week you should leave the unit powered on (do not use the energy saver feature) for
at least 24 hours. If you are prompted to enter a time when turning on from the energy saver mode, you should
have the unit powered on for at least 48 hours. When you first install your unit, you should leave it powered on for
at least 48 hours.

9
About the cooking features of your
microwave oven. GEAppliances.com
TIMER
on/off
SETTINGS ADD
30 SEC
START
PAUSE
CANCEL
OFF
DEFROST
BACK COOKING
MENU
T
U
R
N
T
O
S
E
L
E
C
T
P
R
E
S
S
T
O
E
N
T
E
R
STEAM
FAMILY
SNACKS
Cooking Controls
Time Features
Press Enter
COOKING MENU Food type, Cook Type, etc.
DEFROST Time, Weight, Food Type or 1lb Quick Defrost
SETTINGS
TIMER
ADD 30 SEC Starts immediately!
Convenience Features
Press Enter
STEAM
Enter pad to select Food
My Pyramid
Enter pad to select Food
FAMILY SNACKS
Enter pad to select Food
Check the Convenience Guide before you begin.

10
About the time features.
Time Cook
Time Cook I
Allows you to microwave for any time between
15 seconds and 95 minutes.
Power level 10 (High) is automatically set,
but you may change it for more flexibility.
1Press the COOKING MENU button.
2Turn the dial to select Cook by Time.
3Set the time.
4Set the power level.
4Press the dial or the START/PAUSE button
to start cooking.
You may open the door during Time Cook
to check the food. Close the door and press the
dial or START/PAUSE to resume cooking.
NOTE:You may change the cook time at any
time during cooking by turning the dial or
by pressing the dial to edit the cook settings.
You may also change the power level by
pressing the dial to edit the cook settings.
Time Cook I & II
Lets you change power levels automatically
during cooking. Here’s how to do it:
1Press the COOKING MENU button.
2Turn the dial to select Cook by Time I & II.
3Set time 1
4Set the first Power Level.
5Set time 2
6Set the second Power Level.
7Press the dial or the START/PAUSE button
to start cooking.
At the end of Time Cook I, Time Cook II counts
down.
NOTE:You may change the cook time at any
time during cooking by turning the dial or
by pressing the dial to edit the cook settings.
You may also change the power level by
pressing the dial to edit the cook settings.
T
U
R
N
T
O
S
E
L
E
C
T
P
R
E
S
S
T
O
E
N
T
E
R
COOKING
MENU
START
PAUSE
Using the Dial
You can make selections on the oven by
turning the dial and pressing it to enter
the selection.
Pressing the dial can also be used in place
of the START/PAUSE button for quicker
programming of the oven.
T
U
R
N
T
O
S
E
L
E
C
T
P
R
E
S
S
T
O
E
N
T
E
R
ADD 30 SEC
This is a quick way to set and start cooking
in 30 second blocks each time the ADD 30
SEC button is pressed. The cook time may be
changed by turning the dial at any time during
cooking.
The power level will automatically be set
at 10 and the oven will start immediately.
The power level can be changed as time is
counting down by pressing the dial to edit the
cook settings.
T
U
R
N
T
O
S
E
L
E
C
T
P
R
E
S
S
T
O
E
N
T
E
R
ADD
30 SEC

Food Time Comments
Breads, Cakes
Bread, buns, or rolls (1 piece) 1/4 min.
Sweet rolls (approx. 12 oz.) 2 to 4 min. Rearrange after half the time.
Fish and Seafood
Fillets, frozen (1 lb.) 6 to 9 min.
Fruit
Plastic pouch—1 or 2 1 to 5 min.
(10-oz. package)
Meat
Bacon (1 lb.) 2 to 5 min. Place unopened package in oven. Let stand 5 minutes after defrosting.
Franks (1 lb.) 2 to 5 min. Place unopened package in oven. Microwave just until franks can be separated.
Let stand 5 minutes, if necessary, to complete defrosting.
Ground meat (1 lb.) 4 to 6 min. Turn meat over after first half of time.
Roast: beef, lamb, veal, pork
9 to 13 min.
Use power level 10.
per lb.
Steaks, chops and cutlets 4 to 8 min. Place unwrapped meat in cooking dish. Turn over after first half of time and
per lb. shield warm areas with foil. After second half of time, separate pieces with table
knife. Let stand to complete defrosting.
Poultry
Chicken, broiler-fryer, cut up
14 to 20 min.
Place wrapped chicken in dish. Unwrap and turn over after first half of time. After
(21⁄2to 3 lbs.)
second half of time, separate pieces and place in cooking dish. Microwave 2 to 4
minutes more, if necessary. Let stand a few minutes to finish defrosting.
Chicken, whole (21⁄2to 3 lbs.)
20 to 25 min.
Place wrapped chicken in dish. After half the time, unwrap and turn chicken over.
Shield warm areas with foil. To complete defrosting, run cold water in the cavity
until giblets can be removed.
Cornish hen 7 to 13 min. Place unwrapped hen in the oven breast-side-up. Turn over after first half of time.
per lb. Run cool water in the cavity until giblets can be removed.
Turkey breast (4 to 6 lbs.) 3 to 8 min. Place unwrapped breast in microwave-safe dish breast-side-down. After first half
per lb. of time, turn breast-side-up and shield warm areas with foil. Defrost for second
half of time. Let stand 1 to 2 hours in refrigerator to complete defrosting.
GEAppliances.com
Defrosting Guide
11
T
U
R
N
T
O
S
E
L
E
C
T
P
R
E
S
S
T
O
E
N
T
E
R
DEFROST
START
PAUSE
Time Defrost
Use Time Defrost to defrost for a selected
length of time.
1Press the DEFROST button.
2Turn the dial to select Defrost by Time.
3Turn the dial to select the time you want.
Press the dial to enter.
4Press the START/PAUSE button to start
defrosting.
5Turn the food over if the oven signals TURN
FOOD OVER.
You may change the defrost time at any time
during defrosting by turning the dial.
Power level is automatically set at 3, but can be
changed. You can defrost small items quickly by
raising the power level after entering the time.
Power level 7 cuts the total defrosting time in
about half; power level 10 cuts the total time
to approximately 1/3. However, food will need
more frequent attention than usual.
A dull thumping noise may be heard during
defrosting. This is normal when oven is not
operating at High power.
Defrosting Tips
n
Foods frozen in paper or plastic can be
defrosted in the package. Closed packages
should be slit, pierced or vented AFTER
food has partially defrosted. Plastic storage
containers should be partially uncovered.
nFamily-size, prepackaged frozen dinners can
be defrosted and microwaved. If the food is in
a foil container, transfer it to
a microwave-safe dish.
nFoods that spoil easily should not be allowed
to sit out for more than one hour after
defrosting. Room temperature promotes the
growth of harmful bacteria.
nFor more even defrosting of larger foods,
such as roasts, use Auto Defrost. Be sure
large meats are completely defrosted before
cooking.
nWhen defrosted, food should be cool
but softened in all areas. If still slightly icy,
return to the microwave very briefly, or
let it stand a few minutes.

12
About the convenience features.
If the weight of food is stated in pounds and
ounces, the ounces must be converted to
tenths (.1) of a pound.
Ounces Pounds
1–2 .1
3 .2
4–5 .3
6–7 .4
8 .5
9–10 .6
11 .7
12–13 .8
14–15 .9
Conversion Guide
1 lb Quick Defrost
1 lb Quick Defrost automatically sets the
defrosting times and power levels to give even
defrosting results for meats, poultry and fish
weighing one pound.
nRemove meat from package and place on
microwave-safe dish.
1Press the DEFROST button.
2Turn the dial to “1lb Quick Defrost”, then
press the dial to enter.
3Press the START/PAUSE button or the dial
to start defrosting.
4Turn the food over if the oven signals TURN
FOOD OVER.
nRemove defrosted meat or shield warm
areas with small pieces of foil.
nAfter defrosting, most meats need to stand 5
minutes to complete defrosting.
Weight Defrost (Do not use the shelves
when microwave cooking.)
Use Weight Defrost for meat, poultry and fish
weighing up to six pounds.
Use Weight Defrost
for most other frozen foods.
Weight Defrost automatically sets the
defrosting times and power levels to give even
defrosting results for meats, poultry and fish.
nRemove meat from package and place
on microwave-safe dish.
1Press the DEFROST button.
2Turn the dial to “Defrost by Weight”, then
press the dial to enter.
3Turn the dial to the food weight,
using the Conversion Guide below.
For example, dial 1.2 for 1.2 pounds
(1 pound, 3 oz.) Press the dial to enter.
4Press the START/PAUSE button or the dial to
start defrosting.
5Turn the food over if the oven signals TURN
FOOD OVER.
nRemove defrosted meat or shield warm
areas with small pieces of foil.
nAfter defrosting, most meats need to stand 5
minutes to complete defrosting. Large roasts
should stand for about 30 minutes.
T
U
R
N
T
O
S
E
L
E
C
T
P
R
E
S
S
T
O
E
N
T
E
R
DEFROST
START
PAUSE
T
U
R
N
T
O
S
E
L
E
C
T
P
R
E
S
S
T
O
E
N
T
E
R
DEFROST
START
PAUSE

13
About the MyPyramid Feature. GEAppliances.com
MyPyramid Feature
Allows you to microwave healthy food choices
by servings or with sensor.
1Press MyPyramid pad.
2Turn the dial to enter the food type you
want. Press the dial to enter. See Cooking
Guide for MyPyramid below or check the
display for food types.
3Enter the specific food you want, then
enter the amount if prompted.
4Press the dial or the START/PAUSE button
to start cooking.
NOTE FOR SENSOR COOKING: for best
results do not open the door while cooking
For non-sensor food, you may open the door
during cooking to check the food. Close the
door and press START to resume cooking.
NOTE: Do not use the sensor features twice in
succession on the same food portion. If food
is undercooked after the first countdown, use
TIME COOK for additional time.
Cooking Guide for MyPyramid Feature
NOTE: Use power level 10 unless otherwise noted.
T
U
R
N
T
O
S
E
L
E
C
T
P
R
E
S
S
T
O
E
N
T
E
R
START
PAUSE
First Choice Second Choice Third Choice
Grain Rice 1/2 cup, 1 cup, 1 1/2 cups
Oatmeal 1 to 4 packets
Popcorn 1oz, 3.0 ozs, 3.5 ozs
Macaroni 1/2 cup, 1 cup, 1 1/2 cups
Quinoa 1/2 cup, 1 cup, 1 1/2 cups
Vegetables Asparagus Fresh, Frozen, Canned
Broccoli Fresh, Frozen
Beans Canned
Green Beans Fresh, Frozen, Canned
Carrots Fresh, Frozen, Canned
Corn Fresh Cobs (1 to 4), Frozen, Canned
Peas Fresh, Frozen, Canned
Potatoes Baking, Sweet
Spinach Fresh, Frozen, Canned
Ground Meat
Poultry Bone-in Chicken
Bonless Chicken
Seafood Whitefish
Tilapia
Salmon

14
About the sensor microwave features.
Steam
Use the Steam feature to steam certain pre-
programmed foods. For best performance, please
use a NordicWare Rice Cooker/Steamer Bowl.
1
Press the Steam button.
2
Turn the dial to
select the food you wish to
steam. Press the dial to enter
3Place steamer bowl with water, salt (if
necessary), and food in the microwave with
the steam vents on the steamer bowl in the
OPEN position.
4Press START/PAUSE or turn the dial to begin
cooking.
5When prompted, open the door and CLOSE
the steam vents on the steamer bowl.
6Close the door and press START/PAUSE to
resume cooking.
NOTE: The NordicWare Rice Cooker/Steamer Bowl
should be used for best cooking results.
STEAM
Family Snacks
Use the Family Snacks feature to cook from a
variety of pre-programmed family snack items.
1
Press the Family Snacks button.
2
Turn the dial to
select the food you wish to
cook. Press the dial to enter
3Enter an amount for the snack selected.
4Press START/PAUSE to start cooking.
First Choice Second Choice
Burrito 1 to 3
Chicken Nuggets 1 to 2 servings
Oatmeal 1 to 4 packets
Instant Macaroni and Cheese 1 to 2 servings
Canned Pasta 1 to 2 cans
Hot Dogs 1 to 4
Pizza (5 inch)
Hot Chocolate 1 to 3 cups
Soften
Use the Soften feature to soften certain pre-
programmed foods:
1
Press cooking menu or defrost button.
2
Turn the dial to the Soften. Press the dial to
enter.
3
Turn the dial to
select the food you wish to
Soften. Press the dial to enter
4Enter an amount for the food selected.
5Press START/PAUSE to start cooking.
First Choice Second Choice
Butter 1/2 Stick; 1 Stick; 2 Sticks
Cream Cheese 3 ounces; 8 ounces
Ice Cream 1 pint; 1 quart;
Melt
Use the Melt feature to melt certain pre-
programmed foods:
1
Press cooking menu or defrost button.
2
Turn the dial to the Melt. Press the dial to enter.
3
Turn the dial to
select the food you wish to
Melt. Press the dial to enter
4Enter an amount for the food selected.
5Press START/PAUSE to start cooking.
First Choice Second Choice
Butter 1/2 Stick; 1 Stick;
2 Sticks
Caramel 4 ounces; 8 ounces;
12 ounces; 16 ounces
Chocolate 4 ounces; 8 ounces;
12 ounces; 16 ounces
Marshmallows 5 ounces; 8 ounces;
10 ounces; 16 ounces
FAMILY
SNACKS
T
U
R
N
T
O
S
E
L
E
C
T
P
R
E
S
S
T
O
E
N
T
E
R
T
U
R
N
T
O
S
E
L
E
C
T
P
R
E
S
S
T
O
E
N
T
E
R
First Choice Second Choice
Rice 1 - 1 cup white,
2 - 1 cup brown
Asparagus 1 to 2 cups
Broccoli 1 to 2 cups
Brussel Sprouts 1 to 2 cups
Carrots 1 to 2 cups
Cauliower 1 to 2 cups
Zucchini 1 to 2 cups

15
About changing the power level. GEAppliances.com
The power level may be entered or changed
immediately after entering the time for Time
Cook, Time Defrost or Express Cook. The
power level may also be changed during time
countdown.
1First, follow directions for Time Cook, Time
Defrost or Express Cook.
2Press the POWER button.
3Press the dial to accept the time and enter
power level editing.
4Turn the dial clockwise to increase and
counterclockwise to decrease the power
level. Press the dial to enter.
Variable power levels add flexibility to
microwave cooking. The power levels on the
microwave oven can be compared to the
surface units on a range. Each power level gives
you microwave energy a certain percent of the
time. Power level 7 is microwave energy 70%
of the time. Power level 3 is energy 30% of the
time. Most cooking will be done on High (power
level 10) which gives you 100% power. Power
level 10 will cook faster but food may need
more frequent stirring, rotating or turning over.
A lower setting will cook more evenly and need
less stirring or rotating of the food. Some foods
may have better flavor, texture or appearance
if one of the lower settings is used. Use a lower
power level when cooking foods that have
a tendency to boil over, such as scalloped
potatoes.
Rest periods (when the microwave energy
cycles off) give time for the food to “equalize”
or transfer heat to the inside of the food. An
example of this is shown with power level 3—
the defrost cycle. If microwave energy did not
cycle off, the outside of the food would cook
before the inside was defrosted.
Here are some examples of uses for various
power levels:
High 10: Fish, bacon, vegetables, heating
liquids.
Med-High 7: Gentle cooking of meat and
poultry; baking casseroles and reheating.
Medium 5: Slow cooking and tenderizing for
stews and less tender cuts of meat.
Low 2 or 3: Defrosting; simmering; delicate
sauces.
Warm 1: Keeping food warm; softening butter.
T
U
R
N
T
O
S
E
L
E
C
T
P
R
E
S
S
T
O
E
N
T
E
R
START
PAUSE

Humidity Sensor
What happens when using the Sensor Features:
The Sensor Features detect the increasing humidity released during cooking. The oven
automatically adjusts the cooking time to various types and amounts of food.
DonotusetheSensorFeaturestwiceinsuccessiononthesamefoodportion—itmayresultin
severely overcooked or burnt food. If food is undercooked after the countdown, use Time Cook for
additional cooking time.
nThe proper containers and covers are essential for best sensor cooking.
nAlways use microwave-safe containers and cover them with lids or vented plastic wrap. Never
usetightsealingplasticcontainers—theycanpreventsteamfromescapingandcausefoodto
overcook.
nBe sure the outside of the cooking containers and the inside of the microwave oven are dry
before placing food in the oven. Beads of moisture turning into steam can mislead the sensor.
Dry off dishes so they don’t
mislead the sensor.
Vented
Covered
About the sensor microwave features.
16

17
Arcing Arcing is the microwave term for sparks in the oven. Arcing is caused by:
nmetal or foil touching the side of the oven.
nfoil that is not molded to food (upturned edges act like antennas).
nmetal such as twist-ties, poultry pins, gold-rimmed dishes.
nrecycled paper towels containing small metal pieces.
Covering Covers hold in moisture, allow for more even heating and reduce cooking time. Venting plastic wrap
or covering with wax paper allows excess steam to escape.
Shielding In a regular oven, you shield chicken breasts or baked foods to prevent over-browning. When
microwaving, you use small strips of foil to shield thin parts, such as the tips of wings and legs
on poultry, which would cook before larger parts.
Standing Time When you cook with regular ovens, foods such as roasts or cakes are allowed to stand to finish cooking
or to set. Standing time is especially important in microwave cooking. Note that a microwaved cake
is not placed on a cooling rack.
Venting After covering a dish with plastic wrap, you vent the plastic wrap by turning back one corner so
excess steam can escape.
Term Definition
Microwave terms. GEAppliances.com

18
About the other features.
Clock
Press the Settings button to enter the time of
day.
1Press the Settings button.
2Turn the dial to
select Clock Settings. Press the
dial to enter.
3Turn the dial to
enter the time of day. Press the
dial to enter.
4Press Settings to accept the time.
S
TART
P
AUSE
Start/Pause
In addition to starting many functions, START/
PAUSE allows you to stop cooking without
opening the door or clearing the display.
Control Lock-Out
You may lock the control panel to prevent the
oven from being accidentally started during
cleaning or being used by children.
To lock or unlock the controls, press and
hold the CANCEL/OFF button for about three
seconds. When the control panel is locked,
CONTROL LOCKED will be displayed briefly
anytime a button or dial is pressed.
Cooking Complete Reminder
To remind you that you have food in the oven,
the oven will display YOUR FOOD IS READY and
beep once a minute until you either open the
oven door or press the CANCEL/OFF button.
Cancel/Off
Press the CANCEL/OFF button to stop and
cancel cooking at any time.
CANCEL
OFF
CANCEL
OFF
Surface Light
Press SURFACE LIGHT once for bright light,
twice for the night light or a third time to turn
the light off.
Timer
The Timer operates as a minute timer and can
be used at any time, even when the oven is
operating.
1Press the TIMER button.
2Turn the dial to enter a time. Press the dial
to enter.
3Press the TIMER button to start.
To cancel, press the TIMER button.
When time is up, the oven will signal.
To turn off the timer signal, press TIMER.
NOTE: The display will say TIMER while the timer
is operating if running a timer while working,
the timer will be shown on the right side of the
display, you edit the timer while cooking by
pressing the dial to enter editing, and rotating
it until the timer selection is hghlighted, then
pressing the dial.
TIMER
on/off
S
ETTINGS

Vent Fan
The vent fan removes steam and other vapors
from surface cooking.
Press VENT FAN once for boost fan speed,
twice for high fan speed, three times for
medium fan speed, four times for low fan speed
or five time to turn the fan off.
Automatic Fan
An automatic fan feature protects the
microwave from too much heat rising from the
cooktop below it. It automatically turns on if it
senses too much heat.
If you have turned the fan on you may find that
you cannot turn it off. The fan will automatically
turn off when the internal parts are cool. It
may stay on for 30 minutes or more after the
cooktop and microwave controls are turned off.
Vent
GEAppliances.com
Turntable On/Off
For best cooking results, leave the turntable on.
It can be turned off for large dishes.
1Press the Settings button.
2Turn the dial to
select Turntable ON/OFF. Press
the dial to enter.
3Turn the dial to
select Turntable ON or
Turntable OFF. Press the dial to enter.
Sometimes the turntable can become too hot
to touch.
Be careful touching the turntable during and
after cooking.
Auto Nite Light
The Auto Nite Light can be set to come on and
go off at desired times.
1Press the Settings button.
2Turn the dial to
select Auto Night Light. Press
the dial to enter.
3Turn the dial to
select to turn the feature off,
review the feature, or set the feature. Press the
dial to enter.
4(If selecting to set the feature) Rotate the
dial to set the desired on and off times,
pushing the dial to select the times.
NOTE: Auto Night Light will not come on when
Energy Saver button is engaged. Auto nite light
will always activate the light to the night setting
at the programmed on time, even if the light is
already set to the bright setting. Auto nite light
will always turn the light off at the programmed
off time, even if you have turned the light to
bright.
Beeper Volume
Use to set the beeper volume level.
1Press the Settings button.
2Turn the dial to
select Beeper Volume. Press
the dial to enter.
3Turn the dial to
select to select the desired
volume level. Press the dial to enter.
NOTE: Some beeper noises will always be a pre-set
volume level and cannot be changed.
19
SETTINGS
SETTINGS
SETTINGS
Reminder
The reminder feature cn be used like an alarm
clock to sound a beeper signal at a defined time
of day.
1Press the Settings button.
2Turn the dial to
select Reminder. Press the dial
to enter.
3Turn the dial to
select to clear, review or set the
reminder.
4(If setting the reminder) Rotate the dial to
nter the desired time of day for the
reminder event to occur. Push the dial to
select the times.
SETTINGS

20
Care and cleaning of the oven.
Helpful Hints
An occasional thorough wiping with a solution of baking soda and water keeps the inside fresh.
Be sure the power is off before cleaning any part of this oven.
How to Clean the Inside
Walls, Floor, Inside Window, Metal and Plastic Parts on the Door
Some spatters can be removed with a paper towel; others may require a damp cloth. Remove
greasy spatters with a sudsy cloth, then rinse with a damp cloth. Do not use
abrasive cleaners or sharp utensils on oven walls.
Never use a commercial oven cleaner on any part of your microwave.
Removable Turntable and Turntable Support
To prevent breakage, do not place the turntable into water just after cooking. Wash it carefully
in warm, sudsy water or in the dishwasher. The turntable and support can be broken if dropped.
Remember, do not operate the oven in the microwave mode without the turntable and support
seated and in place.
Shelves
Clean with mild soap and water or in the dishwasher.
Do not clean in a self-cleaning oven.
How to Clean the Outside
We recommend against using cleaners with ammonia or alcohol, as they can damage the
appearance of the microwave oven. If you choose to use a common household cleaner, first
apply the cleaner directly to a clean cloth, then wipe the soiled area.
Case
Clean the outside of the microwave with a sudsy cloth. Rinse and then dry. Wipe the window clean
with a damp cloth.
Control Panel
Wipe with a damp cloth. Dry thoroughly. Do not use cleaning sprays, large amounts of soap and
water,abrasivesorsharpobjectsonthepanel—theycandamageit.Somepapertowelscanalso
scratch the control panel.
Door Panel
Before cleaning the front door panel, make sure you know what type of panel you have. Refer to
the eighth digit of the model number. “S” is stainless steel, “L” is CleanSteel and “B”, “W” or “C” are
plastic colors.
Stainless Steel (on some models)
The stainless steel panel can be cleaned with Stainless Steel Magic or a similar product using a
clean, soft cloth. Apply stainless cleaner carefully to avoid the surrounding plastic parts. Do not use
appliance wax, polish, bleach or products containing chlorine on Stainless Steel finishes.
TIMER
on/off
SETTINGS ADD
30SEC
START
PAUSE
CANCEL
OFF
DEFROST
BACK COOKING
MENU STEAM
T
U
R
N
T
O
S
E
L
E
C
T
P
R
E
S
S
T
O
E
N
T
E
R
TIMER
on/off
SETTINGS ADD
30SEC
START
PAUSE
CANCEL
OFF
DEFROST
BACK COOKING
MENU STEAM
T
U
R
N
T
O
S
E
L
E
C
T
P
R
E
S
S
T
O
E
N
T
E
R
T
IMER
on/off
S
ETTINGS
A
DD
30S
EC
S
TART
P
AUSE
C
ANCEL
O
FF
D
EFROST
B
ACK
C
OOKING
M
ENU
S
TEAM
T
U
R
N
T
O
S
E
L
E
C
T
P
R
E
S
S
T
O
E
N
T
E
R
Other manuals for Appliances Profile PVM2170
1
Table of contents
Other GE Microwave Oven manuals

GE
GE Profile Advantium SCB1001M User manual

GE
GE Appliances DVM1950 How to use

GE
GE JES1460DN User manual

GE
GE Appliances PEB1590 User manual

GE
GE JE1455L Use and care manual

GE
GE JES623 Use and care manual

GE
GE JVM3150 User manual

GE
GE Spacemaker JVM1540DMBB User manual

GE
GE Spacemaker II Use and care manual

GE
GE JE1440 User manual