GE JHP70GN User manual

Microwave Cooking Center
b
Safety instructions ....................2-8
Operating Instructionsr Tips
Aluminum Foil......................,5, 7, 34, 36-38
Electronic Control Features 12
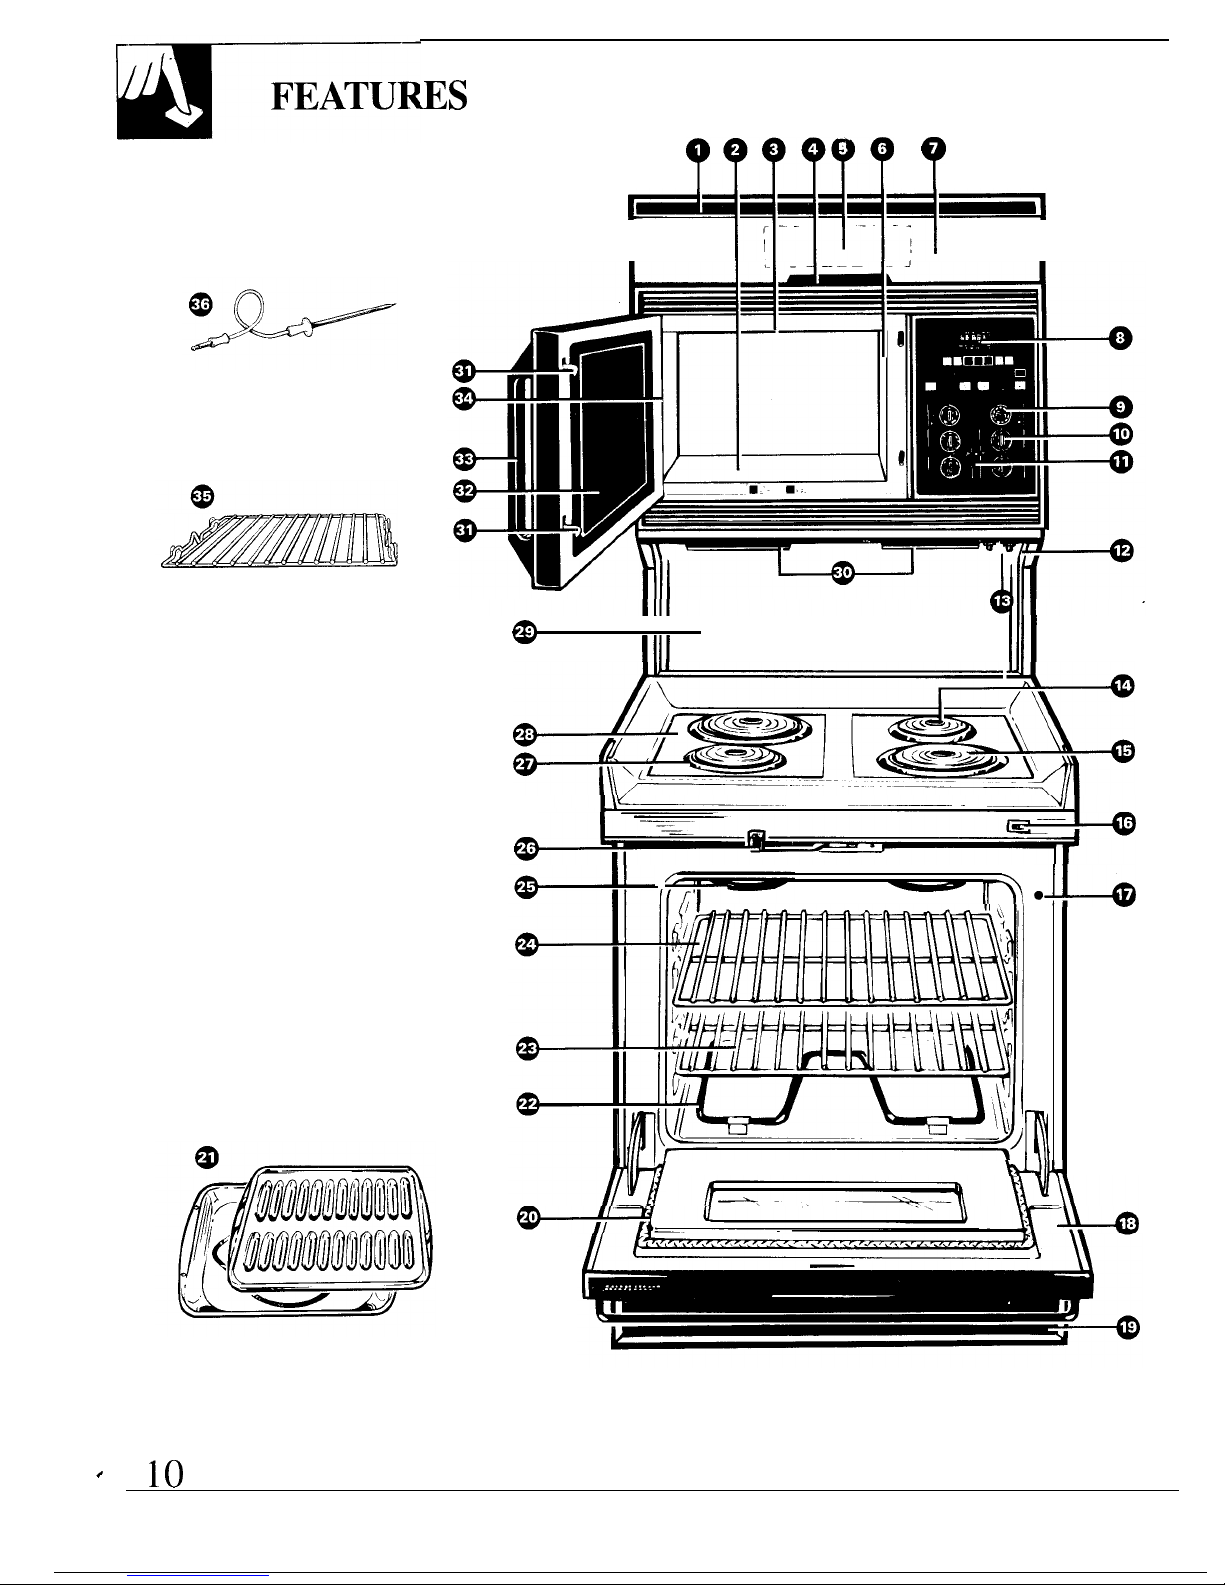
Features . . . . . . . . . . . . . . . . . . . . . . . . . . . . . . . . . . . . . . . . . . . . . . . . . .
.
10, 11
Exhaust System ............................................42
Lower Oven............................................29.4 1
Baking ..................................................3 1-34
Broiling ..37, 38
Controls ..............,,...,,...,,,..,,.30, 32,35,39
Roasting .................,...,,...,.................;.3 5, 36
Self-Cleaning Oven .......,...,,..,,....,.....39-41
Shelves ......,......................7, 29, 33,35, 39
Timed Baking .........................,,,..,.......3 1, 32
Microwave Oven 13–26
Automatic Cooking ..........................22-25
Automatic Defrosting ......................20, 21
Automatic Roasting ..................,....,.. 18, 19
Automatic
Simmer,,,
. . . . . . . . . . . . . . . . . . . . . . . .
.
18, 19
Cooking By
Temperature,..,,,..,
. . . . . . . . . . . . . .
.
17
Cooking by Time . . . . . . . . . . . . . . . . . . . . . . . . . . . . . . . . . . . . . .
.
16
Double
DutyT~
Shelf .....................6, 24, 26
Defrosting by Time.,, . . . . . . . . . . . . . . . . . . . . . . . . . . . . . . . . 15
Hold Time 14
Minute/Second Timer 13, 14
Probe . . . . . . . . . . . . . . . . . . . . . . . . . . . . . . . . . . . . . . . . . . . . . . . . . . . .
.
17, 18
Surface Cooking, . . . . . . . . . . . . . . . . . . . . . . . . . . . . . . . . . . . 27,28
Controls ......................................................2 7
Problem Solver
.......................4g,
50
Thermostat
Adjustment–
Do It Yourself...............................,.. ,....,.........30
More questions
?...call
GE Answer Center” 800.626.2000
Care
and Cleaning
...............,,43
-48
Broiler Pan and Rack ...................,,..,,,.........46
Cooktop..........................................................46
Cooktop Surface Light,...,....,......................48
Lower Oven Door.............................,..,...,,..,45
Lower Oven Light ...........................,........,...48
Microwave Oven..,,....................................,.43
Microwave Oven Lamp .............................,44
Probe . . . . . . . . . . . . . . . . . . . . . . . . . . . . . . . . . . . . . . . . . . . . . .
.
..............,44
Removal of Packaging Tape .........,............43
Surface Unit/Drip Pans ..................,...,,,....,46
Preparation
Flooring and Leveling ...................,,...,,...,,....,9
Consumer Services
..,................5l
Important Phone Numbers ........................5l
Model and Serial Numbers .,...,....................2
Warranty ..,.....,...............................Back Cover
The electrical
ou(out
of the microwave oven
in this cooking center is 800 watts.
(IEC-705
Test Procedure)
GE Appliances
Model
J’HP70GN
MN[
162 Re~ 5

HELP US HELP YOU...
Before using your cooking center, read
this book carefully.
It is intended to help you operate and maintain your
new cooking center properly.
Keep it handy for answers to your questions.
If you don’t understand something or need more help,
write (include your phone number):
Consumer Affairs
GE Appliances
Appliance Park
Louisville, KY 40225
Write down the model and serial numbers.
You’ll find them on a label inside the upper oven
on the left side.
These numbers are also on the Consumer Product
Ownership Registration Card that came with your
cooking center. Before sending in this card, please
write these numbers here:
Model Number
Serial Number
Use these numbers in any correspondence or service
calls concerning your cooking center.
Be sure your cooking center is registered.
It is important that we, the manufacturer. know the
location of your cooking center should
a
need occur
for adjustments.
Your supplier is responsible for registering you
as the owner.
Please check with your supplier to be sure he has
done so; also send in your Consumer product
Ownership Registration Card. If you
mo~e,
or if
you are not the original purchaser please write to us,
stating model and serial numbers.
This appliance
must be registered. Please be certain that it is.
Write to:
GE Appliances
Range Product Service
Appliance Park
Louisville, KY 40225
If you received a damaged cooking center...
Immediately contact the dealer (or builder) that sold
you the cooking center.
Save time and money.
Before you request service...
Check the Problem Solver in the back of this guide.
It
lists
causes of minor operating problems that
yoLl
can
comect
yourself.
IF YOU NEED SERVICE
To obtain service, see the Consumer Services page in NEXT, if you are still not pleased, write all the
the back of this guide. details—including your phone number—to:
We’re proud of our service and want you to be
Manager, Consumer Relations
‘
pleased. If for some reason you are not happy with the GE Appliances
service you receive, here are three steps to follow for Appliance Park
further help. Louisville, KY 40225
FIRST, contact the people who serviced your FINALLY, if your problem is
still
not resolved, write:
appliance. Explain why you are not pleased. In most Major Appliance Consumer Action Panel
cases, this will solve the problem. 20 North Wacker Drive
.,..
Chicago, IL 60606
PRECAUTIONS TO AVOID POSSIBLE EXPOSURE TO
EXCESSIVE MICROWAVE ENERGY
(a) Do Not Attempt
to operate this oven with the
(c)
Do Not Operate the
oven if it is damaged. It is
door open since open-door operation can result particularly important that the oven door close
in harmful exposure to microwave energy. It is properly and that there is no damage to the:
important not to defeat or tamper with the safety (1) door (bent)
interlocks. (2) hinges and latches (broken or loosened)
(b) Do Not Place
any object between the oven f’rent (3) door seals and sealing surfaces.
face and the door or allow soil or cleaner residue
(d) The Oven Should Not
be adjusted
or
repaired by
2
to accumulate on sealing surfaces. anyone except properly qualified service personnel.

.
n
IMPORTANT SAFETY INSTRUCTIONS
Read all instructions before using this appliance.
IMPORTANT SAFETY NOTICE
●
The California Safe Drinking Water and Toxic
Enforcement Act
requires
the
Governor
of
California to publish a list of substances known to
the state to cause birth defects or other
reproductive harm, and requires businesses to
warn customers of potential exposure to such
substances.
●
The fiberglass insulation in self-clean ovens
gives off a very small amount of carbon
monoxide during the cleaning cycle.
Exposure
can be minimized by venting with an open
window or using a ventilation fan or hood.
●
Fluorescent light bulbs contain mercury.
If your model has
q
surface lamp, you must
recycle the fluorescent light bulb according to
local, state and federal codes.
When using electrical appliances basic safety
precautions should be followed, including
the following:
~.RNING—Toreduce
theriskofburns,
electric shock, fire, injury to persons or exposure to
excessive microwave energy:
●
Use this appliance only for its intended use
as described in this manual.
●
Have the installer show you the location
of the circuit breaker or fuse.
Mark it for
easy reference.
“
Be sure your appliance is properly
installed and grounded by a qualified
technician
in accordance with the provided
Installation Instructions.
●
This appliance must be connected to a
grounded, metallic, permanent wiring system,
or an equipment grounding conductor should
be run with the circuit conductors and connected
to the equipment grounding terminal or lead on
the appliance.
“
This appliance should be serviced only by
qualified service personnel.
Contact nearest
authorized service facility for examination, repair
or adjustment. Do not repair or replace any part of
this appliance unless specifically recommended in
this book. All other servicing should be referred to
a qualified technician.
●
Before performing any service, DISCONNECT
THE COOKING CENTER POWER SUPPLY
AT THE HOUSEHOLD DISTRIBUTION
PANEL BY
REMOVING THE FUSE OR
SWITCHING OFF THE CIRCUIT BREAKER.
●
Do not store flammable materials in an oven or
near the cooktop.
●
Do not cover or block any openings on the
appliance.
●
Do not store this appliance outdoors.
Do not use
this product near water—for example, in a wet
basement, or near a swimming pool.
●
This cooking center is not approved or tested
for marine use.
●
Do not operate this appliance if it has a
damaged cord or plug,
if it is not working
properly, or if it has been damaged or dropped.
●
Do not leave children alone-children should
not be left alone or unattended in area where
appliance is in use. They should never be allowed
to sit or stand on any part of the appliance.
c
Do not allow anyone to climb, stand or hang
on the door, drawer or cooktop.
They could
damage the cooking center and even tip it over
causing severe personal injury.
●
CAUTION:
ITEMS
OF
INTEREST TO
CHILDREN SHOULD NOT BE STORED IN
CABINETS ABOVE A COOKING CENTER OR
ON THE COOKTOP— CHILDREN CLIMBING
ON THE COOKING CENTER TO REACH
ITEMS COULD BE SERIOUSLY INJURED.
●
Teach children not to play with the controls or
any other part of the cooking center.
●
Never leave the oven door open when you are
not watching the oven.
●
Never wear loose fitting or hanging garments
while using the appliance.
Flammable material
could be ignited if brought in contact with hot
heating elements and may cause severe burns.
(continued next page)
3“

J
!
●
IMPORTANT SAFETY INSTRUCTIONS
(continued)
●
Use only dry pot holders—moist or
damp pot holders on hot surfaces may
result in burns from steam.
Do not let
pot holders touch hot surface units. Do not use a
towel or other bulky cloth. Such cloths can catch
fire on a hot surface unit,
●
For your safety, never use your appliance for
warming or heating the room.
●
Do not leave paper products, cooking utensils,
or food in the oven when not in use.
●
Always keep dish towels, dish cloths, pot
holders, and other linens a safe distance from
your oven.
●
Always keep wooden spoons and plastic
utensils and canned food a safe distance away
from your oven.
$
Always keep combustible wall coverings,
curtains or drapes a safe distance from
your oven.
“
DO NOT STORE OR USE COMBUSTIBLE
MATERIALS, GASOLINE OR OTHER
FLAMMABLE VAPORS AND LIQUIDS
IN
THE VICINITY OF THIS OR ANY
OTHERAPPLIANCE.
●
Keep hood and grease inters clean to maintain
good venting and to avoid grease fires.
●
Do not let cooking grease or other flammable
materials
”accumulate
in the cooking center
or near it.
f!!!%’
h
$
It
●
Do not use water on grease fires.
b..
Never pick up a flaming pan.
Smother
flaming pan on surface unit by covering
pan completely with well-fitting lid, cookie sheet
or flat tray, or if available, use a dry chemical or
foam-type extinguisher.
Flaming grease outside a pan can be put out
by covering with baking soda or, if available,
a multi-purpose dry chemical or foam-type fire
extinguisher,
Flame in the oven can be smothered completely
by closing the oven door and turning the oven
control to OFF or use a dry chemical or foam-type
extinguisher.
s
Do not touch the surface or oven units or the
interior surface of the oven.
These surfaces may
be hot enough to burn even though they are dark
in color. During and after use, do not touch, or let
clothing or other flammable materials contact
surface units, areas nearby surface units or any
interior area of the oven; allow sufficient time for
cooling, first.
Potentially hot surfaces include the cooktop, areas
facing the cooktop, oven vent openings, surfaces near
the openings, and crevices around the oven door.
Remember:
The inside surface of the oven may
be hot when the door is opened.
●
When cooking pork,
follow the directions
exactly and always cook the meat to an internal
temperature of at least
170°F.
This assures that, in
the remote possibility that trichina may be present
in the meat, it will be killed and the meat will be
safe to eat.
4

—
Iicrowave Oven:
9
Avoid heating baby
food in glass jars,
even without
their
lids; especially meat and
~
Read and follow the specific PRECAUTIONS
TO AVOID POSSIBLE EXPOSURE
TO
egg mixtures,
EXCESSIVE MICROWAVE ENERGY section.
●
Do
not
boil eggs in a microwave oven.
Pressure will build up inside
the egg yolk and will
●
To reduce the risk of fire
in the oven
cavity:
cause it to burst, possibly resulting in injury.
—Do not overcook food. Carefully attend appliance
* Foods with
unbrokfin
outer
“skin”
such as
if paper, plastic or other combustible materials are
potatoes, sausages, tomatoes,
appies,
chicken
placed inside the oven to facilitate cooking.
livers and other giblets, and egg yolks should be
—Remove wire twist-ties and metal handles from
pierced to
allow
steam
to
esca.pfi
during cooking.
paper or plastic containers before placing them
●
Da not defrost frozen beverages in
narrow-
necked bottles (especially carbonated beverages).
Even if the container is opened, pressure can build
up. This can cause the
containerlo
burst, possibly
resulting in injury.
in the oven.
—Do not use your microwave oven to dry
newspapers.
—Do not use
recycled
paper products.
Recycled paper towels, napkins and wax paper
can contain metal flecks which may cause arcing
or ignite. Paper products containing nylon or
nylon filaments should be avoided,
as
they may
also ignite.
—Do not pop popcorn in your microwave oven
unless in a special microwave popcorn accessory
or unless you use popcorn
lfibeled
for
use in
microwave ovens.
—Do not overcook potatoes.
They could
dehydrate and catch fire, causing damage to
your oven.
—Do not operate the oven while empty
to avoid
damage to the oven and the danger of fire. If by
accident the oven should run empty a minute or
two, no harm is done. However, try to avoid
operating the oven empty at all times—it saves
energy and prolongs the life of ’the oven.
—Do not use the oven for storage purposes.
Do not leave paper products, cooking utensils or
food in the oven when not in use.
—If materials inside the oven should ignite,
keep
oven door closed, turn oven off, and
disconnect the power cord, or shut off power at
the fuse or circuit breaker panel.
●
Use foil only as directed in this
book.
TV dinners maybe microwaved in foil trays
less than 3/4 inch high; remove the top foil cover
and return the tray to the box. When using metal
in microwave oven, keep it at least 1 inch away
from sides of oven.
●
Cookware may become hot
because of heat
transferred from the heated food. Pot holders may
be needed to handle the cookware.
c
The oven floor can become too hot to touch. Be
careful touching the floor during and after cooking.
●
Foods cooked in liquids (such
as pasta) may tend
to boil over more rapidly than foods containing
less moisture.
(continued next
page)
●
Some products such as whole eggs and sealed
containers—for example, closed glass jars—will
explode and should not be heated. Such use of
the
microwave oven could result
in injury.
5

!
IMPORTANT SAFETY INSTRUCTIONS
(continued)
●
Do
not use a thermometer
in food you are
microwaving unless the thermometer is designed
or
recommended for use in the microwave oven.
●
Remove the temperature probe from the
oven when
not
using it to cook with. If you
leave the probe inside the oven without inserting
it in food or liquid, and turn on microwave energy,
-
it can create electrical arcing in the oven, and ‘-
damage oven walls.
ip
*
Q
Hot
foods and steam can cause
..-=
burns. Be careful when opening any
containers of hot food, including
popcorn bags, cooking pouches and
boxes:
To
prevent possible injury, direct steam away from
hands and face.
●
Spontaneous boiling—Under certain
special circumstances, liquids may
start
to boil during or shortly after removal
from the microwave oven. To prevent burns from
splashing liquid, stir the liquid briefly before
removing the container from the microwave oven.
●
Use of the DOUBLE DUTY
TM
shelf accessory.
—Remove the shelf from the oven when not in use.
—Do not store or cook with the shelf on the floor
of the oven. Product damage may result.
●
Plastic Cookware—Plastic cookware designed
for microwave cooking is very useful, but should
be used carefully. Even microwave-safe plastic
may not be as tolerant of overcooking conditions
as are glass or ceramic materials and may soften
or char if subjected to short periods of
overcooking. In longer exposures to overcooking,
the food and cookware could ignite. For these
reasons: 1) Use microwave-safe plastics only and
use them in strict compliance with the cookware
manufacturer’s recommendations. 2)
Do
not
subject empty cookware to microwaving. 3) Do
not permit children to use plastic cookware
without complete supervision.
s
Not all plastic wrap is suitable for use
in microwave ovens. Check the package
for
proper use.
%
.
~~Boilable”
cooking pouches and
tightly closed plastic bags should be
slit, pierced or vented as directed on
the package,
If they are not, plastic could burst
during or immediately after cooking, possibly
—Use pot holders when handling the shelf and
cookware. They may be hot.
-Do not use a microwave
browning
dish on
resulting in injury. Also, plastic storage containers
should be at least partially uncovered because
they form a tight seal. When cooking with
containers tightly covered with plastic wrap,
remove covering carefully and direct steam away
from hands and face.
the shelf. The shelf could
overhea~,
Use of
the shelf with the Automatic Cooking feature
is not recommended.
6

—
elf-Cleaning Lower Oven:
●
Stand away from
the cooking center when
opening the oven door.
The hot air or steam
which escapes can cause burns to hands, face
and/or eyes.
●
Do
not heat unopened food containers.
Pressure could build up and the container could
burst, causing an injury.
“
Keep the oven vent duct unobstructed.
●
Keep the oven free from grease build-up.
●
Place the oven shelf in the desired position
while the oven is cool. If shelves must be handled
when hot, do
rw(
let pot holders contact oven units.
●
Pulling out the shelf to the shelf stop is a
convenience in lifting heavy foods.
It is also a
precaution against
burns from touching
hot surfaces of the door or oven walls.
●
When using
cooking or roasting bags in the
oven,
follow the manufacturer’s directions.
●
Do not use your oven to dry newspapers.
– If overheated, they can catch on fire.
●
Do
not clean the door gasket.
The door gasket is
essential for a good seal. Care should be taken not
to rub, damage or move the gasket.
●
Do not use oven cleaners. No
commercial oven
cleaner or oven liner protective coating of any
kind should be used in or around any part of the
oven. Residue from oven cleaners will damage the
inside of the oven when the self-clean cycle
is used.
c
Be
sure to wipe up excess spillage before
starting the Self-Clean operation.
●
Clean only parts listed in this Use and
Care Book.
●
Before self-cleaning the oven,
remove the
broiler pan and other cookware.
●
If the self-cleaning mode malfunctions,
turn
the oven OFF and disconnect the power supply.
Have serviced by a qualified technician.
“
After broiling, always take the broiler pan out
of the oven and
clean
it.
Leftover grease in the
- broiler pan can catch on fire the next time you use
the pan.
Surface Cooking Units:
● Use proper pan size-This appliance is equipped
with one or more surface units of different size.
Select cookware having flat bottoms large
enough to cover the surface unit heating element.
The
use
of undersized
cookwa,e
will expose
a
portion of the
surfac~
unit to direct
Coi.tad
and
may result in ignition of clothing, Proper
relationship of cookware to the surface unit will
also
impiove
efficiency.
●
Be
sure the drip pans and the duct are
not covered and are in place.
Their absence
during cooking could damage cooking center
parts and wiring.
s
Do
not use aluminum foil to line the drip pans
or anywhere in the oven except as described in
this book. Misuse could result in a shock, fire
hazard or damage to the cooking center.
●
Only certain types of glass, glass/ceramic,
ceramic, earthenware or other glazed
containers are suitable for cooktop service;
others may break because of the sudden change
in temperature.
●
To minimize the possibility of burns,
ignition of
flammable materials and spillage, the handle of a
container should be turned toward the center of
the cooktop without extending over nearby
surface units.
(continued next page)

IMPORTANT SAFETY INSTRUCTIONS
(continued)
●
Never leave surface units unattended at high
heat settings.
Boilovers
cause smoking and
greasy spillovers that may catch on fire.
c
Always turn the surface units to OFF before
removing the cookware.
● Keep an eye on foods being fried at HI or .
MED
HI heat settings.
●
To avoid the possibility of a burn or electric
shock,
always be certain that the controls for all
surface units are at the OFF position and all coils
are cool before attempting to remove the unit.
●
Do
not immerse or soak the removable surface
units.
Do not put them in a dishwasher. Do not
‘
self-clean the surface units in the oven.
●
Never clean the
cooktop
surface when it
is
hot.
Some cleaners produce noxious fumes and
wet cloths could cause steam burns if used on a
hot surface.
“
When flaming foods are under the hood,
turn the fan off. The fan, if operating, may spread
the flame.
●
Foods for frying should be as dry as possible.
Frost on frozen foods or moisture on fresh foods
can cause hot fat to bubble up and over the sides
of the pan.
●
Use
little
fat for effective shallow or deep-fat
frying.
Filling the pan too full of fat can cause
spillovers when food is added.
●
If a combination of oils
or
fats will be used
in frying,
stir together before heating, or as fats
melt slowly.
●
Always heat fat slowly, and watch as it heats,
●
Use
a deep fat thermometer whenever
possible to prevent overheating
fat beyond the
smoking point.
●
Never try to move a pan of hot fat, especially a
deep fat fryer.
Wait until the fat has cooled.
Exhaust System
●
Use
care when cleaning the vent hood filter.
Corrosive cleaning agents, such as lye-based oven
cleaners, may damage the filter.
●
Clean the vent hood often.
Do not allow grease
to buildup on the hood or in the filter.
SAVE THESE
INSTRUCTIONS

our
cooking center, like so many other household When the floor covering ends at the front of the
Items,
is heavy and can settle into soft floor cooking center,
the area that the cooking center will
coverings such as cushioned vinyl.
When moving rest on should be built up with plywood or similar
the cooking center on this type of’
tlooring,
use care. material
to
the same level or higher than the floor
Do not install the cooking center over kitchen
covering. This will allow the cooking center to be
carpeting
unless you place
an
insulating pad or sheet moved for cleaning or servicing.
of I/4-inch thick plywood between the cooking center
and
carpeting.
LEVELING THE COOKING CENTER
Leveling screws are located on each corner of the base of the cooking
center.
By removing the bottom drawer, you can level the cooking center
on
an
uneven
floor
with the
LISC
of’
a
nutdriver.
To remove the drawer,
pLIll
the drawer straight out and lift over the
~~Ll
ide
stops.
&
To
replace the drawer,
lift over the guide stops and slide drawer into place.
WHEN
POWER
IS CONNECTED TO COOKING
CENTER
The panel displays all of the oven functions.
After 15 seconds, all
lights
disappew and “RESET” appears in the display. Press the CLOCK pad and
se{
[he
clock, and then press the START pad.
If power is disrupted at any time,
the above sequence reoccurs
and
you must reset the clock.
9

.ES
OF YOUR COOKING CENTER
???’???
?
!111
1111
\~—-----
Ir>
[
J-@
Ii
W-Jllu
‘
10

Explained
Feature Index on page
1 Oven Vent
2
Microwave Oven Floor
I
5,26
3
Microwave Oven Lamp
I
44
4 Vent Hood Extension Handle
I
42
5 Vent Hood Grease Filter
(behind the
Hood
Extension)
8,
42
6 Receptacle for Probe
15
7 Vent Hood Extension
I
42
8
Display and Controls
To remind
yOLI
that you have
food
in the
oven;
the oven control will
beep once
a
minute
until
yoLl
either open the door or press the
CLEAR/OFF pad.
—
9 Oven Set and Oven Temp
Control Knobs
27, 30–32,
39,47
10 Surface Unit Control Knobs
I
27,47
I
I
I Surface On Indicator
Light
27
12 Surface Light Switch
27
13
Vent Hood Switch
42
14
Oven Vent Duct
7, 47
(for
the lower oven) Located
under the right rear
surfuce
unit.
15 Plug-In Surface Units 7, 8,46
16
Lower Oven Light Switch
29
17 Automatic Oven Light Switch
29
18
Lower Oven Door w/
37–39,
Broil Stop Position
45
Easily removed for cleaning.
19 Storage Drawer 3,47
Explained
Feature Index on page
20 Lower Oven Door Gasket 7,39,45
21 Broiler Pan and Rack 37,38,
(lower oven only)
46
Do not clean in the Self-Clean oven.
22 Bake Unit (lower oven) Maybe
45
lifted gently for wiping oven floor.
23 Lower Oven Shelves 7,29,
with Stop Locks 33–35, 39
24 Lower Oven Shelf Supports
29
Shelf positions for cooking are
suggested in the Baking, Roasting
and Broiling sections.
25
Broi]
Unit
(]ower
oven)
37, 38,45
26 Door Latch Handle (lower oven)
31, 35,
Latch for self-cleaning only.
37,40
27 Porcelain Drip Pans 7,46
28
porcelain
Cooktop
46
29 Surface Light 6,48
30
Removable Grease Filters 6,42
3
I Inside Door Latches
?
-
(microwave oven)
32 Window with Metal Shield
43
Allows cooking to be viewed
while keeping microwave
confined in oven.
33 Door Handle (microwave oven)
(
43
34 Model and Serial Numbers
12
35
Double
Duty’[”i
Shelf 6.24.
(microwave oven only)
~6,
44
36
MicrothermometerT” 6, 17,
Temperature Probe
18,44
(microwave oven only)

.—
FEATURES OF YOUR
OVEN CONTROL PANEL
O-J
~H:$JQ~c~~
ENTER MICRO COOK DEF TIMER ROAST
TEMP COOK
;~&ER
E!A!i!:S!!R!CLEAN
~.H
OOEIR
STOP TIME WEIGHT LBS
LATCHEO
r
ITI
:[
II
‘r;
i
7[
71
~
MICROWAVE
TIME
19
‘q
AUTO AUTO AUTO
TEMP
OVEN OEF
COOK
OEF
ROAST
~
POWER
cm
B
*
/1
HOLO
LEvEL
OFF
\
“s,
,,0,,
The clock must be set before any conventional oven
timer function will operate.
1. DISPLAY.
Displays time of day.
Microwave Oven:
Displays the time or temperature
during cooking functions, power level being used,
Auto Roast Codes, cooking mode and instructions.
Conventional Oven:
Displays Time Bake Start and
Stop
tilmes,
self-clean oven Clean Time, oven door
latched message and instructions.
2. TIME COOK. Microwave for a preset amount
of time using automatic power level 10 (or change
the power level after entering the cooking time).
3. TIME DEF. Gentle thawing at automatic power
level 3, (or change the power level after entering
the defrosting time).
4. AUTO COOK. The oven automatically microwaves
at pre-programmed power levels and determines the
proper amount of cooking times
until
the food is
done and the oven shuts off.
5.
AUTO DEF.
Press this pad, then code number
and food weight. The oven automatically sets
power levels and defrosting time.
6.
AUTO ROAST.
Insert the probe, press this pad,
and the desired number pad for code to slow cook
or temperature cook the meat with the automatic
preset program.
7. TEMP COOK/HOLD. Use the temperature probe
to
cook by using a preset temperature. Once the oven
reaches the preset temperature, it switches to the
Hold setting and maintains that temperature until you
either open the door
or
press the CLEAR/OFF pad.
8.
POWER LEVEL. Press this pad
befbre
entering
another power level number if you want
to
change
from the automatic power level 10 (High) for
cooking or power level 3 (Low) for defrosting.
#
12
9. CLEAR/OFF. When pressed, it shuts off the
microwave oven and erases all microwave settings
(except the time of day).
10. START.
After
all
selections are made, press this
pad
to
start the microwave oven, the clock and all
conventional oven timer functions.
11. CLEAR. Press this pad to stop conventional oven
timer and self-cleaning operation or to enter
a
new
Clean Time.
12.
MIN/SEC TIMER.
This feature uses no
microwave energy. It functions as a kitchen timer,
a hold timer after defrost or
as
a delay timer before
13.
14.
15,
16,
microwave time or temperature
cook-ing.
STOP TIME. Press this pad and then the number
pads to enter the time you want the oven to finish
baking or cleaning. The oven will automatically
calculate the correct Start Time for
you.
CLOCK.
Press this pad
to
enter the time of day
or check time of day while cooking.
To
set the clock,
first press the CLOCK pad and
then enter the time of day. For example,
if
the time
is 1
:30,
press the number pads 1, 3 and O. ‘
k
Start”
will flash on the display, directing you to press the
START pad, thus setting the clock.
To
reset or change time,
simply repeat the
above process.
BAKE TIME. Press this pad and then the number
pads to enter
baking
or roasting
lime.
The oven
turns off automatically at the end of that time if the
OVEN SET knob is on TIME BAKE.
NUMBER PADS. Press these pads to enter cooking.
defrosting time, time
of
day, temperature, power
level, Auto Roast Codes, conventional oven bake
Stan and Stop times and to change the Cleaning
Time on the self-cleaning oven.

.tlake
sure
all
the cookware used
in
your
microwave oven is suitable for microwaving.
Most glass casseroles. cooking dishes, measuring
cLips,
custard cups, pottery or
china
dinnerware
which
does not
hi]ve
metal]
ic
trim or
glaze
with
a
nlet~tl
1
ic
sheen
can
be
used.
Some
cookwm is
]aheled
“suitable
foI”
nlicI”ow)aving.”
●
If”
you are not sure if a dish is
microwave-saf’e,
use this test:
Pliice
in
[hc
olen both
the
ciish
you
arc
kstin:
:mct
a
:I;.lss
measuring
cup
filled
with
onc
CLIp
wJatcl”-
Set the
nleosut”ing
CLIp
Q
<~”
\
‘
1)’~<:=-~
,..-:;
..~.
Q.
-J
e
ithcr
in or
nexl
[(~
the
dish. Microwave
f[~r
1 minute
~~[
high.
[t’
the dish
heats. it should not
be
used
lot-
nlicroma~ing.
1!’
the dish
rcmains
cool
iInd
onl) the water in
the
CLIp
hcxs.
[hen
the
dish is
tllict-om~i~c-sllfe.
● Paper towels, wax paper and plastic wrap
c:ln
be
LISd
to
tmvel” dishes in order
to
ret:li
n
moisture and
prek’ent
spattering. Be
SUI”C
to
~’ent
plastic wrap
so
steam cm escape.
●
.Some
microwaved foods require stirring.
rotating or rearranging.
● Steam builds up pressure in foods which
are tightly covered by a skin or membrane.
Pierce
potdtoes,
egg
yolks
and
chicken Iilcrs
to
prevent bursting.
All these things are normal with
●
Di
mm i
n:
of
the
()\ctl
I
i:ht
ond
o
.Somc
TY’-Radio
in[crference
your microwave
oben:
change
in
the
blo~er
sound
nl:~~
nl
i:ht
be
noticed
w’hi
le
using
●
.Stcanl
or
\Jqwr
escaping
from
ocxLIr
w’hi
Ic operation
at
power
!OLII”
nlicrowa\re
o~cn.
1[’s
similar
Ie\els other than
high.
to
the
interference
couscd
by
LII’OLllld [hC
dool”.”
●
lJi
:ht
reflection
aro
LInd the door” ●
A
dill I
thu
mpi
11:
w)unci
\\’h
i
Ic
[Ilc
other
small
:lppl
iances
:md
01”
the
OLlt
C1’
C:tSC
otcn
is
opcrdt
i
n:.
does
not
indicate
a
problem
with
J’OLI1°
()\
’t311.
HOW TO USE THE MINUTE/SECOND TIMER
The
minute/second timer has
3
timing functions:
● I
t
opct”atcs
:1s
a
m
inLltc
[
i
lncr.
● It cdn bc
sc’t
10
dLIl:I\
L>(mk
in:.
●
It
L’:\II
bc
used w
a
hold
se[ti
n:
:ii’ter
k
I’rc)st
i n:.
The
ll~inLltc/scconci
timer
opcr:~tes
wi[hout
[nicrow:lic
cnerg!.
How
to Time a 3-Minute Phone
Call
n
1.
Press
(hC
MI N/SEC
TlhlER
p:Ki
MI
NISEC
TIMER
c1
3.
Press
the
START
pad.
The display
START
shows the
time
counting
do~!n.
IIIEIEIIIIEI
2.
Press
[hc
llLllllb~l”
pXtS
3.
()
~.
When time is Lip,
the
oi’cn
control
Si$gna]s.
~lnd
O (to
sc[
3
m i nutts and
ElmElElm “os” ’( )’ ’’[ ’’) ”
5.
Press
the
M i
INT/SEC’
TIM
ER
pad
[c)
I“CSCL
the
di
Spla>)
to
clock
or nlicroma\c
C(x)k
():”
del’rest
programs.
(
(
()!://}
11/(,(/
//[\/
/1[/$,
[
)
13
——
———
.—.
,

HOW TO USE THE MINUTE/SECOND TIMER
(continued)
Llsing
a Holding Time
The
hold
timer
can
also
be
used
to
program
a
“hold
time” between
microwave cooking functions. The time
can
range from 1 second to
~~
lllinLltes
and
99 seconds.
Programming Delayed Cooking
To delay cooking up to 99 minutes and 99 seconds,
press the TIME COOK. TEMP COOK or the AUTO
ROAST
pad
and enter
the
Cook Time. the temperature
or
the
code. Press the HOLD TIMER pad
anLI
enter
the
number of minutes
to
delay cooking. Press the START
pad. The timer will
coun[
down to zero and
then
cooking will
begin.
NOTE:
When delaying the Temp Cook or the
Au[o
Roast
functions, be sure the probe is in the
l’o(xi
before pressing the START pad.
How to Time Defrost, Hold and Time Cook
Let-s say you want to defrost
a
frozen casserole for
15 minutes, hold for
1(1
minutes and then Time Cook
for
25
minutes. Here’s how
to
do
it:
1.
Take casserole from freezer
and
pltice
in oven.
c1
2. Press the TIME DEF pad.
TIME
DEF
3. Press the
numbcl-
pads
~~~~~
l.f(l~ndotosetl~
nCZlmlZlm
minutes defrosting time.
n
4. Set standing or Hold Time by pressing
MI N/SEC
the
MIN/SEC
TIMER pad.
TIMER
5. Press the 1, 0,
0
and
()
p~ds
to hold for ten minutes
D
6.
Press
the
TIME COOK pad.
TIME
COOK
7. Press
the
2,
5. () and () pads to set
25
minutes of
cooking time.
c1
&
Press
[he
START pad.
START
As
each
function is automatically performed,
the oven display shows instructions entered and
the function,
9. When lime is Lip. the
o~’en
con[rol
signals
and
the
oven automatically shuts off.
NOTE: Foods
th~it
spoil easily such
as
milk,
eggs.
fish, stuffings,
pou[tl”y
and pork
should
not be
allowed
to sit for more than one hour after defrosting. Room
temperature promotes the
growtb
of
hormfu]
bacteria.
Be sure that the oven light is off
beclLlse
heat
from
the
bulb will speed
harmful
bacteria growth.
Defrosting is automatically set on power
level 3,
but can be changed by pressing the
POWER LEVEL pad and the desired power
level.
Questions and Answers
().
What will happen if I accidentally reverse my Q. Can I defrost and hold only’?
defrost, hold and cook instructions?
A. Yes. sometimes yOLI may only want to defrost
A. The
o~en
will
automatic:dly
rearrange your a food.
hold
it. and
cocok
it later. All yOLI need
program. Defrosting will always come first, then to do is program in Time Defrost and amount
hold, and then the cooking [unction. of time. Then progranl Hold and the amount
of time. Be sure to put the
dlawed
dish in the
refrigerator promptly.
‘
14

he
Time Defrost setting is designed for speedy
thawing of frozen food and is one
of
the great
advantages of a microwave oven.
Power level 3 is automatically set for defrosting,
c1
4.
Press the START pad. When the cycle
START
is completed, the oven control signals
and the oven automatically
shuts
off.
but you may change this for more flexibility. 5. Turn the package over, close the door and repeat
To become better acquainted with the defrost the steps 2 and 3 to set the remaining half of the
function, defrost
frozen
strawberries by following defrosting time. Press the START pad.
the steps below. 6. When the oven control signals, open the door,
1.
Place the package of frozen strawberries in the remove the package and separate the strawberries
oven and close the door. to finish defrosting.
n
2. Press the TIME DEF pad.
To change the power level after setting the
TIME
DEF
defrosting time,
press the POWER LEVEL pad,
then press the desired number for a new power
level. Press the START pad.
3.
Select one half of
the
total defrosting time
recommended in your cookbook. For example,
press
4, ()
and 0 to set 4 minutes.
Defrosting Tips
● Family-size, pre-packaged frozen dinners
can
be
defrosted and microwaved. If the food is in a foil
container. transfer it
to
a microwave-safe dish.
●
For
even defrosting,
6
some foods need to
be broken up or
separated part of the
way through the
defrosting time.
Questions and Answers
Q. When I press the START pad,
I
hear a dull,
Q.
thumping noise. What is it?
A.
A.
This sound is normal. It is letting
yoLI
know the
oven is using a power level lower than 1() (High)
Can
I
defrost small items in a hurry?
Yes.
but they will need more frequent attention
than usual. Raise the power level after entering
the time by pressing the desired power level pad.
Power level 7 cuts the total defrosting time in half:
power level
10
cuts the total defrosting time to
approximately one third. During either, rotate or
stir food frequently.
15

COOKING BY TIME
The time cooking feature allows you to select the 3.
Select your cook time. Press 1,
2
and
O
to set
cooking time.
1
minute
and
20 seconds.
The oven shuts off automatically.
Power level 10 (High) is recommended for most
cooking,
but you may change this for more flexibility.
To become better acquainted with time cooking, make
a
cup of coffee by following the directions below.
1.
Fill a cup
2/3
full of water,
add
1
teaspoon of instant
coffee and stir to dissolve.
Use
a
cup that has no
metal
decoration and is
J&:
)
~&
.
=====
.
.
microwave-safe. Place
,
—-—–. . .
the
CLIp
in the oven and
close
the door.
m
2.
Press the TIME COOK pad.
u
COOK
Because automatic power level 10 (High)
is recommended for this cup of coffee,
there is no
need to change the power level.
f—]
4.
press the START
pad
u
START
5. When time is Lip, the oven control signals
The oven then shuts off.
6. Open the door.
If you interrupt Time Cook to check the food,
simply
close the door
and
press “the START pad to
resume cooking. If there is not time remaining on the
timer
yOLI
must reset the timer to resume cooking.
To change the power level after setting the
Cook Time,
press the POWER LEVEL pad, then
press the desired number for the new power level.
How to Use the Time Cook II Feature
The Time Cook II feature lets you set two time
cooking functions within one program.
This is ideal
when you want to change power levels during your
cooking operations. Here’s how to do it.
1.
Place food in oven in microwave-safe container
and
close the door.
0“
2. Press
the
TIME COOK pad
TIME
COOK
3. Select your cook time.
~lZl~~lZl
press21and5
toset
mnmmm
z
Ininutes
and 15 seconds.
4. Press the TIME COOK pad again.
5.
Set your second cook time.
c1
4. Press the START pad.
START
7. When time is up, the oven control signals.
The oven then shuts
oft.
8. Open the door.
If you interrupt Time Cook to check the food,
simply close the door
and
press the START pad to
resume cooking. If there is not time
rel.aining
on the
timer you must reset the timer to resume cooking.
To change the power level after setting the
Cook Time, press the POWER LEVEL
pud,
then
press the desired number for the new power level.

,termd
temperature is the best test
of
doneness for many foods. TEMP
COOK takes the guesswork out of cooking because the oven automatically
switches the Hold setting after reaching the preset food temperature and
maintains that temperature until you either open the door
or
press the
CLEAR/OFF pad.
The Temperature Probe
The temperature probe is a food
thermometer that gauges the
internal temperature of your food:
it must be used when using the
Temp Cook or Auto Roast
microwave oven functions.
A temperature probe has been
provided for use in your new
microwave oven.
Sensol
Temperature probes provided with
other products, such as those used
for ovens, are designed to
withstand high temperatures.
Use of probes other than the one
provided with this
yoduct
may To use your probe properly
result in damage to the probe. in a roast, see the Automatic
Roasting section.
How to Temp Cook a Rolled Beef Rib Roast to Medium
1.
Insert the temperature probe into the roast and
attach the
cable
end of the probe securely into
the receptacle in the oven wall. Close the door.
TE’iFl
2. Press the TEMP COOK/HOLD pad.
LJ
COOK
E
3. Press 1,
2
and 5 to set
125°F.
m4. Press the POWER LEVEL pad.
Press 5 to set medium Dowel”.
I
LEVEL
I,
c1
5. Press the START pad. If the internal
START
temperature of the roast is less than
80°F.,
the display will show “COOL”;
if the roast’s internal temperature is
80°F.
or above, the display
shows
the
temperature counting up.
6.
When
125”F.
is reached, the oven control signals
and “HOLd” will be on the display. The oven will
then hold the temperature.
7. Press the CLEAR/OFF pad to stop the cycle.
8. Remove the probe and the roast from the oven
Cooking Tips
●
Use a lower power level; it wi 11 heat
f-ood
more
● Be sure frozen food
has
been completely defrosted
evenly though requiring more time. before inserting probe. The probe may break off if
● cover
foods
]OOse]y
for moisture control and quick,
you attempt to push it into frozen foods.
even heating.
Questions and Answers
Q. After I followed the steps and pressed the
START pad “ERROR” flashed on the display
and the oven control signaled. What’s wrong?
A. “ERROR” flashes if
yOLI
set the temperature either
below
80”F.
or above
199°F.
The oven tells
yoLl,
between the
tlashing
of “ERROR,”
wilat
incorrect
entry was made. To re-enter, press the CLEAR/OFF
pad and begin
again.
Q. Why did “PRObE” flash after I touched the
START pad?
A.
“PRObE” will flash if you don’t seat the cable end
of the probe securely into the receptacle in the
oven wall or if you press the TEMP
COOWHOLD
pad and forget to use the probe.
Q.
Can I leave my probe in the oven if it’s not
inserted in the food?
A. No,
if it touches the oven wall, damage may
occur to the probe and oven.
17
*

——
AUTOMATIC ROASTING
Auto Roast uses the temperature probe to cook
Just as in regular roasting, only tender roasts should
to the desired serving temperature.
Unlike Temp be Auto Roasted until specified internal temperatures
Cook/Hold, which uses
a
single power level, Auto are reached. Less tender roasts should be microwaved
Roast uses up to
3
power settings which automatically by time.
switch during roasting, thus providing even, tender
cooking results without overcooking.
Preparing Roasts for Auto Roasting
Place tender beef roast on a trivet
in microwave-safe dish. Insert the
probe horizontally into the center Pork or ham roasts need no trivet.
meaty area not touching bone or
Add
1/2
cup
water
to roast dish
fat. Make sure the handle does not and cover with plastic wrap. Allow
touch the food or top or sides of room for the probe when covering.
the oven. Cover with wax paper.
Place the meat in the oven with the
probe to the right. Insert the cable
end of the probe firmly into the
receptacle on the oven
wall.
How to Auto Roast Beef to Medium
c1
AUTO
1.
Press the AUTO ROAST pad.
ROAST
/1
2. Press the number pad 2.
3. Press the START pad. The display shows “COOL”
and “ROAST CODE 2“ until the food temperature
reaches 80°F.
4. At 80°F., the display switches to show the meat’s
internal temperature.
5. When you select Auto Roast codes 1,
2,
3
or 4,
the oven control signals with
3
beeps and “TURn”
flashes in the display when it’s time to turn the
roast over.
6. After you turn the roast, close the door and press
the START pad.
7. After a preprogrammed food temperature is
reached, the oven control signals
3
times and the
oven shuts
off.
NOTE:
The oven continues to cook after the signal
whether or not the roast is turned over.
Automatic Simmer Auto Roast code 6
Total time includes time to bring food to
180°F.
and
hold at that temperature until done.
Set Auto Simmer like Auto Roast. See
the
Auto
Roasting section. The display shows “COOL” until
the food is 80°F., then switches to show the food’s
temperature until
180°F.
is reached.
The oven switches to
“HOLd”
at
180°F.
until
yoLl
remove the food and turn
the
oven off. If stirring
is recommended, you can reset the oven by re-
pressing the START pad. Press the CLEAR/OFF pad
after cooking.

Auto
Roast Guide
Use
containers and coverings as directed
at
left. Place the probe correctly in the roast before cooking.
Food
Beef
Tender Roast
Rare
Medium
Well
Pork
Loin Roast
Precooked Ham
Poultry
Whole Chicken
(3
:bs.)
Whole Turkey (up
to
12
Ibs.
)
(Insert probe into meatiest area
of’
inner
thigh
from
below end and parallel
to
leg. )
Turkey Breast
(
[nsert
probe horizontally into meatiest area.)
Approximate Time
Code Final Temperature*
(minutes per pound)
Hold Minutes**
1
115°F.* 10–l 3
0
2
125°F.~
13-15 0
3
145”F.
15-17
5-1o
4
175°F.
14–1 7
10
1
115°F.
12-15
0
5
190°F.
10-12
10
5
190”F.
10-12
10–15
4175”F.
10-12
10–15
“
Meat cooked to a
final
temperature
of’
140°F.
or less
may
still contain bacteria.
‘;:*’
Recommended standing time
before
serving.
‘;”
The U. S. Dept.
of’
AgricultuI”e
says,
“Rare
beef is popular, but you should know that cooking it to only
140°F.
means
some
food
poisoning organisms may survive.” (Source: Safe Food Book, Your Kitchen Guide., USDA Rev. June 1985. )
Automatic Simmer Guide Auto Roast code
6
Approx.
Food
Time/Hours Comments
Beef
Pot
Roast 5–7
Add enou:h liquid to just cover the meat. If adding vegetables make sure they
we
completely covered by liquid.
Chili
5–8
Precook meat. Place probe
1
inch from top surface. Stir after
3
hours, if possible.
Chicken
SIew’ing
4-6
Add
4
cups liquid. Insert probe into meatiest area of inner thigh from below end
and parallel to leg. Turn over after 1/2 of time.
Broiler/Fryci” 3–4
Same procedure as above.
Ham or Pork
Roas[
4-6 Add 4 cups
]iquid.
soup
StockNegetable 7-1o
Make sure that vegetables and meat are covered by liquid. Stir every 3 hours.
Split Pea
5–7
Add enough liquid to cover peas at least 2 inches. Stir after
3
hours.

AUTOMATIC DEFROSTING
With the Auto Defrost feature, the oven automatically sets the
defrosting times and power levels for you.
Use the Auto Defrost Guide. Enter the food weight in pounds and tenths
of a pound (see the Conversion Guide). Then press the START pad.
The oven calculates defrosting time and changes the power levels during
defrosting to give even defrosting results.
How to Set Auto Defrost
Before you begin, check the guide located on the
inside front of oven when you open the door.
It
shows
minimum and maximum food weights
for a
variety of foods. You will need to know your food
weight before setting Auto Defrost.
1.
Remove the food from the package, place it in the
oven on a microwave-safe dish and close the door.
n
2. Press the AUTO DEF pad.
AUTO
DEF
WJ
3. Enter the selected code number from guide.
For example, poultry calls for code 2.
4. Enter the weight. For example, press number
pads 1 and 2 for weight of 1.2 pounds
(1
pound,
3
ounces). See the Conversion Guide.
After 4 seconds “START” flashes.
5. Press the START
ptid.
u
START
Twice during defrosting, the oven control signals
3 times and “TURn” flashes and the oven shuts off.
“TURn” continues to flash until you open the door.
After turning the food close the door and press the
START pad.
When the Defrosting Time is completed. the oven
control signals
3
times and then beeps every minute
until either the door is opened or the CLEAWOFF
pad is pressed.
Stand Time Conversion Guide
When using the Auto Defrost feature, it is necessary
to allow the food to stand in order to finish defrosting If the weight of food is stated in
the interior. You may take the food out of the oven if pounds and ounces, the ounces
you wish. In some cases, it should stand in your must be converted to tenths
refrigerator. Stand time recommendations are
given
(.1 )
of
a
pound.
in the Auto Defrost Guide.
Ounces
Pounds
1–2
.1
3
?
.L
4-5
3
.
6-7
.4
E=E
1
14-15
.9
Table of contents
Other GE Microwave Oven manuals

GE
GE Appliances WES1450 User manual

GE
GE JMT19F Installation instructions

GE
GE VM141J User manual

GE
GE JE2810A Use and care manual

GE
GE DVM1950SRSS User manual

GE
GE SpacemakerXL JVM1533 User manual

GE
GE JVM172G Installation instructions

GE
GE Appliances CEB1590 User manual

GE
GE JVM1540 OTR User manual

GE
GE Appliances CEB1590 User manual