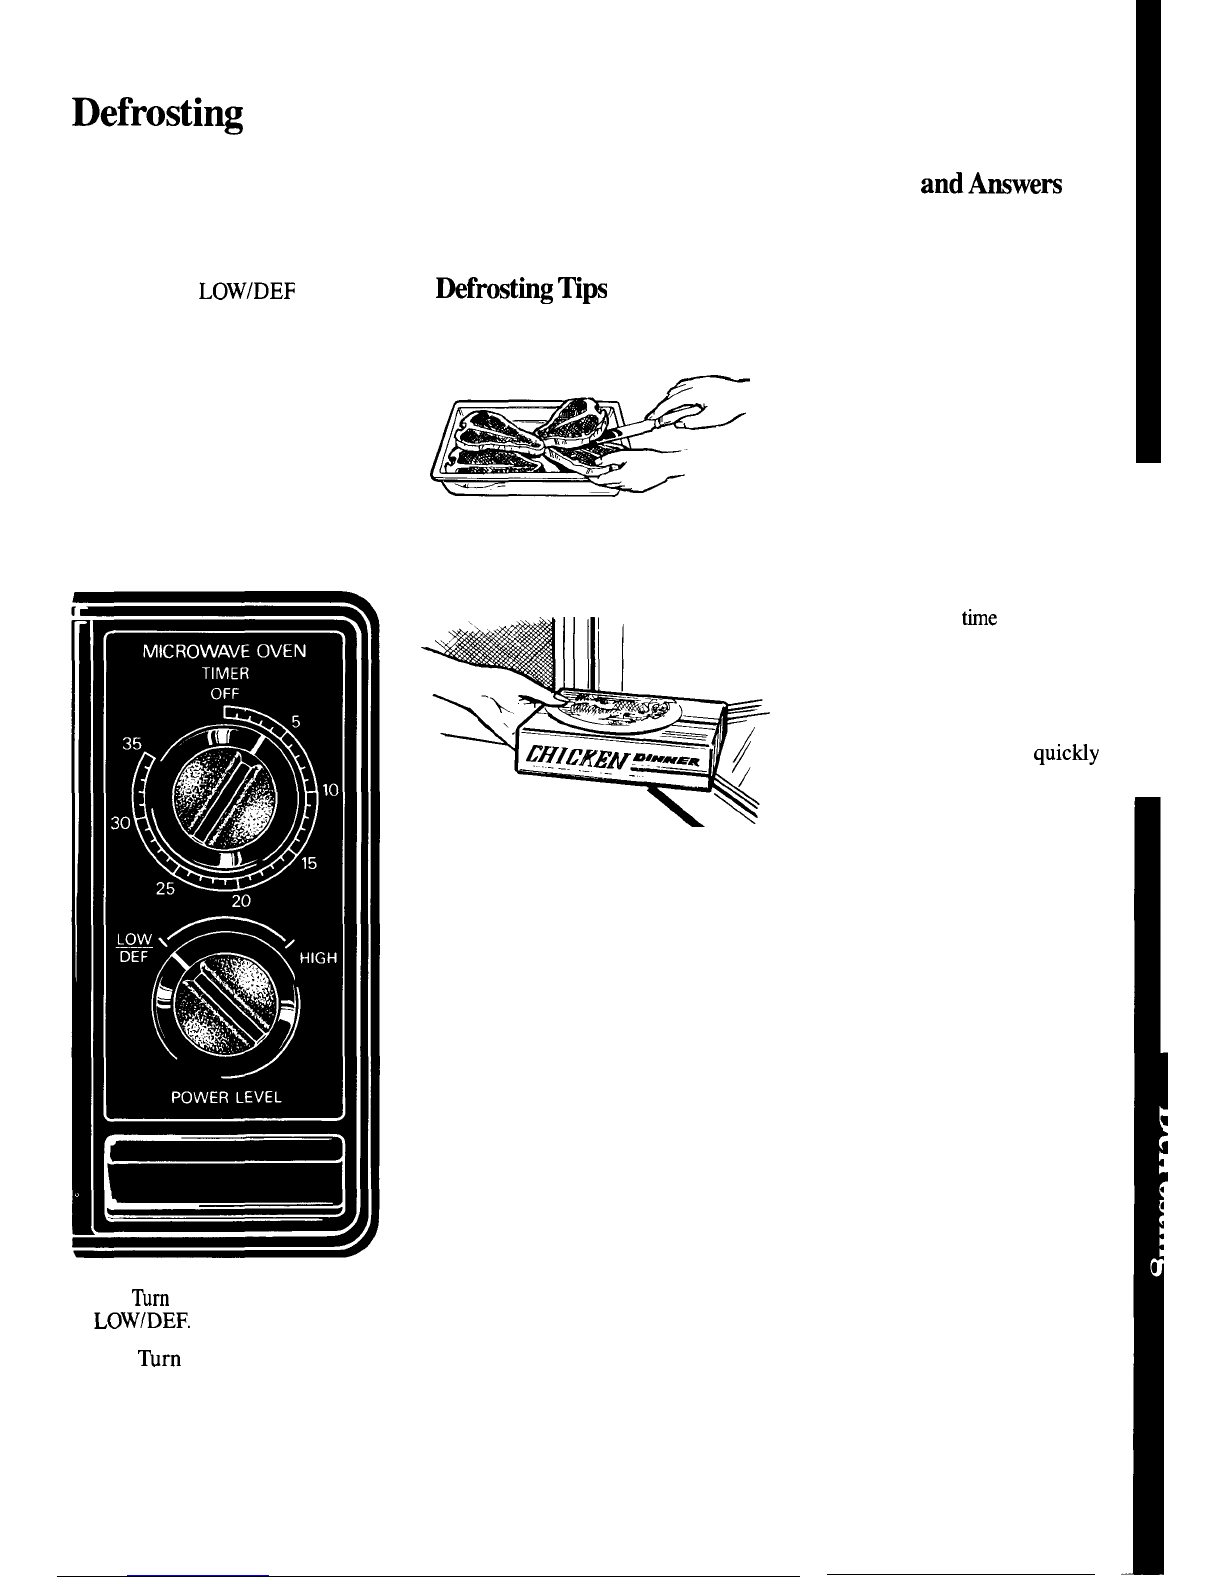
GE JE41A Use and care manual

Sub-CompatiMicmwe
Oven
Contents
Adapter Plugs 22 Precautions 2
Aluminum Foil 4Problem Solver 23
Appliance Registration
2
Repair Service 23
Care and Cleaning
21
Safety Instructions 2-4
Convenience Food Guide
12
Warranty Back Cover
Cooking 6
Cooking Guide 13-19
Defrosting
7
Defrosting Guide 8-10
Extension Cords 22
Features 5
Grounding Instructions 22
Heating or Reheating Guide 11
Microwave Cookware Guide 20
Microwaving Tips
3
GEABWM
CenteP
Model and Serial Numbers
2
80~626.2000
Models JE41A
JE45A
GEAppiances
The electric output
of this microwave oven
is 500 watts.

Help us help you...
Before
usiW
your oven,
mad
this book carefully.
It is intended to help you operate
and maintain your new microwave
oven properly.
Keep it handy for answers to your
questions.
If you don’t understand something
or need more help, write (include
your phone number):
Consumer Affairs
GE Appliances
Appliance Park
Louisville,
KY40225
Write down the model
and serial numbers.
You’ll find them on a label inside
the oven.
These numbers are also on the
Consumer Product Ownership
Registration Card that came with
your microwave oven. Before
sending in this card, please write
these numbers here:
Model Number
Serial Number
Use these numbers in any
correspondence or service calls
concerning your microwave oven.
Be sure your microwave
oven is
~istered.
It is important that we know the
location of your microwave oven
shodd
a need occur for adjustments.
Your supplier is responsible for
registering you as the owner.
Please check with your supplier to
be sure he has done so; also send in
your Consumer Product Ownership
Registration Card. If you move, or
if you are not the original purchaser,
please write to us, stating model
and serial numbers.
This appliance
must be
*tered.
Please he certain
that it is.
Write to:
GE Appliances
Range Product Service
Appliance Park
Louisville, KY40225
If you received a
dam~ed
oven...
Immediately contact the dealer (or
builder) that sold you the oven.
Save time and money.
Before you request service . . .
check the Problem Solver on page 23.
It lists causes of minor operating
problems that you can correct yourself.
Optional Accessory
available at extra cost from your
GE supplier.
4-AOW
Installation Kit
allows
this oven to be mounted under a
cabinet.
All these things are normal with your microwave oven:
●
Steam or vapor escaping from
●
Some TV-Radio interference
around the door. might be noticed while using your
● Light reflection around door or
microwave oven. It’s similar to the
outer case. interference caused by other small
●
Dull thumping sound while appliances and does not indicate a
oven is operating. problem with your oven.
2
PRECAUTIONS
TO AVOID
POSSIBLE
EXPOS~
~
Excwsm
MCROWAW
ENERGY
(a)
h
Not Attempt
to operate
this oven with the door open since
open-door operation can result in
harmful exposure to microwave
energy, It is important not to
defeat or tamper with the safety
interlocks.
~)
h
Not Place any object
between the oven front face and
the door or allow soil or cleaner
residue to accumulate on sealing
surfaces.
(c)
W
Not Operate
the oven
if it is damaged. It is particularly
important that the oven door close
properly and that there is no
damage to the:
(1) door (bent)
(2) hinges and latches (broken or
loosened)
(3) door seals and sealing surfaces.
(d) The Oven Should Not
be
adjusted or repaired by anyone
except properly qualified service
personnel.

Microwaving
~ps
●
Make sure all cookware used in
your microwave oven is suitable for
microwaving. Most glass casseroles,
cooking dishes, measuring cups,
custard cups, pottery or china
dinnerware which does not have
metilic
trim or glme with a
metilic
sheen can be used. Some cookware
is labeled “suitable for microwaving?’
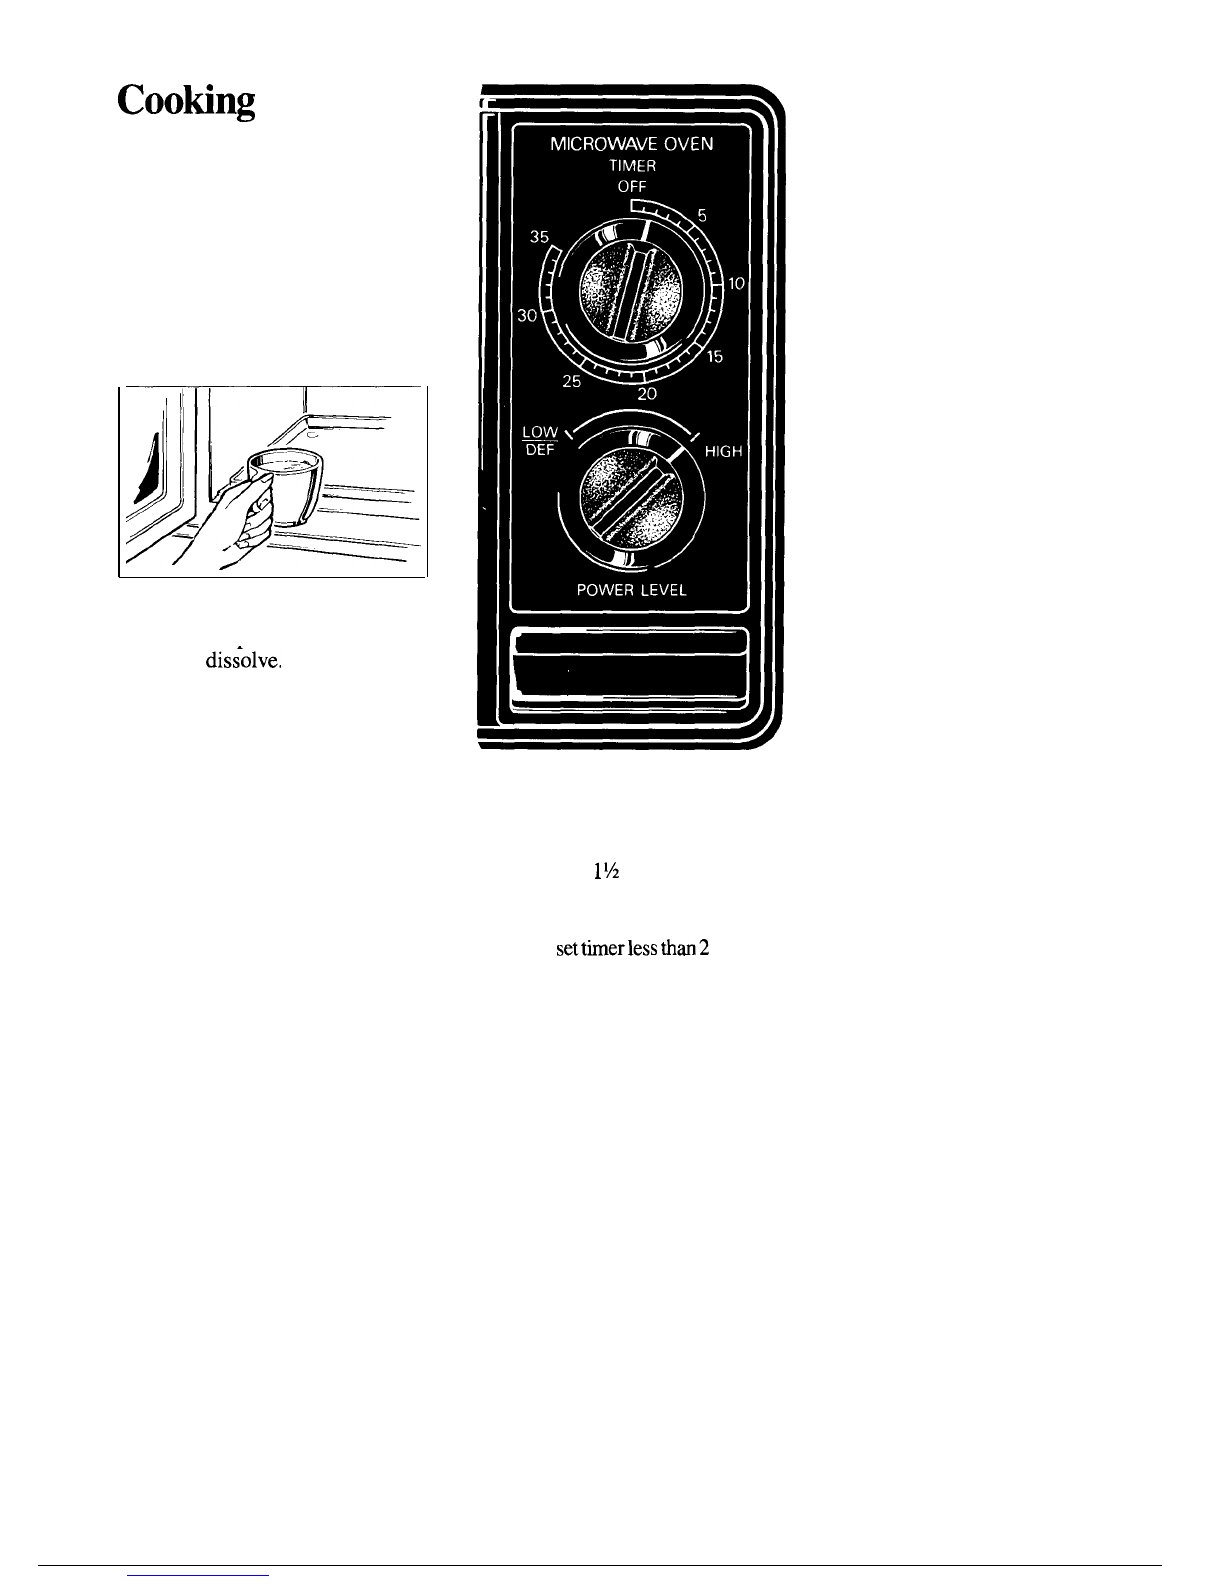
If you are unsure, use this dish test:
Measure 1 cup water in a glass cup.
Place in oven on or beside dish.
Microwave 1 minute at High (10).
If water becomes hot, dish is
microwave safe. If dish heats, it
should not be used for microwaving.
●
Paper towels, wax paper, and
plastic wrap can be used to cover
dishes in order to retain moisture
and prevent spattering.
c
Some microwaved foods require
stirring, rotating or rearranging.
Check the cooking guide for
specific instructions.
●
Steam builds up pressure in foods
which are tightly covered by a skin
or membrane. Pierce
pomtoes,
egg
yolks and chicken livers to prevent
bursting.
E
safe for use
m
m]crowave
ovens.
~PO~~T
S-TY
INSTRUCTIONS
Read all instructions before using this appliance.
When using electrical appliances,
basic safety precautions should be
followed, including the following:
WA~ING–To
reduce
the risk of burns, electric shock,
fire, injury to persons or exposure
to excessive microwave energy:
c
Use this appliance only for its
intended use as described in this
manual.
●
Read and follow the specific
“PRECAUTIONS
~
AVOID
POSSIBLE EXPOSURE
~
EXCESSIVE MICROWAVE
ENERGY” on page 2.
●
This appliance must be grounded.
Connect
ody
topropcrly
grounded
outlet. See “GROUNDING
INSTRU~IONS”
on page 22.
●
This microwave oven is
specifically designed to
heat
or
cook food, and is not intended
for laboratory or
industrid
use.
●
For best operation, plug this
appliance into its own electrical
outlet, to prevent flickering of
lights, blowing of fuse or tripping
of circuit breaker.
Q
Install or locate this appliance
only in accordance with the
provided installation instructions.
●
Be certain to place the front
surface of the door
h
inch~
or
more back from the countertop
edge to avoid accidental tipping
of the
appiiance
in
normai
usage.
●
Do not cover or block any
openings on the appliance.
●
Do not use outdoors.
●
DO
not immerse power cord
or plug in water.
●
Keep power cord away from
heated surfaces.
●
Do not let power cord hang
over edge of table or counter.
3
●
D
O
not operate
this
app]ianee
if it has a damaged
power
cord
or plug, if it is not working
properly, or if it has been
damaged or dropped.
●
See
door surface cleaning
instructions on page 21.
●
This appliance should be
serviced
oniy
by
quWled
serviee
personnel.
Contact nearest
authorized service facility for
examination, repair or adjustment.
●
As with any appliance, close
supervision is necessary
when
used by children.
●
To reduce the risk of fire
in
the oven cavity:
–Donot
ovemkfd.
&fuiiy
attend appliance if paper,
plastic, or other combustible
materiais
are placed inside
the
oven to facilitate cooking.
–Remove wire twist-tire
from
paper or plastic bags before
placing
bag
in oven.
–Do
not use your
microwave
oven to dry newspapers.
–Do not use
reeycled
paper
products.
Recycled paper towels,
napkins and wax paper can
contain metal flecks which
may
cause arcing or ignite. Paper
products containing nylon or
nylon filaments should be
avoided, as they may
also
ignite.
–Do
not operate the oven while
empty to avoid damage to the
oven and the danger of fire.
If
by accident the oven should
run
empty a minute or two, no harm
is done. However,
~
to avoid
operating the oven empty at all
times—it saves energy and
prolongs the life of the oven.
m
,
I
1

mOm~T
SMTY
~STRUCTIONS
(continuti)
Mcmw
oven
udess
in
a
special
microwave popcorn accessory or
u~ess
you
use
popcorn
hbeled
for
use
in microwave
ovens,
-Do not
ovemookpotatoes.
They
could dehydrate and catch
fire, causing
tige
to your oven.
●
~~~~~~
~id~
oven
~h~~d
~te,
keep oven door closed, turn
oven
off, and disconnect power
wrd, or
shut
off power at
&se
or
circuit breaker panel.
*
%rne
produm
such
as
whole
*
S
and sealed
containers-for
example,
closed
glass jars-may
explode
and
should
not
be heated
in
this oven.
.
Avoid
heating.
baby food
in
glass
jars,
even
without their lids;
especially
meat
and egg mixtures.
●
hn%
debt
fromn
beverages
in
narrownw~botdes
(especiMy
carbonated beverages). Even if the
&ontainer
is
opened,
pressure
can build
up.
This can cause the
container to burst, resulting in
injury.
*use
rneti
only as directed in
coo~g
guide.
W
dinners maybe
microwaved
in
foil
trays
less
than
3/4”
high;
remove
top
fbil
cover and return
tray
to box. When using
meti
in
the
microwave
oven,
keep
meti
at
lmt
1 inch away from sides
of
oven,
s
c~k~m
may
become
hot
becawe
of heat transferred from
the
heated
food.
ht
holders may
be
n~ed
to handle the cookware.
.
fi~etim~,
the cooking
tray
cm
beeome
too hot to touch.
k
Careti
handing
the cooking
~during
and after cooking.
●
FOO@
cooked in liquids
(such
as
pasta)
may tend to boil over
more
rapidy
than
fbods
containing
less moisture. Should this occur,
refer to page 21 for instructions on
how to clean the inside of the oven.
.
~ermome~r—Do
not
use a thermometer in food you
are microwaving unless the
thermometer is designed or
recommended for use in the
microwave oven.
.
Plastic
cook~re—plastic
cookware designed for microwave
cooking is very
usefil,
but should
be used
carefu~y.
Even
microwave-
safe plastic may not be as tolerant
of overcooking conditions as are
glass or ceramic materials and
may soften or char if subjected to
short periods of overcooking. In
longer exposures to overcooking,
the food and cookware could
ignite. For these reasons: 1) Use
microwave-safe plastics only and
use them in strict compliance
with the cookware manufacturer’s
recommendations. 2) Do not
subject empty cookware to
microwaving. 3) Do not permit
children to use plastic cookware
without complete supervision.
.
When
cooking
pork,
follow
the directions exactly and always
cook the meat to an internal
temperature of at least
l~°F.
This assures that, in the remote
possibility that trichina may be
present in the meat, it will be
tiled
and
meat
wi~
be safe
to
eat.
o
Boning
eggs is
not
recommended in a microwave
oven.
Pressure can build up
inside the egg yolk and may cause
it
to
burst, resulting in injury,
● Foods
with
unbroken
outer
“skin”
such as potatoes, sausages,
tomatoes, apples, chicken livers
and other giblets, and egg yolks
(see previous caution) should be
pierced to allow steam to escape
during cooking.
o
~~Boilable”
cooking
pouches
and tightly closed plastic bags
should be slit, pierced or vented
as directed in cooking guide, If they
are not, plastic could burst during
or immediately after cooking,
possibly resulting in injury. Also,
plastic storage containers should be
at least
partidy
uncovered because
they form a tight seal. When
cooking with containers tightly
covered with plastic wrap, remove
covering
care~y
and
direct
steam
away from hands and face.
●
Spontaneous boiling—Under
certain special circumstances,
liquids may start to boil during or
shortly after removal from the
microwave
oven, To prevent burns
from splashing liquid, stir the
liquid briefly before removing the
container from the microwave oven,
SAW
T~E
INSTRUCTIONS
4

Features of Your Oven
II
mm
~5A
.4
Cubic Foot
Oven Interior
I
I
\
1. Door Latches.
2. Door Screen. Metal screen
permis
viewing of foods and keeps
microwaves confined inside oven.
3.
Oven Vent.
4. Mode Stirrer Cover.
Protects
the microwave energy distributing
system. Do not remove this cover.
You will damage the oven.
—
N
Q
r
m
I
-.—
--,
,-
::
--.
!
-
-----
—
-..
5. Glass Cooking fray. Tray must
be in place when using the oven.
Cooking performance will be
unsatisfactory without the tray
in place. The tray maybe removed
for cleaning.
6
Oven Interior Light.
~rns
on
when timer is on.
7.
35-Minute Timer.
Set timer to
desired cooking or defrosting time.
Setting the timer starts the oven
(when the door is closed).
&
Door Open Bar. Press to open
door. Door must be securely
latched for oven to operate.
9. Power Level Knob.
This knob
can be set at LOW/DEF or HIGH.
10. Model and Serial Numbers.
5

CooMng
The timer allows you to preset
the cooking time.
The oven shuts off automatically.
Power Level HIGH is recommended
for all cooking and heating.
To become better acquainted with
time cooking, make a cup of coffee
by following the steps below.
Step 1:
Fill a cup 2/3 full of water
and add 1 teaspoon of instant coffee
and stir to
diss-olve.
Use a cup that
has no metal decoration and is
microwave safe (refer to Microwaving
Tips on page 3). Place cup in oven
and close door.
Step 2:
Turn Power Level knob to
HIGH.
Step 3: Set Timer Control. For
coffee, set at
llA
minutes. Timer
may be reset during cooking
if needed.
Note: To settimerless than2 minutes,
turn the Timer Control past 2 and
then back to the desired time.
Step
4: When time is up, the oven
sounds, oven light and fan shut off.
Questions and Answers
Q. I set my oven for the time
called for in the recipe, but at the
end of the time allowed, my food
wasn’t done. What happened?
A. Since house power varies due
to time or location most recipes
give you a time range to prevent
overcooking. Set the oven for
minimum time, test the food for
doneness, and cook your food a
little longer, if necessary.
Q.
What happens if I accidentally
operate the microwave oven
without food in it?
A. Accidental use for short
periods of time does not damage
the magnetron but it is not
recommended.
Q. Can I interrupt the cooking
function to check the food?
A. Yes.
To resume cooking, simply
close the door. The timer must be
reset for cooking to resume unless
time is remaining on timer.
6

Defrosti~
The Defrost setting is designed
for speedy thawing of frozen food
and is one of the great advantages
of a microwave oven.
●
Power Level
LOW/DEF
should
be used for defrosting.
● See your Defrosting Guide for
defrosting help.
To become better acquainted with
the defrost function, defrost frozen
pork chops by following the steps
below.
Step 1: Place l-lb. package of
frozen chops in the oven and
close door.
Step 4:
When oven turns off, turn
package over, close door, and set
timer for remaining defrosting time.
Ufrosting
Mps
●
Foods frozen in paper or plastic
can be defrosted in the package.
●
For even defrosting, many foods
need to be broken up or separated
part of the way through the
defrosting time.
● Pre-packaged frozen dinners
can be defrosted and microwaved.
Be sure to remove any foil covers.
Keep metal trays at least 1“ away
from cavity walls.
●
Check the following guide for
other defrosting tips.
Step
2:
~rn
Power Level knob
to
LOW/DEF.
Step 3:
~rn
Timer Control to one
half of the total defrosting time
recommended in the defrosting
guide. Turning the Timer Control
starts the oven when the door is
closed.
7
Questions
andhwers
Q. When I turn the Timer
Control and start the oven, I hear
a dull thumping noise. What is it?
A.
This sound is normal. It is letting
you know the oven is using a Power
Level lower than HIGH.
Q. Why don’t the defrosting
times in the Defrosting Guide
seem right for my food?
A. These times are averages.
Defrosting time can vary according
to the temperature in your freezer.
Set your oven for the time indicated
in your Defrosting Guide. If your
food is still not completely thawed
at the end of that time, reset your
oven and adjust the
tie
accordingly.
Q. Should all foods be completely
thawed before cooking?
A.
Some foods should not be
completely thawed before cooking.
For example, fish cooks so
quic~y
it is better to begin cooking while it
is still slightly frozen.
Q. Can I open the door during
defrosting to check on the
progress of my food?
A. Yes.
You may open the door at
any time during microwaving. To
resume defrosting, close the door.
The oven begins operating if time is
left on timer. If not, reset timer.
I
1

Defrosti~
Guide
Rwer
hvel:
bw/Def
Hmt
Half
Second Half
Food
We,
Minutes
me,
Minutes
Cements
Meat
Bacon (1
pkg.)
3
3-4
Place unopened package in microwave oven.
~rn
over
per pound per pound after first half of time and unwrap. Let stand 5 minutes.
Microwave just until strips can be separated.
Franks (1 lb.)
4
3
Place unopened package in microwave oven.
~rn
over
after first half of time. Microwave just until franks can
be separated.
Ground beef & pork (1 lb.)
4
3-4
~rn
package over after first half of time. After second
half of time, breakup and let stand 5 minutes.
Ground beef & pork (2 lbs.)
8-10
7-9
~rn
package over after first half of time. Scrape off
softened meat after second half of time. Set aside. Break
up remaining block
and
continue microwaving 3-5 minutes
if necessary.
Spareribs,
2-4
2-3
Place wrapped package in microwave oven.
~rn
over
Wrk
(2 lbs.) per pound per pound
after first half of time. After second half of time separate
pieces with table knife. Let stand to complete defrosting.
steaks,
4-6 4-5 Place
unwrappd
meat in single layer in cooking dish
Chops & per pound per pound
Cuflets in oven.
~rn
over after
first
half of time and separate
defrosted pieces with
table
knife. Let stand to complete
@ef,
lamb,
defrosting.
ved
& pork)
Sausage, 3-4 2-4 Scrape off softened meat after second half of time.
Bulk (1 lb. tray) Set aside. Break up remaining block, microwave 2 to
4 minutes more.
Sausage
34
3-4
~rn
over after first half of time. Let stand 5 minutes.
Bulk (1 lb. roll)
Sausage,
2-3 2-3
Wrn
over and
rotite
1/4 turn after first half of time.
Link (1 lb.) Let stand 5 minutes.
Sausage,
3
2-3
~rn
over after first half of time and rotate patties. Let
Patties (U oz. pkg.)
stand 5 minutes.
8

Power
~vel:
bw/Def
Fimt Half Second Half
Food
~me,
Minutes
~me,
Minutes Comments
Poultry
Chicken, broiler-fryer, cut-up
8-11
(1%-2
Ibs.)
8-11
Place wrapped chicken in
rnicrowve
oven. After first
hdf
of time, unwrap and separate pieces. Let stand 5
finutes.
Chicken, broiler-fryer, cut-up
11-13
(2%-3
Ibs.)
11-13
Place wrapped chicken in microwave oven. After
first
half of time, unwrap and turn over. After second half of
time, separate pieces. Microwave 3 to 5 minutes more,
if necessary.
Whole
11
(2fi-3
Ibs.)
12-13
Place wrapped chicken in microwave oven. After
hdf
of
time, turn chicken
over
and shield warm areas with foil.
fih
& Seafood
Fillets (1 lb.)
6-7
6-7
Place unopened package in microwave oven.
(If
fish is
frozen in water, place in cooking dish.)
firn
over after
first
half
of time. After second
half
of time, hold under
cold
water to separate. Let stand 5 minutes.
Shellfish,
6
6-8
Spread shellfish in
single
layer
in baking dish. Rearrange
small pieces pieces after first half of time. Let stand 5 minutes.
(1 lb.)
Shellfish,
3-4 2-3
Place block in casserole.
firn
over and breakup with
blocks fork after first
half
of time.
Crabmeat (6 oz.)
Shellfish,
3-4 3-4
Arrange in cooking dish with light underside up.
firn
large (8-10 oz.) over after first
half
of time.
Crab legs
Breads, Cakes
Bread or buns (1 lb.)
2-3 2-3
~rn
over after first half of time.
Heat & serve rolls
lY2-2ti
1-2
Rotate package 1/4 turn after first half of time.
(7 OZ. pkg.)
Coffee cake (9-13 oz.)
3-4 2-3
Remove from foil pan if necessary. Rotate 1/2 turn after
first half of time.
Sweet rolls (8-12 oz.)
2-3
2
Rotate 1/4 turn after first half of
time
Doughnuts, 1-3
~/2-2
None No turn needed
Doughnuts,
2-3 2-3
Rotate 1/4 turn after first
hdf
of
time.
glazed, 1 dozen
French toast,
2-4
None No turn needed
2 slices
9

Defrosting Guide
(continued)
%wer
Uvel:
bw/Def
Fimt
Half
Seeond
Half
Food
~me,
Minutes
~me,
Minutes
Commenk
Cake, frosted
1-2 1-2
Place cake in box in microwave oven. Rotate 1/4 turn
(17 oz.)
after first half of time. Let stand 10-20 minutes.
Pound cake
1%-2
(11
‘h
oz.)
1%-2
Remove from foil pan and place on microwave-safe plate
if necessa~. Rotate 1/4 turn after first half of time. Let
stand 10 minutes.
Cheesecake
6-9
None Remove from foil pan and place on microwave-safe plate if
(17-19 oz.)
necessa~.
ht
stand 20-30 minutes to complete defrosting.
~uit,
Hes
Fruit (10-16 oz.)
None Remove from foil and place in microwave-safe container
if
necessa~.
Place package in microwave oven. After
minimum time, break up with fork. Repeat if necessa~
or let stand 5 minutes.
Fruit, in
4-5
None Place package in microwave oven.
Flex
package once.
plastic pouch
(lo oz.)
Fruit pie,
10-16
None Let stand 20-30 minutes to complete defrosting.
or nut pie
(8-in.)
Cream pie
1-2 1-2
Rotate 1/2 turn after first half of time. Let stand 15-25
(14 oz.)
minutes to complete defrosting.
Cusmrd pie
11-13
None Let stand 25-35 minutes to complete defrosting.
(14 oz.)
10

Heating or Reheating Guide
1. Directions below are for reheating already-cooked foods at refrigerator or room temperature. Use microwave oven safe containers.
2. Cover most foods (see tips) for fastest heating. Exceptions are rare or medium meats, some sandwiches, griddle foods
like
pancakes and
baked foods.
3. Be sure foods are heated through before serving. Steaming or bubbling around edges does not necessarily mean food is heated throughout.
As a general rule, hot foods produce an area warm to the touch in center of underside of dish.
Power
hvel:
High
Item Amount Approximate
~me,
Minutes
Appetizers
Saucy, such as meatballs, 1 to 2 servings
3-5
cocktail franks, riblets
3 to 4 servings
5-7
(M
cup per serving)
Pastry bites;
small
pizzas,
2 to 4 servings 2-3%
egg rollsetc.
Plate of
hftovers
Meat plus 2 vegetables
1 plate 3-5
Meak and main dishes
Saucy main dishes; chili,
1 to 2 servings
5-8
chop
suey,
spaghetti, stew
3 to 4 servings
7-1o
(%-1 cup serving)
1 can (16 oz. )
6-8
Hamburgers or meat loaf
1 to 2 servings 2-4
(4 oz. per serving)
3 to 4 servings 4-6
Hot dogs and sausages
1 to 2
1-2
3 to 4 2-3
Rice and pasta 1 to 2 servings
lM-3
(2A-%
cup serving)
Topped or mixed with sauce 1 to 2 servings
5-7
3 to 4 servings
7-9
Tip: Cover saucy main dishes with plastic wrap. Cover other main dishes and meats with waxed paper.
soups
Water based 1 to 2 servings
3-5
(1 cup per serving) 3 to 4 servings
9-12
1 can (10 oz.)
7-9
Vegetables
Small pieces; peas, corn, beans, etc.
1 to 2 servings
1%-4
(%
cup per serving)
3 to 4 servings 4-6
Large pieces or whole; corn
1 to 2 servings
3-5
on the cob, asparagus spears, etc.
3 to 4 servings
6-8
Mashed 1 to 2 servings
3-5
(Y2
cup per serving) 3 to 4 servings
7-9
Tip:
Cover vegetables for most even heating.
Sauces
Dessert; chocolate,
1/2
cup
butterscotch
1-2
1 cup 2-3
Meat or main dish, chunky
1/2
cup
3-4
type, giblet gravy, spaghetti
1 cup
4-6
sauce, etc. 1 can
(16
oz.)
5-7
Creamy type
1/2
cup
3-4
1 cup
4-5
Tip: Cover food to prevent spatter.
11

Convenience Food Guide
1. Most convenience foods can be reheated by microwave only, since they are already cooked. Always use microwave-safe cookware (glass or
plastic). For foods needing browning or crisping, conventional baking is recommended.
2. Remove food from foil containers over 3/4-inch high and place in microwave-safe dish.
Power
Uvel:
High
Food
~me,
Minutes
Commenfi
Appetizers
Frozen prepared sandwiches
2-3
Wrap in paper towel. Rotate 1/4 turn after half of time.
per sandwich
Pizza (3.7 oz.)
3-5
Rotate 1/2 turn after 2 minutes.
Popcorn (3
fi-oz.
pkg.) frozen 5-6 Times given are for microwave popcorn.
Popcorn (3
%-oz.
pkg.) room temp.
3Y2-4%
Fish &
Shellf~h
Fish & chips (5-14 oz. ) 5-8
Remove
foil
cover. Return tray to carton or distribute
evenly on microwave-safe dish.
Breaded fish (5-10 oz.)
5-8
Distribute evenly on microwave-safe dish lined with 2
(14-16
OZ.)
9-11
paper towels. Rearrange or rotate dish 1/4 turn after half of
(23-25 OZ.)
11-13
time.
Meati
Dry mixes, hamburger added
14-16
Add cooked, drained hamburger. Stir after 7 minutes.
Frozen meats (5-8 oz. )
6-10
If pouch package is used, puncture with fork to vent. Stir
(10-16
OZ.)
8-18
meat
pieces or rotate 1/4 turn after half of time.
Frozen Dinners
Hearty T.V.-style (17 oz. )
12-15
Remove foil cover and return tray to carton. If metal tray
Regular T.V.-style
(11
oz.)
10-12
is more than 3/4-inch deep, place food in microwave-safe
Premium entree (8-9 oz.)
10-12
container. Rotate 1/4 turn after half of cooking time. If
(10-13 oz.)
12-14
food is in pouch, slit pouch before microwaving.
Pasta and
Rce
Canned spaghetti (16 oz.)
6-8
Stir before serving.
Frozen lasagna (21 oz. ) 22-24 Rotate 1/4 turn after
half
of time. Let stand 5 minutes
before serving.
Macaroni & cheese (8 oz.)
9-11
Stir or turn 1/2 turn after
half
of cooking time.
Poultry
Fried chicken 2 pieces
5-6 Arrange on plate lined with 2 layers of paper towels. Rotate
4 pieces
10-12
1/2 turn after half of time.
6 pieces
11-13
Frozen pouch (5-7 oz.) 4-6 Slit pouch before microwaving. Stir before serving.
Griddle Foods
French toast 2 pieces
2-3
Arrange on plate
lined
with 2 layers of paper towels.
4 pieces
3-4
Waffles 2 pieces
2-3
Arrange on plate lined with 2 layers of paper towels.
4 pieces
3-4
Breakfast Foods
Country sausage 2
I
%
& biscuits
4
2-3
Rotate 1/4 turn at
1
minute.
6
4-5
Rotate 1/4 turn after 2 minutes.
Breakfast entree (4-6 oz. )
4-5
Stir occasionally or turn
1/4
turn afier half of cooking time.
12

Mea@
Always use microwave-safe dish, plastic or glass
Power
Uvel:
Hi~
Food
Contiiner
Cover
Commenk
Beef
Ground 1 lb.
Casserole
Yes
Crumbled
7-9 min.
Stir every 2 minutes. Add sauce or casserole
ingredients and finish. To cook frozen block,
(for casseroles
microwave
12
to 15 minutes, breaking up and stirring
or soup) every 5 minutes.
Meatballs
Pie plate
Wax
(1 lb.) 8-11 min.
Arrange 3/4 to l-inch apart in circle around edge of
paper
dish. Rotate dish 1/4 turn after
half
of time.
Patties
8-in. square glass dish
Wax
Cover with wax paper.
Route
dish 1/4 turn after half
4 patties/lb. (with trivet if desired) or paper
1-2 patties
time. If desired, add browning sauce or agent. Let
ceramic dinner plate (For
3-4 patties 3-5 min.
patties stand, covered, 2 minutes.
I
or 2 patties use paper
6-8 min.
plate
lined
with double
thickness paper towels. )
Meat loaf
Pie plate
Plastic
26-29 min. Let stand 10 minutes after cooking.
(Round
Ioafi
wrap
Pork
Bacon Microwave- Paper
1-1
M
min.
Arrange in single layer on paper towels or on trivet
safe
plate
towel
per slice set in dish. Layer many
slices
between layers of
paper towels.
Pork sausage Microwave-
Wax
Arrange in single
layer,
Rotate dish 1/2 turn after
(raw) safe cookware
2 patties
paper
half time.
4 patties
2-4 min.
5-7 min.
Pork link sausage Microwave-
Wax
Arrange in single layer. Rearrange after half of time.
(raw) safe cookware
paper
2 links 2-3 min.
4 links 5-6 min.
8 links
7-8 min.
Canadian bacon Microwave-
Wax
Arrange in single layer.
2-4 slices safe cookware
paper
I-2 min.
6 slices 2-3 min.
Hsh
and Seafood
1. Fish is done when it flakes
easily
with a fork. Center may
still
be slightly translucent, but
will
continue cooking as fish stands a few minutes
before serving.
2. Cook fish with or without sauce. A tight cover steams fish. Use a lighter cover of wax paper or paper towel for less steaming.
3. Do not overcook fish. Check at minimum time.
Power
Uvel:
Hi@
Food
Contiiner
Cover
~me
Commen@
Fillets or 8-in. square dish
Wax paper or
9-11
min.
Microwave until fish flakes easily. Let stand 3 minutes
steaks (1 lb. )
Plastic wrap
before serving.
Clams, 6
Pie plate or shallow dish
Plastic wrap
6-8 min.
Arrange in circle. Rotate dish 1/4 turn after halftime.
Shrimp (1 lb.) Pie plate or shallow dish
Plastic wrap
(peeled)
7-9 min.
Stir once during cooking.
Shrimp (2
lbs.
) 2-qt.
casserole
Lid or
(unpeeled)
7-9 min.
Stir twice during cooking
Plastic wrap
13

Poultry
Let chicken and other small poultry stand after microwaving for 5 to 10 minutes.
Power
hvel:
Hi@
Food
Contiiner
Cover
~me
Commen@
Chicken
Pieces Plate or 8-in.
Wax paper 3-4 min.
Brush with browning agent if desired. Arrange in
(1%-2 lbs.,
square dish per piece
single
layer in cooking dish so thickest, meaty pieces
approx.
6 pieces)
are to outside edges of dish.
Whole
8-in. square dish
Wax paper
10-12 min.
(2-2% lbs.) Place breast side down. After half of cooking time turn
per lb.
over. Shield ends of legs and wing tips with foil.
Cornkh Hem
Whole (stuffed
8-in. square dish
Wax paper
11-13 min.
Place breast side down in dish. Wrn over after half
or unstuffed,
1-1%
lbs.)
per lb. of time.
Halves
8-in. square dish
Wax paper
10-12 min.
Arrange skin side up in dish, on bed of stuffing
per lb.
if desired.
as
1. Always pierce whole yolks before microwaving to prevent bursting.
2. Never hard cook
e~s
in
tie
shell,
and do not reheat in-shell hard cooked
e~s.
They
could
explode.
3. Cook
e~sjust
until set, they are delicate and can toughen if overcooked.
Power
hvel:
Hia
Food
Contiiner
Cover
~me
Commenk
Scrambled
Glass measuring cup
No
1-1% min.
Place 1 teaspoon butter per
egg
in dish. Microwave
or casserole
per egg
until melted. Scramble the eggs with the butter and
1 tablespoon
tik
per
e=.
Place in oven and microwave
for half of
total
time. Scrape portions from the outside
to the center. Finish cooking.
Allow
to stand 1 to 2
minutes to set eggs.
Poached
1%-qt.
casserole
Lid 6-8 min. Boil 2 cups hot tap water 6 to 8 minutes, covered.
l-llA
min. Break eggs onto plate, puncture membrane. Swirl
per egg boiling water with spoon,
slip
in eggs gently. Cover.
Let stand in water a few minutes before serving.
Brea&
Crust on breads will be soft,
ouwide
of foods
will
not brown. If desired,
spritie
top of batter with cinnamon-sugar mixture, chopped nuts or
other topping for brown color. Or, increase brown color on upside-down breads by lining dish before microwaving with brown sugar caramel
mixture, or savory topping like crushed canned French fried onion rings.
Power
hvel:
Hi@
Food
Contiiner
Cover
Commen~
Corn bread 8-in. round dish
No 6-8 min. For flavorful browned topping
sprin~e
cooking dish
(8 OZ.) witi
finely
chopped, canned French fried onions before
microwaving.
~rn
out of pan upside down to serve.
Coffee cake 8-in. round dish No
9-11 min.
Let stand on flat surface 10 minutes to finish baking.
(14 oz.)
Gingerbread 8-in. round
No
11-13 min.
Let stand on flat surface 5 minutes to finish baking.
or square dish
Quick bread Glass loaf dish, bottom
No
11-13 min.
Rotate dish 1/4 turn after half time. Let stand on flat
(14-17 oz.)
lined with wax paper surface 15 minutes to finish baking.
14

1. Always use microwave-safe cookware, glass or plastic.
2. For
pasu,
use about half the amount of water needed for conventional boiling; there is less evaporation in a microwave oven. Add regular
amount of salt and 1 teaspoon oil (optional, to prevent sticking).
3. For rice or minute rice, use the same or slightly greater amount of water as with conventional boiling. Add regular amount salt.
4. Cover pasta and rice tightly while microwaving. When using plastic wrap, turn back one corner to vent.
5. Stir or rearrange after half of cooking time. Drain pasta immediately afier microwaving.
6. Microwaving time is about the same as conventional boiling.
Power
hvel:
Hi@
Food
Contiiner
Cover
~me
Commenk
Macaroni 2-qt. casserole
Lid or
17-19 min.
Add 3 cups hot tap water. Stir after 10 minutes. For
(7 oz.)
plastic wrap
rotini
tv~e,
check for doneness after 10 minutes.
Spaghetti
2-qt. casserole Lid or
18-20 min.
Add 3 cups hot tap water. Rearrange after 10 minutes.
(7 oz. broken)
plastic wrap
Egg
noodles
2-qt. casserole
Lid or
14-16 min.
Add 4 cups hot tap water. Stir after 10 minutes. Time
(8 OZ.) plastic wrap is the same for spinach or regular noodles.
Mce
Rice, regular 2-qt. casserole
Lid or
17-19 min.
Add 2 cups hot tap water and 1 teaspoon salt. Stir after
long grain (1 cup)
plastic wrap
10 minutes. Let stand covered 5 minutes before serving.
Rice, minute
1
%-qt.
casserole
Lid or
7-8 min.
Add
1%
cups hot tap water. Stir after 4 minutes.
(1% cups) plastic wrap
Cereal
1. Always use microwave-safe cookware, glass or plastic. Use large enough
conbiner
to avoid
spillover.
2. Start with hottest tap water to shorten cooking time.
3. Do not cover
(prevenk
spillover).
4. Stir half-way through cooking time.
Power
hvel:
Hi~
Food
Contiiner
Cover
~me
Commenk
Oatmeal, quick China or pottery
bowl, No 2-2%
min. Mix cereal, salt and hottest tap water before
per serving
paper bowl microwaving. Stir after 1
Y2
minutes and before serving.
Oatmeal,
l-qt.
casserole
No
4-5 min.
Increase casserole size for more than one serving.
long cooking
Increase time about
2Y2
minutes for each additional
1serving serving.
Grits, quick
China or pottery bowl, No 4-5 min.
Mix cereal with hottest tap water. Increase casserole
1serving paper bowl size and microwave time by
2Y2
minutes per additional
serving.
Cream of wheat l-qt.
casserole
No
3-4 min.
Heat water to boil, then add cereal. Increase time
1 serving or bowl l%
minutes
per additions serving.
Cream of rice China or pottery
bowl,
No
1Y2-2
min. Mix cereal with hottest tap water. Increase time about
lfi
minutes
per additional serving.
Use
2-quafi
1 serving paper bowl
casserole for more than 1 serving.
Note:
To
microwave single-sewing packet of instant cereals, follow package directions for amount of water and microwave at
High
for
1/2
to 1 minute.
15

Vqetibles
mesh
Vegetables
1. Weights given for fresh vegetables are purchase weights, before peeling, trimming, etc.
2. Pierce skins of vegetables to be heated whole and unpeeled (i.e. potatoes, squash, eggplant). This allows steam to escape and prevents bursting
or popping.
3. Add
ody
2 to 3 tablespoons of water per pound. Rinsing vegetables before cooking is usually sufficient. Salt just before serving.
4. Heat, covered, in casserole dish; stirring once. Let stand
coverd
5 minutes
udess
otherwise specified.
Mzen
V~etibles
1. Frozen vegetables maybe heated in pouch, package or freezer container. Puncture pouch before heating and flex halfway through cooking to
distribute heat.
2. Place frozen vegetables in covered casserole dish. Add 2 tablespoons of water
udess
otherwise indicated in chart.
3. Stir once during cooking.
Sdt
vegetables after cooking or put salt in the casserole with the water before adding vegetables.
Power
hvel:
Hi@
Vegetible
hount
~me
Commenk
~~
Fresh
1 lb.
7%-9%
min.
Cut into 1%-inch pieces. Add 1/4 cup water.
Frozen, spears
10 oz.
8-101A
min.
B-
Fresh, green or wax
1 lb. 9%-11%
min.
Cut into 1%-inch pieces. Add 1/4 cup water.
Frozen 9 oz.
8-11 min.
Bmcoti
Fresh, spears
1
lb.
8-10 min.
Add 1/4 cup water.
Frozen, chopped or spears
10 oz. 10-12Y2 min.
CabbWe
Fresh, chopped, shredded
4 cups
11-13 min.
Add 1/4 cup water.
Wedges
4
11-13 min.
Add 1/4 cup water.
Carrob
Sliced, fresh
1 lb. 13-15 min.
Cut carrots into slices 1/2 inch thick. Add 1/4 cup water
Frozen
10 oz. 8%-1OM
min.
CaMower
Fresh,
flowerets
1 lb.
9%-12 min. Add 1/4 cup water.
Whole
1 lb. 16-18 min.
Frozen,
flowerets
10 oz. 9%-11
min.
Com
Whole kernel, frozen
10 oz.
7-8 min.
On the cob, fresh
1 ear
5-7 min.
Add 2 to 4 tablespoons of water.
2 ears
7-9~z
min.
4 ears
15~z-17~z
min.
Fresh
cubed
1 lb.
11-13~2
min.
Add 2 tablespoons water.
Whole
1 lb.
7-10 min.
Pierce skin. Turn over after half of
time.
Ltia
B-
Frozen
10 oz.
8-10 min.
Add 1/4 cup water.
Frozen
Sliced
10 oz.
8-9V2
min
Whole
10 oz.
9-11 min.
16

Power
hvel:
High
Vegetible
hount
Time
Comments
Otiom
Fresh
8-10 9%-12 min.
Use small, whole onions. Add 1/4 cup water.
Peas
Green, fresh
1
%
lbs.
7Yz-9yz
min.
Frozen
Add
1/4 cup water.
10 oz.
7Y2-8
%
min.
Pw
Snow, frozen
6 OZ.
6%-8 min.
Potatoes
Fresh, baking
7-8 min.
Rinse and pat dry. Prick with fork several times. Arrange in circular
medium
;
11-12 min.
6
OZ.
pattern on paper towel lined oven bottom,
equrd
distice
apart. Turn
4
17-18 min.
over after half of time. Let stand 5 minutes before serving.
Spkach
Fresh, leaf
1 lb.
8-10%
min. Add 1/4 cup water.
Frozen, leaf or
chopped
10 oz. 9~z-12
min.
Squash
Summer, sliced, fresh
1 lb.
9fi-12 min. Slice squash l/2-inch thick. Add 1/4 cup water.
Frozen
10 oz.
7
%-9%
min.
Squash
Winter, fresh, whole
1 lb. 9-11 min.
Pierce skin. Turn over
afierhdftime.
ht
stand 7 minutes after cooking.
1
%
lbs. 11-13
Y2
min.
Pierce skin. Let stand 7 minutes after
cooking.
Succotash
Frozen
10 oz.
8Y2-10Y2
min.
Vegetiblw
Frozen, mixed
10 oz. 9%-1 1 min.
ZUCCM
Sliced, fresh
1 lb.
10-12 min. Slice
l/2-inch thick. Add 1/4 cup water.
Frozen
10 oz.
8-10 min.
hount
Undrained Drained Comments
All kinds
8
OZ.
3-3
%
min. 2-2% min.
Place vegetables in microwave-safe serving dish. Cover with plastic
15-17 oz. 6-8 min.
34
min. wrau. Check at minimum time. Stir and serve.
V~etible
Convenience Foods
Vepetable
hount
Time Comments
Braded
Vegetablti
7 oz. pkg. frozen
4-6 min.
Place on trivet, or plate suitable for microwaving. Cook
uncoverd.
Rotate plate 1/4 turn after
halfoftime.
Breading will not be crisp.
Cook conventionally for crispness.
Casserole, Vegetable
8-12 oz. pkg. frozen
10-13 min.
Place in l-quart casserole. Cover. Stir after
hdf
of time.
PotatM
Baked, stuffed, frozen
6-8 min.
Examine potatoes to see
hat
mashed filling is encased in potato skin.
;
9-11 min.
NOT FOIL. Place potato(es) on plate sui~ble for microwave oven.
10-12 min.
Cover with wax paper. Rotate plate 1/2 turn after
hdf
of time.
:
13-15 min.
Potitms
Instant mashed 4 servings
5-7 min.
Use cookware size and amounts of water, milk, butter and
sdt
on
package. Cover. After heating, bristiy stir in potatoes, adding extra
1 to 2
tableswons
drv mix.
17

Cakes and
Desser6
1. Always use microwave-safe cookware, glass or plastic.
2. Before adding batter, grease dishes but do not flour. Or, for easy removal, line dish with wax paper.
3. Crust on cakes will be soft. Refrigerate cake if firm exterior is desirable for frosting.
4. Fruit desserts will be fresh looking and tasting.
Power
Uvel:
Hi@
Food
Contiiner
Cover
~me
Commen6
Cakes
Basic butter or Greased 8-in.
No
10-12 min.
Rotate 1/4 turn after 5 minutes. Let s~nd on heat-proof
Chocolate cake
round dish counter or wooden board to
cool
15 minutes. Invert.
Pineapple
8-in. round dish
No
12-14 min.
Rotate 1/4 turn after 6 minutes. When done, toothpick
Upside-down
Cake
stuck in cake comes out clean. Invert cake onto plate;
let
dish stand over cake a few minutes.
Cupcakes -6 Paper lined cupcaker
No 3-4 min. When cooking several cupcakes, you may notice some
will
be done before others. If so, remove cupcakes as
they are done and continue cooking the rest a few
seconds more.
Bar cookies
8-in. square dish
No
10-13 min.
Grease dish before adding batter. Rotate dish 1/4 turn
after half of time. Cut when cool.
Baked apples Microwave-safe dish Lid or 4-5 min.
Pierce fruit or
peel
to prevent bursting. Rotate dish
or pears or casserole plastic wrap per piece
1/4
turn after half time.
Brownies
(b
oz., 8-in. square dish
No
10-13 min.
Rotate 1/4 turn after 5 minutes.
cake-like or
fudge-like)
Cake mix (with or 8 or 9-in.
No 6-8 min.
Grease dish. Use 2 cups batter. Rotate 1/4 turn after
without pudding round cake dish 4 minutes. Let stand 10 minutes before inverting.
in the mix) 12-cup
bundt
No
15-18 min.
Use all batter. Rotate 1/4 turn every 5 minutes. Let
stand 15 to 20 minutes before inverting to cool.
Candies
1. Always use microwave-safe cookware,
glass
or plastic. For easy cleanup, melt chocolate in paper wrappers seam side up, or place chocolate in
paper bowl to melt.
2. Candies which are boiled become very hot; be sure to handle cooking containers carefully.
Power
hvel:
Hi@
Food
Contiiner
Cover
~me
Commenk
S’Mores Paper napkin
No 15-20 sees.
Cover graham cracker with chocolate and
or paper plate
marshmallow.
Caramel apples l-qt. casserole
No
3M-4
min. Unwrap a 14-ounce package of caramels into measuring
cup. Add 1 tablespoon water. Stir mixture after 2
minutes. Stir again before dipping 4 apples into mixture
Marshmallow
8-in. square dish
Yes
1%
min. to
In 8-inch square dish melt 1/4 cup butter. Add 40
Crisp melt butter
marshmallows (about a 10-ounce package) Cover
3~2-4
min. to
loosely with wax paper and microwave to melt. Stir in
melt marshmallows
4%
cups crispy rice cereal. Press firmly into dish.
Chocolate bark
1%-qt.
casserole
Yes
4-5 min. Place 12-ounce semi-sweet chocolate pieces in
or
bowl
container. Microwave to melt. Add 1 cup whole toasted
almonds. Spread over wax paper on cookie sheet.
Chill
until firm.
18

Gravies & Sauces
1. No cover
is
needed, except for thick, chunky spaghetti sauce,
2. Because microwaved sauces evaporate less than on the range top, they are thinner than conventionally cooked sauces made with the same amount
of thickening. Increase thickening by adding extra teaspoon to
1
tablespoon flour or cornstarch for each cup of liquid.
3. Microwaved sauces do not need to be stirred constantly but most should be whisked vigorously with wire whisk once or twice while microwaving.
4. Vary basic white sauce by adding cheese, egg yolks, cream or dry milk solids. Add flour with mayonnaise or wine.
Power
hvel:
High
Food
Contiiner
Cover Time
Commenti
Gravies and sauces Glass measure
No
5Y2-6Y2
min. Microwave fat, flour and salt together to melt and
thickened with flour
or bowl
blend. Whisk in liquid and finish cooking. Increase
or cornstarch
time 1 to 2 minutes per additional cup of sauce.
(1 cup)
Sauces
Thin,
liquid
sauces Casserole
No 6-8 min. Add cornstarch-water mixture to heated ingredients.
(Au jus, Clam, etc.)
Stir well and microwave to heat thoroughly.
(1 cup)
Melted butter sauces, Glass measure
No
2 min.
Microwave butter just to
melt.
For clarified butter,
clarified butter bring to
boil
then let stand until layers separate.
(’h
cup)
Pour off and use clear top layer.
Thick spaghetti, Casserole or
Yes
barbecue or
large bowl (spaghetti)
sweetlsour sauces
(2
cups)
Cooting
Techniques for Microwaving
Covering.
In both conventional and microwave
cooking, covers hold in moisture and speed heating.
Conventionally, partial covering allows excess steam
escape. Venting plastic wrap or covering with wax
paper serves the same purpose when microwaving.
Arranging in Oven.
In conventional baking, you
uosition foods, such as tomatoes or potatoes, so that
to
hot
air can flow around them. Whe~ microwaving, you
arrange foods in a ring, so that all sides are exposed to
microwave energy.
Stirring.
In range-top cooking, you stir foods up from
the bottom to help them heat evenly. When
microwaving, you stir cooked portions from the
outside to the center. Foods which require constant
stirring conventionally will need only occasional
stirring.
Turning Over.
In range-top cooking you turn over
foods such as hamburgers, so both sides can directly
contact hot pan. When microwaving, turning is often
needed when cooking foods such as frozen hamburgers.
5-7 min.
Stir ingredients together and microwave 5 to 7 minutes,
4-6 min. stirring after half of time. Continue cooking 4 to 6
minutes until sauce is slightly thickened, stirring
twice. Let stand 5 to
10
minutes to develop flavor.
Standing Time.
In conventional cooking, foods such
as roasts or cakes are allowed to stand to finish
cooking or set. Standing time
is especially important in microwave cooking. A
microwaved cake is not placed on a cooling rack.
Shielding.
In a conventional oven you shield chicken
breasts or baked foods to prevent overbrowning. When
microwaving, you may use small strips of foil to shield
thin parts, such as the tips of wings and legs on
poultry, which would cook before larger parts.
Pierce Foods to Release Pressure.
Steam builds up
pressure in foods which are tightly covered by a skin
or membrane. Pierce potatoes (as you do
conventionally), egg yolks and chicken livers to
prevent bursting.
Rotiting.
Occasionally, repositioning a dish in the
oven helps food cook evenly. To rotate half a turn, turn
the dish until the side which was to the back of the
oven is to the front. To rotate a quarter turn, turn the
dish until the side which was to the back of the oven is
to the side.
19
—

~crowave
Cookware Guide
T~E
OF
COOKW~
MCROWAW
USES
Foil-1ined
Hper
Bags, Boxes and
Avoid. Use only foil trays 3/4” or less. Foil or metal will reflect
Baking Trays
microwaves, thus preventing even heating. Arcing can occur if foil is
Mekl
or part metal pok, Mns,
closer than 1“ to oven walls.
Thermometers, Skewers and Foil Trays
Boilable Hard and Soft Plastics,
Cooking ground beef (colander). Defrosting. Heating.
such as:
Rubbermaid
Glass jars,
such as
for baby foods,
Avoid heating baby food in jars,
especially meat and egg mixtures.
vegetables, entrees, syrups, salad Remove metal caps to warm syrup or soften salad dressing from
dressings. refrigerator.
Handmade Pottery, Porcelain,
Cooking and heating.
Stoneware
Microwave Plastics such as:
Cooking.
Anchor Hocking Microwave, Bangor
Plastic, Mister Microwave, Nordic Ware,
Republic,
Tara,
Wearever
Nupac
Paper or Styrofoam Plates and Cups
Heating and serving foods and beverages. Styrofoam should be used
for short-term heating to low temperatures and for serving.
Oven Glass
such as:
Anchor Hocking, Cooking and heating.
Fire King,
Glassbake,
Heller,
Jena,
Pyrex
Regular Dinnerware, such as:
Heating and some cooking.
Corelle by Coming, Dansk Generation,
Denby,
El
Carnino,
Franciscan,
International Stoneware, Lenox
Temperware,
Marsh, Mikasa, Pfalzgraff
Unsuitable Dinnerware, such as:
None.
Coming Centura,
Fitz
and Floyd
Oven-to-table Ware, Melamine, Dishes
with
meti
trim
Paper Towels and Napkins, Wax Paper
Cooking bacon. Absorbing moisture and preventing spatters. Heating
and serving sandwiches or appetizers. Light covering to hold in steam.
Glass-Ceramic
(Pyroceram),
Cooking and heating.
such as:
Corning Ware, Progression G.
by Noritake
Plastic Wrap, Cooking Bags,
Covering to hold in steam (wrap). Cooking (cooking and boil-in-bags).
Boil-in-bags, Storage Bags
Heating (storage bags).
Specialty Glass-Ceramic and Porcelain,
Recommended for microwave oven-to-table cooking of special foods.
such as: El
Camino,
F.B.
Rogers,
Heller,
Marsh Industries,
Pfalz~raff,
Shafford
20
This manual suits for next models
1
Table of contents
Other GE Microwave Oven manuals

GE
GE JE740BK - 7 cu. Ft Capacity Countertop Microwave... Manual

GE
GE JES0736SMSS User manual

GE
GE Monogram ZE2160 User manual

GE
GE JNM3161RFSS Operating manual

GE
GE JE89 Installation instructions

GE
GE Advantium PSB9100DF User manual

GE
GE JHP70GN User manual

GE
GE Hotpoint RE1440H Use and care manual

GE
GE Spacemaker CVM2072 User manual

GE
GE Profile PEM31SF4SS User manual