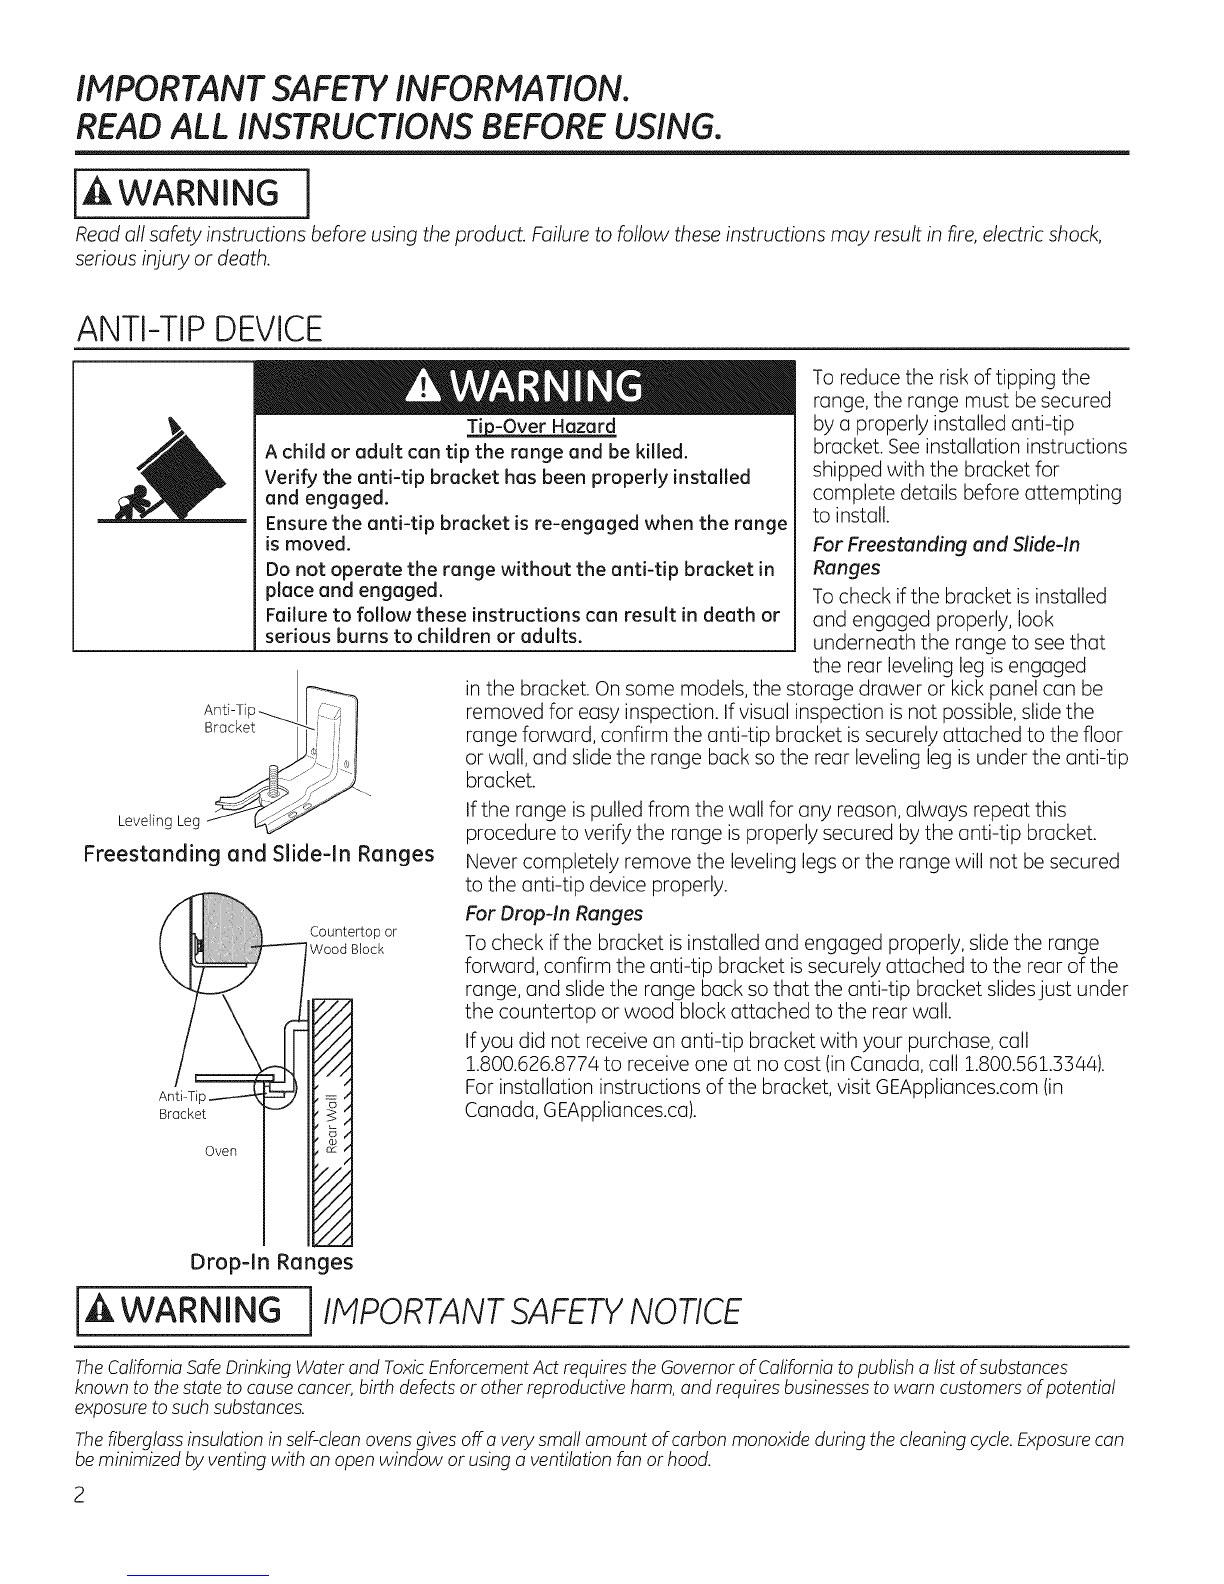
GE PHB925ST2SS User manual

GEApplia nces.c orn
0
og
4.z
U
i
/|
.
0
Espaffol
Fora Spanishversion of this manual, visit
our Websiteat GEAppliances.com.
Para consultar una version en espahol
de este manual de instrucciones,visite
nuestro sitio de internet
GEAppliances.com.
In Canada:
www. GEAppliances.ca
Safety Instructions ............................ 2-5
Operating Instructions
Kitchen Timer .......................................... 11
Oven ............................................... 10-27
Adjust Oven Thermostat .............................. 15
Baking or Roasting .................................... 13
Broiling, Broiling Guide ................................ 14
Controls ............................................... 10
Convection Oven ................................. 16, 17
Pizza .................................................. 17
Preheating ............................................ 13
Probe ................................................. 18
Sabbath Feature ...................................... 27
Self-Cleaning ...................................... 22, 23
SlowCookand Warming Features....................... 20
Special Features .................................. 25, 26
Steam Cleon .......................................... 24
Timed Baking and Roasting ........................... 19
Worming Drawer ..................................... 21
Surface Units ......................................... 6-9
Cookware .............................................. 9
Gloss Cooktop ......................................... 8
Worming Zone ......................................... 7
Care and Cleaning
Aluminum Foil..................................... 3, S,13
Control Panel ......................................... 28
Glass Cooktop ..................................... 34, 35
Lift-Off Oven Door.................................. 30, 31
Light ................................................... 29
Oven Floor ............................................. 33
Oven Heating Elements ................................ 33
Racks ................................................. 31
RemovableWarming Drawer/Drawer Pan................ 33
StorageDrawer....................................... 33
Surfaces .............................................. 28
Vent ................................................... 33
Troubleshooting Tips .......................... s6-4o
Accessories ........................................ 41
Consumer Support
Consumer Support ........................... Back Cover
Warranty .............................................. 43
Write the model and serial
numbers here:
Model #
Serial #
You can find them on a label
behind the drawer or behind the
lower oven door on the front of
the range frame.
Next Step Control
@
Printed on
Recycled Paper
Printed in the United stores 49-80655 07-12 GE

IMPORTANT SAFETY INFORMATION.
READ ALL INSTRUCTIONS BEFORE USING.
[A WARNING ]
Read all safety instructions before using the product. Failure to follow these instructions may result in fire, electric shock,
serious injury or death.
ANTI-TIP DEVICE
_p-Over Hazard
A child or adult can tip the range and be killed.
Verify the anti-tip bracket has been properly installed
and engaged.
Ensure the anti-tip bracket is re-engaged when the range
is moved.
Do not operate the range without the anti-tip bracket in
place and engaged.
Failure to follow these instructions can result in death or
serious burns to children or adults.
To reduce the risk of tipping the
range, the range must be secured
by a properly installed anti-tip
bracket. See installation instructions
shipped with the bracket for
complete details before attempting
to install.
For Freestanding and Slide-in
Ranges
To check if the bracket is installed
and engaged properly, look
underneath the range to see that
the rear leveling leg is engaged
in the bracket. On some models, the storage drawer or kick panel can be
AntPTip_ I !' _ I removed for easy inspection. If visual inspection is not possible, slide the
Bracket -_-- ; !
i i range forward, confirm the anti-tip bracket is securely attached to the floor
.J---...,_,I or wall, and slide the range back so the rear leveling leg is under the anti-tip
__// If the range is pulled from the wall for any reason, always repeat this
Leveling Leg _ _ procedure to verify the range is properly secured by the anti-tip bracket.
Freestanding and Slide-In Ranges Never completely remove the leveling legs or the range will not be secured
to the anti-tip device properly.
For Drop-In Ranges
Countertop or
WoodBlock TOcheck if the bracket is installed and engaged properly, slide the range
forward, confirm the anti-tip bracket issecurely attached to the rear of the
range, and slide the range back so that the anti-tip bracket slides just under
the countertop or wood block attached to the rear wall.
If you did not receive an anti-tip bracket with your purchase, call
1.800.626.8774 to receive one at no cost (in Canada, call 1.800.561.3344).
Anti-T-- For installation instructions of the bracket, visit GEAppliances.com (in
Bracket Canada, GEAppliances.ca).
Oven
Drop-In Ranges
iAWARNINOjIMPOnTANTSAFmYNOTICE
TheCaliforniaSafeDrinking Water and ToxicEnforcementAct requiresthe Governorof Californiato publish a list of substances
known to thestate to causecancer,birth defectsor other reproductive harm, and requires businessesto warn customers ofpotential
exposure tosuch substances.
Thefiberglassinsulation in self-cleanovens givesoff a very small amount of carbon monoxide during the cleaning cycle.Exposurecan
be minimized by venting with an open window or usinga ventilation fan or hood.

GEAppliances.com
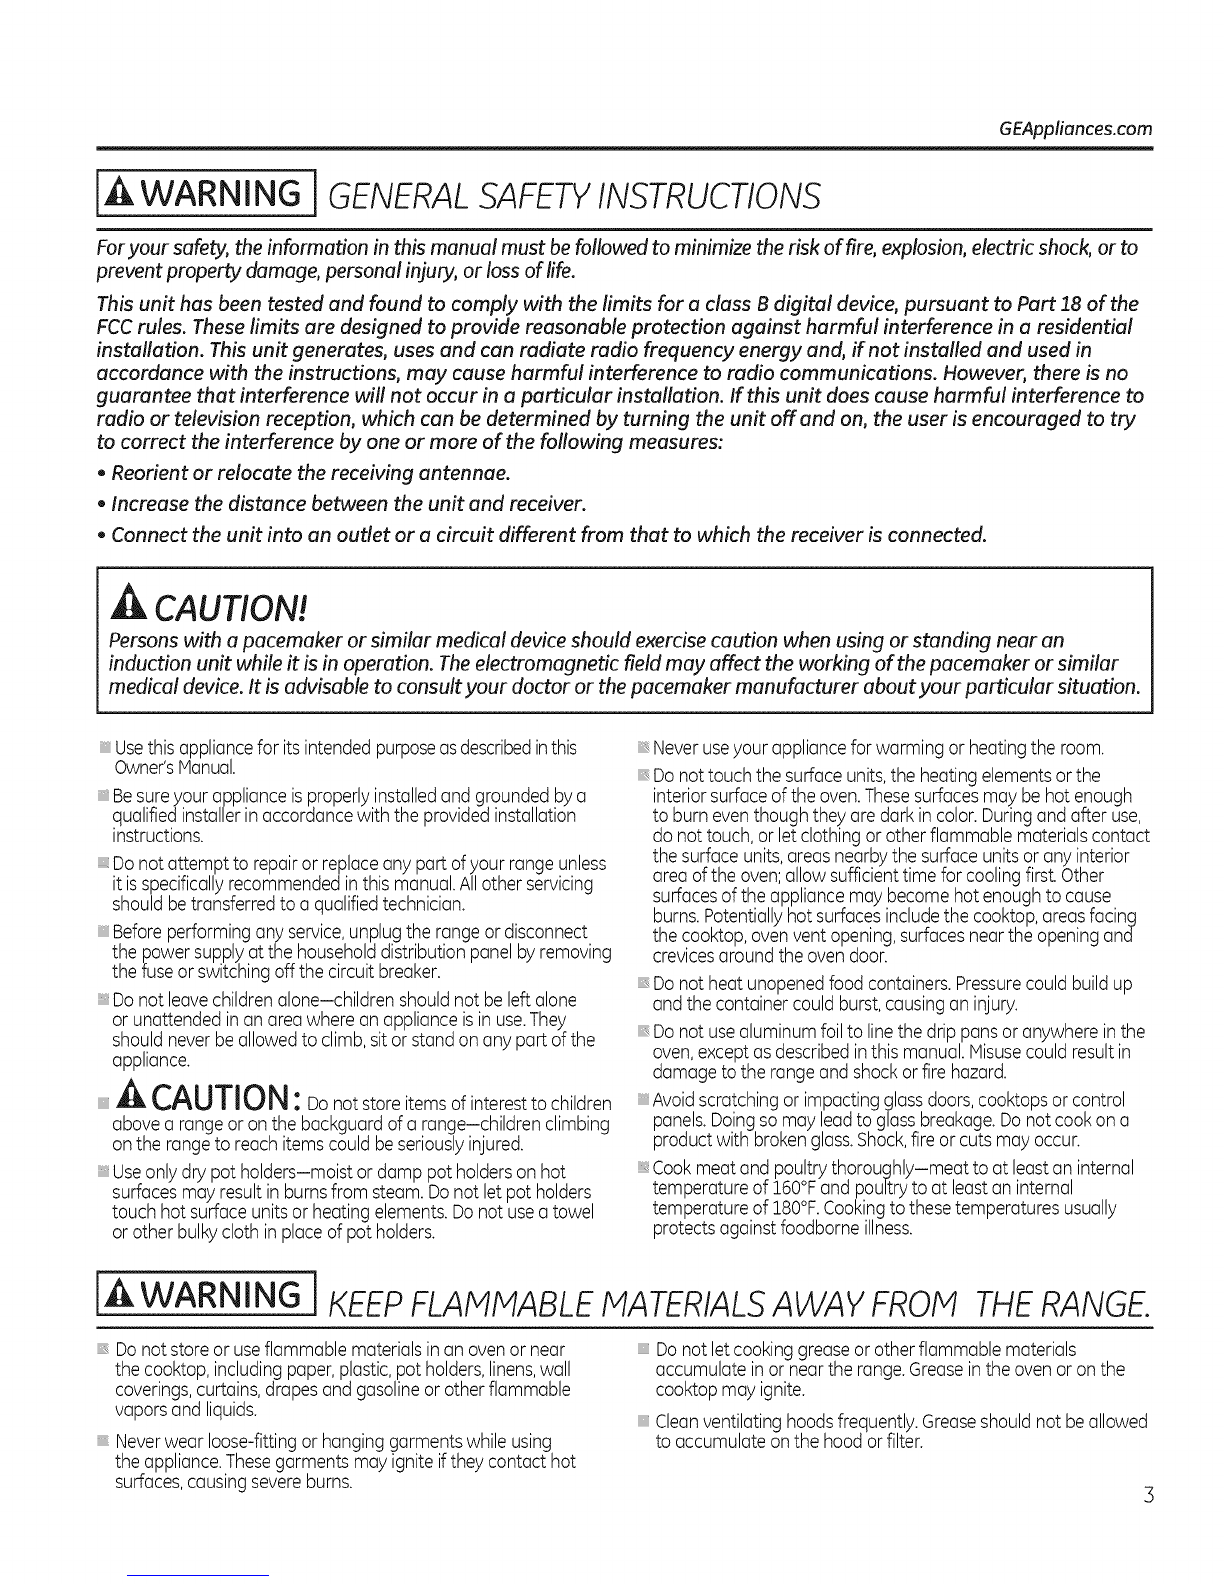
jA WARNING j GENERAL SAFETYINSTRUCTIONS
Foryour safety, the information in this manual must be followed to minimize the risk of fire, explosion, electric shock, or to
prevent property damage, personal injury, or loss of life.
This unit has been tested and found to comply with the limits for a class B digital device, pursuant to Part 18 of the
FCC rules. These limits are designed to provide reasonable protection against harmful interference in a residential
installation. This unit generates, uses and can radiate radio frequency energy and, if not installed and used in
accordance with the instructions, may cause harmful interference to radio communications. However, there is no
guarantee that interference will not occur in a particular installation. If this unit does cause harmful interference to
radio or television reception, which can be determined by turning the unit off and on, the user is encouraged to try
to correct the interference by one or more of the following measures:
oReorient or relocate the receiving antennae.
oIncrease the distance between the unit and receiver.
•Connect the unit into an outlet or a circuit different from that to which the receiver is connected.
CAUTION!
Persons with a pacemaker or similar medical device should exercise caution when using or standing near an
induction unit while it is in operation. The electromagnetic field may affect the working of the pacemaker or similar
medical device. It is advisable to consult your doctor or the pacemaker manufacturer about your particular situation.
Usethis appliancefor its intendedpurposeasdescribedinthis
Owner'sManual.
Besureyour applianceisproperlyinstalledand grounded bya
qualifiedinstallerin accordancewith theprovidedinstallation
instructions.
Donot attempt to repairor replaceany partofyour range unless
it isspecificallyrecommendedin this manual.Allother servicing
shouldbetransferredto a qualifiedtechnician.
Beforeperformingany service,unplug therange or disconnect
the powersupplyatthe householddistributionpanelby removing
thefuse or switchingoff the circuitbreaker.
Donot leavechildrenalone-children shouldnot beleft alone
or unattended inan area wherean applianceisin use.They
shouldneverbe allowedto climb,sitor stand on any partof the
appliance.
A CAUTION:Donotstoreitemsofinteresttochildren
abovea range or onthe backguardof a range-children climbing
on the rangeto reachitemscouldbeseriouslyinjured.
Useonlydry pot holders-moist or damp pot holderson hot
surfacesmay resultin burnsfrom steam.Donotlet pot holders
touch hot surfaceunitsor heatingelements.Donotusea towel
or other bulkycloth in placeof pot holders.
Neveruseyourapplianceforwarming or heatingthe room.
Donottouch the surfaceunits,the heatingelementsor the
interiorsurfaceof theoven.Thesesurfacesmay be hotenough
to burn eventhough they aredark in color.Duringand after use,
do not touch,or letclothingor otherflammable materialscontact
thesurfaceunits,areasnearbythe surfaceunitsor any interior
area ofthe oven;allowsufficienttime forcoolingfirst.Other
surfacesof theappliancemay becomehot enoughto cause
burns.Potentiallyhot surfacesincludethe cooktop,areasfacing
thecooktop,ovenvent opening,surfacesnearthe openingand
crevicesaround theovendoor.
Donot heatunopenedfoodcontainers.Pressurecouldbuild up
and thecontainer couldburst,causingan injury.
Donot usealuminum foilto linethe drip pansor anywhere inthe
oven,exceptasdescribedin this manual.Misusecouldresultin
damageto the rangeand shockor fire hazard.
Avoidscratchingor impactingglassdoors,cooktopsor control
panels.Doingsomay leadto glassbreakage.Donot cookon a
product with brokenglass.Shock,fireor cuts mayoccur.
Cookmeatand pou!trythoroughly-meat to at leastan internal
temperatureof 160 Fand poultryto at leastan internal
temperatureof 180°F.Cookingto thesetemperaturesusually
protectsagainst foodborneillness.
[A WARNING j KEEPFLAMMABLE MATERIALSAWAY FROM THERANGE.
Donotstoreor useflammablematerialsin an ovenor near
the cooktop,includingpaper,plastic,potholders,linens,wall
coverings,curtains,drapesand gasolineor otherflammable
vaporsand liquids.
Neverwear loose-fittingor hanginggarmentswhileusing
the appliance.Thesegarments may igniteifthey contact hot
surfaces,causingsevereburns.
Donotletcookinggreaseor otherflammablematerials
accumulate in or nearthe range.Greaseinthe ovenor onthe
cooktopmay ignite.
_,Cleanventilatinghoodsfrequently.Greaseshouldnot be allowed
to accumulate onthe hood or filter.
3

IMPORTANT SAFETY INFORMATION.
READ ALL INSTRUCTIONS BEFORE USING.
JA J
In WARNING 1IN THEEVENTOFA FIRE,TAKETHEFOLLOWINGSTEPS
TOPREVENTTHE FIREFROM SPREADING:
, Do not usewater on grease fires. Never pick up a flaming
pan. Turn the controls off. Smother a flaming pan on a
surface unit by covering the pan completely with a well-
fitting lid,cookie sheet or flat tray. Use a multi-purpose dry
chemical or foam-type fire extinguisher.
, If there isa fire in the oven during baking, smother the
fire by closing the oven door and turning the oven off or
by using a multi-purpose dry chemical or foam-type fire
extinguisher.
, If there isa fire in the oven during self-clean, turn the oven
off and wait for the fire to go out. Do not force the door
og.p__.Introduction of flesh air at self-clean temperatures
may lead to a burst of flame from the oven. Failureto
follow this instruction may result in severe burns.
iA WARNING j COOKTOPSAFETYINSTRUCTIONS
Never leave the surface units unattended at medium or
high heat settings. Boilovers cause smoking and greasy
spillovers that may catch on fire.
Never leave oil unattended while frying. If allowed to
heat beyond its smoking point, oil may ignite, resulting
in fire that may spread to surrounding cabinets. Use a
deep fat thermometer whenever possible to monitor oil
temperature.
To avoid oil spillover and fire, use a minimum amount of
oil when shallow pan-frying and avoid cooking frozen
foods with excessive amounts of ice.
iiiiiiiiiiii_i;i
Useproper pan size-select cookware having flat
bottoms largeenough to coverthe surface heating
element.Theuseof undersizedcookware will expose
a portion of the surface unitto direct contact and may
result in ignition of clothing. Properrelationshipof
cookware to surface unit will also improve efficiency.
Only certaintypes of glass,glass/ceramic, earthenware
or other glazedcontainers are suitable for cooktop
service;others may break because ofthe sudden
change in temperature.
To minimizethe possibilityof burns,ignition of
flammable materials and spillage,the handle of a
container should be turned toward the center of the
range without extending over nearby surface units.
When preparing flaming foods under a hood,turn the
fan on.
iiiiiiiiiiii_i;i
If power is lost to an electric cooktop while a surface
unit is ON, the surface unit will turn back ON as soon
as power is restored. In the event of power loss, failure
to turn all surface unit knobs to the OFF position may
result in ignition of items on or near the cooktop leading
to serious injury or death.
[A WARNING JGLASSCOOKTOP SAFETYINSTRUCTIONS
(some models)
Use care when touching the cooktop. The glass surface
of the cooktop will retain heat after the controls have
been turned off.
Do not cook on a broken cooktop. If glass cooktop
should break, cleaning solutions and spillovers
may penetrate the broken cooktop and create a
risk of electric shock. Contact a qualified technician
immediately.
Avoid scratching the glass cooktop. The cooktop can be
scratched with items such as knives, sharp instruments,
rings or other jewelry and rivets on clothing.
Do not place or store items that can melt or catch fire
on the glass cooktop, even when it is not being used. If
the cooktop is inadvertently turned on, they may ignite.
Heat from the cooktop or oven vent after it isturned off
4 may cause them to ignite also.
iiiiiiiiiiii_i;i
UseCERANABRYTE®ceramic CooktopCleanerand
CERANABRYTE®CleaningPadto clean the cooktop.
Wait until the cooktop cools and the indicator light
goes out before cleaning.A wet sponge or cloth on a
hot surface can cause steam burns.Some cleaners
can produce noxiousfumes ifapplied to a hot surface.
NOTE:Sugar spillsare an exception.They should be
scraped off while still hotusingan oven mitt and a
scraper.Seethe Cleaningthe glasscooktop section for
detailed instructions.
Read and follow all instructions and warnings on the
cleaning cream label.

GEAppliances.com
[A WARNING [OVEN SAFETYINSTRUCTIONS
Stand away from the range when opening the oven
door. Hot air or steam which escapes can cause burns
to hands, face and/or eyes.
Keep the oven vent unobstructed.
Keep the oven free from grease buildup. Grease in the
oven may ignite.
Place oven racks in desired location while oven is cool.
If rack must be moved while oven is hot, do not let pot
holder contact hot heating element in oven.
When using cooking or roasting bags in the oven,
follow the manufacturer's directions.
Pull the oven rack to the stop-lock position when
loading and unloading food from the oven. This helps
prevent burns from touching hot surfaces of the door
and oven walls.
Do not leave items such as paper, cooking utensils or
food in the oven when not in use. Items stored in an
oven can ignite.
Do not use aluminum foil to line the oven bottom. Foil
may trap or reflect heat, leading to a shock or fire
hazard.
[,&WARNING
(Some models) ] SELF-CLEANING OVEN SAFETYINSTRUCTIONS
The self-cleaning feature operates the oven at temperatures high enough to burn away food soils in the oven.
Follow these instructions for safe operation.
Before operating the self-clean cycle, remove pans,
shiny metal oven racks and other utensils from the
oven. Only gray or black porcelain-coated oven racks
and drip pans may be left in the oven. Do not use
self-clean to clean other parts, such as shiny drip pans
or bowls.
Before operating the self-clean cycle, wipe grease and
food soils from the oven. Excessive amount of grease
may ignite, leading to smoke damage to your home.
If the self-cleaning mode malfunctions, turn the oven
off and disconnect the power supply. Have it serviced
by a qualified technician.
Do not clean the door gasket. The door gasket is
essential for a good seal. Care should be taken not to
rub, damage or move the gasket.
Do not use oven cleaners. No commercial oven cleaner
or oven liner protective coating of any kind should be
used in or around any part of the oven.
WARNING JWARIVllNGDRAWER/LOWEROVENDRAWERSAFETY
INSTRUCTIONS(somemode sl
The purpose of the warming drawer isto hold hot
cooked foods at serving temperature. Bacteria will grow
in food while it is below 140°F. Do not put cold food
in warming drawer. Do not heat food for more than 2
hours. Failure to follow these instructions may result in
foodborne illness.
Do not leave paper products, plastics, canned food or
combustible materials in the drawer. They may ignite.
Do not touch the heating element or the interior surface
of the drawer. These surfaces may be hot enough to
cause burns.
Usecare when opening the drawer. Open the drawer a
crack and let hot air or steam escape before removing or
replacing food. Hot air or steam that escapes can cause
burns to hands, face and/or eyes.
Do not use aluminum foil to line the lower drawer. The
foil will trap heat below, and upset the performance
of the oven. Foil can melt and permanently damage
the drawer bottom. Damage from improper use of
aluminum foil is not covered by the product warranty.

Using the surface units,
How Induction Surface Cooking Works
Induction coils under the glass cooking surface produce
a magnetic field that generates heat in ferrous metals
that are in close proximity. The glass cooking surface is
not heated directly since it is not a ferrous metal, but the
glass may eventually become hot from the pan. Induction
surface coils are more efficient and will heat much faster
than conventional electric and gas cooking surface cooking
products.
CAUTION:
. The induction cooking elements may appear to be coolwhile
turned ONand after they have been turned OFF.Theglass
surface may be HOTfrom residualheat transferredfrom the
cookwareand burnsmay occur.
. DONOTTOUCHHOTCOOKWAREor PANSdirectly with hands.
Always use mitts or pot holdersto protect hands from burns.
. DONOTSLIDEcookware acrossthe cooktop surface. Doing
somay permanently damage the appearance of the ceramic
cooktop.
[ WARNING i IRE HAZARD: Never leave the range unattended with the cooktop on medium or highsettings. Keep flammable items away from the cooktop. Turn off all controls when
done cooking. Failure to follow these instructions can result in fire, serious injury or
death.
Throughout this manual, features and appearance may vary from your model.
Thepower levelwith a fraction
indicatesthe additional
half-step setting. Youmay
hear clicking sounds indicating
the control is maintaining your
desiredsetting.
Surface Unit Cook Settings
The cooktop offers 19 power levels.Power
levelsrange from "LO"to "HI"in precise
half-step increments. Forexample: L,1,1-1/2, 2,
2-1/2 and up to H.
Power Level"L",the lowest setting, is
recommended for "KeepWarm."
Thepower levelincreasesone-half levelwith
each touch.
Single Surface Unit--Cook Settings
To turn on esingle surface unit:
[] Touch the ON/OFFpad;then touch the
[+)/(-)pad.
[] Usethe (+J/(dpad to choose the desired
power setting.
To turn off a singlesurface unit,touch the ON/
OFFpad again.
To usethe Melt feature:
Touch the ON/OFFpad;then touch MELT.
The element will automatically setto a
predetermined setting.
To use the Simmer feature:
Touch the ON/OFF pad;then touch SIMMER.
Theelement will automatically set to a
predetermined setting. Adjust using the [+J/(d
pad to increase or decrease the simmer rate.

[,AWARNING
GEAppliances.com
FOOD POISON HAZARD: Bucteria muy grow in food ut temperutures below 140°F.
•Alwuys sturt with hot food. Do not use wurm settings to heut cold food.
•Do not wurm food for more then 2 hours.
Failure to follow these instructions may result in foodborne illness.
Using the Warming Zone (on some models)
The WARMINGZONEislocated in the back
center of the glass surface.
To use the WARMING ZONE:
FT] Touch the WARMINGZONEON/OFFpad.
[] To selectthe desired control setting, touch
the SELECTpad once for low (L),twice for
medium (MJor three times for high (Hi.
To turn offthe WARMINGZONE:
For best results, GIIfoods on the WARHING
ZONEshould be covered with a lid or aluminum
foil.
Always use pot holders or oven mitts when
removing food from the WARMINGZONE,as
cookware will be hot.
, Donot useplastic wrap to cover food. Plastic
may melt onto the surface and be very
difficult to clean.
Touch the WARMING ZONE ON/OFF pad. . Useonly cookware recommended for top-of-
range cooking.

Using the surface units,
Never COOKJirect, Dnme gross
Alwa_s use COOKware.
Always place the pan in the center of
the surface unit you are cooking on.
For Models With aGlass Cooktop
Theglass cooktop features heating units
beneath a smooth glass surface.
NOTE:Aslight odor isnormal when a new
cooktop isusedfor the first time. It iscaused
bythe heating of new parts and insulating
materials and will disappear in a short time.
Thesurface unit may cycle on and off to
maintain your selectedcontrol setting.
It issafe to place hot cookware on the glass
surface evenwhen the cooktop iscool.
Evenafter the surface units are turned off,the
glasscooktop retains enough heat to continue
cooking.To avoid overcooking, remove pans
from the surface units when the food iscooked.
Avoid placing anything on the surface unit until
it has cooledcompletely.
Water stains (mineraldeposits)are
removable usingthe cleaning cream or full-
strength white vinegar.
Do not slidecookware across the cooktop because
it can scratch the glass-the glassis scratch-resistant
not scratchproof.
Useof window cleaner may leavean
iridescent film on the cooktop. The cleaning
cream will remove this film.
Don'tstore heavy items abovethe cooktop. If
they drop onto the cooktop, they can cause
damage.
Donot usethe surface asa cutting board.
Use flat-bottomed pans.
Use a griddle.
Use a flat-bottomed wok.
What Type of Pans Are Required?
You must usea ferrous pan when usingthe
induction coils on this range.Thewarming
zone is not an induction coil and will work with
anytype of cookware. You can verify your
pan is ferrous if a magnet sticksto it. Quality
cookware with heavy bottoms made of cast
iron,magnetic stainless steeland enameled
steelwork best.Forbest results, usepans
with flat bottoms. Woks that do not haveflat
bottoms in close contact to the glass surface
will not work. Somepans are made especially
for induction cooking.
Placeonly dry panson the surface elements.
Donot placelids on the surface elements,
particularly wet lids.Wet pans and lidsmay
stick to the surface when cool.

GEAppliances.com
8" Min. DiGPQnSize
4 burner cooktops with right- and
left-side (2}induction generators
Use the minimum size pan shown for each
cooking element
Pan Size and Shape
The induction coils require a minimum pan size
in order for the element to turn on. Inorder for
the induction coil to correctly determine ifthe
pan is large enough, it is important that the
pan be centered within the circular graphics
marked on the glasscooking surface. The
minimum pan sizethat will work for each
induction coil is shown on the left. Pansthat
are not ferrous or are too small will not allow
the induction coil to turn on,and the power
leveldisplay for that coil locution will flash
for 30 seconds and then turn off. If a pan is
removed from the induction coilfor more
than 30 seconds,the power will be shut off.
Square punswill work, although round pans
that match the induction coil sizeswork best.
Cookwure larger than the cooktop glass
graphics will work. Forbest results,match the
pun sizewith the nearest-size graphics on the
glasscooking surface.
Boost Mode and Power Sharing
PowerSharingisactivated whenboth elements
in thesame cookingzoneare activatedand one
elementissetfor Boost(H).Theelementthat is
not setfor Boostwill changeto a lowerpower
level.ThisiscalledPowerSharing.WhenBoost
operationiscomplete(10minutes),the other
elementmay be resetto anypower level.Both
elementscanoperatesimultaneouslyat normal
power levelsettingsof "L"to 9.
IMPORTANT NOTE FOR RIGHT SIDE
POWER SHARING
Theelements on the right side share one
generator. Both elements can operate at
any non-Boost (levelL to 9)power levelat
the same time. When the large 11" element
is set for "H" or Boost, the smaller element
is automatically shut off and cannot be
activated. After !0 minutes, Boost (H)will
revert to power level 9.
At that time, the smaller element may be
activated and set for any power level.
Cookware "Noise"
A low humming noise isnormal when using
induction coils,especiallyon higher power
settings.Heavy enamel cast-iron pots produce
lessnoisethan lightweight steel pans. The
amount of content in the panscan alsoaffect
noiselevel.Pansthat completely cover the
graphics on the glass will produce lessnoise.
Water trapped under pans can boil,causing
the cookware to vibrate or slideon the glass
surface.Totry to reducethe noise,move pans
slightlyand/or change power levels.

Usingthe oven controls.
Throughout this manual, features and appearance may vary from your model.
BROIL NI/LO Pad
Touchthis pad to selectthe broilfunction. Seethe
How toSettheOvenfor Broilingsection.
OVENLIGHT Pad
Touchto turn theoven lightson or off.
BAKE Pad
Touchthis pad to selectthe bakefunction. See
the How to SettheOvenforBakingsection.
CONVECTIONCOOKPad
Usesa fan to circulateair in theoven.Seethe
Usingtheconvectionovensection.
WARM Pad
Touchto keepcookedfoods warm.
Seethe How to SettheOvenfor Warmingsection.
_TIMERON/OFF Pads
Touchto setthe kitchentimer.
...............................................................................................Seethe UsingtheKitchenTimersection
COOKTIME TIMEPad
Touchthis pad and then touch the number pads
to setthe amount oftime youwant your food
to cook.Theovenwill shut off when the cooking
time has run out.
SLOW COOKPad
Touchfor long hoursof unattended cooking.
Seethe How to SettheOvenforSlowCook
section.
DELAYSTARTPad
Touchthis pad to setthe ovento start
automatically at a time you set.
iiiiiiii_!i!i!i!il
PROBEPad
Touchwhen usingthe probeto automatically
cook to a desiredinternalfood temperature.
Seethe UsingtheProbesection.
SELF CLEAN Pad
Touch to self-clean the oven.
See the Using the Self-Cleaning Oven section.
STEAM CLEANPad
Touchthis pad for easiercleaningof lightsoiling
off the ovencavity or door..Seethe Usingsteam
cleansection.
CLEAR/OFFPad
Touchto cancelALL ovenoperationsexceptthe
clockand timer.
STARTPad
Mustbetouched to start any cookingor cleaning
function.
CLOCKPad
NOTE:Whensettingtimes,you oresettinghours
and minutesonly.Thelowesttimeyou consetis
oneminute.
Theclockmust be setto the correcttime of day
for theautomatic oventiming functions to work
properly.Thetime of daycannot be changed
during a timed bakingor self-cleaningcycle.
See Toset the clock section.
Ifyour oven was set for a timed oven operation
and a power outage occurred, the clockand all
programmed functions must be reset. The time
of day will flash in the display when there has
been a power outage.
WARMING DRAWER pad
Thewarming drawer will keep hot, cooked
foods at serving temperature. Always start with
hot food. Seethe Usingthe warming drawer
section.
10
PIZZA Pad
Touchthe PIZZApad.
Touchthe number padsto selectI for frozenor
2for fresh pizza.
Touchthe number padsto setthe baking
temperature.
Touchthe STARTpad.
Bakingtime isdetermined bypackage directions.
Placepizza on toprock positionof upper oven.
Whenusingometal troy,usethelowerrock
position.
CONTROLLOCKOUT
Thecontrol pads can be locked so they cannot
be activated when touched. Seethe How to
LockOut the Controlssection.

Using the clock, kitchen timer, and control lockout. GEAppliances.com
To Set the Clock
Theclock must be set to the correct time of day
for the Delay Start functions to work properly.
Thetime of day cannot be changed during
a delayed cooking or a delayed self-cleaning
cycle.
Touch the CLOCKpad.
Touch the number pads untilthe correct
time of day isshown in the display. Ifthe
number pads are not touched within one
minute after you touch the CLOCKpad,
the display revertsto the original setting. If
this happens,touch the CLOCKpad and
enter the time of day.
r_ Touch the STARTpad until the time of day
shows in the display.This enters the time
and starts the clock.
Tocheck the time of day when the display is
showing other information, touch the CLOCK
pad.Thetime of day shows until another pad
istouched. Tochange the time format or turn
off the clock display,seethe SpecialFeatures
section.
TIMER
ON TIMER ]
OFF
TheKitchenTimer isin hours and
minutes.
TheKitchenTimerdoesnotcontroloven
operations.Themaximum settingonthe
KitchenTimeris9hoursard 59minutes.
To Set the Kitchen Timer
%
[] Touch the TIMERON pad.
Touch the number pods untilthe amount
of time you wont shows in the display.For
example,to set 2 hours and 45 minutes,
touch 2, 4 and 5in that order.If you make
a mistake,touch the TIMEROFFpad and
begin again.
r_ Touch the STARTpad.
Aftertouching the STARTpod,SET
disappears;this tellsyou the time iscounting
down, although the display doesnot change
until one minute has passed.Secondswill not
be shown inthe display untilthe lust minute is
counting down.
r4] When the kitchentimer reaches:00,the
control will beep 3 timesfollowed by one
beep every 6 seconds untilthe TIMEROFF
pad istouched.
The6-second tone can be cancelled by
following the stepsin the Specialfeaturesof
your ovencontrol section under Tonesat the
Endof oTimedCycle.
To Reset the Kitchen Timer
If the display isstill showing the time remaining,
you may change it by touching the TIMERON
pad,then touching the number pads sothat the
time you want appears in the display.
If the remaining time isnot in the display (clock,
delay start or cooking time are inthe display),
recall the remaining time by touching the
TIMERON pad and then touch the number
pads to enter the new time you want.
]To Cancel the Kitchen Timer
TIMER TIMER Touch the TIMEROFFpad.
ON OFF
iii_!!!!!_!_i!!!!ii_i!i!iiii!!ili;i;i;i;iiiiiiii!!!ii!!ill¸!iii!iiiiiiii!!ii[i[i[ii¸i¸i!;i;iiii!!i;i¸i¸i!;iiiii!!iiiiii How to Lock Out the Controls
Control Lockout will allowyou to lock out the
touch padsso they cannot be activated when
touched.
Tolock/unlock the controls:
ry] Touch and hold the Control Lockout pad
for 3 seconds. Theoven display will show
"Loc On Loc".
[27 Tounlock the control, touch and hold the
Control Lockout pad for 3 seconds.The
oven display will show "Loc OFFLoc".
When this feature ison,the touch pads will not
respond except for the Cleer/Off pad.
Theadjustment will be retained in memory
after a power failure.
11

Usingthe oven.
Toavoid possible burns,place the racks in the desired position before you turn on the oven.
The number of rack positions may
vary by model.
Before you begin...
Therackshavestops,sothat when placed
correctlyonthesupports,theywillstop before
comingcompletelyout andwillnottilt.
When placing and removing cookware, pull the
rack out until itstops.
On some models,the bake heating element
isunder the oven floor. Never placecooking
utensils,baking stones, foil,or any other items
on the ovenfloor.
Toremove a rack, pull it toward you, tilt the
front end up and pull it out.
[A CAUTION
BURNHAZARD:Avoid touching the hot door
surface when usingthe oven rack inthe lowest
position.Always use 2 hands and 2 mitten pot
holders to move the rack.Pullthe rack out a
few inches and then carefully graspthe sidesof
the rack to pull it out the rest of the way.
Toreplace, placethe end of the rack (stop-
locks)on the support, tilt up the front and push
therack in.
Neverplace cooking utensils,bakingstones,
foil,or any other itemson the ovenfloor.
12
Front
Rail
Fully Open Position "
3rasp here
Extension Reck (onsome models)
When placing and removing cookware,
always pull the rack out by its upper front
rail to its fully open position.
Do not extend the rack quickly. Food may
slide off the front of the rack.
To remove the rack:
[Z] Hake surethe rack is pushed all the way
_ntothe oven sothat side paddles on the
rack from disengagedwith oven support.
r_ Slidethe rack toward you to the bump
(stop position) on the rack support.
[] Firmlygrasp both sidesof the rack frame
and the slidingrack,tilt the front end up
and pull it out.
NOTE:When handling the extension rack, do
not allow the sliding portion to fall open. This
can damage the slides.
To replace the rack:
[Z] Firmlygrasp both sidesof the rack
frame and the sliding rack.
r21Placethe curved end of the rack (stop-
locks)onto the oven supports,tilt up the
front of the rack and push it in asfar as it
will go.
[A CAUTION
Never use the rack when its frame is not fully
inserted in the oven and locked into position.
When the rack isproperly installed and
locked into position,the locking sidepaddles
on the rack frame will click-lock into place
on the oven supports. If the side paddles
did not click-lock into position, repeat the
stepsabove and make surethe side paddles
have been correctly cleaned and lubricated.
SeeExtensionRackin the Careand cleaning
section.

GEAppliances.com
Aluminum Foil
Do not usealuminum foil to line oven bottoms.
Thefoil will trap heat below and upset the
performance of the oven. Foilcan melt
and permanently damage the oven bottom.
Damage from improper useof aluminum foil is
not covered by the product warranty.
Foilmay be usedto catch spills by placing a
sheet on a lower rack,several inches below
the food. Do not usemore foilthan necessary
and never entirely cover an oven rack with
aluminum foil. Keepfoil at least t-!/2" from
oven walls to prevent poor heat circulation.
EP
%-
Rackposition for baking 4 ayer
cakes.
Preheating and Pan Placement
To avoid possible burns, placethe racks
in the desired position beforeyou turn on the
oven,
Preheattheoveniftherecipecallsforit.Preheating
isnecessaryfor goodresultswhenbakingcakes,
cookies,pastriesandbreads.
tfbakingfourcakelayersatthesametime,place
two layersonrackCandtwo layerson rackE.
Staggerpansontheracksooneisnotdirectly
abovetheother.
Bakingresultswillbebetteriffoodiscenteredin
theovenasmuchaspossible.Angelfoodcakeis
theexceptionandshouldbeplacedonthebottom
ovenrack(positionA).Followpackagedirectionson
prepackagedandfrozenfoodsforpanplacement.
Pansshouldnottoucheachotherorthewallsof
theoven.tfyou needto usetwo racks,staggerthe
panssooneisnotdirectlyabovetheother.Leave
approximately1½"betweenpansandfromthe
front,backandsidesofovenwall.
How to Set the Oven for Baking or Roasting
rT] TouchtheBAKEpad.
[] Touchthenumberpadsuntilthedesired
temperatureisdisplayed.
,[_ [] TouchtheSTARTpad.
r-_ Theovenwillstartautomatically.Thedisplaywill
showthechangingtemperaturestartingat 100°F.
(Thetemperaturedisplaywillstarttochangeonce
theoventemperaturereaches100°F.)Whenthe
ovenreachestheselectedtemperature,theoven
controlwillbeepseveraltimesandthedisplaywill
showtheoventemperature.
NOTE.:You may hear the convection fan (on
some models)while the oven ispreheating. The
fan will stop after the oven ispreheated and
the display showsyour set temperature. This is
normal.
TochangetheoventemperatureduringtheBAKE
cycle,touchtheBAKEpadandthenthenumber
padstogetthenewtemperature.
r_ Checkfoodfor donenessatthe minimumtime
ontherecipe.Cooklongerifnecessary.
[] TouchtheCLEAR/OFFpadwhenbakingis
finished,andthenremovethefoodfromthe
oven.
Roasting Guide
Beef
Pork
Lamb
Poultry
Heat Oven Temp.
Rib Roast (4to 8 Ibs.) Rare 525°F
Bone-In and Boneless Medium 525°F
Beef Tenderloin (4 to 6 Ibs.) Rare 425°F
Beef Tenderloin (2 to 3Ibs.) Rare 425°F
Bone-In, Boneless(5to 5 Ibs.) 525°F
Bone-In (5 to 9 Ibs.) Medium 525°F
Boneless 14to 7Ibs.) Medium 575°F
Whole Chicken (Sto 7Ibsj 550°F
Turkey, Whole*
Unstuffed 110to 16 Ibs.) 525°F
Unstuffed (18 to 24 Ibs.) 325°F
Turkey Breast (4 to 6 ]bs.) 525°F
*Stuffed birds generally require 30-45 minutes additional roasting time. Shield lec
prevent overbrowning and dcving of skin.
Internal Temp.
145°F
160°F
145°F
145°F
160°F
165°F
165°F
170°F
170°-180°F
170°-180°F
170°F
s and breast with foil to
13

Usingthe oven.
Leave the door open to the broil stop
position, The door stays open by
itself,yet the proper temperature is
maintained in the oven.
How to Set the Oven for Broiling
Use LOBroil to cook foods such as poultry
or thick cuts of meat thoroughly without
overbrowning them.
[_ Placethe meat or fish on a broiler grid in a
broiler pan designedfor broiling.
r_ Followsuggested rack positions in the
Broiling Guide.
r_ Touch the BROILHI/LO pad once for HI
Broil.
%
@
To change to LO Broil, touch the
BROIL HI/LO pad again.
Touch theSTART pad.
When broilingisfinished,touchthe
CLEAR/OFF pad.
Thesize,weight,thickness,
starting temperature
and your preference
of alonenesswill affect broiling
times. Thisguide
is basedon meats at
refrigerator temperature.
t The U.S.Department of
Agriculture says "Rarebeef is
popular, but you should know that
cooking it to only 140°F means
some food poisoning organisms
may survive." (Source:Safe Food
Book. YourKitchen Guide. USDA
Rev.June 1985.)
Broiling Guide
Preheatthe broiler for2 minutes to improve performance.
Type or
Food Doneness Thickness Rack Position* Comments
Beef Rare (140°F) Steaks - Eor F (food should be 1" Steaks less than 1"
1" thick to 3" from broil element} thick are difficult to
cook rare. They cook
Medium (160°F) Steaks - E(food should be 3" through beforebrowning
3/4" to 1" thick to 4" from broil element} To prevent curling of
meat, slash fat at 1"
Well Done (170°F) Steaks -D or E(food should be 3" intervals.
3/4" to 1" thick to S"from broil element/
or Ground Beef Patties
Chicken Breast, boneless C(food should be 8" Broil skin-side-down
to 9" from broil element} first.
C(food should be 7"
to 8" from broil element)
Breast, bone-in
2/2" to 2" thick
3/4" thick
Fish Fillets D or E(food should be S" Handle and turn very
to 6" from broil element/ carefully.
Pork Chops Well Done (170°F) D (food should be 6" To prevent curling of
to 7" from broil element/ meat, slash fat at 1"
intervals.
*For double ovens,userack position A for the smaller,2-rock-position oven.
If your range isconnected to 208 volts, rare steaks may be broiled by preheating the
broiler and positioning the oven rack one position higher.
14

Adjust the oven thermostat--Do it yourself! GEApplionces.com
You may find that your new oven cooks differently than the one it replaced. Use your new oven for a few weeks to
become more familiar with it. Ifyou still think your new oven is too hot or too cold, you can adjust the thermostat
yourself.
Do not use thermometers, such as those found in grocery stores, to check the temperature setting of your oven. These
thermometers may vary 20-40 degrees.
NOTE:This adjustment will only affect baking and roasting temperatures; it will not affect broiling or self-cleaning
temperatures. The adjustment will be retained in memory after a power failure.
[]DDDD
[]DDDD
To Adjust the Thermostat
r!] Touch the BROILHI/LO and BAKEpadsat
the same time until the display shows SF.
r_ Touch the BAKEpad. A number shows in
the display.
Double Ovens:To adjust the upper oven
thermostat, touch the upper oven BAKE
pad.Toadjust the lower oventhermostat,
touch the lower oven BAKEpad.
@Theoventemperature can be adjusted up
to (+)35°F hotter or (-)35°F cooler.Touch
the number pads the same way you read
them. Forexample,to change the oven
temperature !5°F, touch 1 and 5.
Touch the BAKEpad, again,to alternate
between increasing and decreasing the
oven temperature.
%Whenyou have made the adjustment,
touch the STARTpad to go back to the time
of day display.Useyour oven asyou would
normally.
The type of margarine will affect baking performance!
Most recipes for baking have been developed using high-fat products such as butter or margarine (80% fat).
Ifyou decrease the fat, the recipe may not give the same results as with a higher-fat product.
Recipe failure can result if cakes, pies, pastries, cookies or candies are made with low-fat spreads.
The lower the fat content of a spread product, the more noticeable these differences become.
Federalstandards require products labeled "margarine" to contain at least 80% fat byweight. Low-fat spreads,on the other hand,
contain lessfat and more water. The high moisture content ofthese spreads affects the texture and flavor of baked goods. Forbest
resultswith your old favorite recipes,usemargarine, butter or stick spreads containing at least 70% vegetable oil.
15

Usinq the convection oven.consomemode_s_
Convection Fan Operation
In a convection oven, a fan circulates hot air
over, under and around the food.
Thiscirculating hot air isevenly distributed
throughout the oven cavity.Asa result,foods
are evenlycooked and browned-often in less
time with convection heat.
NOTE"On some models,the fan isdesigned
to rotate in both directions,with a pause in
between.This is normal.
Theconvection fun shuts off when the oven
door isopened. DONOTleave the door open
for long periods of time while using convection
cooking or you may shorten the lifeof the
convection heating element.
CONVECTION
_!i_i__!i_i_i_i!_i_i!_i__ii_I_)_I_I_I_(U_
Convection Cook
Theconvection oven comes with one
convection cook mode and con be used
for Multi-RackConvectionBakingor !-Rack
ConvectionBaking.
Multi-rack position.
Multi-Reck Convection Baking
Because heated air is circulated evenly
throughout the oven,foods can be baked with
excellent resultsusing multiple racks.
Multi-rack baking may increase cook times
slightly for some foods but the overall result
istime saved.Cookies,muffins, biscuits and
other quickbreads givevery good resultswith
multi-rack baking.
When baking on 3 racks,place one rack in the
second (B)position,another rack in the fourth
(D)position and the third rack inthe sixth (F)
position.
Fortwo-rack baking, placeone rack in the
second (B)rack position.Placethe other rack in
the fifth (E)rack position.
1-Rack Convection Baking
When convection baking with only i rack,place
the food sothat it is centered in the oven.
ilT1!p-II-qI-qD :¸
i i!i
i¸))(/ CLEARIi¸
OFF ! ¸¸
16
How to Set the Oven for Convection Baking
[Z] Touch the CONVECTIONCOOKpad for
convection cooking.
[] Touch the number pads to set the oven
temperature.
[] Touch the STARTpad.
NOTE:Ifthe Auto Recipe_"Conversion Feature
ison, it will automatically reducethe set regular
baking temperature by approximately 25%
to the appropriate convection temperature
in convection bake mode. SeeAuto RecipeM
Conversionin the SpecialFeaturessection.
Tochange the oventemperature, touch the
CONVECTIONCOOKpad and then the number
pads to set the new temperature.
When the oven starts to heat,the changing
temperature, starting at 100°F,will be displayed.
When oven reaches the temperature you set, 3
beepswill sound.
r_ Touch CLEAR/OFFpad when finished.
You will hear a fan while cooking with
convection.Thefan will stop when the door is
opened,but the heat will not turn off.
You may hear the oven clicking during
baking.This isnormal.

GEAppliances.com
When baking cookies, you will get
the best results if you use afiat
cookie sheet instead of a pan with
low sides.
Cookware for Convection Cooking
Beforeusingyour convection oven,check to see
ifyour cookware leavesroom for air circulation
in the oven. Ifyou are bakingwith severalpans,
leavespace between them. Also,be surethe
pans do not touch each other or the walls of the
oven.
Paper and Plastic
Heat-resistant paper and plastic containers that
are recommended for use in regular baking can
also be used for convection baking but should
not be used at temperatures higher than the
temperature recommended by the cookware
manufacturer. Plastic cookware that is heat-
resistant to temperatures of 400°F can also be
used.
Metal and Glass
Any type of cookware will work in your
convection oven: however, metal pans heat the
fastest and are recommended for convection
baking.
Darkened or matte-finished pans will bake
faster than shiny pans.
Glass or ceramic pans cook more slowly.
For recipes like oven-baked chicken, use a pan
with low sides. Hot air cannot circulate well
around food in a pan with high sides.
Using the pizza feature. Con
DE]
DE]DEED
DE]DEED
How to Set the Upper Oven For Pizza
Adjustrockpositionfortypeofpizzatroy beingused
(see chart).
r_ TouchthePIZZApod.
21 Touchthenumberpadstoselect! forfrozenor
2forfreshpizza.
[] Touchthenumberpadstosetthebaking
temperature.
r4-] Touch the START pod.
Bakingtime is determined by package directions.
Type of Pizza Trey Rack Position
Tray supplied with fresh pizza B
Pizzaplaced directly on rack B
Hetal tray A
17

Using the probe, consomemode sI
For many foods, especially roasts and poultry, internal food temperature is the best test for doneness. The temperature
probe takes the guesswork out of roasting by cooking foods to the exact alonenessyou want.
The temperature probe has a
skewer-like probe at one end and
a plug at the other end that goes
into the outlet in the oven.
[,& CAUTION
Topreventburns,do notunplug the probe from
the ovenoutlet untilthe ovenhascooled.
Use of probes other than the one provided with
this product may result in damage to the probe
or oven control.
Usethe handles of the probe and plug when
inserting and removing them from the food and
outlet.
Toavoid damaging your probe, do not use
tongs to pull on the cable when removing it.
Toavoid breaking the probe, make sure food
iscompletely defrosted before inserting.
After preparing the meat and placing it on
a trivet or a broiler pan grid,follow these
directions for proper probe placement.
Insertthe probe completely into the meat. It
should not touch bone,fat or gristle.
NOTE:Failureto fully insert the probe into the
meat may result in poor cooking performance
because the probe will sense the oven air vs.
the food temperature.
Readand remove label
Never leaveyour probe insidethe oven
during a self-cleaning or broil cycle.
Do not store the probe in the oven.
For roastswith no bone, insert the probe into
the meatiest part of the roast. Forbone-in ham
or lamb, insert the probe into the center of the
lowest large muscle.
Insertthe probe into the center of dishessuch
as meat loaf or casseroles.
Insertthe probe into the meatiest part of the
inner thigh from below and parallel to the leg of
a whole turkey.
NOTE:Self-cleanand Broil settings will not work
if the temperature probe isplugged in.
18
IT1rq I-q%El
DE]DE]El
DE]DE]El
I-qEl ITII-qEl
How to Set the Oven For Baking/Roasting When Using the Probe
(onsome models)
ryl
r21Insertthe probe fully intothe food.
Plugthe probe into the outlet in the oven.
Makesure it's pushed all the way in.Close
the oven door. Make surethe probe cable
is not touching the broil element.
[] Touch the PROBEpad. Displaywill show
"SetProbe Temp."
[] Touch the number pads to set the desired
internal food or meat temperature. The
maximum internal temperature for the
food that you can set is200°F.
_-] Touch the STARTpad.
[] Touch the BAKEor CONVECTIONpad.
[Z] Touch the number pads to set the desired
oven temperature.
[] Touch the STARTpad.
Thedisplay will flash ifthe probe isinserted
into the outlet and you have not set a probe
temperature and touched the STARTpad.
Touch the PROBEpad to recallthe probe
temperature or BAKEor CONVECTIONpad
to recallthe oven temperture. Forthe probe
temperature, after the internal temperature
of the food reaches !00°F, the changing
temperature will be shown in the display.
[] When the internal temperature of the food
reaches the number you have set,the
probe and the oven turn off and the oven
control signals.To stop the signal,touch
the CLEAR/OFFpad. Usehot pads to
remove the probe from the food. Do not
usetongs to pull on it-they might
damage it.
If the probe is removed from the oven
while probe cooking,the oven will not
automatically turn off.
Tochange the oventemperature during
the Bake/Roastcycle,touch the BAKEor
CONVECTIONpad and then the number pads
to set the new temperature.
You can usethe Kitchen Timer eventhough
you cannot usetimed oven operations while
usingthe probe.

Usingthe timed baking
and roastingfeatures,conso=e=ode sl GEAppliances.com
NOTE: Foods that spoil easily-such us milk, eggs, fish, stuffings, poultry and pork-should not be allowed to sit for more
than 1hour before or offer cooking. Room temperature promotes the growth of harmful bacteria.
Be sure that the oven light is off because heat from the bulb will speed harmful bacteria growth.
How to Set an Immediate Start and Automatic Stop
Theoven will turn on immediately and cook
for a selected length of time.At the end
of the cooking time the oven will turn off
automatically.
[Z] Touch the BAKEor CONVECTIONCOOK
pad or other desired cooking function.
[] Touch the number pads to set the desired
oven temperature.
r3] Touch the STARTpad.
[] Touch the COOKTIMEpad.
NOTE:Ifyour recipe requires preheating, you
may need to add additional time to the length of
the cooking time.
[] Touch the number pads to set the desired
length of cooking time. The minimum
cooking time you can set is I minute.
The oven temperature that you set and
the cooking time that you entered willbe
in the display.
[] Touch the START pad.
Theovenwillturn ON,and the displaywillshow
the cookingtime countdown and the changing
temperature startingat 100°F.(Thetemperature
displaywillstart to changeoncethe oven
temperature reaches100°F.)When the oven
reachesthe temperatureyou set,3 beepswill
sound.
Theovenwill continue to cook for the set
amount oftime, then turn off automatically.
r_ Touch the CLEAR/OFF pad to clear the
display ifnecessary.Removethe food from
the oven. Remember,eventhough the
oven turns off automatically, food left in
the oven will continue cooking after the
oven turns off.
DDD[]D
DDD D
DDDD[]
E]DDD[]
DDD D
[]DD[]D
How to Set a Delayed Start and Automatic Stop
Theoven will turn on at the time of day you set,
cook for a specific length of time and then turn
off automatically.
Make surethe clock showsthe correct time of
day.
[Z] Touch the DELAYSTARTpad.
[_ Touchthe number pads to setthe time of
day you want the oven to turn on and
start cooking.
[-_ Touch the STARTpad.
Touch the BAKEor CONVECTIONCOOK
pad or other desired cooking function.
Touch the number pads to set the desired
oven temperature.
[_] Touch the STARTpad.
[] Touch the COOKTIMEpad.
NOTE:Ifyour recipe requirespreheating, you
may need to add additional time to the length
of the cooking time.
r_] Touch the number pads to set the desired
length of cooking time. Theminimum
cooking time you can set isI minute.
Theoven temperature that you set and
the cooking time that you entered will be
in the display.
rg] Touch the STARTpad.
NOTE:Ifyou would liketo check the times
you have set,touch the DELAVSTARTpad to
check the start time you have set or touch the
COOKTIMEpad to checkthe length of cooking
time you have set.
When the oventurns ONat the time of day
you set,the displaywill show the cooking time
countdown and the changing temperature
starting at 100°F.(Thetemperature displaywill
start to change oncethe oven temperature
reaches 100°F.)When the oven reaches the
temperature you set,beepswill sound.
Theoven will continue to cook for the set
amount of time, then turn off automatically.
[] Touch the CLEAR/OFFpad to clear the
display ifnecessary.Removethe food from
the oven. Remember,eventhough the
oven turns off automatically, food left in
the oven will continue cooking after the
oven turns off.
19

Using the slow cookand warming features.
[A WARNING iOOD POISONHAZARD. Bacteria may grow in food at temperatures below !40°F.
•Always start with hot food. Do not use warm settings to heat cold food.
•Do not warm food for more than 2hours.
Failure to follow these instructions may result in foodborne illness.
@N1DDD
DPlDDN1
How to Set the Oven For Slow Cook
Slow Cook is designed for long hours of unattended
cooking.
rT] Touch the SLOW COOK pad.
F_ Touch the number pad to select the desired
setting - 1for Poultry or 2for Meats. UseMeats
ifyou are unsure which setting to use.
I-_ Touch the number pads to setthe desired
length of cooking time. Thecooking time must
be at least 3hours, up to !! hours 59 minutes.
[-4-1 Touch the STARTpad.
NOTE:Ifa power outage occurswhile the oven is in
Slow Cook,the range will shut off.
Slow Cook Guide
Food
Beef
Chuck Roast
Beef Ribs
Poultry
Whole Chicken
Chicken Pieces
Pork
Boneless Blade
Roast
Country Style
Pork Ribs
Pork Chops
Soup
Vegetable Beef
Soup
Chili
Rack Food Time
Quantity Position Setting (Hours)
3-3V2 Ibs. C Heats HI 5-6 hrs.
LO8-10 hrs.
3Vz-4 Ibs. C Heats HI3-4 hrs.
LO6-8 hrs.
4 Ibs.
8 pieces
(approx. 3 Ibs.)
3-4 Ibs.
3Vz-4 Ibs.
4-8 Ibs.
4 quarts
4 quarts
C
C
c
c
c
c
c
Poultry HI4-5 hrs.
LO 7-9 hrs.
Poultry HI3-4 hrs.
LO5-6 hrs.
Heats HI g-6 hrs.
LO8-10 hrs.
Heats HI3-4 hrs.
LO6-8 hrs.
Heats HI3-4 hrs.
LO6-8 hrs.
Heats HI4-g hrs.
LO8-10 hrs.
Heats HI3-4 hrs.
LO6-8 hrs.
Comments
Add 1/2 cup liquid.
Place ribs in o single layer.
Add 1/2 cup liquid.
Best submerged under a sauce
to prevent surface drying.
Add 1/2-2 cup liquid.
Place ribs in a single layer.
Place chops in a single layer.
Hake sure beef chunks
are submerged.
Submerge beans
to prevent surface drying.
Guideline Tips
The slow cook program uses a complex series of
temperature cycling to obtain the best results. For this
reason, it is recommended that the stow cook program
be allowed to run without cancelling or restarting.
Restarting the stow cook feature while it is in progress
may result in overcooked meat.
Forjuicy and tender meat, choose cuts of meat such
aschuck roast or abonelessblade roast. Leanercuts
of meat, such astop round,ore drier and may need
additional liquid.
Useonly glossand ceramic dishes.Metalpots and pans
tend to transfer the heat into the foods too quickly.
Match the quantity of food to the size pan. Fillthe pan
about 3/4 fullfor best results. Too large a pot allows the
steam to escape, causing foods to dry out.
,Always cover the pot with a lid or aluminum foil.
A wide range of recipes may be used in the stow cook
feature. Forbest results some adjustments may need to
be made. Forsmaller sized recipes, begin checking
at minimum time. For large recipes or when doubling
recipes, foods may be cooked for longer periods of time.
When the slow cook feature completes, the oven will
automatically switch to "warm" mode. Ifadditional stow
cook time is desired, this warm mode may be used to
obtain the extra time.
20
j[WARMl
iii ill STARTiii
How to Set the Oven For Worming
The WARM feature keeps cooked foods hot.
This feature is not designed to reheat cold food.
To use the WARM feature, touch the WARM
pad and then the START pad.
To use the WARM feature after Timed Buking,
follow these steps:
FY] Touch the bake mode of cooking.
F_ Touch the number padsto set the oven
temperature
I-_ Touch the COOKTIMEpad.
[] Touch the number padsto set the desired
length of cooking time.
F_ Touch the WARMpad.
@ Touch the STARTpad.
NOTE:Plasticcontainers,lidsor plastic wrap will
melt if placed in the oven.Meltedplastic may
not be removable and isnot covered underyour
warranty.
This manual suits for next models
1
Table of contents
Languages:
Other GE Range manuals