GE GSS23GSKSS Guide

49-1000471 Rev. 1 5
USING THE REFRIGERATOR: Controls
Controls (on some models)
The temperature controls are preset in the factory
DW)&IRUWKHUHIULJHUDWRUFRPSDUWPHQWDQG
)&IRUWKHIUHH]HUFRPSDUWPHQW$OORZ
KRXUVIRUWKHWHPSHUDWXUHWRVWDELOL]HWRWKHSUHVHW
recommended settings.
The temperature controls can display both the SET
temperature as well as the actual temperature in the
UHIULJHUDWRUDQGIUHH]HU7KHDFWXDOWHPSHUDWXUHPD\
vary slightly from the SET temperature based on usage
and operating environment.
Ŷ 2QVRPHPRGHOVVHWWLQJERWKFRQWUROVWRWKHZDUPHVW
setting until the display flashes (off) will stop cooling
LQERWKWKHIUHH]HUDQGUHIULJHUDWRUFRPSDUWPHQWV
Ŷ 2QRWKHUPRGHOVVHWWLQJHLWKHUFRQWUROWRWKHZDUPHVW
setting until the display flashes (off) will stop the
FRROLQJWRWKHIUHH]HUDQGUHIULJHUDWRU
Ŷ NOTE: Turning the refrigerator off via the controls on
the touch panel does not shut off electrical power to
the refrigerator.
NOTE: The refrigerator is shipped with protective film-
FRYHULQJWKHWHPSHUDWXUHFRQWUROV,IWKLVILOPZDVQRW
removed during installation, remove it now.
Not all features are on all models. Your controls may be similar to the following:
OR
Performance Air Flow System
7KH3HUIRUPDQFH$LU)ORZ6\VWHPLVGHVLJQHGWR
PD[LPL]HWHPSHUDWXUHFRQWUROLQWKHUHIULJHUDWRUDQG
IUHH]HUFRPSDUWPHQWV7KLVXQLTXHVSHFLDOIHDWXUH
consists of the Air Tower along the back wall of the
refrigerator and the Air Tunnel on the bottom portion of
WKHIUHH]HUUHDUZDOO
Placing food in front of the louvers on these components
will not affect performance. Although the Air Tower and
the Air Tunnel can be removed, doing so will affect
WHPSHUDWXUHSHUIRUPDQFH)RUUHPRYDOLQVWUXFWLRQV
on-line, 24 hours a day, contact us at
GEAppliances.comRUFDOO*(&$5(6,Q&DQDGD
contact us at geappliances.ca or call 1.800.561.3344.)

649-1000471 Rev. 1
USING THE REFRIGERATOR: Controls
Controls (on some models)
Filter
Status
Freezer Compartment Temperature Control
$GMXVWIUHH]HUFRPSDUWPHQWWHPSHUDWXUH7KH
IUHH]HUWHPSHUDWXUHLVSUHVHWLQWKHIDFWRU\DW 0°F
(-17.8°C)$OORZKRXUVIRUWHPSHUDWXUHWRVWDELOL]H
to the preset recommended setting.
Fresh Food Compartment Temperature Control
Adjust fresh food compartment temperature. The
fresh food temperature is preset in the factory at
37°F (2.8°C). Allow 24 hours for temperature to
VWDELOL]HWRWKHSUHVHWUHFRPPHQGHGVHWWLQJ
Door Alarm (on some models)
To set the alarm, press this pad until the indicator
light comes on. This alarm will sound if either door is
open for more than 3 minutes. The light goes out and
the beeping stops when you close the door.
LED dispenser Light
Press the Light pad to turn your dispenser light on
and off.
Filter Status
Press the Filter Status pad to display the water
filter’s life percentage (%).
TurboCool TM (on some models)
TurboCool ™ rapidly cools the refrigerator
compartment in order to more quickly cool foods.
Use TurboCool ™ when adding a large amount
of food to the refrigerator compartment, putting
away foods after they have been sitting out at room
WHPSHUDWXUHRUZKHQSXWWLQJDZD\ZDUPOHIWRYHUV,W
can also be used if the refrigerator has been without
power for an extended period.
NOTES: The refrigerator temperature cannot be
changed during TurboCool™.
7KHIUHH]HUWHPSHUDWXUHLVQRWDIIHFWHGGXULQJ
TurboCool™.
When opening the refrigerator door during
TurboCool™, the fans will continue to run if they
have cycled on.
Lock Controls
Press and hold the Lock Controls pad for 3
seconds to lock out ice and water dispenser and all
other controls. Press and hold to unlock the controls.
COMPRESSOR
7RWXUQRႇFRPSUHVVRU
5DLVHWKHIUHH]HUWHPSHUDWXUHDERYHWKHKLJKHVW
setting by pressing the Freezer warmer pad until the
display starts blinking.
2. Raise the Fresh Food temperature above the highest
VHWWLQJXQWLO\RXVHH2))
To turn on the compressor:
1. Press Fresh Food or Freezer colder pad.
NOTE: Compartment lights and the user interface
display will stay on.
The temperature controls can display both the SET temperature as well as the actual temperature in the refrigerator
DQGIUHH]HU7KHDFWXDOWHPSHUDWXUHPD\YDU\VOLJKWO\IURPWKH6(7WHPSHUDWXUHEDVHGRQXVDJHDQGRSHUDWLQJ
environment.
The temperature controls are preset in the factory
at 37°F (2.8°C) for the refrigerator compartment
and 0°F (-17.8°C)IRUWKHIUHH]HUFRPSDUWPHQW
$OORZKRXUVIRUWKHWHPSHUDWXUHWRVWDELOL]HWR
the preset recommended settings.

49-1000471 Rev. 1 7
How it Works
The ClimateKeeper2™ is the industry’s most advanced
refrigeration system, delivering optimum temperature and
humidity performance to keep food garden fresh longer
DQGUHGXFHIUHH]HUEXUQ
The ClimateKeeper2™
system features two
evaporators—one for the
refrigerator and one for the
IUHH]HU
This provides two separate
cooling systems, and
separates the airflow between
WKHIUHVKIRRGDQGIUHH]HU
compartments during normal
cooling operations.*
This ensures that the
humidity levels in the fresh food compartment are
significantly higher than in a conventional system,**
allowing fresh produce and other unsealed foods to
retain their moisture content and freshness longer.
Moisture sensitive foods such as fresh fruit, salads,
rice, etc., can now be stored on open shelves without
excessive moisture loss.
'XHWRWKHKLJKHUKXPLGLW\LQWKHUHIULJHUDWRU\RXPD\
on occasion experience fog or small amounts of moisture
in the refrigerator compartment. This is normal and may
come and go as different food loads and environmental
conditions change. Wipe dry with a paper towel if
desired.
7KHVHSDUDWHDLUIORZV\VWHPPLQLPL]HVWKHPL[LQJRIDLU
between the two compartments, which reduces fresh
food odor transfer to improve the taste of ice.
7KH&OLPDWH.HHSHUV\VWHPDOVRUHGXFHVWKHQXPEHU
RIGHIURVWLQJF\FOHVLQWKHIUHH]HUHYDSRUDWRUWKHUHE\
UHGXFLQJIUHH]HUEXUQ
)UHH]HUDLULVXVHGLQWKHCustomCool™ feature.
7HVWLQJVKRZVDKLJKHUOHYHORIKXPLGLW\LQWKH)UHVK
)RRGVHFWLRQLQClimateKeeper2™ refrigerators versus
conventional units.
How it Works
TurboCool™ rapidly cools the refrigerator compartment
in order to more quickly cool foods. Use TurboCool™
when adding a large amount of food to the refrigerator
compartment, putting away foods after they have been
sitting out at room temperature or when putting away
ZDUPOHIWRYHUV,WFDQDOVREHXVHGLIWKHUHIULJHUDWRUKDV
been without power for an extended period.
Once activated, the compressor will turn on immediately
and the fans will cycle on and off at high speed as
needed for eight hours. The compressor will continue
to run until the refrigerator compartment cools to
DSSUR[LPDWHO\)&WKHQLWZLOOF\FOHRQDQGRIIWR
maintain this setting. After 8 hours, or if TurboCool™ is
pressed again, the refrigerator compartment will return to
the original setting.
How to Use
Press TurboCool™. The
TurboCool™ temperature display
will show TcDQGWKH/('ZLOOEH
activated.
After TurboCool™ is complete, the
TurboCool™ indicator light will go
out.
NOTES: The refrigerator temperature
cannot be changed during
TurboCool™.
7KHIUHH]HUWHPSHUDWXUHLVQRWDIIHFWHGGXULQJ
TurboCool™.
When opening the refrigerator door during
TurboCool™, the fans will continue to run if
they have cycled on.
ClimateKeeper2™ (on some models.)
TurboCool™ (on some models.)
OR
USING THE REFRIGERATOR: &OLPDWH.HHSHU7XUER&RRO

849-1000471 Rev. 1
ExpressChill™ (on some models)
How it Works
The ExpressChill™ feature is a system of dampers, a fan and a temperature
thermistor.
The pan is tightly sealed to prevent the pan’s temperature from causing temperature
fluctuations in the rest of the refrigerator.
The controls for this pan are located in the top of the refrigerator or on the dispenser
with the temperature controls.
How to Use
1. Empty the pan. Place the Chill Tray in the pan. Place
the items on the tray and close the pan completely.
2. Select the ExpressChill™ pad. On some models, you
can then select the chill time (use chart to determine
best setting). Other models will only have one option
(45 minutes). On models with multiple settings, tap the
pad until the light appears next to the desired setting.
Ŷ 7RVWRSDIHDWXUH
before it is finished, tap
that feature’s pad until
no options are selected
and the display is off.
Ŷ 'XULQJ([SUHVV&KLOO
the display on the
controls will count down
the time in the cycle.
How to Remove and Replace the Drawer
To remove:
1. Pull the drawer out to the
stop position.
2. Rotate all four swing locks
to the unlock position.
3. Lift the front of the drawer
up and out.
To replace:
1. Make sure all four swing
locks are in the unlock
position.
2. Place the sides of the drawer
into the drawer supports,
making sure the swing locks
fit on the drawer slots.
3. Lock all four swing locks by
rotating them to the lock
position.
ExpressChill™ Chart (on some models)
NOTE: Results may vary depending on packaging, starting temperature and other food traits.
ExpressChill™
15 Minutes
%HYHUDJH&DQR]
2 Small Juice Boxes
±R]HDFK
30 Minutes
2 to 6 Beverage Cans
R]HDFK
3ODVWLFR]%RWWOHV
of Beverage
4 to 6 Small Juice Boxes
±R]HDFK
)RLO-XLFH3DFNHWV
Wine (750 ml bottle)
45 Minutes
2 Liters of Beverage
*DOORQRI-XLFH
Gelatin—1 package
USING THE REFRIGERATOR: ExpressChill™

49-1000471 Rev. 1 9
USING THE REFRIGERATOR: :DWHU)LOWHU&DUWULGJH0:)
Water Filter Cartridge - MWF(On some models.)
Water filter cartridge
The water filter cartridge is located in the back upper
right corner of the refrigerator compartment.
When to replace the filter on models with a
replacement indicator light
There is a replacement indicator light for the water filter
cartridge on the dispenser. This light will turn orange to
tell you that you need to replace the filter soon.
The filter cartridge should be replaced when the
replacement indicator light turns red or if the flow of water
to the dispenser or icemaker decreases.
When to replace the filter on models without
a replacement indicator light
The filter cartridge should be replaced every six months
or earlier if the flow of water to the dispenser or icemaker
decreases.
Removing the filter cartridge
,I\RXDUHUHSODFLQJWKHFDUWULGJHILUVWUHPRYHWKHROGRQH
by slowly turning it to the left. Do not pull down on the
cartridge. A small amount of water may drip down.
Installing the filter cartridge
1.,I\RXDUHUHSODFLQJD6PDUW:DWHUFDUWULGJHZLWKDQ
adapter, it must be removed before installing the
cartridge. To remove the adapter, turn it to the left
DERXWWXUQ
,I\RXDUHUHSODFLQJD:DWHUE\&XOOLJDQFDUWULGJH
leave the adapter in place. This adapter will stay in the
refrigerator when you replace future cartridges.
2. On models ithout a replacement indicator light, apply
the month and year sticker to the new cartridge to
remind you to replace the filter in six months.
3.)LOOWKHUHSODFHPHQWFDUWULGJHZLWKZDWHUIURPWKHWDS
to allow for better flow from the dispenser immediately
after installation.
4. Line up the arrow on the cartridge
and the cartridge holder. Place
the top of the new cartridge up
LQVLGHWKHKROGHU'RQRWSXVKLW
up into the holder.
5. Slowly turn it to the right until the filter cartridge stops.
'212729(57,*+7(1$V\RXWXUQWKHFDUWULGJH
it will automatically raise itself into position. The
FDUWULGJHZLOOPRYHDERXWWXUQ
6.5XQZDWHUIURPWKHGLVSHQVHUJDOORQVDERXW
three minutes) to clear the system and prevent
sputtering.
7. 3UHVVDQGKROGWKH:$7(5),/7(5SDG
(on some models) on the dispenser for
3 seconds.
NOTE: A newly-installed water filter
cartridge may cause water to spurt from
the dispenser upon first use.
Filter bypass plug
You must use the filter bypass plug when a replacement
filter cartridge is not available. The dispenser and the
icemaker will not operate without the filter or filter bypass
plug.
To use the filter bypass plug on Water by Culligan™
models, you must first remove the filter adapter from the
cartridge holder by turning it to the left.
)RUWKHPD[LPXPEHQHILWRI\RXUILOWUDWLRQV\VWHP*(
Appliances recommends the use of GE Appliances
branded SmartWater™ filters only. Using GE Appliances
branded filters in GE Appliances and Hotpoint
refrigerators provides optimal performance and reliability.
GE Appliances branded SmartWater™ filters are always
the right choice because they are patented and designed
specifically for GE Appliances products. SmartWater™
ILOWHUVPHHWULJRURXVLQGXVWU\16)VWDQGDUGVIRUVDIHW\
and quality that are important for products that are
filtering your water. GE Appliances has not qualified
non-GE Appliances branded filters for use in GE
Appliances and Hotpoint refrigerators and there is no
assurance that non-GE Appliances branded filters meet
GE Appliances standards for quality, performance and
reliability.
To obtain a bypass plug or if you have questions-visit our
Website at GEAppliances.com, or call 1.800.GE.
CARES (1.800.432.2737).
Replacement filters:
,I\RXKDYHTXHVWLRQVRUWRRUGHUDGGLWLRQDOILOWHU
cartridges, visit our website at gewaterfilters.com or
call GE Appliances Parts and Accessories,
,Q&DQDGDFDOO
(appearance may vary)
With adapter Without adapter
Some models use
this type of water
filter.
Cartridge
Holder
)LOWHU
Bypass
Plug
)LOWHU
Bypass
Plug
SmartWater Water by Culligan

10 49-1000471 Rev. 1
USING THE REFRIGERATOR: :DWHU)LOWHU&DUWULGJH;:)(
Water Filter Cartridge - XWFE (On some models)
Water Filter Cartridge
The water filter cartridge holder is located in the
back upper-right corner of the fresh food refrigerator
compartment.
6HOHFWPRGHOVXVHUDGLRIUHTXHQF\LGHQWLILFDWLRQ5),'
WRGHWHFWOHDNVDQGPRQLWRUILOWHUVWDWXV7KH5),'
WHFKQRORJ\LVFHUWLILHGE\WKH)&&
When to Replace the Filter
,IWKHUHLVDUHSODFHPHQWLQGLFDWRUOLJKWIRUWKHZDWHUILOWHU
cartridge on the dispenser, a red light will start blinking to
WHOO\RXWKDW\RXQHHGWRUHSODFHWKHILOWHUVRRQ)RU
models that don’t have the indicator light, the filter
cartridge should be replaced every six months, or earlier
if the flow of water to the dispenser or icemaker
decreases.
Removing the Filter
,I\RXDUHUHSODFLQJWKHILOWHUILUVWUHPRYHWKHSUHYLRXV
one by gently grasping the filter and slowly turning it to
the left, about a ¼ turn. The filter should automatically
release itself when you have rotated it far enough to the
left. A small amount of water may drip down.
CAUTION ,IDLUKDVEHHQWUDSSHGLQWKHV\VWHP
the filter cartridge may be ejected as it is removed. Use
caution when removing.
Filter Bypass Plug
To reduce the risk of property damage due to water
leakage, you MUST use the filter bypass plug when a
replacement filter cartridge is not available. Some models
do not come equipped with the filter bypass plug. To
REWDLQDIUHHE\SDVVSOXJFDOO*(&$5(6,Q
Canada, call 800.561.3344. The dispenser and icemaker
will not operate without either the filter or bypass plug
installed. The bypass plug is installed in the same way as
a filter cartridge.
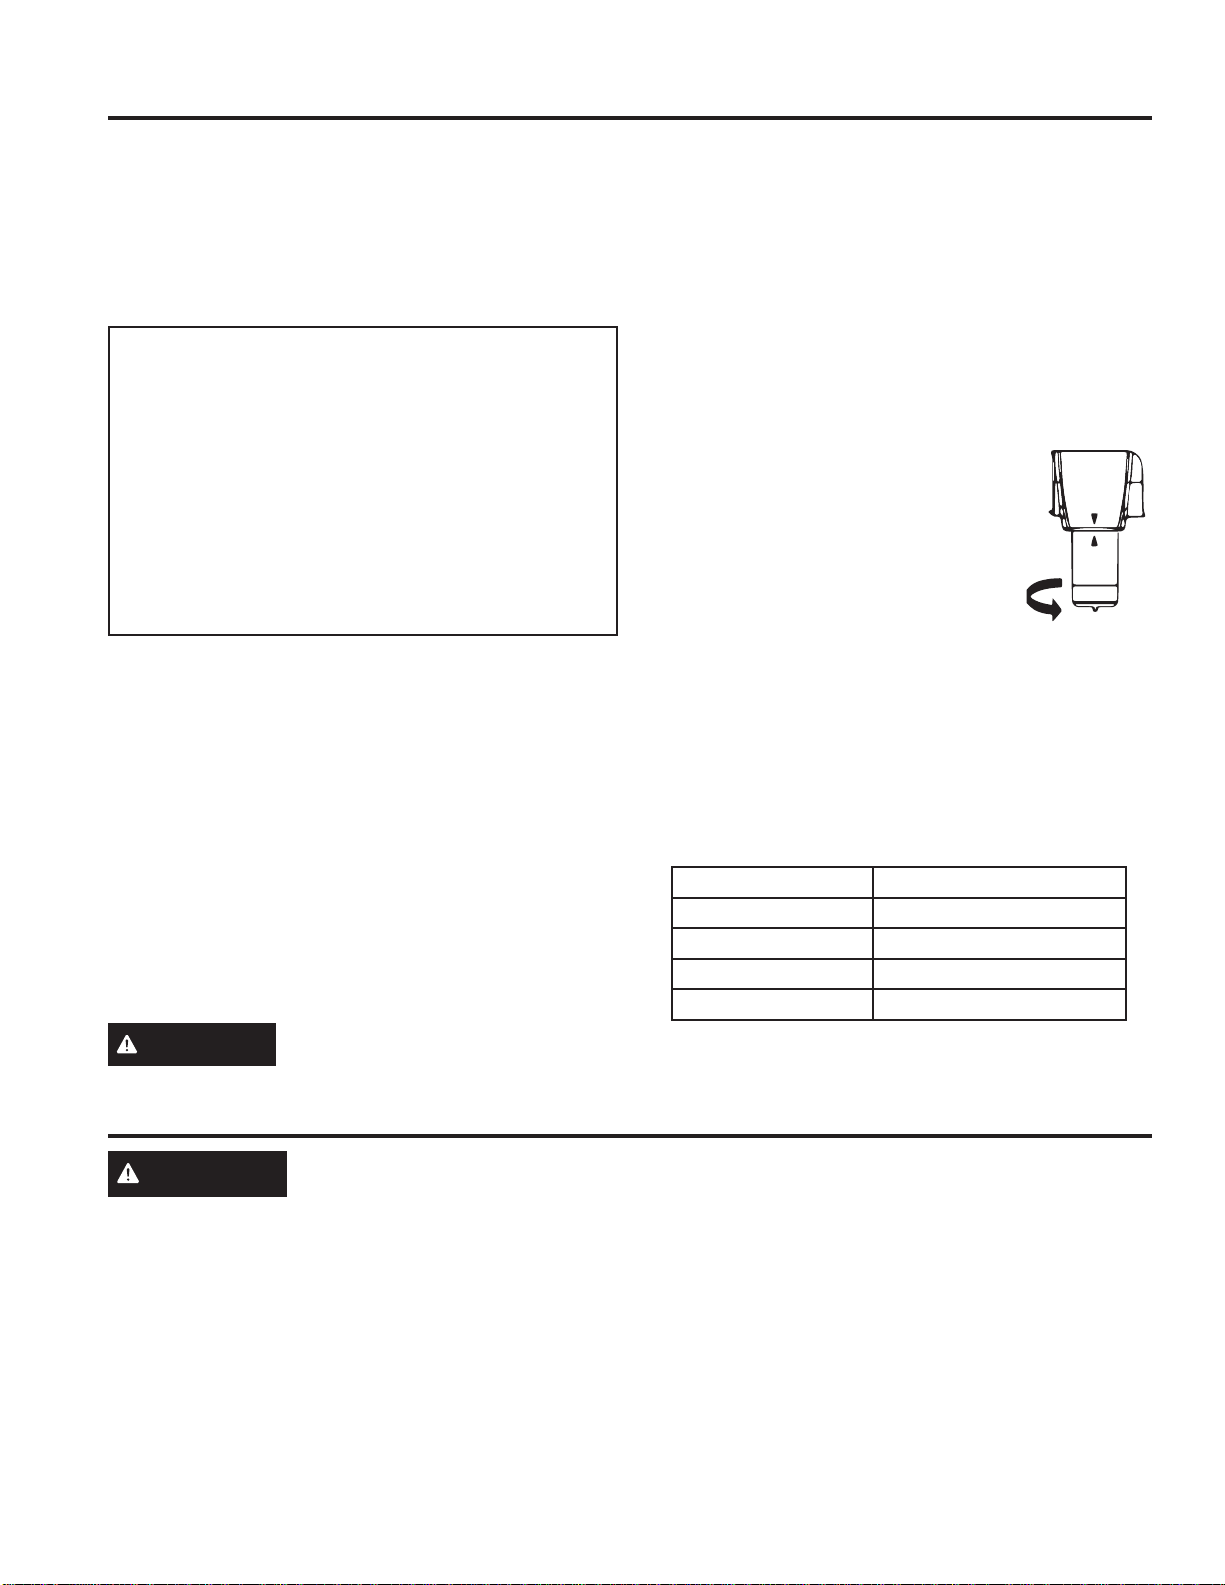
Installing the Filter Cartridge in a Side by
Side Refrigerator
1. Line up the arrow on the filter with the
arrow on the filter cartridge holder.
Gently push the top of the new filter up
inside the holder.
2. Slowly turn the filter to the right until it
VWRSV'212729(57,*+7(1$V\RX
turn the filter, it will automatically raise
itself into position. The filter will move
about a ¼ turn or 90 degrees.
3. Run water from the dispenser for 2 gallons (7.6 liters)
or approximately 5 minutes to clear the system. Water
may spurt out and air bubbles may be visible during
this process.
3UHVVDQGKROGWKH5(6(7:$7(5),/7(5EXWWRQRQ
the dispenser for 3 seconds. On select models, filter
reset will be automatic when a new filter is installed.
6HUYLFH)ORZ 0.5 gpm (1.89 lpm)
Water Supply Potable Water
Water Pressure 25-120 psi (172-827 kPa)
Water Temperature ))&&
Capacity 170 gallons (643.5 liters)
Sign-up for TEXT REMINDERS by texting REPLACE
to 70543.
WARNING To reduce the risk associated with choking, do not allow children under 3 years of age
to have access to small parts during the installation of this product. The disposable filter cartridge should be
replaced every 6 months at the rated capacity, or sooner if a noticeable reduction in flow rate occurs.
)RUWKHPD[LPXPEHQHILWRI\RXUILOWUDWLRQV\VWHP*($SSOLDQFHVUHFRPPHQGVWKHXVHRI*($SSOLDQFHVEUDQGHG
filters only. Using GE Appliances-branded filters in GE Appliances and Hotpoint® refrigerators provides optimal
performance and reliability. GE Appliances filters meet rigorous industry standards for safety and quality that are
important for products that are filtering your water. GE Appliances has not qualified non-GE Appliances-branded
filters for use in GE Appliances and Hotpoint refrigerators and there is no assurance that non-GE Appliances-
branded filters meet GE Appliances standards for quality, performance and reliability.
If you have questions, or to order additional filter cartridges, visit our website at gewaterfilters.com or call GE
Appliances Parts and Accessories, 877.959.8688. (Canada 1.800.661.1616 or GEAppliances.ca/en/products/
parts-filters-accessories)
Application Guidelines/Water Supply
Contains
FCC ID: ZKJ-294D2018 IC: 10229A-294D2018
“This device complies with part 15 of the FCC Rules.
Operation is subject to the following two conditions:
(1) This device may not cause harmful interference, and
(2) this device must accept any interference received,
including interference that may cause undesired
operation.”
“This device complies with Industry Canada licence-
exempt RSS standard(s). Operation is subject to the
following two conditions: (1) this device may not cause
interference, and (2) this device must accept any
interference, including interference that may cause
undesired operation of the device.”

49-1000471 Rev. 1 11
Not all features are on all models.
Refrigerator Door Bins and Freezer Door Tilt-Out Bins
Large Bins
7KHODUJHUUHIULJHUDWRUGRRUELQVDQGIUHH]HUWLOWRXWGRRU
bins are adjustable.
To remove: Lift the front of the bin straight up, then lift
up and out.
To replace or relocate: Engage the back side of the bin
in the molded supports of the door. Then push down on
the front of the bin. Bin will lock in place.
Small Bins
To remove: Lift the front of the bin straight up then out.
To replace: Position the bin above the rectangular
molded supports on the door. Then slide the bin down
onto the support to lock it in place.
The snugger helps prevent tipping, spilling or sliding of
small items stored on the door shelf. Place a finger on
either side of the snugger near the rear and move it back
and forth to fit your needs.
NOTE: Be careful when placing items in the top bin.
Make sure that items do not block or fall into the ice
chute.
Shelves and Bins
Refrigerator bin
)UHH]HUWLOWRXWELQ
Snugger
)UHH]HUELQ
,FH&KXWH
USING THE REFRIGERATOR: Shelves and Bins
Slide-Out Shelf (on some models)
The slide-out shelf allows you to reach items stored
behind others. The special edges of the spillproof shelf
are designed to help prevent spills from dripping to lower
shelves.
Spillproof Shelf
To remove: Slide the shelf out
until it reaches the stop, then
press down on the tab and
slide the shelf straight out.
To replace or relocate: Line
the shelf up with the supports
and slide it into place. The
shelf can be repositioned
when the door is at 90° or
more. To reposition the shelf,
slide the shelf past the stops
and angle downward. Slide shelf down to the desired
position, line up with the supports and slide into place.
Make sure you push the shelves all the way back in
before you close the door.
Edge-to-Edge Shelf
To remove: With door opened at an angle greater than
90°, slide the shelf out until it reaches the stop tab. Press
down on the tab and slide the shelf out until it reaches
the shelf’s back trim. While keeping the left side of the
shelf in contact with the cabinet, pull the shelf down and
forward toward the left to remove.
To replace or relocate: With
door opened at an angle greater
than 90°, align the shelf’s back
trim against the shelf support.
.HHSLQJWKHOHIWVLGHDJDLQVWWKH
cabinet, slowly lift and gently
push the shelf back into place.
Reposition the shelf past the stop
tabs. Make sure you push the
shelves all the way back in before you close the door.
Press tab and pull shelf
forward to remove
Press tab and pull shelf
forward
With left side stays against
the cabinet as you pull down
and to the left to remove

12 49-1000471 Rev. 1
Not all features are on all models.
Freezer Baskets (on some models)
To remove, slide out to the stop
position, lift the front past the stop
position, and slide out.
Make sure you push the baskets all
the way back in before you close
the door.
Freezer Baskets (on some models)
To remove, push the basket
all the way to the back of the
IUHH]HU/LIWXSXQWLOWKHEDFN
pins are disengaged. Lift the
entire basket up and pull out.
Make sure you push the
baskets all the way back in
before you close the door.
QuickSpace™ Shelf (on some models)
This shelf splits in half and slides
under itself for storage of tall
items on the shelf below.
This shelf can be removed and
replaced or relocated just like
Slide-Out Spillproof Shelves.
On some models, this shelf can not be used in the
lowest position.
Slide-Out Freezer Shelves
To remove, slide out to the stop
position, lift the front past the stop
position, and slide out from rib.
Make sure you push the shelves
all the way back in before you
close the door.
Fixed Freezer Shelves
To remove, lift the shelf up at
the left side and then bring the
shelf out.
NOTE FOR DISPENSER
MODELS: ,QRUGHUWRWDNHIXOO
advantage of the tilt-out ice bin
(on some models), only store
items on the shelf below the ice bin that are no taller
than the lowest point on the bin.
Door Wine/Beverage Rack (on some models)
This rack holds up to 5 cans, one
bottle of wine or one 2-liter bottle
of soda.
The rack hangs from the sides of
the dairy bin.
To remove:
(PSW\WKHZLQHEHYHUDJHUDFN
2. Holding the bottom of the dairy
bin, lift the front straight up, then
lift up and out.
3. To detach the rack from the dairy
bin, pull the rack’s side wires out
of the holes on each side of the
dairy bin.
To replace:
1. Reattach the rack to the sides of the bin.
2. Engage the back side of the bin in the molded
supports on the door. Then push down on the front of
the bin. The bin will lock into place.
ShelfSaver™ Rack (on some models)
Use this rack to store beverage
cans for easy access.
,WFDQDOVRKROGD´[´EDNLQJ
dish.
Door Can Rack (on some models)
This door rack holds up to 9
cans.
NOTE: This rack can only be
mounted in the top position
under the dairy bin.
Removable Beverage Rack
(on some models)
The beverage rack is designed
to hold a bottle on its side.
,WFDQEHDWWDFKHGWRDQ\
slide-out shelf.
To install:
1. Line up the large part of
the slots on the top of the
rack with the tabs under the
shelf.
2. Then slide the rack back to
lock it in place.
Shelves and Bins
1
2
USING THE REFRIGERATOR: Shelves and Bins

49-1000471 Rev. 1 13
USING THE REFRIGERATOR: 5HIULJHUDWRU'RRUV
Door Alignment
,IGRRUVDUHXQHYHQDGMXVWWKHUHIULJHUDWRUGRRU
To remove the base grille, open the doors, remove the
screw at each end of the base grille and then pull the
grille straight out.
8VLQJD´VRFNHWZUHQFKWXUQWKHGRRUDGMXVWLQJ
VFUHZWRWKHULJKWWRUDLVHWKHGRRUWRWKHOHIWWR
lower it. (A nylon plug, imbedded in the threads of the
pin, prevents the pin from turning unless a wrench is
used.)
2. After one or two turns of the wrench, open and close
the refrigerator door and check the alignment at the
top of the doors.
Refrigerator Doors (on some models)
The refrigerator doors may feel different than the ones
\RXDUHXVHGWR7KHVSHFLDOGRRURSHQLQJFORVLQJ
feature makes sure the doors close all the way and are
securely sealed.
When opening and closing the door you will notice a stop
SRVLWLRQ,IWKHGRRULVRSHQHGSDVWWKLVVWRSSRLQWWKH
door will remain open to allow you to load and unload
food more easily. When the door is only partially open, it
will automatically close.
The resistance you feel at the stop position will be
reduced as the door is loaded with food.
When the door is only partially open,
it will automatically close.
Beyond this stop the door will stay open.
´6RFNHW:UHQFK
Raise
Refrigerator Doors

14 49-1000471 Rev. 1
Crispers and Pans
Not all features are on all models.
Fruit and Vegetable Crispers
Excess water that may accumulate in
the bottom of the drawers should be
wiped dry.
On some models, the bottom drawer
has full extension slides that allow full
access to the drawer.
Adjustable Humidity Crispers
6OLGHWKHFRQWURODOOWKHZD\WRWKH+,VHWWLQJWRSURYLGH
high humidity recommended for most vegetables.
Slide the control all the way to the LO setting to provide
lower humidity levels recommended for most fruits.
Crisper Removal
Crispers can easily be removed by pulling the drawer
straight out and lifting the drawer up and over the stop
location.
,IWKHGRRUSUHYHQWV\RXIURPWDNLQJRXWWKHGUDZHUVILUVW
WU\WRUHPRYHWKHGRRUELQV,IWKLVGRHVQRWRIIHUHQRXJK
clearance, the refrigerator will need to be rolled forward
XQWLOWKHGRRURSHQVHQRXJKWRVOLGHWKHGUDZHUVRXW,Q
some cases, when you roll the refrigerator out, you will
need to move the refrigerator to the left or right as you
roll it out.
Convertible Deli Pan (on some models)
The convertible deli pan has its own cold air duct to
DOORZDVWUHDPRIFROGDLUIURPWKHIUHH]HUFRPSDUWPHQW
or refrigerator compartment to flow to the pan.
The variable temperature control regulates the air flow
IURPWKH&OLPDWH.HHSHU
Set the control to the coldest setting to store fresh
meats.
Set the control to cold to convert the panto normal
refrigerator temperature and provide extra vegetable
storage space. The cold air duct is turned off. Variable
settings between these extremes can be selected.
HI LO
C
O
L
D
C
O
L
D
E
S
T
USING THE REFRIGERATOR: Crispers and Pans

49-1000471 Rev. 1 15
Not all features are on all models.
Automatic Icemaker
The icemaker will produce seven cubes per cycle—
approximately 100–130 cubes in a 24-hour period,
GHSHQGLQJRQIUHH]HUFRPSDUWPHQWWHPSHUDWXUHURRP
temperature, number of door openings and other use
conditions.
,IWKHUHIULJHUDWRULVRSHUDWHGEHIRUHWKHZDWHUFRQQHFWLRQ
is made to the icemaker, set the power switch in the
2))SRVLWLRQ
When the refrigerator has been connected to the water
supply, set the power switch to the ON position.
7KHLFHPDNHUZLOOILOOZLWKZDWHUZKHQLWFRROVWR)
(–10°C). A newly installed refrigerator may take 12 to 24
hours to begin making ice cubes.
<RXZLOOKHDUDEX]]LQJVRXQGHDFKWLPHWKHLFHPDNHU
fills with water.
Throw away the first few batches of ice to allow the
water line to clear.
Be sure nothing interferes with the sweep of the feeler
arm.
When the bin fills to the level of the feeler arm, the
LFHPDNHUZLOOVWRSSURGXFLQJLFH,WLVQRUPDOIRUVHYHUDO
cubes to be joined together.
,ILFHLVQRWXVHGIUHTXHQWO\ROGLFHFXEHVZLOOEHFRPH
cloudy, taste stale and shrink.
CAUTION Avoid contact with the moving parts of
the ejector mechanism, or with the heating element
(located on the bottom of the ice maker) that releases
WKHFXEHV'RQRWSODFHILQJHUVRUKDQGVRQWKH
automatic ice making mechanism while the refrigerator is
plugged in.
Special note about dispenser models:
Ŷ6RPHPRGHOVKDYHDWLOWRXWLFHELQ7KHELQFDQEH
tilted out as shown in the illustrations, and it will hold
itself up while you take ice out or turn the icemaker
power switch on and off. Be sure to put the bin back in
place before closing the door.
ŶTo restore your ice level from an empty bucket
stage, the following steps are recommended:
1. 12 hours after the first batch of ice has fallen into the
bin, dispense 3 to 4 cubes.
2. After an additional 6 hours, dispense 3 to 4 cubes
again.
These steps will restore your ice level in the shortest
amount of time.
NOTE:
,QKRPHVZLWKORZHUWKDQDYHUDJHZDWHUSUHVVXUH\RX
may hear the icemaker cycle multiple times when making
one batch of ice.
Automatic Icemaker
,FHPDNHU
)HHOHU$UP
Power
Switch
(on some models)
,FHPDNHU
)HHOHU$UP
Power Switch
Green
Power Light
(on some models)
USING THE REFRIGERATOR: $XWRPDWLF,FHPDNHU

16 49-1000471 Rev. 1
Accessing Ice and Reaching the Power Switch on Dispenser Models
There are two types of ice storage bins on dispenser
models. One has a shelf above the bin, the other does
not.
Special note for models with tilt-out ice bin:
Ŷ7KHVHPRGHOVKDYHDWLOWRXWLFHELQ7KHELQFDQEH
tilted out as shown in the illustrations, and it will hold
itself up while you take ice out or turn the icemaker
power switch on and off. Be sure to put the bin back in
place before closing the door.
NOTE: ,QRUGHUWRWDNHIXOODGYDQWDJHRIWKHWLOWRXWLFH
bin, only store items on the shelf below the ice bin that
are no taller than the lowest point on the bin.
Models with tilt out ice bin
To access ice and reach the icemaker power switch:
1. Lift the bin, then pull it forward until the bin stops.
2. Lower the bin to access ice or reach the power switch.
Models with a shelf above the ice bin
To access ice, pull the bin forward.
To reach the power switch, pull the shelf straight out.
Always be sure to replace the shelf.
On some models, to access ice or reach the power
switch:
1. Pull the bin forward until the bin stops.
2. Lower the bin to access ice or reach the power switch.
Removing Ice Bin (dispenser models)
CAUTION The ice bin is heavy when full.
Set the power switch to the OFF position before
removing the bin.
When replacing the bin, be sure to press it firmly into
SODFH,ILWGRHVQRWJRDOOWKHZD\EDFNUHPRYHLWDQG
URWDWHWKHGULYHPHFKDQLVPWXUQ7KHQSXVKWKHELQ
back again.
Automatic Icemaker
Shelf
,FH%LQ
Shelf
Rotate
'ULYH
Mechanism
'LVSHQVHU0RGHOVRQO\
USING THE REFRIGERATOR: $XWRPDWLF,FHPDNHU

49-1000471 Rev. 1 17
Using the Dispenser
6HOHFW&8%(',&( ,
&586+(',&(
or WATER .
Press the glass gently against
the top of the dispenser
cradle.
The spill shelf is not self-
draining. To reduce water
spotting, the shelf and its grille
should be cleaned regularly.
,IQRZDWHULVGLVSHQVHG
when the refrigerator is first
installed, there may be air in the water line system.
Press the dispenser arm for at least two minutes to
remove trapped air from the water line and to fill the
water system. To flush out impurities in the water line,
throw away the first six glassfuls of water.
CAUTION Laceration Hazard
Ŷ1HYHUSXWILQJHUVRUDQ\RWKHUREMHFWLQWRLFHFUXVKHU
GLVFKDUJHRSHQLQJ'RLQJVRFDQUHVXOWLQFRQWDFWLQJ
the ice crushing blades and lead to serious injury or
amputation
Ŷ8VHDVWXUG\JODVVZKHQGLVSHQVLQJ
ice. A delicate glass may break and
result in personal injury.
Locking the Dispenser
3UHVVWKH/2&.SDGIRUVHFRQGVWRORFNWKHGLVSHQVHU
and control panel. To unlock, press and hold the pad
again for 3 seconds.
Dispenser Light
This pad turns the light in the dispenser
on and off. The light also comes on
when the dispenser cradle is pressed.
)RUPRGHOVZLWKDEXOELIWKHOLJKW
burns out, it should be replaced with
DZDWW9PD[LPXPEXOE)RU/('
PRGHOVFRQWDFW)DFWRU\6HUYLFH
Quick Ice (on some models)
When you need ice in a hurry, press
this pad to speed up ice production.
This will increase ice production for
the following 48 hours or until you
press the pad again.
Door Alarm (on some models)
To set the alarm, press this pad until
the indicator light comes on. This
alarm will sound if either door is open
for more than 3 minutes. The light
goes out and the beeping stops when
you close the door.
Water Filter (on some models)
7KH)LOWHU,QGLFDWRU/LJKWZLOOWXUQ\HOORZ
when the filter is nearing expiration.,
and red when the filter is expired. After
you replace the water filter, press and
KROGWKH5HVHW)LOWHUSDGIRUVHFRQGV
until the light turns off to reset the timer.
Filter Status (on some models)
3UHVVWKH)LOWHU6WDWXVSDGWRGLVSOD\
the water filter’s life percentage (%).
Ice and Water Dispenser (on some models.)
Important Facts About Your Dispenser
Ŷ 'RQRWDGGLFHIURPWUD\VRUEDJVWRWKHVWRUDJH
GUDZHU,WPD\QRWFUXVKRUGLVSHQVHZHOO
Ŷ Avoid overfilling glass with ice and use of narrow
glasses. Backed-up ice can jam the chute or cause
WKHGRRULQWKHFKXWHWRIUHH]HVKXW,ILFHLVEORFNLQJ
the chute, poke it through with a wooden spoon.
Ŷ Beverages and foods should not be quick-chilled
in the ice storage drawer. Cans, bottles or food
packages in the storage drawer may cause the
icemaker or auger to jam.
Ŷ To keep dispensed ice from missing the glass, put
the glass close to, but not touching, the dispenser
opening.
Ŷ Some crushed ice may be dispensed even though
\RXVHOHFWHG&8%(',&(7KLVKDSSHQVRFFDVLRQDOO\
when a few cubes accidentally get directed to the
crusher.
Ŷ After crushed ice is dispensed, some water may drip
from the chute.
Ŷ Sometimes a small mound of snow will form on the
door in the ice chute. This condition is normal and
usually occurs when you have dispensed crushed ice
repeatedly. The snow will eventually evaporate.
Spill Shelf
USING THE REFRIGERATOR: ,FHDQG:DWHU'LVSHQVHU
Filter
Status

18 49-1000471 Rev. 1
Care and Cleaning
Cleaning the Outside
The dispenser drip area, (on
some models) beneath the
grille, should be wiped dry.
Water left in this area may
leave deposits. Remove the deposits by adding undiluted
vinegar to the well. Soak until the deposits disappear or
become loose enough to rinse away.
The dispenser cradle (on some models). Before
cleaning, lock the dispenser by pressing and holding the
LOCK pad for 3 seconds. Clean with warm water and
baking soda solution—about a tablespoon (15 ml) of
baking soda to a quart (1 l) of water. Rinse thoroughly
and wipe dry.
Cleaning the Inside
To help prevent odors, leave an open box of baking
VRGDLQWKHIUHVKIRRGDQGIUHH]HUFRPSDUWPHQWV
Unplug the refrigerator before cleaning. ,IWKLVLVQRW
practical, wring excess moisture out of sponge or cloth
when cleaning around switches, lights or controls.
Use warm water and baking soda solution— about a
tablespoon (15 ml) of baking soda to a quart (1 liter) of
ZDWHU7KLVERWKFOHDQVDQGQHXWUDOL]HVRGRUV5LQVHDQG
wipe dry.
Use of any cleaning solution other than that which
is recommended, especially those that contain
petroleum distillates, can crack or damage the
interior of the refrigerator.
CAUTION 'RQRWFOHDQJODVVVKHOYHVRUFRYHUV
with warm water when they are cold. Glass shelves and
covers may break if exposed to sudden temperature
changes or impact such as bumping or dropping.
Tempered glass is designed to shatter into many small
pieces if it breaks.
'RQRWZDVKDQ\SODVWLFUHIULJHUDWRUSDUWVLQWKH
dishwasher.
7KHFKLOOWKDZWUD\LVGLVKZDVKHUVDIH
DO USE DO NOT USE
Soft, clean cloth or sponge Abrasive cloths, scrubbing sponges (with or without
soap), scouring or steel wool pads
Mild detergent mixed with warm water
$SSURYHGVWDLQOHVVVWHHOFOHDQHUV9LVLWWKH*(
Appliances parts store for approved stainless steel
cleaners: GEApplianceparts.com or call 877.959.8688
&OHDQHUVZLWKR[DOLFDFLGVXFKDV%DU.HHSHUV)ULHQG6RIW
Cleanser™ can be used to remove surface rust, tarnish
and small blemishes on stainless steel surfaces only.
Abrasive powders or sprays
Window Sprays or Ammonia
Citrus or plant oil-based cleaners
Acidic or vinegar-based cleaners
Oven cleaners
Cleaners containing acetone (propanone)
$Q\FOHDQHUZLWK:$51,1*DERXWSODVWLFFRQWDFW
NOTE: DO NOT allow stainless steel cleaner to come in contact with any plastic parts such as trim pieces, handle
KDUGZDUHDQGOLQHUV,IXQLQWHQWLRQDOFRQWDFWRIFOHDQHUVZLWKSODVWLFSDUWVGRHVRFFXUFOHDQSODVWLFSDUWZLWKD
sponge and mild detergent mixed with warm water.
STAINLESS STEEL - Outside surfaces, door handles, and trim
DO USE DO NOT USE
Soft, clean cloth or sponge
Microfiber cloth Abrasive cloths, paper towels, scrubbing sponges (with or without soap),
scouring or steel wool pads
Mild detergent mixed with warm
water Abrasive powders, liquids, or sprays
Window sprays, ammonia, or bleach
Citrus or plant oil-based cleaners
Acidic or vinegar-based cleaners
Oven cleaners
Alkaline cleaners
Stainless steel cleaners
DO NOT use Stainless Steel cleaners on the door surfaces.
IMPORTANT:7KHXVHRILQFRUUHFWSURGXFWVPD\GDPDJHWKHRXWHUILQLVKRI)LQJHUSULQW5HVLVWDQW6WDLQOHVVDQG
Black Stainless models. Please follow these instructions and use only the appropriate items below to clean your
appliance surfaces.
Ɣ&OHDQLQWHULRUH[WHULRUVXUIDFHVZLWKZDUPZDWHUPLOGVRDSRUGHWHUJHQWDQGDVRIWRUPLFURILEHUFORWKWRDYRLG
damage.
Ɣ:LSHWKHDSSOLDQFHVXUIDFHGU\ZLWKDVRIWFOHDQFORWKRUPLFURILEHUWRZHOWRDYRLGVWUHDNLQJRUZDWHUVSRWWLQJ
FINGERPRINT RESISTANT STAINLESS STEEL*, BLACK STAINLESS, SLATE, DARK
SLATE, PAINTED - Outside surfaces, door handles, and trim
(DVLO\ZLSHDZD\VPXGJHVDQG¿QJHUSULQWV
CARE AND CLEANING

49-1000471 Rev. 1 19
CARE AND CLEANING
Care and Cleaning
Preparing for Vacation
)RUORQJYDFDWLRQVRUDEVHQFHVUHPRYHIRRGDQG
unplug the refrigerator. Clean the interior with a baking
soda solution of one tablespoon (15 ml) of baking soda
to one quart (1 liter) of water. Leave the doors open.
6HWWKHLFHPDNHUSRZHUVZLWFKWRWKH2))SRVLWLRQDQG
shut off the water supply to the refrigerator.
,IWKHWHPSHUDWXUHFDQGURSEHORZIUHH]LQJKDYHD
qualified servicer drain the water supply system (on
some models) to prevent serious property damage due
to flooding.
Preparing to Move
Secure all loose items such as shelves and drawers by
taping them securely in place to prevent damage.
When using a hand truck to move the refrigerator, do not
rest the front or back of the refrigerator against the hand
truck. This could damage the refrigerator. Handle only
from the sides of the refrigerator.
Be sure the refrigerator stays in an upright position
during moving.
Replacing the Light Bulbs
WARNING Before replacing a burned-out light bulb, the refrigerator should be unplugged in order to avoid
contact with a live wire filament. (A burned-out light bulb may break when being replaced.)
7XUQLQJWKHFRQWUROWRWKH2))SRVLWLRQGRHVQRWUHPRYHSRZHUWRWKHOLJKWFLUFXLW
Refrigerator Compartment—Upper Light
1. Unplug the refrigerator.
2. The bulbs are located at the top of the compartment,
inside the light shield. On some models, a screw at
the front of the light shield will have to be removed.
On other models, the screw is located in the pocket
located at the back of the shield.
3. To remove the light shield, on some models, press
in on the tabs on the sides of the shield and slide
forward and out. On other models, just slide the
shield forward and out.
4. After replacing the bulb with an appliance bulb of the
same or lower wattage, replace the light shield and
screw. When replacing the light shield, make sure
that the tabs at the back of the shield fit into the slots
at the back of the light shield housing.
5. Plug the refrigerator back in.
Tabs
Your light shield will look like one of the following:
OR
Pocket
Behind the Refrigerator
Be careful when moving the refrigerator away from
the wall. All types of floor coverings can be damaged,
particularly cushioned coverings and those with
embossed surfaces.
Pull the refrigerator straight out and return it to position
by pushing it straight in. Moving the refrigerator in a side
direction may result in damage to the floor covering or
refrigerator.
When pushing the refrigerator back, make sure you
don’t roll over the power cord or icemaker supply line (on
some models).

20 49-1000471 Rev. 1
Care and Cleaning
Replacing the Light Bulbs (Cont.)
WARNING Before replacing a burned-out light bulb, the refrigerator should be unplugged in order to avoid
contact with a live wire filament. (A burned-out light bulb may break when being replaced.)
7XUQLQJWKHFRQWUROWRWKH2))SRVLWLRQGRHVQRWUHPRYHSRZHUWRWKHOLJKWFLUFXLW
Refrigerator Compartment—Lower Light
This light is located above the top drawer.
1. Unplug the refrigerator.
2. Lift the light shield up and pull it out.
3. After replacing the bulb with an appliance bulb of the
same or lower wattage, replace the shield.
4. Plug the refrigerator back in.
Freezer Compartment
1. Unplug the refrigerator.
2. Remove the shelf just above the light shield. (The
shelf will be easier to remove if it is emptied first.)
Remove the screw at the top of the light shield.
3. To remove the light shield, press in on the sides, and
lift up and out.
4. Replace the bulb with an appliance bulb of the same
or lower wattage, and reinstall the light shield. When
reinstalling the light shield, make sure the top tabs
snap securely into place. Replace the screw.
5. Reinstall the shelf and plug the refrigerator back in.
Dispenser (on some models)
1. Unplug the refrigerator.
2. The bulb is located on the dispenser under the
control panel. Remove the light bulb by turning it
counterclockwise.
5HSODFHWKHEXOEZLWKDEXOERIWKHVDPHVL]HDQG
wattage.
4. Plug the refrigerator back in.
Replacing the lights on models with LED lighting (on some models)
Setting the controls to OFF does not remove power to
the light circuit. Not all features are on all models.
Refrigerator Compartment
7KHUHLVDQ/('OLJKWLQJGLVSOD\LQWKHWRSDQGVLGHVRI
the fresh food compartment and in the rear and side of
WKHIUHH]HUFRPSDUWPHQWRQVRPHPRGHOV
,IWKLVDVVHPEO\QHHGVWREHUHSODFHGFDOO*(
Appliances Service at 1.800.432.2737 in the United
States or 1.800.561.3344 in Canada.
/('
Lighting
'LVSOD\
CARE AND CLEANING
Table of contents
Other GE Refrigerator manuals

GE
GE TA11 Installation instructions

GE
GE PFSS6SMXSS - Profile 25.8 cu. Ft.... Operating instructions

GE
GE TURBOCOOL 23 Safety guide

GE
GE GSS22IBP User instructions

GE
GE PFSS0MFCSS Manual

GE
GE Profile PCF23RGW Manual

GE
GE Profile PFCF1NJW Manual

GE
GE WML04GADBS Service manual

GE
GE PGSS5NFYASS and Operating instructions

GE
GE PBV10 Original instructions