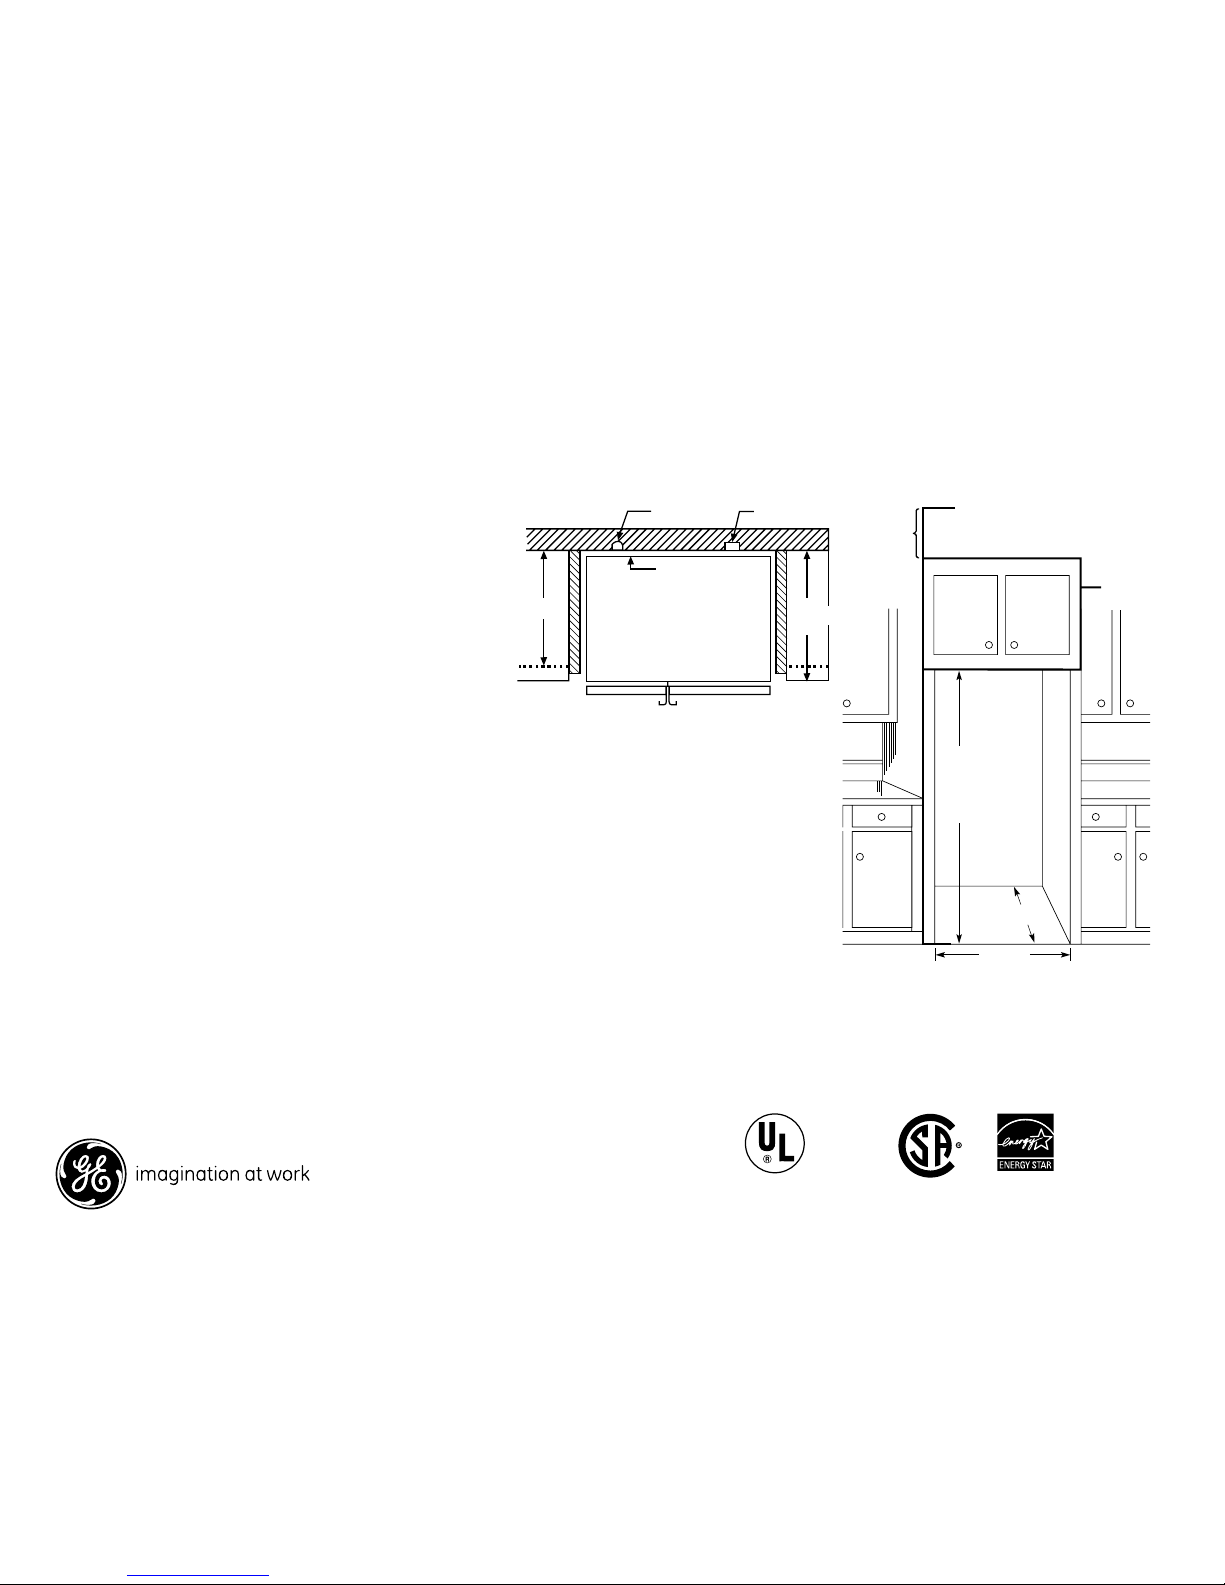
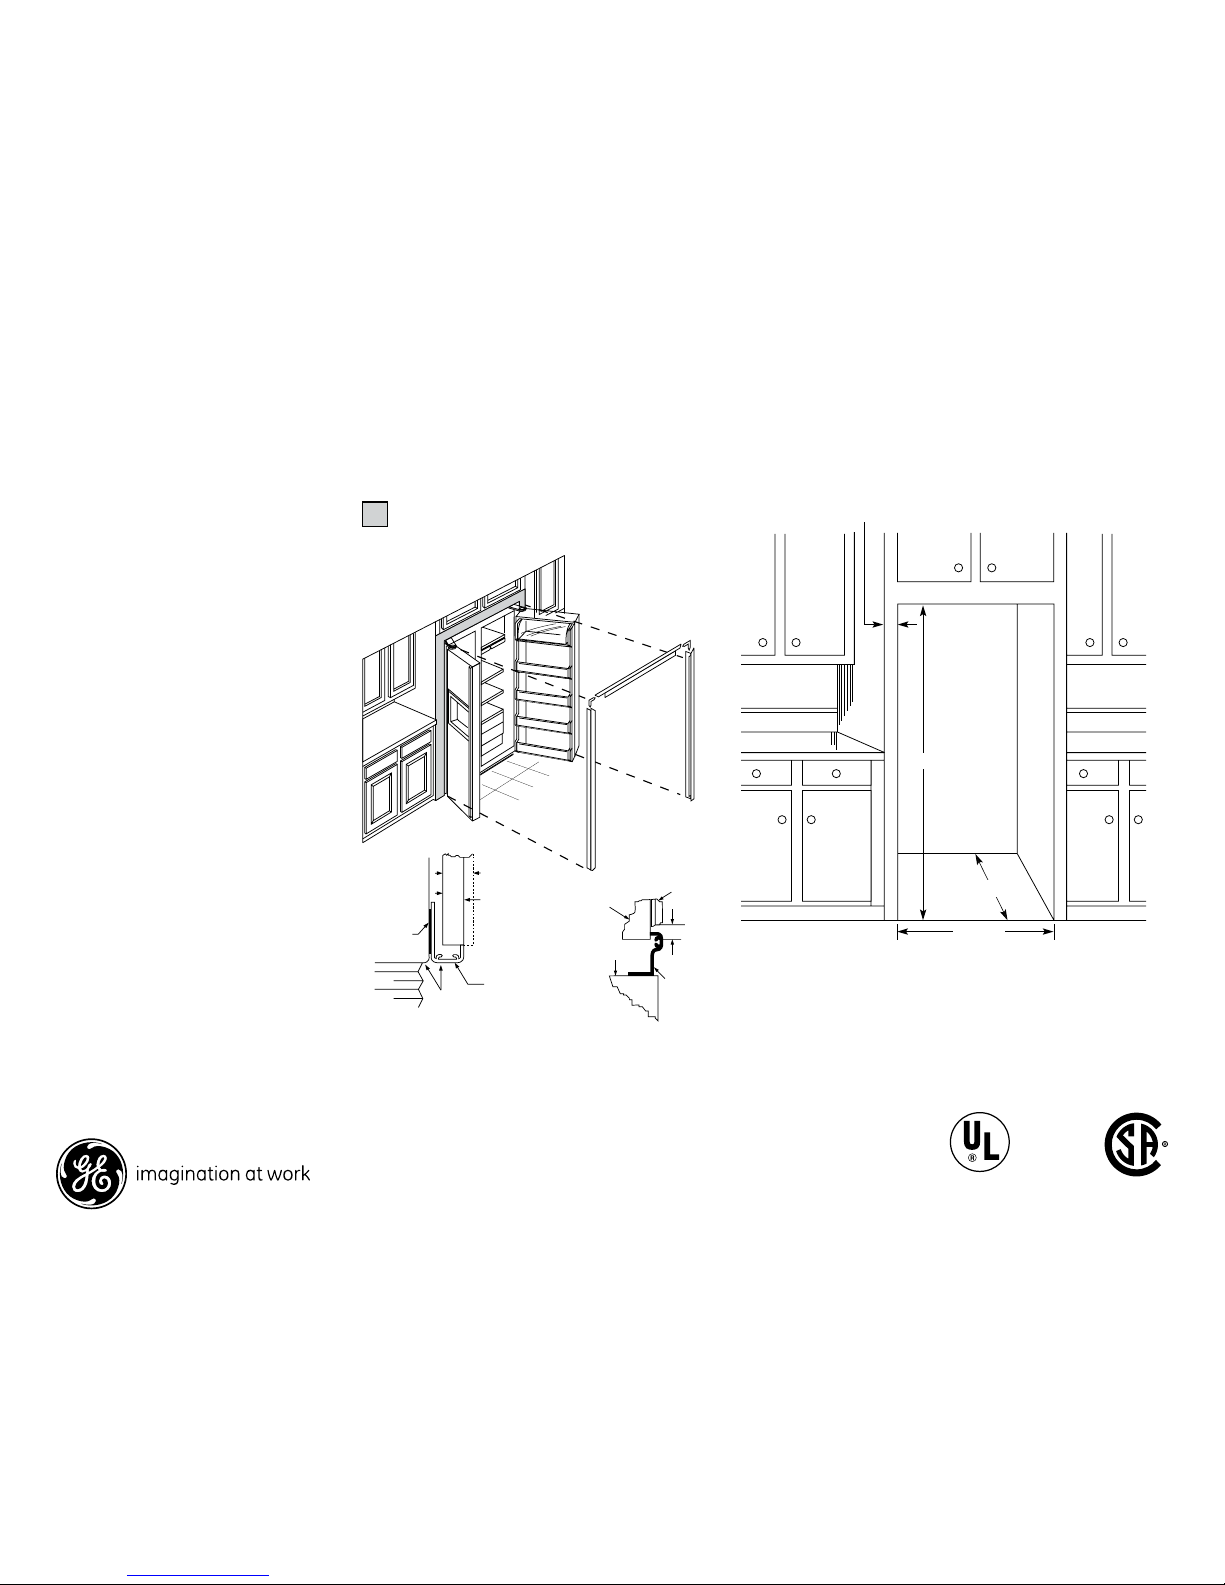
GE Profile PSH25MGW User manual

†Water hook-up fits in back air clearance when calculating
installation depth.
If installed against a wall, allow clearance of 13-15/16" on freezer
side to remove bin.
Clearance required to remove fresh food full-size pan without
disassembling is 18-5/8".
Allow additional space for any necessary leveling adjustments.
"94 SxS Refer
A
Front View
Top View
G
D
C
F
BE
H
Listed by
Underwriters
Laboratories
As an ENERGY STAR®
partner, GE has determined
that this product meets the
ENERGY STAR guidelines
for energy efficiency.
For answers to your Monogram,® GE Profile™or
GE®appliance questions, visit our website at
ge.com or call GE Answer Center®service,
800.626.2000.
Specification Revised 7/07 210251
Dimensions and Installation Information (in inches)
Overall
Dimensions
Height to top of hinge (in.) A 72
Height to top of case (in.) B 71-1/2
Case depth without door (in.) C†23-7/8
Case depth less door handle (in.) D†27-1/8
Case depth with door handle (in.) E†29-9/16
Depth with fresh food door open 90° (in.) F†46
Width (in.) G 35-3/4
Width with door open 90° inc. door handle (in.) H 38-3/16
Air
Clearances
Each side (in.) 1/8
Top (in.) 1
Back (in.) 1/2
PSH25MGW
GE Profile™Counter-DepthENERGY STAR® 24.6 Cu. Ft. Side-By-Side Refrigerator

For answers to your Monogram,® GE Profile™or
GE®appliance questions, visit our website at
ge.com or call GE Answer Center®service,
800.626.2000.
Installation Tips to Maximize the Built-In Look
• All wall/floor molding should be removed prior to installation.
• Water recess on rear wall recommended to prevent water
line damage. 48" minimum length, 1/4" diameter water
line tubing recommended.
• When possible, recess both copper water line and electrical
outlet. (See local codes)
• Front and rear leveling legs are adjustable for the built-in look.
(See owner’s manual)
**The rough-in dimensions of 70-1/4"/72-1/4" are minimum and
measured from the finished floor to top of opening (or the
underside of the overhead cabinets). For Models with Trim Kit:
If frameless style cabinets are planned for above the refrigerator,
you may need to consider adding a maximum of 1/4" (70-1/2")
to height of opening for 23 cu. ft. models and 1/8" (72-3/8") for
25 cu. ft. models to allow for additional clearance between the
cabinet doors and the top of refrigerator trim when the cabinet
doors are in open position.
Rough-In Dimensions and Installation Information (in inches)
8' Ceiling
13" to 14"
Cabinet
12"
Soffit
36-1/8"
24-1/2"
*The rough-in dimensions of 70-1/4"/72-1/4" are minimum and measured from
the finished floor to top of opening (or the underside of the overhead cabinets).
For Models with Trim Kit: If frameless style cabinets are planned for above the
refrigerator, you may need to consider adding a maximum of 1/4" (70-1/2") to
height of opening for 23 cu. ft. models and 1/8" (72-3/8") for 25 cu. ft. models
to allow additional clearance between cabinet doors and top of refrigerator trim
when cabinet doors are in open position.
Collar Trim In. w/ceiling
70-1/4"*
23 cu. ft. models
72-1/4"*
25 cu. ft. models
Listed by
Underwriters
Laboratories
As an ENERGY STAR®
partner, GE has determined
that this product meets the
ENERGY STAR guidelines
for energy efficiency.
Specification Revised 7/07 210251
25"
Counter
Top
ElectricalWater
3/4" Airspace
(1/2" Gap + 1/4"
Wall Plates)
24"
Cabinet
25"
Counter
Top
Electrical Water
3/4" Airspace
(1/2" Gap + 1/4"
Wall Plates)
24"
Cabinet
25"
Counter
Top
ElectricalWater
Trim
3/4" Airspace
(1/2" Gap + 1/4"
Wall Plates)
24"
Cabinet
25"
Counter
Top
Electrical Water
Trim
3/4" Airspace
(1/2" Gap + 1/4"
Wall Plates)
24"
Cabinet
FOR 21 CUBIC FOOT MODELS
FOR 24 CUBIC FOOT MODELS
Fig 2A eps
PSH25MGW
GE Profile™Counter-DepthENERGY STAR® 24.6 Cu. Ft. Side-By-Side Refrigerator

210251
Collar Trim Installation
An enclosure is required to match up to the
trim, see Typical Installation. To obtain the
most integrated look, the cabinet or soffit
above the refrigerator should extend out
to the same depth as the side panels. The
refrigerator opening must have minimum
dimensions of 70-1/4" high x 36-1/8" wide
x 24-1/2" deep as shown at right. If there is
an overhead cabinet, allow 1" for cabinet
door clearance with the top trim piece so
the cabinet doors can be opened without
hitting the top trim. If 1/2" side panels are
used, then side trim and panel will be even.
If 3/4" side panels are used, then some of
the side panel will extend beyond the trim
and must be finished.
IMPORTANT: Before finalizing specifications
for your GE Profile Counter-Depth
Refrigerator, please NOTE:
• A minimum of 36-1/8" is required for
refrigerator installation with collar
• Be sure to allow for 1/2" or 3/4" side
panels in addition to the 36-1/8"
minimum.
Typical Installation
Shaded areas represent front surfaces of side panels and
overhead cabinet or soffit that contacts trim.
Refer collar trim install
70-1/4"*
36-1/8"
24-1/2"*
1/2" minimum
*The rough-in dimension of 70-1/4" is minimum and is measured from the
finished floor to top of opening (or the underside of the overhead cabinets).
For Models with Trim Kit: If frameless style cabinets are planned for above the
refrigerator, you may need to consider adding a maximum of 1/4" (70-1/2") to
height of opening to allow additional clearance between cabinet doors and
top of refrigerator trim when cabinet doors are in open position.
Collar Trim Installation Art
Rough-In Dimensions and Installation Information (in inches)
Magnetic
Tape
3/4" Cabinet
Side Panel
1/2" Cabinet
Side Panel
Side trim must be installed
flush with the gasket contact
surface on the case.
Refrigerator
Case
Side TrimDoor Gasket
Overhead
Cabinet
Cabinet
Door
Top Trim
Case
1"
Specification Revised 7/07
PSH25MGW
GE Profile™Counter-DepthENERGY STAR® 24.6 Cu. Ft. Side-By-Side Refrigerator
For answers to your Monogram,® GE Profile™or
GE®appliance questions, visit our website at
ge.com or call GE Answer Center®service,
800.626.2000.
Listed by
Underwriters
Laboratories

Order your own custom wood panels to match cabinetry
or other decor.
Panels up to 1/4" thick will fit door frame with no special
preparation. Add filler behind material thinner than 1/4"
for proper fit.
Weight Limits: Total weight of panels (i.e., both freezer
panels)—Fresh Food = 38 lbs., Freezer = 28 lbs.
NOTE: Panels up to 3/4” will require special routing area
around handles. Dimensions may vary depending on
depth of panel.
IMPORTANT: Before finalizing specifications for your
GE Profile Counter-Depth Refrigerator, please NOTE:
• A minimum of 36-1/8" is required for refrigerator
installation with collar
• Be sure to allow for 1/2" or 3/4" side panels in addition
to the 36-1/8" minimum.
210251
Door Panel Dimensions and Installation Information (in inches)
Installation of Water Outlets
Freezer Panel
without Dispenser
Freezer Panel
with Dispenser
Fresh Food
Panel
(Fresh Food panel shown)
Notch required at top
corner as noted.
Detail C
Freezer Panel
Without Dispenser
Freezer Panel
With Dispenser
Fresh Food
Panel
Cut
out
1/8 1/8
14-15/32 14-15/32
14-15/32
36-1/4
17
19-15/32
5/16
Cut
out
Cut
out 1/8
5/16 5/16
FRONT
6969
FRONT FRONT
Alternate
water
line location
through floor
1/2"
Water hook-up
on the refrigerator
Recommended water line
location using recess
in rear wall
Recommended
single loop of 1/4" copper water line
Water hook-up
on the refrigerator
Rear Wall View
18"
24"
Allow 48" minimum water
line to enable refrigerator
to be pulled forward
Alternate
water
line location
through floor
1/2"
Recommended water line
location using recess
in rear wall
Recommended single loop
of 1/4" copper water line
Water hook-up
on the refrigerator
Rear Wall View
Top View
Top View
18"
24"
Allow 48" minimum water
line to enable refrigerator
to be pulled forward
In.of water & Electric Ot. Art
Alternate
water
line location
through floor
1/2"
Water hook-up
on the refrigerator
Recommended water line
location using recess
in rear wall
Recommended
single loop of 1/4" copper water line
Water hook-up
on the refrigerator
Rear Wall View
18"
24"
Allow 48" minimum water
line to enable refrigerator
to be pulled forward
Alternate
water
line location
through floor
1/2"
Recommended water line
location using recess
in rear wall
Recommended single loop
of 1/4" copper water line
Water hook-up
on the refrigerator
Rear Wall View
Top View
Top View
18"
24"
Allow 48" minimum water
line to enable refrigerator
to be pulled forward
In.of water & Electric Ot. Art
5/16"
1/8"
Dr. Panel Dim. Detail C
1/4" Max.
Panels 1/4" thick
or less
Dr. Panel Dim. Panel 1/4 Thic
k
Specification Revised 7/07
PSH25MGW
GE Profile™Counter-DepthENERGY STAR® 24.6 Cu. Ft. Side-By-Side Refrigerator
Listed by
Underwriters
Laboratories
For answers to your Monogram,® GE Profile™or
GE®appliance questions, visit our website at
ge.com or call GE Answer Center®service,
800.626.2000.

As an ENERGY STAR®
partner, GE has determined
that this product meets the
ENERGY STAR guidelines
for energy efficiency.
Specification Revised 7/07 210251
Features and Benefits
• Counter-Depth Configuration - Offers a built-in look by fitting almost completely flush with
surrounding cabinetry and blending in with décor
• ClimateKeeper2™System - Keeps food garden fresh longer, while protecting ice from odor transfer,
with its unique dual-evaporator system
• ExpressChill™with 1 Setting - Chills beverages quickly with easy one-button selection of 45 minutes.
• Slide 'n Store™Full-Extension Freezer Baskets - Extends 12" to 16" beyond the cabinet, providing easy
loading and unloading
• Quick Ice™Option - Makes ice up to 50% faster than normal settings-ideal for entertaining
• TurboCool™Setting - "Revs up" the refrigerator, cooling it quickly after frequent door openings
• Integrated Ice™System - Frees up valuable freezer space; It tilts down, providing easy access to bulk ice
• Tilt-Out Freezer Door Bins - Move forward for convenient access
• Integrated Shelf Support System - Provides strong, yet flexible support
• Adjustable ClearLook™Door Bins - Hold gallon-size containers with style and ease
• Adjustable Slide-Out, Spillproof Glass Shelves - Shelves slide out, spills stay put
• GE Water Plus Filtration System - Delivers clean, great-tasting water and ice through the LightTouch!
Dispenser with indicator light
• Model PSH25MGWBV - Black on black
• Model PSH25MGWWV - White on white
• Model PSH25MGWCV - Bisque on bisque
PSI23MGTWV/BV
PSH25MGTWV/BV
WATER
LOCK
Hold3seconds
CRUSHED
DOOR
ALARM
CUBED
LIGHT
Hold3seconds to Reset
QUICKICE
RSET
FILTER
PSH25MGW
GE Profile™Counter-DepthENERGY STAR® 24.6 Cu. Ft. Side-By-Side Refrigerator
This manual suits for next models
2
Table of contents
Other GE Refrigerator manuals

GE
GE GE Energy Star GBSL3HCYLLS Manual

GE
GE TFX20DGB Training manual

GE
GE Profile CustomStyle PSH23PGT Manual

GE
GE TBW25 User manual

GE
GE TBG16NACBRWW Training manual

GE
GE GEPDS20MFSWW User manual

GE
GE PSS26NSTSS Manual

GE
GE HTS17GBBWW Assembly instructions

GE
GE ENERGY STAR GTL21KBXBS User manual

GE
GE Monogram ZISS480NXSS User manual

GE
GE GTH18KBR User manual

GE
GE 49-60468-1 User manual

GE
GE Profile PSDS3YGXSS User manual

GE
GE Profile ENERGY STAR PDS22MIS Manual

GE
GE PSF26NGPCBB and Safety guide

GE
GE 18, 19 User manual

GE
GE 14 User manual

GE
GE Monogram ZISW360DX Manual

GE
GE Profile 24 CustomStyle User manual

GE
GE TBX16SSBAA User instructions