GE TBX18 User manual

,
.
--.
@
..
Contents
Appliance Registration 2 ModelandSerialNumbers2
Base Grille
4
Problem Solver
13,14
Care andCleaning 12 RepairService
15
Condenser 12 SafetyInstructions
3
Energy Saver Switch
5
Shelves
7
Energy-SavingTips
2
Storage Drawers
49
Food Storage Suggestions
6
Drawer
8c
Cover Removal
4
9
Storage Times
6
TemperatureControls
5
IceTrays
10
Vacation
&
MovingTips
12
Icemaker
10
Warrantv Back Cover
Icemaker Accessory
Kit
11
Water Filter Accessory
11
Installation
394
Adapter Plug
4
AdjustableRollers
4
Clearances
4
Electrical Requirements
3.4
Extension Cord
4
Grounding
3
Location
4
GEAnswer
Center@
Light Bulb Replacement 12
800.b'2li2000
Models
TBX18
TBX20
GE
Appliances

Help
us
help
you.
Read this
book
carefully.
It is intended to helpyou operate
and maintain your newrefrigerator
properly.
Keep it handy for answers to your
questions.
If you don’t understand something
orneed more help, write (include
your phone number):
Consumer Affairs
GE Appliances
Appliance Park
Louisville,
KY
40225
Write downthe model
andserial numbers.
You’ll see them on a label on the
left side, near the topof the fresh
food compartment.
Thesenumbers are also on the
Consumer Product Ownership
Registration Card that came with
your refrigerator.
h
*&
Before sending inthe registration
card, please write these numbers
here:
Model
Number
Serial
Number
Use these numbers in any
correspondenceorservicecalls
concerning your refrigerator.
If you received a damaged
refrigerator,
immediately contact
the dealer (or builder) that soldyou
the refrigerator.
Save time and money.
Before you requestservice,
check the Problem Solver on pages
13
and
14.
It
listscauses
of
minor
operating problems thatyou can
correct yourself.
Energy-saving tips
,*
Location of yourrefrigeratoris
important. Avoid locating it next to
your range, a heating ventor where
the sun will shine directly onit.
Don’t open thedoorsmore often
than necessary.
Close the doors as soon as possible,
particularly in hot, humid weather.
Keep Energy Saver Switch inthe
left position unless moisture forms
on the outsideof the refrigerator.
Be surethedoors areclosed
tightly. Before leavingthehouse
orretiring for the night, check to
be sure the doorshaven’t been left
open accidentally.
Store only those foods requiring
refrigeration in your refrigerator.
Wipe moisture
from
bottles and
cartons before putting them in the
refrigerator.
Keep foods covered to reduce
moisture buildup inside the
refrigerator.
If you turn the controls to the
coldest position for quick chilling
or freezing,be sure to turn them
back to regular settings.
Don’t overcrowd your refiigemtor.
Overcrowding can require extra
electrical energy to keep everything
cool.
?.
2

IMPORTANT
SAFETY
INSTRUCTIONS
--.
Readallinstructions before
using
this appliance.
WARNING-When using this
appliance,always exercise basic
safety precautions,including the
following:
Use this appliance only forits
intended purposeasdescribedin
this Use and Care Book.
This refrigerator mustbe
properly installedin accordance
with the Installation Instructions
before itis used. See grounding
instructionsbelow and on page
4.
Never unplugyour refrigerator
by pulling on thepower cord.
Always gripplug firmly and pull
straightout from theoutlet.
Repairorreplaceimmediately
all
electric service cords thathave
become frayed or otherwise
damaged.
Do
not usea cord that
showscracksorabrasion damage
along its lengthorat eitherthe plug
or connectorend.
Do not allow children toclimb,
stand or hangon theshelvesin
the refrigerator.They could
damagethe refrigerator and
seriouslyinjurethemselves.
After your refrigeratoris in
operation, donot touch thecold
surfaces, particularlywhen hands
are damp orwet. Skin mayadhere
to theseextremelycold surfaces.
If your refrigerator has an
icemaker, donot place fingersor
hands
on the automaticicemaking
mechanismwhile the refrigerator
is
plugged in.Thiswill help protect
you from possible injury. It will
also
prevent interference with the moving
partsof theejectormechanism, or
with the heatingelementthat
releases thecubes.
When movingyour refrigerator
away
fromthe
wall,
be
carefui
not
to
roll
overordamage thepower
cord.
Don’t
refreeze
fmnfoods
which
have thawed completely.The
United States Departmentof
Agriculture in Home and Garden
Bulletin
No.
69
says:
“. ..You may safely refreeze frozen
foods that have thawed if they still
contain icecrystalsor if theyare
stillcold-below
40°F.
“.
.
.Thawed ground meats, poultry
or fish that have
any
off-odor or
off-color should not be refrozen and
should not beeaten. Thawed ice
cream should bediscarded. If the
odor
or
colorof any foodis poor or
questionable,get rid ofit. Thefood
may bedangerous
to
eat.
“Even partial thawing and refreezing
reduce theeatingqualityof foods,
particularly fruits, vegetables and
prepared foods.Theeatingquality
of red meatsis affected lessthan
that of manyother foods. Use
refrozen foodsas soon aspossible to
save asmuch of their eating quality
asyou can?
If
your old refrigerator
is
still
around thehouse but not in use,
be sure toremove the doors. This
will reducethepossibility of
danger tochildren.
Unplug your refrigerator:
A.
Before making any repairs.
Note: We strongly recommend
that anyservicingbe performed
by aqualifiedindividual.
B.
Beforecleaning.
C. Before replacinga burned-out
light bulb,the refrigerator should
be unplugged
in
orderto avoid
contact witha live wirefilament.
(A burned-out light bulb may
break when beingreplaced.)
Note: Turningcontrolto
OFF
position does not remove power
to the light circuit.
Do
not operateyour refrigerator
in
the presenceof explosive fumes.
SAVE
THESE
INSTRUCTIONS
Installation
Requirements-IMPORTANT..
.
Please
Read
Carefully.
How
toconnect
I
1
Where a standardtwo-urongwall
electricity
For personal safety,
this appliancemust be
properly grounded.
The power cordof this appliance
is equipped witha three-prong
(grounding)plug which mates with
a standard three-prong(grounding)
wall outlet (Fig.
1)
to minimize the
possibility of electricshock hazard
from thisappliance.
PREFERRED
METHOD
INSURE
PRO~ER
GROUND EXISTS
BEFOREUSE
Have walloutletand circuitchecked
by a qualified electricianto make
sureoutlet isproperlygrounded.
3
outlet is encountered,
i’t
is
Gur
personal responsibilityand
obligation to have
it
replaced
with
a properly grounded three-prong
wall outlet.
DO NOT, UNDERANY
CIRCUMSTANCES, CUT
OR
REMOVE
THE THIRD
(GROUND)PRONG
FROM
THE
POWER CORD.
(continued
rur
page)

hta11atiOn Requirements
(continue+IMPORTANT.. .Please Read Carefully.
Use of Adapter Plug
Because of potential safety hazards
under certain conditions,we
strongly recommend against useof
an adapter plug. However, if you
still elect to use an adapter, where
'
localcodespermit, a TEMPORARY
CONNECI'ION may be made toa
properly grounded two-prong wall
outlet by use of a UL listed adapter
(Fig.
2)
available at most local
hardware stores.
I
TEMPORARY
METHOD
I
PERMITTEOIN CANADA1
1
:gK]
1
IAOAPTERPLUGS NOT
I
?I
I
Larger slot in adapter mustbe
aligned with larger slot
in
wall
outlet to provide proper polarity
in
connectionof powercord.
CAUTION:
Attaching adapter
ground terminal towall outlet cover
screw does not ground the appliance
unless cover screw is metal, and not
insulated, and wall outlet is
grounded through house wiring.
You should have the circuit checked
by a qualified electricianto make
sure the outlet is properly grounded.
When disconnecting thepower
cord from the adapter,
always hold
theadapter with one hand.If this
is not done, the adapter ground
terminal is very likely to break
with repeated use.
Shouldtheadapter ground
terminal
break,
DO
N(YI'
USE
the
applianceuntil a proper ground
hasagainbeen established.
Use of Extension Cords
Because of potential safety hazards
under certain conditions,we
strongly recommend against the
use
of
an
extension cord. However,
if youstill elect to use
an
extension
cord, it is absolutely necessary that
it
be
a
UL
listed 3-wire grounding
type
appliance
extension
cord
having
a grounding type plug and outlet
and that the electrical ratingof the
cord be15 amperes (minimum) and
120 volts.
The refrigerator should
always be plugged into
its
own
individual electrical outlet-
(115 volt,
60
Hertz, or
100
volt,
50
Hertz, single phase AC). This is
recommended for best performance
and to prevent overloading house
wiring circuits, which could cause a
fire hazard from overheating wires.
Refrigerator Location
Do
not install refrigerator where
temperature will go below
60°F.
because
it
will
not run often enough
to maintain proper temperatures.
Do
install
it
on
a
floor
strong
enough to support a
fully
loaded
refrigerator.
Also see Energy-Saving Tips
regarding location.
Clearances
Allow the following clearances for
easeof installation and properair
circulation:
Sides
.........
3/4"
Top
............
1"
Back
...........
1"
Water Supply to Icemaker
(on
models
so
equipped)
If your refrigerator has an
icemaker, orif youplan to add an
icemaker later, the icemaker will
have to be connected to a cold
water line.
A
water supply kit
containing copper tubing, shut-off
valve, fittingsand instructionsis
available at extra cost from your
dealer. Thereshould be sufficient
tubing forthe icemaker from the
cold water supply to allow moving
therefrigerator out from thewall
several feet (approximately
8
feet
of
1/4"
copper tubing in three
10-inch diameter coils).
4
Rollers/Leveling
Legs
Somemodelshave adjustable
rollers
that enableyou to movethe
refrigeratoraway from thewall for
cleaning; other models have
adjustable leveling legs.
Rollersor legs, located behind the
base grille, should be set
so
the
refrigeratoris firmly positioned on
the floor and the front is raisedjust
enough thatthe doors close easily
when opened about halfway.
To
adjust rollers
or
levelinglegs,
remove the basegrille by grasping
it at the bottom and pulling
it
out.
Turn
rolleradjustingscrews
or
levelinglegs
clockwise to raise
refrigerator, counterclockwise to
lower it. Use adjustable wrench
(3/8"
hex head bolt)orpliers.
When adjusting front rollersor
leveling legs for proper door
closure, itis recommended thatthe
bottom front edgeof thecabinet be
approximately
3/4"
from the floor.
To
replace basegrille,
align
prongs onback of grille with
clampsin cabinetand
push
forward
until grille snaps into place.

Operating Your Refrigerator
p..
~-.+sfj
.
Set the Temperature Controls
TEMPERATURE
CONTROLS
E
COLDEST
COLDEST
9
ALLOW
24
HOURS
FOR
TEMPERATURES
TO
STABILIZE
Your refrigerator hastwo controls
that letyou regulate thetemperature
in the fresh food and freezer
compartments.
INITIALLY,setthe
FRESH
FOOD
control at
5
and the
FREEZER controlat
C.
For colder or warmer temperatures,
adjust the desired compartment
control one letter or number ata time.
IMPORTANT
When initially setting the controls
or when adjusting them, allow
24
hours for the temperatures to
stabilize, or even out.
Note: Turning the fresh food
control to the
OFF
position stops
cooling in
BOTH
compartments-
fresh food AND freezer-but
does not shut
off
power
to
the
refrigerator.
How
to
Test Temperatures
Use the
milk
test for the fresh food
compartment.
Place a containerof
milk
on the top shelf in the fresh
food compartment. Check it aday
later.
If
the milkis too warmor too
cold, adjust the temperature controls.
Use the ice cream testfor the
freezer compartment.
Place a
container of ice cream inthe center
of the freezer compartment. Check
it after aday. If it’s toohard or too
soft, adjust the temperature controls.
Always allow
24
hours for
the refrigerator to reach the
temperature
you
set.
If
you
turn
your
household
thermostat below
60°F.
at night
.
..you may want to turn the
lettered
control one step colder,
as
from
“C”
to
“DI’
Coolertemperaturesin the
house may causethe compressor to
operate less frequently, thus allowing
the freezer compartmentto warm
somewhat. To protect your frozen
food supply, leave your
lettered
setting at this colder setting for the
entire winteror for whatever period
of time you are turning down your
thermostat. This isespecially
important whenthe thermostat is
turned down for an extended period.
This change should have no effect
on your fresh food compartment.
However,
if
freezing occurs, turn
the numbered control one step
warmer, as from
“5”
to
‘‘4;’
When you stop turning the
thermostat down, turn temperature
controls back
to
their regular settings.
Energy Saver Switch
TheEnergy
Saver Switch is
located on the
temperature
control panel.
To reduce the amount of
electricity required to operate
your refrigerator, push switch to
the left position.
This turnsoff heaters in your
refrigerator that prevent moisture
from forming on the outside.
With the heaters turned off,there
is a chance that moisturemay form
on theoutsideof your refrigerator,
especiallywhen the weatheris
humid. Thehumidity is most likely
to be high in the summer,
in
the
early morning hours, and in homes
which are not air conditioned.
Over an extended periodof time,
moisture’that forms
on the outside
may cause deteriorationof the paint
finish. It will be important
to
protect
the finish
by
using appliance polish
wax
as
described on page
12.
When the Energy Saver Switch
is
pushed
to
the right,
electricity
flows through the low wattage
heaters which
warm
the outside
of the cabinet and, under most
conditions, prevent the forming
of moisture or water droplets.
No
Defrosting
It
is not necessary to defrost the
freezer or fresh food compartments.
Your refrigerator is designed and
equipped to defrost itself
automatically.
5

Food
Storage Suggestions
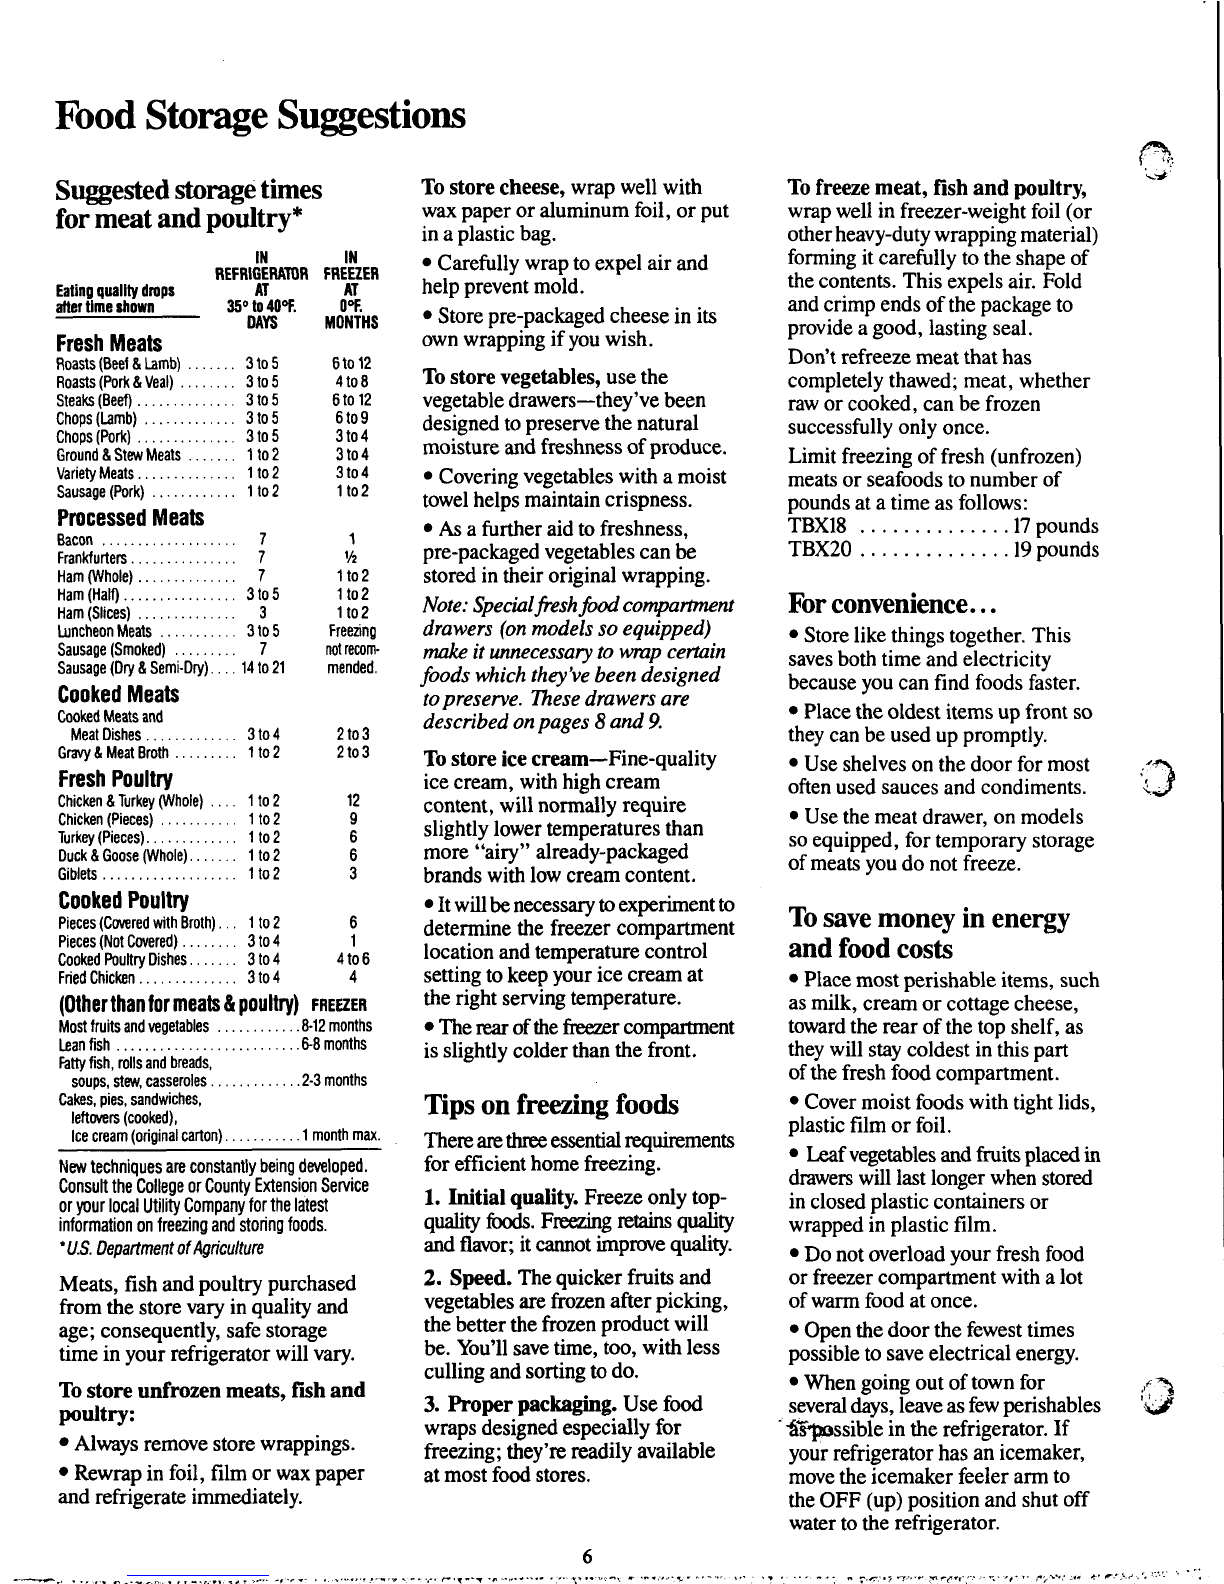
Suggested storage times
for meat and poultry*
IN
REfRlGERAmR
Eatinp
quality
dmps
AT
after
time
shown
3!io
to
40T.
DAYS
Fresh
Meats
Roasts
(Beef
&
Lamb)
.......
3
to
5
Roasts(Pork
&
Veal)
........
3
to
5
Steaks(Beef)
..............
3
to
5
Chops (Lamb)
.............
3
to
5
Chops(Pork)
..............
3
10
5
Ground&Stew Meats
.......
1
to
2
Variety Meats.
.............
1
to
2
Sausage (Pork)
............
1
to
2
Processed
Meats
Bacon
...................
7
Frankfurters.
..............
7
Ham (Whole)
..............
7
Ham(Half)
................
3
to
5
Ham (Slices)
..............
3
Luncheon
Meats
...........
3
to
5
Sausage(Smoked)
.........
7
Sausage (Dry
&
Semi-Dry)
....
14
to
21
Cooked
Meats
Cooked Meatsand
Meat
Dishes
.............
3
to
4
Gravy
&
Meat Broth
.........
1
to
2
Fresh Poultry
Chicken &Turkey (Whole)
.... 1
to
2
Chicken(Pieces)
...........
1
to
2
Turkey (Pieces).
............
1to2
Duck
&
Goose
(Whole).
......
1
to
2
Giblets
...................
1
to
2
CookedPoultry
Pieces(Covered with Broth).
..
1
to
2
Pieces
(Not
Covered)
........
3
to
4
Cooked PoultryDishes.
......
3
to4
FriedChicken
..............
3
to
4
f
REEZER
IN
AT
0%
MONTHS
6
to
12
6
to
12
6to9
3
to
4
3
to
4
3to4
1to2
4
to
8
1
ch
1to2
1
to2
1to2
Freezing
not
recom-
mended.
2
to
3
2
to
3
12
9
6
6
3
6
1
4
to
6
4
(Other than
for
meats
&
poultry)
FREm
Most
fruits and vegetables
...........
.8-12
months
soups,
stew,
casseroles
............
.2-3
months
Lean fish
.........................
.6-8
months
Fatty
fish,
rolls
and breads,
Cakes, pies, sandwiches,
leftovers
(cooked),
Icecream (original carton).
..........
1
monthmu.
New
techniques are constantly being developed.
Consult the College or County Extension Service
or
your local Utility Company for the latest
information on freezing and storing foods.
'U.S.
Oepartment
of
Agriculture
Meats, fish and poultry purchased
fromthe store vary in quality and
age; consequently, safe storage
time in your refrigerator will vary.
To
store
unfrozen meats, fish
and
Always removestore wrappings.
Rewrap in foil, filmor
wax
paper
and refrigerate immediately.
poultry:
To
storecheese, wrap well with
wax paper or aluminumfoil, orput
in a plastic bag.
Carefully wrap to expelair and
help prevent mold.
Store pre-packaged cheese in its
own wrapping if youwish.
To storevegetables, usethe
vegetable drawers-they've been
designed to preservethenatural
moisture and freshnessof produce.
Covering vegetables with a moist
towel helps maintaincrispness.
As
a furtheraid to freshness,
pre-packaged vegetables can be
stored
in
their original wrapping.
Note: Specialfreshwcompartment
drawers (on models
so
equipped)
make
it
unnecessary to wmp cemin
foods which they've beendesigned
topreserve. Thesedrawersare
described
on
pages
8
and
9.
To
store
ice
cream-Fine-quality
ice cream,
with
high cream
content, will normallyrequire
slightly lower temperatures than
more "airy" already-packaged
brands with low cream content.
It willbenecessary
to
experiment to
determine the freezercompartment
location and temperature control
setting to keep yourice cream at
theright serving temperature.
The
rear
of the freezer compartment
is slightly colder thanthe front.
Tips
on freezing foods
There
are
three
essential requirements
forefficient home freezing.
1.
Initialquality. Freeze only top-
quality
foods.
Freezing retains
quality
and flavor; it cannot improve
quality.
2.
Speed. The quickerfruits and
vegetablesarefrozenafterpicking,
the better the frozen product will
be. You'll save time,
too,
with less
culling and sorting to do.
3.
Proper
packaging. Use food
wraps designed especiallyfor
freezing; they're readily available
at most food stores.
6
To freezemeat,
fish
andpoultry,
wrap well in freezer-weight foil (or
other heavy-duty wrapping material)
forming it carefully to the shapeof
the contents.This expels air. Fold
and crimpendsof the package to
provide agood, lasting seal.
Don't refreeze meatthat has
completely thawed;meat, whether
raw or cooked, canbe frozen
successfully only once.
Limit freezingof fresh (unfrozen)
meats or seafoods to numberof
pounds at a timeas follows:
TBX18 .............
.17
pounds
TBX20
.............
.19
pounds
For convenience.
..
Store like things together. This
saves bothtime and electricity
becauseyou can find foods faster.
Placethe oldest items up front
so
they can be used up promptly.
Use shelves on thedoor for most
often usedsauces and condiments.
Use the meat drawer, on models
so
equipped, for temporary storage
of meats youdonot freeze.
To
save money in energy
and food costs
Place mostperishableitems, such
as milk, creamorcottage cheese,
toward the rear of the topshelf, as
they will staycoldest in this part
of the fresh foodcompartment.
Cover moist foods with tight lids,
plastic filmorfoil.
Leaf
vegetables and fruits placed
in
drawers will last longer when
stored
in closed plastic containersor
wrapped in plasticfilm.
Do
not overload your fresh food
or freezer compartment with a lot
of warm foodat once.
Openthe door the fewest times
possible to saveelectricalenergy.
When goingout of town for
several days, leaveasfew perishables
.
%-?pssible in the refrigerator. If
your refrigerator has an icemaker,
move the icemakerfeelerarm to
the OFF(up)position and shutoff
water tothe refrigerator.

Shelves
How
to
rearrange
your shelves
Adjustable Shelves in
Fresh Food Compartment
(on
models
so
equipped)
Some models haveadjustable
shelvesin the fresh food compart-
ment, enabling
you
rearrange the
shelves
to
fit
your family's food
storage needs.
To
remove shelves:
Tilt
shelf up
at front, then
lift
it
up and out
of
tracks
on
rear wall of refrigerator.
To
replace shelves:
Select desired
shelf height. With shelf front raised
slightly, engage top lugs
in
tracks
at rear
of
cabinet. Thenlower front
of
shelf until
it
locks into position.
Temperedglass shelves(onmodels
so
equipped) areadjustable
in
the
same manner.
SpacemakerDoor
(on
models
so
equipped)
Deep shelves on doors
of
General
Electric refrigerators provide
convenient storage for frequently-
used items.
Deeper shelves
on
Spacemaker
Doors can accommodate atwo-liter
bottle on the bottom shelf and a
six-pack
on
the shelf above
it.
Snuggeds),
on models
so
equipped, aredesigned
to
give
you storage flexibility
on
your
fresh food door. Salad dressing,
steak sauces and other condi-
ments cannow be kept securely
against the door liner to help pre-
vent tipping,spilling and sliding.
For
most efficient operation, place
index fingerand middle finger
on
eithersideof snugger and move
it
back andforth to
fit
your
needs.
Two-Position
Shelf in
Freezer Compartment
(on
models
so
equipped)
To
remove shelf:
Lift shelf off shelf
supports,
tilt
it,
and take
it
out.
To
relocate shelf:
1.
After removing shelf. remove
shelf supports by sliding them
upward and replace them
on
other
set of mounts.
2.
Lower shelf onto relocated
supports.
Partial-Width
Shelf
in
Freezer Compartment
(on
models
so
equipped]
To
relocate this
shelf
against the
opposite
wall:
1.
Remove shelf.
2.
Remove shelf supports by
sliding them upward and replace
them
on
mountson opposite wall.
3.
Replace shelf with legless end
on repositioned supports.
7

General Electric Food-Saver System
Cool’n Fresh Drawer
(on nlodels
so
equipped)
This refrigcrated 1/3-width drawer
is
designed
to
provide temporary
lower humidity storage for itenis
such as:
Apples Oranges Squash,
Apricots Peaches summer
Grapes Pears Strawberries
Mushrooms Raspberries Tangerines
Nectarines
Adjusta-Temp Drawer
(on models
so
equipped)
This V3-width drawer
in
some
mtdels has an adjustable two-
position temperature control which
let! you regulate the amount of cold
airentering the drawer.
When control
is
all theway to the
left at the “MEATS” setting,
baffle
is
fully
open
to
provide coldest
storage area.
When control
is
all theway to
the right at the
‘‘FRUITS”
setting,
baffle
is
fully
closed to provide
normal refrigerator temperature.
Moist’n
Fresh
Drawer
(on
mtdels
so
equipped)
This refrigerated drawer is designed
to keep
unwrapped foods
fresh by
retaining the natural moisture content
of
fi~ds
such as:
Artichokes Cherries Plums
Asparagus Corn Radishes
Beets, topped Currants Rhubarb
Blueberries Greens, leafy Spinach
Carrots Lettuce Tomatoes,
Celery Parsley ripe
Peas, green
As
in
any refrigerated storagearea,
it
is recommended that odorous
foodsbe stored wrapped-foods
such as:
Broccoli Cabbage Parsnips
Brussels Cauliflower Turnips
Green Onions
Storage time will depend upon the
type of food and
its
condition when
placed
in
the drawer.
Excess water which may accumulate
in
the bottomof the Moist’n Fresh
drawer should be poured out and
the drawer wiped dry.
TheMoist’n Fresh drawer is partially
sealed by gaskets attached to the
cover at the front and back edges.
Always replace
it
in thiscover and
push the drawer
all
the way
in.
Adjusta-FreshDrawer
j3
L.’
(on
models
so
equipped)
Thisdrawer has a second, inside
cover. Theadjustable humidity
control
lets
you regulate the amount
of coldairentering the drawer.
Slide the control all theway to
the right
to
the “VEGETABLES”
setting
and the cover closes
fully
to
provide a high humidity storage area.
Slidethe control all theway to
the left to the
“FRUITS”
setting
and the cover stays partially open to
provide a less humid storage area.
Variable settings between
“FRUITS”
and “VEGETABLES” can be
selected as user desires.
DrawerRemoval
c3
-I
Drawers will stop before coming
all theway out of the refrigerator to
help prevent contents from spilling
onto the floor. Drawers can be
removed easilyby tilting up slightly
and pulling past “stop” location.
To remove drawers when the
fresh food compartment door
cannot be opened fully, followthe
procedure thatappliesto your
model.

1.
Remove drawer farthest from
door.
2.
Lift
drawer cover
up
and
pu@d.
it
out.
\\
3.
Slide remaining drawer and
cover
to
the
middle.
4.
Pull drawer
out
until
it
hits the
stops. Then,
with
thumbson edge
of drawer cover
trim,
lift
drawer
slightly
up
and
out
over the stops.
5.
Place hand on drawercover
and pull out drawer.
6.
Lift
cover and remove
it.
After cleaning, replace
in
reverse
order.
Always replace theCool’n Fresh
or
Adjusta-Temp drawer
in
the left
position.
If
your refrigerator has
twin
fruit
Sealed Snack Pack
and vegetabledrawers:
(onmodels
so
equipped)
1.
Removedrawer farthest
from
a.
door.
2.
Lift drawer cover up and
pull
it
out.
ill,
The Sealed Snack Pack-and glass
shelf to which itis attached-can
be relocated within the fresh food
compartment.Thesealed drawer
retains high humidity for convenient
storage of meats and cheese, bacon,
V
N\
horsd’oeuvres,spreadsandsnacks.
3.
Slide remaining drawer and
cover to the middle. place hand
on
cover and
pull
out drawer.
Detachable Meat Drawer
or
Meats’n Snacks Drawer
(onmodels
so
equipped)
The meat drawer canbe removed
and taken to the sink
or
food
preparation area.You
may
also
relocate
it
within
the fresh food
compartment
to
suit yourstorage
needs.
To
relocate meat drawer:
If
your meatdraweris attached to
an adjustableshelf.drawer andshelf
can be relocated at any level.
4.
Lift
cover and remove
it.
After cleaning, replace
in
reverse
order.
If
your
refrigerator has steel wire
shelves,meat drawercan
also
be
,
relocated on any shelf.Slidedrawer
out.
remove drawercover fromshelf
above. relocate cover ondesired
shelf.andslidedrawer backin place.
9

Ice Service
Ice
Trays
(on
models
so
equipped)
/
Ice traysare designed to release
ice cubes easily. Hold the tray
upside-down overa container and
twist both ends to release cubes.
/
/F-
For only oneor two icecubes,
leave the tray right-side
up,
twist
both ends slightly
and
remove the
number of cubesyou want.
Wash icetraysin lukewarm
water only.
Do
not
put
them
in
an automatic dishwasher.
Automatic Icemaker
(on
models
so
equipped)
Your icemakerwill produce eight
cubes per cycle-approximately
100
cubes
in
a24-hour period,
depending on freezer compartment
temperature, room temperature,
number of door openings and other
use conditions.
If
your refrigeratoris operated
before water connection is made
to theicemaker, keep the icemaker
feeler arm
in
the OFF
(up)
position
as shown below.
Feeler Arm
in
OFF
position
ice Storage
Bin
When refrigerator has been
connected to water supply, move
the feeler arm to theON (down)
position.
FeelerArm
in
ON
position
10
Ice cube mold will automatically
fill
with water after cooling to
freezing temperature, and first
cubes will normally freeze after
several hours. When cubesare
solidly frozen, they
will
be ejected
from the mold into the ice storage
bin by means of a sweeperarm.
Icemaking will continue
until
the
feeler arm sensesa sufficient
accumulation of ice cubes
in
the
storage bin and halts the operation
temporarily. For maximum ice
storage, level the stored cubes
with
your hand occasionally.Be sure
nothing interferes
with
the swing
of
the feelerarm.
The icemaker ejects cubes
in
groupsof eight and
it
is normal for
several cubes to be joined together.
Once your icemakeris in
operation, throwaway thefirst
few batches of icecubes. This
will
flushaway any impurities
in
the
water line.
Do
thesamethingafter
0
vacations or extended periods when
ice isn’tused.
Caution:
Under certain
rare
circumstances,ice cubes may
be
discolored,
usually
appearing
with agreen-bluish hue.The
cause
of
this
unusual
discoloration
is
apparently due
to
acombination
of
factors suchascertain
characteristicsof
local
waters,
household plumbing and the
accumulation
of
copper
salts
in
an
inactive water supplyline
which feedsthe icemaker.
Continued consumption
of
such
discolored
ice
cubesmay be
injuriousto health.
If
such
discoloration
is
observed,
discardthe ice cubes and
-
’
contact your
GE
Factory
ServiceCenter oranauthorized
Customer Care@ servicer.

Move icemaker feeler arm to
OFF
(up)position when:
home water supply is tobe off for
several hours
ice storage binis to be removed
for a period of time
going away on vacation, at which
time you shouldalsoturn off the
valve
in
the water supply line to
your refrigerator
If ice is used infrequently,
old
cubes will become cloudy and taste
stale. Empty ice storagebin
periodically andwash
it
in
lukewarm water.
If this is your
first
icemaker,
you’ll hear occasional sounds that
may be unfamiliar. They are normal
icemaking sounds and arenot
cause forconcern.
m:,
lL
.:,;
bd>
Automatic Icemaker
Accessory Kit
(optional atextracost)
An automatic icemaker will replace
the iceyou use..
.
automatically. It
can keepyou supplied
with
a binful
of
cubes-ice for everything,
everybody-without fussor muss.
If yourrefrigerator did not come
already equipped with an automatic
icemaker, you may add one-
contact your local GEdealer;
specify
UK-KIT-2
or
UK-KIT4
A water supply kit containing
coppertubing, shut-off valve,
fittings and instructions needed to
connect the icemaker to your cold
water line isalsoavailable at
extracost.
Water Filter
Accessory
(optional atextracost)
Your ice cubes can only
be as fresh-tasting as the
water that produces
them. That’swhy it’s a
good ideato purify your
water witha water filter.
Its activated charcoal
removes musty, stale
odors and unpleasant
medicinal, metallic
tastes. A porous fiber
cartridge catchesdirt,
rustparticles,sand and
silt while special crystals
reduce deposits
of
hard
scale.
Thewater filteris available from
your
GE
dealer. Specify
WR97X214.
It has complete installation
instructions and installs
in
minutes
on
1/4”
OD
copper water line.
11

Care and Cleaning
Cleaning-Outside
Thedoor handles and trim
can be
cleaned with a cloth dampened with
a solutionof mild liquid dishwashing
detergent and water. Dry with a
soft
cloth. Don't wax handlesortrim.
*
Keepthefinish clean.
Wipewith
a cleancloth, lightly dampened
with kitchen appliancewax or mild
liquid dishwashing detergent. Dry
and polish with aclean,
soft
cloth.
Do
not
wipe the refrigerator with
a soileddishwashing clothor wet
towel. These may leave a residue that
can damagethe paint.
Do
not use
scouringpads, powdered cleaners,
bleach,or cleanerscontaining
bleach,because these products can
scratch and weaken the paint finish.
Protect
the paint
finish.
The finish
on
theoutside of the refrigerator is
a high quality, baked-on paint finish.
With propercare,
it
will stay new-
looking and rust-free for years.
Apply acoatof kitchenlappliance
wax whenthe refrigerator isnew,
and then at least twice a year.
Appliance PolishWax
8c
Cleaner
(Cat.
No.
WRWX216)
is available
from
GE
Appliance PartsMarts.
Cleaning-Inside
Clean the inside of the fresh food
and freezer compartments
at least
once a year. Unplug refrigerator
before cleaning. If
this
is not practical,
.
wringexcessmoistureout of sponge
or cloth when cleaning around
switches, lightsor controls.
Use warm water and baking soda
solution-about a tablespoon of
baking sodato aquartof water.
Thisboth cleansand neutralizes
odors.
Rinse thoroughly with
water and wipe dry.
Otherparts of the refrigerator-
including door gaskets, meat and
vegetable drawers,icestorage
containerand allplastic parts-can
be cleanedthe sameway.
Do
not
use cleansing powdersor other
abrasivecleaners.
To help preventodors, leave
an open box of baking soda inthe
rear of therefrigerator, onthe top
shelf. Change the box everythree
months. An open box of baking
sodain the freezer willabsorb
stale freezer odors.
Do
not
wash
any of your
refrigerator's plastic parts in
your
automatic dishwasher.
Behind refrigerator
Care should be taken in moving
your refrigeratoraway from the
wall. All typesof floorcoverings
can be damaged,particularly
cushioned coverings andthose
with embossedsurfaces.If your
refrigerator is on wheels, pull it
straightout and return
it
to position
by pushing itstraight
in.
Moving
your refrigerator in asidedirection
may result
in
damage to yourfloor
covering or refrigerator.
Condenser
For most efficientoperation,you
need to keepthecondenserclean.
Turn
temperature control
to
OFF.
Remove the basegrille,
if
your
refrigerator has one-see page
4.
Sweepaway or vacuum dust thatis
readily accessible
on condenser
coils,then turn
the controlback
on. Thiseasy
cleaning operation
should be done at
leastoncea year.
Light bulb replacement
On othermodels,
a bulb and socket
arelocated behind
a shield directly
below the tempera-
turecontrol panel.
To replace a lightbulb,
unplug the
refrigerator's power cord and plug
from the walloutlet. Then reach up
behind the shield, unscrew the burned
out bulb, andreplaceit with a
standard 40-wattappliancebulb.
When yougo on vacation
For extendedvacationsor
absences,
remove food and shut off
power to the refrigerator. Cleanthe
interiorwith bakingsodasolution
of one tablespoonof sodato one
quart of water.
Wipe
dry. To prevent
odors, leave open
box
of baking
soda
in
refrigerator. Leavedoorsopen.
For shorter vacations,
remove
perishablefoodsandleave controls
gj)
at regular settings. However,
if
room
temperature is expected todrop
below 60"F., follow same instructions
as for extended vacations.
If your refrigeratorhas an
icemaker,
move the icemaker
feeler arm tothe OFF (up)position
and besureto shut offthe water
supply to the refrigerator.
On some models, a light bulb and
socket arelocated behind ashield
on eachsideof thetemperature
controlpanel.
-
*e?*
When you move
Disconnectthepower cord from
the walloutlet, removeall food,
and clean anddry the interior.
Securealllooseitems
such as
c
shelves and storagepans by taping
them securely inplaceto prevent
damage.
Be surethe refrigeratorstays in
an
uprightposition
duringactual
moving and inthevan. The-
refrigerator must besecuredin the
van to prevent movement. Protect
theoutside of the refrigeratorwith
a blanket.

Rapid Electrical Diagnosis
Your refrigeratoris wired for accurate
only minutes for aservicetechnician to
check itsentireelectrical system. No
need forthetechnician to movethe
refrigeratorto make the diagnosis.
=
'
-r
electricaldiagnosis
in
yourhome-takes
:m-
Questions?
Use
This
Problem
Solver
-?Ez€ZF
-
PROBLEM
REFRIGERATOR
DOES NOT OPERATE
MOTOR OPERATES
FOR LONG PERIODS
MOTOR STARTS
&
STOPS FREQUENTLY
VIBRATION OR
RATTLING
OPERATING
SOUNDS
FOODS DRY
OUT
POSSIBLECAUSE AND
REMEDY
May be
in
defrostcycle when motordoesnot operateforabout
35
minutes.
Temperaturecontrolin OFFposition.
If interiorlight is not on, refrigerator may not be plugged in at walloutlet.
If plugis secureand the refrigerator stillfailsto operate,plug a lampor a small
appliance intothe same outlet todetermineif there is a tripped circuitbreakeror
burned outfuse.
Modern refrigeratorswith more storagespaceand alargerfreezercompartment
require moreoperatingtime.
Normal whenrefrigeratoris firstdeliveredto your home-usually requires
24
hours
to completelycooldown.
Large amountsof food placed inrefrigeratorto becooledor frozen.
Hot weather-frequent door openings.
Door leftopen.
Temperaturecontrolsareset toocold. Refer to page
5.
Grilleand condenserneed cleaning. Refer to page
12.
Check ENERGY-SAVINGTIPS on page
2.
Temperaturecontrolstartsand stops motorto maintain eventemperatures.
If refrigerator vibrates, more than likely
it
isnot resting solidly on the floor. The front
roller screwsor front leveling legs need adjusting,or flooris weak or uneven. Refer
to
ROLLERYLEVELING LEGS on page
4.
If dishes vibrate on shelves, try moving them. Slight vibration is normal.
The high speed compressor motor required to maintain near zero temperatures in
the large freezer compartment may produce higher sound levels than your old refrigerator.
Normal fanair flow-one fan blows cold air through the refrigerator and freezer
compartments-another fan coolsthecompressor motor.
These NORMALsoundswill alsobe heard fromtime to time:
Defrost timer switchclicksatdefrost.
Defrost waterdripping.
Temperaturecontrolclicks ONor OFF.
Refrigerant boilingorgurgling.
Crackingorpopping of cooling coils caused by expansion and contraction during
Icecubes droppinginto the bin and waterrunningin pipesas icemakerrefills.
defrost andrefrigerationfollowingdefrost.
Foods notcovered,wrapped or sealedproperly.
(conrinuednexr page)
13

The Problem Solver(continued)
0-
I
PROBLEM
1
POSSIBLECAUSE ANDREMEDY
r
~-
HOT AIR FROM
B(TTTOMOF
REFRIGERATOR
Normal air flow cooling motor. In the refrigerationprocess,it is normal that heat be
expelled
in
the area under the refrigerator. Some floor coverings will discolor at these
normal and safe operating temperatures.Your floor covering supplier should be
consultedif you object tothisdiscoloration.
'
FRESH FOOD
OR
FREEZER
COMPARTMENT
TEMPERATURE
TOO
WARM
FROST ORICE
CRYSTALS ON
FROZEN FOOD
AUTOMATIC
ICEMAKER
DOES NOT WORK
(on models
so
equipped)
~~
Temperature control not set cold enough. Refer to page
5.
Warm weather-frequent door openings.
Door left open for too longatime.
Package holdingdooropen or blockingair duct in freezer compartment.
Package blockingairductin freezer compartment.
Door may have beenleftajar orpackage holdingdoor open.
Too frequentor too longdooropenings.
Frost within package
is
normal.
Icemaker feelerarm in OFF (up)position.
Water supply turned offor not connected.
Freezer compartment
too
warm.
Cubes
too
small-water shutoff valve connecting refrigerator to home waterline
may be clogged.
SLOW ICE CUBE
FREEZING Door may have beenleft ajar.
Turn temperatureof freezer compartment colder.
ICE CUBESHAVE
ODOR/TASTE
MOISTURE FORMS
ON OUTSIDEOF
REFRIGERATOR
-
~~
Old cubes need to bediscarded.
Ice storage container needsto be emptied and washed.
Unsealed packages in refrigeratorand/orfreezer compartmentsmay betransmitting
odor/taste to ice cubes.
Interiorof refrigerator needs cleaning. Refer to page
12.
~
Notunusualduring periodsof highhumidity.
I\
x
1
MoveEnergy Saver Switch to theright.
r
~~~~ ~~
MOISTURE Too frequentor too longdoor openings.
INSIDE. In humid weather,aircarriesmoisture into refrigerator whendoorsare opened.
REFRIGERATOR
HAS ODOR Foods with strong odors should be tightly covered.
Check for spoiled food.
Interiorneeds cleaning. Refertopage
12.
Defrost water system needs cleaning.
Keep openbox of baking sodain refrigerator; replace everythreemonths.
If
you
need morehelp...call, toll free:
GE
Answer Center@
800.6262000
consumer information service
14

If
You
Need
Service
.
I.
.
'
,*--
---
To obtainservice,see yourwarranty
on the back page of this book.
We're proud ofour service and
want you to bepleased. If for some
reason you are not happy withthe
serviceyou receive, herearethree
steps to follow forfurtherhelp.
FIRST,
contactthepeople who
servicedyour appliance. Explain
why you are not pleased. In most
cases, this will solvetheproblem.
NEXT,
if
you arestill not pleased,
write all the details-including
your phone number-to:
Manager, Consumer Relations
GE Appliances
Appliance Park
Louisville, Kentucky
40225
FINALLY,
if
your problem is still
not resolved, write:
Major Appliance
Consumer Action Panel
20
North Wacker Drive
Chicago, Illinois
60606
15

. ..
YOUR
GENERAL ELECTRIC REFRIGERATOR
WARRANTY
WHAT
IS
COVERED
FULLONE-YEARWARRANTY
For one yearfromdate oforiginal
purchase,we will provide, freeof
charge, parts
and
service labor
inyour hometo repairor replace
anypart of therefrigerator
that
fails becauseof a manufacturing
defect.
FULLFIVE-YEAR WARRANTY
For fiveyearsfromdate oforiginal
purchase,we will provide, freeof
charge, partsandservice laborin
your hometo repairor replace
any
part of the sealedrefrigerating
system
(thecompressor,
condenser, evaporator andall
connectingtubing)that fails
becauseof amanufacturing
defect.
Thiswarranty isextended to
the original purchaserand any
succeedingowner forproducts
purchasedfor ordinaryhomeuse
inthe
48
mainlandstates, Hawaii
andWashington, D.C. InAlaskathe
warranty isthe same exceptthat it is
LIMITEDbecause you mustpay
to
shipthe producttothe service shop
or fortheservicetechnician'stravel
coststo your home.
All warranty servicewill beprovided
byour Factory ServiceCentersor
byour authorizedCustomerCare@
servicersduring normalworking
hours.
Lookinthe White
or
Yellow Pages
of
your telephonedirectoryfor
GENERALELECTRIC COMPANY,
GENERALELECTRICFACTORY
HOTPOINTFACTORY SERVICE or
GENERALELECTRIC CUSTOMER
CARE@ SERVICE.
SERVICE, GENERAL ELECTRIC-
WHAT
1s
NOT COVERED
Servicetrips
to
yourhometo
teachyou how
to
usethe product.
Readyour Use and Care material.
If
youthen have any questions
aboutoperatingthe product,
pleasecontactyour dealer
or
our
ConsumerAffairs officeat the
addressbelow, orcall,tollfree:
GE AnswerCenteP
800.626.2000
consumerinformationservice
Improperinstallation.
If
you havean installationproblem,
contactyour dealeror installer.
You are responsiblefor providing
adequateelectrical, plumbingand
other connectingfacilities.
Replacementof housefuses or
resettingof circuit breakers.
Failureof the product
if
it is used
for other than itsintendedpurpose
or usedcommercially.
Damageto productcaused
byaccident,fire, floodsor acts
of God.
WARRANTOR
IS
NOTRESPONSIBLE
FOR CONSEQUENTIAL DAMAGES.
Some statesdo not allowtheexclusion or limitationOf incidentalor consequentialdamages,
SO
the above limitationor excluSion
may notapplyto you. Thiswarranty gives youspecific legal rights,andyou mayalsohaveother rightswhichvary fromstateto state.
To know what yourlegal rights are inyour state,COnSUlt your localor State consumeraffairsofficeor your state'sAttorneyGeneral.
Warrantor: GeneralElectricCompany
If
further help is neededconcerningthiswarranty, write:
Manager-Consumer Affairs, GeneralElectricCompany, AppliancePark, Louisville, KY
40225
Part
No.
468344P03
Pub.
NO.
49-6512
TBX18
TBX20
This manual suits for next models
1
Table of contents
Other GE Refrigerator manuals

GE
GE TBX16RICAA User instructions

GE
GE SIDE-BY-SIDE REFRIRATOR 22 Original instructions

GE
GE HPS18BTHBRBB Operating instructions

GE
GE SIDE-BY-SIDE REFRIRATOR 22 Repair manual

GE
GE TBF18ZW Owner's manual

GE
GE TFX27F Installation instructions

GE
GE GTH18EBBWW Assembly instructions

GE
GE monogram ZIDI240 User manual

GE
GE 21 Safety guide

GE
GE GTU150PAXR User manual