GE WMR04GAV Operating instructions

ge. COrn
¢/3
©
€
bb
Safety Information ......... 2, 3
Operating Instructions
Care and Cleaning ........ 6, 7
Conuol Settings ............. 4
Refligerator Features ........ 5
Installation Instructions ...8-10
Troubleshooting Tips .... 13, 14
Consumer Support
Consumer Support..Back Cover
Warranty. ................. 15
ATTENTION:
Defrosting--Do not usesharp,pointed
objectsto removefrost or ice from
surfacesof the refrigeratorand/or
freezercompartment.Doingsocould
puncturethe comingcoil, causingthe
unitto Joseitsability to maintain cold
temperaturesand voidingthewarranty.
See the CareandCleaning sectionfor
instructionson defrostingthe
refrigeratorand/orfreezer
compartment.
Writethemodelandserialnumbershere:
Model#
Serial#
Find these numbers on a label inside
the refl'igemtor on the side wall.
WMflO46AV
19705616PO05 49-60561 03-08JR

iMPORTANTSAFETYiNFORMATiON.
READALLiNSTRUCTiONSBEFOREUSING.
k, WARNING!
Use this appliance only for its intended purpose as described
in this Owner's Manual
SAFETYPRECAUTIONS
When using electrical appliances, basic safety precautions
should be followed, including the following:
This rcfi-igeFator must be Keep tinge_ out of the "pinch
iiiiiiiiiiiii_iil
properly installed and loca/ed in
_mcordance with file Ins/;fllafion
Instructions bef_)re it is used.
Do not allow children/o climb,
stand or hang on the shelves
in the reDigcmtor. They could
damage the refrigerator and
seriously i*_.jure themselves.
Do not store or use gasoline or
other flammable vapors and
liqtfids in the vicinity of this or
any other appliance.
iiiiiiiiiiiii_iil
iiiiiiiiiiiii_iil
iiiiiiiiiiiii_iil
point" areas; clearances between
file doors and cabinet arc
necessarily small. Be carotid
closing dt_ when children
arc in tile area.
Unplug the refrigem/or be%re
cleaning and making repairs.
GE does not support any
servicing of the refrigerator.
Turning the mmpemture
control dial to the 0(off)
position stops cooling but does
not shut off power to the
reti'igcmtor.
DANGER!RiSKOFCHILDENTRAPMENT
PROPERDISPOSALOFTHEREFRIGERATOR
Child enwapment and
sultocafion arc not problems of
the past. Junked or abandoned
refi'igem/ors arc sdll dangerous...
even if they will sit for 'ijust a tbw
day:s." If you are getting rid of
your old refi'igemtor, please
follow the instructions below/o
help prevent accidents.
Before You Throwaway Your
Old Refrigeratoror Freezer:
Take off the doors.
[.cave tile shelxes in place so
that children may not easily
climb inside.
Refrigerants
All rcliigcmtion products contain
refi'igenmts, which under tbdeml
law must be removed prior/o
prt _duc t disposal. If you arc
getting rid of an old refrigeration
product, check with the company
handling the disposal about
what/o do.

_e.com
USEOFEXTENSIONCORDS
Because of potential safety hazards under certain conditions,
we strongly recommend against the use of an extension cord.
However, if )_m must use an extension cord, it is absolutely necessary
that it be a U[Ais/ed, B-wire grounding Wpe appliance extension cord
h_ng a grounding/)pe plug and outlet and that tile electrical Fating
of tile cord be 15 amperes (n/inilnum) and 120 volts.
HOWTOCONNECTELECTRICITY
Do not, under any circumstances, cut or remove the third
(ground) prong from the power cord. Forpersonal safety,
this appliance must be properly grounded.
Tile power cord of this appliance
is equipped widl a ?_prong
(grounding) plug which
mares with a standard 3-prong
(grounding) _all outlet/o
minimize tile possibili b' of electric
shock hazard flom this appliance.
Have tile wall outlet and circuit
checked by a qualified electrician
/o make sure tile outlet is
prt _perly grt rended.
If you have only a s/;mdard
E-prong wall outlet, it is your
persomfl responsibili b' and
obligation/o have it replaced
with a properly grounded
3-prong wall outlet.
Tile refrigerator should alway:s be
plugged into i/s own individual
electrical outlet which has a
voltage rating that matches tile
rating plate.
This provides tile best
per%finance and also prevents
overloading house wiring circui/s
which could cause a fire hazard
flom (_verheamd wires.
Never unplug your refrigem/or
by pulling on tile power cord.
Alwav_sgrip plug firmly and pull
straight out fl'om tile outlet.
Repair or replace immediately all
power cords that have become
fl;_yed or otherwise damaged.
Do not use a cord that shows
crimes or abcasion damage along
i/s length or at either end.
When mtMng tile refrigerator
away fl'om tile wall, be careflfl
not/o roll over or damage tile
power cord.
3

Aboutthe contro/on the refrigerator.
Thecontrol will look like the one above.
Thearrow indicates the setting selected.
ControlSettings
The temperature control maintains the temperature in the
refligecator. I is the warmest setting; higher nmnl)ers are colder
settings with ]being the coldest setting. The wpical setting is between
2and 3.
Allow 24 hours fbr the reffigennor/o reach the desired/empennure.
Ifyt)u want a coMer or warmer temperature, move the dial one setting"
at a time. Moving the control/o 0stops cooling but does not turn off
the power/o the refl'igemtor. Setting the control/oo high may cause
fl'eezing in the refl'igemtor depending on the room /empemture.
How ToTestTemperatures
Use the milk test. Place a container of milk on a shelf and check it
a day later. If the milk is too warm or too cold, adjust the tempecature
control.
Afterchang/7_gthecontrol,allow24hoursfor therefrigeratortoreachthe
temperatureyouhaveset.

About the refrioerator features, go.oo
Shelves
To remo_e a shelI_ lift up tile back slightly and pull torward.
Some models hme multi-position silel_es that can 1)e mo_ed
to dittcrent lexels.
lee Tray Compartment
This comparmmnt is designed tot production of ice cubes and
short-turin storage (a tbw day:s at most) of some commercially-
tiozen toods when in contact with the evaporator (cold surti_ce
in compartment.)
Door Shelves
Shelxes on the door proxqde comenient storage tot tiequently
used items. Some models have doors that are deep enough to
store large bottles.
5

Careandcleaningoftherefrigerator.
Cleaning the Outside
Keep the outside clean, Wipe with a clean cloth lightly dampened
with ldkhen appliance wax or mild liquid dish detergent. Dry and
polish with a clean, soft cloth.
Donot wipetherefrigeratorwith asoi/ld dishcbth or wettowel Thesemav
/lavearesiduethatcanerodethepa/lL Donotusescouringpads,powdered
cleaners,bleachorcleanerscontainingbleachbecausetheseproductscan
scratchandweakenthepaintf/lish.
Protect the paint finish. The finish on the outside of the ret_k'igerator
is a high qualib; baked-on paint finish. With proper care, it will
stay new-looking and mst-fl'ee %r years. Apply a coat of kit(hen/
appliance wax when the refrigerator is new; and then at least
twice a year.
Cleaning the Inside
Tohelp prevent odors, }ea',e an open 1)ox of baking soda in the
reJ}igecator.
Unplug the refrigerator before cleaning. If this is not practical,
wring excess moisture out of sponge or cloth when cleaning
around the control
Use warm water and baking soda s()lufion-about a tal)lespoon
(15 ml) of baking soda to a quart (1 liter) of water. This both
cleans and neutralizes odors. Rinse and wipe do _.
Other parts of the reDigerator-including door gaskets, fl'uit
and vegetable drawers, and all plastic parts--can be cleaned
the same way.
Donot wash anyp/ast/l refrigerator parts in the dishwasher

gO. COrn
Defrosting (on manual defrost models with freezerarea)
Defrostwheneverfrostonthewaftoftheicetraycompartmentbecomes
1/4" thick.Neverusea sharp ormetallicinstrumentto removefrostas
it maydamagethecoolingcoils.(Apuncturedcoolingco//will cause
seriousproblemsandvoidthewarranty.)Werecommendusingaplasticscraper
Donotuseanyelectricaldevicein defrostingyourrefrigerator
Todefrost."
Remove toods and ice tcays fl'om tile ice to, Wcompartment.
, Set tile tempecature control dial at 0 (off)position.
On models witixmt a drip tm}_ place a pan 1)eneatil tile ice troy
compartment to collect water.
Deflosting usually takes a icw hours. To deflost thster, keep tile
door open. Also, pouring warm (not hot) water on tile fl'osted part
m_ff speed deft'()sting. Do not use boiling water--4 t m_ff damage
plastic parts.
After defrosting:
, Empty water fl'om the drip tcay or fl'om tile pan placed beneath
the ice w, ff comparm_ent. _;\_sh the w,ff or I)an with warm water.
Wipe the ice way compartment with a damp cloth.
, Turn the temperature control to the desired setting and
return %od and ice tcays to the refl'igecator.
NOTE."ff ice buildupis verythick, it may keep the lee tray compartmentdoor
from opening or closing completely. Don't try to force it open; after defrosting,
the door will openand close eas/7_
Preparing for Vacation
For long vacations or al)sences, remove fi)od and unplug tile
refl'igemtor. Move the control to tile 0(off) position, and clean the
inmrior with a 1)aking soda solution of one tal)lespoon (l 5 ml) of
1)aking soda to one quart (l liter) of water. Leave tile door open.
Preparing to Move
Secure all h)ose items such as shelves and ice tcays l)y taping them
securely in place to prevent damage.
Besure therefrigerator stays in an upright position during moving.

Preparingtoinstalltherefrigerator.
Read these instructionscompletely and carefully.
RefrigeratorLocation
Do not install tile refl'igen_tor where tile temperature will go below
:%()°F(10°C) because it will not run often enough to maintain
proper temperatures.
Install it on a floor strong enough to support it flflly loaded.
Do not install it closer than :%"(13 cm) next to a hinge.
Do not install it in a recessed area.
Do not build in tile reffigecator.
Clearances
Allow tile %llowing cleanmces %r ease of installation and proper
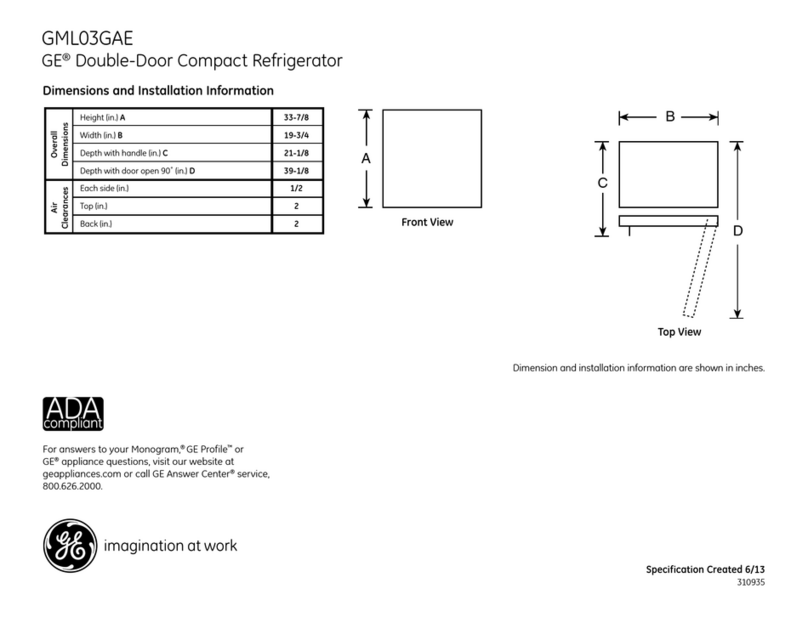
air circulation.
Sides 1/2" (13 ram)
Top 2" (:% ram)
Back 2" (51 ram)*
*From tile rear cal)inet surfi_ce to tile wall
Turncounterclockwiseto raise,
clockwiseto lower.
Leveling Legs
Adjustable legs at tile flont corners of tile refrigerator
should 1)e set so tile refrigerator is firmly positioned on
tile floor and the fl'ont is ndsedjust enough that tile
door closes easily when opened about halt\va}_
Toadjust the leveling legs, turn the legs counterclockwise
toraise tile refiiger,_tor, clockwise to lower it.

go.corn
BoorReversal
l. Remove the two plug buttons on the top left of the cabinet.
2. Remove tile plastic hinge cover 13y gently pressing %rw_rd
and lifting
13y tile back edge.
3. Remove the two screws fi'om the top hinge.
4. Lift tile top hinge up and off of tile reKigerator.
5. LiD the door up and off of the l)ottom hinge.
6. Renlove the hinge pin gron/n/et Ikon/the l)ot|on/of the door
on tile rigilt side and insert into tile left side.
7. Tilt tile reKigerator cabinet backw_rd.
8. Remove tile hinge pin. Keep tile/wo spacers %r
reinstallation.
9. Remove tile hinge leveling leg and tile tilree screws to
remove the bottom hinge on the right side.
10. Remove tile case leveling leg and tile case screw Kom tile
left side. Notice that the case leveling leg is different fiom
the hinge leveling leg.
11. Flip the bottom hinge plate to install on the left side of the
refiigerator.
12. Screw the three bottom hinge screws into place.
13. Put a spacer between the hinge pin and the bottom hinge
and screw the hinge pin into place.
14. Place the second spacer between the hinge pill and the
door. Position the door on the bottom hinge.
15. While the magnetic gasket holds the door ill place, secure
the top hinge with /wo screws.
16. Replace the hinge cover on the top hinge.
17. Place the/wo plug buttons ill the holes on the right side of
the refiigerator cabinet.
9

Preparingtoinstalltherefrigerator.(cont.)
"!__ Leveling legs
pin
grommet
Spacer
Bottom
hinge
Spacer
Bottom
hinge pin
70

NOteS. ge.com
77

Notes.
72

Troubleshootingtips.
Save time and money!
ge. corn
Possible Causes
Refdgerator does not Control in 0(o#) position.
Refrigeratorunplugged.ks
The fuse is blown/circuit
breaker is tripped.
Vibration or rattling Front leveling legs
(slight vibration need adjusting.
is normaO Refrigerator is on
an uneven surface.
Motor operates for Normal when refrigerator
long periods or cycles ksfirst plugged in.
What ToOo
Move the control to a
temperature setting.
Push the plug c()mpletely
into the outlet.
Replace fllse or reset
the breaker.
See Leveling Legs.
Use shims/o level tile
rcfligemtor.
W;fit 24 hours %r the
refrigerator to completely
COO1 dowu.
Often occurs when This is normal.
large amounts of food
are placed in refrigerator.
Door left open. Check to see if package is
holding door open.
Hot weather or frequent
door openings.
Temperature control
set at the coldest setting.
Not enough dearmme
from the wall.
This is normal.
See About the control
See Clearancesin Preparing
to installthe refrigerator.
/3

Troubleshootingtips.
Save time and money!
What ToDo
Refrigeratortoowarm SeeAbout the control.
Possible Causes
Temperature control
nut set cold enough.
Warm weather or Set tile temperature
frequent door openings, control orm stop colder.
See About the control.
Door left open. Check/o see if package is
holding door open.
Cabinet sides are warm This is normal fin a hot
wall type condenser.
Refrigerator has odor
Moisture forms on
outside of refrigerator
Moisture collects inside
(in humid weather,
air carries moisture
into refrigerator when
door is opened)
Refrigerator too cold
Foods transmitting odor
to refrigerator.
Interior needs demling.
Defrost water pan needs
clemfing.
Not unusual during
periods of high humidity.
Too frequent or too long
door openings.
Temperature control
set too cold.
Foods with strong odors
should be dghtly wrapped.
Keep an open box of
baking soda in the
refi'igennor; replace
eve Wthree months.
See Care and cleaning.
Wipe surti_ce dr}_
SeeAbout the control.
/d

GERefrigerator
One-Year Limited Warranty.
Staple your receipt here.
Proof of the original purchase date is
needed to make awarranty claim.
What GE Will Provide:
One Year
From the date of the
original purchase
Replacement un# fk_rany product which fidls due to a
detect in materials or workmanship. Tile exchange
unit is warranted tk_r the remainder of your product's
original one-year warranty period.
Properly pack your unit.
We recommend using the original
carton and packing materials.
Return the product to the retail
location where it was purchased.
Include in the package a copy of
the sales receipt or other evidence
of date of original purchase. Also
print your name and address and
adescription of the defect.
Customer instruction. This owner's
manual provides information
regarding operating instructions
and user controls.
Service trips to your home to teach
you how to use the product.
Improper installation, delivery or
maintenance.
Failure of the product if it
is abused, misused, or used for
other than the intended purpose
or used commercially.
: Loss of food due to spoilage.
Replacement of house fuses or
resetting of circuit breakers.
Replacement of the light bulbs.
Damage caused after delivery.
Damage to the product caused by
accident, fire, floods or acts of God.
Incidental or consequential damage
caused by possible defects with
this appliance.
This warranty is extended to the original purchaser and any succeeding owner for
products purchased for home use within the USA.
Some states do not aflow the exclusion or limitation of incidental or consequential
damages. This warranty gives you specific legal rights, andyou may also have other
rights which vary from state to state. Toknow what your legal rights are, consult your
local or state consumer affairs office or your state's Attorney General.
Exclusionof implied warranties: Except where prohibited or restricted by law,
there are no warranties, whether express, oral or statutory which extend beyond
the description on the face hereof, including specificafly the implied warranties
of merchantability or fitness for aparticular purpose.
Warrantor:General Electric Company.Louisville, KY40225 I5

ConsumerSupport.
GEAppliancesWebsite ge._o,.
Have a question or need assistance with your appliance? Tr_ the GE Appliances Website
24 hours a da_ any day ()f"tile _eaI": For ,gneateI corn enience and fhster seis_ce, vouj can
11o_,_dowYfload ()'_,_llei"s Manu_ds, order palls or or e_en schedule sel_4ce on-line.
RealLifeDesignStudio ge.oo_
(;E supports tile Unix ersal Design concept.products, set\ices and em4ronments that
can be used by people of all ages, sizes and capabilides. We recosmize the need to
design for a _ide range of physical and mental abilities and impairnmnts. For details
of GE's Universal Desigm applications, including kitchen desigm ideas %i people _tll
disabilities, check out our Website today. For tile beating impaired, please call
800.TDD.GEAC (800.833.4322).
PartsandAccessories ge.oom
Indi_4duals qualified to ser\4ce their o_n appliances can brae pai_s or accessories
sent directh to their hon_es (\ ISA, MasterCard and Discoxer cards are accepted).
Order on-line toda}, 24 hours exer} da} or b) phone at 800.626.2002 during normal
business hours.
Instructionscontainedin this manual cover pmcedures to he performedhy any user
6E does notsupport anyservicing of the refrigerator,
ContactUs ge_.com
If}ou are not satisfied with tile service )ou receive on }our (;E product, contact us
on our Website with all tile details including )our phone numbei; or _fite to:
(;eneivd Managei; (_//stoi//ei Relations
GE Appliances, Appliance Park
Louisx411e, KY 40225
Printed in China
Table of contents
Other GE Refrigerator manuals

GE
GE GE Enegy Star GFSS2HCY Manual

GE
GE 2 Cubic Foot Series Original instructions

GE
GE Profile PSCS3TGX User manual

GE
GE Monogram ZISW420DX Manual

GE
GE GSL22JFXLB User manual

GE
GE Profile PSC25NSWSS Manual

GE
GE GSH25KGR User instructions

GE
GE Profile PTS22SHSSS Manual

GE
GE GPS12FG Operating instructions

GE
GE GSS20GEWBB Original instructions

GE
GE ZIPP360NZA User manual

GE
GE GMR04BANWW - Compact 4.3 Cubic Foot Total Capacity... User guide

GE
GE GTH18EBB Manual

GE
GE GSF25IGZ Manual

GE
GE Profile Operating instructions

GE
GE GTH17DBDCC Assembly instructions

GE
GE GTH18DBPARCC and Operating instructions

GE
GE GSS25MSSSS Safety guide

GE
GE 15 Series Operating instructions

GE
GE Monogram ZICS36NA User instructions