GE GFWH2400 Original instructions

OGEAppliances.com
Safety Instructions .............................2,3
Operating Instructions
Control Panels .....................................................4
Control Settings ..............................................5, 6
Features .............................................................6-9
Loading and Using the Washer ...........9, 10
Cleaning the Washer .............................11-13
Installation Instructions ...........14-19
Preparing to Install Your Washer .............14
Location of Your Washer .............................15
Rough-In Dimensions ....................................15
Unpacking Your Washer ..............................16
Electrical Requirements ................................16
Grounding Requirements ............................16
Water Supplg Requirements ......................17
Drain Requirements .......................................17
Installing the Washer .............................17-18
Replacement Ports .........................................18
Adoptive Vibration Control ..........................19
Troubleshooting Tips ...................20-23
Consumer Support
Warrantg ............................................................25
Service Telephone Numbers .....................26
GFW H2400
GFWH2405
GFWS3500
GFWS3505
GFWS3600
GFWS3605
ENERGYSTAR
As on ENERGY STAR ® partner,
GEhGsdetermined that this
product meets the ENERGYSTAR®
guidelines for energg efficiencg.
Write the model and serial
numbers here:
Model #
Serial #
Youcan find them on a label on the
side of the washer. 49-90390 GE 06/16/10

IMPORTANT SAFETY INFORMATION.
READ ALL INSTRUCTIONS BEFORE USING.
AWARNING! _o__o__o_,_ informationin_,i_mon.o_m._b__o,ow_,_omin,mi__ _i_,
of fire or explosion, electric shock, or to prevent property damage, personal injury or
loss of life.
The instructions in this manual and all other literature included with this washer are
not meant to cover every possible condition and situation that may occur. Good, safe
practices and caution MUSTbe applied when installing, operating and maintaining
any appliance.
WATER HEATERSAFETY
Undercertain conditions,hydrogen gas may beproduced in a water heater that hasnot been usedfor two weeks
or more. Hydrogen gascan be explosiveunder thesecircumstances.
Ifthe hotwater hasnot beenusedfor two weeks or more,prevent the possibilituof damage or injurg bg
turning on all hot water faucets and allowing them to run for severalminutes. Dothis before usinganu electrical
appliance which isconnected to the hot water sustem.This simple procedurewill allow any built-up hudrogen
gas to escape.Sincethe gas isflammable, do not smokeor usean open flame or applianceduring this process.
PROPERINSTALLATION
Thiswasher must beproperly installedand located in accordance with the Installation Instructions beforeit isused.
'_ Installor store whereit will notbe exposed ,_Properlyground washerto conform with all governing
to temperatures belowfreezingor exposed codesand ordinances.Followdetailsin Installation
to the weather,which couldcause permanent Instructions.
damage and invalidatethe warranty.
YOURLAUNDRYAREA
[] Keepthe area underneath and around gour
appliances free of combustible materials such as
lint, paper, ragsand chemicals.
[] Donot leavethe washer door open.An open door
could entice children to hang on the door or crawl
insidethe washer.
[] Closesupervision isnecessarg ifthis appliance is
used bg or near children. Donot allow children to
plag on,with or insidethis or ang other appliance.
2

GEAppliances.com
Usethis
appliance
onlyfor its
intended
purposeas
describedin
this Owner's
Manual.
WHEN USINGTHEWASHER
[]
[]
[]
[]
Never reach into washer while it is moving.
Wait until the machine has completely stopped
before opening the door.
Donot mix chlorine bleach with ammonia
or acids such as vinegar and/or rust remover.
Mixing different chemicals can produce a toxic
gas which may cause death.
Donot wash or dry articles that have been
cleaned in, washed in, soaked in or spotted
with combustible or explosive substances (such
as wax, oil, paint, gasoline, degreasers, dry-
cleaning solvents, kerosene, etc.)which may ignite
or explode. Do not add these substances to the
wash water. Do not use or place these substances
around your washer or dryer during operation.
The laundry process can reduce the flame
retardancy of fabrics. To avoid such a result,
carefully follow the garment manufacturer's
wash and care instructions.
[]
[]
[]
Never attempt to operate this appliance
if it isdamaged, malfunctioning, partially
disassembled, or has missing or broken parts,
including a damaged cord or plug.
Do not slam the washer door closed. Do not try
to force the door open when locked (LOCKED
indicator ON This could result in damage to
the washer.
The washer isequipped with an electrical
overload protector. The motor will stop
if it becomes overheated. The washer will
automatically restart after a cool-down
period of up to 2 hours, if the washer
has not been manually turned off
during this time.
[] To minimize the possibility of electric shock,
unplug this appliance from the power supply
or disconnect the washer at the building's
distribution panel by removing the fuse or
switching off the circuit breaker before attempting
any maintenance or cleaning. NOTE'.Pressing the
power button does NOT disconnect the appliance
from the power supply.
WHEN NOT IN USE
[] Turn off water faucets to relieve pressure on
hoses and valves and to minimize leakage if
a break or rupture should occur. Check the
condition of the fill hoses; GErecommends
changing the hoses every 5 gears.
[] Before discarding a washer, or removing it
from service, remove the washer door to prevent
children from hiding inside.
[] Do not attempt to repair or replace any part of
this appliance unless specifically recommended
in this Owner's P1anual,or in published user-repair
instructions that you understand and have the
skillsto carry out.
[] Do not tamper with controls.
READANDFOLLOWTHISSAFETYINFORMATIONCAREFULLY.
SAVE THESE INSTRUCTIONS

About the washer control panel.
Find the illustration that closely matches your mode! and see the cycle descriptions starting on page 6 for details.
STEAMREFREBH
EASY CARE
DEUCATES
HAND WAS BASKETCLEAN
WASHABLE WOOL LAIN _ SPIN
D
START
COLORS /
STAIN WASH NORMALwHITES /
EASY CARE HEAVY DUTY
ACTIVE WEAR
.L,C.......I....I
HAND WAS_ NORMAL MEDIUM
WASHABLE WOOL LIGHT LOW
SPEEDWASH START EXTRALIGHT NOSpIN
O
WASH
SAN_TIZEwARMcoLoHOT
TAPCOLD
4
EASY CARE
COLORS I
STAIN WASH NORMAL WHITES /
ACTIVE WEAR
DELICATES
HAND WASH
SPEEDWASH
RINSE & SPIN

About the washer control settings. GEApp,o,ces.com
Power
Press to "wake up" the displag. If the displag is active, press to put the washer into st(]ndbg mode.
NOTE:Pressing POWERdoes not disconnect the appliance from the power supply.
Wash Cycles
The wash cgcles ore optimized for specific tgpes of wash loads.The chart below will help gou match the wash
setting with the loads. The GentleCleaff _lifters lightlg tumble the clothes into the water and detergent solution
to clean the load.
WHITES/HEAVY For heavilg to lightlg soiled white cottons, household linens, work
DUTY and plag clothes.
For heavg to lightlg soiled colorfast cottons, household linens,
COLORS/NORMAL work and plag clothes.
For heavg soiled colorfast cottons, household linens, work and
STAIN WASH play clothes.
EASYCARE For wrinkle-free and permanent press items.
(PERMA PRESS)
For active sports, exercise and some casual wear clothes. Fabrics
ACTIVE WEAR include modern technologg finishes and fibers such as spandex,
stretch and micro4ibers.
DELICATES
HANDWASH
WASHABLE WOOL
(some models)
SPEED WASH
DRAIN &SPIN Drain and spin at ang time.
RINSE &SPIN Rinse and spin at ang time.
(some models)
BASKET CLEAN Usefor cleaning the basket of residue and odor. Recommended use of once
per month.
STEAM REFRESH
(some models)
For lingerie and special-care fabrics with light to normal soil.
Provides gentle tumbling and soak during wash and rinse.
For items labeled hand-washable with light soils. Provides gentle
rocking to mimic the handwashing action.
For the washing of machine washable wool products, provided
that theg are washed according to the instructions on the
garment label. When selecting this cgcle, gou must use a
detergent suitable for washing wool.
For lightlg soiled items that are needed in a hurrg. Cgcle time is
approximatelg 30 minutes, depending on selected options.
To de-wrinkle 1 to 5 cotton blend items. This is not a wash cgcle, but
a cgcle that applies onlg steam to the garments. The washer will
beep upon completion of the cgcle, and will continue to tumble for 30
minutes to keep wrinkles from setting in. Press Start/Pause to remove
clothes. If clothes are slightlg damp after completion of the cgcle,
hang drg clothes for 10 minutes before wearing.
5

About the washer control panel.
Soil Level
Ch(]nging the SOILLEVELincre(]ses or decre(]ses the w(]sh time to remove different (]mounts of soil.
To ch(]nge the SOILLEVEL,press the SOILLEVELbutton until you h(]ve re(]ched the desired setting.
You c(]n choose between Extr(] Light, Light, Norm(]l or He(ivy soil.
Spin Speed
Ch(]nging the SPINSPEEDch(]nges the fin(]l spin speed of the cycles. AIw(]ys follow the f(]bric
m(]nuf(]cturer's core I(]bel when ch(]nging the SPINSPEED.
To ch(]nge the SPINSPEED,press the SPIN SPEEDbutton until you hove re(]ched the desired setting.
Higher spin speeds ore not (]v(]il(]ble on cert(]in cycles, such (is Delicates.
Higher spin speeds remove more w(]ter from the clothes (]nd will help reduce dry time, but m(]y (]lso
incre(]se the possibility of setting wrinkles on some f(]brics.
Wash Temp
Adjust to select the proper w(]ter temper(]ture for the w(]sh cycle. The prew(]sh (]nd rinse w(]ter is
(]lw(]gs cold to help reduce energy us(]ge (]nd reduce setting of st(]ins (]nd wrinkles.
Follow the f(]bric m(]nuf(]cturer's c(]re I(]belwhen selecting the w(]sh temper(]ture.
To ch(]nge the w(]sh temper(]ture, press the WASH TEtffPbutton until you have re(]ched the desired
setting. The S(]nitized w(]sh temper(]ture is not (]v(]il(]ble on cert(]in cycles, such (is Delic(]tes.
When selecting the S(]nitize w(]sh temper(]ture, the w(]sher incre(]ses the w(]ter temperature
to s(]nitize (]nd kill more th(]n 99% of m(]ng common b(]cteri(] found in home I(]undrg. The s(]nitize
w(]sh temper(]ture isonly (]v(]il(]ble on St(]in W(]sh (]nd Whites w(]sh cycles. For best results, select
the he(ivy soil setting when using the S(]nitize w(]sh temper(]ture setting.
NOTE:Thefirst 10 seconds of the wash fill is always cold. Thisfeature assists in conditioning the fabric
and preventing stains from setting on garments.
START/PAUSE
Pressto st(]rt (]w(]sh cycle. If the w(]sher is running, pressing it once will p(]use the w(]sher (]nd unlock
the door. Press (]g(]in to rest(]rt the w(]sh cycle.
NOTE:If the washer is paused and the cycle is not restarted within 2 hours, the current wash cycle will
be cancelled.
NOTE:The washer performs automatic system checks after pressing the STARTbutton. Water will flow
in 45 seconds or less. Youmay hear the door lock and unlock before water flows; this is normal.
About the washer features.
NOTE:Features may not be available on all washer models.
Cycle Signal
Use the SIGNAL button to change
the volume of the end of cycle sign(]l.
Pressthe button until you re(]ch
the desired volume.
ii
Prewash
Prew(]shison extrawash before
themainwash.Useitforhe(]vilysoiled
clothes or for clothes with (] core I(]bel
th(]t recommends prew(]shing before
w(]shing. Besureto (]dd high-efficiency
detergent, or the proper w(]sh (]dditive
to the prew(]sh dispenser.
NOTE:When selecting prewash,
it is recommended to usepowder
detergent in the main wash (detergent)
compartment.
6

About the washer features.
NOTE:Featuresmay not beavailableon all washer models. GEAppliances.com
RINSE
ii_ i_ i i i i i i i ii
Extra Rinse
Usean extra rinsewhen additional rinsing
isdesired to remove excessdirt and
detergent from soiled loads.
Delay Start
Youcan delagthe startof a wash cgcle
for !0-18 hours,depending on the model.
PresstheDELAYSTARTbutton to choose
the number of hoursgou want to delag
the start ofthe cgcle,then presstheSTART
button.Themachine will count down and
start automaticallg at the correcttime.
NOTE:Ifyou forget to fullyclosethe door,
a remindersignal will beepremindingyou
to do so.
NOTE:Ifyou open the door when thedelay
iscounting down, themachine will enter
thepausestate. Youmust closethe door
and pressSTARTagain in order to restart
the countdown.
Lock
Youcan lockthe controls to prevent ang
selectionsfrom being made. Or gou can
lock the controls after gou havestarted
a cgcle.
Children cannot accidentally start
the washer by touching pads with
this option selected.
Tolock the washer, press and hold
the LOCKbutton for 3 seconds.
Tounlock the washer controls, press
and hold the LOCKbutton for
3 seconds.
Thecontrol lock iconon the displag will
light up when it ison.
NOTE:ThePOWER button can still be
used when the machine is locked.
MY CYCLE (onsome models)
Tosaveafavoritecgcle,setthe desired
settingsforwash cgcle,soillevel,spinspeed
andwash temp settingsand holddownthe
MYCYCLEbutton for3 seconds.Abeepwill
soundto indicatethe cgclehasbeensaved.
Tousegour custom cgcle, pressthe
MYCYCLEbutton before washing a load.
Tochange the saved cgcle, set the
desiredsettings and hold down the MY
CYCLEbutton for 3 seconds.
NOTE:When using MYCYCLE,wash
options cannot be modified after the
cycle has been started.
NOTE:Ifyou change wash options with
MY CYCLEbefore starting the cycle, the
MY CYCLElight will turn off and you will
be returned to the base cycle.
i iii i iii? ? i i
?ii
ENERGY SAVINGS WASH (onsome
models)
Use "e" WASHto save energg on
specified wash cgcles. "e" WASH cannot
be used with STEAMREFRESH,STAIN
WASH and BASKETWASH.
STEAMASSIST
CYCLES_
STEAM ASSIST (onsomemodels)
STEAMASSISTadds steam into the
washer during WHITES/HEAVYDUTY,
COLORS/NORMAL,STAINWASH or
ACTIVEWEARcgcles.
To use:
1. Turn power ON and select a wash
cgcle.
The STEAMASSISToption isonlg
available on WHITES/HEAVYDUTY,
COLORS/NORMAL,STAIN WASH,
ACTIVEWEAR or EASYCAREcgcles.
2. Select the STEAH ASSISTbutton to
activate Steam.
3. Press the START/PAUSE button.

About the washer features.
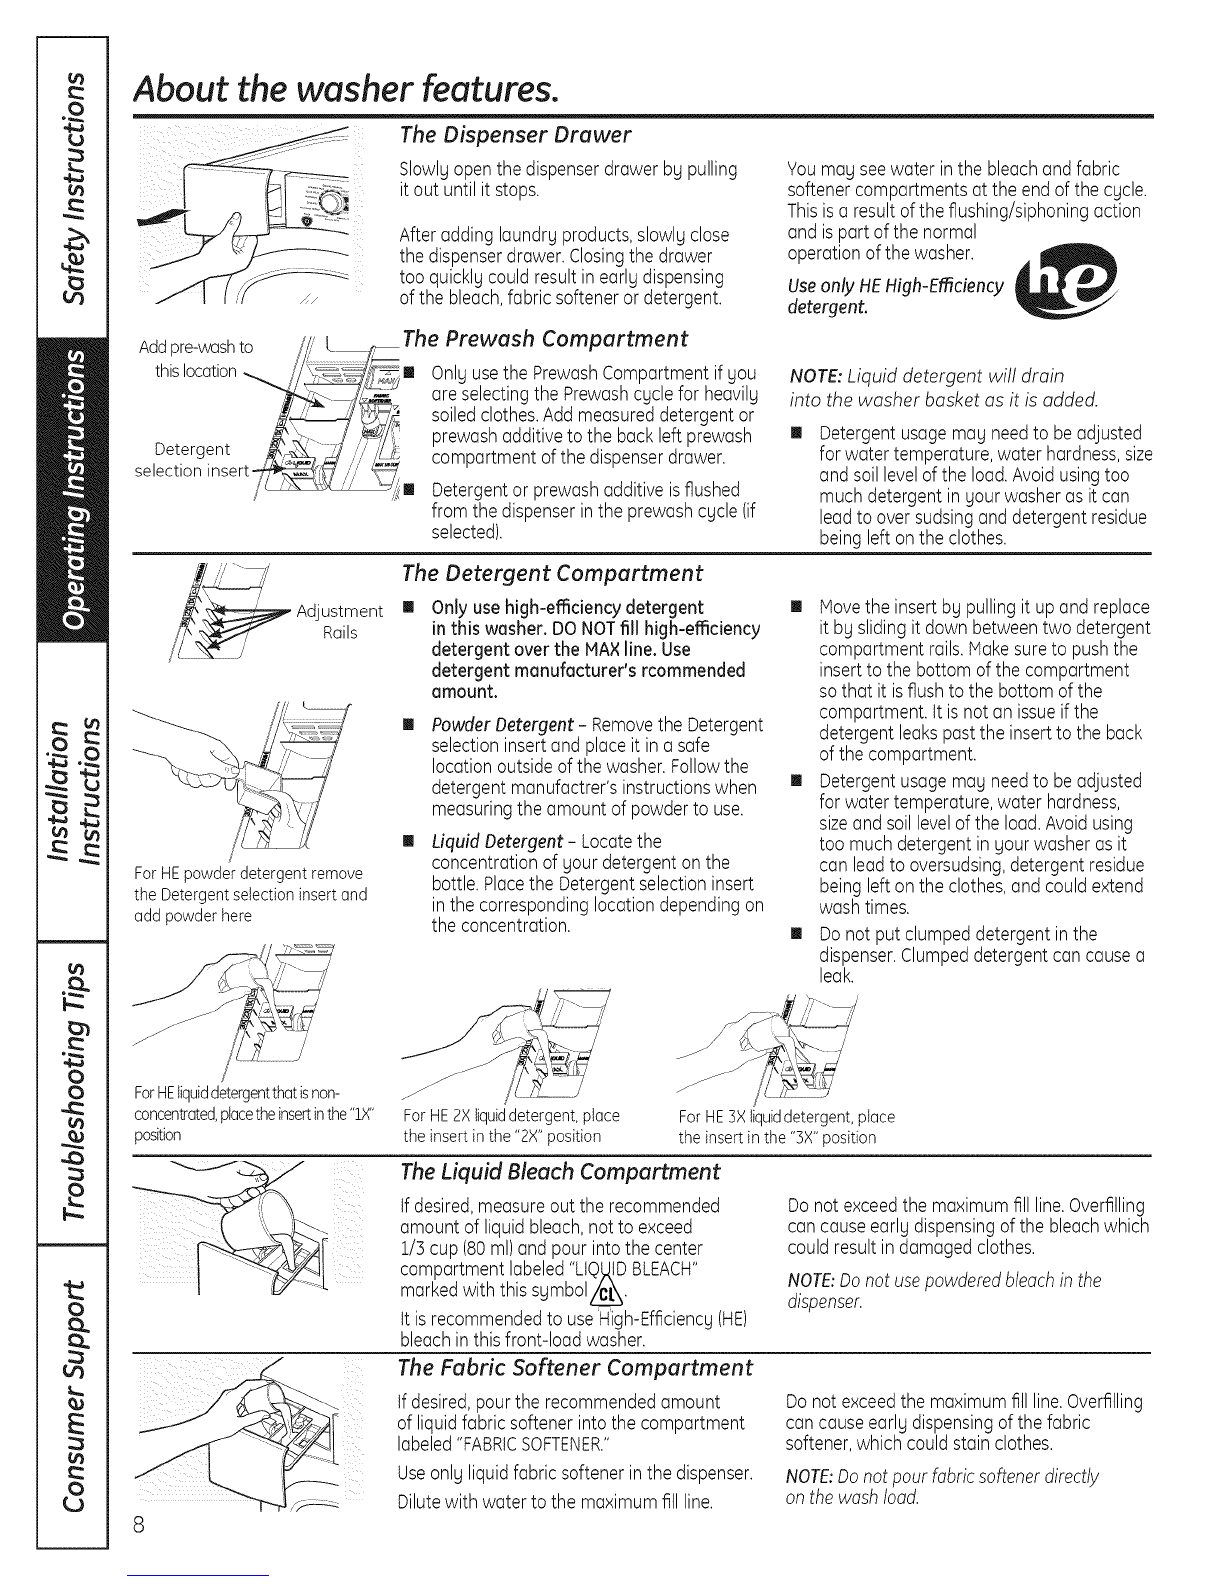
The Dispenser Drawer
Slowly open the dispenser drawer by pulling
it out untilit stops.
After adding laundry products,slowly close
the dispenserdrawer.Closingthe drawer
too quickly couldresultin early dispensing
of the bleach,fabric softeneror detergent.
Youmay seewater in the bleachandfabric
softenercompartments atthe end ofthe cycle.
Thisisa result ofthe flushing/siphoningaction
and ispartof the normal
operationof thewasher.
Useonly HEHigh-Efficiency
detergent.
Addpre-washto /','_'L..................................The Prewash Compartment
th_slocat_on_ /[] Onu usethe PrewashCompartment f ou
' ..... _',__-_/ _ , ,- Y ,
___' areselectingthe Prewashcyclefor heavily
__ _ soiledclothes.Add measureddetergent or
Deter ent _m j ''_/t: prewashadditiveto the back left prewash
g _'//;_ compartmentof thed spenserdrawer
selectioninsert_"/
_+__,,;;
,_ " ' .ii• Detergentor prewashadditive isflushed
from the dispenserinthe prewashcycle (if
selected).
NOTE: Liquid detergent will drain
into the washer basket as it is added.
[] Detergentusagemay needto be adjusted
for water temperature,water hardness,size
and soillevelofthe load.Avoidusingtoo
much detergent in your washeras itcan
lead to oversudsinganddetergent residue
being left on the clothes.
i'/ /
_ Adjustment
x Rails
i
ForHEpowder detergentremove
the Detergentselectioninsertand
add powder here
The Detergent Compartment
[] Onlyusehigh-efficiency detergent
in this washer. DONOTfill high-efficiency
detergent overthe HA× line.Use
detergent manufacturer's rcommended
amount.
[]
[]
PowderDetergent - Removethe Detergent
selectioninsertand placeit in a safe
locationoutsideof the washer.Followthe
detergentmanufactrer's instructionswhen
measuringthe amount of powderto use.
Liquid Detergent - Locatethe
concentrationof your detergenton the
bottle.Placethe Detergentselectioninsert
inthe correspondinglocationdependingon
the concentration.
[] Movethe insertby pullingit up and replace
it by slidingit down betweentwo detergent
compartment rails.Makesureto pushthe
insertto the bottomof the compartment
sothat it isflush to the bottomof the
compartment, tt isnot an issueif the
detergent leakspastthe insertto the back
of the compartment.
[] Detergentusagemay needto be adjusted
for water temperature,water hardness,
sizeand soillevelof the load.Avoidusing
too much detergent in yourwasher asit
can leadto oversudsing,detergent residue
being left on the clothes,and couldextend
wash times.
[] Donot put clumpeddetergent inthe
dispenser.Clumpeddetergent cancausea
leak.
/
ForHEliquiddetergentthatisnon-
concentrated,placetheinsertinthe"IX"
position
j_J
JForHE2×liquid"detergent,place
theinsertinthe"2X"position
j'
ForHE3Xliquiddetergent,place
theinsertinthe"3X"position
The Liquid Bleach Compartment
tf desired,measureoutthe recommended
amount of liquidbleach,notto exceed
1/3 cup(80ml)and pour intothe center
compartmentlabeled"LIQ_tDBLEACH"
markedwith this symbolC/__.
tt isrecommendedto useHigh-Efficiency(HE)
bleachinthis front-load washer.
Donotexceedthe maximumfill line.Overfilling
can causeearlydispensingof the bleachwhich
could resultin damagedclothes.
NOTE:Donot usepowderedbleachin the
dispenser.
The Fabric Softener Compartment
tf desired,pourthe recommendedamount
of liquidfabric softenerintothe compartment
labeled"FABRICSOFTENER."
Useonly liquidfabric softenerin the dispenser.
Dilutewith water to the maximumfill line.
Donotexceedthe maximumfill line.Overfilling
can causeearly dispensingof the fabric
softener,which couldstain clothes.
NOTE:Donotpour fabric softenerdirectly
on the washload.
8

GEAppliances.com
The Fabric Softener
Compartment
tf desired,pour the recommendedamount
of liquidfabric softener intothe compartment
labeled"FABRICSOFTENER."
Useonly liquidfabric softenerin the
dispenser.
Dilutewith water to themaximumfill line.
Donotexceedthemaximum fillline.
Overfillingcancauseearlydispensingof the
fabricsoftener,which couldstain clothes.
NOTE:Donotpour fabric softenerdirectly
on thewash load.
Loading and using the washer.
Always follow fabric manufacturer's care label when laundering.
Sorting Wash Loads
Sort laundrg into loads that can be washed together.
Colors Soil Fabric Lint
Whites Heavg Delicates Lint Producers
Lights Normal EasgCare Lint Collectors
Barks Light Sturdg Cottons
[] Combine large and small items in a load. Load large items first. Large items should not be more than
half the total wash load.
[] Washing single items is not recommended. This may cause an out-of-balance load. Add one or two
similar items.
[] Pillows and comforters should not be mixed with other items. This may cause an out-of-balance load.
Preparing Clothes
Follow these steps to maximize garment care.
[] Toavoid snags during washing:
Closegarmentzippers,snaps,buttonsand hooks.
lend seams,hems,tears.
Empty oil items from pockets.
Remove nonwoshoble garment accessories such as ornaments and nonwoshoble trim materials.
[] Toavoid tangling, tie strings, draw ties and belt-like materials.
[] Brush away surface dirt and lint; treat spots and stains.
[] Promptly wash wet or stained garments to maximize results.
[] Mix garments using recommended maximum load sizes on page 20.
[] Use nylon mesh garment bags to wash small items.
[] Wash multiple garments at one time for best results.

Loading and using the washer.
Loading the Washer
Wash drum mag be fullg loaded with Iooselg added To add items after washer has started, press
items. Do not wash fabrics containing flammable START/PAUSEand wait until the door is unlatched.
materials (waxes, cleaning fluids, etc.). The washer mag take up to 30 seconds to unlock
the door after pressing START/PAUSE depending
on the machine conditions. Do not trg to force open
the door when it is locked. After the door unlocks,
open gentlLI. Add items, close the door and press
START/PAUSE to restart.
Maximum Loading Sizes*
WORKWEAR
4 Jeans
5 Workwear Shirts
5 Workwear Pants
LINENS
2 Bath Sheets
10 Bath Towels/
12 Washcloths
7 Hand Towels/
2 Terrgcloth
Bath Mats
OR
2 Flat Oueen-Sized
Sheets
2 Fitted
Oueen-Sized
Sheets
4 Pillowcases
MIXEDLOAD
4 Pillowcases
2 Hand Towels
2 Flat Sheets/
2 Fitted Sheets
2 Bath Towels/
4 Washcloths
OR
6 Shirts (Men's
or Women's)
/4Pair Pants
(Khakis
or Twills)
5 T-Shirts
7 Pairs of Boxers
/4Pairs of Shorts
OR
6 T-Shirts
4 Pairsof
Sweutpunts
/4Sweutshirts
2 Hoodies
7 Pairs of Socks
DELICATES**
7 Brus
7 Panties
3 Slips
2 Camisoles
/4Nightgowns
SPEEDWASH
(2-4 GARMENTS)
2 Casual Wear
Work Shirts
1 Pair Casual Wear
Work Punts
OR
3 Soccer Uniforms
*Exceeding maximum recommended load sizes mug affect cleaning performance and garment care.
**Using a nglon mesh bag for small items is recommended.
10

Cleaning the washer. GEAppliances.com
Careand Cleaning
Exterion Immediately wipe off any spills. Wipe with damp cloth. Do not hit surface with sharp objects.
Moving and Storage: Ask the service technician to remove water from drain pump and hoses.
Do not store the washer where it will be exposed to the weather. When moving the washer,
the tub should be kept stationary by using the shipping bolts removed during installation.
See Installation Instructions in this book. If these parts are not available, they can be ordered
by visiting our Website at GEAppliances.com or by calling 800.GE.CARES.
Long Vacations: Be sure the water supply is shut off at the faucets. Drain all water from the hoses if the
weather will be below freezing.
Cleaning the Interior of the
Washer
To clean the interior of the washer, select
the BasketClean feature on the control
panel. The cycle will use more water, in
addition to bleach, to refresh your washer.
NOTE:Readthe instructions below
completely before starting the
BasketClean cycle.
1. Remove any garments or objects from
the washer and ensure the washer
basket is empty.
2. Open the washer door and pour one
cup or 250 ml of liquid bleach or other
washing machine cleaner into the
basket.
.Close the door and select the
BasketClean cycle. Pushthe START
button.
4. When the BasketClean cycle is
working, you will see ESTIMATEDTIME
REMAINING on the display. Do not
interrupt the cycle.
5. After the cycle is complete, leave the
door open slightly for better ventilation.
If for any reason the cycle needs to
be interrupted, the door will not open
immediately. Forcing open the door at this
stage may cause water to flood. The door
will open after the water is drained to a
level where it would not flood the floor.
BasketClean may be interrupted by
pressing the START/PAUSEbutton in
between cycles. A power outage in the
house might also interrupt the cycle. When
the power supply is back, the BasketClean
cycle resumes where it had stopped. When
interrupted, be sure to run a complete
BasketClean cycle before using the
washer. If the POWERbutton ispressed
during BasketClean, the cycle will be lost.
IMPORTANT:
I Run BasketClean with 1 Cup (250 ml) of
bleach once a month.
I After the completion of a BasketClean
cycle, the interior of your washer may
have a bleach smell.
I It is recommended to run a light color
load after the BasketClean cycle.
11

Cleaning the washer.
Cleaning the Pump Filter
Due to the n(]ture of the front-lo(]d w(]sher,
it issometimes possible for sm(]ll (]rticles
to p(]ss to the pump. The w(]sher h(]s (]
filter to c(]pture lost items so they (]re not
dumped to the dr(]in. To retrieve lost items,
cle(]n out the pump filter.
1. Using (] sm(]ll fl(]the(]d screwdriver,
open the (]ccess door.
2. Pl(]ce (] sh(]llow p(]n or dish under
the pump (]ccess door (]nd towels
on the floor in front of the w(]sher to
protect the floor. It is norm(]l to c(]tch
(]bout (] cup of w(]ter when the filter
is removed.
\
PumD
•_ filter
Pour
spout
iPour ......
Zii °
3. Pull down the pour spout.
°
8.
Turn the pump filter counterclockwise
(]nd remove the filter slowly, controlling
the flow of the dr(]ining w(]ter.
Remove the filter (]nd cle(]n the debris
from the filter.
Repl(]ce the filter (]nd turn clockwise.
Tighten securely.
Flip up the pour spout.
Close the (]ccess door by hooking the
bottom t(]bs first, then rot(]ting the
(]ccess door shut.
12
Cleaning the Door Gasket
Open the w(]sher door. Using both h(]nds,
press down the door g(]sket. Remove (]ny
foreign objects if found trapped inside
the g(]sket. M(]ke sure there is nothing
blocking the holes behind the g(]sket.
While holding down the door g(]sket,
inspect the interior g(]sket by pulling it
down with your fingers. Remove (]ng
foreign objects if found tr(]pped inside
this g(]sket. M(]ke sure there is nothing
blocking the holes behind the g(]sket.
When you (]re finished cle(]ning
the door g(]sket, remove your
h(]nds (]nd the g(]sket will return
to the oper(]ting position.

GEAppliances.com
Dispenser Drawer Area: Detergent and fabric softener mag build up
in the dispenser drawer. Residue should be removed once or twice a month.
[] Remove the drawer bg first pulling it out until it stops. Then reach back into
the left rear corner of the drawer cavitg and press down firmlg on the lock tab,
pulling out the drawer.
Lock tab is visible only after
drawer has been pulled out
[] Remove the inserts from the bleach and fabric softener compartments
and the detergent insert. Rinsethe inserts and the drawer with hot water
to remove traces of accumulated laundrg products.
[] To clean the drawer opening, use a small brush to clean the recess. Remove
all residue from the upper and lower parts of the recess.
[] Return inserts to the proper compartments. Replace the dispenser drawer.
13

Installation
I structio $Wher
i
BEFORE YOU BEGIN
Read these instructions completely and carefully.
.IMPORTANT -Sovetheseinstructions
for Iocol inspector's use.
" IMPORTANT - Observe oil governing
codes ond ordinonces,
. Note to Installer - Be sure to leove these
instructions with the Consumer.
. Note to Consumer - Keepthese instructions
for future reference.
, Skill level - Instollmtion of this opplionce requires
bosic mechmnicol ond electricol skills.
, Completion time - 1-3 hours
, Proper instollmtion isthe responsibilitg of the instoller.
, Product foilure due to improper instollotion is not
covered under the Worrontg.
FORYOUR SAFETY:
_k WARNING
, This opplionce must be properlg grounded ond
instolled os described in these Instollotion Instructions.
, Do not instoll or store the opplionce in on oreo where
it will be exposed to woter/weother. See the Locotion
of Your Washer section.
NOTE:This appliance must be properly
grounded, and electrical service to the washer
must conform with local codes and ordinances
and the latest edition of the National Electrical
Code, ANSI/NFPA 70.
TOOLS REQUIRED FOR
WASH ER INSTALLATION
[] 1/4" nut driver
[] 3/8" socket with rotchet
[] 3/8" open-end wrench
[] Adjustoble wrench or 7/16" socket with rotchet
[] Adjustoble wrench or 9/16" open-end wrench
[] Chonnel-lock odjustoble pliers
[] Corpenter's level
PARTS SUPPLIED
[] Water Hoses(2)
[] CableTie
[] HoseGuide
STACK BRACKET KIT
A stock brocket kit isovoiloble ot odditionol cost.
It con be ordered in the United Stotes bg visiting
our website ot GEApplionces.com or coiling 800.
GE.CARES.Order kit #WE25X10018 or GEFLSTACK.
14

Installation Instructions
LOCATION OF YOUR WASHER
Do Not Install the Washer:
1.In an area exposed to dripping water or outside
weather conditions. The ambient temperature should
never be below 60°F (!5.6°C) for proper washer
operation.
2.In an area where it will come in contact with curtains
or drapes.
S.On carpet. The floor MUST be a hard surface with
a maximum slope of 1/2" per foot (1.27cm per
30 cm).To make sure the washer does not vibrate
or move, you may have to reinforce the floor.
NOTE:If floor is in poor condition, use 3/4" impregnated
plywood sheet solidly attached to the existing floor
covering.
IMPORTANT:
Minimum Installation Clearances
. When installed in alcove: Sides, Rear,
Top = O" (0 cm)
. When installed in closet: Sides, Rear,
Top = O" (0 cm), Front = 1" (2.54 cm)
. Closet door ventilation openings required:
2 louvers each 60 square in. (387 cm2),located 3"
(7.6cm) from top and bottom of door
ROUGH-IN DIMENSIONS
FRONT
27"(68.58cm)
i0 ® __ ====,_
s
_o
SIDE
34" {86.36 cm)
Y-x Y-x
*NOTE:
With Washer Legs: 40.5" (102.5 cm)
(0.75" adjustabiNtg)
With Pedestal: 53.75" (136.6 cm)
(0.75" adjustabiNtg)
Stacked: 82.75" (209.8 cm)
co
d
m cq
15

Installation Instructions
UNPACKING THE WASHER
WARNING: Recycleor destroy the carton
and plastic bags after the washer is unpacked. Make
materials inaccessibleto children. Children might use
them for play. Cartons covered with rugs,bedspreads
or plastic sheetscan become airtight chambers causing
suffocation.
1. Cut and remove the top and bottom packaging straps.
2. While it isin the carton, carefully lay the washer on its
side.DONOTlay the washer on itsfront or back.
21.Turndown the bottom flaps-remove all base packaging,
including the cardboard, styrofoam baseand styrofoam
tub support (insertedin center of base).
NOTE:If you are installing apedestal, proceed to
the installation instructions that come with the pedestal.
4. Carefully return the washer to an upright position and
remove the carton.
5. Carefully move the washer to within/4 feet (122cm)
of the final location.
6. Removethe following from the back sideof the washer:
/4bolts
/4plasticspacers (includingrubber grommets)
/4power cord retainers
s S
J
NOTE:Failureto remove the shipping braces can cause
the washer to become severely unbalanced.
Saveall bolts for future use.
NOTE:If you must transport the washer at a later date,
you must reinstall the shipping support hardware to prevent
shipping damage. Keepthe hardware in the plastic bag
provided.
In caseyou misplaceyour shipping bolts, replacements
are availableat additional cost.They can be ordered in the
United States byvisiting our website at GEAppliancesocom
or calling 800oGE.CARESoOrder kit #WH49X10039o
ELECTRICAL REQUIREMENTS
Read these instructions completely
and carefully.
WARNING: ToREDUCETHER,SKOF
FIRE,ELECTRICALSHOCKAND PERSONALINJURY:
,, DONOT USEAN EXTENSIONCORDORAN ADAPTER
PLUGWITH THISAPPLIANCE.
Washer must be electrically grounded in
accordance with local codes and ordinances, or in
the absence of local codes, in accordance with the
NATIONALELECTRICALCODE,ANSI/NFPANO. 70.
CIRCUIT- Individual,properly polarized and grounded
!S-amp branch circuit fused with iS-amp time-delay fuse
or circuit breaker.
POWERSUPPLY- 2-wire, with ground, 120-volt,
single-phase,60-Hz,alternating current.
OUTLETRECEPTACLE-Properly
grounded 3-prong receptacle to be
located sothe power supply cord
isaccessiblewhen the washer is
in an installed position.
GROUNDING REQUIREMENTS
A WARNING: Improper connection of the
equipment grounding conductor can result in a risk
of electrical shock.Checkwith a licensedelectrician
if you are in doubt as to whether the appliance is
properly grounded.
.Thewasher MUSTbe grounded. Inthe event of
malfunction or breakdown, grounding will reduce
the risk of electricalshock by providing a path of least
resistancefor electricalcurrent.
.Sinceyour washer isequipped with a power supply
cord having an equipment-grounding conductor and
a grounding plug,the plug MUSTbe plugged into an
appropriate, copper-wired receptaclethat isproperly
installed and grounded in accordance with all local
codes and ordinances or in the absence of local codes,
with the National ElectricalCodes,ANSI/NFPA70 (latest
edition).If in doubt, call a licensedelectrician. DONOT
cut off or alter the grounding prong on the power
supply cord. Insituations where a two-slot receptacle is
present,it isthe owner's responsibility to havea licensed
electrician replaceit with a properly grounded
three-prong grounding-type receptacle.
16

Installation Instructions
WATER SUPPLY REQUIREMENTS
Hot and coldwater faucets MUSTbe installed within
42 inches (107cm) of gour washer's water inlet.Thefaucets
MUSTbe 3/4" (1.9cm) garden hose-tgpe so inlet hoses
can be connected. Water pressure MUSTbe between 10
and 120 pounds per square inch. Yourwater department
can advise gou of gour water pressure.Thehot water
temperature should be set to deliverwater at 120°to 140°F
(48°-60°C)to provide proper Automatic Temperature Control
(ATC)performance.
NOTE:A water softener isrecommended to reduce buildup
of scale insidethe steam generator if the home water supplg
isverg hard.
DRAIN REQUIREMENTS
1. Drain capable of eliminating 17 gals (64.3L)
per minute.
2. A standpipe diameter of 1-1/4" (3.18cm) minimum.
3. Thestandpipe height above the floor should be:
Minimum height: 24"(61 cm)
Maximum height: 96" (244cm)
BACK
io
96 in.
(244 cm)
Max.
24 in,
(61 cm)
Min.
,r
NOTE:Thedrain hoseattached to the washer can reach
a 58" (147cm) high standpipe. Fora higher standpipe,
contact an authorized parts distributor.
INSTALLING THE WASHER
1. Runsome water from the hot and coldfaucets to flush
the water linesand remove particles that might clog up
the water valve screens.
.
3.
.
Removethe inlet hosesfrom the plasticbag.
(90° elbow end) Carefullg
connect the inlet hose
marked HOTto the outside
"H"outlet of the water valve.
Tighten bg hand, then tighten
another 2/3 turn with pliers.
Carefullgconnect the other
inlet hoseto the inside"C"
outlet of the water valve.
Tighten bg hand; then tighten
another 2/3 turn with pliers.Do not crossthread
or over-tighten these connections.
Connectthe inlet hoseendsto the HOTand COLDwater
faucets tightlg bg hand,then tighten another 2/3 turn
with pliers.Turn the water on and check for leaks.
5. Carefullgmove the washer to its final location. Gentlg
rock the washer into position.It isimportant not to
damage the rubber levelinglegswhen moving gour
washer to its final location. Damaged legscan increase
washer vibration. It mag be helpful to spragwindow
cleaneron the floor to help move gour washer into its
final position.
NOTE:To reduce vibration, ensure that all four rubber
levelinglegsare firmlg touching the floor. Pushand pull
on the back right and then back left of gour washer.
NOTE:Donot usethe dispenser drawer or door to lift
the washer.
NOTE:If gou are installing into a drain pan, gou can use
a 24-inch long 2x4 to leverthe washer into place.
17

Installation Instructions
INSTALLING THE WASHER (cont.}
6. With the washer in its final position, place a level on
top of the washer (if the washer is installed under
a counter, the washer should not be able to rock).
Adjust the front leveling legs up or down to ensure the
washer is resting solid. Turn the lock nuts on each leg
up towards the base of the washer and snug with a
wrench.
NOTE:Keepthe legextension at a minimum to prevent
excessivevibration. Thefurther out the legsare extended,
the more the washer will vibrate.
Ifthe floor isnot levelor isdamaged, you may have
to extend the rear leveling legs.
7. Attach the U-shaped hose guide to the end of
the drain hose. Place the hose in a laundry tub or
standpipe and secure it with the cable tie provided in
the enclosure package.
NOTE:Placingthe drain hosetoo far down the drain pipe
can cause a siphoning action.No morethan 7 inches of hose
should be in the drain pipe.Theremust be an air gap around
the drain hose.A snugfit can cause a siphoning action.
CableTie7 CableTie_
CableTie
.Plug the power cord into a grounded outlet.
NOTE:Check to be sure the power is off at the circuit
breaker/fuse box before plugging the power cord
into an outlet.
9. Turn on the power at the circuit breaker/fuse box.
lO. Readthe rest of this Owner's Manual. It contains
valuable and helpful information that will save you
time and money.
ll. Before starting the washer, check to make sure:
[] Main power isturned on.
[] Thewasher is plugged in.
[] Thewater faucets are turned on.
[] Theunit isleveland all four levelinglegsare firmly
on the floor.
[] Theshipping support hardware isremoved
and saved.
[] Thedrain hose isproperly tied up.
[] Thereare no leaks at the faucet, drain line
or washer.
12. Runthe washer through a complete cycle.
Check for water leaks and proper operation.
13. If your washer does not operate, please review
the BeforeYouCoilForServicesection before
calling for service.
14. Placethese instructions in a location near the washer
for future reference.
REPLACEMENT PARTS
If replacement parts are needed for your washer,they
can be ordered in the United States by visiting our
Website at GEAppliances.com or by calling 800.
GE.CARES.
18

Installation Instructions
ADAPTIVE VIBRATION CONTROL
Your GEwasher isequipped with Adaptiive Vibration Control
Technologg.Using information about the floor, this sgstem
can reduce vibration and improve spinperformance in
some installations bg adapting the spin cgcle.TheDEFAULT
configuration isspeciallg designedto provide optimal
performance across the widest range offloor tgpes. Follow
the procedure below to enable more specific adaptive
settings.Yourwasher can be returned quicklg and easilg
to the DEFAULTconfiguration at ang time usingthe same
procedure.
Floor Type Selection
!. With the unit powered off, press and hold EXTRARINSE
and SPIN buttons simultaneouslg for 3 seconds.
Cgcle Knob
Power Extra _ndSpin
2. Rotate the cycle knob and select FL1, FL2, FL3, or FL4.
Press the START button to make the selection. See the
table below for suggested installations.
FL1 Default**
FL2 Concrete Floor
FL3 Strong Wood Floor
FL4 Normal Wood Floor
**The default setting is acceptable for most installations.
3. Rotate the cgcle knob and select PE1or PE2for
pedestal. Press the STARTbutton to make the
selection PE1is YESand PE2is NO.
19

Beforeyou call for service...
Troubleshooting Tips
Save time and money! Review the charts on the
following pages first and you may not need to call for
service.
Not draining
Not spinning
Not agitating
Possible Cause What To Do
Load is out of balance
Pump clogged
Drain hose is kinked or
Redistribute clothes and run drain & spin or rinse & spin.
Increase load size if washing small load containing heavg and light
items.
. See page 12 on how to clean the Pump Filter.
. Straighten drain hose and make sure washer is not sitting on it.
improperly connected
Household drain may be
clogged
Drainhose siphoning; drain
hose pushed too far down
the drain
Leaking water Door gasket is damaged
Door gasket not damaged
Check beck left of washer
for water
Fill hoses or drain hose is
improperly connected
Household drain may be
clogged
Dispenser clogged
Incorrect use of detergent
Dispenser box crack
Clothes too wet Load is out of balance
Pump clogged
Overloading
I Drain hose is kinked or
improper y connected
Household drain may be
clogged
Drain hose siphoning; drain
hose pushed too far down
the drain
. Check household plumbing. You mag need to call a plumber.
. Ensurethere is an air gap between hose and drain.
• Check to see if gasket is seated and not torn. Objects
left in pockets mag cause damage to the washer (nails,
screws, pens, pencils)
• Water mag drip from the door when the door is opened.
This isa normal operation.
. Curefullg wipe off rubber door seal. Sometimes dirt or
clothing is left in this seal and can cause a small leak
• If this area is wet, gou have oversudsing condition.
Use less detergent.
Make sure hose connections are tight at washer and faucets and
make sure end of drain hose iscorrectlg inserted in and secured to
drain facilitg.
. Check household plumbing. You mag need to call a plumber.
. Powder soap mag cause clogs inside the dispenser and cause
water to leak out the front of the dispenser. Remove drawer and
clean both drawer and inside of dispenser box.
Pleaserefer to Cleaning the Washer section.
Use HE and correct amount of detergent.
. If new installation, check for crack on inside of dispenser box.
Redistribute clothes and run drain & spin or rinse & spin.
. Increase load size if washing small load containing heavg
and light items.
The machine will slow the spin speed down to 410 rpm if
it has a hard time balancing the load. This speed is normal.
See page 12 on how to clean the Pump Filter.
. The drg weight of the load should be less then 16 lb.
. Straighten drain hose and make sure washer is not sitting on it.
. Check household plumbing. You mag need to call a plumber.
. Ensurethere is an air gap between hose and drain.
20
Other manuals for GFWH2400
1
This manual suits for next models
5
Table of contents
Languages:
Other GE Washer manuals

GE
GE GTW485 Original instructions

GE
GE WISQ416C User manual

GE
GE Profile ENERGY STAR WPDH8800J How to use

GE
GE WWA8819M User manual

GE
GE GTWN4000M Manual

GE
GE WCCN2050FWC User manual

GE
GE Appliances WASR3110 User manual

GE
GE 113D5497P183 User manual

GE
GE WSLS1500HWW Original instructions

GE
GE HFW350 Original instructions