GE WSLS1500HWW Original instructions

WASHERS
SAFETY INSTRUCTIONS.........4
USING THE WASHER
Getting Started ...................... 6
Controls ............................ 6
Features ..............................8
Loading .............................10
CARE AND CLEANING .......... 11
INSTALLATION
INSTRUCTIONS ..................13
TROUBLESHOOTING TIPS......22
CONSUMER SUPPORT
Warranty ........................... 25
Consumer Support ................... 26
WSLP1500
WSLS1500
OWNER’S MANUAL &
INSTALLATION
INSTRUCTIONS
Write the model and serial
numbers here:
Model #_________________
Serial # _________________
You can find them on a label
on the back of the washer.
49-90533-1 10-16 GEA
ENGLISH/FRANÇAIS/
ESPAÑOL
GE is a trademark of the General Electric Company. Manufactured under trademark license.
3828EY3068Q Rev: 1

2
THANK YOU FOR MAKING GE APPLIANCES A PART OF YOUR HOME.
Whether you grew up with GEAppliances, or this is your first, we’re happy to have you in the family.
We take pride in the craftsmanship, innovation and design that goes into every GEAppliances
product, and we think you will too. Among other things, registration of your appliance ensures
that we can deliver important product information and warranty details when you need them.
Register your GE appliance now online. Helpful websites and phone numbers are available in
the Consumer Support section of this Owner’s Manual. You may also mail in the pre-printed
registration card included in the packing material.

3
Notes. GEAppliances.com

4
IMPORTANT SAFETY INFORMATION.
READ ALL INSTRUCTIONS BEFORE USING.
IMPORTANT SAFETY INSTRUCTIONS
To reduce the risk of death, fire, explosion, electric shock, or injury to persons when using your
appliance, follow basic precautions, including the following:
Read all instructions before using the appliance.
DO NOT wash or dry articles that have been previously cleaned in, washed in, soaked in or spotted with gasoline,
dry-cleaning solvents, or other flammable or explosive substances, as they give off vapors that could ignite or
explode.
DO NOT add gasoline, dry-cleaning solvents, or other flammable or explosive substances to the wash water. These
substances give off vapors that could ignite or explode.
Under certain conditions, hydrogen gas may be produced in a hot-water system that has not been used for 2
weeks or more. HYDROGEN GAS IS EXPLOSIVE. If the hot water system has not been used for such a period, before
using a washing machine, turn on all hot-water faucets and let the water flow from each for several minutes. This
will release any accumulated hydrogen gas. As the gas is flammable, DO NOT smoke or use an open flame during
this time.
DO NOT allow children to play on or in this appliance. Close supervision of children is necessary when this appliance
is used near children. Before the washer is removed from service or discarded, remove the door or lid. Failure to
follow these instructions may result in death or injury to persons.
DO NOT reach into the appliance if the basket or agitator is moving to prevent accidental entanglement.
DO NOT install or store this appliance where it will be exposed to the weather.
DO NOT tamper with controls, repair or replace any part of this appliance or attempt any servicing unless
specifically recommended in the user maintenance instructions or in published user repair instructions that you
understand and have the skills to carry out.
Keep the area around your appliance clean and dry to reduce the possibility of slipping.
DO NOT operate this appliance if it is damaged, malfunctioning, partially disassembled, or has missing or broken parts
including a damaged cord or plug.
Unplug the appliance or turn off the circuit breaker before servicing. Pressing the Power button DOES NOT disconnect
power.
See “ELECTRICAL REQUIREMENTS” located in the Installation Instructions for grounding instructions.
SAVE THESE INSTRUCTIONS
WARNING

5
GEAppliances.com
WHEN NOT IN USE
Turn off water faucets to minimize leakage if a break or
rupture should occur. Check the condition of the water
supply hoses; GE Appliances recommends changing the
water supply hoses every 5 years.
Ensure that the hot water hose is connected to the “H”
(internal red screened) valve and the cold water hose is
connected to the “C” (internal blue screened) valve.
Install or store where it will not be exposed to
temperatures below freezing or exposed to the weather,
which could cause permanent damage and invalidate
the warranty.
Properly ground washer to conform with all
governing codes and ordinances. Follow details
in Installation Instructions.
This washer does include water supply hoses.
GE Appliances strongly recommends the use of
factory specified parts. A list of factory hoses available
for purchase are listed below. These hoses are
manufactured and tested to meet GE Appliances
specifications.
GE Appliances strongly recommends the use of new
water supply hoses. Hoses degrade over time and need
to be replaced every 5 years to reduce the risk of hose
failures and water damage.
Parts and Accessories
Order on-line at GEApplianceparts.com today, 24 hours a
day or by phone at 800.626.2002 during normal business
hours. In Canada, visit your local GE Appliances parts
distributor or call 800.661.1616.
Part Number Accessory
PM14X10002 4 ft Rubber Water Supply Hoses
Or
PM14X10005 4 ft Braided Metal Water Supply Hoses
WX10X10011 Tide®Washing Machine Cleaner*
PM7X1 Washer Floor Tray
PROPER INSTALLATION
This washer must be properly installed and located in accordance with the Installation Instructions before it is used.
If you did not receive an Installation Instructions, you can receive one by visiting GEAppliances.com or by calling
800.GE.CARES (800.432.2737). In Canada, visit www.GEAppliances.ca or call 800.561.3344.
* Tide®is a registered trademark of Procter & Gamble
SAVE THESE INSTRUCTIONS
- Electrical Shock Hazard
WARNING
Plug into a grounded 3 prong outlet.
DO NOT remove ground prong.
DO NOT use an adapter.
DO NOT use an extension cord.
Failure to do so can result in death, fire or electrical
shock.

About the control and indicator settings.
Before starting the washer:
•Sort laundry by color and/or fabric type.
•Load laundry in the washer.
• Add detergent to the dispenser drawer.
• Add fabric softener to the fabric softener dispenser.
• Add bleach , if desired, to the bleach dispenser.
Power
Press the Power button to turn on the control panel.
NOTE: Pressing Power does not disconnect the appliance from the power supply.
1
2
Normal For heavily to lightly soiled colorfast cottons, household linens, work and play clothes.
This cycle
provides the best overall cleaning and should be used for most everyday items. Provides normal wash
and medium speed spin.
Delicates
For lingerie and special-care fabrics with light to normal soil. Provides light
wash and
low speed spin.
Speed Wash
For small loads of lightly soiled items that are needed in a hurry. Provides light wash/rinse and short
high speed spin.
Heavy Duty An above normal cycle for heavily soiled or stained clothes. A soak cycle is added and the agitate
cycle is extended for extra cleaning. This more aggressive cycle should be used sparingly.
Handwash
For items labeled hand-washable with light soils. Provides gentle tumbling and soak during
wash and rinse.
Soak Cycle An extended wash cycle to loosen embedded soils and stains.
My Cycle
To save a favorite cycle, set Cycles to My Cycle and select the desired Process, Options and
Water Temp settings. Press the Start button. The washer will automatically save the setting
and start.
To change the My Cycle, re-save following the above process.
To use My Cycle, set Cycles to My Cycle and press the Start button.
Basket Clean Use for cleaning the basket of residue and odor. Recommended use of at least once per month.
NOTE: Never load laundry while using Basket Clean. The laundry may become damaged. See
the Care and Cleaning section.
Cycles
Press the Cycles button to select the desired cycle.
3Deep Fill
Increases the amount of wash water during all cycles except for Basket Clean.
F
1
82
11
67345
10 9
6
To reduce the risk of fire, electric shock, or injury to persons, read the IMPORTANT SAFETY
INSTRUCTIONS before operating this appliance.
WARNING

GEAppliances.com
4Options
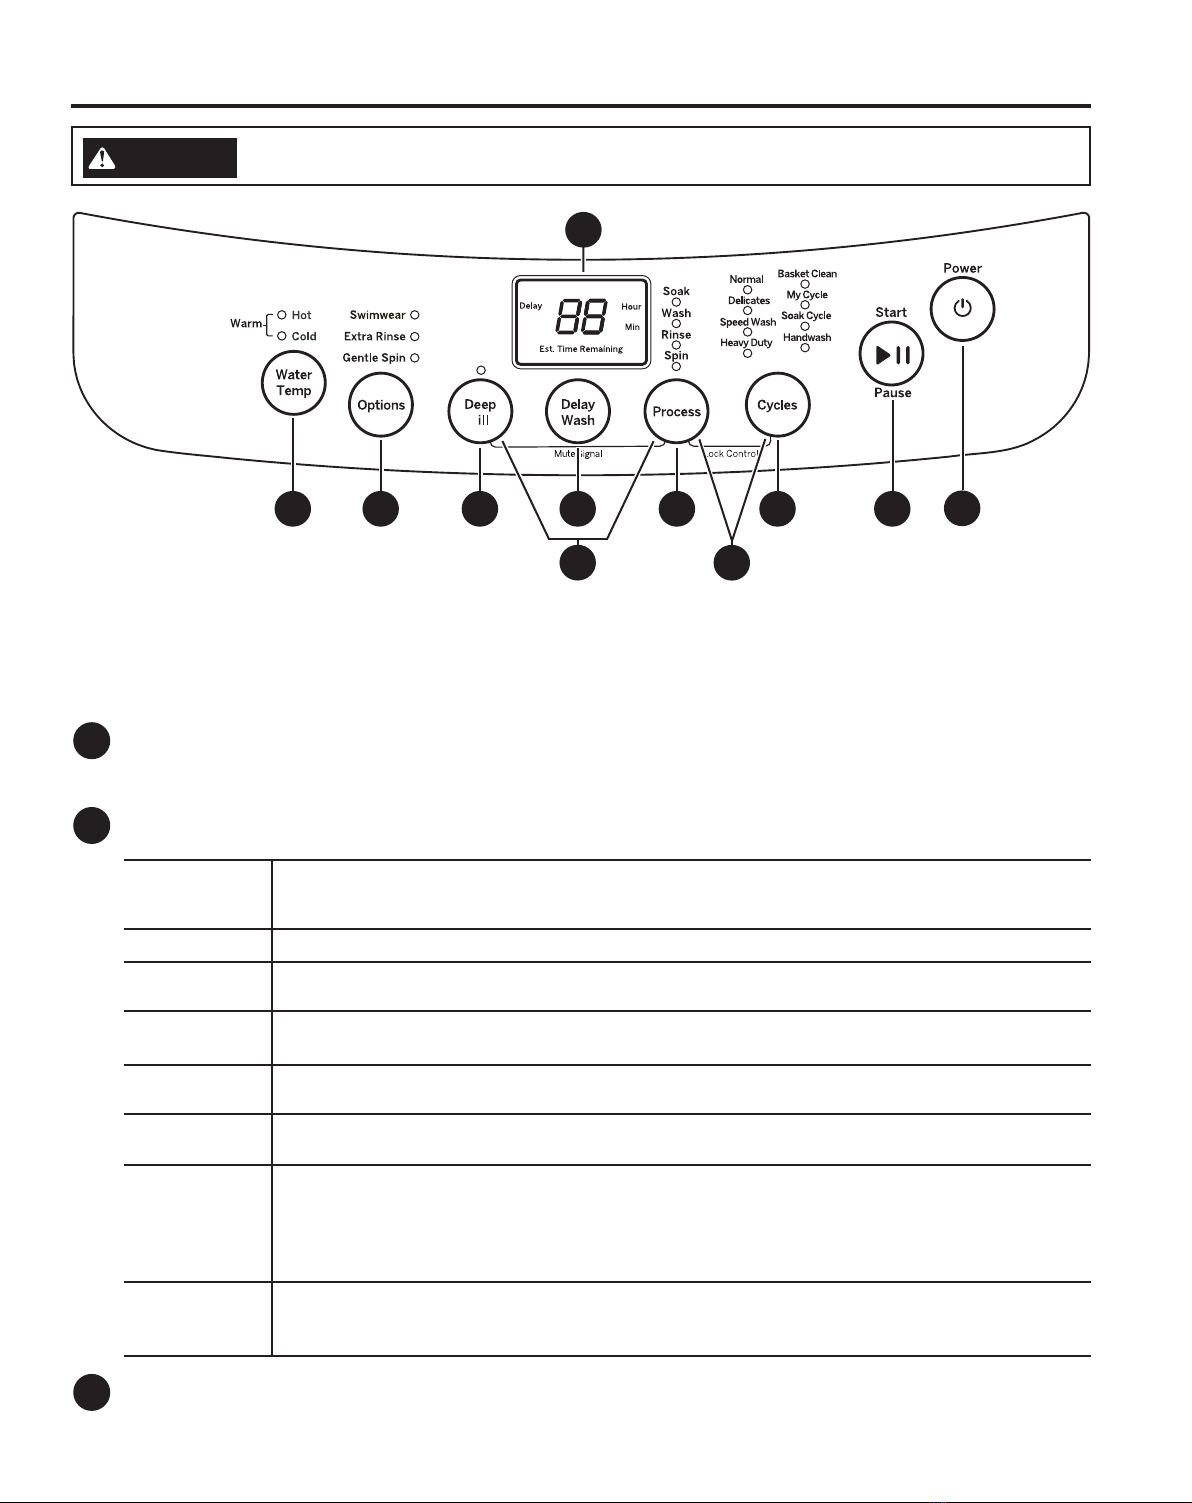
Press the Options button to select the desired options.
Swimwear
Select to spin excessive water out of swimwear. NOTE: This is NOT a wash cycle. This option
can only be selected after turning the unit on by pressing Power. Do NOT load more than 4
pounds of clothes into the washer.
Extra Rinse
When you use extra detergent or bleach to clean heavily soiled clothes, use the Extra Rinse
option to better remove additional residues. NOTE: This option is available for Normal,Heavy
Duty,Soak Cycle and My Cycle.
Gentle Spin
Provides a lower spin speed.
NOTE: This option will be selected automatically in Delicates,
Handwash and Soak Cycle. This option is available for Heavy Duty and My Cycle.
5Water Temp
Select the water temperature for the wash cycle: Hot; Warm (hot and cold); Cold. Always follow fabric manufacturer’s
care label or instructions when laundering.
NOTE FOR PORTABLE MODELS: When using a one-faucet connection, adjust the water flow mix and water
temperature at the faucet.
6Process
Chose the wash options to include in the cycle. Press the Process button until all the options you want to include are
lit. More than one option can be selected.
Soak Select to set a soak cycle only. Washer basket will fill, soak and drain.
NOTE: This option is available for Normal,Heavy Duty,Soak Cycle and My Cycle.
Wash Select to set a wash cycle only. Washer basket will fill, wash and drain.
Rinse Select to set a rinse cycle only. Washer basket will rinse and spin.
Spin Select to set a spin cycle only. Washer basket will spin.
7Delay Wash
You can delay the start of a wash cycle for 3–48 hours. Press the Delay Wash button to choose the number of hours
you want to delay the start of the cycle, then press the Start/Pause button. The machine will count down and start
automatically at the correct time.
NOTE: If you forget to fully close the lid, a reminder signal will beep reminding you to do so.
NOTE: If you open the lid when the delay is counting down, the machine will enter the pause state. You must close the lid and
press Start/Pause again in order to restart the countdown.
To cancel Delay Wash, press Power to restart.
8Start/Pause
Press to start a cycle. If the washer is running, pressing it once will pause the washer. Press again to restart the cycle.
NOTE: If the washer is paused and the cycle is not restarted within 15 minutes, the current cycle will be cancelled.
9Lock Controls
You can lock the controls to prevent any selections from being made. Controls can be locked or unlocked after you have
started a cycle.
To lock/unlock the washer, press and hold the Process and Cycles buttons for 3 seconds.
A sound is made to indicate the lock/unlock status.
10 Mute Signal
To turn the signal sounds on/off, press and hold the Deep Fill and Process buttons for 3 seconds.
11 Display
The display shows the approximate time remaining until the end of the cycle.
NOTE: The cycle time is affected by how long it takes the washer to fill. This depends on the water pressure in your home.
NOTE: If Delay Wash is set, Delay and the time remaining until the cycle starts will be shown before the remaining cycle
time is displayed.
7

8
Liquid Bleach
Dispenser
Bleach will automatically
dispense into the wash
basket
Washer features.
Features and appearance will vary throughout this manual
Powder Detergent
Dispenser Drawer
Detergent will automatically
dispense into the wash
basket
Fabric Softener
Dispenser
Fabric softener will
automatically dispense
into the wash basket
Wash Basket
Control Panel
Water Supply Hoses
Make sure hose
connections do not leak
Power Cord
Lint Filter
Clean the lint filter
as necessary.
Drain Hose and
U-Shaped Guide
Base

9
GEAppliances.com
Liquid Bleach
Dispenser
Powder Detergent Dispenser Drawer
Add powder detergent by pouring it in the
back center powder dispenser drawer. Most
detergent will immediately enter the basket.
Liquid detergent should be added directly to
the wash basket following the manufacturer’s
directions.
DO NOT put detergent packets in
dispenser compartments. Laundry
detergent packets should only be
added directly to the wash basket following
the manufacturer’s directions.
Powder Detergent
Dispenser Drawer
Fabric Softener Dispenser
Add liquid fabric softener by pouring it into the
left center fabric softener dispenser. The liquid
will be added at the optimum time in the rinse
cycle.
DO NOT put detergent packets in
dispenser compartments. Laundry
detergent packets should only be
added directly to the wash basket following
the manufacturer’s directions.
Liquid Softener
Dispenser
Liquid Bleach
Add liquid bleach by pouring it into the left front
liquid bleach dispenser. The water fill dilutes
liquid chlorine bleach as the washer fills for the
wash cycle.
1Check clothing care labels for special
instructions.
2Measure liquid bleach carefully, following
instructions on the bottle.
Never pour undiluted liquid chlorine
bleach directly onto clothes or into the
wash basket.
Do not pour powdered bleach into
bleach compartment.
3Before starting the washer, pour measured
amount of bleach directly into bleach
compartment. Avoid splashing or over-filling
dispenser. If you prefer to use powdered
bleach, add it into the wash basket with
your detergent.
Do not mix chlorine bleach with
ammonia or acids such as vinegar and/
or rust remover. Mixing can produce a
toxic gas which may cause death.
DO NOT put detergent packets in
dispenser compartments. Laundry
detergent packets should only be
added directly to the wash basket following
the manufacturer’s directions.
( )
( )
( )

Always follow fabric manufacturer’s care label when laundering.
Loading the Washer
Load dry items loosely in the washer basket. For
best results, load items evenly and loosely around
the outside of the basket. To add items after
washer has started, press Pause, lift the lid and
submerge additional items around the outside of
the basket. Close the lid and press Start to resume.
Do not place large items such as sheets, blankets
and towels across the infusor. Load them around
the outside of the basket.
Do not put lawn or sofa cushions into the washer
as they are too big to move. Remove outer covers
and ONLY wash them.
Proper Use of Detergent
Using too little or too much detergent is a
common cause of laundry problems.
Use less detergent if you have soft water, a
smaller load or a lightly soiled load.
For spots, apply pre-treatment to items as
recommended on the product label. Application
should be made in the basket to prevent overspray
which may cause the coloring on the lid or graphics
to fade.
GE Appliances recommends the use of High
Efficiency detergents in all Energy Star rated
washers. HE detergents are formulated to work
with low water wash and rinse systems. HE
detergents reduce the oversudsing problems
commonly associated with regular detergents.
When using high efficiency or concentrated
detergents, consult the product label to determine
amount required for optimum performance.
Excessive detergent will negatively impact wash
performance.
Sorting Wash Loads
Sort by color (whites, lights, colors), soil level,
fabric type (sturdy cottons, easy care, delicates) and whether the fabric produces lint (terry cloth,
chenille) or collects lint (velveteen, corduroy).
Loading and using the washer.
Average Small Load
Clothes Level
Water Level
Average Medium Load
Clothes Level
Water Level
Clothes Level
Water Level
Average Large Load
10
- Fire Hazard
WARNING
DO NOT wash fabrics soiled with flammable liquids or cleaning solvents.
No washer can completely remove oil.
DO NOT wash or dry anything that has been soaked in or spotted with any type of oil (including
cooking oils).
DO NOT reach into the washer until all moving parts have stopped.
Doing so can result in death, explosion, fire or amputation.

To clean the interior of the washer, select the
Basket Clean feature on the control panel.
This Basket Clean cycle should be performed,
at a minimum, once per month. This cycle
will use more water, in addition to bleach, to
control the rate at which soils and detergents
may accumulate in your washer.
NOTE: Read the instructions below
completely before starting the Basket Clean
cycle.
1. Remove any garments or objects from the
washer and ensure the washer basket is
empty.
2. Open the washer lid and pour one cup or
250 ml of liquid bleach or other washing
machine cleaner into the basket.
3. Close the lid and select the Basket Clean
cycle. Push the Start button.
4. When the Basket Clean cycle is working,
the display will show the estimated cycle
time remaining. The cycle will complete in
about 3 hours. Do not interrupt the cycle.
Basket Clean may be interrupted by pressing
the Start pad in between cycles. A power
outage in the house might also interrupt the
cycle. When the power supply is back, the
Basket Clean cycle resumes where it had
stopped. When interrupted, be sure to run a
complete Basket Clean cycle before using the
washer. If the Power pad is pressed during
Basket Clean, the cycle will be lost.
IMPORTANT:
Run Basket Clean with 1 Cup (250 ml) of
bleach once a month.
After the completion of a Basket Clean
cycle, the interior of your washer may
have a bleach smell.
It is recommended to run a light color load
after the Basket Clean cycle.
Pour into the
washer basket
Interior of the Washer
Care and cleaning. GEAppliances.com
Clean EVERY MONTH to remove any items
that may have been caught in the filter.
1. Remove the blue lint filters from the side of
the basket by unclipping.
2. Open the blue disc, remove all lint, rinse
and close.
3. Replace by snapping filter back into its
location in the washer basket.
Lint Filter
Push top down
and pull out
11

Care and cleaning.
Immediately wipe off any spills. Wipe with damp
cloth. Try not to hit surface with sharp objects.
Exterior of the Washer
Hoses connecting washer to faucet should be
replaced every 5 years.
Water Supply Hoses
Ask the service technician to remove water from
drain pump and hoses. Do not store the washer
where it will be exposed to the weather.
Moving and Storage
Be sure water supply is shut off at faucets. Drain
all water from hoses and water filter pump area
if weather will be below freezing.
Long Vacations
If the flow of entering water into the washer
is slow, the inlet water valve screen(s) may be
clogged.
Check and clean inlet valve screens EVERY
SIX MONTHS.
1. Turn off water valve(s).
2. Disconnect water hose(s) from the back of
the washer.
3. Remove the screen(s), clean with a brush
and replace.
4. Replace the hose(s).
5. Turn water valves on.
6. Check for leaks, tighten if necessary.
Inlet Water Valve Screen(s)
Clean EVERY MONTH to remove any items
that may have been caught in the filter or
housing.
1. At the bottom back of the washer, place
a towel or shallow pan on the floor under
the filter cap to catch any water that may
flow out.
2. Turn the filter cap counter-clockwise and
pull to remove. Water may begin to flow
out.
3. Remove any objects and lint from the
housing and filter.
4. Replace the filter by aligning its guide rib
with the housing rails, pushing all the way
in and turning clockwise to lock in place.
Pump Filter and Housing
Housing
rails
Filter
guide
rib
Housing
Filter
12
Clean EVERY MONTH to remove
any items that may have been
caught in the filter or housing.
Back

Installation
Washers
Instructions WSLP1500 and WSLS1500
If you have any questions, call GE Appliances at 800.GE.CARES (800.432.2737)
or visit our Website at: GEAppliances.com
In Canada, call 800.561.3344 or visit www.GEAppliances.ca
13
SPECIFICATIONS
Type Fully automatic
Basket capacity
2.6 cu. ft.
Electrical ratings
120V, 60Hz
Wash system Rotating drum
Outer dimensions 23 1/4” (W) x 23 7/8” (D) x 36 1/2” (H)
59.06cm (W) x 60.65cm (D) x 928mm (H)
Weight 90 1/2 lbs. (41kg)
445ø8” (113.35cm)
237ø8” (60.65cm)
Allowing for
adjustable feet
231ø4” (59.06cm)
36”- 47”
(91.45-119.38cm)
Standpipe
451ø4” (115cm) minimum height of
water valves to clear top of washer
Electricity supply
120V, 60Hz

DO NOT install or store this appliance in any location
where it could be exposed to water or weather.
Washer must be installed on firm flooring to minimize
vibration during spin cycles. Concrete flooring is best,
but wood base is sufficient providing floor support
meets FHA standards.
Washer should not be installed on rugs.
Install or store where it will not be exposed to
temperatures below freezing.
BEFORE YOU BEGIN
Read these instructions completely and carefully.
•IMPORTANT –Save these instructions
for local inspector’s use.
•IMPORTANT – Observe all governing
codes and ordinances.
• Note to Installer – Be sure to leave these
instructions with the Consumer.
• Note to Consumer – Keep these instructions
for future reference.
• Skill level – Installation of this appliance requires
basic mechanical skills.
• Completion time – 1 hour
• Proper installation is the responsibility of the
installer.
• Product failure due to improper installation is not
covered under the Warranty.
• Note – This appliance must be properly grounded,
and electrical service to the washer must conform
with local codes and ordinances and the latest
edition of the National Electrical Code, ANSI/NFPA 70.
WASHER LOCATION
•WATER PRESSURE³0XVWEHSVLPLQLPXPWR
150 p.s.i. maximum dynamic pressure measured at
faucet.
•WATER TEMPERATURE³+RXVHKROGZDWHUKHDWHU
should be set to deliver water at 120° to 135°F (49°
to 57°C) IN THE WASHER when HOT wash is selected.
•SHUT-OFF VALVES³%RWKKRWDQGFROGVKXWRII
valves (faucets) should be supplied.
•DRAIN³:DWHUPD\EHGUDLQHGLQWRDVWDQGSLSHRU
set tub. The discharge height MUST NOT BE LESS
THAN 30” nor more than 8’ above the base of the
washer. The standpipe must be 11ø2” minimum inside
diameter and must be open to the atmosphere.
PLUMBING
•Ensure washer is centered between the rack sides.
RACK INSTALLATION
This appliance must be supplied with the voltage and
frequency indicated on the rating plate (located on
the back of the washer) and connected to an
individual, properly grounded branch circuit, protected
by a 15- or 20-amp circuit breaker or time-delay fuse.
ELECTRICAL
Pliers
TOOLS REQUIRED
Water Hoses (2)
(Stationary models only)
PARTS SUPPLIED
Drain Hose
Installation Instructions
14
Uni-couple®Hose
(Portable models only)
Base Cover Kit

PORTABLE MODELS
Installation Instructions
ALL MODELS
MAKE SURE WASHER IS IN ITS FINAL
LOCATION AND ADJUST LEGS
•
ELECTRICAL REQUIREMENTS
Plug into a grounded 3-prong outlet.
DO NOT remove ground prong.
DO NOT use an adapter.
DO NOT use an extension cord.
Failure to follow these instructions can result in death,
fire or electrical shock.
CIRCUIT – Individual, properly polarized and grounded 15
or 20 amp circuit breaker or time-delay fuse.
POWER SUPPLY – 2 wire plus ground, 120 Volt, single
phase, 60 Hz, alternating current.
Outlet Receptacle – Properly grounded
3-prong receptacle to be located so the
power cord is accessible when the washer
is in an installed position. If a 2-prong
receptacle is present, it is the owner’s
responsibility to have a licensed electrician replace it with
a properly grounded 3-prong grounding type receptacle.
Washer must be electrically grounded in accordance with
local codes and ordinances, or in the absence of local codes,
in accordance with the NATIONAL ELECTRICAL CODE, ANSI/
NFPA NO. 70 latest edition. Check with a licensed electrician if
you are not sure that the washer is properly grounded.
If required by local codes, an external
18 gauge or larger copper ground wire
(not provided) may be added. Attach
to washer cabinet with a #8-18 x ½”
sheet metal screw (available at any
hardware store) to rear of washer.
Mobile Home Installation:
Installation must conform to Standard for Mobile Homes,
ANSI A119.1 and National Mobile Home Construction and
Safety Standards Act of 1974 (PL93-383).
GROUNDING INSTRUCTIONS
This appliance must be grounded. In the event of
malfunction or breakdown, grounding will reduce the risk
of electric shock by providing a path of least resistance
for electric current. This appliance is equipped with a
cord having an equipment- grounding conductor and
a grounding plug. The plug must be plugged into an
appropriate outlet that is properly installed and grounded
in accordance with all local codes and ordinances.
WARNING
Improper connection of the equipment-
grounding conductor can result in a risk
of electrical shock. Check with a qualified electrician, or
service representative or personnel, if you are in doubt as to
whether the appliance is properly grounded. DO NOT modify
the plug on the power supply cord. If it will not fit the outlet,
have a proper outlet installed by a qualified electrician.
15
FOR YOUR SAFETY
!
STATIONARY MODELS
Adjust the legs of the
washer by lifting up the
front of the unit and
rotating the legs clockwise
until the unit is level.
INSTALL FRONT LEG STOPPERS
•
To prevent the washer from “walking” during a spin
cycle, tilt the washer back slightly and insert the leg
stoppers under the front legs.
Leg stopper Caster
wheel
WARNING Before beginning the installation,
unplug the appliance or turn off the
circuit breaker. Pressing the Power button DOES NOT
disconnect power
.
If you did not receive a base cover with your purchase,
call 800.626.8774 to receive one at no cost. (In Canada, call
800.561.3344.) For installation instructions of the cover, visit:
www.GEAppliances.com. (In Canada, www.GEAppliances.ca.)
Base Cover
Kit Included
- Entanglement
WARNING
• A child or adult can become entangled and result in
serious injury.
• Install the base cover to the unit by sliding cover in
place and screwing into the unit.
• Failure to do so can result in serious injury.
- Electrical Shock Hazard
WARNING
Ensure
proper
ground exists
before use.
Attach
ground
wire
and
ground
screw
(obtain
locally)

Cable Tie
Cable Tie
Cable Tie
Laundry Tub
Stand Pipe
WARNING
:Make sure the washer is
unplugged.
Run some water from the hot and cold faucets
to flush the water lines and remove particles that
might clog up the water valve screens.
FLUSH WATER LINES
1
Installation Instructions
WASHER CONNECTIONS - STATIONARY MODEL WSLS1500
Connect the inlet hose ends to the HOT and COLD
water faucets tightly by hand, then tighten another
2ø3turn with pliers. Turn the water on and check for
leaks. Retighten if necessary.
CONNECT TO WATER LINES
2
CAREFULLY MOVE THE WASHER
TO ITS FINAL LOCATION
3
Form a U shape on the end of the drain hose with
the hose pointed toward the drain. Place the hose in
a laundry tub or stand pipe and secure it with a cable
tie (not included).
NOTE: If the drain hose is placed in a stand pipe
without forming a U shape, a siphoning action could
occur. There must be an air gap around the drain
hose. A snug hose fit can also cause a siphoning
action.
CONNECT DRAIN HOSE
4
PLUG THE POWER CORD INTO A
GROUNDED OUTLET
5
Ensure proper ground
exists before use
16

ALCOVE OR CLOSET INSTALLATION
60 sq. in.
(387.1 sq. cm)
60 sq. in.
(387.1 sq. cm)
Closet door
Installation Instructions
WASHER CONNECTIONS - STATIONARY MODEL WSLS1500
RUN THE WASHER THROUGH A
COMPLETE CYCLE
7
Check for water leaks and proper operation.
REMOVE THE PROTECTIVE FILM
COVERING THE CONTROL PANEL
8
It contains valuable and helpful information that will
save you time and money.
READ THE REST OF THIS OWNER’S
MANUAL
9
NOTE: If your washer does not operate, please
review the Before You Call For Service section.
• Minimum clearances between washer and adjacent
walls or other surfaces are: 1” top, 1” either side,
2” front (closet only) and 4” rear.
• Consideration must be given to provide adequate
clearance for installation and service.
• Closet doors must be louvered or otherwise ventilated
and have at least 60 square inches of open area. If the
closet contains both a washer and a dryer, doors must
contain a minimum of 120 square inches of open area.
INSTALLATION CHECKLIST
6
Before starting the washer, check to make sure:
Main power is turned on.
The washer is plugged in.
The water faucets are turned on.
The unit is level.
The drain hose is properly tied up.
There are no leaks at the faucet, drain line
or washer.
17

Uni-Coupler Hose
Faucet Connector
Drain Connection
COLD Water
Supply
Connector
Water Filter
Installation Instructions
REMOVE THE UNI-COUPLE®HOSE
FROM INSIDE THE WASHER BASKET
1
CONNECT TO WATER LINE
2
Use the hose connector provided with the washer for a
one-faucet connection.
TO CONNECT THE WASHER:
Attach the hose connector to the faucet adapter
by pulling down on the locking collar while lifting
up on the connector until it snaps into place.
Make sure the water filter provided is in place.
CONNECT TO VALVE INLET
3
Attach the COLD water supply connector to the
COLD water valve inlet (color BLUE). Make sure the
washer is inside the connector before tightening.
TIGHTEN CONNECTOR
4
Tighten the connector, ensuring the threads are
aligned properly for tightest fit. Inspect for kinks
or binding of the hose.
CONNECT DRAIN HOSE
5
Attach the drain hose to the rear of the washer.
Install the clamp on the drain hose and tighten to
prevent leakage of water.
18
WASHER CONNECTIONS FOR PORTABLE MODEL
:6/3³21()$8&(7&211(&7,216
Hose Connector
Locking Collar
Faucet Adapter
Lift up
and
lock on
Pull
down
Attach to
COLD/BLUE
Tighten
Attach and clamp
drain hose

Ensure proper ground
exists before use
Installation Instructions
WASHER CONNECTIONS FOR PORTABLE MODEL
:6/3³21()$8&(7&211(&7,216&217
MAKE SURE THE TEMPERATURE
SELECTOR IS SET AT COLD
6
SLOWLY TURN ON THE WATER
FAUCET ALL THE WAY TO THE
DESIRED TEMPERATURE SETTING
7
PLUG THE POWER CORD INTO A
3-PRONG GROUNDED OUTLET
8
The electrical power cord is on the back of the
washer.
REMOVE THE PROTECTIVE FILM
COVERING THE CONTROL PANEL
9
INSTALLATION CHECKLIST
10
Before starting the washer, check to make sure:
Main power is turned on.
The washer is plugged in.
The water faucets are turned on.
The unit is level.
There are no leaks at the faucet, drain line
or washer.
19

TO DISCONNECT THE WASHER:
Hose Connector
Water
Flow
Button
TURN WATER FAUCET OFF
1
UNPLUG POWER CORD AND
RETURN IT TO THE STORAGE AREA
2
PRESS THE RED WATER FLOW
BUTTON TO RELEASE THE WATER
PRESSURE
3
DISCONNECT FROM WATER LINE
4
Installation Instructions
Move the locking collar down and pull the hose
connector down to disengage from the faucet
adapter.
DRAIN WATER
5
Drain water from the hoses through the
hose connector.
20
Hose Connector
Locking Collar
Pull
down
This manual suits for next models
3
Table of contents
Languages:
Other GE Washer manuals

GE
GE GTWN5450D User manual

GE
GE Profile WPGT9350 How to use

GE
GE WWA7304V Installation instructions

GE
GE WWA7010G User manual

GE
GE Appliances GTWN3000M1WS User manual

GE
GE GTW302BMP Original instructions

GE
GE WCVH4815KMS Assembly instructions

GE
GE WMXR3080T User manual

GE
GE WA5800R User manual

GE
GE GTWN3000M Manual