Geemarc HP5990A User manual

HP5990A, HP5990, HP5990J, HP5990AJ
!!!Please ensure you read the user manual
thoroughly before use!!!
900MHz Wireless Headphone
English
Contents

1
!!!Please refer to our website: www.geemarc.com
for an up to date user guide, as there may be
important updates and changes you need to be
aware of!!!
INTRODUCTION ......................................................... 3
SAFETY & CARE ADVICE ............................... 4
PACK COMPONENTS ................................................ 5
FUNCTION IDENTIFICATION ..................................... 6
● Function Identification: Headset Receiver ............... 6
● Function Identification: Charging Cradle ................. 7
INSTALLATION .......................................................... 8
● Transmitter .............................................................. 8
● Headset .................................................................. 9
OPERATION ............................................................... 10
● Initial Operation ....................................................... 10
●Routine Operation ................................................... 11
●Improving Sound by Switching Channels .................. 12
●Controlling the Tone (Bass & Treble) ...................... 13
●Adjusting the Sound Balance (left-right) .................. 14
●Using the Mute Button and Microphone for
Conversation ........................................................... 14
●Charging the Battery ............................................... 15
TECHNICAL SPECIFICATIONS ................................. 17

2
TROUBLESHOOTING ....................................... 18
● No Sound ................................................................ 18
●Distortion ................................................................. 18
Cleaning & Maintenance ........................................... 19
Spare/replacement parts ........................................... 19
Customer support ...................................................... 19
GUARANTEE .............................................................. 20
CE DECLARATION ..................................................... 20
BATTERY WARNINGS ..................................... 21
DISPOSAL INFORMATION ........................................ 21
INTRODUCTION
Contents
INTRODUCTION

3
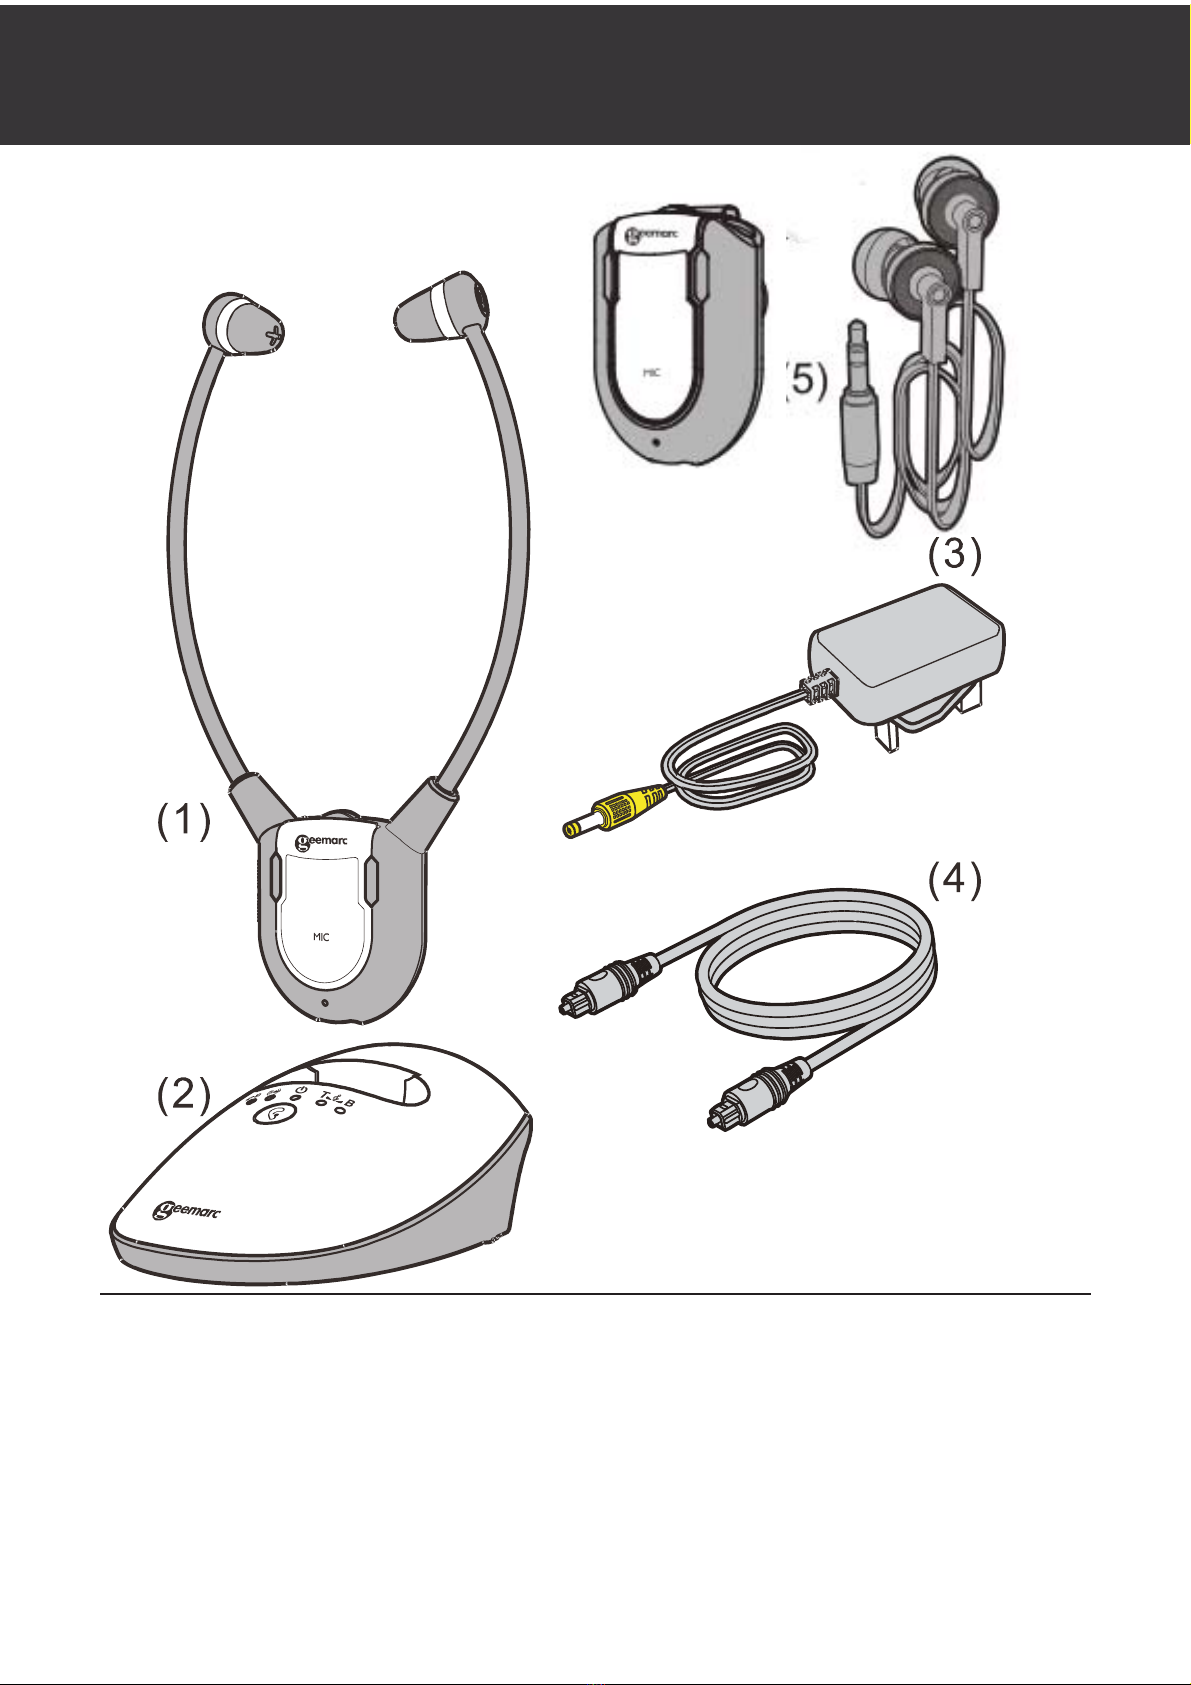
The Geemarc Wireless Audio Listener is an audio amplification
system specifically designed for people with hearing difficulties.
The Geemarc Audio Listener can be used with all kinds of audio
systems for interference-free listening enjoyment – TV set,
Smartphone, DVD player, CD player, Hi-Fi system, iPod or
other.
Audio output from a TV or audio device is transmitted by the
Charging Cradle, the wireless Headset receives the signal and
amplifies the audio sound for the listener.
● The listener’s comfort and long-term enjoyment has been built
into every feature of the Geemarc Wireless Audio Listener:
● Lightweight wireless headset fitted with soft silicone ear buds
for prolonged listening comfort;
● Rich, adjustable audio quality:
o Broad audio bandwidth;
o Adjustable bass, treble and balance to compensate for
hearing loss.
● Up to 60 meters transmit-receive range keeps you within
hearing distance all over the house and garden;
● Auto-tune button on your headset – tune in for the best sound
exactly where you are;
● Listen but keep in touch with your surroundings:
o Multiple Headsets can be paired with one Charging Cradle;
o Single-touch Mute function switches the Audio Listener into
a conversation assistant enabling you to talk with and listen
to the people around you with the Headset on, taking
advantage of its built-in audio amplifier to hear everything
better.
● Up to 6 hours of rechargeable battery life per full charge –
never lose the soundtrack in mid-program;
● Only 3 hours to fully recharge the Headset simply by replacing
the Headset in its Charging Cradle.

4
SAFETY & CARE ADVICE
To make the best use of this product and to use it safely, please
read these instructions thoroughly before use and keep safe for
future reference.
Warning: This product can be very loud. Take care to prevent
others from using this product, if they do not have the same level
of hearing loss. Excessive sound pressure from earphones and
headphones can cause hearing loss.
Caution: Electric shock. DO NOT insert unattached plug heads
in to mains power sockets. Plug heads MUST be fitted to the
power adaptor.
Electrical connection: The unit is designed to operate from a
100-240VAC - 50/60Hz supply. (Classified as 'hazardous voltage'
according to EN 60650 standard).
Caution: Batteries should only be replaced by Geemarc or
authorised Vendor. Please refer to the chapter:
<Spare / replacement parts> for more information.
Keep the unit away from heat sources.
DO NOT expose the unit to direct sunlight.
Do not expose the Headset, which contains batteries, to excessive
heat such as sunshine, fire etc.
Clean the Headset and ear pads regularly. For details on cleaning,
please refer to the chapter: <Clearning & Maintenance>.
DO NOT modify the unit in any way.
Please note: The unit may be subject to interference from
appliances that generate strong electrical or magnetic fields e.g.
wireless Internet routers, microwaves, mobile phones, lighting
transformers etc. To avoid this interference, place the Charging
Cradle unit away from such sources.
SAFETY & CARE ADVICE

5
PACK
COMPONENTS
(1) Headset Receiver/TV Receiver(with Belt Clip)
(2) Charging Cradle and Transmitter
(3) Power Supply
(4) Optical Cable
(5) Ear Phone
PACK COMPONENTS

6
FUNCTION IDENTIFICATION
Function Identification: Headset Receiver
FRONT REAR
(1) Earbuds
(2) Volume Control
(3) Power/Signal LED Indicator
FUNCTION IDENTIFICATION

7
(4) Mute Button for Verbal Communications
(5) Microphone
(6) Auto Tune Button for Frequency Channel
(7) Sound Balance Control
(8) Power On/Off Switch
(9) Battery Contact
Function Identification: Charging Cradle
FUNCTION IDENTIFICATION

8
FRONT REAR
(1) Charging Pins
(2) Tone Adjustment
(3) LED Indicator: Battery Charge (Red = charging, Green =
fully charged)
(4) LED Indicator (Green): Audio Signal
(5) LED Indicator (Green): Power
(6) LED Indicator (Yellow): Treble enhanced
(7) LED Indicator (Blue): Bass enhanced
(8) Audio In
(9) Frequency Channel Selector (CH1 or CH2)
(10) Optical In Socket
(11) Power ON/OFF
(12) DC In Socket
INSTALLATION

9
Transmitter
(1) Connect the Power Supply to the DC IN Socket located on
the Charge Cradle rear panel.
(2) Connect the Power Supply to an electricity socket (100-
240V ~ 50/60Hz).
The green Power Indicator LED will glow immediately.
(3) Connect one end of the Optical Cable to the rear panel of
the Charge Cradle.
(4) Connect the other end of the Optical Cable to your Audio
Source (e.g. TV set, Hi-Fi system) with Optical Ouput.
(5) Accessories for items (5) and (6) in above drawing are not
provided in the pack components.
(6) If your Audio Source does not have an optical socket, then
use one of the following Adapters(not provided in the pack
INSTALLATION INSTALLATION
INSTALLATION

10
components) that connects to the Audio In of the
Transmitter.
• 3.5mm to 3.5mm Audio Cable
• 3.5mm to 6.3mm Adapter Plug
• RCA Adapter Cable
• SCART Adapter
(7) On the rear panel of the Charging Cradle, switch the
Power ON/OFF Switch to ON.
When the audio signal is detected from the Audio Source, the
Green LED Signal Indicator will glow constantly.
Headset
Make sure the built-in Battery inside the Headset is fully
charged for the first use – see Initial Operation below.
OPERATION
OPERATION

11
Initial Operation
1. Make sure the CL7350 is plugged into the electricity.
2. Switch ON the CL7350 – on
the rear of the Charging
Cradle (see figure (1) at right).
3. Place the Headset in the
Charging Cradle for at least
three hours to allow it to fully
charge.
• Make sure the Headset is
switched OFF (see figure (2)
at right).
• The LED Indicator glows
red during charging.
• It will glow in green after the
battery is fully charged (see
figure (3) at right).
4. After the three hours have
passed and the charging
LED has turned green, you
can proceed to the Routine
Operation.
Routine Operation

12
1. Switch on the Audio Source (TV set or audio device) that
the Transmitter is connected
to. The Signal LED Indicator
will glow continuously (see
figure (4) at right).
2. On the Headset Receiver,
switch the ON the On/Off
Switch (see figure (5) at right).
The green signal LED
Indicator will glow
continuously.
3. Adjust the Volume to the
desired sound level (see
figure (6) at right), then fit the
Earbuds in your ears.
NOTE: Make sure the volume
on your Audio Source (TV set
or other audio device) is turned
up to at least half of its full
volume to get good sound
quality in your Earbuds.
Improving Sound by Switching Channels
OPERATION OPERATION

13
The CL7350 can transmit on either of two built-in frequency
channels. You can select the channel that will produce better
audio quality.
1. If the audio sound is distorted or unclear, press the Auto
Tune Button on the Headset
Receiver (see figure (7) at
right), to match the frequency
of Channel 1 or Channel 2
set at the back of Transmitter.
Allow a few seconds for the
audio to resume.
2. If this does not help, switch
the channel selector on the
rear of the Charging Cradle
(see figure (8) at right) and
see if the audio quality has
improved.
3. Press the Auto Tune button
again to improve the quality
still further.
NOTE: The Transmitter will turn
off automatically about 5 minutes if there is no audio signal
from the audio source (TV set, etc.), or the signal from the
audio source is too weak for proper reception. However, if the
audio signal returns to an acceptable level, the transmission
will automatically restart.
Controlling the Tone (Bass & Treble)
OPERATION

14
You can adjust the tone of the audio you are listening to and
enhance your listening pleasure by amplifying either the
Treble or the Bass in the Headset Receiver.
Press the Tone Clarity Button to switch cyclically
between :
1. Enhanced treble (yellow LED glows ),
2. Enhanced bass (blue LED glows ), or
3. Flat tone (bass and treble equally enhanced, no LEDs
glowing ).
Adjusting the Sound Balance (left-right)
OPERATION

15
You can adjust the sound to suit your hearing in each ear.
With the Headset on, rotate the
Sound Balance button (see
figure (10) at right) to adjust the
sound – you will notice that the
sound seems to “drift” from one
side to the other. Play with this
button until you find your most
pleasant sound balance.
Using the Mute Button and Microphone for Conversation
You can switch from Listening mode to Conversation mode
without having to take off the Headset.
To talk or listen to someone :
1. Press the Mute button (see figure (11) at right). This will
shut off the Audio Source and the Headset will become an
amplifier by activating the
Microphone.
2. To resume listening to your
audio device, press the Mute
button again. The
microphone will be shut off
and the audio will resume.
Charging the Battery
Mute
Button
Microphone
OPERATION

16
1. The signal LED Indicator on the Headset Receiver will blink
slowly when the battery level
is low. At this stage there are
about 20 minutes of
operating time before the
Headset will switch off.
Recharge the battery.
2. Switch OFF the On/Off
Switch on the Headset (see
figure (12) at right). The
green LED on the Headset
should turn off.
3. Place the Headphone on the
Charging Cradle (see figure
(13) at right), make sure the
charge contact touches the
charge pins on the Charging
Cradle.
4. The Charging process starts
automatically.
• The LED Indicator glows red during charging.
• It will glow in green after the battery is fully charged.
WARNING:
The battery must not be exposed to excessive heat such as
sunshine, fire etc.
Do not attempt to replace the original rechargeable battery.
When the headphones are not in use, move the switch to the
OFF position to avoid damaging the batteries.
The battery must always be fully charged before first use.
An initial 3 hours charge is required to guarantee an
OPERATION

17
acceptable service life for the rechargeable battery. Always
ensure that the Headphone Receiver is switched to OFF
position while the battery are charging.
Excessive sound pressure from earphones and headphones
can cause hearing loss.
IMPORTANT:
This unit should be operated with built-in rechargeable battery
only. When replacing the battery or when disposing of the unit,
always comply with applicable laws relating to the disposal of
battery. Please place them in a proper disposal container to
ensure that they are eliminated safely and in an
environmentally friendly way.
TECHNICAL SPECIFICATIONS

18
Battery operating Time
: Up to 6 Hours
Range
: Up to 60 meters (CL7350_VDE)
: Up to 30 meters (CL7350_US)
Frequency response
: 30 Hz
– 10K Hz
Signal
-to-noise ratio
: >65 dB
Distortion
: <2%
Headset weight
: 58 grams
Operating voltage
: Charging Cradle: 8V, 400mA
: Headset: 3.7V, 350mA Lithium
Polymer Battery
Transmission mode
: UHF Stereo
Carrier frequency
: 863MHz (CL7350_VDE)
: 900MHz (CL7350_US)
TROUBLESHOOTING
TROUBLESHOOTING

19
No Sound
● Ensure the power supply is properly plugged into the electricity
socket and that its cable is properly connected to the DC IN
connector on the Charge Cradle.
● Ensure that the Headset Power ON/OFF switch is switched ON.
● Check the state of the Battery charging in the Headset – place it
in the Charge Cradle and recharge the battery until the Battery
Charge LED turns green.
● Ensure that the TV set, Hi-Fi system or audio component is
switched ON and set to a channel that broadcasts an audio
signal.
● Ensure that the volume on the connected audio component is
turned up to at least half its full volume.
● The connected audio/video equipment may not be in playback
mode. Start playback on by the equipment.
● Use the Volume Control on the Headset to turn up the volume.
● Check whether the Headset volume level is set too low. Adjust
the volume to a suitable level.
● If the sound is not clear and distorted, change the frequency
Channel selection on the back of the Charge Cradle, and then
press the Auto Tune Button on the Headset Receiver for better
reception.
Distortion
● The battery inside Headset may need charging. Recharge the
battery.
● The Headset may be too far away from the transmitter inside
the Charge Cradle. Bring them closer together.
● The audio signal input level from the audio source is too low.
Increase the volume at the audio source.
● If the sound is not clear and distorted, change the frequency
Channel on the back of the Charge Cradle, and then press the
Auto Tune Button on the Headset for better reception.
Cleaning & Maintenance
Cleaning & Maintenance .
Spare/replacement parts . Customer support
This manual suits for next models
3
Table of contents
Other Geemarc Wireless Headphones manuals