manuals.online logo
Brands
  1. Home
  2. •
  3. Brands
  4. •
  5. GEMY
  6. •
  7. Hot Tub
  8. •
  9. GEMY G9082 User manual

GEMY G9082 User manual

Contents
Profile
Installing preparation and attention
Step of installation
Adjustment.
Must be executed
Attention
Maintenance
Using skill
Basic circuit of massage bath tub
Technical parameters
Remote Controller
Computer panel use guide
ManualOperation
Failure solution
Page 1
Page 9
Page 7
Page 8
Page 7
Page 5
Page 4
Page 4
Page 3
Page 3
Page 3
Page 2
Page 2
Page 1
Page 6
Control Panel
MASSAGE BATHTUB SERIES
USER MANUALUSER MANUAL
Make your life be classicalMake your life be classical
1.Fitting installation: Open the packing first and take out the bathtub,then install all the fittings.
2.Level test: First,place the massage bathtub at installation point,then check wh ether it is
level by visual test.Second,let proper water in then drain it out, in order to check
whether it is at the best state of draining
4. The power plug,the cold-hot water pipe connection and the drainage should be got ready
in advance according to the electrical instruction picture (see following chart).
5. Check whether all the accessory are in order before installation,and be free to contact us
if there is any problem
6. Please prepare the hammer,spanner,screwdriver,multimeter and so on before
installation
7. Be careful as far as possible during the installation process,avoiding the sharp and hard
object fall straight down to hit or scratch the surface to cause unnecessary loss.
SSWW
Steps of installation
3. Foo t a dju stm ent :
Adjust the support foot
untill it is horizontal.
5.Drainage installation:
Install the drainage at the
tub bot t om first, then
connect it to the drain
outlet.Please make sure
th e d r ai n p ip e i s n ot
flexed .
4. Cold-hot water pipe
connection: Move the
bathtub slightly toward
outside, then install the
w a t e r p i p l e w i t h
“Cold” or “Hot” mark
at the corresponding
position.
6.Power connection:
U s e mul t i mete r t o c h eck
whether the ground wire in
power plug is connect well with
the pump surface and support
rack, then connect the yellow
and g reen w ire with eart h
.Finally,insert the plug into
socket.
SSWW
Profile
3SSWW
Installing preparation and attention
1. be
。
2.
。
3.
。
The installation space should larger than the product size (see following chart).
Please leave proper space in order to install or maintain conveniently
The floor should be level,the wall should be essential vertical , and the wall corner
Should be 90 degree
The floor should be level and firm(eg. Cement,tile floor) so that the bathtub foot can
contact the floor evenly
Page 1
Dear customer:
Thank you for using our massage bathtub.This product series we designed is characterized
by its superior material,neat style,comfortable,practical and economical.It is the new
generation of leisure product,and it will bring you great relaxation and pleasure bath.
Please check whether the spare parts in order according to the overall chart after opening
the packing,and analyze the product structure and installation position of accessory,then
start the installation according to the following instruction.
You are welcome to visit our website www.gemy.cn if there is any question.
15 25
15 2 5
720
11 90
700
72 0
650
2155
排水口
900
070
40 0
&05
40 0
11 09
Power
o wa eH t t r
l erCoo wat
&50
7. Installation completion: Push the bathtub to installation position after checking
everything is ok,then place the silicon glue along the gap between the wall and bathtub
edge. The installation procedure is complete here.
SSWW
Adjustment.
1. First,turn on the cold water valve after the silicon glue is dry,then adjust the hot water
valve until the mixed water with proper temperature. Second,twist the water separatering
valve to the shower function,then adjust the portable shower ,to let the water in and clean
the bathtub.
r eD ain r
http://www.gemy.cn
Page 2
http://www.gemy.cn
1. It is easy to slip because of the soap water in bathtub,please be careful.
2. Please pay attention to enter bathtub so as not to stumble.
3. Make sure the water reach the proper position when start the water pump.
4. Turn on the cold water valve first when let the water in or use the portable
shower,then adjust the hot water valve until the water with appropriate
temperature ,so as not to be scalded .
5. Let appropriate water in to clean the bathtub,in order to use conveniently next
Time.
6. Please turn off the water valve and draw the plug out, if you will not use the
bathtub for long time .
Warning Warning
3SSW W 
务必执行
SSWW
Must be executed
SSWW
Attention
1. Please don't hit or scratch the bathtub with hard object.
2. Water will leak if the silicon glue desquamate,please make it up once it fall off.
3. Don't use chemical such as acid,alkali,drugs(eg.Hydrochloric acid),solvents
etc.,To clean the bathtub.Because the chamical mentioned above is bad
for health.
SSWW
Maintenance
1. Preheat the bathtub with warm water (18-20°C) before using, if the room temperature is
too low.Please do not let hot water (more than 50°C) hit bathtub directly。Drain the water
completely after using,then wipe the bathtub up with soft cloth . Make sure there is no waer
left in the bathtub, because the left water may freeze
2. If the bathtub is slightly dirty,please use soft cloth or sponge with neutral cleanser to
clean. Don't clean the bathtub with nylon product,because it will reduce luster of
acrylic.Clean the dirt with flannelette which smeared with toothpaste .The detergent such as
acetone,ammonia water and the organic solvent are forbidden to clean the bathtub. Don't
sterilize the bathtub with formic acid and druggery includes formic acid, otherwise it will
damage the bathtub surface
3. Maintenance of gold-plating accessory: Wipe the gold-plating accessory up lightly with
flannelette,should not try with rough cloth
4. Wipe the bathtub with NO2000 sanding paper when it is scratched, then polish it with
flannelette and toothpaste
.This product must be installed by the qualified person.
2.The equipotential connection of this product must be jointed In the
right way on floor.
3.The wire should be connected with the fixed wiring unit.
4.The wire should be connected with leakage protector and earth wire
unit. (Rated current >20 A ; Rated leakage protector current
≤30mA) .
5.Make sure that the supply voltage is compatible with the rated voltage
before using.
6.No one should get close to the steam box.
7.Never use other shower functions during steaming process.
8.The person after drinking, or taking sleeping medicine are not allowed
to use this product. Hypertensive patient, patient with heart disease
And epileptic are not allowed to use this product.
9.Children must be guided to use this product with parent.
The whole test procedure is complete here.Please read the security attention
carefully before using the product,in order to avoid unnecessary damage or
loss.Keep the instruction well for subsequent reference after reading.
40 m m40 m m
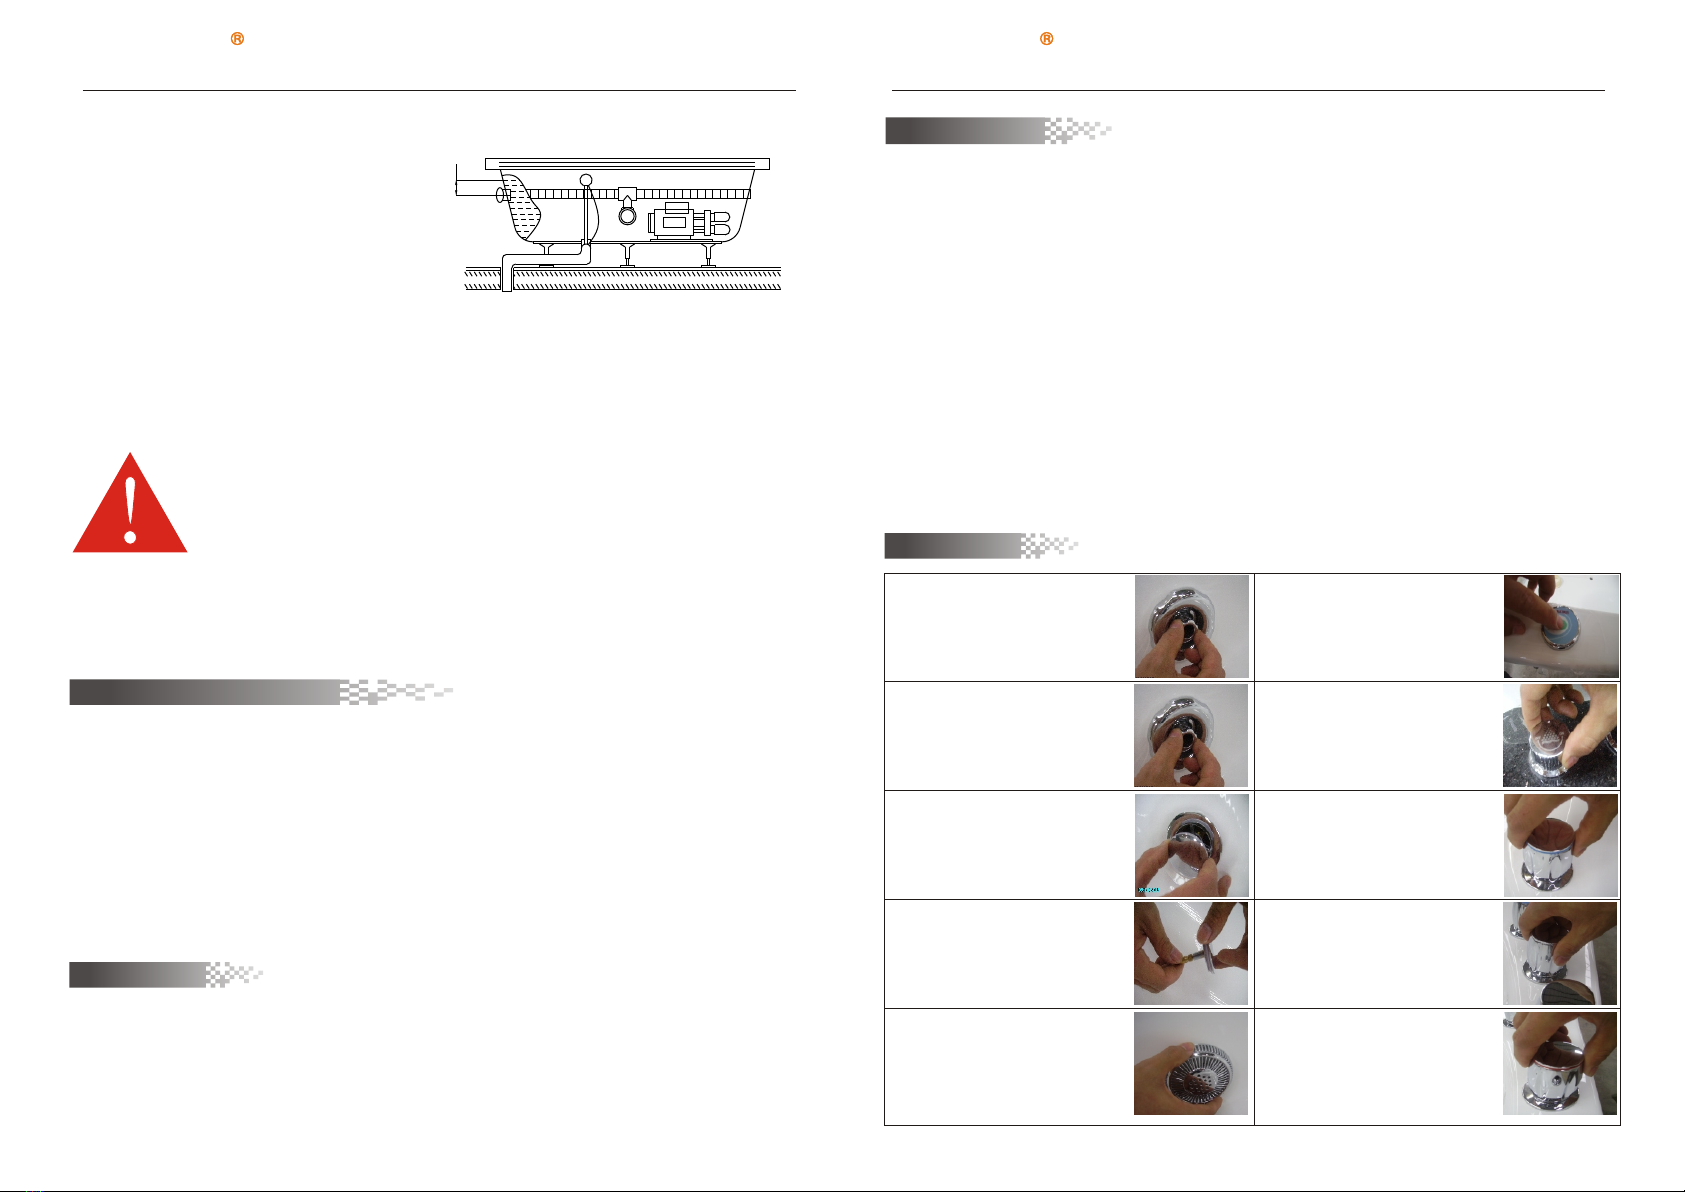
2.When the water level reach a
proper position,then start the water
pump,adjust the water nozzle,check
whether the water pump works well
and water leaks or not.
SSWW
Using skill
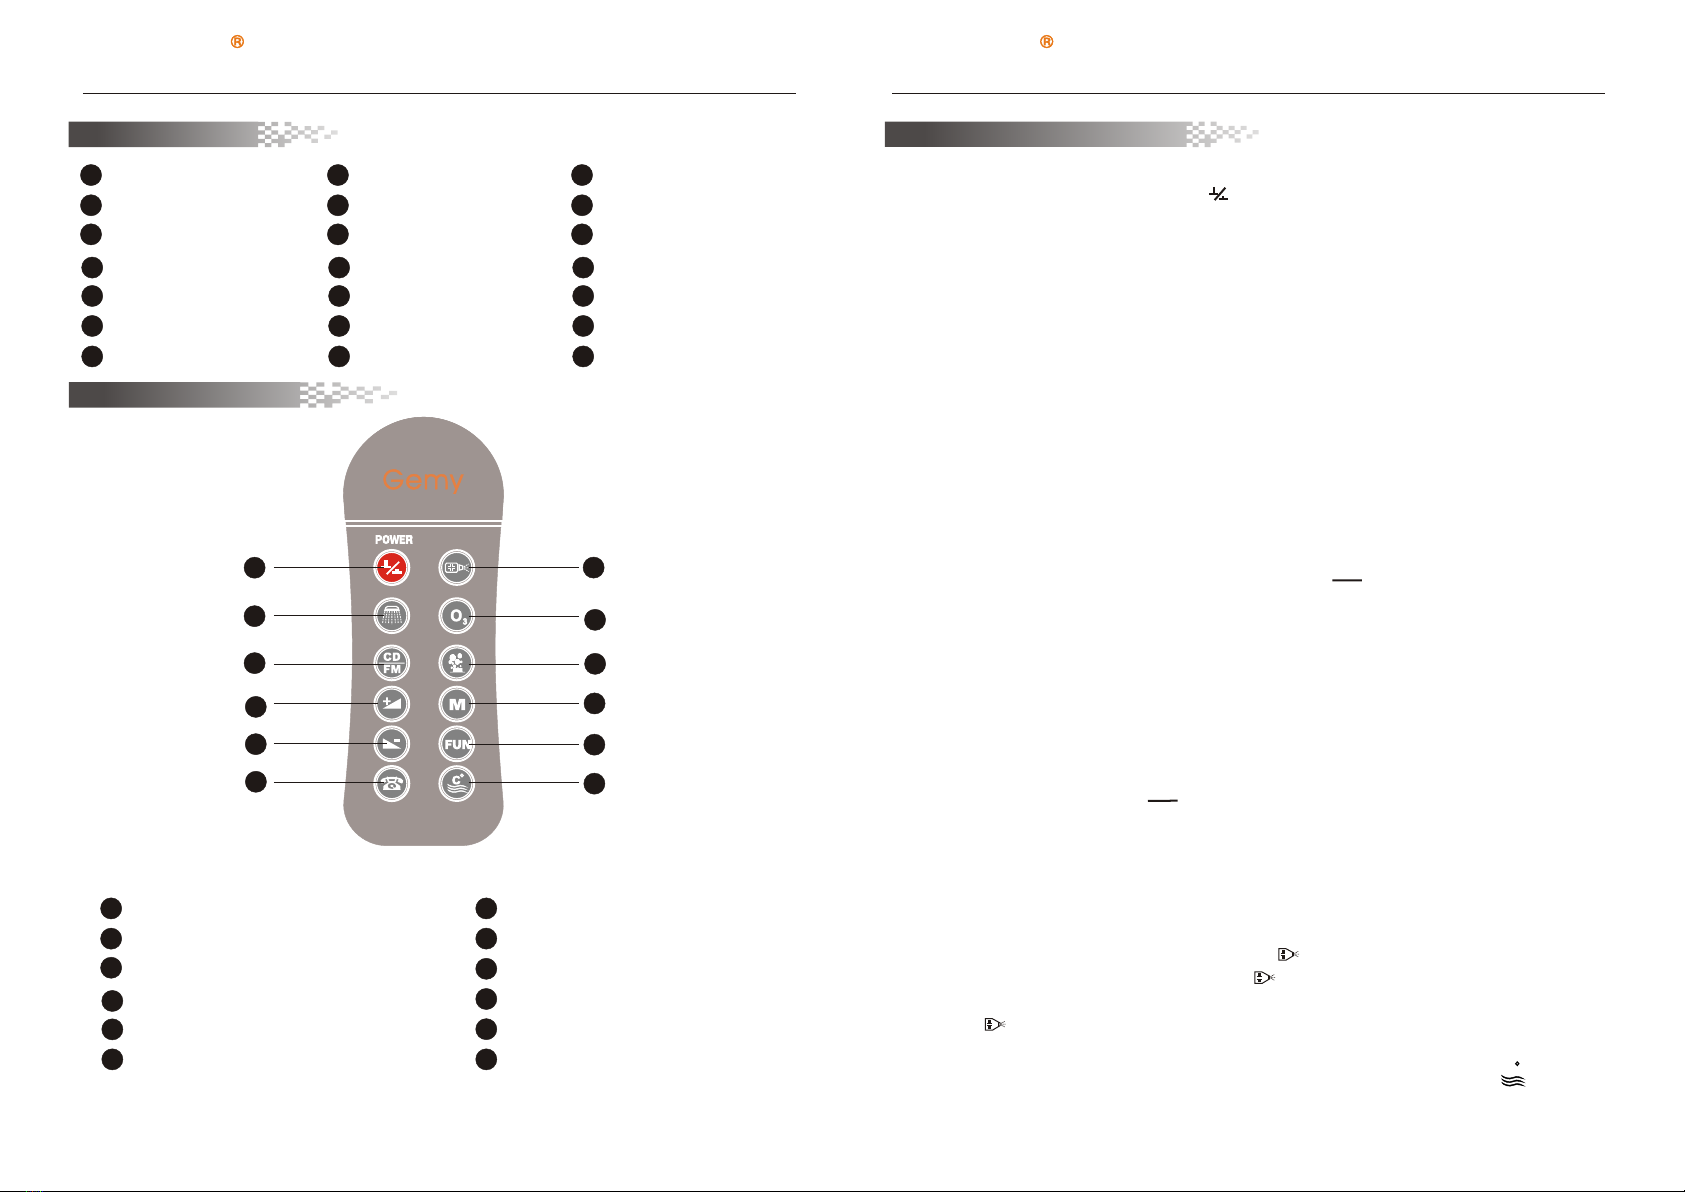
1. water output adjustment:
Rotate the water nozzle deasil
to adjust its water output.
2. Direction adjustment of
water output: Move the water
nozzle toward the directions
you like.
3. Sundries cleaning of
drainage: Take off the cover
to clean away sundries under
the drainage.
4. Drainage adjustment:
Adjust the copper screw of
water plug to control the
drainage volume.
5. Sundries cleaning of water
circulation cover: Rotate the
cover clockwise to take it
off,then screw it on after
cleaning.
6. Motor start: Press the
air switch to let the massage
pump on or off.
7. M a s s a g e i n t e n s i t y
adjustment: Twist the air
switch to adjust the massage
intensity.
8 . C o l d w a t e r v a l v e
adjustment: Twist the cold
w a t e r v a l v e t o r e g u l a t e
output volume .
10. H o t w a t e r v a l v e
adjustment: Twist the valve
to adjust hot water output of
portable shower and water
infall,also with function of
temperature adjustment.
9. Water separating valve:
Twist the valve to switch the
function of portable shower
and water infall.
Page 3Page 4
http://www.gemy.cn http://www.gemy.cn
SSWW
Using skill
11. Portable shower adjustment. Hold
the portable shower pole,then twist the
shower head to adjust the volume of
water output .There are many kinds of
shower function .
L
N
E
(YELLOW GREEN)
ML
TR
S
Basic circuit of massage bath tub
Rate d Volta ge
Working co ndition s and chara c teristi cs
AC220V
Rate d current
Rate d frequency
Rate d Power
Insulatio n Resista nce Waterpro of grades
Load category
Rated lo ad volta ge
Wind Pump
Rated load frequency
Load confi guratio n paramet e rs
Rated lo ad power
AC22 0V
1.1KW
Oth er
1.3KW
50Hz
IPX5
6A
>20M
Pump AC22 0V
200W
Ozone
Waterf all
Underwate r li ghts
AC12 V
AC12 V
DC12V
8W
5W
15W
SSWW
Technical parameters
BH238A1 Directions for use
RadioRadio
MM
POWERPOWER
OO
33
FU NFU N
1
2
3
4
5
6
7
8
9
10
1.Power on/off
2.O z o ne on/o f f
3.P r e ss the ke y t o turn down the
frequency
/V o l ume of ra d io
4.R a d io on/o f f
5.Radio frequency /volume
6.D y n amic la t ticeli q uid cry s tal
di s p lay scr e en
7.P u m p on/of f
8.A i r p ump on/ o ff
9.M a k e selec t ion the channel
10.P r ess the ke y t o turn up t h e
 
Ra d i oRa d i o
OO
33
TUNET U N E
TUNET U N E MEMMEM
AUTO M A TIC WH R L P OOL SY S T EMAUTO M A TIC WH R L P OOL SY S T EM
BH308A1 Directions for use
1
2
3
4
5
6
7
8
9
10
11
3SS W W 
Computer panel use guide
Dear customer, choose the different computer panel according to you the product, your
computer control panel possibly is one of these two panels below (the following chart
shows). Because its application method is approximately the same, now take BH128JHF for
example to introduce operating instructions.
1.D y n amic la t ticeli q uid cry s tal disp l ay
screen
2.P r e ss the ke y t o turn down the vo l ume
of r a d io
3.P r e ss the ke y t o turn down the
frequency of radio
4.P o w er on/o f f
5.P r e ss the ke y t o turn up the freq u ency
of r a d io
6.M a k e selec t ion the cha n nel
7.P r e ss the ke y t o turn up the volu m e of
radio
8.R a d io on/o f f
BH128JHF D irec tions f or use
M
12
7
8
10
11
FM
CD
CH
MHz
MAX
M I N
AF
D
B
E
9
C
1
2
3
4
5
6
G
13
H
-+
FUN
C
Page 5 Page 6
http://www.gemy.cn http://www.gemy.cn
CDCD
FMFM
4、 Speaker
Under the state system, presses the panel or remote panel key first to open radio
function, the LCD screen shows the current frequency of radio, under radio mode; click
FUN Key of the panel or a remote panel, opening FM automatic search broadcasting, click
p or q Key of panel or remote panel to carry out manual broadcasting; press p or q Key
of panel or remote panel for half second, can upward or downward automatically search
broadcasting; When received the broadcasting, presses M Key for 2 seconds that could save
the current station frequency on the broadcasting, the FM channel switching system into the
state when click FUN Key twice, click p or q key to turn upward or downward for manual
switching channels; channel range of 1-8. Click FUN Key Third time, the state entered
thermostats regulate temperature. Click this key again, adjust the volume state.
Click the panel or a remote panel second time, the system switch CD input states, the
LCD screens shows the words of CD, click this Key again to turn off the speaker function.
3SSWW
Fu nc ti on S wi tc h
Wa te rf al l Co nt ro l
1
2
Wa te r Pu mp O n/ Of f
3
Wa te r Th er mo st at O n/ Of f
4
5
FM C ha nn el S wi tc h & St or e
6
7
8
LC D Sc re en
13
A
On / O ff
FM /CD
Vo lu me / F un ct io n Ad ju st
Do wn K ey
Vo lu me / F un ct io n Ad ju st
Up K ey
B
C
D
Fu nc ti on V al ue D is pl ay
Vo lu me V al ue D is pl ay
F
Wa te r Pu mp S ta tu s
9
12
Ai r pu mp o n/ of f
10
E
Re mo te C on tr ol R ec ei ve
Wi nd ow
Ozone on/off
11
H
Wa te r Th er mo st at S ta tu s
G
SSWW
Remote Controller
SSWW
Control Panel
Te le ph on e
Ai r Pu mp S ta tu s
light status
Oz on e St at us
1
2
3
4
5
6
7
8
9
12
10
11
1
2
3
4
5
6
7
8
9
12
10
11
On/Off
Wa t e rfall C o ntrol
CD /FM
Vo l u me / Func t ion Adju s t Up key
Vo l u me / Func t ion Adju s t Down Ke y
Telephone
Water Pump On/Off
Oz o n e on/of f
Ai r p u mp on/o f f
FM C h a nnel Sw i tch & Stor e
Function Switch
Wa t e r Therm o stat On/ O ff
Manual Operation
2、underwater lamp/backlight lamp
In the state of running, Switch on any function of motor and air bubble bath to start the
underwater lamp / back light lamp. When surfing and motor function and air bubble bath are
both closed, underwater lamp / backlight lamp is closed. When being lack of water, air pumps
works for 15 minutes, during this time, underwater lamp / back light lamp can not be turned
on.
1、Turn on/off:
In the state of electricity being on, press Key of the panel or remote panel, the system
start, and 1- hour later shutdown function, open all functional operations, the screen shows
room temperature with yellow green light. Click here to re-key or time executing shutdown
operations to close all open functions.
3、Telephone
Under the of running, when a phone is called in, the phone rings and temporarily close the
audio functions. Press ( button of the panel or remote panel ring to stop, listen to the state
by telephone, LCD screen shows TEL words, and temporarily close the pumps, air pumps,
and other functions. After the phone call , press this Key to hung up, and automatically
restore the original functions.
CDCD
FMFM
5、 Volume adjustmen
6、Motor massage function(water motor)
Under the state system open and water full, press Key of panel or remote panel, which
opened pump function, the LCD screen shows icons, and press again to close pump
function.(Note : the water pump can not be opened under the system leak water and the LCD
screen icon shining. )
Under CD or Radio states, the state FUN Key not be clicked or in state to adjust the
volume, presses panel or remote panel or key to decrease or increase sound volume
7、 Thermostat
Under water full and opening of water pumps, press the panel or remote panel Key
C
Page 7 Page 8
http://www.gemy.cn http://www.gemy.cn
3SSW W 
Failure solution
8、Bubble bath function(air pump)
+
-
Press 03 Key of the panel or remote panel, open disinfection function for 15 minutes, the
LCD screen shows icon and remain time, press the Key again to close disinfection.
When the system is open and water is full, press the panel or remote panel Key once to
open air pump. The LCD screen shows air pump icon as follow figure. Press Key on panel
or remote panel by the second time to close the air pump. Under the state of air pump
opening, if system changes from full water to lack water, or opening it when lack of water,
the air pump will stop after 15 minutes.
Activated thermostat, the LCD screen's temperature icon brightened, and press this Key
again to close thermostat. When the bathtub temperature is below the set temperature, the
thermostat and heating rods is activated, when the bathtub temperature reached setting
temperature, thermostat stop heating rods (if being lack of water, thermostat cannot be
started, and it will be shut down automatically if working). Two seconds before the start,
when the temperature icon shining, under thermostat press FUN Key of panel or remote
panel third time, then press the or Key of panel or remote panel can be set thermostat
of the water tank. System default temperature is 35 °C. Adjustable range is 15-45 °C.
9、Disinfection.
Problem Possible reason Solution
The water level has not
reached the probe
Continue adding water,let
the water level reach
the probe
Air driven switch faulty Replace
Loose plug Fix the plug
Pump jammed with rubbish
Clear the blockage
Pump cannot start
Pump is damaged Replace
Failure of adjuster Replace the sealing rubber
ring inside
Massage failure Air pipe leakage or loose
connection
Clearing the blockage
tighten the connection
Join rings broken Replace
Lock nut may be loose Tighten the nut
Leakage
Adhesive glue aging
Use new adhesive glue
Ground bolt is loose or free
Adjust ground bolt to touch
the ground
Shaking is too
Severe
Backwater is jammed Clear the rubbish in
Strainer
Lamp circuit is not closed
Fix the lamp circuit
Bulb is damaged Replace
Pump runs but the
lamp is not working
Transformer is damaged Replace
Page 9
http://www.gemy.cn
®
 

 
G9082
Finished Wall
Hot Water Cold Water
Finished Floor
Power
Outline
Finished Wall
Drainer
Name
Description
Standard(※)/Optional(○)
Qty
Remarks
Faucet
Drum-Shaped
three-piece
Faucet
※
1
Hot/Cold Water
Adjust;
Faucet/Shower
Diverter
Water Inlet
“7” Shaped
Water Inlet
※
1
Water Supply
Hand Shower
22A8# hand
shower with
holder and 1.5
m Hose
※
1
shower
Water Pump
DH1.0
※
1
Whirlpool for
Water Massage
Big Water Jet
Adjustive big
nozzle
※
6
Small Water
Jet
Small Nozzle
in new style
※
3
Air Switch
Round Shape
※
1
Power on/off
Switch
Hydrodynamic
Adjustor
Round Shape
※
1
Adjusting
Hydrodynamic
intensity for
water massage
Air Pump
AP300
○
1
300W
Babble Jet
8 Babble
nozzles
○
Drain
A203 (Copper)
Drain
※
1
Water Drainage
Underwater
Light
3w LED
※
1
Colorful Light
Headrest
※
1
Computer
Control Panel
○
1
Radio
○
1
Speaker
○
1
Ozone
System
○
1
Thermostat
Heater
○
1
keep water
temperature
TV
Handrail
Shelf
※
1
Backrest
※
1
Foaming PU
Icebox
Water Level
Detector
○
1
Cleaning
System for
Water Pipes
○
1
Auto Waste
Discharge
※
1
Model: G9082
Specifications: 1520x1520x780

Popular Hot Tub manuals by other brands

Saratoga Spa LUXURY SERIES owner's manual

Saratoga Spa

Saratoga Spa LUXURY SERIES owner's manual

Jacuzzi Signa 6 Plus Whirlpool Bath BP87 Specification sheet

Jacuzzi

Jacuzzi Signa 6 Plus Whirlpool Bath BP87 Specification sheet

Nordic Impulse owner's manual

Nordic

Nordic Impulse owner's manual

Thermasol TWPH7S installation manual

Thermasol

Thermasol TWPH7S installation manual

Kogan IBIZA KASPABWIBZA user guide

Kogan

Kogan IBIZA KASPABWIBZA user guide

American Standard Cadet Elite 2772E SERIES installation instructions

American Standard

American Standard Cadet Elite 2772E SERIES installation instructions

Aquatica Digital Zen Spa Pro installation manual

Aquatica Digital

Aquatica Digital Zen Spa Pro installation manual

Hydropool Self Clean 395 Gold owner's manual

Hydropool

Hydropool Self Clean 395 Gold owner's manual

American Standard Cadet Elite 2773EC Features & dimensions

American Standard

American Standard Cadet Elite 2773EC Features & dimensions

Master Spas LEGEND LSX700 owner's manual

Master Spas

Master Spas LEGEND LSX700 owner's manual

Aquatic Serenity Studio 9 Specification sheet

Aquatic

Aquatic Serenity Studio 9 Specification sheet

Aquatic WINCHESTER AI6644HWI Specification sheet

Aquatic

Aquatic WINCHESTER AI6644HWI Specification sheet

Plastweld PW-SPA BASIC Assembly instructions

Plastweld

Plastweld PW-SPA BASIC Assembly instructions

Pro-Form 831.210051 user manual

Pro-Form

Pro-Form 831.210051 user manual

M-Spa C-TE043 owner's manual

M-Spa

M-Spa C-TE043 owner's manual

Calspas LTR20121002 owner's manual

Calspas

Calspas LTR20121002 owner's manual

Calspas Home Resorts FA-1325 owner's manual

Calspas

Calspas Home Resorts FA-1325 owner's manual

Hotspot LAP owner's manual

Hotspot

Hotspot LAP owner's manual

manuals.online logo
manuals.online logoBrands
  • About & Mission
  • Contact us
  • Privacy Policy
  • Terms and Conditions

Copyright 2025 Manuals.Online. All Rights Reserved.