Geneva A010 User manual

SETUP GUIDE–ENGLISH............................................................................................................ 01
SETUP-ANLEITUNG–DEUTSCH................................................................................................ 17
GUIDE D’INSTALLATION–FRANÇAIS ........................................................................................ 33
GUÍA DE CONFIGURACIÓN–ESPAÑOL .................................................................................... 49
GUIDA ALL’INSTALLAZIONE–ITALIANO................................................................................... 65
INSTALLATIEHANDLEIDING–NEDERLANDS ........................................................................... 81
INSTALLATIONSVEJLEDNING–DANSK .................................................................................... 97
INSTALLATIONSGUIDE–SVENSKA ......................................................................................... 113
BRUKSANVISNING–NORSK .................................................................................................... 129
ASENNUSOPAS–SUOMI........................................................................................................... 145
GUIA DE CONFIGURAÇÃO–PORTUGUÊS.............................................................................. 161
설치 가이드 .................................................................................................................................... 177
AeroSphère Large (Model: A010)
AeroSphère Small (Model: A020)
AeroSphère Base (Model: A030)
GENEVA
AeroSphère / Small / Large / Base

1
ENGLISH
IMPORTANT SAFETY INSTRUCTIONS
1. Read these instructions.
2. Keep these instructions.
3. Heed all warnings.
4. Follow all instructions.
5. Do not use this device near water.
6. Only clean with a dry cloth.
7. Do not block any vents. Install in accordance with the manufacturer’s
instructions.
8. Do not install near any heat sources such as radiators, heaters, stoves,
or other devices (including amplifiers) that produce heat.
9. Do not defeat the safety purpose of the polarized or grounding-type
plug. A polarized plug has two blades with one wider than the other. A
grounding type plug has two blades and a third grounding prong. The
wide blade or the third prong are provided for your safety. If the provided
plug does not fit into your outlet, consult an electrician for replacement
of the obsolete outlet.
10. Protect the power cord from being walked on or pinched particularly at
the plugs, convenience receptacles, and the point where they exit from
the device.
11. Only use attachments/accessories specified by the manufacturer.
12. Use only with the cart, stand, tripod, bracket, or table specified
by the manufacturer, or sold with the device. When a cart is
used, use caution when moving the cart/device combination to
avoid injury from tip-over.
13. Unplug this device during lightning storms or during long periods of disuse.
14. Refer all servicing to qualified service personnel. Servicing is required
when the device has been damaged in any way, such as power-supply
cord or plug damages, liquid has been spilled or objects have fallen into
the device, the device has been exposed to rain or moisture, does not
operate normally, or has been dropped.
15. Do not install this equipment in a confined or built-in space such as a
book case or similar unit, and maintain well-ventilated conditions. The
ventilation should not be impeded by covering the vents with items such
as newspaper, table-cloths, curtains etc.
16. WARNING: Please refer the information on exterior bottom enclosure for
electrical and safety information before installing or operating the device.
17. WARNING: To reduce the risk of fire or electric shock, do not expose
this device to rain or moisture. The device should not be exposed to
dripping or splashing and objects filled with liquids, such as vases,
should not be placed on the apparatus.
18. CAUTION: Danger of explosion if battery is incorrectly replaced. Only
replace with the same or equivalent type.
19. WARNING: The battery (battery or batteries or battery pack) should not
be exposed to excessive heat such as sunshine, fire or the like.
20. WARNING: The mains plug/appliance coupler is used as a cut-off de-
vice, the cut-off device should remain readily operable.
21. Correct Disposal of this product. This marking indicates that this
product should not be disposed with other household wastes through-
out the EU. To prevent possible harm to the environment or human
health from uncontrolled waste disposal, recycle it responsibly to
promote the sustainable reuse of material resources. To return your used
device, please use the return and collection systems or contact the
retailer where the product was purchased. They can take this product for
environmental safe recycling.
Batteries in the remote control: Keep the remote control battery away
-
charge, disassemble, heat above 212ºF (100ºC ), Replace only with a battery
of the correct type and model number (CR2032 lithium coin cell battery, 3 V ).
The remote control supplied with this product contains a coin/button cell
battery. If the coin/button cell battery is swallowed, it can cause severe
internal burns in just 2 hours and can lead to death.
Keep new and used batteries away from children. If the battery compart-
ment does not close securely, stop using the product and keep it away
from children.
If you think batteries might have been swallowed or placed inside any part of
the body, seek immediate medical attention.
Operating Temperatures: 5 – 40 deg ºC / 41 – 104 deg ºF
AeroSphère Base—Use the original power adapter: Only use the sup-
plied original power adapter to power and charge the device. Other power
adapters might look similar, but using them could result in electric shock
and could damage the device.
WARNING: To reduce the risk of electric shock, do not remove cover
(or back ) as there are no user-serviceable parts inside. Refer servicing
to qualified personnel.
This lightning flash with arrowhead symbol within an equilateral triangle
is intended to alert the user to the presence of non-insulated “dangerous
voltage” within the product’s enclosure that may be of sufficient magnitude
to constitute a risk of electric shock.
The exclamation point within an equilateral triangle is intended to alert
the user to the presence of important operating and maintenance instruc-
tions in the literature accompanying the appliance.
This equipment is a Class II or double insulated electrical appliance. It
has been designed in such a way that it does not require a safety connec-
tion to electrical earth.
FCC Regulations Warning:
approved by the party responsible for compliance could void the user’s authority to
operate the equipment. NOTE: This equipment has been tested and found to comply
with the limits for a Class B digital device, pursuant to Part 15 of the FCC Rules. These
limits are designed to provide reasonable protection against harmful interference in a
residential installation. This equipment generates, uses and can radiate radio frequency
energy and, if not installed and used in accordance with the instructions, may cause
harmful interference to radio communications. However, there is no guarantee that
interference will not occur in a particular installation. If this equipment does cause
harmful interference to radio or television reception, which can be determined
by turning the equipment off and on, the user is encouraged to try to correct the
interference by one or more of the following measures:
Reorient or relocate the receiving antenna.
Increase the separation between the equipment and receiver.
Connect the equipment into an outlet on a circuit different from that to which the
receiver is connected.
Consult the dealer or an experienced radio/ TV technician for help.
authority to operate the equipment under FCC rules.
FCC ID: ZXX-A010 / ZXX-A020 / ZXX-A030
Canada This device complies with Industry Canada licence- exempt RSS standard( s).
Operation is subject to the following two conditions: (1 ) this device may not cause
interference, and (2 ) this device must accept any interference, including interference
that may cause undesired operation of the device.
Industrie Canada (IC ): 10107A -A01 / 10107A -A02 / 10107A - A03
CE Conformity
G-Lab GmbH declares that this device complies with the essential requirements
and other relevant provisions of European Directive 1999 /5 /EC. The
declaration of conformity may be consulted upon request to G-Lab GmbH,
Zurich, Switzerland or on http://genevalab.com.
The European Directive on Waste Electrical and Electronic Equipment
(WEEE ) was implemented to dramatically reduce the amount of
waste going to landfills, thereby reducing the environmental impact
on the planet and human health. Please act responsibly by recy-
cling used products. If this product is still usable, consider giving
it away or selling it.
Used batteries: Please dispose of used batteries properly, following the
local regulations. Do not place the battery in fire.
Licensing and copyrights
© 2014 G-Lab GmbH. All rights reserved.
Under the copyright laws, this manual may not be copied, in whole or in part, without
the written consent of G-Lab GmbH.
Geneva®is a registered trademark of G-Lab GmbH.
AirPlay, iPad, iPhone, iPod, iPod classic, iPod nano, iPod touch, iTunes, iOS, and Retina
are trademarks of Apple Inc., registered in the U.S. and other countries. iPad Air, iPad
mini, and Lightning are trademarks of Apple Inc.
“Made for iPod,” “Made for iPhone,” and “Made for iPad” mean that an electronic
standards. Apple is not responsible for the operation of this device or its compliance
with safety and regulatory standards. Please note that the use of this accessory with
iPod, iPhone, or iPad may affect wireless performance.
App Store is a service mark of Apple Inc.
iTunes is for legal or rightholder-authorized copying only. Don’t steal music.
The Bluetooth®word mark and logos are registered Trademarks owned by Bluetooth SIG, Inc.
Wi-Fi is a registred trademark of the Wi-Fi Alliance.
Setup Guide version
Version: v1.0. for the following products:
Geneva AeroSphère / Large (Model: A010 ) / Small (Model: A020 ) / Base (Model: A030 )

32
ENGLISH
I ABOUT THE GENEVA AEROSPHÈRE SYSTEM
AEROSPHÈRE SMALL, LARGE & BASE
AeroSphère Small and AeroSphère Large
AeroSphère Small and AeroSphère Large are wireless active speakers
that play music from the following sources:
AirPlay®(via Wi-Fi®)
DLNA®(via Wi-Fi )
Bluetooth®Audio (including the high quality codec aptX®)
Line-In
FM, DAB+ and audio CD, with the optional AeroSphère Base
In this document “AeroSphère speaker” refers to both models
AeroSphère Small and AeroSphère Large.
The speakers can be control via
Remote control and/ or
AeroSphère App (iPhone®or Android®)
AeroSphère Base
By adding an AeroSphère Base to your home network, the following
functions will be added to all connected AeroSphère speakers:
FM radio
DAB/ DAB+ radio ( works only in countries with DAB service)
Audio CD
Additional Line-In input
Up to four AeroSphère speakers can be added to the AeroSphère Base.
AeroSphère Base streams audio from CDs, FM or DAB to up to four
connected AeroSphère speakers at the same time. The AeroSphère
Base is controlled with the AeroSphère app (iPhone or Android). In
addition, most functions can also be controlled with the remote control.
AEROSPHÈRE APP
If your smartphone is connected to your Wi-Fi home network, you can control all AeroSphère products with the AeroSphère app. Both iPhone and
automatically.
Functions
Show all AeroSphère products in your Wi-Fi network
Change volume on all AeroSphère speakers
Adjust bass and treble on all AeroSphère speakers
Change the input sources on the speakers
Launch other streaming applications on your smartphone
Control the FM, DAB+ and Audio CD functionality of the
AeroSphère Base
Change the names of all the speakers, for example to “Bedroom”
and “Living room”
How to download the AeroSphère App
iPhone version: search for “AeroSphere” in the App Store®
The Geneva AeroSphère app works with iPhone and iPod Touch.
Android version: search for “AeroSphere” in the Google Play store.
WHAT TO DO NEXT?
AeroSphère Small & Large
1. Getting started with the AeroSphère Small & Large ........ page 04
Once completed: you can play Bluetooth on the AeroSphère speaker
(Time required: 5 minutes).
2. Wi-Fi Setup for the AeroSphère Small & Large................. page 06
Once completed: the AeroSphère speaker is connected to your Wi-Fi
network. Now you are ready to use AirPlay, DLNA and all audio sources
from the AeroSphère Base (FM, DAB+, audio CD)
(Time required: 5 minutes).
3. First steps with the AeroSphère Small & Large................ page 08
Once completed: you know how to use AirPlay, DLNA and Line-In.
You are familiar with the display status and the remote control.
AeroSphère Base
1. Getting started with the AeroSphère Base ....................... page 11
Once completed: you have connected all wires and you are ready for
the Wi-Fi setup (Time required: 5 minutes).
2. Wi-Fi Setup for the AeroSphère Base................................ page 13
Once completed: the AeroSphère Base is connected to your Wi-Fi
network. Now you are ready to use listen to FM, DAB+ and Audio CD
from the AeroSphère Base (Time required: 5 minutes).
3. First steps with the AeroSphère Base ............................... page 14
Once completed: you know how to use FM, DAB+ and the Audio CD
with the remote control and the AeroSphère app. There is no additional
speakers automatically.
Problems? ................................................................................ page 16
See the “Troubleshooting and FAQ” section and the “Feature Guide” on aerosphere.genevalab.com.
WOULD YOU LIKE TO LEARN MORE?
Use the “Feature Guide“ to learn more about the system
Windows and Mac computers.
aerosphere.genevalab.com

54
ENGLISH
BLUETOOTH SETUP
Mobile phones, tablets, and computers with Bluetooth can connect to the AeroSphère speaker and play music wirelessly. The mobile phone,
tablet, or computer must support Bluetooth A2DP. The AeroSphère speaker supports also the high quality codec aptX.
Initial Setup (“pairing” ) with iPhone, iPad or iPod touch
1. Press on the remote control.
2. Select “Settings” on your iPhone. Select “General/Bluetooth”. Turn
on Bluetooth. New Bluetooth devices are detected automatically.
3. Wait until “AeroSphère Small/Large ... (Not Paired)” appears.
4. Select “AeroSphère...”. The phone is now connecting ( “pairing” ) to
the AeroSphère speaker.
5. Once successfully paired, you can play music on an iPhone, iPad or
iPod touch and listen to it on the AeroSphère speaker.
Bluetooth settings on the iPhone®
PLAYING MUSIC WITH BLUETOOTH
Most smartphones connect automatically to the AeroSphère speaker
after the initial setup (“pairing” ).
Press on the remote control. When the AeroSphère speaker
constant blue color.
Now music that is playing on your smartphone streams
automatically to the AeroSphère speaker.
Status information on the display
Blue, constant: successfully connected.
Blue, fast flashing: searching for previously paired devices.
Blue, slow flashing: pairing / no active connection.
Pairing guide for other devices and mobile phones
Go to www.genevalab.com and select “Support.”
Selecting Bluetooth as audio output
(control center of iOS7 )
II GETTING STARTED WITH THE AEROSPHÈRE SMALL & LARGE
Time required: 5 minutes
Once completed you can play Bluetooth on the AeroSphère speaker
POWERING THE SPEAKER UP
Connect power
Turn the AeroSphère speaker carefully on its side. Don’t put the
AeroSphère Large on its head. Connect one end of the power cord to the
connector to the on the bottom of the AeroSphère speaker.
connector while pushing in, until it is inserted all the way. Make sure the AC
power cord is properly attached. Finally, plug the other end in a wall outlet.
Remote control
Remove the plastic slip at the end of the remote control.
Turn on the AeroSphère speaker
Press the power button on the remote control , or press the power
button at the back of the speaker. The Geneva logo will turn yellow.
Using Bluetooth
Press the button on the remote control, and wait until the entry
“AeroSphère” appears in the Bluetooth setup of your smart phone. For
detailed instructions, go to the next chapter “Bluetooth Setup”. With
Bluetooth you can listen music wirelessly without being connected to
your Wi-Fi network.
Now go to chapter “Wi-Fi Setup for AeroSphère Small & Large”
In order to use AirPlay, DLNA or Geneva Multiroom, you need to
connect the AeroSphère speakers to your home network.
Proper placement of the AeroSphère Large
The AeroSphère Large is a high performance audio system, and
produces heat during operation. This means the metal plate at the
bottom side can get hot. Do not place the speaker on a heat sensitive
for proper air circulation underneath the unit. The speaker must
not be placed on a bed, sofa or similar surfaces that may block the
natural ventilation.

76
ENGLISH
III WI-FI SETUP FOR THE AEROSPHÈRE SMALL & LARGE
Time required: 5 minutes
Once completed: the AeroSphère speaker is connected to your Wi-Fi network. Now you are ready to use AirPlay, DLNA and all audio sources
from the AeroSphère Base (FM, DAB+, audio CD).
OVERVIEW
wireless network). There are three different methods you can use for the Wi-Fi setup.
WI-FI SETUP METHOD WHEN TO USE THIS METHOD
WAC * You can use your iPhone, iPad, iPod Touch. They require iOS 7 or higher.
WPS Your Wi-Fi router has a WPS push button for easy network setup.
AeroSphère Network Setup webpage Advanced method go to the “Feature Guide” on aerosphere.genevalab.com
time.
WI-FI SETUP WITH WAC (WIRELESS ACCESSORY CONFIGURATION )
What is needed for this setup?
1. An iOS device (Phone, iPad or iPod Touch ) with iOS version 7
or higher.
2. The iOS device must already be connected to your Wi-Fi network
Instructions
1.
two times repeatedly in green. When you are using the AeroSphère
and go to step 3.
2.
enable the Wi-Fi Setup with WAC manually:
Hold the “SETUP” button on the back for 10 seconds, until the
green.
3. Go to Settings of your iOS device and select Wi-Fi.
4. Wait until you see the entry “SET UP NEW AIRPLAY SPEAKER” on
the lower part of the display. Select it.
5. Press “Next” on the upper right.
6. The iOS device will now automatically transfer its Wi-Fi settings to
the AeroSphère speaker.
7. Wait until the display of the AeroSphère speaker has successfully
green to a constant green.
What is WAC?
WAC is an easy Wi-Fi setup method for iOS devices (iPhone, iPad, iPod
Touch ). By default this Wi-Fi setup method is enabled when you use
green.
Troubleshooting
Repeat the procedure.
Make sure your iPhone, iPad or iPod touch are using iOS version 7
or higher
Make sure your iPhone, iPad or iPod touch is connected to a Wi-Fi
network
Try another Wi-Fi setup method.
Check the networking troubleshooting guide on the Genevalab.com
Support page.
3
4
5
6
WI-FI SETUP WITH WPS
What is needed for this setup?
Your Wi-Fi router needs to support WPS. No computer or smartphone is needed for this setup.
3
4
Instructions
1. Turn the AeroSphère speaker on.
2. green.
3. Press the “SETUP” button on the back of the AeroSphère speaker.
4. On the Wi-Fi router press the WPS button. Typically a light on the
button for a few seconds. The AeroSphère speaker and the Wi-Fi
router are now starting to connect to each other.
5. Wait until the display of the AeroSphère speaker changes to button
green. This can take up to a minute. Now you are connected to your
Wi-Fi network.
What is WPS?
WPS (Wi-Fi protected setup ) is a simple way to connect a new device
to a Wi-Fi network. WPS is a common feature on today’s Wi-Fi wireless
routers or Wi-Fi access points. When pushing the “SETUP” button on
the AeroSphère Small or Large and the “WPS” button on the Wi-Fi
access point within about a minute, the AeroSphère Small or Large will
automatically connect to the Wi-Fi network.
Troubleshooting
Repeat the procedure.
Upgrade the software on your Wi-Fi router.
Try another Wi-Fi setup method.
Check the networking troubleshooting guide on the Genevalab.com
Support page.
WI-FI SETUP WITH THE AEROSPHÈRE NETWORK SETUP WEBPAGE
Follow the detailed description in the “Feature Guide” on aerosphere.genevalab.com

98
ENGLISH
IV FIRST STEPS WITH THE AEROSPHÈRE SMALL & LARGE
Once completed you know how to use AirPlay, DLNA and Line-In. You are familiar with the display status and the remote control.
Are you connected to Wi-Fi?
Before using AirPlay, DLNA, FM, DAB+ or CD you need to connect the
AeroSphère speaker to your Wi-Fi network. See previous chapter “Wi-Fi
Network Setup”.
Turn the power on of the AeroSphère speaker and check the display.
After the start-up period (yellow ), a blinking display means you are
waiting to connect. Once you are successfully connected, the display
is constant. For detailed display status information, go to the following
chapter “Controls”.
AIRPLAY
What is AirPlay?
AirPlay lets you wirelessly stream music from your iPhone, iPad, iPod touch, Mac or Windows computer to the Geneva AeroSphère speaker and
other AirPlay speakers. Once you select the AeroSphère speaker with the AirPlay icon in iTunes or the iOS device, the AeroSphère speakers switch
automatically from the current audio source to AirPlay.
Playing music with iTunes@from a computer (Mac or Windows)
1. Turn the AeroSphère speaker on.
2. Wait until the AeroSphère speaker has successfully connected to
the Wi-Fi network (the display is constant green ).
3. Open iTunes on your Mac or Windows computer.
4. Select the AirPlay icon, then select “AeroSphère Small” or
“AeroSphère Large”.
Any music playing on iTunes is now streamed to the AeroSphère
speaker over the Wi-Fi network.
Internet Radio, Spotify and other streaming apps
Any iPhone or iPad app that plays music can be streamed over the
Wi-Fi network to the AeroSphère speaker via AirPlay.
Playing music from an iPhone, iPad or iPod Touch
1. Select the app “Music” any other music or streaming app.
2. Select the AirPlay icon, then select “AeroSphère Small” or
“AeroSphère Large”.
AirPlay in the control center
(AirPlay on iOS 7 and newer )
AirPlay on iOS 6 and earlier
You can listen to music from other iPhone apps, such as Internet Radio,
Spotify@, etc. In most iPhone apps the AirPlay icon will automatically
appear if there is an AirPlay speaker in your local network.
AirPlay on iOS 7 and newer
Swipe from the bottom to the top to make the control center appear.
The AirPlay icon shows available speakers below the play/pause icon.
If there are no AirPlay speakers available, the AirPlay icon is hidden.
AUDIO
Volume
Remote control: use the volume buttons
AeroSphère app: use the volume bar
Bass and treble
AeroSphère app: tap the music note icon on the lower right of the
screen, then use the bass and treble bar.
DLNA
What is DLNA?
DLNA is a standard for streaming audio via a home network to a
speaker. The AeroSphère speakers support DLNA. Once a user
selects the AeroSphère speaker in a DLNA app on a smartphone, the
AeroSphère speakers automatically switch from the current audio
source to DLNA.
Playing music from the Android app “BubbleUPnP”
We recommend the app “BubbleUPnP” for streaming music from your
Android phone to the AeroSphère speaker.
1. Download “BubbleUPnP” from the Google Play store.
2. Change audio output from “Local Renderer” to “AeroSphère Small”
or “AeroSphère Large”.
3. Music will automatically play on the AeroSphère speaker.
REMOTE CONTROL
Power On/ Off
Volume control
AirPlay
Line In
DAB/ DAB+
Line-In connector at the Base
AirPlay/ DLNA: change tracks
FM: auto-search
DAB+: change stations
CD: change tracks
Eject CD
DLNA
Bluetooth
FM
audio CD
AirPlay/ DLNA /CD: play / pause
2
Support for AeroSphère Base

1110
ENGLISH
V GETTING STARTED WITH THE AEROSPHÈRE BASE
Time required: 5 minutes
Once completed: you have connected all wires and you are ready for the Wi-Fi setup.
OVERVIEW
The AeroSphère Base adds FM, DAB+ and audio CD functionality to all
AeroSphère Base speakers in the same home network. The AeroSphère
is controlled with the remote controls of the AeroSphère speakers, or
with the AeroSphère iPhone and Android App.
No separate remote control is needed to operate the AeroSphère
Base. The AeroSphère Base has no remote control sensor. You
can control the AeroSphère Base functionality directly from the
AeroSphère speakers.
CONNECTING ALL WIRES
Attach the FM/ DAB+ Antenna
1. Screw the enclosed FM/DAB+ antenna into the antenna connector
on the back.
2. Screw the two rods into the end of the antenna
3. Place the end of the antenna at least one meter away from the
AeroSphère Base. The long wire allows you to place the antenna in
a location where you have the best FM/DAB+ reception. Note that
only the two rods at the end of the wire is the actual antenna.
Connect the power
1. Connect the AC power adapter to an AC wall outlet. Then connect
the other end of the AC power adapter into the back of the
AeroSphère Base.
2. Move the power switch to the ON position. The AeroSphère Base is
a network device and will always stay connected to the network.
Next: Wi-Fi Setup
Now you are ready to connect the AeroSphère Base to your Wi-Fi
network—go to the next chapter for more details.
Do I need to configure the AeroSphère system?
the Speakers are connected to the Wi-Fi network, the AeroSphère Base
automatically.
DISPLAY
The color of the Geneva logo shows the operation status of the device.
COLOR STATUS
off Device is powered off
yellow Device is starting up
green (constant ) AirPlay or DLNA, connected to the Wi-Fi network
AirPlay or DLNA, waiting to connect to the Wi-Fi network
blue (constant ) Bluetooth, connected
Bluetooth, connecting or pairing
pink Line-In
ONLY WITH AEROSPHÈRE BASE
red Audio CD (AeroSphère Base)
light blue FM or DAB+ (AeroSphère Base)
pink Line-In (AeroSphère Base)
Waiting to connect to the AeroSphère Base
ADVANCED
green/ yellow blinking Failed to connect to a Wi-Fi network
Successfully connected to Wi-Fi network
Wi-Fi setup in progress (WPS method)
Wi-Fi setup in progress (webpage or WAC method)
LINE-IN
The 3.5 mm analog audio input on the back of the AeroSphère speaker can be used for external audio sources. Press on the remote control.
There are two buttons on the remote control: the upper button selects the analog audio input on the AeroSphère speaker, the lower
button selects the analog audio input of the AeroSphère Base.
BACK PANEL
POWER BUTTON POWER ON / OFF
WPS setup (push button once )
WAC setup / Network webpage setup (hold button for 10 sec )
Line-in connector Analog audio input (stereo ), 3.5 mm connector
AC power input connector AC power input (100 - 240 VAC, 50/60 Hz)

1312
ENGLISH
VI WI-FI SETUP FOR THE AEROSPHÈRE BASE
Time required: 5 minutes
Once completed: the AeroSphère Base is connected to your Wi-Fi network. Now you are ready to use listen to FM, DAB+ and Audio CD from the
AeroSphère Base.
OVERVIEW
network. The AeroSphère Base must be in same Wi-Fi network as the AeroSphère speakers.
WI-FI SETUP METHOD WHEN TO USE THIS METHOD
WPS Your Wi-Fi router has a WPS push button for easy network setup.
AeroSphère Network Setup webpage* Advanced method.
go to the “Feature Guide” on aerosphere.genevalab.com
time.
WAC is not supported on the AeroSphère Base
WI-FI SETUP WITH WPS
What is needed for this setup?
Your Wi-Fi router needs to support WPS. There is no computer or smartphone needed for this setup.
Instructions
1. Turn the AeroSphère Base on.
2. green.
3. Press the white “SETUP” button on the back of the AeroSphère Base.
4. On the Wi-Fi router press the WPS button. Typically a light on the
button for a few seconds. The AeroSphère speaker and the Wi-Fi
router are now starting to connect to each other.
5. Wait until the status light changes from fast blinking green to
connected to your Wi-Fi network.
Troubleshooting
Repeat the procedure.
Upgrade the software on your Wi-Fi router.
Try the “AeroSphère Network Setup webpage” method in the
next chapter.
Check the Genevalab.com support page.
What is WPS?
WPS (Wi-Fi protected setup ) is a simple way to connect a new device
to a Wi-Fi network. WPS is a common feature on today’s Wi-Fi wireless
routers or Wi-Fi access points. After pushing the white “SETUP” button
on the AeroSphère Base and the “WPS” button on the Wi-Fi access
point, within about a minute the AeroSphère Base will automatically
connect to the Wi-Fi network.
WI-FI SETUP WITH THE AEROSPHÈRE NETWORK SETUP WEBPAGE
Follow the detailed description in the “Feature Guide” on aerosphere.genevalab.com
BACKPANEL
STATUS LIGHT
yellow AeroSphére Base is starting up, this takes about 20 seconds
green (constant ) Successfully connected to the Wi-Fi network and successfully connected to at least one
AeroSphère speaker
green (slowly blinking ) Successfully connected to the Wi-Fi network
green (fast blinking ) In the process of connecting to the Wi-Fi network
Wi-Fi setup in progress (WPS method)
Wi-Fi setup in progress (network setup webpage method)
yellow / green / red (changing) Software update in progress
How to eject the CD
You can eject the CD with the following methods:
Hold your hand about 10 mm above the CD slot. The CD eject
sensor is located above the CD slot. It detects the hand with a
proximity sensor.
Use the button on the remote control
Use the eject icon in the AeroSphère app
Power switch
Power On / Off
DC power input
Connect to the AC power adapter connector
Radio antenna connector:
Input for external FM / DAB antenna.
F-Type connector.
Wi-Fi SETUP:
Press: WPS push button setup method
Hold for 10 seconds: Network webpage setup method
Analog audio input
3.5 mm connector
Status light
Shows current status,
see details below

1514
ENGLISH
VII FIRST STEPS WITH THE AEROSPHÈRE BASE
Once completed: you know how to use FM, DAB+ and the Audio CD with the remote control and the AeroSphère app. There is no additional
automatically.
HOW TO CONTROL THE AEROSPHÈRE BASE
You can control the AeroSphère Base with the AeroSphère app and a remote control of the AeroSphère speaker. The Base has no remote control
sensor so you need to point the remote control at an AeroSphère speaker.
How do I find the AeroSphère speakers and Base with the App?
AeroSphère speakers and Base automatically.
How to download the AeroSphère app
iPhone version: search for “AeroSphere” in the App Store®
The Geneva AeroSphère app works with iPhone and iPod Touch.
Android version: search for “AeroSphere” in the Google Play store.
BEYOND THE BASICS
How many AeroSphère speakers can I connect to the
AeroSphère Base?
Up to four AeroSphère speakers.
Why is there a delay when changing the AeroSphère sources
(from/to FM, DAB, CD )?
The audio is streamed over the Wi-Fi network and then the audio
is buffered for a few second on the speakers. The reason for audio
audio interruptions.
Why is there a delay when I change stations in DAB or when I
change tracks on a CD?
See above. After pressing a CD or DAB command on the remote
control or app (change stations, change tracks ), the station or tracks
are changed immediately on the AeroSphère Base, but the audio
buffering on the AeroSphère speakers adds a delay.
There are audio interruptions when I listen to FM radio
The wireless network bandwidth is not only limited, but also shared
with Bluetooth, other devices on the same Wi-Fi network and Wi-Fi
networks close by. See section “How to make sure you get the best
audio streaming quality in your Wi-Fi network” for ways to minimize
audio interruptions.
Can I turn the AeroSphère Base on and off from the
AeroSphère App?
No. The AeroSphère Base is running all the time, similar to a Wi-
Fi router.
FM
How to select FM
Remote control: press .
AeroSphère app: after you selected the AeroSphère speaker icon,
select the FM menu in the main screen.
Find a station automatically with auto-search
Remote control: Press or .
AeroSphère app: Swipe the FM frequency scale.
Select a station manually
AeroSphère app: slide the frequency scale to the
desired frequency.
FM presets
AeroSphère app: select a station in the FM station list. To store and
edit the presets, select the menu entry “Presets”.
DAB/ DAB+
The AeroSphère Base is compatible with DAB and DAB+.
How to select DAB+
Remote control: press .
AeroSphère app: after you have selected an AeroSphère speaker
icon, select the DAB menu in the main screen.
Select a station
Remote control: Press or to change radio stations.
AeroSphère app: select a station in the DAB station list
Using DAB for the first time (“Scan” function )
Initially the AeroSphère Base has no DAB+ stations stored. Using the
After a “Scan”, the stations are automatically stored. The “Scan”
function is also needed after moving the AeroSphère Base to a new
location with different radio stations or when you move the AeroSphère
Base to a room with a different radio reception.
1. Tap the “Scan” menu item on DAB screen in the AeroSphère app.
2. Once all available stations have been found, the list is refreshed.
What is DAB?
DAB/ DAB+ ( sometimes also called digital radio) is only available in
certain countries (UK, Germany, Switzerland, Norway, Hong Kong,
and more).
AUDIO CD
How to select CD
Remote control: press .
AeroSphère app: after you have selected an AeroSphère speaker
icon, select the CD menu in the main screen.
Basic control
Remote control: use , and to play, pause and
skip tracks.
AeroSphère app: use the , and buttons.
How to eject a CD
Hold your hand above the CD slot. The CD eject sensor is located
above the CD slot. It detects the hand with a proximity sensor.
Remote control: press .
AeroSphère app: use the eject icon in the AeroSphère app.

1716
DEUTSCH
WICHTIGE SICHERHEITSHINWEISE
1. Sie diese Anleitung
2. Heben Sie diese Anleitung auf
3. Beachten Sie alle Warnungen
4. Befolgen Sie alle Anweisungen
5. Benutzen Sie das Gerät nicht in der Nähe von Wasser.
6. Nur mit einem trockenen Tuch reinigen.
7. Versperren Sie keine Belüftungsöffnungen. Installieren Sie das Gerät
nach den Vorgaben des Herstellers.
8. Installieren Sie das Gerät nicht in der Nähe von Wärmequellen wie
Heizungen, Wärmespeichern, Öfen oder anderen Geräten (einschließlich
Verstärkern), die Wärme erzeugen.
9. Halten Sie sich an die Sicherheitsvorschriften für einen gepolten Stecker
oder Schutzkontaktstecker. Ein gepolter Stecker besitzt 2 Kontakte
wovon einer breiter ist, als der andere. Ein Schutzkontaktstecker hat
2 Kontakte und eine dritte Erdungsphase Der breitere Kontakt sowie
die Erdungsphase dienen Ihrer Sicherheit. Wenn der gelieferte Stecker
nicht in Ihre Steckdose passt, konsultieren Sie einen Elektriker für einen
entsprechenden Ersatz.
10. Schützen Sie das Netzteil vor Tritten und Quetschungen, insbesondere
an Stecker, Anschlussdosen und an dem Punkt, wo die Kabel aus dem
Gerät austreten. Achten Sie besonders auf den festen Sitz des Netzste-
ckers am Gerät und der Steckdose.
11. Nutzen Sie ausschließlich das vom Hersteller empfohlene Zubehör.
12. Nutzen Sie das Gerät nur mit den vom Hersteller empfohlenen/
mitgelieferten Befestigungsmöglichkeiten. Wird ein fahrbares
Gestell benutzt, ist besondere Vorsicht geboten um Verlet-
zungen durch eventuelles Umkippen der Gestell-Geräte-Kom-
bination zu vermeiden.
13. Ziehen Sie bei Gewittern, oder wenn das Gerät über längere Zeit nicht
gebraucht wird, den Stecker des Geräts aus der Steckdose.
14. Beauftragen Sie mit allen Servicearbeiten nur qualifiziertes Serviceperso-
nal. Ein Service ist erforderlich, wenn das Gerät beschädigt wurde, etwa
wenn das Netzteil oder die Stecker beschädigt sind, Flüssigkeit über
dem Gerät verschüttet wurde, oder Gegenstände in das Gerät geraten
sind, wenn das Gerät Regen oder Feuchtigkeit ausgesetzt war, nicht
normal funktioniert, oder fallen gelassen wurde.
15. Installieren Sie das Gerät nicht in geschlossenen Schränken oder Ein-
bauvorrichtungen wie beispielsweise einem Bücherfach oder Ähnlichem.
Achten Sie auf gute Belüftung. Die Belüftungsöffnungen dürfen zu
keiner Zeit durch beispielsweise Zeitungen, Tischdecken, Vorhänge, etc.
abgedeckt werden.
16. ACHTUNG: Lesen Sie das beigefügte Informationsblatt zu Strom- und
Sicherheitshinweisen, bevor Sie das Gerät installieren oder gebrauchen.
17. ACHTUNG: Um das Risiko eines Feuers oder elektrischen Schocks so
gering wie möglich zu halten, setzen Sie das Gerät weder Regen noch
Feuchtigkeit aus. Halten Sie das Gerät fern von Spritzwasser und Was-
serbehältern wie zB. Vasen. Stellen Sie diese niemals auf das Gerät.
18. WARNUNG: Wenn die Batterie unsachgemäß ausgetauscht wird,
besteht Explosionsgefahr. Ersetzen Sie die Batterie nur durch eine Neue
vom richtigen Typ.
19. ACHTUNG: Setzen Sie die Batterie (Batterie, Batterien oder Batte-
rie-Pack) keines Falls starker Hitze wie direkter Sonneneinstrahlung,
offenem Feuer oder Ähnlichem aus.
20. ACHTUNG: Der Plug-In Adapter fungiert als Überspannungsschutz, und
sollte deshalb unbeschädigt bleiben.
21. Korrekte Entsorgung des Produkts. Produkte, die dieses Symbol
tragen, dürfen EU-weit NICHT mit dem normalen Hausmüll entsorgt
werden. Um mögliche Schäden für Umwelt und Mensch durch unkon-
trollierte Müllentsorgung zu vermeiden, entsorgen Sie das Produkt über
eine Sammelstelle für Wiederverwertung von elektronischen Geräten. In-
formationen zur Rückgabe und zu Sammelstellen erhalten Sie bei Ihrem
Händler. Dieser kümmert sich um umweltgerechtes Recycling.
Batterien der Fernbedienung: Halten Sie die Batterie der Fernbedienung
außer Reichweite von Kindern. Batterien können bei unsachgemäßem
Gebrauch Brände oder Verätzungen verursachen. Die Batterie nicht wie-
deraufladen, zerlegen oder auf über 212ºF (100ºC ) erhitzen. Ersetzen Sie
die Batterie nur durch eine Neue vom richtigen Typ und Modell-Nummer
(CR2032 Lithium-Knopfzelle, 3 V ).
Betriebstemperaturen: Die empfohlene Betriebstemperatur für das Model
Cinema beträgt zwischen 5 und 40 Grad Celsius / 41 und 104 Grad Fahrenheit.
AeroSphère Base—Verwenden Sie das Original-Netzteil: Verwenden Sie
nur das mitgelieferten Originalnetzteil, um das Gerät zu betreiben und zu laden.
Andere Netzteile können ähnlich aussehen, aber mit ihnen kann es zu einem
Stromschlag bzw. zu Schäden am Gerät kommen.
Dieses Gerät ist ein Elektrogerät der Klasse II, also doppelt isoliert. Es
wurde so ausgelegt, dass es erdungsfrei betrieben werden kann.
CE Konformität
G-Lab GmbH erklärt, dass dieses Gerät die grundlegenden Anforderungen
und andere relevanten Bestimmungen der Richtlinie 1999/5/EC erfüllt. Die
Konformitätserklärung kann auf Anfrage an G-Lab GmbH, Zürich, Schweiz
oder unter http://genevalab.com eingesehen werden.
Dieses Produkt kann wiederverwertet werden. Produkte, die dieses Sym-
bol tragen, dürfen NICHT in den normalen Hausmüll weggeworfen
werden. Bringen Sie das Produkt am Ende seines Lebenszyklus
zu einer Sammelstelle für die Wiederverwertung von Elektro- und
elektronischen Geräten. Informationen zur Rückgabe und zu Sam-
melstellen erhalten Sie bei Ihrer örtlichen Behörde.
Die europäische Richtlinie für Entsorgung von Elektro- und elektro-
nischen Geräten (WEEE ) wurde implementiert, um die Menge des Mülls
auf Mülldeponien drastisch zu senken und damit die Umweltauswirkung
auf den Planeten und auf die menschliche Gesundheit zu reduzieren. Bitte
handeln Sie verantwortungsbewusst, indem Sie ge-brauchte Produkte der
Wiederverwertung zuführen. Wenn dieses Produkt noch benutzbar sein
sollte, können Sie es auch verschenken oder verkaufen.
Gebrauchte Batterien: Bitte entsorgen Sie gebrauchte Batterien ordnungs-
gemäß entsprechend den in Ihrem Land geltenden Vorschriften. Werfen Sie
die Batterie nicht ins Feuer.
Deutschland: Dieses Gerät enthält Batterien. Bitte nicht in den Hausmüll
werfen. Entsorgen Sie das Gerät entsprechend der maßgeblichen gesetz-
lichen Vorgaben.
Der Begriff Bluetooth®und die Logos sind eingetragene Marken der Bluetooth SIG, Inc.
©2012 G-Lab GmbH. Alle Rechte vorbehalten. Diese Bedienungsanleitung darf unter
Urheberrechtsgesetzen ohne schriftliche Zustimmung der G-Lab GmbH weder ganz
noch teilweise kopiert werde.
Die Handelsmarke EmbracingSound®gehört der Embracing Sound Experience AB.
VIII TROUBLESHOOTING AND FAQ
See also areosphere.genevalab.com
GENERAL
Why are there two buttons on the remote control?
The upper refers to the LINE-IN analog audio input on the back of
an AeroSphère speaker.
The lower (next to CD) selects the analog audio input on the
back of the AeroSphère Base. Audio from this input is streamed to all
connected AeroSphère speakers.
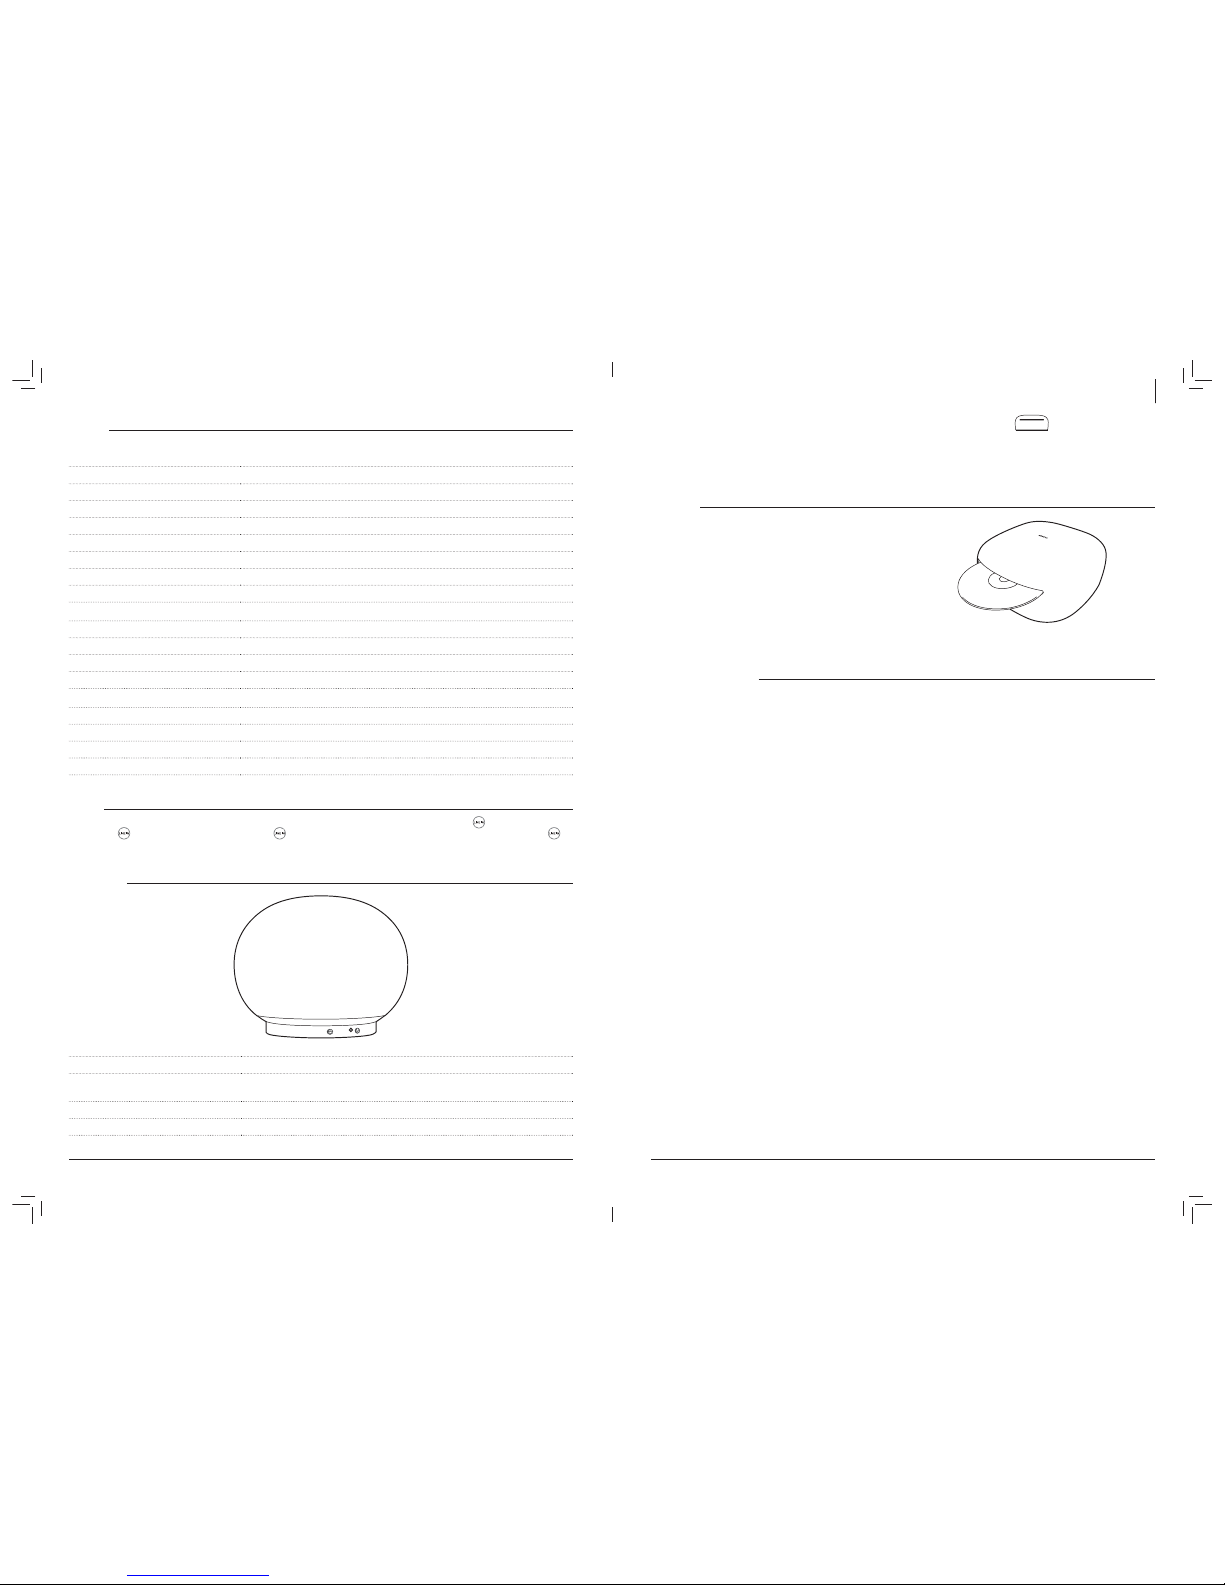
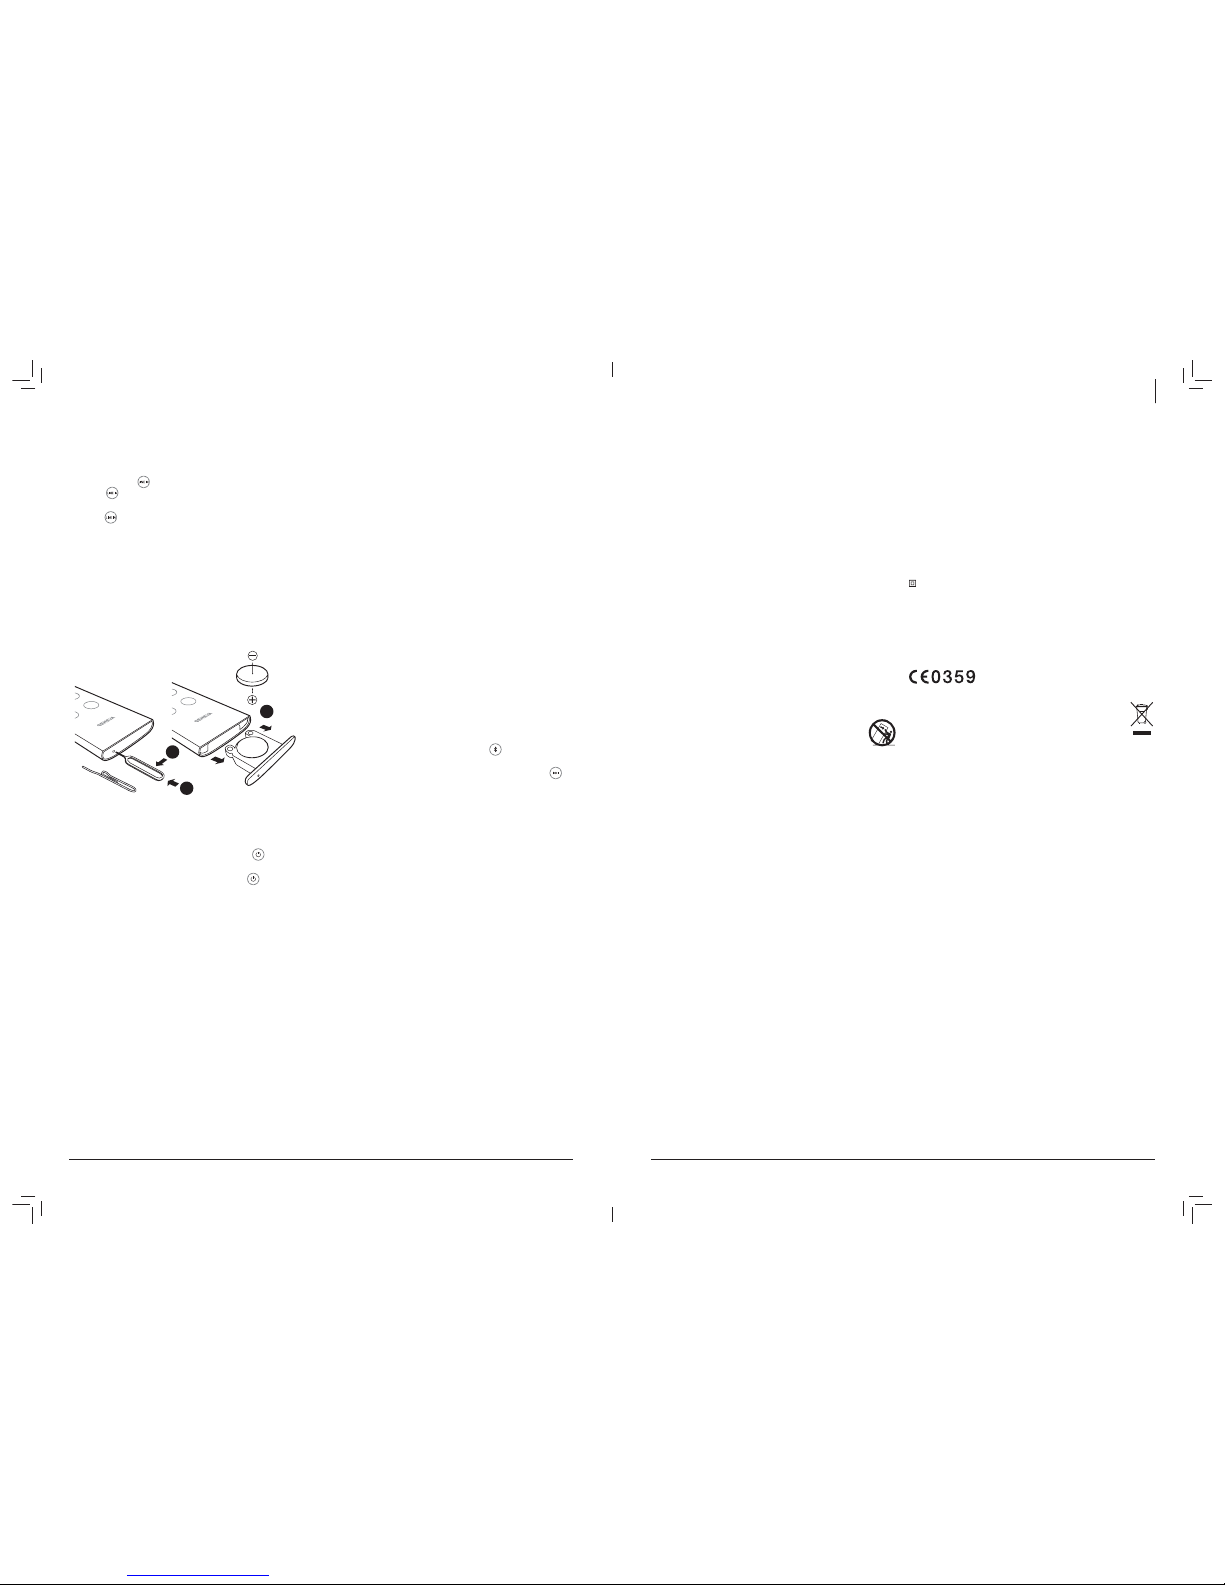
How do I change the battery in the remote control?
1. Locate the small hole on the black side facing the user.
2. Gently push the included pin into this hole and push in.
Alternatively you can use a safety pin.
3. Push the pin gently to the left side.
4. The battery compartment will slide out. Replace the battery (3V
lithium cell, 3V CR2032). Verify that the battery is inserted with the
right polarity (+ side is facing down ).
2
3
4
How do I change the bass and treble?
Use the music note icon in the AeroSphère app.
Power consumption in standby
AeroSphère Large: 0.47 Watt ( Powering off: use the button on
remote control or the power button on the back of the speaker)
AeroSphère Small: 0.3 Watt ( Powering off: use the button on
remote control or the power button on the back of the speaker)
AeroSphère Base: 0.3 Watt ( Powering off: slide power switch to
“OFF” position)
Why is the AeroSphère Small or AeroSphère Large turning itself off?
The AeroSphère speaker will automatically turn itself off after 15
minutes if there is no active audio input. This is an Energy saving
functionality, required by law in many countries.
WI-FI SETUP
How to reset to factory default settings
AeroSphère speakers: Hold the power button on the back of the
speakers for 10 seconds, until the display starts blinking red. Then
button.
AeroSphère Base: Hold the Wi-Fi button for a few seconds while
turning the power switch from OFF to ON position.
What happens when I do reset to factory defaults?
1. The Wi-Fi network settings are reset.
2. The Wi-Fi setup method WAC is started (AeroSphère speakers only).
Are WAC and “Network setup webpage” methods active at the
same time?
Yes, both methods are available at the same time. If you have an iOS
device with iOS 7 or higher, you are not able to select the temporary
Wi-Fi network from the Wi-Fi menu in the iOS preferences. With an iOS
device with iOS 6 or lower, you will not see the WAC method in the Wi-
Fi setup menu.
BLUETOOTH
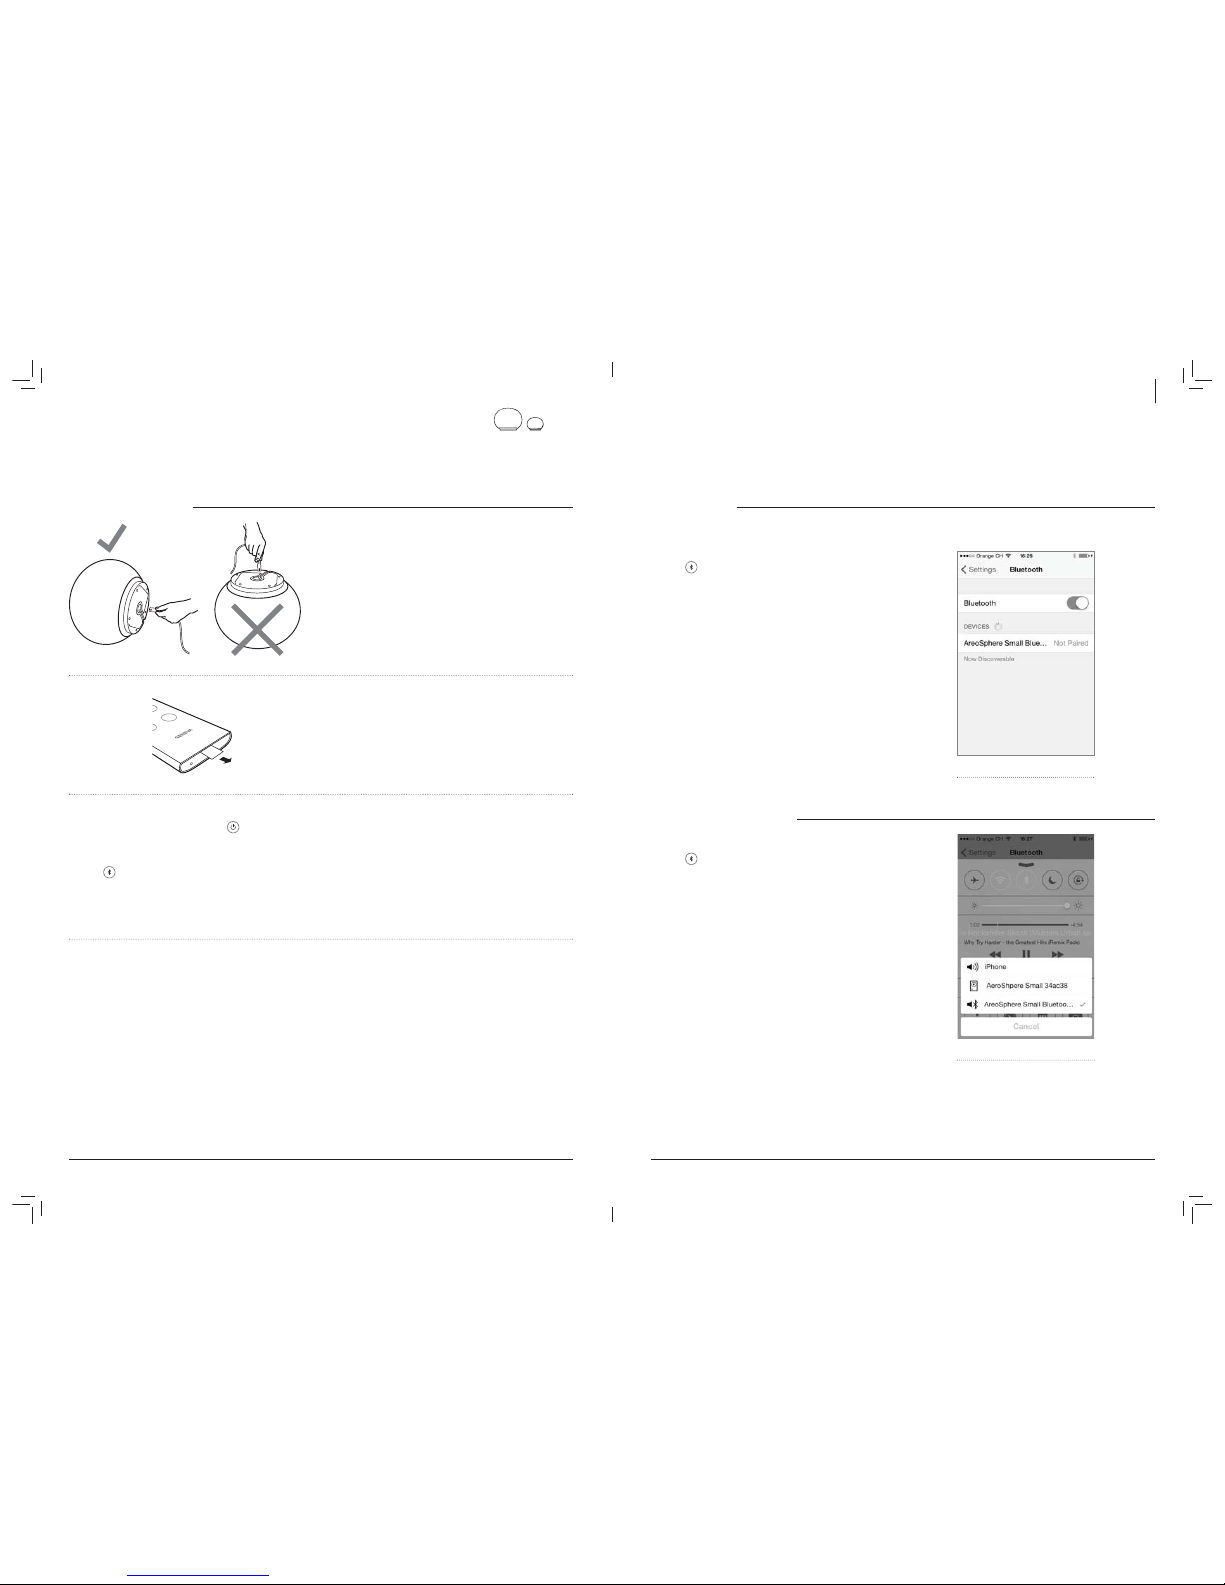
I cannot connect to the AeroSphère speaker.
1. Select Bluetooth with the remote control – the display must be blue
2.
can be connected at the same time.
3. Reset Bluetooth with the instructions below.
How to reset Bluetooth
Up to eight paired Bluetooth devices can be stored. To clear the
memory, perform the following steps:
1. Turn on the AeroSphère speaker and select with the remote
control.
2. Within 5 seconds of entering Bluetooth mode, hold down the
button on the remote control for at least 5 seconds.
3. Pair your mobile phone again.
During pairing, my smartphone requests a PIN—what is the PIN?
If the phone asks for a PIN, enter “0000” (four zeros ).
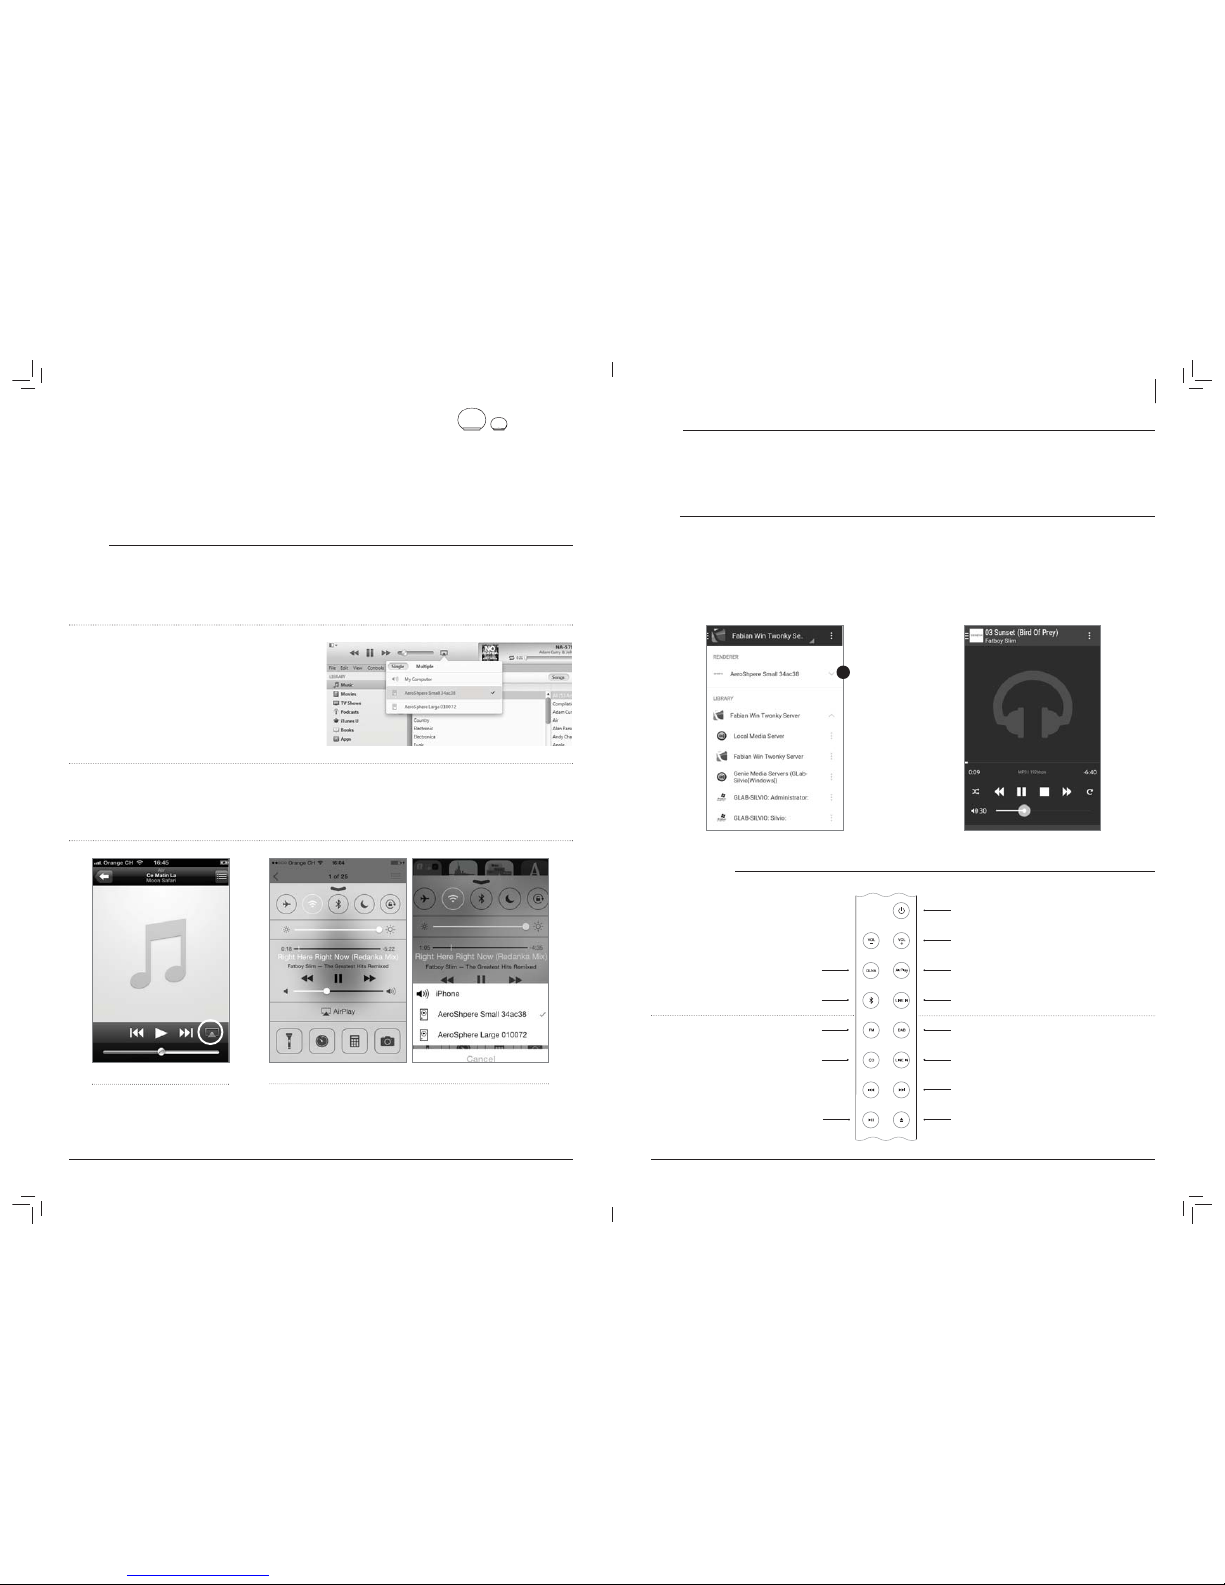
AIRPLAY
I don’t see the AeroSphère speaker show up in the AirPlay icon
of iTunes
The AirPlay icon in iTunes or iPhone only shows if an AirPlay speaker
has been discovered in your Wi-Fi network. Make sure the AeroSphère
speaker is successfully connected to your home network. The display
must be constant green.
How do multiple AirPlay speakers in the same network
behave together?
iTunes can play to more than one AirPlay speaker at the same time. The
music will always be synchronized.
SUPPORT
Service and repair
If the product is damaged and needs repair, please contact your dealer.
Visit www.genevalab.com area.
Warranty
www.genevalab.com.

1918
DEUTSCH
WAS IST ALS NÄCHSTES ZU TUN?
AeroSphère Small & Large
1. Erste Schritte mit der AeroSphère Small & Large ............ Seite 20
Nach Abschluss: Sie können Bluetooth auf den AeroSphère-Lautsprechern
abspielen (Zeitbedarf 5 Minuten ).
2. Wi-Fi-Einrichtung für die AeroSphère Small & Large....... Seite 22
Nach Abschluss: Der AeroSphère-Lautsprecher ist mit Ihrem Wi-
Fi-Netzwerk verbunden. Nun können Sie AirPlay, DLNA und alle
Audio-Quellen der AeroSphère Base (UKW, DAB+, Audio-CD) nutzen
(Zeitaufwand: 5 Minuten ).
3. Erste Schritte mit AeroSphère Small & Large................... Seite 24
Nach Abschluss: Sie wissen, wie man AirPlay, DLNA und
Line-In verwendet. Sie sind mit dem Anzeigestatus und der
Fernbedienung vertraut.
AeroSphère Base
1. Erste Schritte mit der AeroSphère Base ........................... Seite 27
Nach Abschluss: Sie haben alle Kabel angeschlossen und sind bereit
für die Wi-Fi-Einrichtung (Zeitbedarf 5 Minuten ).
2. Wi-Fi Setup for the AeroSphère Base................................ Seite 29
Nach Abschluss: Die AeroSphère Base ist mit Ihrem Wi-Fi-Netzwerk
verbunden. Nun können Sie UKW-Radio, DAB-Radio und Audio-CD mit
der AeroSphère Base hören (Zeitaufwand: 5 Minuten).
3. First steps with the AeroSphère Base ............................... Seite 30
Nach Abschluss: Sie wissen, wie man UKW, DAB und Audio-CDs mit
der Fernbedienung und der AeroSphère-App nutzt. Es ist keine weitere
Einrichtung erforderlich, da die AeroSphère Base alle AeroSphère-
Lautsprecher automatisch
Probleme? ................................................................................ Seite 32
aerosphere.genevalab.com.
MÖCHTEN SIE MEHR ERFAHREN?
Im “Feature Guide” erfahren Sie mehr über das System.
Geräten, Windows- und Mac-Computern verwenden können.
aerosphere.genevalab.com
I ÜBER DAS SYSTEM GENEVA AEROSPHÈRE
AEROSPHÈRE SMALL, LARGE & BASE
AeroSphère Small und AeroSphère Large
AeroSphère Small und AeroSphère Large sind aktive Funklautsprecher,
die Musik aus den folgenden Quellen wiedergeben:
AirPlay (über Wi-Fi®)
DLNA®(über Wi-Fi )
Bluetooth®-Audio (einschließlich dem qualitativ hochwertigen
Codec aptX®)
Line-In
UKW (FM ), DAB+ und Audio-CD mit der als Zubehör erhältlichen
AeroSphère Base
In diesem Dokument bezieht sich “AeroSphère-Lautsprecher” auf die
beiden Modelle AeroSphère Small und AeroSphère Large zusammen.
Die Lautsprecher lassen sich wie folgt steuern:
per Fernbedienung und/oder
per AeroSphère-App (iPhone®oder Android®)
AeroSphère Base
Wenn Sie Ihrem Heimnetzwerk eine AeroSphère Base hinzufügen,
werden allen angeschlossenen AeroSphère-Lautsprechern folgende
Funktionen hinzugefügt:
UKW-Rundfunk
DAB/DAB+ Radio (funktioniert nur in Ländern mit DAB-Rundfunk)
Audio-CD
Zusätzlicher Line-In-Eingang
An die AeroSphère Base können bis zu vier AeroSphère-Lautsprecher
angeschlossen werden. Die AeroSphère Base versorgt bis zu
vier angeschlossene AeroSphère-Lautsprecher gleichzeitig mit
Audiosignalen von CDs bzw. aus dem UKWoder DAB-Radioteil. Die
AeroSphère Base wird mit der AeroSphère-App ( iPhone oder Android)
gesteuert. Darüber hinaus können die meisten Funktionen auch mit der
Fernsteuerung gesteuert werden.
AEROSPHÈRE APP
Wenn Ihr Smartphone mit den Wi-Fi-Heimnetzwerk verbunden ist, können Sie alle Produkte von AeroSphère mit der AeroSphère-App steuern.
Lautsprecher und die Base automatisch
Funktionen
Alle AeroSphère-Produkte in Ihrem Wi-Fi-Netzwerk anzeigen
Lautstärke an allen AeroSphère-Lautsprechern ändern
Bässe und Höhen an allen AeroSphère-Lautsprechern einstellen
Die Eingangsquellen an den Lautsprechern ändern
Start anderer Streaming-Anwendungen auf Ihrem Smartphone
Bedienen Sie die UKW-, DABund Audio-CD-Funktionen der
AeroSphère Base
Ändern Sie die Namen aller Lautsprecher, zum Beispiel in
“Schlafzimmer” und “Wohnzimmer”
So laden Sie die AeroShère-App herunter
iPhone-Version: Suche nach “AeroSphere” im App Store®
Die App Geneva AreoSphère funktioniert mit iPhone und iPod Touch.
Android-Version: Suche nach “AeroSphère” im Google Play Store.

2120
DEUTSCH
BLUETOOTH-EINRICHTUNG
Handys, Tablets und Computer mit Bluetooth lassen sich mit den AeroSphère-Lautsprechern verbinden und können dann Musik per Funk
abspielen. Das Handy, Tablet bzw. der Computer müssen Bluetooth A2DP unterstützen. Die AeroSphère-Lautsprecher unterstützen auch den
qualitativ hochwertigen Codec aptX.
Ersteinrichtung (“Pairing”) mit iPhone, iPad oder iPod touch
1. Drücken Sie auf der Fernbedienung.
2. Wählen Sie “Einstellungen” auf Ihrem iPhone. Wählen Sie
“Allgemein / Bluetooth”. Schalten Sie Bluetooth ein. Neue
Bluetooth-Geräte werden automatisch erkannt.
3. Warten Sie, bis “AeroSphère Small/Large ... (nicht gekoppelt )”
angezeigt wird.
4. Wählen Sie “AeroSphère ...” aus. Das Telefon verbindet sich jetzt
mit dem AeroSphère-Lautsprecher (“Pairing”).
5. Nach erfolgreicher Ankopplung können Sie Musik von einem
iPhone, iPad oder iPod touch abspielen und sie über den
AeroSphère-Lautsprecher anhören.
Bluetooth-Einstellungen auf dem iPhone®
ABSPIELEN VON MUSIK MIT BLUETOOTH
Die meisten Smartphones stellen nach der Ersteinrichtung (“Pairing” )
automatisch eine Verbindung mit dem AeroSphère-Lautsprecher her.
Drücken Sie auf der Fernbedienung. Wenn der AeroSphère-
Lautsprecher die Verbindung herstellt, wechselt die Anzeige von
blau blinkend auf konstant blau.
Nun wird Musik, die Sie auf dem Smartphone abspielen,
automatisch zum AeroSphère-Lautsprecher gestreamt.
Statusinformationen auf der Anzeige
Blau, konstant: erfolgreich verbunden.
Blau, schnell blinkend: Suche nach zuvor angekoppelten Geräten.
Blau, langsam blinkend: Ankopplung (Pairing ) / keine
aktive Verbindung.
Pairing Guide für andere Geräte und Handys
Gehen Sie auf www.genevalab.com und wählen Sie “Support”.
Auswählen von Bluetooth als Audio-
Ausgang (Steuerzentrale von iOS7 )
II ERSTE SCHRITTE MIT AEROSPHÈRE SMALL & LARGE
Zeitbedarf: 5 Minuten
Nach Abschluss können Sie Bluetooth auf dem AeroSphère-Lautsprecher abspielen.
STROMVERSORGUNG DES LAUTSPRECHERS
Netzanschluss
Legen Sie den AeroSphère-Lautsprecher vorsichtig auf die Seite. Stellen
Sie den AeroSphère-Lautsprecher nicht auf den Kopf! Schließen Sie
ein Ende des Stromkabels an die Buchse am Boden des AeroSphère-
Lautsprechers an.
Halten Sie das Ende des Netzkabels fest in den Fingern und wackeln Sie
mit dem Stecker hin und her, bis er vollständig eingeschoben ist. Prüfen
Sie, ob das Netzkabel richtig angeschlossen ist. Stecken Sie dann das
andere Ende in eine Steckdose.
Fernbedienung
Entfernen Sie die Plastikfolie am Ende der Fernbedienung.
AeroSphère-Lautsprecher einschalten
Drücken Sie die Power-Taste auf der Fernbedienung , oder drücken
Sie die Power-Taste auf der Rückseite des Lautsprechers. Das Geneva-
Logo wird gelb.
Verwenden von Bluetooth
Drücken Sie die
-Taste auf der Fernbedienung, und warten Sie,
bis der Eintrag “AeroSphère” im Bluetooth-Einrichtungsdialog Ihres
nächsten Kapitel “Bluetooth-Einstellungen”. Mit Bluetooth können Sie
Musik auch ohne Anbindung an Ihr Wi-Fi-Netzwerk per Funk hören.
Nun gehen Sie zum Kapitel “Wi-Fi-Einrichtung für AeroSphère
Small & Large”
Um AirPlay, DLNA oder Geneva Multiroom zu nutzen, müssen Sie die
AeroSphère-Lautsprecher an Ihr Heimnetzwerk anschließen.
Richtige Platzierung der AeroSphère Large
Die AeroSphère Large ist ein Hochleistungs-Audiosystem und erzeugt
im Betrieb Wärme. Das bedeutet, dass die Metallplatte auf der
Unterseite heiß werden kann. Stellen Sie die Lautsprecher nicht auf
unter dem Gerät gegeben ist. Der Lautsprecher darf nicht auf Betten,
Luftzirkulation behindern würden.

2322
DEUTSCH
WI-FI-EINRICHTUNG MIT WPS
Was wird für diese Einrichtung benötigt?
Ihr Wi-Fi-Router muss WPS unterstützen. Für dieses Einrichtungsverfahren wird kein Computer oder Smartphone benötigt.
3
4
Anleitung
1. Schalten Sie den AeroSphère-Lautsprecher ein.
2. Warten Sie, bis die Anzeige grün blinkt.
3. Drücken Sie die Taste “SETUP” auf der Rückseite des AeroSphère-
Lautsprechers.
4. Drücken Sie die WPS-Taste auf dem Wi-Fi-Router. Gewöhnlich wird
eine LED auf der Taste anfangen, zu blinken. Wenn nichts geschieht,
müssen Sie die Taste eventuell für einige Sekunden gedrückt halten.
Der AeroSphère-Lautsprecher und der Wi-Fi-Router beginnen nun,
sich miteinander zu verbinden.
5. Warten Sie, bis die Anzeige des AeroSphère-Lautsprechers grün
wird. Dies kann bis zu einer Minute dauern. Jetzt sind Sie mit Ihrem
Wi-Fi-Netzwerk verbunden.
Was ist WPS?
WPS (Wi-Fi Protected Setup ) ist ein einfacher Weg, um ein neues Gerät
mit einem Wi-Fi-Netzwerk zu verbinden. WPS ist bei heutigen Wi-Fi-
Funkroutern oder Wi-Fi-Zugangspunkten eine verbreitete Funktion.
Wenn man an der AeroSphère Small oder Large die Taste “SETUP” und
zugleich, also innerhalb von etwa einer Minute, die Taste “WPS” am
Wi-Fi-Zugangspunkt drückt, verbindet sich die AeroSphère Small oder
Large automatisch mit dem Wi-Fi-Netzwerk.
Fehlerbehebung
Wiederholen Sie den Vorgang.
Aktualisieren Sie die Software auf Ihrem Wi-Fi-Router.
Versuchen Sie es mit einem anderen Wi-Fi-Einrichtungsverfahren.
Schauen Sie in das Fehlerbehebungs-Netzwerkhandbuch auf der
Support-Seite von Genevalab.com.
WI-FI-EINRICHTUNG MIT DER NETZWERK-EINRICHTUNGSWEBSITE VON AEROSPHÈRE
Folgen Sie der detaillierten Beschreibung im “Feature Guide” auf aerosphere.genevalab.com
III WI-FI-EINRICHTUNG FÜR AEROSPHÈRE SMALL & LARGE
Zeitbedarf: 5 Minuten
Nach Abschluss: Der AeroSphère-Lautsprecher ist mit Ihrem Wi-Fi-Netzwerk verbunden. Nun können Sie AirPlay, DLNA und alle Audio-Quellen
der AeroSphère Base (UKW, DAB+, Audio-CD) nutzen.
ÜBERSICHT
Zum Abspielen von Musik per Funk mit AirPlay oder DLNA müssen die AeroSphère-Lautsprecher zunächst per Wi-Fi (WLAN / Funknetzwerk) mit
Ihrem Heimnetzwerk verbunden werden. Es gibt drei verschiedene Methoden für die Wi-Fi-Einrichtung.
WI-FI-EINRICHTUNGSVERFAHREN WANN SOLLTE MAN DIESES VERFAHREN WÄHLEN?
WAC * Sie können Ihr iPhone, iPad oder iPod Touch verwenden. Diese müssen unter iOS 7 oder neuer laufen.
WPS Ihr Wi-Fi-Router hat eine WPS-Taste zur einfachen Netzwerkeinrichtung.
AeroSphère Network
Setup Webseite
Erweitertes Verfahren—Besuchen Sie die Website aerosphere.genevalab.com und gehen Sie hier zum
“Feature Guide”.
* Ist standardmäßig aktiviert, wenn Sie den AeroSphère-Lautsprecher zum ersten Mal verwenden.
WI-FI-EINRICHTUNG MIT WAC (WIRELESS ACCESSORY CONFIGURATION )
Was wird für diese Einrichtung benötigt?
1. Ein iOS-Gerät (Phone, iPad oder iPod Touch) mit iOS Version 7
oder neuer.
2. Das iOS-Gerät muss bereits mit Ihrem Wi-Fi-Netzwerk verbunden sein
Anleitung
1. Schalten Sie den AeroSphère-Lautsprecher ein: warten Sie, bis
Sie die Anzeige zwei Mal grün blinkt. Wenn Sie den AeroSphère-
Lautsprecher zum ersten Mal verwenden, ist dieser Modus bereits
aktiviert. Überspringen Sie Schritt 2 und fahren Sie mit Schritt 3 fort.
2. Wenn die Anzeige nicht zweimal grün blinkt, können Sie die Wi-Fi-
Einrichtung mit WAC auch manuell aktivieren:
Halten Sie die “SETUP”-Taste auf der Rückseite für 10 Sekunden
gedrückt, bis die Anzeige zweimal grün blinkt.
3. Gehen Sie zu den Einstellungen von Ihrem iOS-Gerät und wählen
Sie Wi-Fi aus.
4. Warten Sie, bis Sie der Eintrag “Neuen AirPlay-Lautsprecher
einrichten” im unteren Teil des Displays erscheint. Wählen Sie
ihn aus.
5. Drücken Sie oben rechts auf “Weiter”.
6. Das iOS-Gerät überträgt nun automatisch seine Wi-Fi-Einstellungen
auf den AeroSphère-Lautsprecher.
7. Warten Sie, bis die Anzeige des AeroSphère-Lautsprechers
erfolgreich mit dem Wi-Fi-Netzwerk verbunden ist: die Anzeige
wechselt von grün blinkend auf stetig grün.
Was ist WAC?
WAC ist eine einfaches Wi-Fi-Einrichtungsverfahren für iOS-Geräte
(iPhone, iPad, iPod Touch). Standardmäßig ist dieses Wi-Fi-
Einrichtungsverfahren aktiviert, wenn Sie die AeroSphère-Lautsprecher
zum ersten Mal verwenden. Das Display zeigt durch zweimaliges
wiederholtes grünes Blinken an, dass WAC aktiv ist.
Fehlerbehebung
Wiederholen Sie den Vorgang.
Prüfen Sie, ob Ihr iPhone, iPad oder iPod touch unter iOS mit
Version 7 oder neuer läuft.
Stellen Sie sicher, dass Ihr iPhone, iPad oder iPod touch mit einem
Wi-Fi-Netzwerk verbunden ist.
Versuchen Sie es mit einem anderen Wi-Fi-Einrichtungsverfahren.
Schauen Sie in das Fehlerbehebungs-Netzwerkhandbuch auf der
Support-Seite von Genevalab.com.
3
4
5
6

2524
DEUTSCH
AUDIO
Lautstärke (Volume)
Fernsteuerung: Verwenden Sie die Lautstärketasten
AeroSphère-App: Verwenden Sie den Lautstärkebalken
Bässe und Höhen
AeroSphère-App: Tippen Sie auf das Musiknoten-Symbol in der
unteren rechten Bildschirmecke, dann verwenden Sie den Bass-
und Höhenbalken.
DLNA
Was ist DLNA?
DLNA ist ein Standard für das Audio-Streaming über ein Heimnetzwerk
zu einem Lautsprecher. Die AeroSphère-Lautsprecher unterstützen
DLNA. Sobald ein Benutzer die AeroSphère-Lautsprecher in einer
DLNA-App auf einem Smartphone auswählt, schalten die AeroSphère-
Lautsprecher automatisch von der aktuellen Audioquelle auf DLNA um.
Abspielen von Musik aus der Android-App “BubbleUPnP”
Wir empfehlen die App “BubbleUPnP” für das Streaming von Musik von
Ihrem Android-Handy zum AeroSphère-Lautsprecher.
1. Laden Sie “BubbleUPnP” aus dem Google Play Store herunter.
2. Ändern Sie den Audio-Ausgang von “Local Renderer” auf
“AeroSphère Small” oder “AeroSphère Large”.
3. Die Musik wird automatisch auf dem AeroSphère-
Lautsprecher abgespielt.
FERNBEDIENUNG
IV ERSTE SCHRITTE MIT DER AEROSPHÈRE SMALL & LARGE
Nach Abschluss wissen Sie, wie man AirPlay, DLNA und Line-In verwendet. Sie sind mit dem Anzeigestatus und der Fernbedienung vertraut.
Sind Sie mit Wi-Fi verbunden?
Vor der Verwendung von AirPlay, DLNA, UKW, DAB oder CD müssen
Sie die AeroSphère-Lautsprecher mit Ihrem Wi-Fi-Netzwerk verbinden.
Siehe das vorherige Kapitel “Wi-Fi-Netzwerkeinrichtung”.
Schalten Sie den AeroSphère-Lautsprecher ein und überprüfen Sie
die Anzeige. Nach der Hochfahrdauer (gelb ) bedeutet eine blinkende
Anzeige, dass das Gerät auf die Verbindung wartet. Nachdem Sie
erfolgreich verbunden sind, leuchtet die Anzeige konstant. Weitere
“Bedien- und Anzeigeelemente”.
AIRPLAY
Was ist AirPlay?
Mit AirPlay können Sie per Funk Musik von Ihrem iPhone, iPad, iPod touch, Mac oder Windows-Computer auf den Geneva AeroSphère-
Lautsprecher und andere AirPlay-Lautsprecher streamen. Sobald Sie den AeroSphère- Lautsprecher mit dem AirPlay-Symbol in iTunes oder dem
iOS-Gerät auswählen, wechseln die AeroSphère-Lautsprecher automatisch von der aktuellen Audioquelle zu AirPlay.
Abspielen von Musik mit iTunes@von einem Computer ( Mac oder
Windows)
1. Schalten Sie den AeroSphère-Lautsprecher ein.
2. Warten, bis sich der AeroSphère-Lautsprecher erfolgreich mit dem
Wi-Fi-Netzwerk verbunden hat (das Display leuchtet ständig grün ).
3. Starten Sie iTunes auf Ihrem Mac oder Windows-Computer.
4. Drücken Sie das AirPlay-Symbol und wählen Sie dann “AeroSphère
Small” oder “AeroSphère Large” aus.
Die in iTunes abgespielte Musik wird nun über das Wi-Fi-Netzwerk auf
die AeroSphère-Lautsprecher gestreamt.
Internet-Radio, Spotify und andere Streaming-Apps
Jede iPhone- oder iPad-App, die Musik abspielt, kann über das Wi-Fi-
Netzwerk per AirPlay zum AeroSphère-Lautsprecher gestreamt werden.
Abspielen von Musik von einem iPhone, iPad oder iPod Touch
1. Wählen Sie die App “Music” oder eine andere Musik- oder
Streaming-App.
2. Drücken Sie das AirPlay-Symbol und wählen Sie dann “AeroSphère
Small” oder “AeroSphère Large” aus.
AirPlay in der Steuerzentrale
(AirPlay auf iOS 7 und neuer )
AirPlay auf iOS 6 und älter.
AirPlay auf iOS 6 und älter
Sie können Musik von anderen iPhone-Apps, wie z.B. Internet-Radio,
Spotify@usw. abspielen. In den meisten iPhone-Apps erscheint das
AirPlay-Symbol automatisch, wenn es in Ihrem lokalen Netzwerk einen
AirPlay-Lautsprecher gibt.
AirPlay auf iOS 7 und neuer
Wischen Sie von unten nach oben, um das Steuercenter anzuzeigen.
Die AirPlay-Symbol zeigt die verfügbaren Lautsprecher unterhalb
des Play-/Pause-Symbols an. Wenn keine AirPlay-Lautsprecher zur
Verfügung stehen, ist das AirPlay-Symbol ausgeblendet.
2
Ein-/ Ausschalten
Lautstärkesteuerung
AirPlay
Line-In (analoger Audioeingang )
DAB/ DAB+
Analoger Line-In-Anschluss an der Base
AirPlay/ DLNA: Titelsprung
FM: Automatische Sendersuche
DAB+: Senderwechsel
CD: Titelsprung
CD-Auswurf
DLNA
Bluetooth
UKW-Radio
Audio-CD
AirPlay/ DLNA/CD: Wiedergabe/ Pause
Unterstützung für
AeroSphère Base

2726
DEUTSCH
V ERSTE SCHRITTE MIT DER AEROSPHÈRE BASE
Zeitbedarf: 5 Minuten
Nach Abschluss: Sie haben alle Kabel angeschlossen und sind bereit für die Wi-Fi-Einrichtung sind.
ÜBERSICHT
Die AeroSphère Base fügt die Funktionen UKW, DAB und Audio-CD zu
allen AeroSphère-Lautsprechern im gleichen Heimnetzwerk hinzu. Die
AeroSphère wird mit den Fernbedienungen der AeroSphère-Lautsprecher
oder mit der AeroSphère-App für iPhone und Android gesteuert.
Zur Bedienung der AeroSphère Base ist keine separate Fernbedienung
notwendig. Die AeroSphère Base hat keinen Fernbedienungssensor.
Sie steuern die Funktionen der AeroSphère Base direkt über die
AeroSphère-Lautsprecher.
ANSCHLUSS ALLER KABEL
Anschluss der UKW-/DAB-Antenne
1. Schrauben Sie die beiliegende UKW-/DAB-Antenne in den
Antennenanschluss auf der Rückseite.
2. Schrauben Sie die beiden Stäbe in das Ende der Antenne
3. Stellen Sie das Ende der Antenne mindestens einen Meter entfernt
von der AeroSphère Base auf. Mit dem langen Kabel können Sie
die Antenne an einem Ort aufstellen, wo Sie den besten UKW-/
DAB-Empfang haben. Beachten Sie, dass nur die zwei Stangen am
Kabelende die eigentliche Antenne darstellen.
Netzanschluss
1. Schließen Sie das Netzteil an eine Steckdose an. Dann das
andere Ende des Netzteils in die Rückseite der AeroSphère Base
einstecken.
2. Schieben Sie den Netzschalter in die Stellung ON. Die AeroSphère
Base ist ein Netzwerkgerät und bleibt ständig mit dem Netzwerk
verbunden.
Weiter: Wi-Fi-Einrichtung
Nun sind Sie bereit, die AeroSphère Base an Ihr Wi-Fi-Netzwerk
anzuschließen—siehe das nächste Kapitel mit weiteren Details.
Muss ich das AeroSphère-System konfigurieren?
Sobald die Basis und die Lautsprecher mit dem Wi-Fi-Netzwerk
verbunden sind, Findet die AeroSphère Base alle verfügbaren
AeroSphère-Lautsprecher automatisch.
DISPLAY
Die Farbe des Geneva-Logos zeigt den Betriebszustand des Geräts an.
FARBE STATUS
Aus Gerät ist ausgeschaltet
Gelb Das Gerät wird gestartet
Grün (konstant ) AirPlay oder DLNA, Verbindung mit dem Wi-Fi-Netzwerk steht
Grün (blinkend ) AirPlay oder DLNA, Gerät wartet auf Verbindung mit dem Wi-Fi-Netzwerk
Blau (konstant ): Bluetooth, verbunden
Blau (blinkend ) Bluetooth, Verbindungsvorgang (bzw. Pairing) läuft noch
Rosa Line-In
NUR IN VERBINDUNG MIT AEROSPHÈRE BASE
Rot Audio-CD (AeroSphère Base)
Hellblau FM oder DAB+ (AeroSphère Base)
Rosa Line-In (AeroSphère Base )
Rot / Hellblau / Rosa (blinkend ) Warten auf Verbindung mit der AeroSphère Base
ERWEITERTE EINSTELLUNGEN
Grün / Gelb blinkend Verbindung zu einem Wi-Fi-Netzwerk fehlgeschlagen
Grün (blinkt 3 mal ) Erfolgreich mit dem Wi-Fi-Netzwerk verbunden
Grün (wiederholtes kurzes einzelnes Blinken ) Wi-Fi-Einrichtung läuft (WPS-Verfahren)
Grün (wiederholtes kurzes Doppelblinken ) Wi-Fi-Einrichtung läuft ( Webseite oder WAC-Verfahren)
LINE-IN
Der analoge 3,5mm-Klinkensteckeraudioeingang auf der Rückseite des AeroSphère-Lautsprechers kann für externe Audioquellen verwendet
werden. Drücken Sie auf der Fernbedienung . Es gibt zwei -Tasten auf der Fernbedienung: die obere -Taste wählt den analogen
Audioeingang am AeroSphère-Lautsprecher. Die untere -Taste wählt den analogen Audioeingang an der AeroSphère Base.
RÜCKSEITE
EIN-/AUS-TASTE EIN-/AUSSCHALTEN
Wi-Fi-Einrichtungstaste: WPS-Einrichtung (Taste einmal drücken)
WAC-Einrichtung / Netzwerk-Website-Einrichtung ( Taste für 10 Sekunden gedrückt halten )
Line-In-Anschluss Analoger Audio-Eingang (Stereo ), 3,5-mm-Klinkenstecker
Netzeingangsbuchse Netzspannungsbuchse (100-240 V~, 50/60 Hz )

2928
DEUTSCH
VI WI-FI-EINRICHTUNG FÜR DIE AEROSPHÈRE BASE
Zeitbedarf: 5 Minuten
Nach Abschluss: Der AeroSphère-Lautsprecher ist mit Ihrem Wi-Fi-Netzwerk verbunden. Nun können Sie UKW-Radio, DAB-Radio und Audio-CD
mit der AeroSphère Base hören.
ÜBERSICHT
Um UKW, DAB+ und Audio-CD per Funk an AeroSphère-Lautsprecher AeroSphère zu streamen, muss die AeroSphère Base zuerst
mit dem gleichen Wi-Fi-Netzwerk verbunden werden. Die AeroSphère Base muss sich im gleichen Wi-Fi-Netzwerk wie die AeroSphère-
Lautsprecher
WI-FI-EINRICHTUNGSVERFAHREN WANN SOLLTE MAN DIESES VERFAHREN WÄHLEN?
WPS Ihr Wi-Fi-Router hat eine WPS-Taste zur einfachen Netzwerkeinrichtung.
Webseite für das AeroSphère Network Setup* Erweitertes Verfahren.
Besuchen Sie die Website aerosphere.genevalab.com und gehen Sie hier zum “Feature Guide”.
* Ist standardmäßig aktiviert, wenn Sie den AeroSphère-Lautsprecher zum ersten Mal verwenden.
WAC wird von der AeroSphère Base nicht unterstützt.
WI-FI-EINRICHTUNG MIT WPS
Was wird für diese Einrichtung benötigt?
Ihr Wi-Fi-Router muss WPS unterstützen. Für dieses Einrichtungsverfahren wird kein Computer oder Smartphone benötigt.
Anleitung
1. Schalten Sie die AeroSphère Base ein.
2. Warten Sie, bis die Status-LED grün blinkt.
3. Drücken Sie die Taste “SETUP” auf der Rückseite der
AeroSphère Base.
4. Drücken Sie die WPS-Taste auf dem Wi-Fi-Router. Gewöhnlich wird
eine LED auf der Taste anfangen, zu blinken. Wenn nichts geschieht,
müssen Sie die Taste eventuell für einige Sekunden gedrückt halten.
Der AeroSphère-Lautsprecher und der Wi-Fi-Router beginnen nun,
sich miteinander zu verbinden.
5. Warten Sie, bis die Status-LED von schnellem grünem Blinken zu
langsamem grünen Blinken übergeht. Sie sind nun erfolgreich mit
Ihrem Wi-Fi-Netzwerk verbunden.
Fehlerbehebung
Wiederholen Sie den Vorgang.
Aktualisieren Sie die Software auf Ihrem Wi-Fi-Router.
Versuchen Sie es mit dem Verfahren “Netzwerkeirichtung über die
AeroSphère-Webseite” im nächsten Kapitel.
Besuchen Sie die Support-Seite von Genevalab.com.
Was ist WPS?
WPS (Wi-Fi Protected Setup ) ist ein einfacher Weg, um ein neues Gerät
mit einem Wi-Fi-Netzwerk zu verbinden. WPS ist bei heutigen Wi-Fi-
Funkroutern oder Wi-Fi-Zugangspunkten eine verbreitete Funktion.
Nach Druck auf die weiße “SETUP”-Taste hinten an der AeroSphère
Base und der “WPS”-Taste am Wi-Fi-Zugangspunkt innerhalb von etwa
einer Minute nimmt die AeroSphère Base automatisch Verbindung mit
dem Wi-Fi-Netzwerk auf.
WI-FI-EINRICHTUNG MIT DER NETZWERK-EINRICHTUNGSWEBSITE VON AEROSPHÈRE
Folgen Sie der detaillierten Beschreibung im “Feature Guide” auf aerosphere.genevalab.com
RÜCKSEITE
STATUS-LED
Gelb Die AeroSphère Base fährt hoch, dies dauert etwa 20 Sekunden
Grün (konstant ) Das Gerät ist erfolgreich mit dem Wi-Fi-Netzwerk und mindestens einem AeroSphère-
Lautsprecher verbunden
Grün (langsam blinkend ) Das Gerät hat sich erfolgreich mit dem Wi-Fi-Netzwerk verbunden
Grün (schnell blinkend ) Das Gerät verbindet sich gerade mit dem Wi-Fi-Netzwerk
Grün (wiederholt einzeln blinkend ) Wi-Fi-Einrichtung läuft (WPS-Verfahren )
Grün (wiederholt doppelt blinkend ) Wi-Fi-Einrichtung läuft (Verfahren Netzwerkeinrichtung über die Website )
Gelb / Grün / Rot (abwechselnd ) Software-Update läuft
Wie wird die CD ausgeworfen?
Sie können die CD auf folgende drei Arten auswerfen:
Halten Sie Ihre Hand etwa 10 mm über den CD-Schlitz. Der CD-
Hand automatisch mit einem Näherungssensor.
Sie können die taste auf der Fernbedienung benutzen
Sie können das Auswurfsymbol der AeroSphère-App verwenden
Ein-/Aus-Schalte
Ein-/Ausschalten
12V POWER
Stecken Sie hier das Netzteil ein.
FM/DAB
Eingang für externe UKW-/DAB-Antenne.
F-Stecker.
Wi-Fi SETUP:
Kurz drücken: Einrichtungsverfahren WPS-Tastendruck
Für 10 Sekunden gedrückt halten: Einrichtungsverfahren Website-Setup
Line-In-Anschluss
Analoger Audio-Eingang (Stereo ),
3,5-mm-Klinkenstecker
Status-LED
Zeigt den aktuellen
Status an,
Details siehe unten

3130
DEUTSCH
DAB/ DAB+
Die AeroSphère Base unterstützt die Sendestandards DAB und DAB+.
So wählen Sie DAB+ aus
s per Fernsteuerung: Drücken Sie die Taste .
s per AeroSphère-App: Nachdem Sie das Symbol für den
AeroSphère-Lautsprecher ausgewählt haben, wählen Sie im
Hauptfenster das DAB-Menü aus.
Auswählen Sie eines Senders
per Fernbedienung: Drücken Sie oder , um die
Radiosender zu wechseln.
per AeroSphère-App: Wählen Sie einen Sender aus der DAB-
Senderliste aus.
Bei der erstmaligen Verwendung von DAB (Sendersuchlauf)
Anfangs hat die AeroSphère Base noch keine DAB-Sender
in Ihrer Region verfügbaren Sender. Nach einem “Scan” werden
die Sender automatisch gespeichert. Die Funktion “Scan” wird
auch nach der Verbringung der AeroSphère Base an einen neuen
Standort mit anderen Radiosendern oder in ein Zimmer mit anderen
Empfangsbedingungen benötigt.
Tippen Sie in der AeroSphère-App auf den Menüpunkt
“Scan” (Suchlauf ).
Sobald alle verfügbaren Sender gefunden wurden, wird die
Liste aktualisiert.
Was ist DAB?
DAB/DAB+ (manchmal auch Digitalradio genannt ) steht nur in
bestimmten Ländern (z.B. in Großbritannien, Deutschland, der Schweiz,
Norwegen, Hong Kong und einigen anderen) zur Verfügung.
AUDIO CD
CD auswählen
per Fernsteuerung: Drücken Sie die Taste .
per AeroSphère-App: Nachdem Sie das Symbol für den
AeroSphère-Lautsprecher ausgewählt haben, wählen Sie im
Hauptfenster das CD-Menü aus.
Grundfunktionen zur Steuerung
per Fernsteuerung: Nutzen Sie die Tasten , und zum
Abspielen, Pausieren und Anspringen von Titeln.
per Aerosphère-App: Nutzen Sie die Symbole , und
Auswerfen einer CD
Halten Sie Ihre Hand über den CD-Schlitz. Der CD-Auswurfsensor
automatisch mit einem Näherungssensor.
per Fernsteuerung: Drücken Sie die Taste .
per AeroSphère-App: Verwenden Sie das Auswurfsymbol in der
AeroSphère-App.
VII ERSTE SCHRITTE MIT DER AEROSPHÈRE BASE
Nach Abschluss: Sie wissen, wie Sie UKW, DAB+ und die Audio-CD mit der Fernbedienung und der AeroSphère-App nutzen können. Es ist keine
weitere Einrichtung erforderlich, da die AeroSphère Base alle AeroSphère-Lautsprecher automatisch
WIE SIE DIE AEROSPHÈRE BASE STEUERN
Sie können die AeroSphère Base mit der AeroSphère-App und der Fernsteuerung eines AeroSphère-Lautsprechers steuern. Die Basis hat keinen
Fernbedienungssensor, so dass Sie die Fernbedienung stattdessen auf einen AeroSphère-Lautsprecher richten müssen.
Wie kann ich die AeroSphère-Lautsprecher und die Basis mit der
App finden?
verfügbaren AeroSphère-Lautsprecher automatisch.
So laden Sie die AeroShère-App herunter
iPhone-Version: Suche nach “AeroSphère” im App Store®
Die App Geneva AeroSphère funktioniert mit iPhone und iPod Touch.
Android-Version: Suche nach “AeroSphère” im Google Play Store.
WEITERE DETAILS
Wie viele AeroSphère-Lautsprecher kann ich mit der AeroSphère
Base verbinden?
Bis zu vier AeroSphère-Lautsprecher.
Warum gibt es eine Verzögerung bei der Umschaltung der
Eingangsquellen der AeroSphère (von/nach FM, DAB, CD)?
Der Ton wird über das Wi-Fi-Netzwerk gestreamt und dann für ein
paar Sekunden in den Lautsprechern gepuffert. Die Audio-Pufferung
geschieht, um Aussetzer aufgrund von Wi-Fi-Netzwerkverkehr zu
minimieren.
Warum gibt es eine Verzögerung, wenn ich den Sender bei DAB
wechsele oder wenn ich zu anderen Titeln auf einer CD springe?
Siehe oben. Nach Druck der CD- oder DAB-Steuertaste auf der
Fernbedienung oder der App (Senderwechsel, Titelsprung) werden
der Sender oder der Titel auf der AeroSphère Base sofort gewechselt,
aber die Audio-Pufferung in den AeroSphère-Lautsprechern fügt eine
Verzögerung hinzu.
Es gibt Audio-Unterbrechungen, wenn ich UKW-Radio höre
Die Funknetzwerkbandbreite ist nicht nur begrenzt, sondern wird auch
mit Bluetooth, anderen Geräte im gleichen WiFi-Netzwerk und Wi-Fi-
Netzwerken in der Nähe geteilt. Möglichkeiten, die Audioaussetzer so
beste Audio-Streaming-Qualität in Ihrem Wi-Fi-Netzwerk sicher”.
Kann ich die AeroSphère Base über die AeroSphère-App ein-
und ausschalten?
Nein, die AeroSphère Base ist die ganze Zeit an, ähnlich wie bei einem
Wi-Fi-Router.
UKW-RADIO
So wählen Sie UKW aus (FM )
Fernsteuerung: Drücken Sie .
AeroSphère-App: Nachdem Sie das Symbol für den AeroSphère-
Lautsprecher ausgewählt haben, wählen Sie im Hauptfenster das
FM-Menü aus.
Einen Sender automatisch mit dem Sendersuchlauf finden
per Fernbedienung: Drücken Sie oder .
per AeroSphère-App: Streichen Sie über die UKW-Frequenzskala.
Einen Sender manuell wählen
AeroSphère-App: Schieben Sie die Frequenzskala auf die
gewünschte Frequenz.
UKW-Speicherplätze
AeroSphère-App: Wählen Sie einen Sender aus der UKW-
Senderliste aus. Um die Senderbelegung zu speichern oder zu
ändern, wählen Sie den Menüeintrag für die Senderliste (Presets).

3332
INFORMATIONS DE SÉCURITÉ IMPORTANTES
1. Lisez ces instructions
2. Conservez ces instructions
3. Respectez tous les avertissements
4. Suivez toutes les instructions
5. N’utilisez pas cet appareil près de l’eau.
6. Nettoyez-le uniquement avec un chiffon sec.
7. Ne bloquez pas les ouvertures de ventillation. Procédez à l’installation
conformément aux instructions du fabricant.
8. N’installez pas l’appareil près d’une source de chaleur telle qu’un radia-
teur, une arrivée d’air chaud, un four ou tout autre appareil (notamment
les amplificateurs) générant de la chaleur.
9. Ne supprimez pas la sécurité de la fiche polarisée ou mise à la terre. Une
fiche polarisée possède deux lames dont l’une est plus large que l’autre.
Une fiche mise à la terre possède deux lames et une broche de terre.
La lame plus large ou la broche sont fournies pour votre sécurité. Si la
fiche fournie ne rentre pas dans votre prise, consultez un électricien pour
remplacer la prise obsolète.
10. Protégez le cordon d’alimentation contre les risques de piétinement ou
de pincement notamment au niveau des fiches, des prises de courant et
des points de raccordement de l’appareil.
11. Utilisez uniquement les fixations et accessoires recommandés par
le fabricant.
12. Utilisez uniquement le chariot, stand, trépied, support ou
table spécifiés par le fabricant ou vendus avec l’appareil. Si
vous utilisez un chariot, soyez prudent lorsque vous déplacez
l’ensemble chariot/appareil pour éviter les blessures en cas
de chute.
13. Débranchez cet appareil en cas d’orage ou s’il n’est pas utilisé pendant
une longue période.
14. Confiez toutes les réparations à un technicien qualifié. La réparation est
nécessaire lorsque l’appareil a été endommagé de quelque façon que
ce soit, comme l’endommagement de la fiche ou du cordon d’alimenta-
tion, un déversement de liquide ou une insertion d’objet dans l’appareil,
l’exposition de l’appareil à la pluie ou à l’humidité, un fonctionnement
anormal ou une chute de l’appareil.
15. N’installez pas cet équipement dans un espace confiné ou encastré
comme une bibliothèque ou endroit similaire et maintenez de bonnes
conditions de ventilation. La ventilation ne doit pas être entravée en
obstruant les ouvertures d’aération avec des objets tels que journaux,
nappes, rideaux, etc.
16. AVERTISSEMENT : Veuillez vous référer aux informations électriques
et de sécurité figurant au bas du boîtier (extérieur ) avant d’installer ou
d’utiliser l’appareil.
17. AVERTISSEMENT : Pour réduire le risque d’incendie ou de choc élec-
trique, n’exposez pas cet appareil à la pluie ou à l’humidité. L’appareil ne
doit pas être exposé à des éclaboussures et de plus, aucun objet rempli
de liquide, tel qu’un vase, ne doit être posé sur l’appareil.
18. ATTENTION : Un risque d’explosion existe si la pile n’est pas remplacée
correctement. Remplacez-la uniquement par une pile du même type ou
équivalente.
19. AVERTISSEMENT : La batterie (batterie ou piles ou bloc-piles ) ne doit
pas être exposée à une chaleur excessive comme le soleil, le feu, etc.
20. AVERTISSEMENT : Lorsque la prise d’alimentation est utilisée comme
dispositif de déconnexion, ce dispositif doit demeurer aisément accessible.
21. Élimination correcte de ce produit. Ce symbole indique que ce produit
ne doit pas être jeté avec les autres déchets ménagers dans toute l’UE.
Afin d’éviter tout effet nocif sur l’environnement ou la santé humaine, en-
gendré par une mauvaise élimination des déchets, recyclez-le de façon
responsable afin de promouvoir la réutilisation durable des ressources
matérielles. Lorsque votre appareil arrive en fin de vie, déposez-le dans
un point de collecte ou de retour ou contactez le revendeur où le produit
a été acheté. Il pourra se charger du recyclage adéquat de l’appareil.
Pile de la télécommande : conserv0ez la pile de la télécommande hors de
portée des enfants. Une mauvaise manipulation peut entraîner un incendie
ou une brûlure chimique. Ne la rechargez pas, ne la démontez pas, ne la
chauffez pas au-delà de 212 ºF (100 ºC ). Remplacez-la exclusivement avec
une pile de même type et de même numéro de modèle (pile bouton au
lithium CR2032, 3 V).
Températures de fonctionnement: La plage de température recommandée
pour l’appareil Model Cinema est comprise entre 5 et 40 ºC.
AeroSphère Base—Utilisez l’adaptateur secteur d’origine : Utilisez
uniquement l’adaptateur secteur d’origine fourni pour faire fonctionner et
recharger l’appareil. Les autres adaptateurs secteurs peuvent lui ressem-
bler visuellement, mais leur utilisation pourrait causer une électrocution et
endommager l’appareil.
Cet équipement est un appareil électrique de classe II ou à double isola-
tion. Il a été conçu de telle sorte qu’il n’a pas besoin d’être relié à la terre.
CONFORMITE
Canada
Cet appareil est conforme la norme d’Industrie Canada exempts de licence
RSS (s ). Son fonctionnement est soumis aux deux conditions suivantes:
(1 ) cet appareil ne peut pas causer d’interférences,et (2 ) cet appareil doit
accepter toute interférence, y compris les interférences qui peuvent causer
un mauvais fonctionnement de l’appareil.
Industrie Canada (IC ): Nr. 10107A -A040
Conformité CE
G-Lab GmbH déclare que cet appareil est conforme aux exigences essen-
tielles et aux autres dispositions pertinentes de la directive 1999/5/CE. La
déclaration de conformité peut être consultée sur demande à G-Lab GmbH,
Zurich, Suisse, ou sur http://genevalab.com.
Ce produit peut être recyclé. Les produits portant ce symbole NE
DOIVENT PAS être jetés avec les déchets ménagers courants. A la
fin du cycle de vie du produit, apportez-le dans un centre de collecte
conçu pour le recyclage des dispositifs électriques et électroniques.
Renseignez-vous sur les points de retour et de collecte auprès de
votre collectivité locale
La directive européenne sur les Déchets d’équipements électriques et
électroniques (DEEE ) a été mise en œuvre pour diminuer considérable-
ment la quantité de déchets enfouis, réduisant de ce fait l’impact environne-
mental sur notre planète et notre santé. Agissez toujours de façon respons-
able en recyclant les produits usagés. Si ce produit peut encore être utilisé,
envisagez de le donner ou de le vendre.
Piles usagées: ne jetez pas les piles usagées n’importe où, suivez les régu-
lations locales. Ne jetez pas les piles dans le feu.
Geneva®est une marque déposée de G-Lab GmbH.
Apple, iPod, iPhone and iPad are trademarks of Apple Computer, Inc. registered in the
U.S. and other countries.
© 2012 G-Lab GmbH. Tous droits réservés. Conformément à la
réglementation sur les droits d’auteur, le présent manuel ne peut être copié, en tout ou
partie, sans l’accord écrit de G-Lab GmbH.
La marque et les logos Bluetooth®sont des marques déposées appartement à Bluetooth
SIG, Inc.
La marque EmbracingSound®est la propriété d’Embracing Sound Experience AB
FRANÇAIS
VIII FEHLERBEHEBUNG UND HÄUFIGE FRAGEN
Siehe auch areosphere.genevalab.com
ALLGEMEINES
Warum gibt es zwei
-Tasten auf der Fernbedienung?
Die obere -Taste aktiviert den analogen LINE-IN-Audioeingang auf
der Rückseite eines AeroSphère-Lautsprechers.
Die untere -Taste ( neben CD ) wählt den analogen Audio-Eingang
auf der Rückseite der AeroSphère Base aus. Das Audiosignal
von diesem Eingang wird an alle angeschlossenen AeroSphère-
Lautsprecher gestreamt.
Wie kann ich die Batterie der Fernbedienung auswechseln?
1. Suchen Sie das kleine Loch auf der schwarzen dem Benutzer
zugewandten Seite.
2. Schieben Sie den mitgelieferten Stift in dieses Loch und stoßen Sie
ihn vorsichtig nach vorne.
Alternativ können Sie auch eine Sicherheitsnadel verwenden.
3. Drücken Sie die Spitze vorsichtig nach links
4. Das Batteriefach rutscht heraus. Ersetzen Sie die Batterie
(3V-Lithiumzelle, 3V CR2032). Achten Sie auf die richtige
Batteriepolung (Seite mit dem +Pol nach unten ).
2
3
4
Wie kann ich die Bässe und Höhen einstellen?
Verwenden Sie das Musiknoten-Symbol in der AeroSphère-App.
Stromverbrauch im Standby
AeroSphère Large: 0,47 Watt ( Ausschalten: Verwenden Sie die Power-
Taste auf der Fernbedienung oder den Ein-/Aus-Schalter auf der
Rückseite des Lautsprechers)
AeroSphère Small: 0,3 Watt ( Ausschalten: Verwenden Sie die Power-
Taste auf der Fernbedienung oder den Ein-/Aus-Schalter auf der
Rückseite des Lautsprechers)
AeroSphère Base: 0,3 Watt ( Ausschalten: Schiebeschalter in Stellung
“OFF” bringen)
Warum schalten sich die AeroSphère Small und AeroSphère large
selbsttätig aus?
Der AeroSphère-Lautsprecher schaltet sich automatisch nach
15 Minuten aus, wenn kein Audiosignal anliegt. Dies ist eine
Energiesparfunktionen, die per Gesetz in vielen Ländern erforderlich ist.
WI-FI-EINRICHTUNG
Wie stelle ich das Gearät auf die Werkseinstellungen zurück?
AeroSphère-Lautsprecher: Halten Sie den Ein-/Aus-Schalter auf der
Rückseite der Lautsprecher für 10 Sekunden gedrückt, bis die Anzeige
anfängt, rot zu blinken. Dann nehmen Sie den Finger von der Taste.
AeroSphère Base: Halten Sie die Wi-Fi-Taste für einige Sekunden
gedrückt und stellen Sie dabei den Ein-Aus-Schalter von OFF auf ON.
Was passiert, wenn ich das Gerät auf die
Werkseinstellungen zurücksetze?
1. Die Wi-Fi-Netzwerkeinstellungen werden zurückgesetzt.
2. Das Wi-Fi-Einrichtungsverfahren WAC wird gestartet ( nur bei den
AeroSphère-Lautsprechern).
Sind die verfahren WAC und “Netzwerkeinrichtung per Website”
zur gleichen Zeit aktiv?
Ja, beide Verfahren sind gleichzeitig verfügbar. Wenn Sie ein iOS-
Gerät mit iOS 7 oder einer neueren Version haben, können Sie das
vorübergehende Wi-Fi-Netzwerk nicht aus dem Wi-Fi-Menü in den iOS-
Einstellungen auswählen. Bei einem iOS-Gerät mit iOS 6 oder älter wird
Ihnen das WAC-Verfahren im Wi-Fi-Einrichtungsmenü nicht angezeigt.
BLUETOOTH
Mir gelingt keine Verbindung mit dem AeroSphère-Lautsprecher.
1. Wählen Sie Bluetooth mit der Fernbedienung aus - die Anzeige
muss blau sein (stetig oder blinkend ).
2. Wenn die Anzeige nicht blinkt, ist bereits ein anderes Gerät
angeschlossen. Dieses Gerät muss zuerst ausgeschaltet werden -
nur ein Gerät kann gleichzeitig angeschlossen werden.
3. Setzen Sie Bluetooth laut den nachstehenden Anweisungen zurück.
Bluetooth zurücksetzen
Es können bis zu acht angekoppelte Bluetooth-Geräte (“Pairings”)
gespeichert werden. Um den Speicher zu löschen, führen Sie die
folgenden Schritte aus:
1. Schalten Sie die AeroSphère-Lautsprecher ein und wählen Sie mit
der Fernbedienung aus.
2. Innerhalb von 5 Sekunden nach Umschalten auf den Bluetooth-
Modus drücken Sie die Taste auf der Fernbedienung für
mindestens 5 Sekunden.
3. Koppeln Sie Ihr Handy wieder an.
Während der Ankopplung (“Pairing”) fragt mein Smartphone nach
einer PIN—wie lautet die PIN-Nummer?
Wenn das Telefon zur Eingabe einer PIN auffordert, geben Sie “0000”
ein (vier Nullen ).
AIRPLAY
Die AeroSphère-Lautsprecher tauchen im AirPlay-Symbol von
iTunes nicht auf
Das AirPlay-Symbol wird in iTunes oder auf dem iPhone nur dann
angezeigt, wenn ein AirPlay-Lautsprecher in Ihrem Wi-Fi-Netzwerk
gefunden wurde. Prüfen Sie, ob der AeroSphère-Lautsprecher
erfolgreich mit Ihrem Heimnetzwerk verbunden ist. Die Anzeige muss
stetig grün leuchten.
Wie verhalten sich mehrere AirPlay-Lautsprecher im gleichen
Netzwerk zusammen?
iTunes kann mehr als einen AirPlay-Lautsprecher gleichzeitig anspielen.
Die Musik bleibt immer synchronisiert.
SUPPORT
Service und Reparatur
Wenn das Produkt beschädigt ist und repariert werden muss, wenden
Sie sich bitte an Ihren Händler. Besuchen Sie die Webseite www.
genevalab.com, um einen Händler in Ihrer Nähe zu
Garantie
Siehe die besonderen Bedingungen für Ihr Land unter www.genevalab.com.

3534
QUE FAIRE ENSUITE ?
AeroSphère Small & Large
1. Démarrage rapide avec AeroSphère Small et Large........ Seite 36
À l’issue de cette étape : vous pouvez diffuser de la musique via Bluetooth
sur le haut-parleur AeroSphère (Temps nécessaire 5 minutes).
2. Configuration du Wi-Fi pour AeroSphère Small et Large .. Seite 38
À l’issue de cette étape : le haut-parleur AeroSphère est connecté
à votre réseau Wi-Fi. Vous êtes maintenant prêt( e ) à utiliser AirPlay,
DLNA et toutes les sources audio à partir de l’AeroSphère Base (FM,
DAB+, Audio CD) ( Temps nécessaire : 5 minutes ).
3. Premiers pas avec AeroSphère Small et Large ................ Seite 40
À l’issue de cette étape : vous savez comment utiliser AirPlay,
la télécommande.
AeroSphère Base
1. Démarrage rapide avec AeroSphère Base........................ Seite 43
À l’issue de cette étape : vous avez branché tous les câbles et
minutes).
2. Configuration Wi-Fi pour AeroSphère Base...................... Seite 45
À l’issue de cette étape : l’AeroSphère Base est connecté à votre
réseau Wi-Fi. Vous êtes maintenant prêt(e) à écouter la radio FM, la
radio DAB+ et des CD audio à partir de l’AeroSphère Base (Temps
nécessaire : 5 minutes).
3. Premiers pas avec AeroSphère Base ................................ Seite 46
À l’issue de cette étape : vous savez comment utiliser la radio FM,
la radio DAB+ et les CD audio avec la télécommande et l’application
AeroSphère. Aucun autre réglage n’est nécessaire car l’AeroSphère
Base détectera automatiquement tous les haut-parleurs AeroSphère.
Vous rencontrez des problèmes ? ........................................... Seite 48
Consultez la section « Dépannage et FAQ » et le « Guide des fonctions (Feature Guide) » qui est disponible sur aerosphere.genevalab.com.
SOUHAITEZ-VOUS EN SAVOIR PLUS ?
Utilisez le « Guide des fonctions (Feature Guide ) » pour en savoir plus sur le système.
appareils Android et iOS, ainsi qu’avec les ordinateurs Windows et Mac.
Vous pouvez trouver le « Guide des fonctions ( Feature Guide) » sur notre site Internet : aerosphere.genevalab.com
I À PROPOS DU SYSTÈME AEROSPHÈRE DE GENEVA
AEROSPHÈRE SMALL, LARGE ET BASE
AeroSphère Small et AeroSphère Large
AeroSphère Small et AeroSphère Large sont des haut-parleurs actifs
AirPlay®(via Wi-Fi®
)
DLNA®(via Wi-Fi )
audio Bluetooth®(Y compris le codec de haute qualité aptX®
)
Line-In
FM, DAB+ et CD audio, avec l’AeroSphère Base en option
Dans ce document, le terme « haut-parleur AeroSphère » se réfère à la
fois aux modèles AeroSphère Small et AeroSphère Large.
Les haut-parleurs peuvent être contrôlés via
La télécommande et/ou
L’application AeroSphère ( iPhone®or Android®
)
AeroSphère Base
Lorsque vous ajoutez AeroSphère Base à votre réseau domestique, les
fonctions suivantes seront ajoutées à tous les haut-parleurs AeroSphère
connectés :
Radio FM
Radio DAB/DAB+ (ne fonctionne que dans les pays où la DAB est
disponible)
CD audio
Entrée Line-In supplémentaire
Jusqu’à quatre haut-parleurs AeroSphère peuvent être ajoutés à
AeroSphère Base. AeroSphère Base diffuse des contenus audio à
partir de CD, de radio FM ou DAB sur jusqu’à quatre haut-parleurs
AeroSphère connectés simultanément. AeroSphère base est contrôlé
par l’application AeroSphère (iPhone ou Android). En outre, la
plupart des fonctions peuvent également être contrôlées avec la
télécommande.
APPLICATION AEROSPHÈRE
Si votre smartphone est connecté à votre réseau domestique Wi-Fi, vous pouvez contrôler tous les produits AeroSphère à l’aide de l’application
AeroSphère. Les applications pour iPhone et Android sont disponibles. Aucune installation n’est nécessaire car l’application Aerosphère trouvera
automatiquement tous les haut-parleurs AeroSphère et l’AeroSphère Base.
Fonctions
Montrer tous les produits AeroSphère présents dans votre
réseau Wi-Fi
Régler les basses et les aigus sur tous les haut-parleurs AeroSphère
Lancer d’autres applications de streaming sur votre smartphone
Contrôler les fonctions de radio FM, de radio DAB+ et de CD audio
de l’AeroSphère Base
Changer les noms de tous les haut-parleurs, par exemple en
« Chambre » et « Salon »
Comment télécharger l’application AeroSphère
Version pour iPhone : Cherchez « AeroSphere» dans l’App Store®
L’application AeroSphère de Geneva fonctionne avec l’iPhone et
l’iPod Touch.
Version pour Android : Cherchez « AeroSphere » dans le Google
Play store.
FRANÇAIS

3736
CONFIGURATION DU BLUETOOTH
Les téléphones mobiles, les tablettes et les ordinateurs avec Bluetooth peuvent se connecter au haut-parleur AeroSphère et lire de la musique
en charge le codec de haute qualité aptX.
Configuration initiale (« jumelage ») avec l’iPhone, l’iPad ou l’iPod touch
1. Appuyez sur le bouton de la télécommande.
2. Sélectionnez « Réglages » sur votre iPhone. Sélectionnez « Général
/ Bluetooth ». Activez le Bluetooth. Les nouveaux périphériques
Bluetooth sont détectés automatiquement.
3. Attendez jusqu’à ce que le message « AeroSphère Small/Large ...
(Not Paired ) » apparaisse.
4. Sélectionnez « AeroSphère... ». Le téléphone est maintenant en train
de connecter (« jumelage ») au haut-parleur AeroSphère.
5. Une fois le jumelage réalisé avec succès, vous pouvez lire de la
musique sur un iPhone, un iPad ou un iPod touch et l’écouter à
partir du haut-parleur AeroSphère.
Réglages du Bluetooth sur l’iPhone®
LIRE DE LA MUSIQUE AVEC BLUETOOTH
La plupart des smartphones se connectent automatiquement au haut-
Appuyez sur le bouton de la télécommande. Lorsque le
Maintenant, la musique en cours de lecture sur votre smartphone
est diffusée automatiquement sur le haut-parleur AeroSphère.
Informations de statut sur l’affichage
Bleu, fixe : connexion établie avec succès.
Bleu, clignotement rapide : à la recherche d’appareils qui ont déjà
été jumelés.
Bleu, clignotement lent : jumelage/pas de connexion active.
Guide de jumelage pour les autres appareils et téléphones mobiles
Rendez-vous sur le site www.genevalab.com et sélectionnez «Support ».
Sélection du Bluetooth en tant que sortie
audio (centre de contrôle d’iOS7 )
II DÉMARRAGE RAPIDE AVEC AEROSPHÈRE SMALL ET LARGE
Temps nécessaire : 5 minutes
À l’issue de cette étape, vous pouvez diffuser de la musique via Bluetooth sur le haut-parleur AeroSphère.
ALIMENTATION ÉLECTRIQUE DU HAUT-PARLEUR
Brancher l’alimentation électrique
Placez le haut-parleur AeroSphère soigneusement sur le côté. Ne posez
pas AeroSphère Large sur sa tête. Connectez une des extrémités du
cordon d’alimentation au connecteur à la prise située en bas du haut-
parleur AeroSphère.
Maintenez l’extrémité du cordon d’alimentation CA avec vos doigts et
poussez le connecteur avec un mouvement de va-et-vient jusqu’à ce qu’il
soit complètement inséré. Assurez-vous que le cordon d’alimentation
d’alimentation dans une prise de courant murale.
Télécommande
télécommande.
Allumez le haut-parleur AeroSphère
Appuyez sur le bouton marche/arrêt de la télécommande , ou
appuyez sur le bouton marche/arrêt à l’arrière du haut-parleur. Le logo
de Geneva devient alors jaune.
Utilisation du Bluetooth
Appuyez sur le bouton de la télécommande, et attendez jusqu’à
Bluetooth de votre smartphone. Pour des instructions détaillées, allez
réseau Wi-Fi.
Maintenant, allez au chapitre « Configuration du Wi-Fi pour
AeroSphère Small et AeroSphère Large ».
Pour utiliser AirPlay, DLNA ou Geneva Multiroom, vous devez connecter
les haut-parleurs AeroSphère à votre réseau domestique.
Positionnement correct d’AeroSphère Large
AeroSphère Large est un système audio de haute performance, qui
plaque de métal du fond peut devenir chaude. Ne posez pas le haut-
parleur sur une surface sensible à la chaleur (comme le bois non traité,
etc.). La surface doit être plane pour que l’air circule correctement sous
l’appareil. Le haut-parleur ne doit pas être placé sur un lit, un canapé
ou toute surface similaire qui pourrait bloquer la ventilation naturelle.
FRANÇAIS
This manual suits for next models
2
Table of contents
Languages:
Other Geneva Speakers manuals