Genie GR-20J User manual

SAFETY NOTICE 120012
1 of 2
Date: 29-10-2012
Models Affected: GR-20J & GR-26J
Serial Numbers affected: GRJ10-1 to GRJ10-120
GRJ11-121 to GRJ11-309
GRJ12-310 to GRJ12-352
Subject: Unintended Machine Movement
Allowable Hours: 30 minutes
Issue:
Genie has determined that a braking system malfunction exist on the above referenced GRJ
machines. During machine start-up, the brakes can briefly release when the emergency stop is
pulled out (i.e. power on) or when the key switch for platform / off / ground operation is activated.
Unintentional release of the brakes can result in unintended machine movement.
Action Required:
This safety notice requires the addition of a relay in the brake system.
1. Locate all machines within the models and serial range referenced above.
2. Fill out the attached parts order form and return to Terex AWP Parts and Service department
to receive the brake system relay kit P/N 218069.
Installation of the relay kit must take place as soon as possible but no later than 30 days
from receipt of the kit.
Continued Use:
Machines may remain in service while waiting for the kit provided the machine is on firm
level ground during machine power-up.

SAFETY NOTICE 120012
2 of 2
Warranty:
The labor and travel distance required to perform this inspection and installation are covered
under the provisions of our warranty agreement. Warranty claims can be submitted online , fax or
e-mail. Please combine as many machines as possible on one claim form. If you need more
information about filing a warranty claim, call Terex AWP warranty department.
If you are the owner of an affected machine and are not an authorized Terex AWP dealer,
please contact your nearest Terex AWP dealer for assistance in completing this bulletin.
Only Terex AWP Authorized Dealers will be reimbursed for labor or any other costs
associated with this bulletin under the provisions of our standard warranty terms and
conditions.
Local norms and regulations require that the seller of a Genie machine report to Genie the model
and serial number of each machine sold, as well as the name, address, and telephone number of
the new owner, within 60 days of the sale.
Enclosures:
Machine List Report
New Owner Update Form
Parts Order Form
UK: 00 44 1476 584 333
France: 00 33 237 260 986
Germany: 00 49 422 149 1821
Iberica: 0034 900 808 110
Italy: 0039 075 941 8171
Sweden: 0046 3157 5101
Middle East: 0097 143 391 381 or
0097 150 459 7937
All other locations: 0031 653 221 908

Safety Notice 120012
New Owner Update Form
(for updating machine owner information only)
Local Norms and Regulations requires that the seller of a Genie machine report to Genie the model and
serial number of each machine sold, as well as the name, address, and telephone number of the new
owner, within 60 days of the sale.
•If you have sold a machine, list the complete model and serial number (examples: GRJ10-110 or
GRJ11-225 or GRJ12-315), address and phone number of the new owner.
New Owner Information:
Machine 1 Machine 2 Machine 3
Model*
Serial Number*
Owner Name*
Address 1*
Address 2
City/State/Zip*
Phone Number*
Contact Person
* Required fields.
Seller Information:
Date:
Company Name:
Account #:
Address:
(street)
(city)
State, zip code
Phone #:
•List any machines that could not be inspected or repaired because of the following:
Model & Serial Number Scrapped Exported Stolen Others (explain)
- - - -
- - - -
- - - -
- - - -
Fax To: UK 0044 1476 584 330 Italy: 0039 075 941 8146
France: 0033 237 260 998 Sweden: 0046 3157 5104
Germany: 0049 4221 491 820 Middle East: 0097 143 990 382
Iberica: 0034 935 725 080 All other locations: 0031 165 510 826

Safety Notice 120012
Parts Order Form
EMEAR
Fax this form to Terex AWP Parts Department to receive the indicated Brake system relay kit for
your machine. List the model and serial number of each affected machine.
Kit P/N = 218069
•Please list the complete model and the serial number of your machine (examples: GRJ10-110 or
GRj11-225 or GRJ12-315).
Send Parts to: (If you would like to send
Date: parts to a different location)
Company Name: Company Name:
Ordered by: Attn:
Account # (If applicable): Account # (if applicable):
Address: Address:
(street): (street):
(city): (city):
(state, zip code): (state, zip code):
Phone: Phone:
Fax to Holland : 00 31 165 511 148
Model Serial Number Model Serial Number
- -
- -
- -
- -
- -
- -
- -

Installation Instructions
Brake Release Relay
GR
-
2
0J
GR
-
2
6J
Part No. 218071
Rev A

Rev. A Instructions
Introduction
2 GR-20J • GR-26J Part No. 218071
Introducti on
Observe and Obey:
This procedure shall be completed by a person
trained and qualified on the repair of this
machine.
Immediately tag and remove from service a
damaged or malfunctioning machine.
Repair any machine damage or malfunction
before operating the machine.
Before Starting Installation:
Read, understand and obey the safety rules
and operating instructions in the appropriate
operator's manual.
Be sure that all necessary tools and parts are
available and ready for use.
Read this procedure completely and adhere to
the instructions. Attempting shortcuts may
produce hazardous conditions.
Indicates that a specific result is expected after
performing a series of steps.
Indicates than an incorrect result has occurred
after performing a series of steps.
Note: These installation instructions only apply
to the Genie models listed below, as required
by Safety Notice 120012.
GRJ-20J
GRJ-26J
Tools Required:
Side cutters
Ratchet
10mm socket
8mm Allen key
Cable tie
Components of Kit 218069
Kit, Relay, GRJ Brake System
Genie part number 218070
Qty. 1
Installation Instructions
Genie part number 218071
Qty. 1

Rev. A Instructions
Procedure
Part No. 218071 GR-20J • GR-26J 3
Procedure
Brake Relay Installation
Perform this procedure on a firm, level surface with
the boom in the stowed position and disconnected
from any AC power source.
Note: Refer to the schematic on page 6 as a guide.
1Turn the key switch to the off position and push
in the red Emergency Stop button.
2Open the turntable covers. Remove the ground
control side cover and set aside.
3Using an 8mm allen key, remove the battery
cable from the positive battery terminal. Refer
to Illustration 1.
Electrocution/burn hazard.
Contact with electrically charged
circuits could result in death or
serious injury. Remove all rings,
watches and other jewelry.
Illustration 1
4At the ground control, remove the wing nut and
washer and set aside. Open the cover.
5Cut the cable tie that secures the black
protective wrap on the controller.
6Locate and remove the pink wire from the
brake release toggle switch. Refer to
Illustration 2.
Illustration 2
WARNING

Rev. A Instructions
Procedure
4 GR-20J • GR-26J Part No. 218071
7Connect the pink wire from terminal 30 of the
relay kit (Genie part number 218070) to the
wire removed in step 6. Secure the connection
with the supplied heat shrink. Refer to
Illustration 3.
Illustration 3
8Connect the pink wire from terminal 87 of the
relay kit to the brake release toggle switch.
Refer to Illustration 2.
9Using a 10mm socket and ratchet, connect the
green/yellow wire of terminal 85 of the relay kit
to terminal B- of the motor controller. Refer to
Illustration 4.
10 Using a 10mm socket and ratchet, connect the
red wire of terminal 86 of the relay kit to
terminal B+ of the motor controller. Refer to
Illustration 4.
11 Insert the relay assembly into the protective
flexible sleeve and secure using a cable tie.
Refer to Illustration 4.
Illustration 4
1terminal B-
2terminal B+
3protective sleeve
12 Close the ground control box and secure with
the retaining fasteners removed in step 4.
1 2 3

Rev. A Instructions
Procedure
Part No. 218071 GR-20J • GR-26J 5
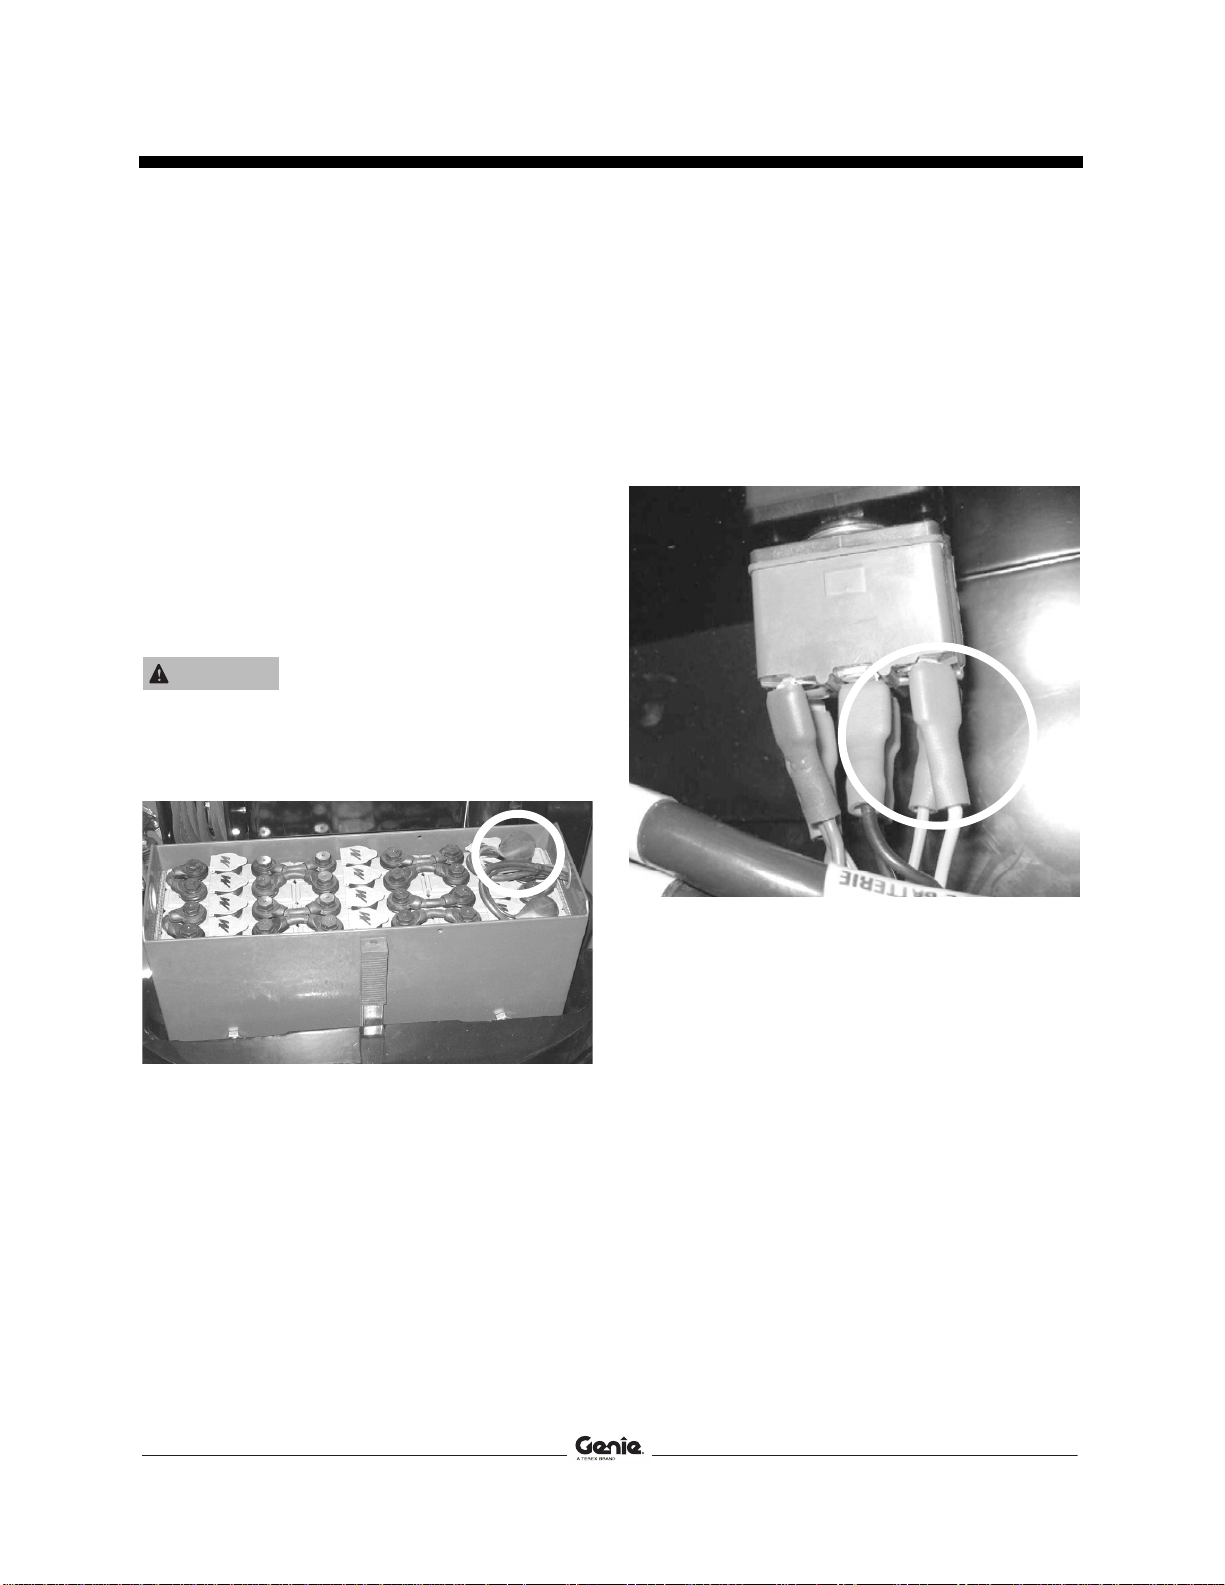
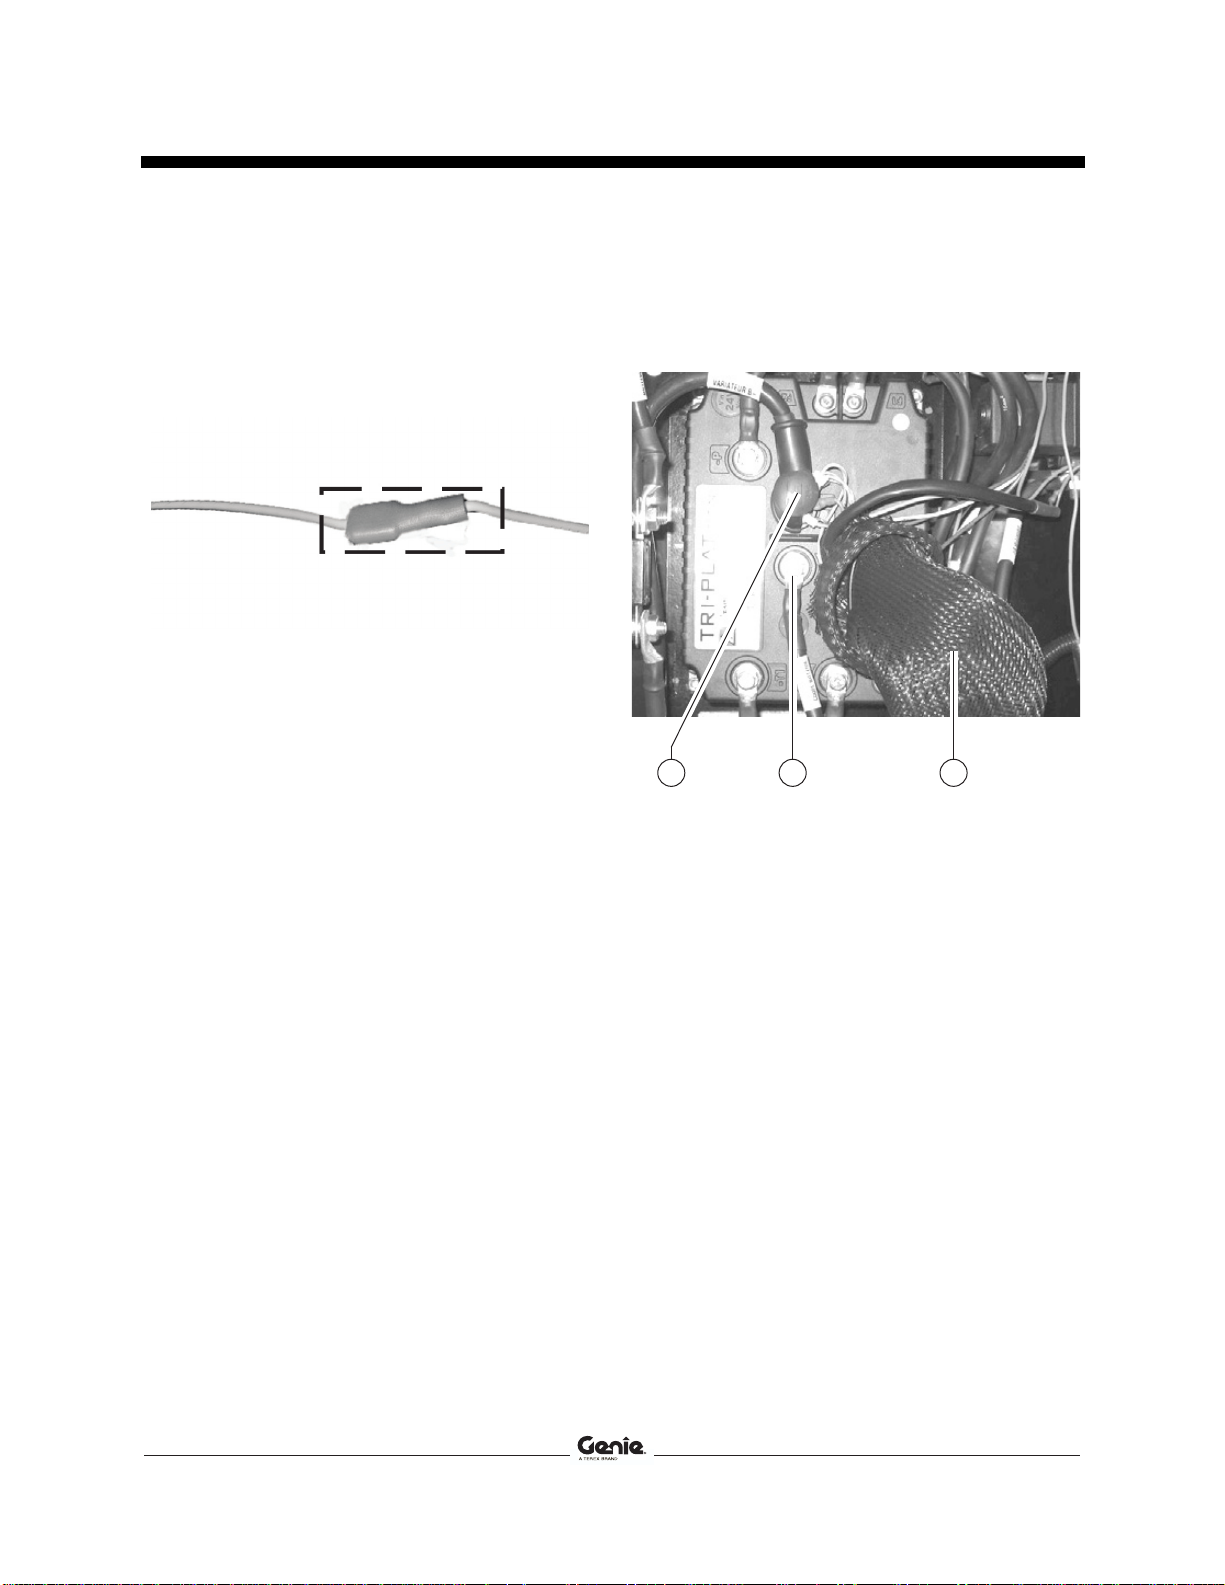
13 Using an 8mm allen key, connect the battery
cable to the positive battery terminal. Refer to
Illustration 1.
Electrocution/burn hazard.
Contact with electrically charged
circuits could result in death or
serious injury. Remove all rings,
watches and other jewelry.
14 Install the ground control side cover. Close the
turntable covers.
15 Perform function test. Refer to the Operator's
Manual on your machine.
16 Return the machine to service.
17 Fill out and sign the attached completion form
and fax or email to Terex AWP Warranty
Department. This will serve as verification that
you have completed Safety Notice 120012.
If you have any further questions regarding these
instructions or need assistance, please contact the
Genie Service Department at one of the following
telephone numbers:
United States: 800-536-1800
Canada: 425-881-1800
Europe: UK 0044 1476 584 333
France 0033 237 260 986
Germany 49 4221 491 821
Iberica 0034 935 725 090
Italy 0039 075 941 8132
Scandinavia 0046 3157 5154
Other locations 0031 653 221 908
Middle East: 0097 143 391 800 or
0097 150 459 7937
Australia: 61 7 3456 4444
All other locations 001-425-881-1800
WARNING

Rev. A Instructions
Schematic
6 GR-20J • GR-26J Part No. 218071
Schematic

SAFETY NOTICE
120012
Completion Form
Your signature on this form will verify that you have installed kit P/N 218069.
Fax to: United States 877-738-7530 United Kingdom 0044 1476 584 330
Canada 425-498-7530 France 0033 237 260 998
Australia 61 733751002 Germany 0049 4221 491 820
All other locations 001-425-498-7530 Italy 0039 075 941 8146
Iberica 0034 935 725 080
Scandinavia 0046 3157 5104
Middle East 0097 143 990 382
All other locations 0031 165 510 826
Email to: awp.emeartechnicalsupport@terex.com
Date:
Company Name:
Account # (if applicable):
Address:
(street)
(city)
(state, zip code)
Phone:
Please list the complete serial number (example: GRJ10-110 or GRJ11-277).
Serial Number: Serial Number:
Print (service manager) Signature Date
Instructions PartN o. 218071
Rev. A
GR-20J • GR-26J
Other manuals for GR-20J
2
This manual suits for next models
1
Table of contents
Popular Relay manuals by other brands

E.J.A. Engineering
E.J.A. Engineering Guardmaster Minotaur MSR14T installation instructions

Siemens
Siemens 62 Series Installation and service instructions

Berker
Berker RolloTec 2975 operating instructions

LEGRAND
LEGRAND Wattstopper LMRC-611-16M quick start guide

GE
GE B90 instruction manual

Siemens
Siemens 7SD502 instruction manual