40681504070, 11/2018
INSTRUCCIONES PARA EL CONTROL
REMOTO UNIVERSAL
ADVERTENCIA
UNA PUERTA EN MOVIMIENTO PUEDE PROVOCAR LESIONES GRAVES O MUERTE
•NO instalar el transmisor a menos que el dispositivo de seguridad del operador de la puerta
funcione conforme a lo requerido por el manual del operador de la puerta. La Consola Mural debe
estar instalada a la vista de la puerta, a 5 pies (1.52 m) como mínimo por encima del suelo y alejada
de las piezas móviles de la puerta.
•Mantener a la gente alejada de la abertura mientras la puerta se esté moviendo.
•NO permitir que los niños jueguen con el transmisor o con el operador de la puerta.
•Si la reversa de seguridad no funciona debidamente:
•Cerrar la puerta, luego desconectar el abrepuertas utilizando la manija de desactivación manual.
•NO utilizar el transmisor ni el operador de la puerta.
•Consultar los Manuales del Propietario de la Puerta y del Abrepuertas antes de tratar de realizar
reparaciones.
Declaración de la FCC Parte 15.21 :
Cambios o modicaciones que no hayan sido expresamente aprobados por la parte
responsable del cumplimiento podrían invalidar la autoridad del usuario de operar el aparato.
Declaración de la FCC / IC:
Este aparato cumple con la(s) norma(s) de la FCC Parte 15 y RSS de exención de licencia
del Ministerio de Industria de Canadá. Su operación está sujeta a la dos condiciones
siguientes: (1) este aparato no puede provocar interferencia perjudicial, y (2) este aparato
debe aceptar toda interferencia recibida, incluyendo la interferencia que pueda provocar un
funcionamiento indeseado del aparato.
Para obtener ayuda o respuestas, contactarse con el departamento de Atención al
Cliente, mediante el chat del sitio web (www.geniecompany.com) o por teléfono, al
1-800-354-3643 para obtener ayuda con la programación.
Para información sobre piezas: www.geniecompany.com/
patent, ©2018 GMI Holdings DBA, The Genie Company
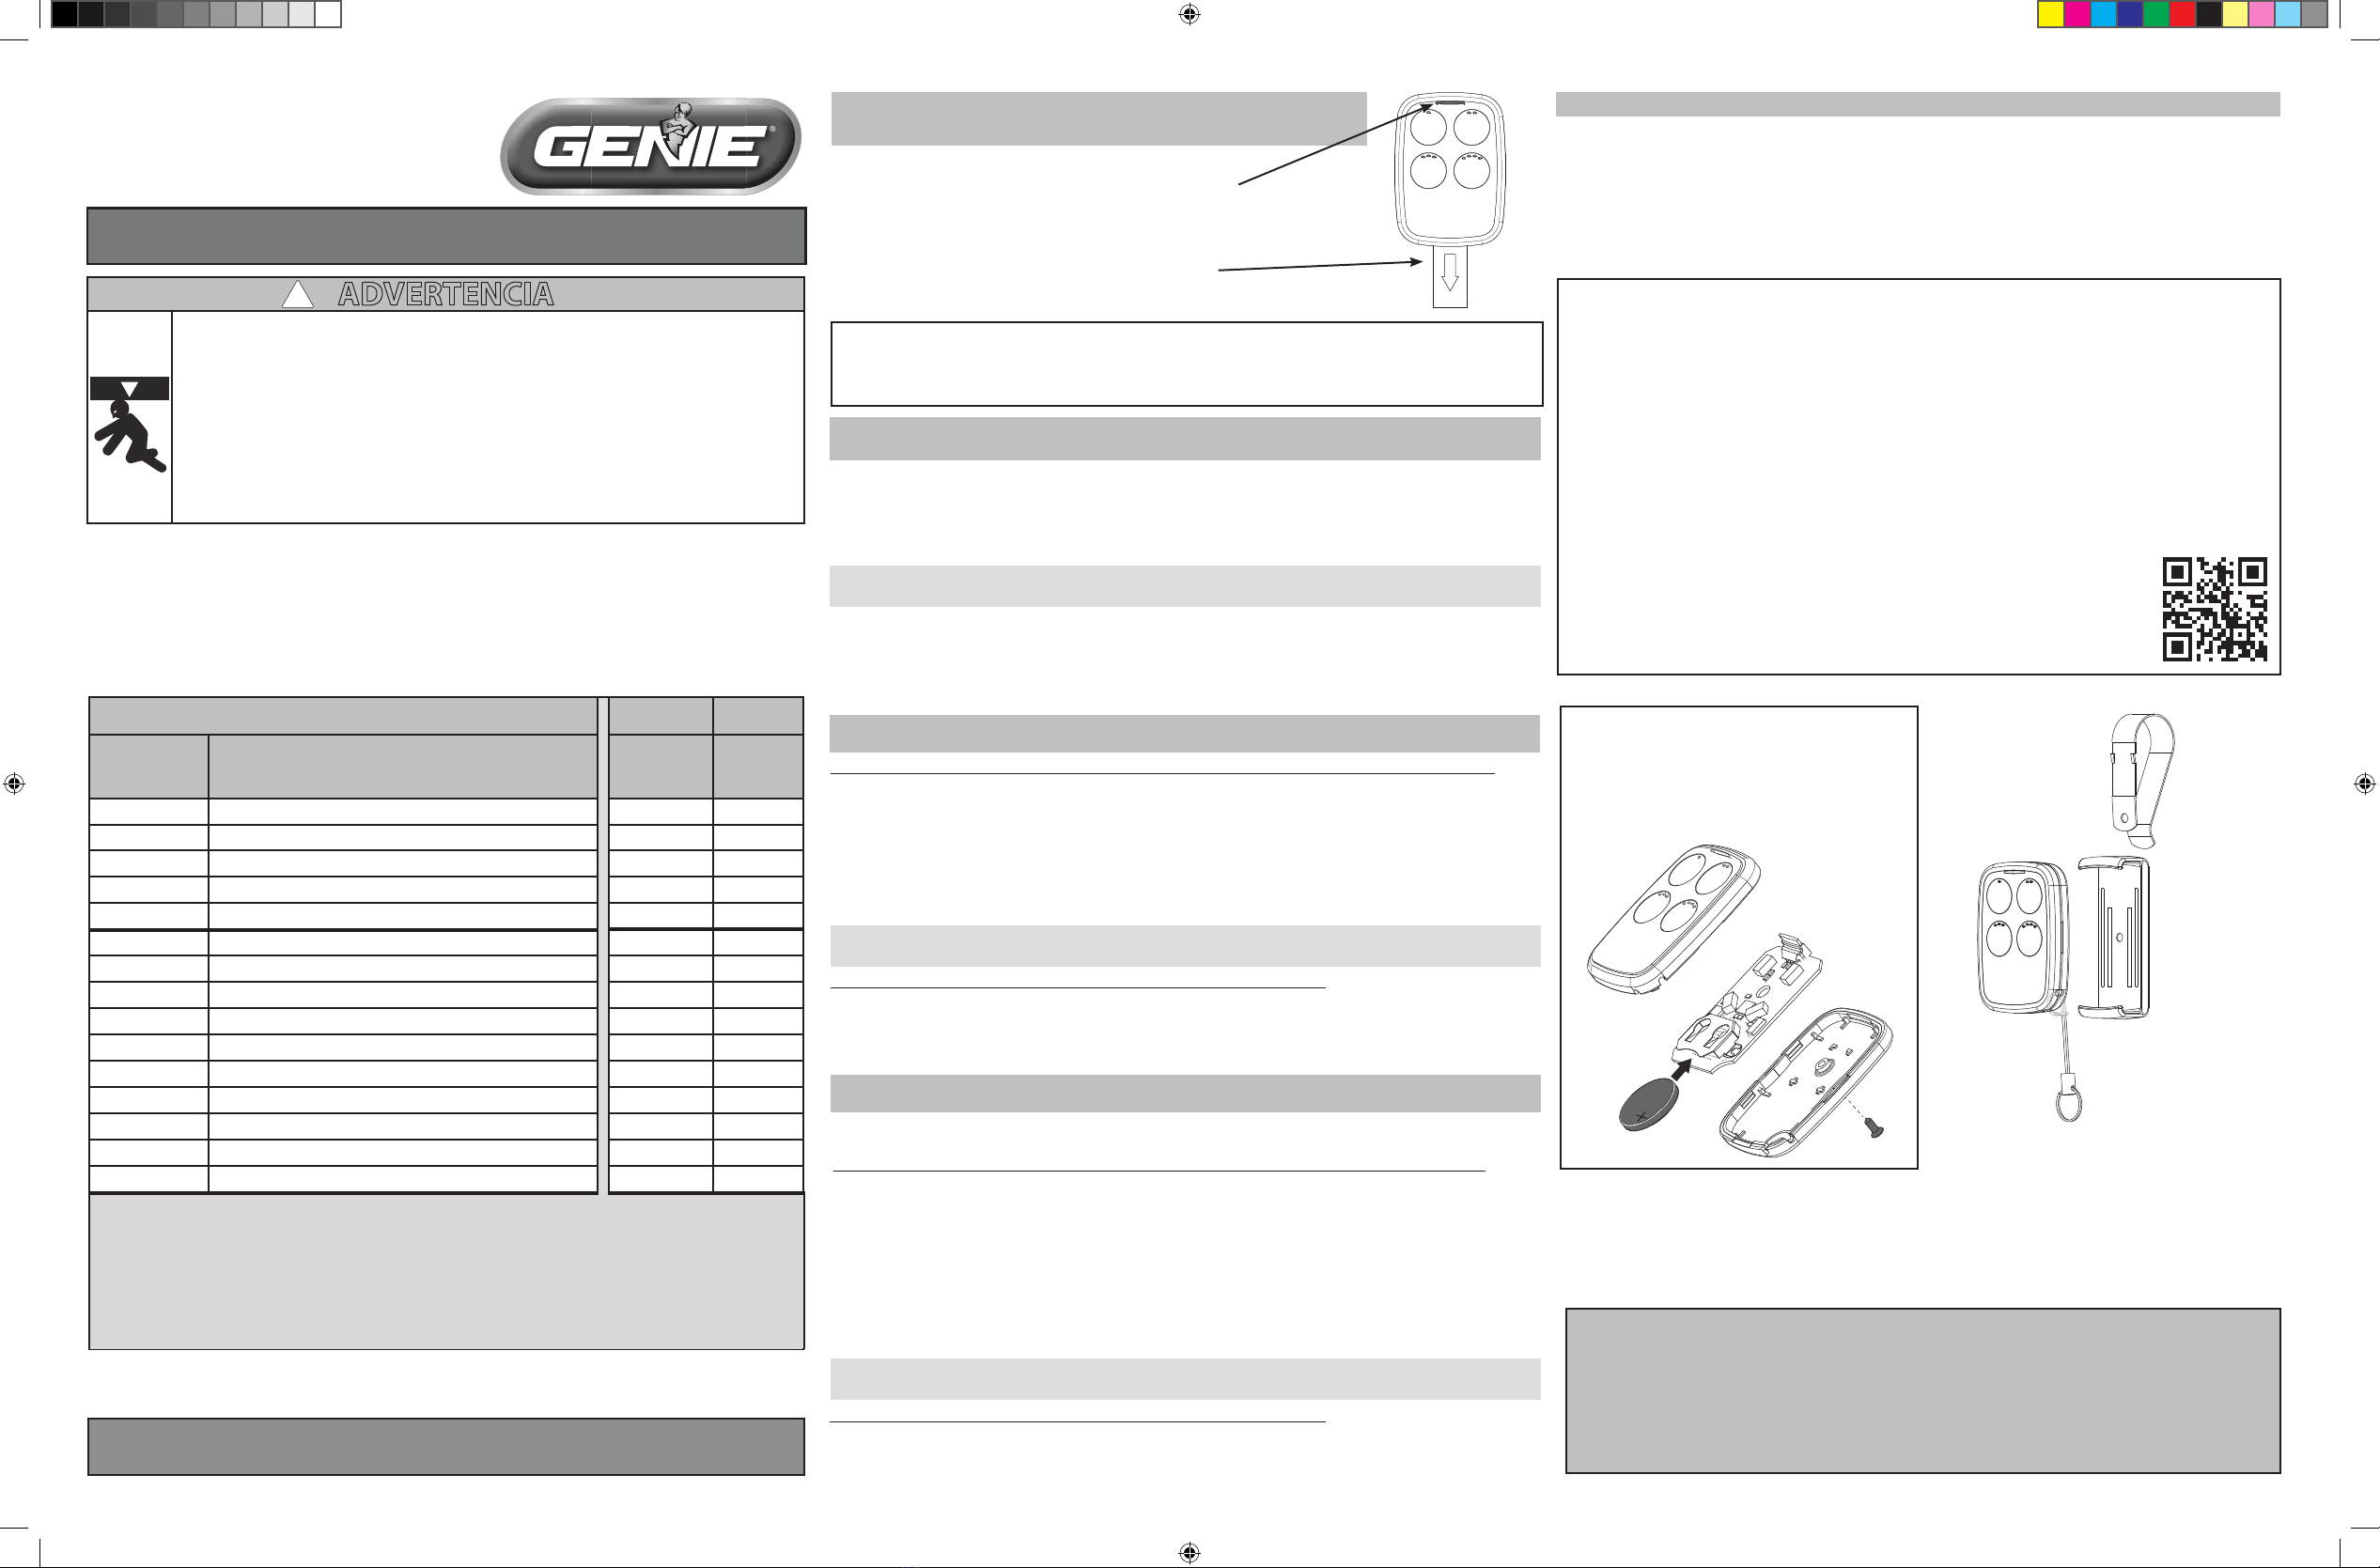
PASO 1 - ACTIVAR EL CONTROL REMOTO/DISPOSICIÓN
DE LOS BOTONES Y LED
Lengüeta de activación: Tirar de la lengüeta para
activar el control remoto.
NO SE DEBE UTILIZAR CON NINGÚN ABREPUERTAS DE GARAJE FABRICADO ANTES DE 1993.
UN SISTEMA DE REVERSA SIN CONTACTO (FOTOCÉLULAS) DEBE ESTAR INSTALADO Y EN BUEN
FUNCIONAMIENTO
El control remoto universal se puede programar para que funcione con diferentes marcas y tipos de abrepuertas de
garaje. Ubicar la marca y las especicaciones del abrepuertas consultando la etiqueta en el cabezal del abrepuertas,
en el manual de instrucciones, en los controles remoto presentes para el abrepuertas o con el fabricante original del
abrepuertas.
A continuación están las marcas y las especicaciones con las cuales este control remoto es compatible, y los
métodos que se pueden usar para programarlos. Usar el Cuadro A a continuación para encontrar la combinación
de abrepuertas/especicaciones y luego continuar con un método de programación disponible. Todas las
combinaciones indicadas se pueden programar usando el MÉTODO DE CLONACIÓN.
NOTA: Durante la programación, el abrepuertas de garaje funcionará. Es importante cerciorarse de que
no hayan miembros del personal ni obstrucciones en la abertura de la puerta del garaje.
LED - El LED (diodo emisor de luz) se iluminará con
cada pulsación del botón y también se iluminará en
respuesta a pulsaciones del botón durante modos
de programación diferentes.
PIEZAS
Clip para
la visera
Base
Llavero
*Genie e Intellicode son marcas de comercio registradas de The Genie Company. Todo otro nombre y marca
de comercio indicados son propiedad de sus dueños respectivos.
* INSTRUCCIONES DEL BOTÓN DE APRENDIZAJE AMARILLO CHAMBERLAIN®:
Cómo cambiar las pilas:
Retirar el pequeño tornillo de cabeza en cruz
de soporte.
Empujar y abrir la caja con una moneda
pequeña o con un destornillador.
Cambiar la pila por una pila tipo moneda
CR2032.
1 2
3 4
Para usar con la tecnología Chamberlain® con un botón de APRENDIZAJE AMARILLO:
1. Presione el botón APRENDER en el abridor de la puerta del garaje durante 2-3 segundos y luego suéltelo.
2. Oprimir y soltar el botón pre congurado o el botón que recién se haya programado en forma lenta y expresa
varias veces hasta que el abrepuertas de garaje funcione. Dejar que marche hasta que se detenga.
3. Presione el botón APRENDER nuevamente en el abridor de la puerta del garaje por 2-3 segundos y luego
suéltelo.
4. Presione y suelte el botón que acaba de programar lenta y deliberadamente varias veces hasta que el abridor
de la puerta del garaje vuelva a funcionar. Déjalo correr hasta que se detenga. La programación está completa.
OPCIÓN 1: MÉTODO DE INICIO RÁPIDO
Se puede usar 1 de los 4 botones pre congurados por el fabricante en el control remoto, como se indica abajo.
Botón 1: Genie Intellicode 1 u Overhead Door CodeDodger I
Botón 2: Chamberlain® con un botón de APRENDIZAJE VIOLETA
Botón 3: Chamberlain® con un botón de APRENDIZAJE ANARANJADO/ROJO
Botón 4: Chamberlain® con un botón de APRENDIZAJE AMARILLO*
1. Oprimir el botón LEARN (APRENDER) en el abrepuertas de garaje durante 2-3 segundos y luego soltar.
2. Oprimir y soltar el botón pre congurado en el control remoto universal que corresponda a su abrepuertas,
en forma lenta y expresa varias veces hasta que el abrepuertas de garaje funcione. La programación para este
botón se habrá completado.
*Chamberlain® con un botón de APRENDIZAJE AMARILLO? Mover directamente a la instrucción en
la parte superior derecha de esta hoja.
MÉTODO DE PROGRAMACIÓN DISPONIBLE MÉTODO DE
INICIO RÁPIDO
MÉTODO DE
APRENDIZAJE
Marca Megahertz (MHz) & Notas de especicación Número de botón
pre congurado
en el control
remoto
Cantidad de
pulsaciones
del botón
Genie® 315/390 MHz, Intellicode® I, 1995-current 1 1
Overhead Door® 315/390 MHz, CodeDodger® I, 1995-current 1 1
*Chamberlain® 315 MHz, Purple Learn Button, Security +®, 2006-2014 2 2
*Chamberlain® 390 MHz, Orange/Red Learn Button, Security +®, 1996-2005 3 3
*Chamberlain® 390 MHz, Yellow Learn Button, Security +2.0®, 2011-current 4 4
*Chamberlain® 390 MHz, Green Learn Button, Billion Code®, 1993-1995 5
Genie® 315/390 MHz, Intellicode® II, 2010-2011 6
Overhead Door® 315/390 MHz, CodeDodger® II, 2010-2011 6
Sommer® 310 MHz, Rolling Code 7
Linear® 318 MHz, Mega Code® 8
Wayne Dalton® 372.5 MHz, Rolling Code, 1999-current 9
Ryobi® 372.5 MHz, Rolling Code 10
Guardian® 303 MHz, Fixed Learn Code 11
Xtreme® brand 303 MHz, Fixed Learn Code 11
Marantec® 315 MHz, Fixed Learn Code 12
*Chamberlain® 390 MHz, Fixed Dip Switch Método de clonación
Este método funcionará
con TODAS las marcas y
especicaciones indicadas
aquí si tiene un control
remoto de operación
existente.
FAAC® 433.92 MHz, Rolling Code
Genie® 390 MHz, Fixed Dip Switch, 1993-1995
NICE® 433.92 MHz, Rolling Code
Overhead Door® 390 MHz, Fixed Dip Switch, 1993-1995
Stanley® 310 MHz, Fixed Dip Switch, 1993-current
*Chamberlain = LiftMaster®/Craftsman®
NOTA: Si se tiene más de un abrepuertas de la misma marca/MHz, es importante indicar que los 4
botones se pueden programar individualmente. Se puede usar cualquier combinación de métodos
de programación disponible para la combinación de abrepuertas/especicación para obtener la
conguración del botón deseada.
Cuadro A
OPCIÓN 2: MÉTODO DE APRENDIZAJE
COLOCAR EL CONTROL REMOTO UNIVERSAL EN EL MODO DE APRENDIZAJE Y SELECCIONAR UN BOTÓN
1. Oprimir y mantener oprimido en botón No. 2 del control remoto universal Genie.
2. Mientras aún se está manteniendo oprimido el botón No. 2, oprimir el botón No. 4 del control remoto universal -
cuatro veces.
3. Soltar ambos botones.
El LED AZUL en el control remoto comenzará a centellear. Se tendrán 15 segundos para completar la entrada.
4. Oprimir el botón que se haya elegido en el control remoto universal las veces requeridas indicadas en la columna
del MÉTODO DE APRENDIZAJE próxima a su abrepuertas y la especicación en el Cuadro A.
Esperar el resto de los 15 segundos. El LED AZUL emitirá un destello largo y luego se apagará.
PROGRAMACIÓN DEL CONTROL REMOTO UNIVERSAL PARA EL ABREPUERTAS
1. Oprimir el botón LEARN (APRENDER) en el abrepuertas de garaje durante 2-3 segundos y luego soltar.
2. Oprimir y soltar el botón recién programado en forma lenta y expresa varias veces hasta que el abrepuertas de
garaje funcione. la programación para este botón se habrá completado.
*Chamberlain® con un botón de APRENDIZAJE AMARILLO? Mover directamente a la instrucción en
la parte superior derecha de esta hoja.
OPCIÓN 3: MÉTODO DE CLONACIÓN
El control remoto universal Genie puede clonar un control remoto operacional presente para cualquier
combinación de marcas/especicaciones de abrepuertas de garaje indicadas en el Cuadro A
COLOCAR EL CONTROL REMOTO UNIVERSAL EN EL MODO DE CLONACIÓN Y SELECCIONAR UN BOTÓN
1. Colocar el control remoto original y el control remoto universal Genie a una distancia de 2”- 4”(5.08 cm - 10.16
cm) entre sí.
2. Oprimir y mantener oprimido el botón No. 1 del control remoto universal Genie. Mientras se continúa
oprimiendo el botón No. 1, oprimir el botón No. 2 del control remoto universal - cuatro veces.
Soltar ambos botones. El LED BLANCO en el control remoto comenzará a centellear. Se tendrán 20 segundos para
completar la entrada.
3. Mantener oprimido el botón operacional presente en el control remoto original hasta que el parpadeo del
control remoto universal nuevo cambie de DESTELLOS BLANCOS lentos a destellos AZULES rápidos.
4. Cuando el LED AZUL del control remoto universal esté parpadeando rápidamente, oprimir el botón escogido
en el control remoto universal en forma lenta y expresa. El LED emitirá una luz ja y luego se apagará.
PROGRAMACIÓN DEL CONTROL REMOTO UNIVERSAL PARA EL ABREPUERTAS
1. Oprimir el botón LEARN (APRENDER) en el abrepuertas de garaje durante 2-3 segundos y luego soltar.
2. Oprimir y soltar el botón recién programado en forma lenta y expresa varias veces hasta que el abrepuertas de
garaje funcione. la programación para este botón se habrá completado.
*Chamberlain® con un botón de APRENDIZAJE AMARILLO? Mover directamente a la instrucción en
la parte superior derecha de esta hoja.
CONFIGURACIÓN DE FÁBRICA: Si en cualquier momento es necesario remover la conguración
del control remoto y regresar a las conguraciones de fábrica, se deberá oprimir y mantener oprimido
el botón No. 3 mientras se oprime el botón No. 4 - cuatro veces. El LED azul emitirá un destello largo y
luego se apagará. Para el “MÉTODO DE APRENDIZAJE” y el “MÉTODO DE CLONACIÓN” esto removerá la
programación presente y hará que el control remoto regrese a la conguración original de fábrica. Para
los botones pre congurados que ya se hayan programado para un abrepuertas, se deberá remover estas
conguraciones de la misma manera en que se removerían los transmisores originales del cabezal. Es
importante consultar las instrucciones en el manual del abrepuertas. También se puede (para todos los
métodos) programar simplemente por encima de lo que ya se había hecho.
AYUDA CON LA PROGRAMACIÓN: Si el abrepuertas no se activa después de haber realizado
los pasos indicados, repetir los pasos o contactarse con el departamento de Atención al Cliente,
mediante el chat del sitio web (www.geniecompany.com) o por teléfono al: 1-800-354-3643 para
obtener ayuda con la programación. También se puede escanear este código QR
para obtener información adicional y enlaces.
Método de clonación
Este método funcionará con TODAS las marcas y
especicaciones indicadas aquí si tiene un control
remoto de operación existente.
NO SE DEBE UTILIZAR CON NINGÚN ABREPUERTAS DE GARAJE FABRICADO ANTES DE 1993. UN SISTEMA DE
REVERSA SIN CONTACTO (FOTOCÉLULAS) DEBE ESTAR INSTALADO Y EN BUEN FUNCIONAMIENTO.


