George Foreman GR59A Baby George User manual

Baby George™
Rotisserie
OWNER’S MANUAL
Model No. GR59A
TM
GEORGE FOREMAN

31
IMPORTANT SAFEGUARDS
When using electrical appliances, basic safety precautions should
always be followed, including the following:
1. Read all instructions.
2. Do not touch hot surfaces. Use handles or knobs.
3. o protect against electrical shock do not immerse cord, plugs,
or appliance in water or other liquid.
4. Close supervision is necessary when any appliance is used by
or near children.
5. Unplug from outlet when not in use and before cleaning. Allow
to cool before putting on or taking off parts.
6. Do not operate any appliance with a damaged cord or plug or
after the appliance malfunctions or has been damaged in any
manner. Contact Consumer Service.
7. he use of accessory attachments not recommended by the
appliance manufacturer may cause injuries.
8. Do not use outdoors.
9. Do not let cord hang over edge of table or counter, or touch
hot surfaces.
10. Do not place on or near a hot gas or electric burner, or in a
heated oven.
11. Extreme caution must be used when moving an appliance con-
taining hot oil or other hot liquids.
12. o disconnect, turn imer Control to the OFF position, then
remove plug from wall outlet.
13. Use extreme caution when removing tray or disposing of hot
grease.
14. Do not use appliance for other than intended use.
15. Oversized foods or metal utensils (except recommended
accessories) must not be inserted in the Rotisserie as they may
create a fire or risk of electric shock.
16. A fire may occur if the appliance is covered or touching
flammable material, including curtains, draperies, walls, and the
like, when in operation. Do not store any item on top of the
appliance when in operation.
17. Do not clean with metal scouring pads. Pieces can break off
the pad and touch electrical parts involving a risk of electric
shock.
2
* Dill Salmon
Delicate herbs baste the fish.
3 8-ounce salmon steaks, 1 1/4 inch thick
4 teaspoons low fat margarine
2 teaspoons chopped fresh parsley
4 teaspoons chopped fresh dill
3 ablespoons fat-free Mayonnaise
1 1/2 teaspoons non-fat milk
3/4 teaspoon pepper
1/2 teaspoon salt
Combine the margarine, parsley, dill, mayonnaise, milk, pepper and
salt in a small bowl. Mix well. Brush the salmon steaks on both
sides with the sauce. Place the fish in the Adjustable Flat Basket
and insert into Rotisserie. Set the imer for 25-30 minutes or until
done. he fish will flake easily when done. Serves 3.
Skewered Lamb Kabobs
Marinade
1/4 cup olive oil
4 teaspoons dried rosemary
2 cloves crushed garlic
1/4 teaspoon salt
Kabobs
1 pound boneless lamb
4 large mushrooms
1 medium green zucchini cut into 1" squares
1 ripe plum tomato
Stir marinade ingredients together in a large bowl. Add the lamb
squares, zucchini, tomatoes and mushrooms to the marinade and
toss until all is well coated. Let stand, covered loosely, stirring
occasionally. Keep refrigerated. Add ingredients to skewers and
load onto Rotisserie Bar Assembly. Insert into Rotisserie. Set imer
for 25-35 minutes or cook until done. Serves 4.

* Quick Turkey Burgers
A healthful alternative to traditional burgers. Serve with all your
favorite condiments.
1 pound ground turkey
1/4 cup finely chopped onion
1/4 cup finely chopped green pepper
1/4 cup shredded low fat cheddar cheese
2 teaspoons Worcestershire® sauce
1/4 teaspoon black pepper
1/2 teaspoon salt
4 hamburger buns
In a large bowl, mix together turkey, onion, green pepper, cheese,
Worcestershire sauce, pepper and salt. Shape into four patties of
equal thickness. Place the turkey patties in the Adjustable Flat
Basket and insert into Rotisserie. Set the imer for 25-30 minutes
and cook until the meat is at least 165ºF. Serve with fat-free may-
onnaise, mustard, sweet red onion slices, pickles or other favorite
condiments. Serves 4.
Hawaiian Fish
1 pound orange roughy fillets
Marinade
1/3 cup pineapple juice
1 ablespoon soy sauce
1 ablespoon lemon juice
2 cloves minced garlic
Mix the above ingredients and pour over fish fillets. Let marinate for
a maximum of 30 minutes in the refrigerator. Cook in Adjustable
Flat Basket for 20-24 minutes or until done. he fish will flake easily
when done. Serves 4.
IMPORTANT SAFEGUARDS,
Continued
18. Do not place any of the following materials in the Rotisserie:
paper, cardboard, plastic, and the like.
19. Do not cover the Drip ray or any part of the appliance with
metal foil. his will cause overheating of the appliance.
20. Avoid contacting moving parts.
SAVE THESE INSTRUCTIONS
THIS APPLIANCE IS FOR HOUSEHOLD USE ONLY
3
30

29
Additional Important
Safeguards
WARNING: This appliance generates heat and escaping
steam during use. Proper precautions must be taken to pre-
vent the risk o burns, ires, other injury to persons or dam-
age to property.
1. A person who has not read and understood all operating and
safety instructions is not qualified to operate this appliance.
2. Unplug rom outlet when not in use and be ore cleaning.
To avoid electric shock, never immerse or rinse this
appliance in water or any other liquid.
3. If this appliance falls or accidentally becomes immersed in
water, unplug it from the wall outlet immediately. Do not reach
into the water!
4. o reduce the risk of burns or other injuries, do not touch hot
surfaces. Use of protective oven mitts or gloves as well as
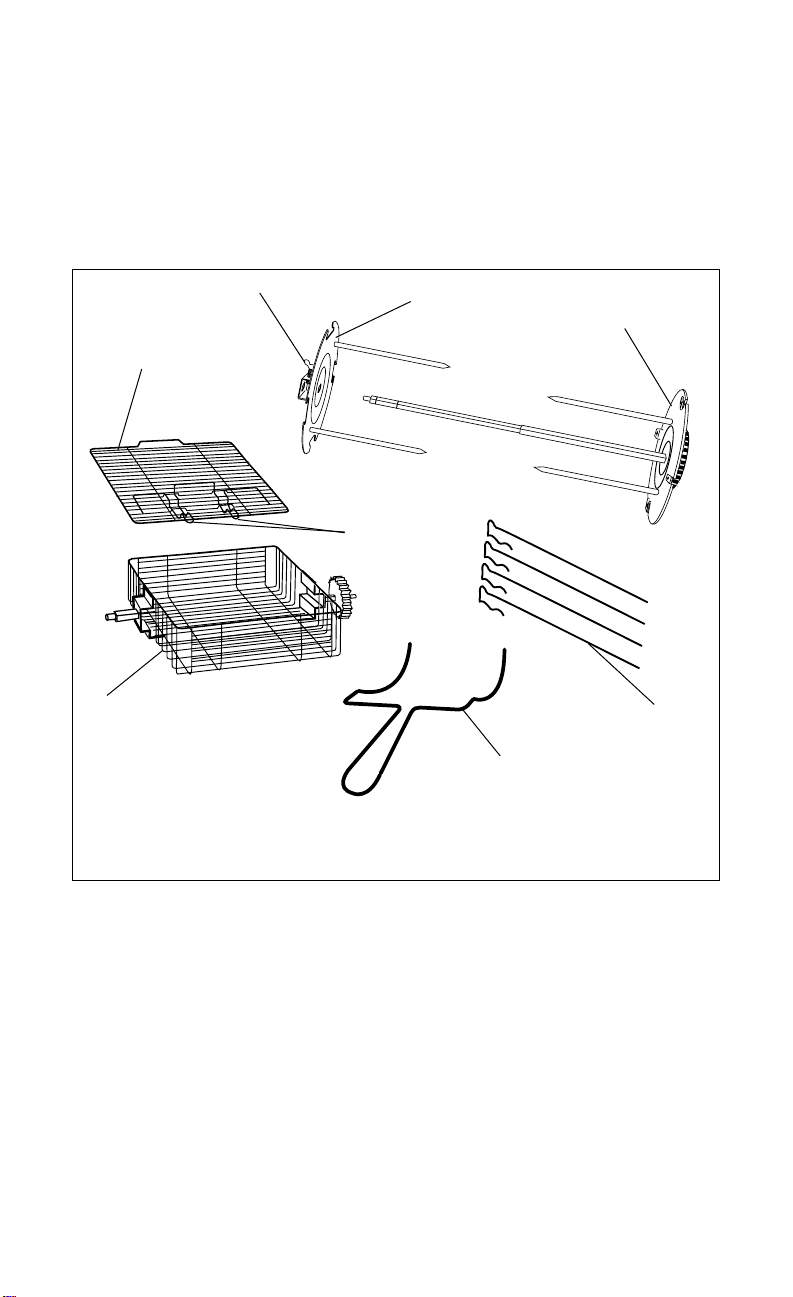
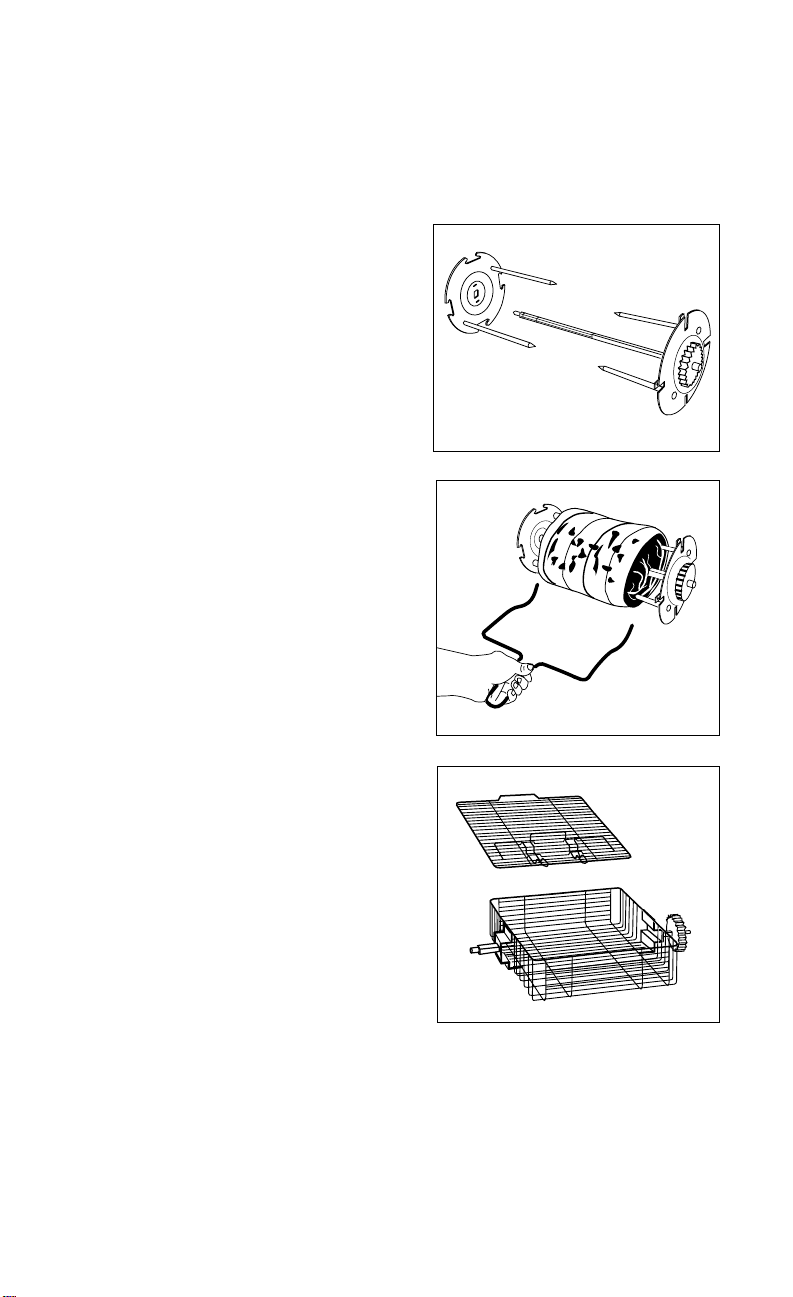
long-handled utensils is recommended. Use the Rotisserie
Remover when removing Rotisserie Bar Assembly from inside
the Rotisserie.
5. o reduce the risk of injury to persons or property, unplug this
appliance before inserting food. Always keep the appliance
unplugged from the wall outlet when not in use.
6. When using this appliance, provide adequate air space above
and on all sides for air circulation. Do not operate this appliance
while it is touching or near curtains, wall coverings, clothing,
dish towels or other flammable materials.
7. o reduce the risk of fire, do not leave this appliance unattend-
ed during use.
8. Do not use or attempt to repair a malfunctioning appliance!
9. he cord to this appliance should only be plugged into a 120V
AC electrical wall outlet.
10. Do not use this appliance in an unstable position.
11. Do not attempt to dislodge food or clean the Rotisserie while it
is plugged in or while it is still hot.
12. Do not attempt to use this appliance without the Cover in
place.
4
* Mediterranean Chicken & Vegetable Kabobs
Add rice pilaf and you have an entire meal!
3 ablespoons olive oil
2 teaspoon lemon juice
3/4 teaspoon dried oregano
2 teaspoon minced garlic
3/4 teaspoon ground cumin
3/4 teaspoon black pepper
2 skinless chicken breast halves, cut into 1-inch cubes
1 small red pepper, cut into 1-inch cubes
1 small green pepper, cut into 1-inch cubes
1 small white onion, cut into large chunks
prepared rice pilaf
In a small bowl combine oil, juice, oregano, garlic, cumin and pep-
per. Place the chicken cubes in a shallow glass pan and pour the
marinade over the chicken, turning to coat evenly. ightly cover the
pan with plastic wrap and refrigerate 4-8 hours. hread the chicken
cubes on the metal Skewers, alternating the chicken with red and
green peppers and onions. Discard remaining marinade. Place the
Skewers in the Rotisserie as instructed on page 14. Set the imer
for 25-35 minutes or until done. he chicken is done when the juices
run clear and there is no pink color visible. Remove the chicken and
vegetables from the Skewers and serve with rice pilaf. Serves 4.
* Basil & Citrus Turkey Breast
A tangy marinade dresses up this healthful entrée.
1 3-pound boneless turkey breast
1/2 cup non-fat chicken broth
1 ablespoon cider vinegar
1/4 cup orange juice
1/4 teaspoon black pepper
1 ablespoon minced fresh basil
Place the turkey breast in a deep glass dish. Mix the marinade ingre-
dients and pour over the turkey breast, turning to coat evenly. Cover
tightly with plastic wrap. Marinate 4-6 hours in the refrigerator, turn-
ing occasionally. Prepare the turkey for the Rotisserie on the
Rotisserie Bar Assembly. Insert into Rotisserie. Discard any remaining
marinade. Set the imer for 1 1/2-2 hours. he turkey is fully cooked
when the juices run clear and the meat is white, with no pink remain-
ing. he temperature should be 170ºF on the meat thermometer. If
the turkey is not fully cooked, reset the imer for an additional 10
minutes and test again. Cool slightly and slice thinly. Serves 6 - 8.

Polarized Plug
his appliance has a polarized plug (one blade is wider than the
other). o reduce the risk of electric shock, this plug is intended to
fit into a polarized outlet only one way. If the plug does not fit fully
into the outlet, reverse the plug. If it still does not fit, contact a qual-
ified electrician. Do not attempt to modify the plug in any way.
Short Cord Instructions
A short power supply cord is provided to reduce the risk resulting
from becoming entangled in or tripping over a longer cord. Longer
extension cords are available and may be used if care is exercised
in their use.
If a longer extension cord is used, (1) the marked electrical rating of
the extension cord should be at least as great as the electrical rat-
ing of the appliance, and (2) the longer cord should be arranged so
that it will not drape over the counter top or table top where it can
be pulled on by children or tripped over unintentionally.
Electric Power
If the electric circuit is overloaded with other appliances, your appli-
ance may not operate properly. It should be operated on a sepa-
rate electrical circuit from other appliances.
5
28
* Italian Rotisserie Chicken Breasts
he marinade in this recipe adds a sophisticated taste to the mild
chicken flavor.
2 boneless, skinless chicken breast halves
1/4 cup fat-free Italian salad dressing
2 ablespoons fat-free chicken broth
1 1/2 teaspoons olive oil
1 1/2 teaspoons lemon juice
1/2 teaspoon grated lemon peel
1/4 teaspoon dried Italian seasoning
1 ablespoon chopped green onion
1/8 teaspoon black pepper
Place the chicken breasts in a shallow glass pan. Combine the dress-
ing, broth, oil, juice, lemon peel, seasoning, onions and pepper in a
small bowl. Pour over the chicken breasts and seal the dish tightly with
plastic wrap. Marinate in the refrigerator for 4-12 hours, turning occa-
sionally. Place the chicken in the Adjustable Flat Basket and insert into
Rotisserie. Set the imer for 25-35 minutes and cook until the chicken
is 170ºF on the meat thermometer. he chicken is done when the
juices run clear and there is no pink color visible. Discard any remain-
ing marinade. Serves 2.
* Deli Rotisserie Chicken
his recipe is straight from the grocery deli, where that wonderful aroma
of rotisserie chicken always makes shoppers immediately hungry.
1 4-5 pounds whole roasting chicken
1 teaspoon salt
2 teaspoons paprika
1 teaspoon chili powder
1 teaspoon garlic powder
2 teaspoons black pepper
1 teaspoon onion powder
1 teaspoon dried thyme
Remove the giblets from the chicken and discard. Wash the cavity well
and dry with paper towels. ie the chicken wings and legs with cook-
ing string. Combine all the spices in a small bowl and mix well. Rub
thoroughly into the skin of the chicken, pressing gently. Cover the
chicken and refrigerate overnight. Prepare the chicken for the
Rotisserie and load onto Rotisserie Bar Assembly. Insert into
Rotisserie. Set the imer for 1 1/2 - 2 hours. he chicken is fully
cooked when the juices run clear and the meat is white, with no pink
remaining. he temperature in the dark meat should be 180ºF on the
meat thermometer. If the chicken is not fully cooked, reset the imer
for an additional 10 minutes and test again. Serves 4.

27
Getting to Know Your
Baby George™Rotisserie
A. Rotisserie Body
B. Lift-up Cover with Viewing
Window (P/N 21415)
C. imer Control
D. Cover Handles
E. Drip ray (P/N 21414)
F. Rotisserie Bar Assembly
rack
G. rack Grooves
H. Heating Element
I. Reflector (P/N 21416)
6
A
B
C
E
G
F
H
D
I
Chicken with Rosemary
1 2-3 pound chicken
Marinade
3/4 cup vegetable oil
3/4 cup lemon juice
2 cloves minced garlic
1 finely chopped medium onion
1/3 teaspoon salt
1/2 teaspoon pepper
1/3 teaspoon dried rosemary or thyme
Mix the above ingredients well and pour over the chicken. Let mar-
inate for 3 hours in the refrigerator. Cook on the Rotisserie Bar
Assembly for 1 - 1 1/2 hours or until the temperature in the dark
meat is 180ºF on the meat thermometer. he chicken is done when
the juices run clear and there is no pink color visible. Serves 2 - 3.
Herbed Roasted Chicken
1 4-5 pound chicken
Herb Rub
2-3 ablespoons dried rosemary
1 ablespoon peppercorns
2-4 ablespoons salt
2 ablespoons dried thyme
2-3 ablespoons dried parsley
Clean out the inside cavity of the chicken. Remove skin if desired.
Pat the surface dry with a paper towel. Combine all of the rub
ingredients. Rub the ingredients onto the surface of the chicken.
Place the chicken on Rotisserie Bar Assembly. ie cooking string
around chicken to hold in legs so they do not touch the Heating
Element in the Rotisserie. Insert into Rotisserie. Set imer for
1 1/2 - 2 hours or until the temperature in the dark meat is 180ºF
on the meat thermometer. Serves 4.

26
J. Adjustable Flat Basket Cover (P/N 21417A)
K. Metal abs
L. Adjustable Flat Basket Bottom w/Gear Assembly (P/N 21583B)
M. End Wheel w/ humb Screw (P/N 21584A)
N. End Wheel w/Wheel Gear and Center Bar (P/N 21584B)
O. Skewers with Handles (4) (P/N 21394)
P. Rotisserie Remover (P/N 21395)
Q. humb Screw (P/N 21585)
Getting to Know Your
Baby George™Rotisserie
Accessories
N
J
7
P
M
O
* Herbed Pork Roast
Marinade this roast overnight to develop the wonderful mustard
and herb flavors.
1 4-pound boneless pork loin roast
3 ablespoons Dijon®mustard
1 cup minced onion
3 ablespoons minced garlic
2 ablespoons paprika
2 teaspoons black pepper
2 teaspoons dried thyme
1 teaspoon celery seed
1 teaspoon ground sage
2 teaspoons chili powder
ie the roast with cooking string and place it in a medium glass
bowl. Rub the surface of the roast with the Dijon mustard. Combine
the onion, garlic, paprika, pepper, thyme, celery seed, sage and
chili powder in a small bowl. Mix well and sprinkle generously over
the roast, turning the roast to coat evenly. Cover the roast with
plastic wrap and refrigerate 8-12 hours. Prepare the roast for the
Rotisserie on Rotisserie Bar Assembly. Insert into Rotisserie. Set
the imer for 2 1/4 - 3 hours or until done. he roast is done when
the internal temperature is 160ºF on the meat thermometer. Let the
meat rest for 15 minutes and slice thinly to serve. Serves 12.
K
L
Q

25
* Spicy Pork Tenderloin
A fast entrée that will delight everyone in the family.
1 ablespoon chili powder
1/4 teaspoon dried oregano
1/4 teaspoon salt
1/4 teaspoon Italian seasoning
1/4 teaspoon ground cumin
1 ablespoon minced garlic
1 1-pound pork tenderloin
Combine chili powder, oregano, salt, Italian seasoning, cumin and
garlic in a small bowl. Generously press the spice mixture into the
pork, coating each side. Place the tenderloin in the Adjustable Flat
Basket and insert in the Rotisserie. Set the imer for 45-75 minutes
or until done. he pork is cooked when the temperature is 160ºF
on the meat thermometer. Slice the tenderloin thinly and serve.
Serves 4.
8
Introduction
Your Baby George™Rotisserie is a full-featured Rotisserie with a
powerful motor and a heavy-duty Rotisserie Bar Assembly.
Complete with all the accessories you’ll need, your Baby George™
Rotisserie allows you to cook anything from delicate fish or vegeta-
bles to poultry items and hamburgers! Cook fish or hamburgers in
the Adjustable Flat Basket and roasts or poultry on the Rotisserie
Bar Assembly. Any way you cook it—it’s healthy and delicious!
Rotisserie
Foods which are cooked on a Rotisserie are extra flavorful,
because they are self-basted with their own juices. Foods are more
healthful as fat can drip down, away from the food during cooking.
Carefully center food (especially food with a bone in it) on the
Rotisserie Bar Assembly, as unbalanced food will cause a jerking
motion during cooking. his causes undue stress on the Motor.
Adjust food as necessary.
No food should touch the Heating Element or walls of the unit. Use
cooking string to tie all poultry; some meats also require tying. rim
food if necessary.
Before cooking poultry, clean inside of cavity removing giblets and
neck, then tie bird with cooking string. Secure legs together with
string and secure with a knot. Or, use the legs-ties that may come
on the bird. Next, truss the thighs by wrapping string around the
largest part of the thigh and secure with a knot. Wrap string around
breast securing wings snugly next to body of bird and secure with
a knot. Cut off excess string. Refer to the "Cooking Chart" for max-
imum size of food.

9
ACCESSORIES
Rotisserie Bar Assembly
Your Baby George™Rotisserie fea-
tures a heavy-duty Rotisserie Bar
Assembly which consists of two
assemblies:
1. End Wheel w/Center Bar and
Gear and two meat tines
2. End Wheel w/ humb Screw and
two meat tines
he Rotisserie Bar Assembly fits
into the Rotisserie and the heavy-
duty motor turns the Assembly so
your food cooks evenly and conve-
niently—without all the added fat!
Rotisserie Remover
For easy insertion and removal of
the Rotisserie Bar Assembly, always
use the Rotisserie Remover.
Adjustable Flat Basket
Use the Adjustable Flat Basket to
cook small cuts of meat, hamburger,
seafood, or for browning potatoes
and vegetables. he Adjustable Flat
Basket has a Cover which can be
raised or lowered to adjust to the
thickness of the food and keep it in
place.
Suggested foods: Hamburgers,
steaks, pork chops, fish, chicken
breasts, potatoes, sliced or chunked
vegetables, etc.
24
Hungarian Pork Chops
2 4-ounce boneless pork chops, 1/2 inch thick
Marinade
2 ablespoons chili sauce
1-1/3 ablespoons lemon juice
2 ablespoons grated onion
1/3 teaspoon dry mustard
1 ablespoon Worcestershire®sauce
Dash salt, pepper and paprika
Mix above ingredients well and pour over chops. Marinate for up to
3 hours in the refrigerator. Load into Adjustable Flat Basket and
insert in Rotisserie. Set imer for 18-26 minutes or until done. he
meat is done when the internal temperature is 160ºF on the meat
thermometer. Serves 2.
Honey Pineapple Pork Roast
1 4-pound boneless pork roast
Marinade
1/4 cup tamari or light soy sauce
1/4 cup white vinegar
1/4 cup extra virgin olive oil
1/4 cup fresh or canned (packed in juice) crushed pineapple
2 ablespoons honey
2 ablespoons finely chopped ginger
2 cloves finely chopped garlic
Soak a 5 lb. boneless, trimmed and tied pork roast in marinade for
4 hours in the refrigerator. Place on Rotisserie Bar Assembly and
insert in Rotisserie. Set imer for 2 1/4 - 3 hours or until the meat
is at least 160ºF. Close Rotisserie Cover. You may want to use drip-
pings for basting during the last 45 minutes of cooking. Baste peri-
odically every 10-15 minutes. Serves 12.

23
* Oriental Steak Kabobs
Serve these kabobs with mixed vegetables and steamed rice for a
well-balanced meal.
1 1-pound beef sirloin steak, cut into 1-inch cubes
1/4 cup soy sauce
1/4 cup cider vinegar
2 ablespoons minced garlic
1/4 teaspoon ground allspice
1/4 teaspoon ground ginger
1/4 cup chopped green onion
1/4 cup water
1 ablespoon honey
Place the steak cubes into a shallow glass pan. Combine all the
remaining ingredients and pour over the steak, turning to coat
evenly. Refrigerate 12-24 hours. hread the steak cubes onto the
Skewers and place in the Rotisserie as instructed on page 14.
Discard any remaining marinade. Set the imer for 25-35 minutes
or until done. Serves 4.
* Sirloin & Broccoli Linguine
A hearty, full-meal salad.
1 12-ounce beef top sirloin steak
8 ounces linguine noodles, cooked and drained
1 chopped tomato
1 chopped red pepper
1 cup broccoli cuts, cooked and cooled
1 chopped carrot
1 chopped red onion
Dressing
1/2 cup low fat mayonnaise
1/2 teaspoon dill
2 ablespoons blue cheese
1 ablespoon minced garlic
1 ablespoon cider vinegar
1 teaspoon lemon juice
Place the sirloin steak in the Adjustable Flat Basket and insert in
Rotisserie. Set the imer for 25-40 minutes or until the meat is at
least 145ºF. Cool and slice thinly. In a large bowl, combine the
steak, noodles, tomato, red pepper, broccoli, carrot and onion.
Make the dressing by mixing together the mayonnaise, dill, blue
cheese, garlic, vinegar and lemon juice. Whisk together and pour
over the beef and pasta salad. Serves 4.
10
ACCESSORIES (Cont.)
Skewers
Four skewers mean shish-kabobs for every-
one! Combine your favorite meats and/or
vegetables to create your favorites. hese
skewers are designed to be used with the
Rotisserie Bar Assembly. See "Preparing for
Use" for details.
Suggested foods: Cubed beef, chicken,
vegetables, etc.

11
WARNING: Do not attempt to assemble parts inside the
Rotisserie while it is plugged in or hot. Burns or other seri-
ous injuries can occur.
Before Using Rotisserie for the First Time
Before using your Baby George™Rotisserie for the first time, wash
all accessories with hot, soapy water. Rinse all parts well and dry
thoroughly. Be sure the Rotisserie is unplugged and use a damp
cloth or sponge to wipe down the inside and outside of the
Rotisserie.
CAUTION: Never immerse the Rotisserie in water or any
other liquid!
Prepare Food
We recommend preparing the food to be cooked before proceed-
ing with any Rotisserie assembly. Cut all vegetables to be cooked
or prepare a homemade marinade for extra flavor (see “Recipes”
for information about Marinades and Rubs). If necessary, store food
in refrigerator while preparing Rotisserie.
Before placing any items to be cooked onto the Rotisserie Bar
Assembly or Adjustable Flat Basket, we suggest familiarizing your-
self with how the Rotisserie operates and how each accessory is
assembled and used in the Rotisserie.
Rotisserie Bar Assembly
1. Locate the Rotisserie Bar Assembly.
2. he Rotisserie Bar assembly consists of two End Wheels. One
End Wheel (N) has a gear, center bar and two meat tines
attached to it. he other End Wheel (M) has two meat tines and
a humb Screw locking device.
3. Loosen the humb Screw and pull the End Wheel off the center
bar of the Rotisserie Bar Assembly. Carefully slide the food to
be cooked onto the center bar and meat tines of the geared
End Wheel.
4. Once the food is in place, align the End Wheel with the center
bar of the Rotisserie Bar Assembly. Push the End Wheel with
humb Screw toward the geared End wheel as far as possible.
ighten the humb Screw to lock the End Wheel in place.
Preparing for Use
22
Chicken Rub
1 ablespoon pepper or cracked peppercorn
2-4 ablespoons salt
1/2 ablespoon tarragon
Note: Measurements will vary due to sizes of the meat. As a rule,
use 1-2 ablespoons of rub ingredients per pound of food. For a
5 lb. chicken, use up to 12 ablespoons of spices.
Beef Roast
1 5-pound boneless beef roast
Marinade
3/4 cup vegetable oil.
3/4 cup lemon juice
8-10 cracked black peppercorns
6-8 whole cloves garlic
1 sliced red onion
1 ablespoon dry rosemary
Mix ingredients together and pour over desired meat portion. Allow
to marinate overnight in the refrigerator, turning from time to time.
his marinade is the best for most kinds of meat including venison
and tougher cuts of meat. Place meat on Rotisserie Bar Assembly
and insert into Rotisserie. Set timer for 2 1/4-3 1/4 hours or until
done. he beef is cooked when the temperature is at least 145ºF
on the meat thermometer.
* Dijon Mustard Steaks
he Dijon gives these small dinner steaks a distinctive flavor.
4 4-ounce beef KC/NY strip steaks, 1 1/4" thick
1/2 cup Dijon mustard
1 ablespoon olive oil
1 ablespoon minced garlic
1 teaspoon dried oregano
1 teaspoon dried thyme
1/2 teaspoon dried basil
Place the steaks in a shallow glass pan. Combine the mustard, oil,
garlic and spices to make a thick sauce. Brush each steak with the
mustard mixture and turn to coat both sides. Cover the steaks with
plastic wrap and marinate in the refrigerator for 2-4 hours to blend
the flavors. Place the steaks in the Adjustable Flat Basket and
insert into Rotisserie. Discard any remaining sauce. Set the imer
for 14-30 minutes and cook until the meat is at least 145ºF.
Serves 4.

21
Recipes
Recipes indicated by asterisk (*) are adapted from the George
Foreman's Big George Rotisserie Cookbook by George Foreman
and Connie Merydith Pascoe Publishing ©Salton, Inc. 1999.
A Little About Marinades and Rubs
Marinades tenderize, add flavor and moisten all kinds of foods. o
keep beef, fish and chicken flavorful and juicy, a marinade is crucial.
here are three basic ingredients in most marinades. Acids (vinegar,
citrus, etc.), oils and spices. he acids tenderize, the oils moisten,
and the spices add the flavor.
he amount of time a food marinates depends on the flavor and
texture of that food. For example, fish should only marinate for up
to 30 minutes or less, while a steak should marinate for a couple of
hours or more.
While foods are marinating, they should be kept refrigerated. It is
best to remove the food and bring back to room temperature
before cooking. NOTE: Do not allow raw or uncooked meats to
stand at room temperature for extended periods of time.
Extra flavor can be added to meats by rubbing with your choice of
spices and herbs. his is called a dry rub. Before cooking, rub the
food with spice and herb mixture and it is ready to cook. Common
examples of spice rubs are cracked peppercorn, garlic, or rose-
mary.
Rubs
Any spice or herb can be used for a dry rub on virtually any kind of
meat: roasts, chicken, steaks, and fish. hese, of course, are just
suggestions. he possibilities for rubs are endless...
Here are some examples:
Red Meat Rub
1 ablespoon cracked peppercorn
2-4 ablespoons salt
2-4 cloves minced garlic
1 ablespoon rosemary
1 ablespoon paprika
Fish Rub
1 ablespoon dried basil
1 teaspoon salt
1 teaspoon pepper
pinch paprika
12
5. WITHOUT TURNING THE
ROTISSERIE ON YET, use
the Cover Handles to raise the
Cover.
6. Hold the Rotisserie Bar
Assembly so the End Wheel
with the gear faces to the
right. Slide the Rotisserie Bar
into the Rotisserie along the
Rotisserie Bar Assembly
rack. See Figure 1. Make
sure each end of the center
Bar Assembly drops into the
center grooves of the Rotisserie
Bar rack.
Assemble Drip Tray
1. If not in place, slide Drip ray
into position, as shown in
Figure 2.
Insert Reflector
1. Grasp the Handle and slide the
Reflector behind the Heating
Elements. See Figure 3. Make
sure the notches hook over the
Heating Element brackets. he
bottom of the Reflector must
angle over the Drip ray.
Preparing for Use (Cont.)
Figure 1
Figure 2
Figure 3

USING THE ACCESSORIES
ADJUSTABLE FLAT
BASKET
1. Squeeze the two metal tabs
on the Adjustable Flat
Basket Cover and remove.
See Figure 4. Set Cover
aside.
2. Place food into Basket.
Place food flat; do not
“stack” food.
3. Replace Basket Cover so it
fits IGH LY against food.
( he Cover will "hold" the
food in place as it turns. he
cover can be adjusted up or
down to accommodate the
thickness of the food. See
Figure 5.
4. WITHOUT TURNING THE
ROTISSERIE ON YET, use
the Cover Handles to raise
the Cover.
5. Hold the Adjustable Basket
Assembly so the small gear
faces to the right. Slide it into
the Rotisserie along the
Rotisserie Bar Assembly
rack. Make sure each end
of the Adjustable Basket
Assembly drops into the center grooves of the Rotisserie Bar
rack.
Figure 4
Figure 5
1320
User Maintenance Instructions
WARNING: Do not attempt to disassemble or clean the unit
while it is plugged in and/or is hot. Burns or other serious
injuries can occur.
Your Baby George™Rotisserie requires little maintenance. It con-
tains no user-serviceable parts inside the Rotisserie. Contact con-
sumer service if the product requires servicing.
CAUTION: Unplug appliance rom wall outlet and allow all
parts to cool completely be ore cleaning.
CAUTION: Do not use metal or abrasive scouring pads or
harsh or abrasive cleansers to clean the parts o the
Rotisserie. I necessary, use a nylon bristle brush to loosen
hardened ood particles.
1. Once product is unplugged and has cooled completely, carefully
pull out Drip ray. Use care not to spill any liquids as they may
still be hot.
2. Remove all accessories from Rotisserie. Wash all accessories in
hot, soapy water. Rinse well and dry thoroughly.
3. Wipe outside of Rotisserie with a damp cloth or sponge. Dry
with a soft cloth.
4. Lift open Cover. If desired and to make cleaning easier, you may
also lift open the Cover completely, then pull up and remove
Cover to release from tracks. Use a damp sponge to wipe the
interior of the Rotisserie. Do not use metal or abrasive scour-
ing pads or harsh or abrasive cleansers to clean inside the
Rotisserie. Dry all parts thoroughly. If Cover is removed,
replace into tracks on sides of Rotisserie and close Cover.
Preparing for Use (Cont.)

19
Hints and Tips
CAUTION: Always protect hands with oven mitts when handling
hot Rotisserie parts!
• Do not place Rotisserie underneath cabinets or on a tablecloth during use.
• imes given in Cooking Chart are suggestions.
• Before beginning the full roasting process, turn the imer Control to a
minimum setting to let the machine rotate a few times with meat in
place. Be sure the meat rotates freely and does not hit the Heating
Element when it rotates. urn imer Control to “OFF.” If the meat does
hit the Heating Element, remove food and tie the food with cooking
string or you may need to cut the meat down in size slightly.
• Do not cover food while it is cooking in the Rotisserie.
• Do not attempt to cook food in the Rotisserie without the Cover in place
and closed.
• When cooking fatty foods (duck, etc.), check Drip ray often to be sure
the drippings do not overflow.
• When large cuts of meat are finished roasting, let it sit for 15-20 minutes
to let the cooking process complete and to allow the juices to settle
before carving.
• Make sure to use oven mitts or hot pads when removing the Rotisserie
Bar Assembly with (or without) the Rotisserie Remover.
• Place 1 pound of hot dogs flat on work surface with sides touching.
Measure approximately 1-inch from edge of hot dogs and push Skewer
through all hot dogs. Measure approximately 2 1/2-inches over from
Skewer in hot dogs and push second Skewer through. Place Skewers
onto Rotisserie Bar Assembly. Repeat for second pound of hot dogs.
Cooking Chart (Cont.)
FOOD &
QUANTITY
Vegetables
Garlic Heads
Baked Potatoes
(4)
COOKING
METHOD
Adjustable Flat
Basket
Adjustable Flat
Basket
Rotisserie Bar
Assembly
WEIGHT/
SIZE
1-1¹⁄₂" pcs.
Pieces to
fill Basket
6 heads
8-10 oz.
each
COOKING
TIME
35-45 min.
25-30 min.
1-1¹⁄₂ hrs.
INTERNAL
TEMPERATURE
Cook until tender
Cook until tender
Cook until tender
PLEASE NOTE: he USDA recommends that meats such as beef and
lamb, etc. should be cooked to an internal temperature of 145ºF. Pork
should be cooked to an internal temperature of 160ºF and poultry prod-
ucts should be cooked to an internal temperature of 170º-180ºF to be
sure any harmful bacteria has been killed. When re-heating meat/poultry
products, they should also be cooked to an internal temperature of 165ºF.
14
Skewers
NOTE: Use Skewers with the Rotisserie Bar Assembly only. Do not
attempt to use Skewers in any other manner.
1. Load food onto the skewers.
2. Place the End Wheel with
humb Screw onto the center
bar of the Rotisserie Bar
Assembly. Align the locking
device on the End Wheel with
the guide lines on the center
bar of the Rotisserie Bar
Assembly. ighten thumb screw
to lock in place.
3. Hold one Skewer with the
hooked end of the Skewer fac-
ing to the left. Place the Skewer
in a notched cut out in the End
Wheel with humb Screw and
align the tip of Skewer with the
hole in the raised tab on the
End Wheel (with gear).
4. Squeeze and press down on
the top of the Skewer until it
snaps firmly into place. See
Figure 7. Repeat for remaining
Skewers.
5. WITHOUT TURNING THE
ROTISSERIE ON YET, use
the Cover Handles to raise the
Cover.
6. Hold the Rotisserie Bar
Assembly so the End Wheel
with the gear faces to the right.
Slide the Rotisserie Bar into the
Rotisserie along the Rotisserie
Bar Assembly rack. Make sure
each end of the Rotisserie Bar
Assembly drops into the center
grooves of the Rotisserie Bar rack.
Preparing for Use (Cont.)
Figure 6
NOTCHED
WHEEL
HOOKED END
OF SKEWER
"SQUEEZE"
Figure 7
HUMB SCREW
GUIDE
LINES

15
NOTE: When using this product for the first time, you may
notice a slight odor and a small amount of smoke. This is
normal and will dissipate in a short amount of time.
1. Use Cover Handles to lift open Cover.
2. Prepare food, Rotisserie Bar Assembly and accessories as
instructed in “Preparing for Use.”
3. Close Cover.
4. Be sure Drip ray is in place and properly positioned beneath
Reflector. (See “Preparing for Use.”)
5. Plug the Rotisserie into a polarized 120V, 60 Hz household
electrical outlet.
6. Once the Rotisserie is plugged in, you may begin operation by
turning the imer Control to the desired cooking time.
NOTE: he imer Control is adjustable anywhere between 15
minutes and 3 hours (180 minutes).
As soon as the imer Control is turned to a time setting, the
Rotisserie motor will begin turning and the Heating Element will
turn on.
Allow the food to cook for the desired length of time. he food
will cook only for as long as the imer is set. When the time
elapses, the imer will sound a loud “ding” and the Rotisserie
will turn off (both the Heating Element and the Motor).
7. Once food is cooked and the Rotisserie is off, unplug the
Rotisserie from the electrical outlet. Allow the Rotisserie and
cooked food to sit 15-20 minutes.
CAUTION: Always unplug Rotisserie be ore removing
ood. DO NOT carve meat while it is in the Rotisserie.
Operation
18
Cooking Chart (Cont.)
FOOD &
QUANTITY
BEEF
-bone Steak (1)
Filet Mignon (3)
Hamburgers (4)
PORK
Pork Loin Center
Roast, trimmed and
tied
Boneless Pork
Chops (3)
Pork
Chops (2)
enderloin
LAMB
Leg, semi-boneless
Kabobs
SEAFOOD
Swordfish
Steak (3)
Salmon Steak (3)
Salmon Fillet (3)
Orange Roughy
Fillet (4)
Jumbo Shrimp,
split shell
MISCELLANEOUS
Hot Dogs (16)
Bratwurst (4)
Smoked Bratwurst,
cured & cooked (12)
COOKING
METHOD
Adjustable Flat
Basket
Adjustable Flat
Basket
Adjustable Flat
Basket
Rotisserie Bar
Assembly
Adjustable Flat
Basket
Adjustable Flat
Basket
Adjustable Flat
Basket
Rotisserie Bar
Assembly
Skewers
Adjustable Flat
Basket
Adjustable Flat
Basket
Adjustable Flat
Basket
Adjustable Flat
Basket
Adjustable Flat
Basket
Skewers
Adjustable Flat
Basket
Skewers
WEIGHT/
SIZE
³₄" thick
12 oz.
1¹₂" thick
8 oz. each
³₄" thick
4 oz. each
5 lbs.
1" thick
4 oz. each
¹₂" thick
4 oz. each
1-1¹⁄₄ lbs.
5¹₂ lbs.
1" pieces
1" thick
6 oz. each
1¹⁄₄" thick
8 oz. each
1" thick
4 oz. each
¹₂" thick
4 oz. each
¹₂ lb.
2 lbs.
2 oz. each
2 lbs.
COOKING
TIME
14-18 min.
19-23 min.
24-28 min.
35-38 min.
41-45 min.
51-55 min.
25-30 min.
2¹₄ 2³₄ hrs.
2¹₂-3 hrs.
32-34 min.
42-44 min.
18-22 min.
22-26 min.
45-75 min.
2¹₄-2³₄ hrs.
25-35 min.
27-30 min.
25-30 min.
20-25 min.
20-24 min.
25-30 min.
22-26 min.
20-30 min.
15-20 min.
INTERNAL
TEMPERATURE
145º F med/rare
160º F medium
170º F well done
145º F med/rare
160º F medium
170º F well done
160º F medium
160º F medium
170º F well done
160º F medium
170º F well done
160º F medium
170º F well done
160º F medium
170º F well done
160º F medium
170º F
Cook until flaky
Cook until flaky
Cook until flaky
Cook until flaky
Cook until opaque
165º F
165º F
165º F

17
Cooking Chart
he following times are meant to be used as guidelines only. imes will vary
due to the cut or thickness of the meat being cooked. o be sure that the
food is truly done, use a cooking thermometer. If the food does need more
time to cook, reset the timer and check periodically so you do not over cook.
FOOD &
QUANTITY
POULTRY
Chicken, Whole (1)
Chicken, Whole (1)
Boneless Skinless
Chicken Breast,
Halves (2)
Chicken Wings
Chicken Kabob
Rock Cornish
Game Hens (2)
Duck, Whole (1)
urkey Burgers (4)
urkey, Whole,
boneless
urkey Breast,
boneless
BEEF
Rib Eye Roast,
trimmed and tied
op Round Rolled
Roast
op Sirloin
Steak (2)
Rib Eye Steak (4)
KC/NY Strip
Steak (4)
COOKING
METHOD
Rotisserie Bar
Assembly
Rotisserie Bar
Assembly
Adjustable Flat
Basket
Adjustable Flat
Basket
Skewers
Rotisserie Bar
Assembly
Rotisserie Bar
Assembly
Adjustable Flat
Basket
Rotisserie Bar
Assembly
Rotisserie Bar
Assembly
Rotisserie Bar
Assembly
Rotisserie Bar
Assembly
Adjustable Flat
Basket
Adjustable Flat
Basket
Adjustable Flat
Basket
WEIGHT/
SIZE
5 lbs.
2¹₂ lbs.
7 oz.
each
1 lb.
1" pieces
1-1¹₄ lb.
each
4-5 lbs.
4 oz.
each
3 lbs.
3 lbs.
5 lbs.
4 lbs.
1" thick
8 oz. each
³₄" thick
4 oz. each
³₄" thick
4 oz. each
COOKING
TIME
1¹₂ -2hrs.
1- 1¹₂ hrs.
25 - 35 min.
30 - 40 min.
25 - 35 min.
1 - 1¹₄ hrs.
1¹₄ - 1³⁴hrs.
25 - 30 min.
1¹₄ - 1¹₂ hrs.
1¹₂ -2hrs.
2¹⁴ - 2³⁴hrs.
2³⁴ - 3¹⁴hrs.
2 - 2¹⁄⁴hrs.
2¹⁄⁴ - 2¹₂ hrs.
23 - 26 min.
26 - 29 min.
29 - 32 min.
19 - 23 min.
24 - 28 min.
29 - 33 min.
17 - 21 min.
22 - 26 min.
28 - 32 min.
INTERNAL
TEMPERATURE
180º F
180º F
170º F
180º F
170º F
180º F
180º F
160º F
180º F
170º F
145º F med/rare
160º F medium
145º F med/rare
160º F medium
145º F med/rare
160º F medium
170º F well done
145º F med/rare
160º F medium
170º F well done
145º F med/rare
160º F medium
170º F well done
16
8. Protect your hands
with oven mitts and use
the Rotisserie Remover to
remove the Rotisserie Bar
Assembly from the
Rotisserie.
9. Squeeze the handle and
place the Rotisserie
Remover on the inside of
the End Wheels, lift up
and out of the Rotisserie.
See Figure 8.
CAUTION: Always pro-
tect hands with oven
mitts when handling
hot Rotisserie parts or
when removing ood
rom Rotisserie.
10. o remove the food from
the Rotisserie Bar
Assembly, loosen the
thumb screw on the End
Wheel and pull it off the
center bar. Carefully
remove food from
Rotisserie Bar Assembly.
Operation (Cont.)
HELPFUL HINTS WHEN COOKING LARGER CUTS OF MEAT
WITH A HIGHER FAT CONTENT:
• Cook large cuts of meats only on the Rotisserie Bar Assembly;
cook slabs of meat in the Adjustable Flat Basket.
• rim off all excess fat from meat before cooking in the
Rotisserie.
• Remove all grease residue from the cooled Heating Elements.
• Cook beef and pork until meat thermometer reads 145˚F for
medium rare, beef only, and 170˚F for well done.
Figure 8

15
NOTE: When using this product for the first time, you may
notice a slight odor and a small amount of smoke. This is
normal and will dissipate in a short amount of time.
1. Use Cover Handles to lift open Cover.
2. Prepare food, Rotisserie Bar Assembly and accessories as
instructed in “Preparing for Use.”
3. Close Cover.
4. Be sure Drip ray is in place and properly positioned beneath
Reflector. (See “Preparing for Use.”)
5. Plug the Rotisserie into a polarized 120V, 60 Hz household
electrical outlet.
6. Once the Rotisserie is plugged in, you may begin operation by
turning the imer Control to the desired cooking time.
NOTE: he imer Control is adjustable anywhere between 15
minutes and 3 hours (180 minutes).
As soon as the imer Control is turned to a time setting, the
Rotisserie motor will begin turning and the Heating Element will
turn on.
Allow the food to cook for the desired length of time. he food
will cook only for as long as the imer is set. When the time
elapses, the imer will sound a loud “ding” and the Rotisserie
will turn off (both the Heating Element and the Motor).
7. Once food is cooked and the Rotisserie is off, unplug the
Rotisserie from the electrical outlet. Allow the Rotisserie and
cooked food to sit 15-20 minutes.
CAUTION: Always unplug Rotisserie be ore removing
ood. DO NOT carve meat while it is in the Rotisserie.
Operation
18
Cooking Chart (Cont.)
FOOD &
QUANTITY
BEEF
-bone Steak (1)
Filet Mignon (3)
Hamburgers (4)
PORK
Pork Loin Center
Roast, trimmed and
tied
Boneless Pork
Chops (3)
Pork
Chops (2)
enderloin
LAMB
Leg, semi-boneless
Kabobs
SEAFOOD
Swordfish
Steak (3)
Salmon Steak (3)
Salmon Fillet (3)
Orange Roughy
Fillet (4)
Jumbo Shrimp,
split shell
MISCELLANEOUS
Hot Dogs (16)
Bratwurst (4)
Smoked Bratwurst,
cured & cooked (12)
COOKING
METHOD
Adjustable Flat
Basket
Adjustable Flat
Basket
Adjustable Flat
Basket
Rotisserie Bar
Assembly
Adjustable Flat
Basket
Adjustable Flat
Basket
Adjustable Flat
Basket
Rotisserie Bar
Assembly
Skewers
Adjustable Flat
Basket
Adjustable Flat
Basket
Adjustable Flat
Basket
Adjustable Flat
Basket
Adjustable Flat
Basket
Skewers
Adjustable Flat
Basket
Skewers
WEIGHT/
SIZE
³₄" thick
12 oz.
1¹₂" thick
8 oz. each
³₄" thick
4 oz. each
5 lbs.
1" thick
4 oz. each
¹₂" thick
4 oz. each
1-1¹⁄₄ lbs.
5¹₂ lbs.
1" pieces
1" thick
6 oz. each
1¹⁄₄" thick
8 oz. each
1" thick
4 oz. each
¹₂" thick
4 oz. each
¹₂ lb.
2 lbs.
2 oz. each
2 lbs.
COOKING
TIME
14-18 min.
19-23 min.
24-28 min.
35-38 min.
41-45 min.
51-55 min.
25-30 min.
2¹₄ 2³₄ hrs.
2¹₂-3 hrs.
32-34 min.
42-44 min.
18-22 min.
22-26 min.
45-75 min.
2¹₄-2³₄ hrs.
25-35 min.
27-30 min.
25-30 min.
20-25 min.
20-24 min.
25-30 min.
22-26 min.
20-30 min.
15-20 min.
INTERNAL
TEMPERATURE
145º F med/rare
160º F medium
170º F well done
145º F med/rare
160º F medium
170º F well done
160º F medium
160º F medium
170º F well done
160º F medium
170º F well done
160º F medium
170º F well done
160º F medium
170º F well done
160º F medium
170º F
Cook until flaky
Cook until flaky
Cook until flaky
Cook until flaky
Cook until opaque
165º F
165º F
165º F

19
Hints and Tips
CAUTION: Always protect hands with oven mitts when handling
hot Rotisserie parts!
• Do not place Rotisserie underneath cabinets or on a tablecloth during use.
• imes given in Cooking Chart are suggestions.
• Before beginning the full roasting process, turn the imer Control to a
minimum setting to let the machine rotate a few times with meat in
place. Be sure the meat rotates freely and does not hit the Heating
Element when it rotates. urn imer Control to “OFF.” If the meat does
hit the Heating Element, remove food and tie the food with cooking
string or you may need to cut the meat down in size slightly.
• Do not cover food while it is cooking in the Rotisserie.
• Do not attempt to cook food in the Rotisserie without the Cover in place
and closed.
• When cooking fatty foods (duck, etc.), check Drip ray often to be sure
the drippings do not overflow.
• When large cuts of meat are finished roasting, let it sit for 15-20 minutes
to let the cooking process complete and to allow the juices to settle
before carving.
• Make sure to use oven mitts or hot pads when removing the Rotisserie
Bar Assembly with (or without) the Rotisserie Remover.
• Place 1 pound of hot dogs flat on work surface with sides touching.
Measure approximately 1-inch from edge of hot dogs and push Skewer
through all hot dogs. Measure approximately 2 1/2-inches over from
Skewer in hot dogs and push second Skewer through. Place Skewers
onto Rotisserie Bar Assembly. Repeat for second pound of hot dogs.
Cooking Chart (Cont.)
FOOD &
QUANTITY
Vegetables
Garlic Heads
Baked Potatoes
(4)
COOKING
METHOD
Adjustable Flat
Basket
Adjustable Flat
Basket
Rotisserie Bar
Assembly
WEIGHT/
SIZE
1-1¹⁄₂" pcs.
Pieces to
fill Basket
6 heads
8-10 oz.
each
COOKING
TIME
35-45 min.
25-30 min.
1-1¹⁄₂ hrs.
INTERNAL
TEMPERATURE
Cook until tender
Cook until tender
Cook until tender
PLEASE NOTE: he USDA recommends that meats such as beef and
lamb, etc. should be cooked to an internal temperature of 145ºF. Pork
should be cooked to an internal temperature of 160ºF and poultry prod-
ucts should be cooked to an internal temperature of 170º-180ºF to be
sure any harmful bacteria has been killed. When re-heating meat/poultry
products, they should also be cooked to an internal temperature of 165ºF.
14
Skewers
NOTE: Use Skewers with the Rotisserie Bar Assembly only. Do not
attempt to use Skewers in any other manner.
1. Load food onto the skewers.
2. Place the End Wheel with
humb Screw onto the center
bar of the Rotisserie Bar
Assembly. Align the locking
device on the End Wheel with
the guide lines on the center
bar of the Rotisserie Bar
Assembly. ighten thumb screw
to lock in place.
3. Hold one Skewer with the
hooked end of the Skewer fac-
ing to the left. Place the Skewer
in a notched cut out in the End
Wheel with humb Screw and
align the tip of Skewer with the
hole in the raised tab on the
End Wheel (with gear).
4. Squeeze and press down on
the top of the Skewer until it
snaps firmly into place. See
Figure 7. Repeat for remaining
Skewers.
5. WITHOUT TURNING THE
ROTISSERIE ON YET, use
the Cover Handles to raise the
Cover.
6. Hold the Rotisserie Bar
Assembly so the End Wheel
with the gear faces to the right.
Slide the Rotisserie Bar into the
Rotisserie along the Rotisserie
Bar Assembly rack. Make sure
each end of the Rotisserie Bar
Assembly drops into the center
grooves of the Rotisserie Bar rack.
Preparing for Use (Cont.)
Figure 6
NOTCHED
WHEEL
HOOKED END
OF SKEWER
"SQUEEZE"
Figure 7
HUMB SCREW
GUIDE
LINES

USING THE ACCESSORIES
ADJUSTABLE FLAT
BASKET
1. Squeeze the two metal tabs
on the Adjustable Flat
Basket Cover and remove.
See Figure 4. Set Cover
aside.
2. Place food into Basket.
Place food flat; do not
“stack” food.
3. Replace Basket Cover so it
fits IGH LY against food.
( he Cover will "hold" the
food in place as it turns. he
cover can be adjusted up or
down to accommodate the
thickness of the food. See
Figure 5.
4. WITHOUT TURNING THE
ROTISSERIE ON YET, use
the Cover Handles to raise
the Cover.
5. Hold the Adjustable Basket
Assembly so the small gear
faces to the right. Slide it into
the Rotisserie along the
Rotisserie Bar Assembly
rack. Make sure each end
of the Adjustable Basket
Assembly drops into the center grooves of the Rotisserie Bar
rack.
Figure 4
Figure 5
1320
User Maintenance Instructions
WARNING: Do not attempt to disassemble or clean the unit
while it is plugged in and/or is hot. Burns or other serious
injuries can occur.
Your Baby George™Rotisserie requires little maintenance. It con-
tains no user-serviceable parts inside the Rotisserie. Contact con-
sumer service if the product requires servicing.
CAUTION: Unplug appliance rom wall outlet and allow all
parts to cool completely be ore cleaning.
CAUTION: Do not use metal or abrasive scouring pads or
harsh or abrasive cleansers to clean the parts o the
Rotisserie. I necessary, use a nylon bristle brush to loosen
hardened ood particles.
1. Once product is unplugged and has cooled completely, carefully
pull out Drip ray. Use care not to spill any liquids as they may
still be hot.
2. Remove all accessories from Rotisserie. Wash all accessories in
hot, soapy water. Rinse well and dry thoroughly.
3. Wipe outside of Rotisserie with a damp cloth or sponge. Dry
with a soft cloth.
4. Lift open Cover. If desired and to make cleaning easier, you may
also lift open the Cover completely, then pull up and remove
Cover to release from tracks. Use a damp sponge to wipe the
interior of the Rotisserie. Do not use metal or abrasive scour-
ing pads or harsh or abrasive cleansers to clean inside the
Rotisserie. Dry all parts thoroughly. If Cover is removed,
replace into tracks on sides of Rotisserie and close Cover.
Preparing for Use (Cont.)
Other manuals for GR59A Baby George
1
Table of contents
Other George Foreman Oven manuals

George Foreman
George Foreman GR80B User manual

George Foreman
George Foreman GV6S Grill & Roast User manual

George Foreman
George Foreman TO2021BQ Owner's manual

George Foreman
George Foreman George Foreman GRV660 User manual

George Foreman
George Foreman GR80B User manual

George Foreman
George Foreman GR80 User manual