German Light Products Startube 4 HiRes User manual

1
12
20
0c
cm
m
(
(4
4x
x3
36
6
W
Wa
at
tt
t)
)
i
in
nc
cl
l.
.
S
Sp
pl
li
it
tt
te
er
r
Instruction Manual
from software version 4.1
(Instruction version 1.1)
Internet: http://www.glp.de

(
(4
4x
x3
36
6
W
Wa
at
tt
t)
)
2 Version 1.1 GLP •German Light Products GmbH
Table of contents
1Description of Device and Functions..............................................3
1.1Safety Instructions .....................................................................................4
2Preparation and Installation.............................................................5
2.1Mounting .....................................................................................................5
2.2Secure the ..........................................................................5
2.3Connections................................................................................................5
2.4Adjust the DMX- Address...........................................................................6
2.5Channel configuration and operation mode ............................................7
2.6DMX-Table...................................................................................................7
3Operating...........................................................................................7
4Maintenance / Tube change.............................................................8
5Technical Specification....................................................................8
5.1Startube 4 HiRes.........................................................................................8
5.2Assembly and dimensions ........................................................................9
5.3General view ...............................................................................................9
5.4Accessory: Splitter................................................................10

(
(4
4x
x3
36
6
W
Wa
at
tt
t)
)
GLP •German Light Products GmbH Version 1.1 3
1 Description of Device and Functions
- The is a fluorescent tube lighting concept for professional
architecture and stage lighting.
- The system consists of 4x T8 fluorescent tubes 36W in the colors red, green, blue
and white.
- Each of the 4 tubes of the is individually controllable over a DMX-
512 channel.
- Internal high resolution control electronics allows a continuously and smooth
dimming between 0% and 100%.
- By means of additive color mixing with a very high resolution, one receives a
homogeneous color mixing behavior with very high luminous efficiency.
- Moreover the tubes show a very fast responding behavior, with which the system
suits also application like fast running light programs and stroboscope-similar
effects.
- In Seven-Channel-Mode the possibility exists to turn off the pre-heating of the
tubes, to choose between two dimmer curves, to turn on a stroboscope effect and
to regulate the maximum brightness of all tubes.
- The DMX start address is adjusted simply over keys at the system and directly
indicated over the display. In Seven-Channel-Mode the Display goes out 10
seconds after the last key press to enable operation in darker settings.
- The mode switchover takes place by pushing two keys of the Display
simultaneously. (100 and 10: Four-Channel-Mode, 100 and 1: Seven-Channel-
Mode )
- The fourth fluorescent tube serves the background brightness increase in the
white color. Furthermore also the possibility exists to exchange this tube by
another color to obtain there a higher brightness.
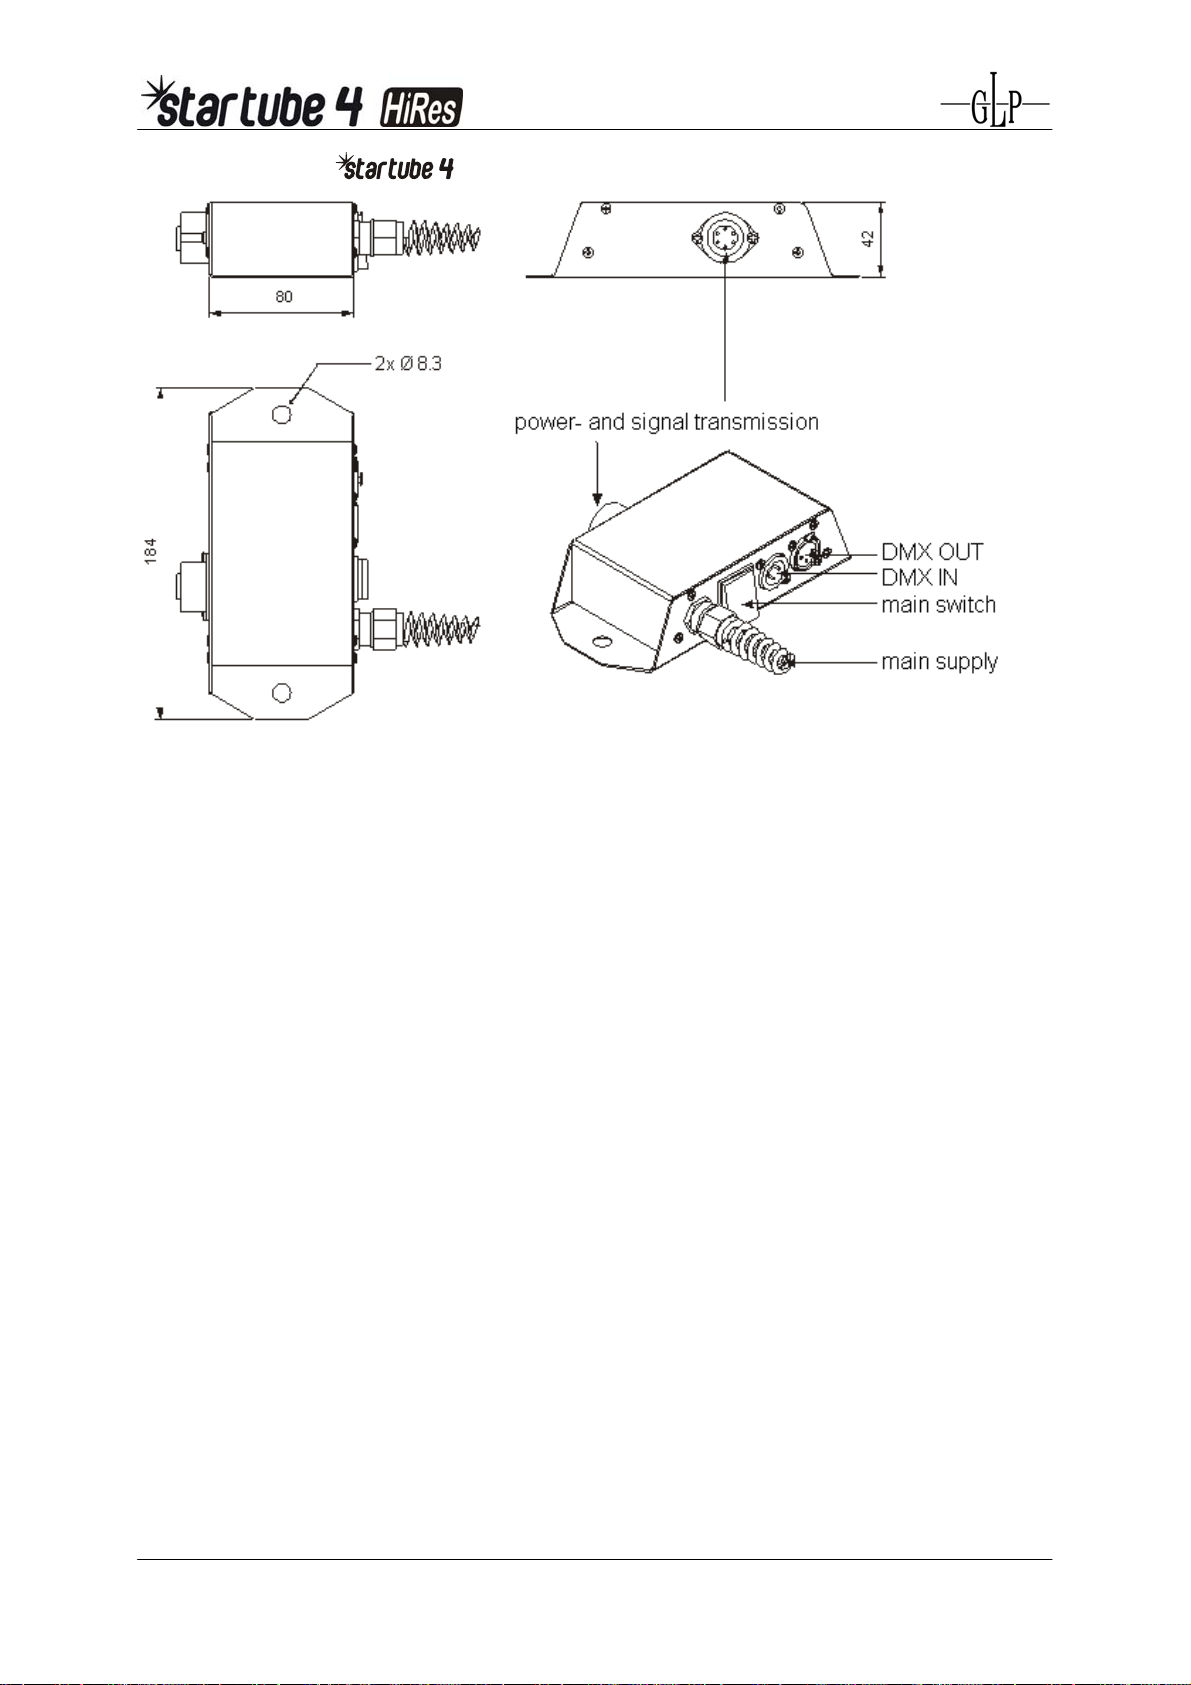
- A further advantage is the lockable single-connector-system and the very low
power consumption, which is reached by a very good compensation. Thus it is
possible to attach up to 15 in a row connected to one
S
Sp
pl
li
it
tt
te
er
r
at each single 16A phase.
- Integrated threaded bushes M10 for a clamp, a CAMLOC quick-lock-system, a
fitting for a safety rope and the removable feet simplifying the handling within the
tour exercise.

(
(4
4x
x3
36
6
W
Wa
at
tt
t)
)
4 Version 1.1 GLP •German Light Products GmbH
- By the possibility to mount the devices both, lengthwise as well as in transversal
direction without any gaps, large coherent shining surfaces can be constructed.
- As accessories, cable connections are available in the lengths 1m, 2m, 5m, 10m
and 20m.
1.1 Safety Instructions
The
is a High-Tech product. To guarantee a
smooth operation it is necessary to keep the following rules.
The manufacturer of this device will not take responsibility of
damages through disregard of the information given in this
manual. Warranty adjustments will be canceled.
1. Never try to repair or to dismantle the yourself. Opening the
internal housing can lead to current impacts or other injuries. Turn for arising
problems always to an authorized specialist dealer or directly to G
GL
LP
P.
2. The
is exclusively meant for the use in the internal area.
Never use or store the system out of doors.
3. When installation the devices attention is to be paid to a sufficient temperature
heat sink. Take advised from the G
GL
LP
P
- support if an installation in restrained
or badly ventilated conditions is planned.
4. Protect the equipment against humidity and wetness as well as against in-
creased vibrations.
5. Unplug the from the AC outlet before any service.
6. To allow a secure operation, follow also the installation guide described in
chapter 2.1. Operating the without suited safety aids like
Safety cables or clamps/hooks can increase the risk of accident.
7. The installation should be done by qualified staff only. You need to pay
attention to the common rules of technology that are not explicit mentioned in
this manual.
8. Use only original spare parts. Any structural modification will cancel all warran-
ty adjustments.

(
(4
4x
x3
36
6
W
Wa
at
tt
t)
)
GLP •German Light Products GmbH Version 1.1 5
2 Preparation and Installation
2.1 Mounting
The can be mounted in any arbitrary position without any gaps. To
ensure a safe installation under all circumstances, the system offers various
possibilities like screw-on standings and assembly angle, different attaching by
means of a hook, classical M10 hook or CAMLOC quick-lock-systems.
835
640
770
4xM10
700
82
2.2 Secure the
Regardless of the rigging of the you have to use a stipulated safety
wire. Therefore you have to thread a safety wire through the intended application at
the fixture and connect it with the truss-support. Pay attention to a safe and proper
fastening.
Pay attention to the regulations of: BGV C1 (former VBG 70) and
DIN VDE 0711-217 !
The installation should be done by qualified staff only.
2.3 Connections
You can connect up to 15 in one row. The S
Sp
pl
li
it
tt
te
er
ris
therefore connected to a single 16A phase. Also the DMX signal for all 15
is attached directly to this device. Power and the DMX signal will be
both transmitted over the multi-core cable, connected firmly with the system. For
forwarding the power and DMX signal, differently manufactured cables are available
as accessories.
During mounting and dismounting, the system must be disconnected
from the mains supply. Otherwise the connectors can by damaged!

(
(4
4x
x3
36
6
W
Wa
at
tt
t)
)
6 Version 1.1 GLP •German Light Products GmbH
2.4 Adjust the DMX- Address
To adjust the DMX- (Start) Address please
use the three keys underneath the display.
“Key 100” for the 100 digits.
“Key 10” for the 10 digits.
“Key 1” for the 1 digits. Counting upwards.
Each unit uses four or seven DMX channels.
Channel 1 = white in Seven-channel-mode:
Channel 2 = red Channel 5 = pre-heating off, dimmer curve selectable
Channel 3 = green Channel 6 = Stroboscope effect
Channel 4 = blue Channel 7 = superior dimmer
Example:
In Four-channel-mode In Seven-channel-mode
no. 1 DMX Channel 001 DMX Channel 001
no. 2 DMX Channel 005 DMX Channel 008
no. 3 DMX Channel 009 DMX Channel 015

(
(4
4x
x3
36
6
W
Wa
at
tt
t)
)
GLP •German Light Products GmbH Version 1.1 7
2.5 Channel configuration and operation mode
The comes with two operation mode which vary in functionality and
number of DMX channels. In the compatibility mode (Display Key 100 and 10 pushed
simultaneously; Display shows “H0”) four DMX channels are needed. Thereby each
channel controls the brightness of a tube. Thereby the pre-heating of the tubes is on
durably.
In Seven-channel-mode (Display Key 100 and 1 pushed simultaneously; Display
shows “H1”) channel 5 is intended to be used to turn of the pre-heating of the tubes
and choose between old and new dimmer curve. Channel 6 conduces to adjust the
stroboscope effect. Channel 7 controls the maximum brightness of all tubes. Thereby
the brightness depends on the settings of channel 1-4.
2.6 DMX-Table
Channel 1 Brightness of the first tube in 255 steps
Channel 2 Brightness of the second tube in 255 steps
Channel 3 Brightness of the third tube in 255 steps
Channel 4 Brightness of the fourth tube in 255 steps
In Seven-channel-mode
Channel 5 0-99 linear dimmer curve
100-199 dimmer curve softer in lower sector
200-255 pre-heating of the tubes off
Channel 6 0-15 tubes OFF
16-239 strobe; frequency: 0.2Hz - 50Hz
240-255 tubes ON
Channel 7 Maximum brightness of all tubes in 255 steps
3 Operating
During operating the the following points are to be considered:
a) After the system is switched on, the tubes need a certain time (a few minutes) to
reach their operating temperature. Easy flickering is not to be avoided in this time.
b) After this period the system should operate smooth. If you have still those
flickering and glowing effects at DMX value 000, please turn around the main plug
at the
S
Sp
pl
li
it
tt
te
er
r
by 180° (zero-lead and phase exchange).

(
(4
4x
x3
36
6
W
Wa
at
tt
t)
)
8 Version 1.1 GLP •German Light Products GmbH
4 Maintenance / Tube change
Dependent on the operating conditions you should clean the
in regular intervals. Make sure that the system
is disconnected from the mains supply. The housing can
simply be cleaned with a dampish cloth. The fluorescent tubes
should be abraded with a lint-free cloth very carefully. For your
own protection it is recommendable to wear safety gloves. To
change a fluorescent tube turns it carefully by approx. 90° in
the socket. For this e.g. loop a narrow band leather around the
tube ends and slue it around carefully.
If the vertical slot of the socket is visible the tube can be then removed. Insert the
tube in reverse order again.
New tubes should be operated approx. 100 hours for reaching an optimal
operational behavior on full efficiency.
Only fluorescent tubes of the type T8, 36W must be used!
5 Technical Specification
5.1 Startube 4 HiRes
Power consumption each system 4x T8 fluorescent tubes 36W
RGB- Color mixing system red, green, blue, white
DMX-512 control 4 DMX channels each 0-100% dimming
max. ambient temperature 45°C
Dimensions WxLxH 1237mm x 133mm x 104mm
(with mounted feet +65mm)
Weight 11 kg
CAMLOC- quick-lock-systems
Connecting system over multi-core cables and Splitter system

(
(4
4x
x3
36
6
W
Wa
at
tt
t)
)
GLP •German Light Products GmbH Version 1.1 9
5.2 Assembly and dimensions
1237
835
640
770
4xM10
700
1302
130
93
82
161
5.3 General view
A
A
B
B

(
(4
4x
x3
36
6
W
Wa
at
tt
t)
)
10 Version 1.1 GLP •German Light Products GmbH
5.4 Accessory: Splitter

(
(4
4x
x3
36
6
W
Wa
at
tt
t)
)
GLP •German Light Products GmbH Version 1.1 11
Table of contents