4 5
Noise
• The operator must wear the ear protector when the noise level at this position
exceeds 85dB(A). It is recommended that the operator wears the ear protector even if
the noise levels are less than 85dB(A).
Vibration
• The operator is exposed to the risk caused by vibration. Frequent and prolonged
exposure to high intensive vibration can cause disorders, especially to hands and
arms. Disorders caused by vibration depend on many factors such as type of tool,
type of work, individual operator, and his physical conditions, working conditions,
working period, design of tool, temperature, etc. The operator must use the tool in
accordance with the total daily usage of ISO5349.
Mounting and Dismounting Abrasive Product
• When mounting and dismounting the abrasive product, make sure that the air line is
not connected to the tool or that the air line is shut off.
• Make sure that the dimensions of the abrasive product are compatible with the tool
and that the abrasive product fits the spindle of the tool.
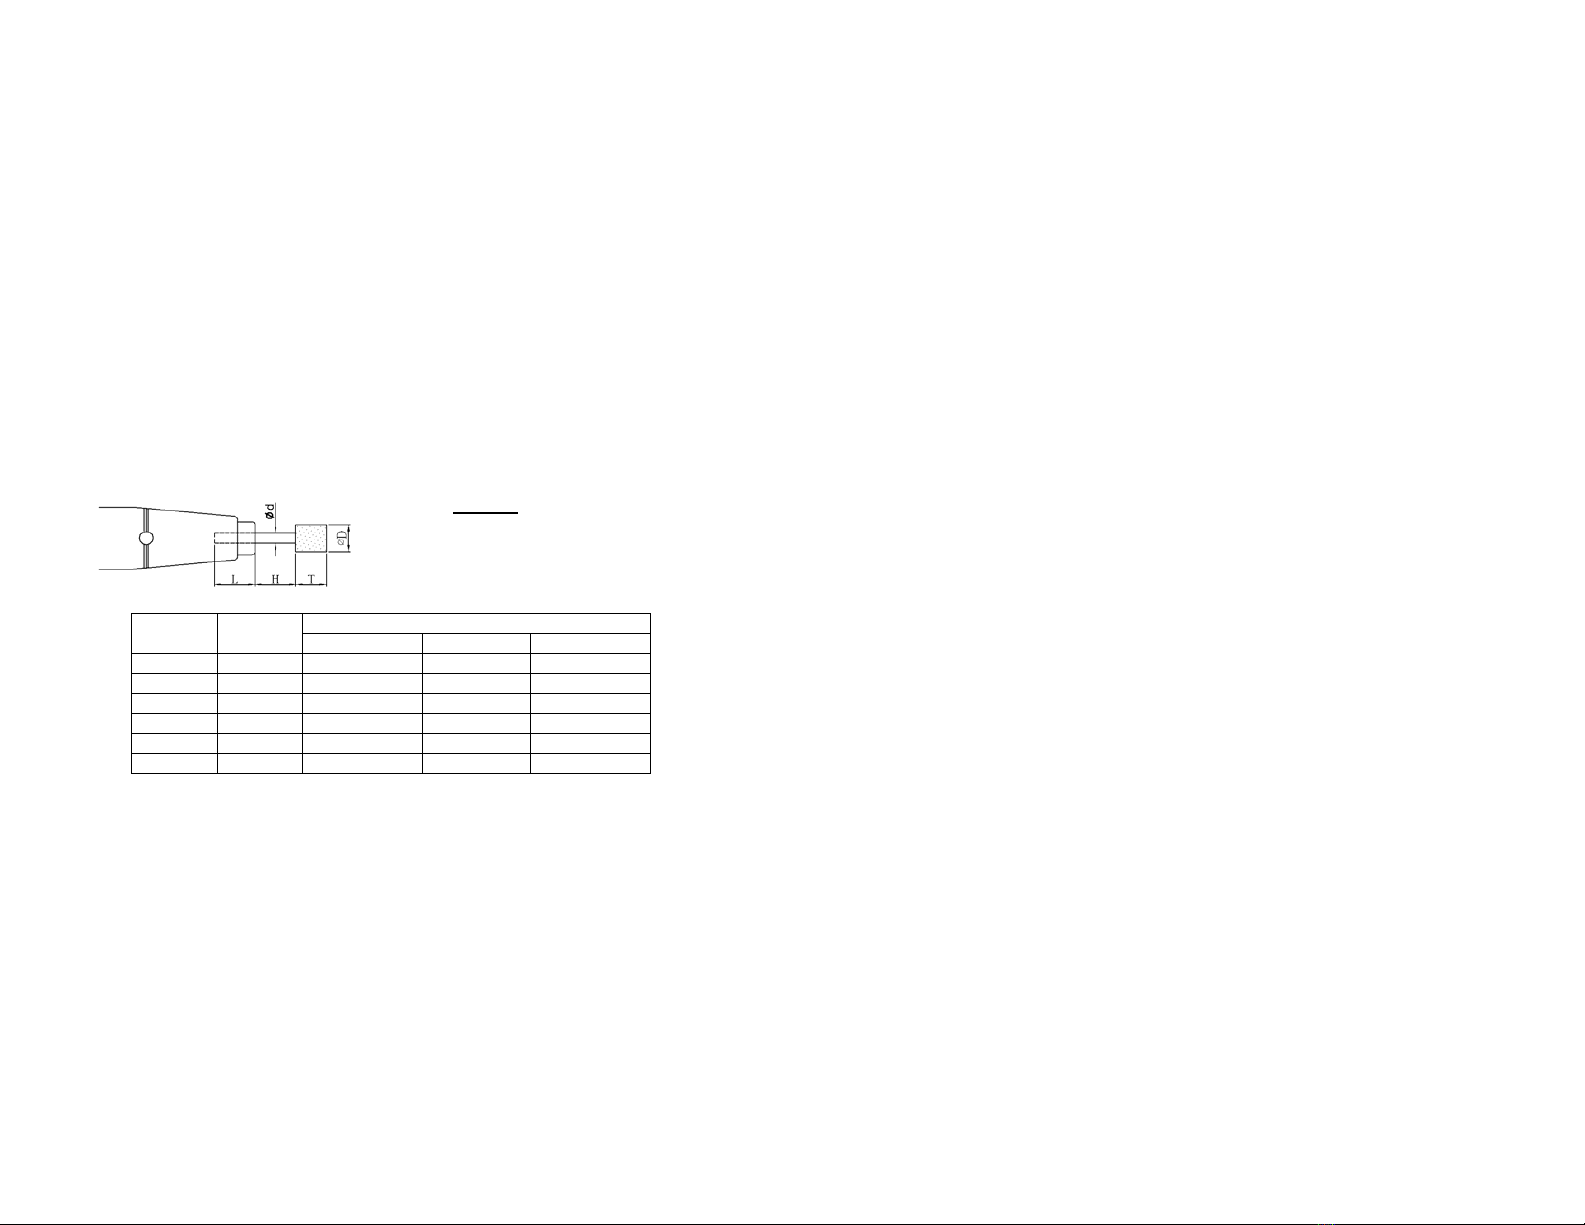
Suggested gripping and over-hanging length
• The minimum gripping length of insert tool should be no less than 10mm.
Noise: The operator must wear the ear protector when the noise level at this position
exceeds 85dB(A). It is recommended that the operator wears the ear protector even if the
noise levels less than 85dB(A).
Vibration: The operator is exposed to get the risk caused by vibrations. Frequent and
prolonged exposure to high intensive vibrations can cause disorders, especially to hands
and arms. Disorders caused by vibrations depend on many factors such as type of tool,
type of work, individual operator, and his physical conditions, working conditions, working
period, design of tool, temperature, etc. The operator must use the tool in accordance with
the total daily usage of ISO5349.
Mounting and Dismounting Abrasive Product
When mounting and dismounting the abrasive product, make sure that the air line is not
connected to the tool or that the air line is shut off.
Make sure that the dimensions of the abrasive product are compatible to the tool and
that the abrasive product fits the spindle of the tool.
Suggested gripping and over-hanging length
The minimum gripping length of insert tool should be no less than 10mm.
Recommended overhanging length (mm)
ØD (mm) T (mm) 13mm 25mm 38mm
3.0 13 105,000rpm 64,000rpm 46,650rpm
6.0 13 60,000rpm 38,000rpm 26,250rpm
9.5 13 45,370rpm 28,500rpm 21,000rpm
9.5 25 26,250rpm 18,750rpm 14,250rpm
13 13 34,500rpm 22,500rpm 16,870rpm
13 25 20,620rpm 13,870rpm 10,120rpm
Checking Abrasive Product
yUse only the appointed abrasive products. Do not use worn out product.
yHandle and store the abrasive product with care in accordance to its manufacturer’s
instructions.
yIn an extremely high or low temperature, allows the tool and the abrasive products a
sufficient slow revolution.
yAfter mounting the abrasive product, run the tool at no load for about 3 minutes in a safe
place such as under a workbench or under an isolated place. Stop the operation
immediately when you feel an unusual vibration, hear unusual sound, notice unusual
change in speed and/or find any other irregularity.
Correct Working with Tool
yAlways consult the manufacturer before attempting to install and use the tool if there
should be any doubt about safety and appropriate use of tool or the abrasive product or
accessory.
yDo not modify the tool without permission or agreement from the manufacturer.
yNever use or continue to use the tool when you feel unusual vibration, hear unusual sound,
notice unusual changes in speed and find any other irregularities.
yThe tool should be used according to its capacity and only for its own purpose.
yDo no touch the abrasive product mounted on the tool during operation.
yBe aware of long hair, loose clothing, ties, etc. drawing in the tool.
yMake sure that sparks resulting from use are directed so that they do not hit persons,
flammables substances, etc.
yMake sure that the workpiece is properly supported or fastened so as to avoid kick back.
yBe aware that the tool will keep running-on for a while even after turning off. Do not touch
the abrasive tool until it came to completely stop. It is very dangerous to touch the
abrasive product soon after stopping operation.
yNever carry the tool by the hose or yank it to disconnect from power supply.
yDo not use the air hose for supporting, lifting or lowering the tool.
yMake sure that other people in the work area are at the safe distance.
yDo not abandon the tool during operation.
yDo not start the operation of the tool when it is laid down.
Keeping Tool After Use
The tool must be kept in a clean, dry place, so that it can be used properly easy and safely.
The storage of tools should be in a humidity controlled room. Avoid large temperature
fluctuations room.
Maintenance and Repairs
yThe tool must be properly maintained and tested by competent and trained personnel. At
any sign of malfunction or unusual behavior, the tool should be taken out of service for
examination and repair.
yIt is recommended to dismantle the tool for overhauling and cleaning periodically after 500
hours of operation or once every six months.
yWhen giving maintenance or repairs, make sure to disconnect the tool from the air line or
to shut off the air supply.
yBefore clearing the tool for use, make sure that all parts have been correctly assembled
with all fasteners tightened.
yCheck the speed or rpm of the tool without the abrasive product on the spindle after each
maintenance or repairing.
Disposal of Tool
The tool is made of steel, casting iron, brass, bronze casting, aluminum alloy, rubber and
plastic components or using some of those materials. When disposing of the tool, be sure not
to cause pollution to human beings and environment.
Remark:
L = gripping length
H = Overhanging length
T = Mounted Point length
ØD = Diameter of mounted point
Checking Abrasive Product
• Use only the appointed abrasive products. Do not use worn out products.
• Handle and store the abrasive product with care in accordance with its manufacturer’s
instructions.
• In an extremely high or low temperature, allows the tool and the abrasive products a
sufficient slow revolution.
• After mounting the abrasive product, run the tool at no load for about 3 minutes in a
safe place such as under a workbench or under an isolated place. Stop the operation
immediately when you feel an unusual vibration, hear unusual sound, notice unusual
change in speed and/or find any other irregularity.
Correct Working with Tool
• Always consult the manufacturer before attempting to install and use the tool if there
should be any doubt about safety and appropriate use of the tool or the abrasive
product or accessory.
• Do not modify the tool without agreement from the manufacturer.
• Never use or continue to use the tool when you feel unusual vibration, hear unusual
sound, notice unusual changes in speed and find any other irregularities.
• The tool should be used according to its capacity and only for its own purpose.
• Do not touch the abrasive product mounted on the tool during operation.
• Be aware of long hair, loose clothing, ties, etc. drawing in the tool.
• Make sure that sparks resulting from use are directed so that they do not hit persons,
flammable substances, etc.
• Make sure that the workpiece is properly supported or fastened so as to avoid kick
back.
• Be aware that the tool will keep running-on for a while even after turning off. Do not
touch the abrasive tool until it comes to a complete stop. It is very dangerous to touch
the abrasive product soon after stopping operation.
• Never carry the tool by the hose or yank it to disconnect from the power supply.
• Do not use the air hose for supporting, lifting or lowering the tool.
• Make sure that other people in the work area are at a safe distance.
• Do not abandon the tool during operation.
• Do not start the operation of the tool when it is laid down.
Keeping Tool After Use
• The tool must be kept in a clean, dry place, so that it can be used easily and safely.
The storage of tools should be in a humidity controlled room.
• Avoid large temperature fluctuations.
Maintenance and Repairs
• The tool must be properly maintained and tested by competent and trained personnel.
At any sign of malfunction or unusual behavior, the tool should be taken out of service
for examination and repair.
• It is recommended to dismantle the tool for overhauling and cleaning periodically after
500 hours of operation or once every six months.
• When giving maintenance or repairs, make sure to disconnect the tool from the air line
or to shut off the air supply.
• Before clearing the tool for use, make sure that all parts have been correctly
assembled with all fasteners tightened.
• Check the speed or rpm of the tool without the abrasive product on the spindle after
each maintenance or repairing.
D. Disposal of Tool
• The tool is made of steel, casting iron, brass, bronze casting, aluminum alloy, rubber
and plastic components or using some of those materials.
• When disposing of the tool, be sure not to cause pollution to human beings and the
environment.