Geutebruck G-Case/WPH-1010 User manual

G-Case/WPH-1010
Installation
Weather Proof Housing


G-Case/WPH Series Installation
1
Preface
The information given in this manual was current when published. The company
reserves the right to revise and improve its products. All specifications are subject
to change without notice.
Copyright
Under copyright laws, the content of this user manual may not be copied, photo-
copied, translated, reproduced or reduced to any electronic medium or machine-
readable format, in whole or in part, without prior written permission of the com-
pany.
© 2018 by GEUTEBRÜCK All Rights preserved.
NOTE: READ THIS
INSTALLATION GUIDE CAREFULLY, BEFORE YOU
START WITH INSTALLATION.
Important Information
Before proceeding, please read and observe all instructions and warnings in this
manual. Retain this manual with the original bill of sale for future reference and, if
necessary, warranty service. When unpacking the unit, check for missing or dam-
aged items. If any item is missing, or if damage is evident, DO NOT INSTALL OR
OPERATE THIS PRODUCT. Contact your dealer for assistance.

G-Case/WPH Series Installation
2
Package Contents
WPH with 1 (Heater) + 2 (Camera mounting plate) + 3 (PSU)
Space holder for camera mounting
Cable gland, already mounted
Desiccant bag
Manual

G-Case/WPH Series Installation
3
Contents:
1. Package contents Page 2
1. Technical data Page 4
2. Installation guide Page 5
3. Splitter connectors Page 9
4. Accessories Page 10
NOTES:
Installation and usage of the product must be done by qualified personnel under compliance
of laws and instructions which are valid for the installation site.
Before doing any installation or maintenance, it must be secure that all isolating devices for mains sup-
ply are active.
Warning! If the heater is inactive for short time, it still can be very hot.
Use original spare parts only.
If the housing is mounted in the correct way, maintenance is not required.
Following symbols are visible on the product or in this manual:
WARNING!
Users have to read and understand this manual to minimize the risk of wrong handling.

G-Case/WPH Series Installation
4
Technical data
G-Case/WPH-1001
Description Weather proof housing with sunshield, temperature controlled heater, in-
tegrated splitter and additional temperature controlled fan
Concealed cable guide Ka-
belführung Yes
Varnish RAL 9002
Material of housing Aluminium
Power supply for heater 12 VDC
Cable entry PG gland
Power supply for splitter 110 - 240 VAC / 12 VDC
Outside dimensions of WPH
in mm (L x W x H) 560 x 194 x 330 (with wall mount bracket; see above)
Usable inner dimensions
in mm (L x W x H) 310 x 120 x 85
Protection class IP 66
Weight 4,2 kg (w/o wall mount bracket, camera, lens)
Order no. 0.02800

G-Case/WPH Series Installation
5
Installation
For installation of the wall mount bracket and the G-Case/WPH-1001, please follow the
steps below:
1. Mark the drill holes by using the bracket,
drill the holes and place the plugs.
2. Guide the network cable through the
bracket.
3. Attach the bracket to the wall by using
the screws and plugs from the accesso-
ries.
4. Press the suspension mechanic until stop,
hold it and -
- lead the retaining claws into the wall mount
bracket. Release the suspension mechanic.
5. Wall mount bracket and WPH are connected now, so that
cabling is easy to carry out.

G-Case/WPH Series Installation
6
6. Loosen the PG gland.
7. If you need a network cable only, take the rubber seal
with one 6 mm bore. If 2 cables are needed use the seal
with 2 x 6 mm bore.
Choose one of the rubber seals and lead (e.g. only) the
network cable through these 3 components, as shown
here.
Press the seal into the plastic grommet – it snaps in
hearable. Stick the grommet into the gland and turn it
slowly.
The grommet has one position in which it snaps in.
Screw the PG cap a bit, pull the cable out of the wall mount
bracket smoothly and screw the PG cap tangible.
8. Turn down the WPH onto the wall mount
bracket and fix it with both screws.

G-Case/WPH Series Installation
7
Completion should look
like shown here.
CAUTION!
For Pole mount please respect the following order
a) At first install the bracket onto the pole mount adapter.
b) Guide the network cable through the bracket and pole
mount adaptor.
c) Mount this combination at the pole by using the two ten-
sion bands.
d) After this, please proceed at step three of wall mounting.
9. Open the WPH cover and connect the power source
cable to the PSU like shown. Please refer to section
PSU connectors on page 9.
10. Take the camera mounting plate, screw a lens onto
a camera and place the camera onto the plate.
11. If the combination shows enough
space downwards, it can be
mounted directly on the plate.

G-Case/WPH Series Installation
8
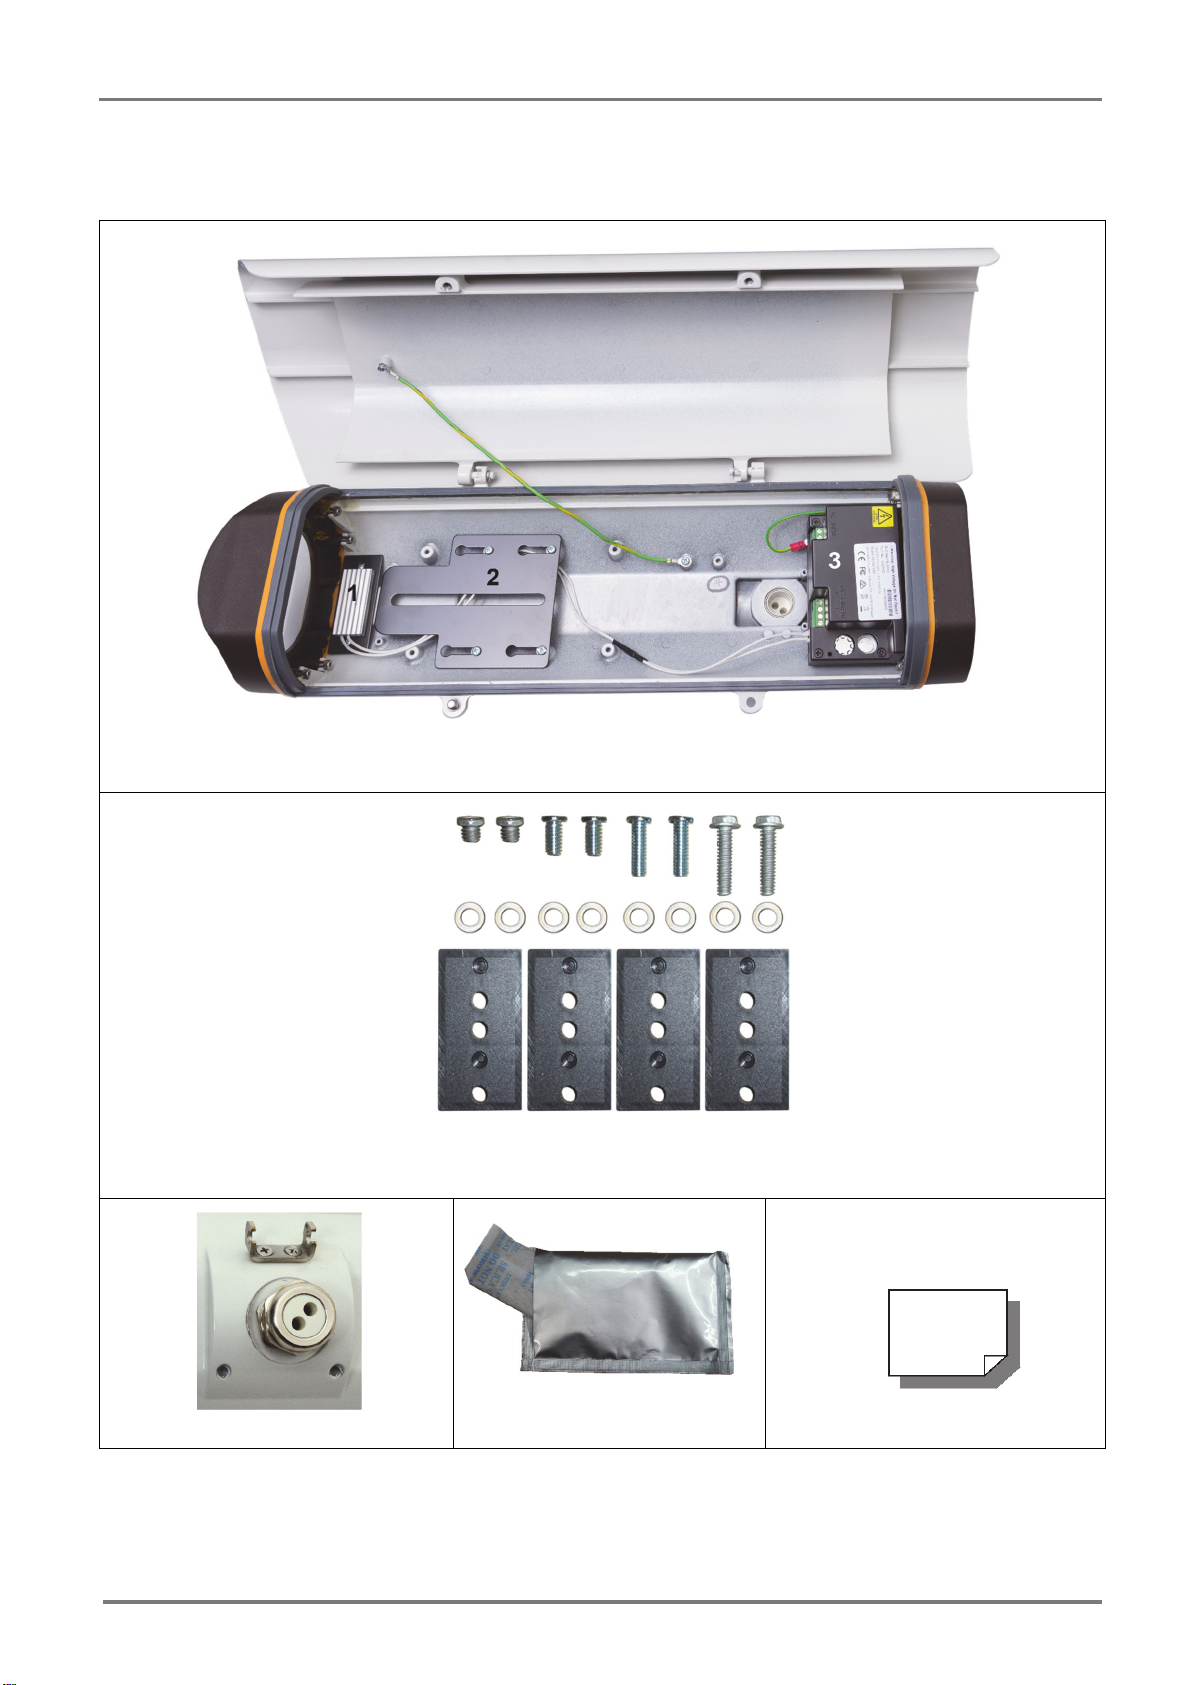
For this, use a suitable screw in the accessory
bag. If the combination is too deep, increase
the seat of the camera with the space holders
in the accessory bag and a suitable screw with
washer.
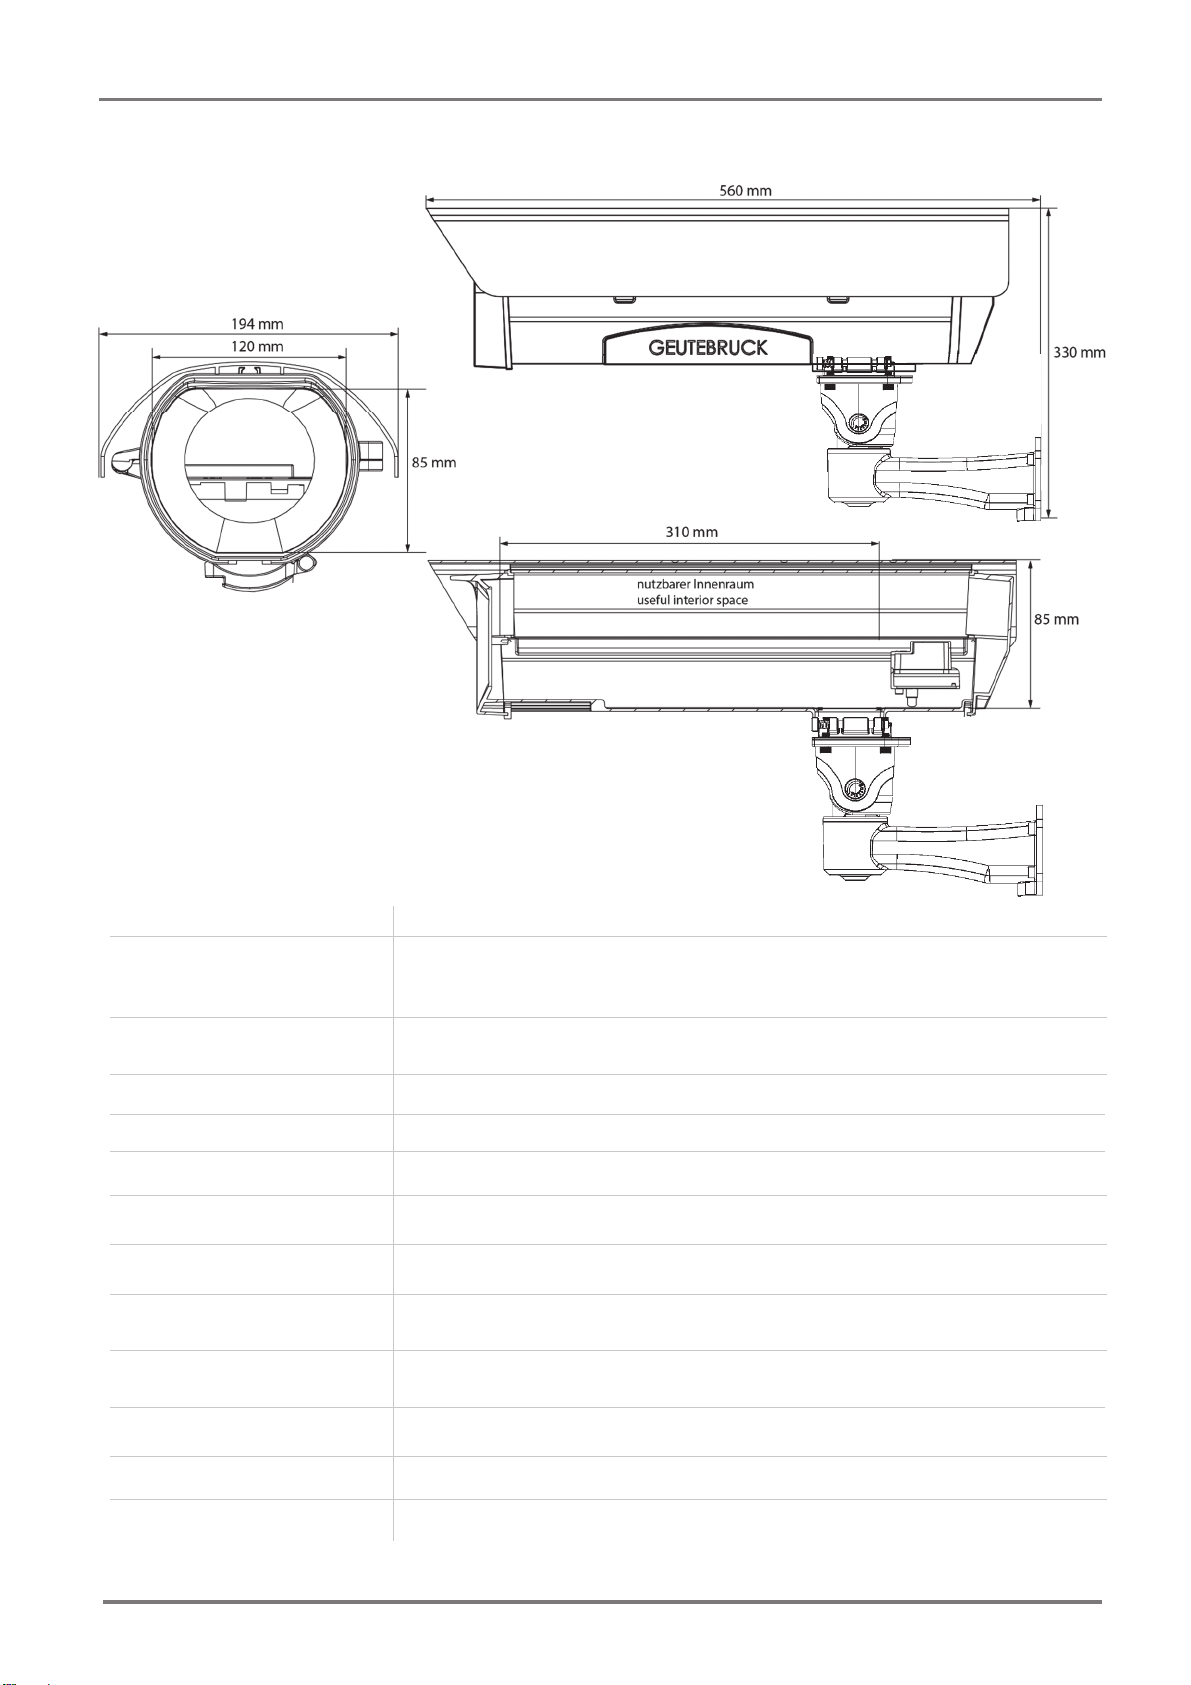
Pay attention that, if the camera is placed into the WPH, the distance between
lens and front glass is not too large. This can lead to black corners in the picture
(vignetting), when the lens is in maximum wide angle mode. Additionally the dis-
tance of the lens above the heater shield should not be too close. The tempera-
ture of the heater may cause lens damage.
Smaller cameras (altogether with smaller lenses) can be individually placed on the
mounting plate. It is possible to place this plate nearer to the front glass, or turn it
so that the flap points to the PSU. Connect the camera to the PSU and the net-
work cable.
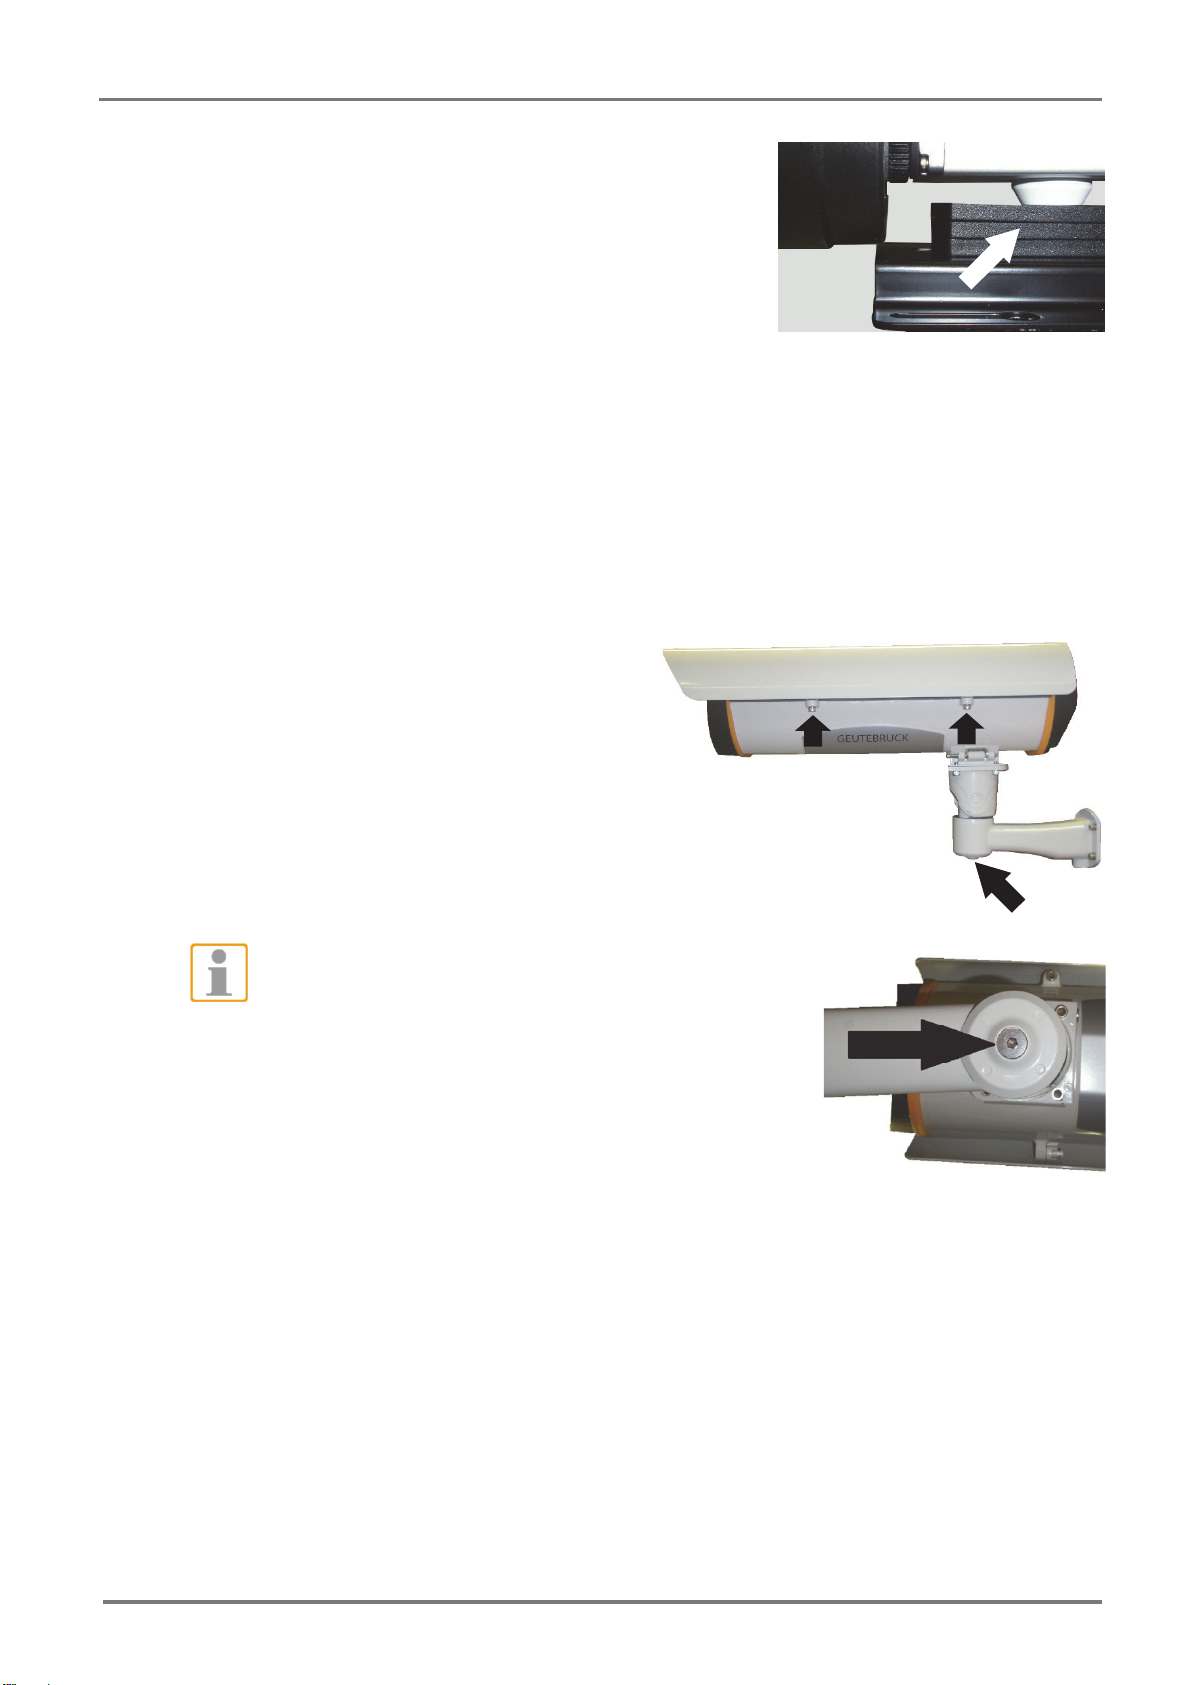
For finishing the installation, please
close the the case cover and fix it with
the screws.
Completed housing G-Cam/WPH.
NOTE
After finishing the complete installation, please don’t
forget to fix the position of the WPH by tightening the
fixing screw.

G-Case/WPH Series Installation
9
PSU connectors
No. Connector Description
1 PS In External Power Source 110 VAC– 230 VAC
2 PS Out, 12 VDC clamps Power supply for the camera
3 12 VDC plug Power supply for the heater (already in use)
4 12 VDC plag Power supply for additional devices

G-Case/WPH Series Installation
10
Accessories
G-Case/WMB-005
Art.-No.: 5.15922,
Wall Mount Bracket for G-Case/WPH-1010
G-Case/PMA-101
Art.-No.: 5.18375,
Pole Mount Adapter
G-Case/BCE-010
Art.-Nr.: 5.15921,
Ceiling Mount Bracket for G-Case/WPH-1010
620 mm
340 mm
90 mm
70 mm


GEUTEBRÜCK GmbH
Im Nassen 7-9 | D-53578 Windhagen
Tel. +49 (0)2645 137-0 | Fax-999
www.geutebrueck.com
Technische Änderungen vorbehalten.
Technical alterations reserved.
Sous réserve des modications.
Suministro sujeto a modicaciones técnicas o disponibilidad.
G-Case/WPH-1010_IA_EN 03.04.2018
This manual suits for next models
1
Table of contents
Other Geutebruck Camera Accessories manuals