Accordatore Cromatico
GEWA CLIP-2
Grazie per aver acquistato questo articolo.
Si prega di leggere attentamente le istruzioni prima
dell’utilizzo.
Scopo di utilizzo
Il GEWA CLIP-2 è da utilizzarsi come accordatore di
strumenti musicali a corda
Informazioni important per la sicurezza
• Per evitare corto-circuiti, shock elettrico o qualsiasi
malfunzionamento è necessario:
Non smontare l’articolo. Non esporre l’accordatore
ad alte temperature o eccessive situazioni di
umidità ( ad esempio luce solare diretta). Evitare urti
violenti. La polvere può danneggiare i circuiti
interni. Assolutamente da non utilizzare con mani
umide.
• Per evitare danni meccanici: non premere I pulsanti
con eccessiva forza; evitare di far cadere
l’accordatore
• Pulizia: non usare detergent contenenti alcohol o
altri solvent in quanto questi potrebbero
danneggiare il colore o le scritte sull’accordatore.
Pulire solo con un panno asciutto anti-polvere.
• Batterie: pila 3V inclusa. Utilizzare sempre e solo
modello CR2032. In caso di non utilizzo prolungato
oppure in caso di batteria scarica, è consigliato
rimuovere la pila per preservare i componenti
interni.
• Non esporre assolutamente a amme o altro tipo di
fonte di calore eccessiva
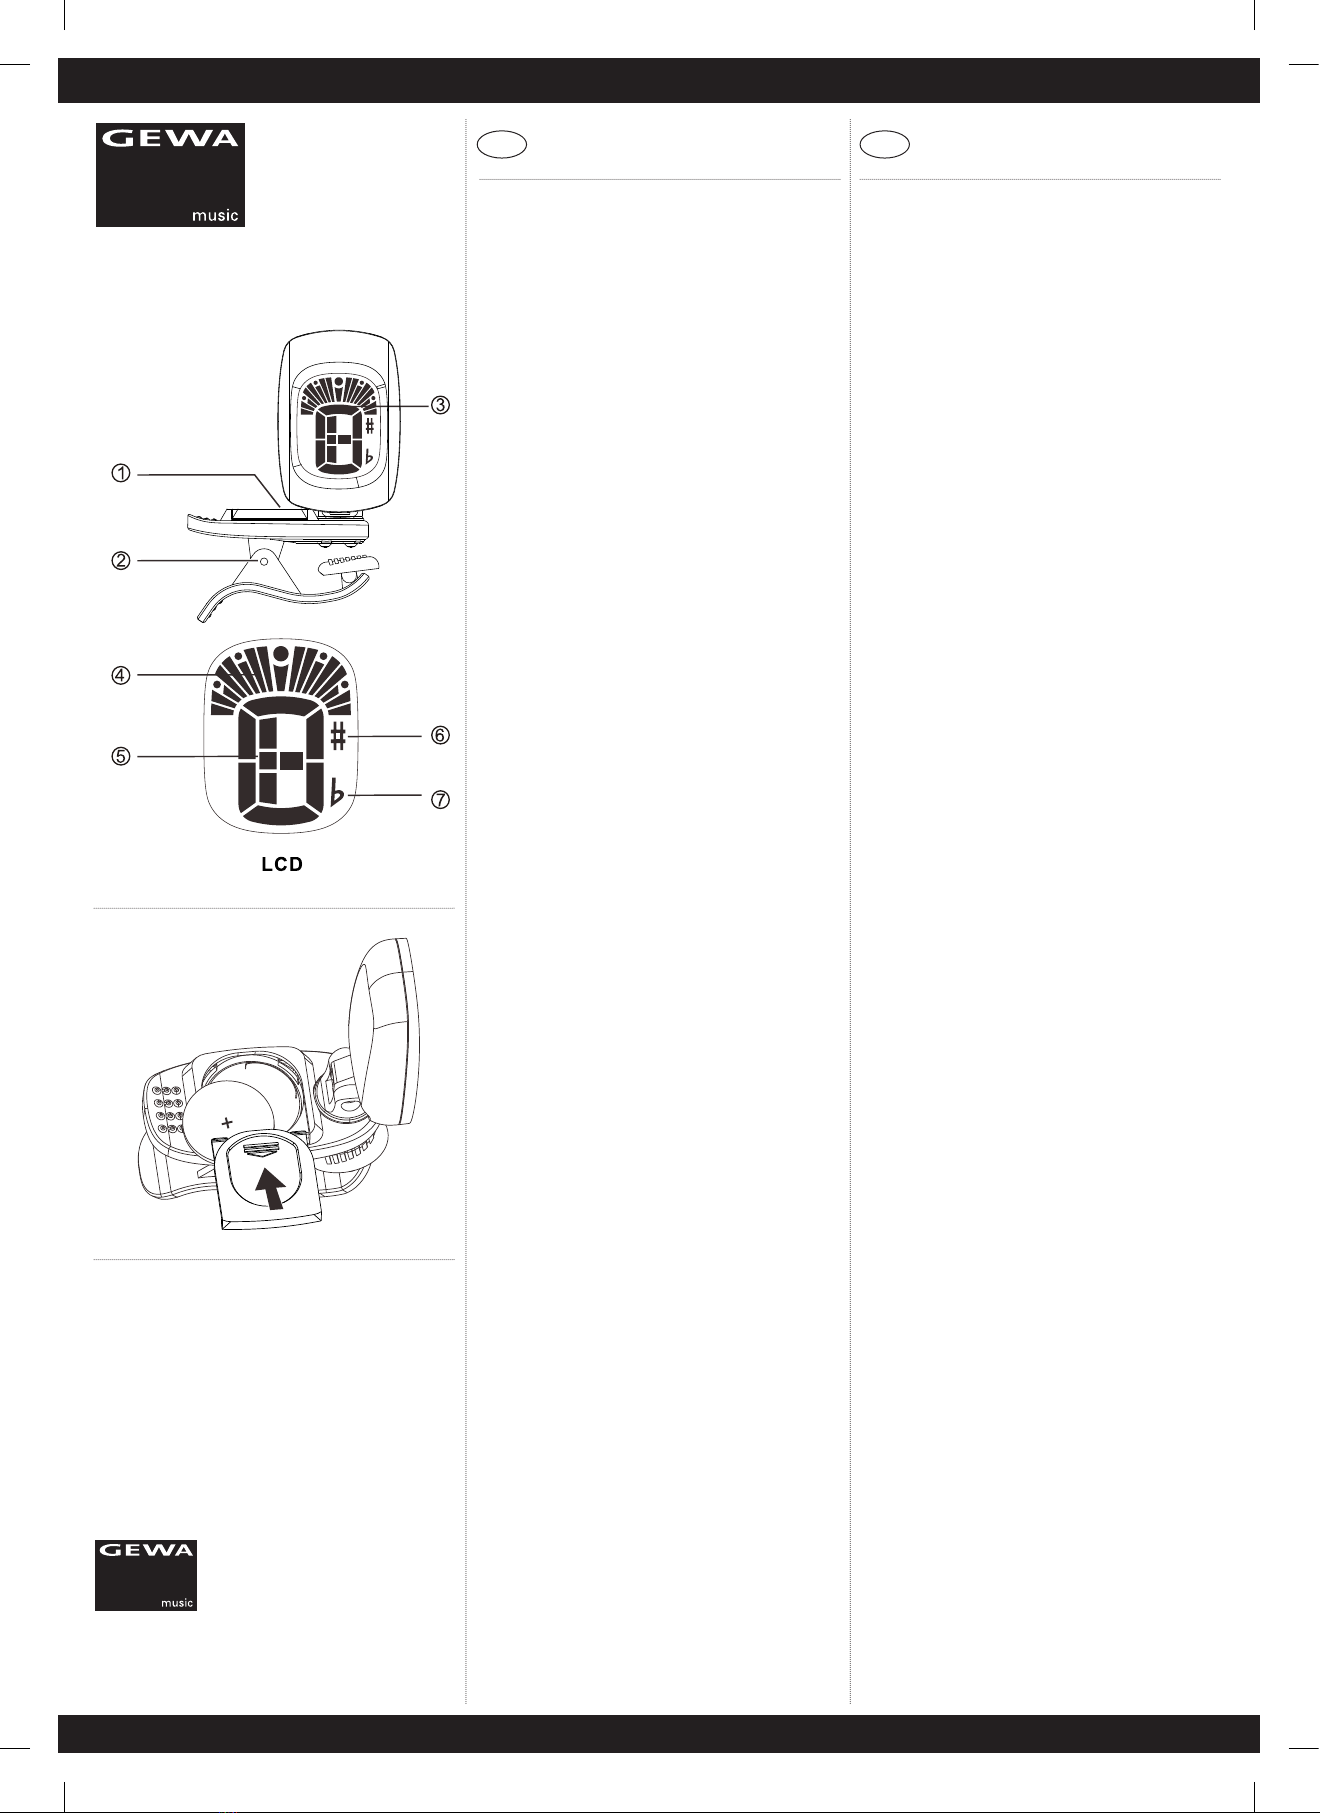
Dettagli prodotto
1 Vano batteria
2 Clip
3 Schermo LCD
4 Ago
5 Nome della nota
6 Calante
7 Eccedente
Funzionamento
1. Quando l’accordatore viene agganciato allo
strumenti si accende automaticamente, così come
sispegne quando viene rimosso. Dopo 5 minuti di
inutilizzo si spegnerà automaticamente. Per
accenderlo di nuovo è suciente ri-agganciarlo.
2. L’accordatore identica automaticamente la nota
suonata, che verrà indicate sul display. E’ preferibile
iniziare ad accordare dalle corde più “basse”
arrivando alle più “alte”. Per un’accordatura accurata
è necessario che l’ago sia in posizione centrale e lo
schermo si illumini di verde. Con l’ago posizionato
alla sinistra e lo schermo arancione, la corda andrà
tirata, con l’ago sulla destra dello schermo e di
colore rosso, la nota andrà allentata.
Dettagli tecnici
Modalità di accordatura: Cromatico
Raggio di accordatura: A0 - C8
Calibrazione: A4 = 440Hz
Precisione: +/-1 Cent
Alimentazione: 3 V (1x batteria al litio CR2032)
Consumo: in modalità accordatore <12mA
Inserimento e sostituzione della batteria
Quando lo schermo risulta essere meno “luminoso”
è necessario sostituire la batteria, come illustrato
nell’immagine.
Prestare attenzione alla corretta polarità quando si
inserisce la nuova batteria
Smaltimento
Non smaltire l’articolo nella comune raccolta dei
riuti, ma in apposite aree per la raccolta di materiali
elettronici
Anador Cromático
GEWA CLIP-2
Gracias y felicidades por la adquisición del anador
GEWA CLIP-2. Por favor, lee el manual atentamente
antes de usar el aparato por primera vez.
Uso recomendado
El anador GEWA CLIP-2 se debe utilizar para anar
instrumentos musicales. Este anador es solo para
utilizarse en espacios cerrados.
Instrucciones importantes de seguridad
• Para evitar corto-circuitos, descargas eléctricas o
mal funcionamiento, hay que prestar especial
atención en: No desmontar jamás el dispositivo.
No exponerlo a altas temperaturas o humedades
(por ejemplo: radiación solar directa, calor, lugares
húmedos…). Evitar grandes vibraciones. El polvo y
la suciedad pueden dañar el anador. Nunca
utilizarlo con las manos mojadas.
• Para evitar daños mecánicos: No aplicar demasiada
fuerza sobre los botones del anador. Evitar las
caídas
• Limpieza: No usar agentes que contengan alcohol o
disolventes, pues pueden dañar el acabado del
aparato o el lacado del dispositivo. Limpiar solo con
trapos secos y sin polvo.
• Baterías: La batería de 3V viene incluida. Usar el
mismo modelo CR2032 al reemplazarla. Cuando el
anador vaya a estar mucho tiempo sin ser utilizado,
o cuando la batería este agotada, por favor,
extráigala para evitar daños a los componentes
electrónicos debido a la fuga de la batería.
• No coloque ningún objeto inamable cerca o sobre
l dispositivo.
Características del producto
1. Compartimento para la batería
2. Clip
3. Pantalla LCD
4. Aguja
5. Nombre de la nota
6. Sostenido
7. Bemol
Uso
1. El anador se enciende automáticamente
cuando se pinza en el instrumento, y se desconecta
automáticamente al quitarlo de la pala. Para
ahorrar batería, el anador se apaga a los 5 minutos
automáticamente. Para encenderlo se ha de colocar
en la pala otra vez.
2. El anador identica automáticamente la nota que
está sonando, y la muestra en la pantalla. Lo mejor
para empezar a anar es comenzar con una
frecuencia más baja que la que se quiere anar, e
ir tensando la cuerda hasta llegar a la nota deseada.
A partir de aquí comenzamos a nar con más
precisión: Si la nota sigue siendo demasiado grave,
la aguja se quedará en el área izquierda, la pantalla
estará naranja y la cuerda deberá ser tensada. Si la
nota es demasiado aguda, la aguja estará en la zona
derecha, la pantalla estará de color rojo y la cuerda
deberá ser destensada. Si la cuerda está bien
anada, la aguja estará en el centro y el LCD de colo
verde.
Datos técnicos
Modo de anación: Cromático
Rango de anación: A0-C8
Calibración: A4=440Hz
Precisión: ± 1 Cent
Energía: 3 V (1 batería de litio CR2032)
Consumo de energía: Modo anación < 12mA
Inserción y cambio de batería
Cuando la pantalla o la luz se vuelven tenues, por favor,
cambie la batería como se muestra en la imagen. Preste
atención en la polaridad cuando cambie la batería
Eliminación de desecho
No tire el dispositivo a la basura doméstica. Diríjase a
los puntos de recogida para residuos eléctricos.
IT ES
Chromatic Tuner GEWA CLIP-2
Accordeur chromatique
GEWA CLIP-2
Félicitations pour votre achat du GEWA CLIP-2. Merci de
lire attentivement le manuel avant d‘utiliser l‘appareil
pour la première fois.
Utilisation
L’accordeur chromatique GEWA CLIP-2 est utilisé pour
accorder les instruments de musique.
Il est destiné à une utilisation privée et uniquement en
intérieur.
Consignes de sécurité
• Pour éviter les courts-circuits, les chocs électriques
ou un quelconque dysfonctionnement, ne pas
essayer de démonter l’appareil, ne pas l’exposer
à des températures élevées, une humidité excessive
(comme le soleil direct, un appareil de chauage,
les pièces humides etc...) ou à de fortes vibrations.
La poussière peut également endommager le
métronome. Ne pas utiliser avec les mains humides.
• Pour éviter des dommages mécaniques:
Ne pas faire fonctionner les commandes avec une
force excessive. Ne pas faire tomber l’accordeur sur
une surface dure.
• Nettoyage: Ne pas utiliser d‘alcool ou de produits à
base de solvants, qui pourraient dissoudre
l‘impression ou la peinture de l‘appareil. Nettoyer
uniquement avec un chion sec et sans poussière.
• Piles: 1 pile 3 V dans la livraison. Toujours utiliser
le même type CR2032. Lorsque vous n‘utilisez pas
l’accordeur ou si les batteries sont vides, les ôter de
l’accordeur pour éviter d‘endommager
l‘électronique causés par des piles qui pourraient fuir.
• Ne jamais placer une amme sur l‘appareil ou à
proximité, comme par exemple une bougie …etc
Caractéristiques et fonctions
1 Compartiment de la pile
2 Clip
3 Ecran LCD
4 Indicateur à aiguille
5 Nom des notes
6 ½ ton supérieur
7 ½ ton inférieur
Utilisation
1. L’accordeur s‘allume automatiquement lorsqu‘il est
placé sur l‘instrument et s’arrête automatiquement
après 5 minutes ou lorsque vous le retirez de
l‘instrument
2. L’accordeur détecte automatiquement la note
jouée, qui apparaît à l‘écran. Commencez avec une
fréquence inférieure à celle que vous souhaitez
régler et tendez la corde jusqu‘à ce que vous
atteignez la note désirée. Maintenant, il est temps
de peauner: Si la note est encore trop basse,
l‘aiguille est dans la zone de gauche et l‘écran LCD
est orange. La corde doit être plus tendue. Si la note
souhaitée est trop haute, l‘aiguille est dans la zone
de droite et l‘écran LCD est rouge. La corde doit être
détendue. Lorsque la corde est accordée, l‘aiguille
reste au milieu et l‘écran devient vert.
Fiche technique
Mode: Chromatique
Plage d’accord: A0 - C8
Calibrage: A4 = 440Hz
Tolérance/justesse: +/-1 Cent
Alimentation: 3 V (1 x Pile bouton Lithium CR2032)
Consommation: <12 mA
Installation et remplacement de la pile
Quand ‘écran LCD ou le retro éclairage devient faible,
changez la pile comme indiqué sur l’illustration.
Faites attention à la polarité lors du remplacement de
la pile.
Recyclage
Ne pas jeter cet appareil dans les ordures ménagères,
mais le déposer dans une collecte locale de déchets
électroniques.
FR