Korg Dolcetto-V User manual

Precautions
Location
Using the unit in the following locations can result in a malfunction.
• In direct sunlight
• Locations of extreme temperature or humidity
• Excessively dusty or dirty locations
• Locations of excessive vibration
• Close to magnetic elds
Power supply
Be sure to turn the power switch to OFF when the unit is not in use. Remove the battery
in order to prevent it from leaking when the unit is not in use for extended periods.
Interference with other electrical devices
Radios and televisions placed nearby may experience reception interference. Operate
this unit at a suitable distance from radios and televisions.
Handling
To avoid breakage, do not apply excessive force to the switches or controls.
Care
If the exterior becomes dirty, wipe it with a clean, dry cloth. Do not use liquid cleaners
such as benzene or thinner, or cleaning compounds or ammable polishes.
Keep this manual
After reading this manual, please keep it for later reference.
Keeping foreign matter out of your equipment
Never set any container with liquid in it near this equipment. If liquid gets into the
equipment, it could cause a breakdown, re, or electrical shock. Be careful not to let
metal objects get into the equipment.
THE FCC REGULATION WARNING (for USA)
NOTE: This equipment has been tested and found to comply with the limits for
a Class B digital device, pursuant to Part 15 of the FCC Rules. These limits are
designed to provide reasonable protection against harmful interference in a
residential installation. This equipment generates, uses, and can radiate radio
frequency energy and, if not installed and used in accordance with the instruc-
tions, may cause harmful interference to radio communications. However, there
is no guarantee that interference will not occur in a particular installation. If this
equipment does cause harmful interference to radio or television reception, which
can be determined by turning the equipment off and on, the user is encouraged to
try to correct the interference by one or more of the following measures:
• Reorient or relocate the receiving antenna.
• Increase the separation between the equipment and receiver.
• Connect the equipment into an outlet on a circuit different from that to which
the receiver is connected.
• Consult the dealer or an experienced radio/TV technician for help.
If items such as cables are included with this equipment, you must use those
included items.
Unauthorized changes or modication to this system can void the user’s authority
to operate this equipment.
Notice regarding disposal (EU only)
When this “crossed-out wheeled bin” symbol is displayed on the product,
owner’s manual, battery, or battery package, it signies that when you
wish to dispose of this product, manual, package or battery you must do
so in an approved manner. Do not discard this product, manual, package
or battery along with ordinary household waste. Disposing in the correct
manner will prevent harm to human health and potential damage to the
environment. Since the correct method of disposal will depend on the
applicable laws and regulations in your locality, please contact your local
administrative body for details. If the battery contains heavy metals in
excess of the regulated amount, a chemical symbol is displayed below the
“crossed-out wheeled bin” symbol on the battery or battery package.
IMPORTANT NOTICE TO CONSUMERS
This product has been manufactured according to strict specications and volt-
age requirements that are applicable in the country in which it is intended that
this product should be used. If you have purchased this product via the internet,
through mail order, and/or via a telephone sale, you must verify that this product
is intended to be used in the country in which you reside.
WARNING: Use of this product in any country other than that for which it is
intended could be dangerous and could invalidate the manufacturer’s or dis-
tributor’s warranty.
Please also retain your receipt as proof of purchase otherwise your product may
be disqualied from the manufacturer’s or distributor’s warranty.
CALIFORNIA USA ONLY
This Perchlorate warning applies only to primary CR (Manganese Dioxide) Lithium
coin cells sold or distributed ONLY in California USA.
“Perchlorate Material–special handling may apply, See www.dtsc.ca.gov/haz-
ardouswaste/perchlorate.”
This device complies with Part 15 of the FCC Rules.
Operation is subject to the following two conditions: (1) This device may not cause
harmful interference, and (2) this device must accept any interference received,
including interference that may cause undesired operation.
Complies with Canadian ICES-003 Class B.
Conforme au Reglement Canadian NMB-003 classe B
■お願い
1.
保証書に販売年月日等
の記入がない場合は無
効となります。記入で
きないときは、お買い上
げ年月日を証明できる
領収書等と一緒に保管
してください。
2.
保証書は再発行致しま
せんので、紛失しないよ
うに大切に保管してく
ださい。
4015-2 Yanokuchi, Inagi-city, Tokyo 206-0812 Japan
© 2013 KORG INC.
Thank you for purchasing the Korg Dolcetto-V
Clip-on Tuner/Metronome.
Merci d’favoir choisi la Clip-on Tuner/Metro-
nome Dolcetto-V de Korg.
Vielen Dank, dass Sie sich für einen Dolcetto-
V Clip-on Tuner/Metronome von Korg ent-
schieden haben.
Gracias por comprar el anador para enchufar
Dolcetto-V Clip-on Tuner/Metronome de Korg.
このたびは、コルグ Clip-on Tuner/Metronome
Dolcetto-Vをお買い上げいただきまして、まこと
にありがとうございます。 OWNER’S MANUAL
MANUEL D’UTILISATION
BEDIENUNGSANLEITUNG
MANUAL DE USUARIO
取扱説明書
アフターサービス
修理または商品のお取り扱いについてのご質問、ご相談は、お客様相談窓
口へお問い合わせください。
お客様相談窓口
PHS等一部の電話ではご利用できません。固定電話または携帯電話か
らおかけください。
受付時間月曜~金曜10:00 ~ 17:00(祝祭日、窓口休業日を除く)
●サービス・センター :〒168-0073 東京都杉並区下高井戸1-15-12
保証書
コルグ Dolcetto-V 本保証書は、別記の保証規定により無償修理をお約束するものです。
お買い上げ日 年 月 日
販売店名

Note name indicators for violin mode: 4G, 3D, 2A, 1E
Note name indicators for viola mode: 4C, 3G, 2D, 1A
In the violin and viola modes, appears in the upper-right corner of the
display to indicate the pure h scale.
Calibration (reference pitch) settings (*M)
Press the CALIB [ ] or [ ] buon to change the seing within the range of 410
Hz to 480 Hz in 1 Hz steps. Hold down the buon to increase or decrease the
seing continuously.
Using the metronome
1. Press the power/function buon to activate the metronome.
The metronome starts, and the metronome
pendulum will swing le and right according
to the tempo.
2.
Each time you press the power/function buon,
the function will cycle between metronome
(no sound) → metronome (sound) → tuner →
metronome (no sound)...
At this time, the metronome seing indicators will cycle between (no
sound) → (sound) → no indicator (tuner) → (no sound)...
3. Using the TEMPO [ ] and [ ] buons, set the tempo (*M).
Hold down the buon to increase or decrease the seing continuously.
4. Press the BEAT buon to select the BEAT seing (*M).
Hold down the buon to increase or decrease the seing continuously.
: → → (duplet) → (triplet) → → → → → → ...
5. To stop the metronome, press the power/function buon to activate the
tuner, or hold down the power/function buon to turn o the Dolceo-V.
WhentheDolceo-Visturnedon,thetunerisactivated.
Attaching to the instrument and range of motion
The Dolceo-V tunes by picking up the vibrations
of the instrument. Therefore, be sure to aach the
Dolceo-V to the head stock of your instrument
in order to tune it. In addition, the Dolceo-V can
be freely moved so that the display is easy to read.
TheDolceo-Vmaybedamagedifyouapplyexcessive
forcewithinitsrangeofmotion,oraempttomoveit
beyonditsintendedrangeofmotion.
PleasecarefullyaachtheDolceo-Vtoyourinstru-
ment.LeavingtheDolceo-Vaachedforalongtime
maydamageormarktheinstrument'ssurface.
Depending onvariousfactorssuch as age-related
changeorthesurfacenish,thereisapossibilitythat
yourinstrumentmaybedamagedbyaachingthis
product.
Specications
Tuner
Scale: 12-note equal temperament (chromatic),
Pure h (Violin, Viola)
Range (sine wave): Chromatic A0 (27.50 Hz)–C8 (4186 Hz)
Precision: +/-1 cent
Reference pitch: A4 = 410–480 Hz (1 Hz steps)
Metronome
Tempo range: q = 30–252
Tempo accuracy: ±0.1%
Beat range: 0–5 beats, duplet, triplet
Dimensions: 56 mm (W) X 49 mm (D) X 69 mm (H)/
2.20 inches (W) X 1.93 inches (D) X 2.72 inches (H)
Weight: 34 g/1.20 oz. (including baery)
Baery life
Tuner: Approximately 8 hours
(A4 input, operating continuously)
Metronome: Approximately 8 hours
(120 tempo, 4 beats, sound, operating continuously)
Included items: CR2032 lithium baery (3 V)
*M Seings are remembered even when the power is o. However, seings will
be initialized when you replace the baery (default, Tuner mode: Chromatic,
calibration: 442 Hz; metronome: tempo = 120, beat = 4).
• Specications and appearance are subject to change without notice for im-
provement.
Metronome display of
the 120 tempo, 4-beat
and sound settings
360°
45°
45°
30°
30°
Parts of the Dolcetto-V
Installing the battary
Makesuretoturnthepowerobeforeyouinstallorreplacethebaery.
When the baery begins to run low, the baery indicator ( ) will light up.
The Dolceo-V will continue to function for a while
longer, but tuning will become less accurate. Replace
the baery as soon as possible.
1. While lightly pressing on the baery holder on
the back of the Dolceo-V, in direction
1
of
the part marked A, pull it in direction
2
to
remove the baery holder.
2. Making sure to observe the correct polarity, in-
sert the baery so that the “+” side of the baery
is visible.
3. Return the baery holder to its original position.
Backlight
The backlight will illuminate brightly when sound is input, the metronome is
activated or when a buon is pressed.
When there has been no user input for approximately three seconds on tuner, the
backlight will dim slightly in order to prevent the baery from being depleted.
Switching between the tuner and metronome
Press the power/function buon to switch between the tuner and metronome.
At the same time, the display will switch to the selected function.
Tuning
Tuning procedure
1. Press the power/function buon to turn on the Dolceo-V and activate the
tuner.
If the power is le on for approximately 20 minutes without any user input,
it will turn o automatically.
ToturnotheDolceo-V,holddownthepower/functionbuon.
2. If necessary, change the tuner mode and calibration seings.
The procedure with the tuner mode set to chromatic (factory default; no
mode indicator,) is described below.
3. Play a single note on your instrument.
The display will show the name of the note that’s closest to the pitch de-
tected. Tune your instrument to the correct pitch so that the desired note
name appears.
4.
Once again, play a single note on your instru-
ment and adjust the tuning so that the center
segment of the meter (indicated by ) is lit up.
An indicator toward the right will light up if the
pitch is too high, and an indicator toward the le
will light up if the pitch is too low.
If you want to tune to a pure major third or pure minor third above a certain
note, adjust the pitch to the pure major or minor third marks on the meter.
For example if you want to tune to a pure major third above A, make the
note name indicator read C#, and tune so that the meter indicates the le [ ].
Alternatively, if you want to tune to a pure minor third above A, make the
note name indicator read C, and tune so that the meter indicates the right [ ].
Evenifthepitchiswithintherangeofdetection,itmaynotbepossibletodetectthe
pitchofaninstrumentalsoundthatcontainslargenumbersofovertonesorasound
thathasarapiddecay.
Themetermayrespondtovibrationsitpicksupfromtheenvironment;however,
thiswillnotaecttuningoftheinstrument.
Setting the tuner mode (*M)
Each time you press the MODE buon, the tuner mode
changes, with the current mode shown by the mode
indicator.
Chromatic (no indicator) → Violin ( ) →
Viola ( ) → Chromatic...
In addition, in the violin and viola modes, the string number closest to the
detected pitch appears to the le of the note name indicator.
MODE indicator
Reference
pitch indicator
Battery indicator
MODE/BEAT button Note name
indicator
Pure major third
Pure minor third
CALIB /
TEMPO button
CALIB / TEMPO button
PURE 5TH/
metronome
setting indicators
Power/
function button
A
Meter indications
when correctly tuned
Violin 3rd
string
Viola 4th
string

Précautions
Emplacement
L'utilisation de cet instrument dans les endroits suivants peut en entraîner
le mauvais fonctionnement.
• En plein soleil
• Endroits très chauds ou très humides
• Endroits sales ou fort poussiéreux
• Endroits soumis à de fortes vibrations
• A proximité de champs magnétiques
Alimentation
Lorsque vous n’utilisez pas l’appareil, n’oubliez pas de le mettre hors
tension. Retirez les piles pour éviter toute fuite lorsque l’appareil ne sera
pas utilisé pendant de longues périodes de temps.
Interférences avec d'autres appareils électriques
Les postes de radio et de télévision situés à proximité peuvent par
conséquent souffrir d'interférences à la réception. Veuillez dès lors faire
fonctionner cet appareil à une distance raisonnable de postes de radio
et de télévision.
Maniement
Pour éviter de les endommager, manipulez les commandes et les boutons
de cet instrument avec soin.
Entretien
Lorsque l'instrument se salit, nettoyez-le avec un chiffon propre et sec.
Ne vous servez pas d'agents de nettoyage liquides tels que du benzène
ou du diluant, voire des produits inammables.
Conservez ce manuel
Après avoir lu ce manuel, veuillez le conserver soigneusement pour toute
référence ultérieure.
Evitez toute intrusion d'objets ou de liquide
Ne placez jamais de récipient contenant du liquide près de l'instrument.
Si le liquide se renverse ou coule, il risque de provoquer des dommages,
un court-circuit ou une électrocution.Veillez à ne pas laisser tomber des
objets métalliques dans le boîtier (trombones, par ex.).
Note concernant les dispositions (Seulement EU)
Quand un symbole avec une poubelle barrée d’une croix ap-
parait sur le produit, le mode d’emploi, les piles ou le pack de
piles, cela signie que ce produit, manuel ou piles doit être
déposé chez un représentant compétent, et non pas dans une
poubelle ou toute autre déchetterie conventionnelle. Disposer
de cette manière, de prévenir les dommages pour la santé
humaine et les dommages potentiels pour l’environnement. La
bonne méthode d’élimination dépendra des lois et règlements
applicables dans votre localité, s’il vous plaît, contactez votre orga-
nisme administratif pour plus de détails. Si la pile contient des métaux
lourds au-delà du seuil réglementé, un symbole chimique est afché
en dessous du symbole de la poubelle barrée d’une croix sur la pile
ou le pack de piles.
REMARQUE IMPORTANTE POUR LES CLIENTS
Ce produit a été fabriqué suivant des spécications sévères et des
besoins en tension applicables dans le pays où ce produit doit être
utilisé. Si vous avez acheté ce produit via l’internet, par vente par
correspondance ou/et vente par téléphone, vous devez vérier que ce
produit est bien utilisable dans le pays où vous résidez.
ATTENTION: L’utilisation de ce produit dans un pays autre que celui
pour lequel il a été conçu peut être dangereuse et annulera la garantie
du fabricant ou du distributeur. Conservez bien votre récépissé qui
est la preuve de votre achat, faute de quoi votre produit ne risque de
ne plus être couvert par la garantie du fabricant ou du distributeur.
安全上のご注意
火災・感電・人身傷害の危険を防止するには以下の指示を守ってください
警告
この注意事項を無視した取り扱いをすると、死亡や重傷を負う可能性が予想されます
・次のような場合には、直ちに電池をぬく。
○異物が内部に入ったとき ○製品に異常や故障が生じたとき
修理が必要なときは、コルグお客様相談窓口へ修理を依頼してください。
・本製品を分解したり改造したりしない。
・修理/部品の交換などで、取扱説明書に書かれている以外のことは絶対に
しない。
・大音量や不快な程度の音量で長時間使用しない。大音量で長時間使用す
ると、難聴になる可能性があります。万一、聴力低下や耳鳴りを感じたら、
専門の医師に相談してください。
・本製品に異物(燃えやすいもの、硬貨、針金など)を入れない。
・温度が極端に高い場所(直射日光の当たる場所、暖房機器の近く、発熱す
る機器の上など)での使用や保管はしない。
・振動の多い場所で使用や保管はしない。
・ホコリの多い場所で使用や保管はしない。
・風呂場、シャワー室で使用や保管はしない。
・雨天時の野外などのような湿気の多い場所で、使用や保管はしない。
・本製品の上に液体の入ったもの(水や薬品等)を置かない。
・本製品に液体をこぼさない。
・濡れた手で本製品を使用しない。
注意
この注意事項を無視した取り扱いをすると、傷害を負う可能性、
または物理的損害が発生する可能性があります
・正常な通気が妨げられない所に設置して使用する。
・ラジオ、テレビ、電子機器などから十分に離して使用する。ラジオやテレ
ビ等に接近して使用すると、本製品が雑音を受けて誤動作する場合があり
ます。また、ラジオ、テレビ等に雑音が入ることがあります。
・外装のお手入れは、乾いた柔らかい布を使って軽く拭く。
・長時間使用しないときは、電池の液漏れを防ぐために電池を抜く。
・電池や本体は幼児の手の届かないところに保管する。
・電池を過度の熱源(日光、火など)にさらさない。
・ボタンやツマミに必要以上の力を加えない。故障の原因になります。
・外装のお手入れに、ベンジンやシンナー系の液体、コンパウンド質、強燃
性のポリッシャーは使用しない。
・不安定な場所に置かない。
保証規定(必ずお読みください)
本保証書は、保証期間中に本製品を保証するもので、付属品類(ヘッドホンなど)
は保証の対象になりません。保証期間内に本製品が故障した場合は、保証規定
によって無償修理いたします。
1.本保証書の有効期間はお買い上げ日より1ケ年です。
2.次の修理等は保証期間内であっても有償修理となります。
・消耗部品(電池など)の交換。
・お取扱い方法が不適当のために生じた故障。
・天災(火災、浸水等)によって生じた故障。
・故障の原因が本製品以外の他の機器にある場合。
・不当な改造、調整、部品交換などにより生じた故障または損傷。
・保証書にお買い上げ日、販売店名が未記入の場合、または字句が書き替え
られている場合。
・本保証書の提示がない場合。尚、当社が修理した部分が再度故障した場合
は、保証期間外であっても、修理した日より3ケ月以内に限り無償修理い
たします。
3.本保証書は日本国内においてのみ有効です。
ThiswarrantyisvalidonlyinJapan.
4.お客様が保証期間中に移転された場合でも、保証は引き続きお使いいただ
けます。詳しくは、お客様相談窓口までお問い合わせください。
5.修理、運送費用が製品の価格より高くなることもありますので、あらかじめ
お客様相談窓口へご相談ください。発送にかかる費用は、お客様の負担と
させていただきます。
6.修理中の代替品、商品の貸し出し等は、いかなる場合においても一切行って
おりません。
本製品の故障、または使用上生じたお客様の直接、間接の損害につきましては、
弊社は一切の責任を負いかねますのでご了承ください。本保証書は、保証規定
により無償修理をお約束するためのもので、これによりお客様の法律上の権利
を制限するものではありません。

Vorsichtsmaßnahmen
Aufstellungsort
Vermeiden Sie das Aufstellen des Geräts an Orten, an denen
• es direkter Sonneneinstrahlung ausgesetzt ist;
• hohe Feuchtigkeit oder Extremtemperaturen auftreten können;
• Staub oder Schmutz in großen Mengen vorhanden sind;
• das Gerät Erschütterungen ausgesetzt sein kann.
• in der Nähe eines Magnetfeldes.
Stromversorgung
Stellen Sie den Netzschalter auf OFF, wenn das Gerät nicht benutzt wird. Wenn Sie
das Gerät über einen längeren Zeitraum nicht benutzen, nehmen Sie die Batterien
heraus, damit sie nicht auslaufen.
Störeinüsse auf andere Elektrogeräte
Dieser kann bei in der Nähe aufgestellten Rund-funkempfängern oder Fernsehge-
räten Empfangsstörungen hervorrufen. Betreiben Sie solche Geräte nur in einem
geeigneten Abstand von diesem Erzeugnis.
Bedienung
Vermeiden Sie bei der Bedienung von Schaltern und Reglern unangemessenen
Kraftaufwand.
Reinigung
Bei auftretender Verschmutzung können Sie das Gehäuse mit einem trockenen,
sauberen Tuch abwischen. Verwenden Sie keinerlei Flüssigreiniger wie beispiels-
weise Reinigungsbenzin, Verdünnungs- oder Spülmittel. Verwenden Sie niemals
brennbare Reiniger.
Bedienungsanleitung
Bewahren Sie diese Bedienungsanleitung gut auf, falls Sie sie später noch einmal
benötigen.
Flüssigkeiten und Fremdkörper
Stellen Sie niemals Behältnisse mit Flüssigkeiten in der Nähe des Geräts auf. Wenn
Flüssigkeit in das Gerät gelangt, können Beschädigung des Geräts, Feuer oder
ein elek-trischer Schlag die Folge sein. Beachten Sie, daß keinerlei Fremdkörper
in das Gerät gelangen.
Hinweis zur Entsorgung (Nur EU)
Wenn Sie das Symbol mit der „durchgekreuzten Mülltonne“ auf Ihrem
Produkt, der dazugehörigen Bedienungsanleitung, der Batterie oder
dem Batteriefach sehen, müssen Sie das Produkt in der vorgeschrie-
benen Art und Weise entsorgen. Dies bedeutet, dass dieses Produkt
mit elektrischen und elektronischen Komponenten nicht mit dem
normalen Hausmüll entsorgt werden darf. Für Produkte dieser Art
existiert ein separates, gesetzlich festgelegtes Entsorgungssystem.
Gebrauchte elektrische und elektronische Geräte müssen separat
entsorgt werden, um ein umweltgerechtes Recycling sicherzustellen. Diese
Produkte müssen bei benannten Sammelstellen abgegeben werden. Die
Entsorgung ist für den Endverbraucher kostenfrei! Bitte erkundigen sie sich
bei ihrer zuständigen Behörde, wo sie diese Produkte zur fachgerechten
Entsorgung abgeben können. Falls ihr Produkt mit Batterien oder Akkumula-
toren ausgerüstet ist, müssen sie diese vor Abgabe des Produktes entfernen
und separat entsorgen (siehe oben). Die Abgabe dieses Produktes bei einer
zuständigen Stelle hilft ihnen, dass das Produkt umweltgerecht entsorgt wird.
Damit leisten sie persönlich einen nicht unerheblichen Beitrag zum Schutz
der Umwelt und der menschlichen Gesundheit vor möglichen negativen Ef-
fekten durch unsachgemäße Entsorgung von Müll. Batterien oder Akkus, die
Schadstoffe enthalten, sind auch mit dem Symbol einer durchgekreuzten
Mülltonne gekennzeichnet. In der Nähe zum Mülltonnensymbol bendet sich
die chemische Bezeichnung des Schadstoffes.
Cd oder NiCd steht für Cadmium, Pb für Blei und Hg für Quecksilber.
WICHTIGER HINWEIS FÜR KUNDEN
Dieses Produkt wurde unter strenger Beachtung von Spezikationen und Span-
nungsanforderungen hergestellt, die im Bestimmungsland gelten. Wenn Sie
dieses Produkt über das Internet, per Postversand und/oder mit telefonischer
Bestellung gekauft haben, müssen Sie bestätigen, dass dieses Produkt für
Ihr Wohngebiet ausgelegt ist.
WARNUNG: Verwendung dieses Produkts in einem anderen Land als dem, für
das es bestimmt ist, verwendet wird, kann gefährlich sein und die Garantie des
Herstellers oder Importeurs hinfällig lassen werden. Bitte bewahren Sie diese
Quittung als Kaufbeleg auf, da andernfalls das Produkt von der Garantie des
Herstellers oder Importeurs ausgeschlossen werden kann.
Precauciones
Ubicación
El uso de la unidad en las siguientes ubicaciones puede dar como
resultado un mal funcionamiento:
• Expuesto a la luz directa del sol
• Zonas de extremada temperatura o humedad
• Zonas con exceso de suciedad o polvo
• Zonas con excesiva vibración
• Cercano a campos magnéticos
Fuente de alimentación
Apague la unidad cuando no la use la batería. Retire las baterías si no
va a usar la unidad durante un tiempo largo.
Interferencias con otros aparatos
Las radios y televisores situados cerca pueden experimentar interferen-
cias en la recepción. Opere este dispositivo a una distancia prudencial
de radios y televisores.
Manejo
Para evitar una rotura, no aplique excesiva fuerza a los conmutadores
o controles.
Cuidado
Si exterior se ensucia, límpiese con un trapo seco. No use líquidos
limpiadores como disolvente, ni compuestos inamables.
Guarde este manual
Después de leer este manual, guárdelo para futuras consultas.
Mantenga los elementos externos alejados del equipo
Nunca coloque ningún recipiente con líquido cerca de este equipo,
podría causar un cortocircuito, fuero o descarga eléctrica. Cuide de que
no caiga ningún objeto metálico dentro del equipo.
Nota respecto a residuos y deshechos (solo UE)
Cuando aparezca el símbolo del cubo de basura tachado sobre un
producto, su manual de usuario, la batería, o el embalaje de cualqui-
era de éstos, signica que cuando quiere tire dichos artículos a la
basura, ha de hacerlo en acuerdo con la normativa vigente de la
Unión Europea. No debe verter dichos artículos junto con la basura
de casa. Verter este producto de manera adecuada ayudará a evitar
daños a su salud pública y posibles daños al medioambiente. Cada
país tiene una normativa especíca acerca de cómo verter productos poten-
cialmente tóxicos, por tanto le rogamos que se ponga en contacto con su
ocina o ministerio de medioambiente para más detalles. Si la batería contiene
metales pesados por encima del límite permitido, habrá un símbolo de un
material químico, debajo del símbolo del cubo de basura tachado.
NOTA IMPORTANTE PARA EL CONSUMIDOR
Este producto ha sido fabricado de acuerdo a estrictas especicaciones y
requerimientos de voltaje aplicables en el país para el cual está destinado.
Si ha comprado este producto por internet, a través de correo, y/o venta
telefónica, debe usted vericar que el uso de este producto está destinado
al país en el cual reside. AVISO: El uso de este producto en un país distinto
al cual está destinado podría resultar peligroso y podría invalidar la garantía
del fabricante o distribuidor. Por favor guarde su recibo como prueba de
compra ya que de otro modo el producto puede verse privado de la garantía
del fabricante o distribuidor.

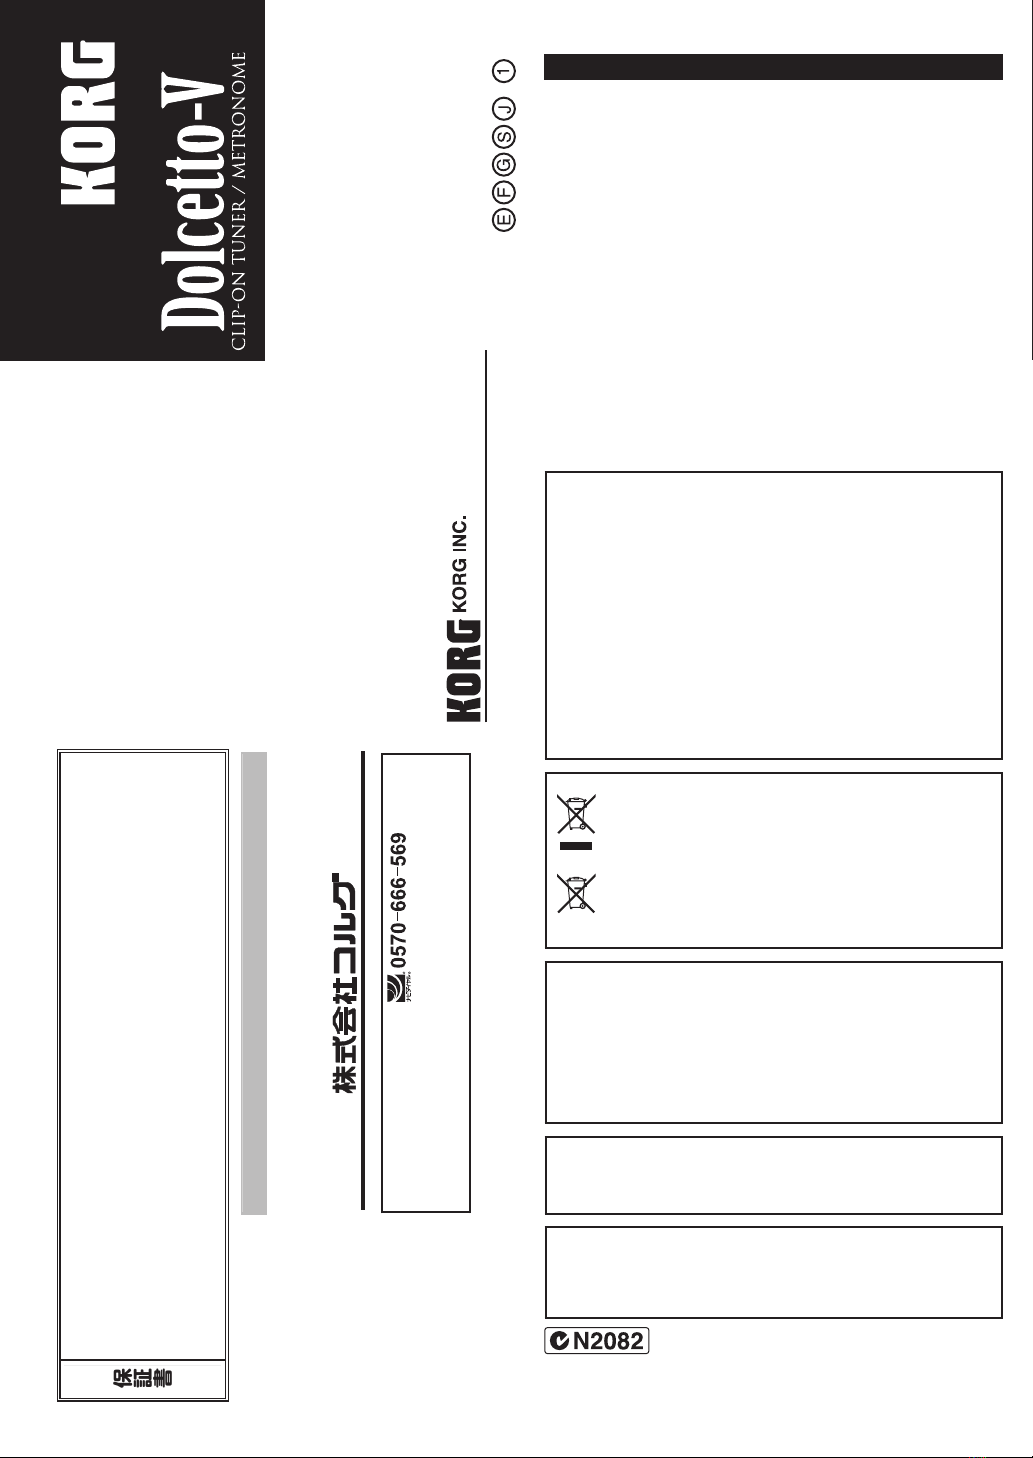
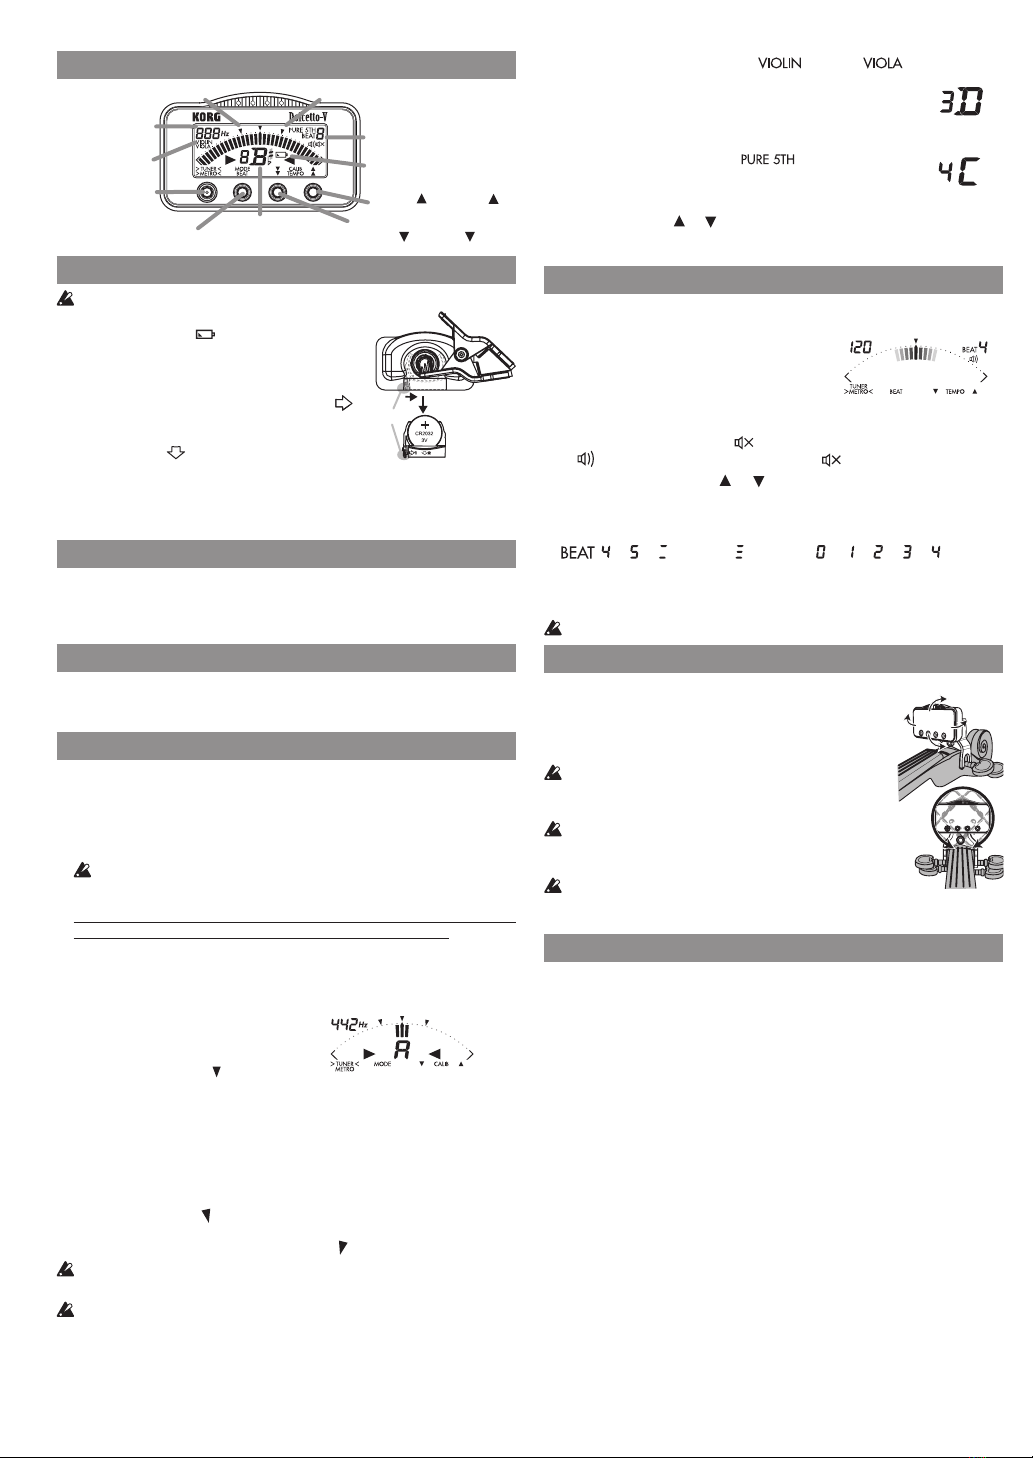
Parties du Dolcetto-V
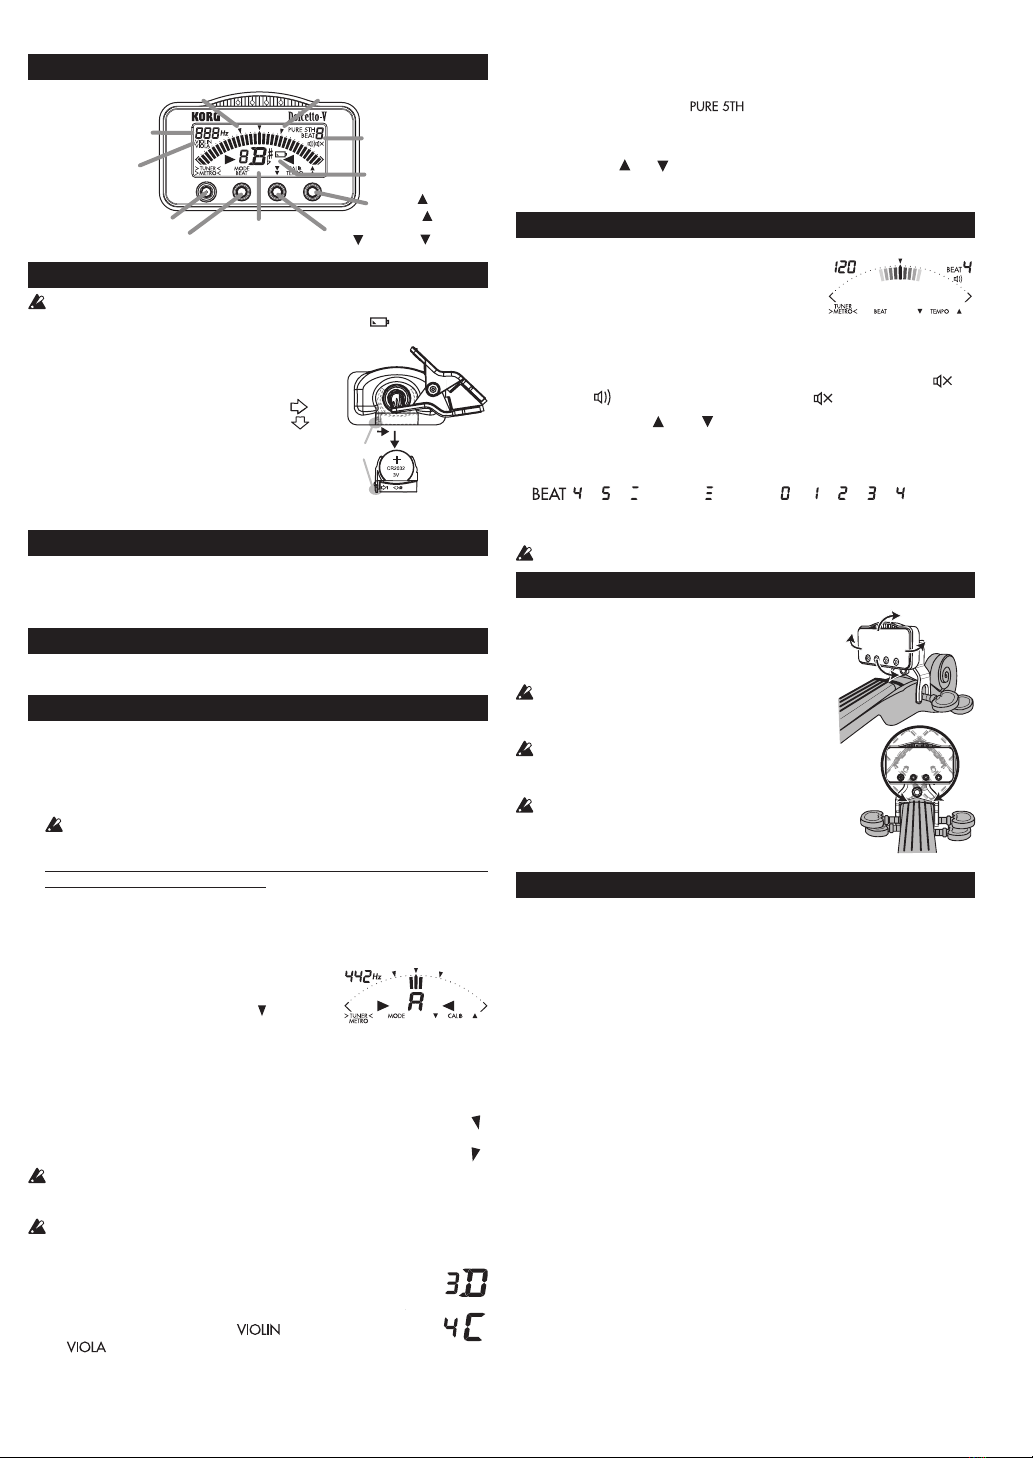
Mise en place de la pile
Coupeztoujoursl’alimentationavantdechangerlapile.
Quand la pile commence à s’épuiser, l’indicateur de
pile ( ) s’allume.
L’Dolceo-V continue à fonctionner un certain temps
mais l’accordage devient moins précis. Remplacez la
pile aussi vite que possible.
1. Tout en appuyant légèrement sur la portion A du
compartiment de pile au dos du Dolceo-V dans
la direction
1
, tirez le compartiment dans la
direction
2
pour l’extraire de l’accordeur.
2.
Remplacez la pile en veillant à respecter la polarité: la face “+” de la pile
doit être visible.
3. Remeez en place le compartiment de pile.
Rétroéclairage
Le rétroéclairage illumine fortement l’écran quand l’instrument reçoit un signal,
quand la fonction métronome est active ou quand vous enfoncez un bouton.
Après environ 3 secondes sans aucun signal ou manipulation, l’intensité du
rétroéclairage diminue an d’économiser la pile.
Alterner entre l’accordeur et le métronome
Appuyez sur l’interrupteur d’alimentation/le bouton de fonction pour alterner
entre l’accordeur et le métronome.
L’écran active alors l’achage de la fonction sélectionnée.
Accordage
Procédure d’accordage
1. Appuyez sur l’interrupteur d’alimentation/le bouton de fonction pour
mere le Dolceo-V sous tension et activer l’accordeur. Si l’instrument
reste sous tension pendant environ 20 minutes sans aucun signal ou
manipulation, il se met automatiquement hors tension.
PourmereleDolceo-Vhorstension,maintenezenfoncésoninterrupteur
d’alimentation/boutondefonction.
2. Si nécessaire, vous pouvez modier les réglages de calibrage et de trans-
position.
La procédure ci-dessous décrit le mode d’accordeur chromatique (réglage
par défaut, pas d’indicateur de mode).
3. Jouez une note isolée sur l’instrument.
L’écran ache le nom de la note la plus proche de la hauteur détectée. Accor-
dez grossièrement votre instrument de sorte à faire apparaître la note voulue.
4. Jouez à nouveau une note isolée sur l’instrument et accordez-la jusqu’à ce que le
segment central de l’indicateur (repéré par ) s’allume.
Le témoin côté droit s’allume si la note est trop
haute et le témoin côté gauche s’allume si la note
est trop basse. Si vous voulez vous accorder une
tierce majeure pure ou une tierce mineure pure
plus haut qu’une note donnée, réglez la hauteur
de sorte que l’écran ache l’indicateur de tierce
majeure pure ou de tierce mineure pure.
Si, par exemple, vous voulez vous accorder une tierce majeure pure au-dessus
de La, veillez à ce que l’indicateur du nom de la note corresponde à “C#”, et
accordez-vous de sorte que le segment de gauche (repéré par [ ]) s’allume à
l’écran. Pour vous accorder une tierce mineure pure au-dessus de La, veillez
à ce que l’indicateur du nom de la note corresponde à “C”, et accordez-vous
de sorte que le segment de droite (repéré par [ ]) s’allume à l’écran.
Mêmesilanotesetrouveàl’intérieurdelaplagededétection,ellepeutnepasêtre
détectéesilesondel’instrumentdemusiquecontientungrandnombred’harmo-
niquesouuntempsdedescenterapide.
Ilsepourraitquel’accordeurréagisseàdesvibrationsambiantesqu’ilcapte;cela
n’aectetoutefoispasl’accorddel’instrument.
Réglage du mode d’accordeur (*M)
Chaque pression du bouton MODE change de mode d’accordeur; l’indicateur de
mode signale le mode actif.
Mode chromatique (pas d’indicateur) → Violon ( )
→ Alto ( ) → Chromatique...
En outre, en modes violon et alto, l’écran ache le numéro
de la corde la plus proche de la hauteur détectée à gauche de
l’indicateur du nom de note.
Indicateur de la
note de référence
Bouton CALIB /TEMPO
Indicateur
du MODE
Indicateur du
nom de la note
Bouton MODE/BEAT
Bouton CALIB
/
TEMPO
Tierce majeure pure Tierce mineure pure
Indicateur de pile
Indicateurs
PURE 5TH/
de réglage du
métronome
Interrupteur
d'alimentation/
bouton de fonction
A
Indications à l'écran
quand l'accord est
correct
3e corde
de violon
4e corde
de alto
Indicateurs du nom de note en mode violon: 4G (Sol), 3D (Ré), 2A (La), 1E (Mi)
Indicateurs du nom de note en mode alto: 4C (Do), 3G (Sol), 2D (Ré), 1A (La)
En modes violon et alto, l'écran ache l'indicateur dans son coin
supérieur droit, signalant qu'il s'agit de la gamme à intervalles de quinte pure.
Réglages de calibrage (diapason) (*M)
Appuyez sur le bouton CALIB [ ] ou [ ] pour ajuster le calibrage; la plage de
réglage s’étend de 410 Hz à 480 Hz par pas de 1 Hz. Vous pouvez augmenter
ou diminuer le réglage de façon continue en maintenant le bouton enfoncé.
Utilisation du métronome
1. Appuyez sur l’interrupteur d’alimentation/le bouton de fonction pour
activer le métronome.
Le métronome démarre et le balancier du
métronome mécanique oscille de gauche à
droite à l’écran sur le tempo.
2. Chaque pression sur l’interrupteur d’ali-
mentation/le bouton de fonction sélec-
tionne tour à tour les options suivantes:
métronome (pas de son) métronome (son)
→ accordeur → métronome (pas de son)...
L’écran reète le réglage du métronome avec les indicateurs suivants:
(pas de son) → (son) → pas d’indicateur (accordeur) → (pas de son)...
3. Réglez le tempo du métronome (*M) avec les boutons TEMPO [ ] et [ ].
Vous pouvez augmenter ou diminuer le réglage de façon continue en main-
tenant le bouton enfoncé.
4. Appuyez sur le bouton BEAT pour sélectionner le réglage de mesure BEAT
(*M).
Vous pouvez passer les options en revue de façon continue en maintenant
le bouton enfoncé.
: → → (binaire) → (ternaire) → → → → → → ...
5. Pour arrêter le métronome, appuyez sur l’interrupteur d’alimentation/le
bouton de fonction pour activer l’accordeur, ou maintenez enfoncé l’inter-
rupteur d’alimentation/le bouton de fonction an de mere le Dolceo-V
hors tension.
Lafonctiond’accordeurestactivéeàlamisesoustensionduDolceo-V.
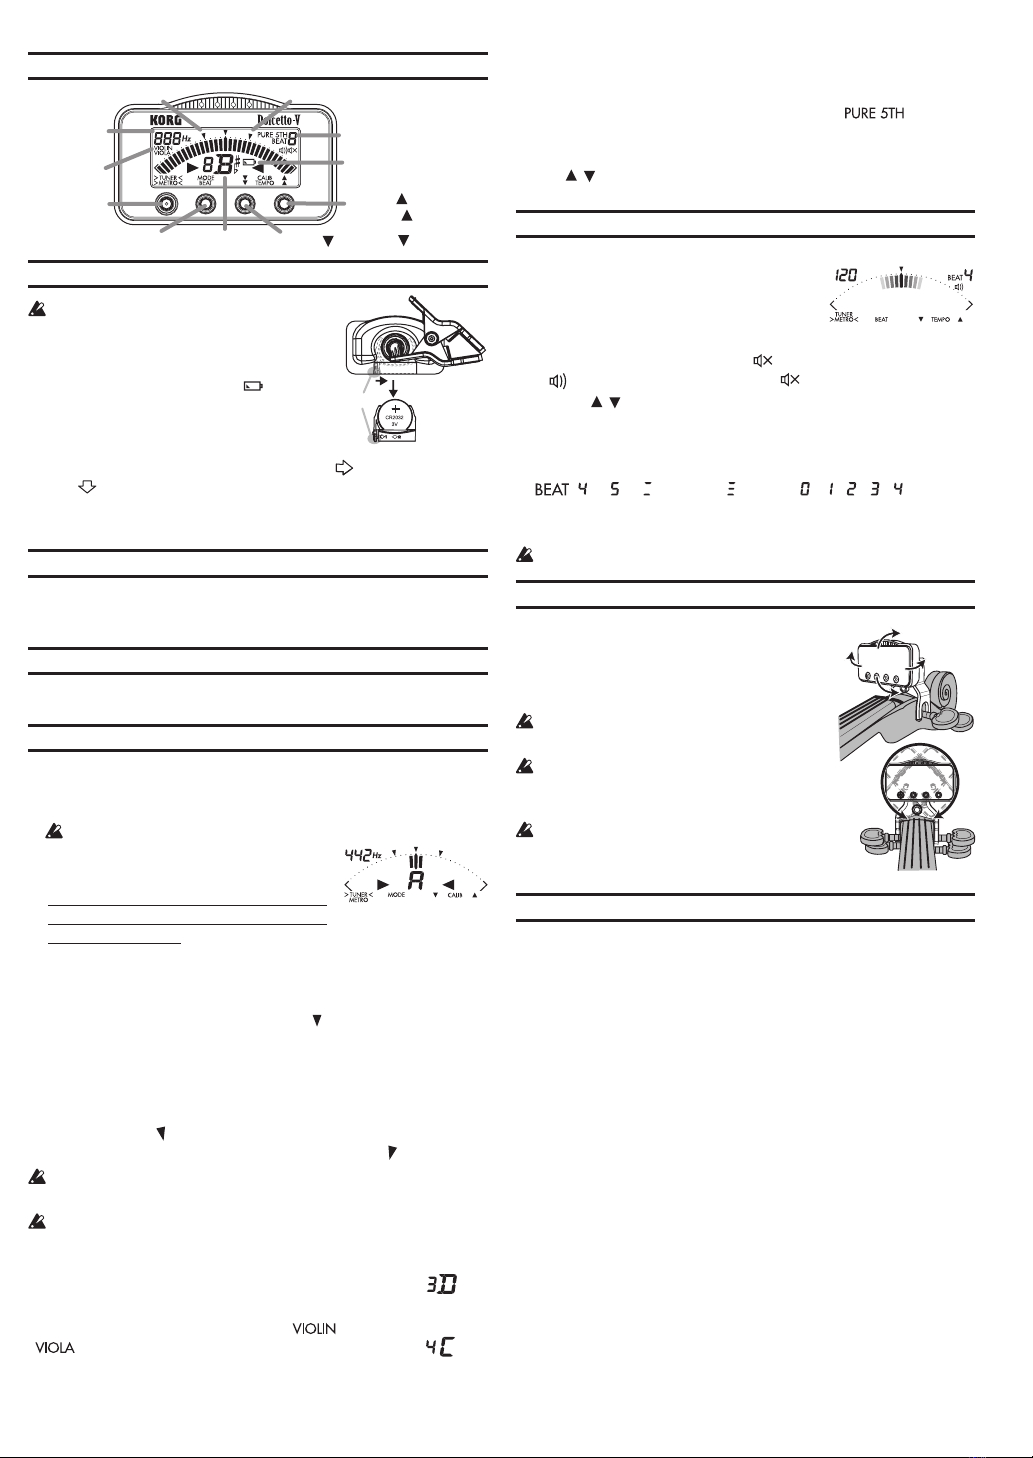
Fixation sur l’instrument et plage de manœuvre de l’accordeur
L’Dolceo-V détermine l’accordage en captant les vibrations de l’instrument. Veillez donc
à xer l’Dolceo-V sur la tête de votre instrument pour garantir un accordage able. En
outre, vous pouvez déplacer et manœuvrer l’Dolceo-V comme
bon vous semble pour une lisibilité parfaite de son écran.
Vousrisquezd’endommagerl’Dolceo-Vsivouslemanipulezavec
uneforceexcessiveousivoustentezdelemanipulerendehorsde
saplagedemanœuvre.
S’ilvousplait,aachezsoigneusementl’Dolceo-Vàvotreins-
trument.Lelaisseraachépendantunlongmoment,peutrayer
lasurfacedevotreinstrument.
Dépendantdeplusieursfacteurscommelechangementdû
àl’âgedel’instrumentoulanitiondelastructure,ilya
unepossibilitéquevotreinstrumentsoitendommagéparle
systèmed’aacheparpince.
Spécications
Accordeur
Gamme: 12 notes tempérament égal (chromatique),
Quinte pure (violon, alto)
Plage de détection (onde sinus):
chromatique A0 (27,50 Hz)–C8 (4186 Hz)
Précision: +/-1 centième
Note de référence: A4 = 410 à 480 Hz (paliers de 1 Hz)
Métronome
Plage de tempo: q = 30–252
Précision du tempo: ±0,1%
Types de mesure: 0–5 temps, binaire, ternaire
Dimensions: 56 mm (L) x 49 mm (P) x 69 mm (H)
Poids: 34 g (pile comprise)
Autonomie de la pile
Accordeur: Environ 8 heures
(utilisation continue, entrée de la note A4)
Métronome: Environ 8 heures
(120 tempo, 4 mesure, son, utilisation continue)
Accessoires fournis: Pile au lithium CR2032 (3 V)
*M
Les réglages sont conservés même quand l’appareil est mis hors tension.
Néanmoins, les réglages seront réinitialisés si vous remplacez la pile
(réglages par défaut, mode d’accordeur: chromatique, calibrage: 442 Hz
métronome: tempo = 120, mesure = 4).
• Les caractéristiques et l’aspect du produit sont susceptibles d’être modiés
sans avis préalable en vue d’une amélioration.
Affichage de métronome
pour un tempo de 120,
une mesure à 4 temps et
un réglage de son
360°
45°
45°
30°
30°

Teile des Dolcetto-V
Einsetzen der Batterie
DeaktivierenSiedenNetzsalter,bevorSiedieBaerieeinlegenoderausweseln.
Wenn die Baerie fast ersöp ist, leutet die Baerieanzeige ( ) auf.
Der Dolceo-V funktioniert dann zwar no eine Weile,
allerdings lässt seine Genauigkeit dann ebenfalls na.
Weseln Sie die Baerie also so snell wie mögli aus.
1.
Um den Baeriehalter auf der Rüseite des Dolceo-
V zu entfernen, drüen Sie ihn leit in Ritung .
1
und ziehen Sie ihn in Ritung
2
.
2. Um die korrekte Polarität zu gewährleisten, legen Sie
die neue Baerie so ein, dass die „+“-Seite sitbar
ist.
3. Setzen Sie den Baeriehalter in seine Ausgangsposition zurü.
Hintergrundbeleuchtung
Die Hintergrundbeleutung wird aktiviert, wenn ein Eingangssignal empfangen wird,
das Metronom aktiviert ist oder eine Taste gedrüt wird.
Drei Sekunden na der letzten Benutzereingabe lässt die Helligkeit der Hintergrund-
beleutung etwas na, um die Baerie zu sonen.
Zwischen Tuner und Metronom umschalten
Drüen Sie die Netzsalter/Funktion-Taste, um zwisen Tuner und Metro-
nom umzusalten.
Dabei weselt au das Display zur gewählten Funktion.
Tuning
Tuning-Verfahren
1. Drüen Sie die Netzsalter/Funktion-Taste, um den Dolceo-V einzusalten
und den Tuner zu aktivieren.
Wenn das Gerät ca. 20 Minuten lang eingesaltet bleibt, und keine Benutzereingabe
erfolgt, saltet es si automatis aus.
HaltenSiedieNetzsalter/Funktion-Tastegedrüt,umdenDolceo-Vauszusalten.
2. Ändern Sie gegebenenfalls die Kalibrierungs- und Transpositionseinstellungen.
Die Vorgehensweise mit dem romatisen Stimm-Modus (Werkseinstellung,
keine Modus-Anzeige) wird unten stehend besrieben.
3. Spielen Sie eine Einzelnote auf dem Instrument.
Das Display zeigt den Namen der Note an, die der gespielten Note am nästen kommt.
Stimmen Sie Ihr Instrument so, dass der Name der gewünsten Note angezeigt wird.
4. Spielen Sie erneut eine Einzelnote auf Ihrem Instrument und stimmen Sie so
lange, bis das milere Metersegment (dur angezeigt) leutet.
Eine Anzeige rets davon leutet, wenn der Ton zu ho ist, und einen Anzeige
links davon leutet, wenn der Ton zu tief ist.
Eine Anzeige rets davon leutet, wenn der Ton zu
ho ist, und einen Anzeige links davon leutet, wenn
der Ton zu tief ist.
Um auf eine reine große Terz oder eine reine kleine Terz
über einer bestimmten Note zu stimmen, müssen Sie
auf dem Meter die Tonhöhe auf die Markierungen für
reine große bzw. reine kleine Terz einstellen.
Beispiel: Um auf eine reine große Terz über „A“ zu stimmen, müssen Sie dafür sorgen,
dass „C#“ als Notenname angezeigt wird, und die Note dann so stimmen, dass das
Meter auf der linken Markierung [ ] steht. Möten Sie aber auf eine reine kleine Terz
über „A“ stimmen, müssen Sie dafür sorgen, dass „C“ als Notenname angezeigt wird,
und die Note dann so stimmen, dass das Meter auf der reten Markierung [ ] steht.
AuwenndieTonhöheinnerhalbdesErkennungsbereisist,kannesunmöglisein,die
TonhöheeinesInstrumentenklangszuerkennen,wenndiesereinenhohenAnteilanObertönen
odersehrsnellesAbklingenaufweist.
DasMeterkannaufSwingungenausderUmgebungreagieren.Diesbeeinträtigtaller-
dingsnitdenStimmvorgangdesInstruments.
Einstellen des Stimm-Modus (
*M
)
Mit jedem Drüen des MODE-Tasters ändert si der Stimm-Modus, wobei der momen-
tane Modus in der Modus-Anzeige folgendermaßen erseint:
Chromatis (keine Anzeige) → Violine ( ) → Viola ( ) → Chromatis...
Bezugstonhö
henanzeige
MODE-Anzeige
Notennamen-Anzeige
MODE/BEAT-Taste
Batterieanzeige
Reine große Terz Reine kleine Terz
CALIB /
TEMPO -Taste
CALIB / TEMPO -Taste
Netzschalter/
Funktion-Taste
TRANSPOSE-/
Metronomeinstel-
lungs-Anzeigen
A
Meteranzeige bei
korrekter Stimmung
Außerdem erscheint im
Violine
- und
Viola
-Modus links neben der Notennamen-An-
zeige die Saitennummer, die der erkannten Tonhöhe am ähnlichsten ist.
Notennamen-Anzeige für Violine-Modus: 4G , 3D, 2A, 1E
Notennamen-Anzeige für Viola-Modus: 4C, 3G, 2D, 1A
Im Violine- und Viola-Modus erseint rets oben
im Display, um eine Skala mit reiner Quinte anzuzeigen.
Kalibrierungseinstellungen (Referenzton) (*M)
Drüen Sie die CALIB [ ]-Taste bzw. CALIB [ ]-Taste, um die Einstellung über einen
Berei von 410 Hz bis 480 Hz in Srien von 1 Hz zu ändern. Halten Sie die Taste
gedrüt, um den Wert fortlaufend zu erhöhen bzw. zu verringern.
Verwendung des Metronoms
1. Drücken Sie die Netzschalter/Funktion-Taste, um das Metronom zu ak-
tivieren.
Das Metronom startet, und das Pendel swingt entspreend des Tempos von links
na rets.
2. Dur wiederholtes Drüen der Netzsal-
ter/Funktion-Taste ändern Sie die Funk-
tionsweise folgendermaßen: Metronom
(kein Ton) → Metronom (Ton) → Tuner →
Metronom (kein Ton) …
Die Metronomeinstellungs-Anzeigen wird dabei folgendermaßen angezeigt:
(kein Ton) → (Ton) → keine Anzeige (Tuner) → (kein Ton) …
3. Stellen Sie mit der TEMPO [ ]-Taste bzw. TEMPO [ ]-Taste das Tempo ein (*M).
Halten Sie die Taste gedrüt, um den Wert fortlaufend zu erhöhen bzw. zu verringern.
4. Drüen Sie die BEAT-Taste, um die BEAT-Einstellung auszuwählen (*M).
Halten Sie die Taste gedrüt, um den Wert fortlaufend zu erhöhen bzw. zu verringern.
: → → (Duole) → (Triole)
→
→ → → → → ...
5. Um das Metronom zu stoppen, drüen Sie die Netzsalter/Funktion-Taste zur
Aktivierung des Tuners, oder halten Sie die Netzsalter/Funktion-Taste gedrüt,
um den Dolceo-V auszusalten.
WennderDolceo-Veingesaltetwird,istderTuneraktiviert.
Anbringen an das Instrument und Bewegungsspielraum
Das Dolceo-V stimmt Ihr Instrument, indem es dessen Swingungen aufnimmt. Aus
diesem Grund sollte das Dolceo-V zum Stimmen an die Kopfplae Ihres Instruments
angebrat werden. Darüber hinaus kann das Dolceo-V frei bewegt werden, um die
Ablesbarkeit des Displays zu verbessern.
DasDolcetto-Vkannbeschädigtwerden,wenninnerhalbdes
BewegungsspielraumsübermäßigeKraaufdasGerätausgeübt
wirdbzw.wennversutwird,esüberdenBewegungsspielraum
hinauszubewegen.
BiebefestigensiedasDolceo-VvorsitiganihremInstrument.
WennsiedasDolceo-VfürlängereZeitanihremInstrument
befestigtlassen,kanndieszuVeränderungenanderOberäe
desInstrumentsführen.
AbhängigvonversiedenenFaktorenwiez.B.altersbedingte
VeränderungenderLaierung/OberäeIhresInstrumentes,
kannesvorkommendasseinAnbringendiesesProduktszueiner
Besädigungführt.
Technische Daten
Tuner
Skala: 12 Noten gleiswebende Stimmung (Chromatis),
Reine Quinte (Violine, Viola)
Bereich (Sinuswelle): Chromatis A0 (27,50 Hz)–C8 (4186 Hz)
Präzision: +/-1 Cent
Bezugstonhöhe: A4 = 410–480 Hz (in Srien von 1 Hz)
Metronome
Tempoberei: q = 30–252
Tempogenauigkeit: ±0,1%
Taktberei: 0–5 Taktsläge, Duole, Triole
Abmessungen: 56 mm (B) x 49 mm (T) x 69 mm (H)
Gewit: 34 g (mit Baerie)
Baerielebensdauer
Tuner: ca. 8 Stunden (kontinuierlier Betrieb mit eingesaltetem Stimm-
gerät, A4-Eingang)
Metronome: ca. 8 Stunden (120 bpm, 4 Taktsläge, Ton, Dauerbetrieb)
Lieferumfang: CR2032 Lithiumbaerie (Knopfzelle, 3 V)
*M Die Einstellungen bleiben gespeichert, wenn das Gerät ausgeschaltet wird.Die
Einstellungen werden zurückgesetzt, wenn Sie die Baerie ersetzen (Werkseinstel-
lung, Stimm-Modus: chromatisch, Kalibrierung: 442 Hz; keine Transposition (C);
Metronom: Tempo = 120; Taktschläge = 4).
• Änderungen der technischen Daten und des Designs ohne vorherige Ankündigung
vorbehalten.
3. Violinesaite
4. Violasaite
Metronomanzeige mit 120
bpm, 4 Taktschlägen und ton
360°
45°
45°
30°
30°

Partes del Dolcetto-V
Instalación de la Batería
Apaguelaunidadantesdeinstalaroreemplazarlabatería.
Cuando la batería comience a agotarse, se iluminará
el indicador de batería ( ).
El Dolceo-V seguirá funcionando un tiempo, pero
será menos exacto. Reemplace la Batería tan pronto
como sea posible.
1.
Mientras presiona suavemente en la dirección
1
la parte marcada como A del soporte de la batería
en la parte posterior del sistema Dolceo-V, tire
en la dirección
2
para retirar el soporte de la
batería.
2. Inserte la batería asegurándose de que la polaridad es correcta, de forma
que la cara “+” de la batería sea visible.
3. Vuelva a colocar el soporte de la batería en su posición original.
Retroiluminación
La retroiluminación se hace más brillante cuando hay sonido de entrada, me-
trónomo o cuando se pulsa un botón.
Si el usuario no realiza ninguna operación durante unos tres segundos, la
retroiluminación se atenuará ligeramente para evitar que la batería se agote.
Conmutación entre el anador y el metrónomo
Pulse el botón de alimentación/función para alternar entre el anador y el
metrónomo.
Al mismo tiempo, la pantalla también cambiará a la función seleccionada.
Anación
Procedimiento de anación
1. Pulse el botón de alimentación/función para encender el Dolceo-V y
activar el anador.
Si la alimentación se deja durante unos 20 minutos sin que el usuario realice
ninguna acción, se apagará de forma automática.
ParaapagarelDolceo-V,mantengapulsadoelbotóndealimentación/función.
2. En caso necesario, cambie los ajustes de calibración y transposición.
El procedimiento con el modo de anador establecido en cromático (valor
de fábrica; sin indicador de modo) se describe a continuación.
3. Toque una sola nota en su instrumento.
La pantalla mostrará el nombre de la nota más cercana al tono detectado.
Ane su instrumento con el tono correcto para que aparezca el nombre de la
nota deseada.
4.
De nuevo, toque una nota en su instru-
mento y ajuste la anación de forma
que se ilumine el segmento central del
medidor (indicado por ).
El indicador de la derecha se iluminará
si el tono es demasiado agudo, y el indi-
cador de la izquierda se iluminará si es demasiado grave.
Si desea anar una tercera mayor pura o una tercera menor pura por encima
de una cierta nota, ajuste el tono hasta que la tercera mayor o menor pura se
marque en el medidor.
Por ejemplo, si desea anar una tercera mayor pura por encima de A, haga que
el indicador de nombre de nota marque C# y ane de forma que el medidor
indique la izquierda [ ]. Asimismo, si desea anar una tercera menor pura
por encima de A, haga que el indicador de nombre de nota marque C y ane
de forma que el medidor indique la derecha [ ].
Aunqueeltonoestédentrodelrangodedetección,puedequenoseaposibledetectarel
tonodeunsonidoquecontengagrancantidaddearmónicosoquetengaunarápidacaída.
Elmedidorpuederesponderalasvibracionesquerecogedelentorno;sinembargo,
esonoafectaráalaanacióndelinstrumento.
Ajuste del modo de anador (*M)
Cada vez que pulsa el botón MODE, el modo de anador cambia; el indicador
de modo muestra el modo actual.
indicador
de tono de
referencia
indicador
de MODE
indicador de
nombre de nota
Botón MODE/BEAT
Botón
CALIB /TEMPO
Indicador de batería
tercera mayor pura tercera menor pura
Botón
CALIB
/
TEMPO
Indicadores de ajuste
de PURE 5TH/
metrónomo
Botón de
alimentación/
función
A
Indicaciones de medidor si
se ha afinado correctamente
Cromático (sin indicador) → Violín ( ) → Viola ( ) → Cromático...
Además, en los modos de viola y violín, el número de cuerda más cercano al tono
detectado aparece a la izquierda del indicador de nombre de nota.
Indicadores de nombre de nota para el modo de violín: 4G , 3D, 2A, 1E
Indicadores de nombre de nota para el modo de viola: 4C, 3G, 2D, 1A
En los modos de violín y viola, aparece en la esquina
superior derecha de la pantalla para indicar la quinta escala pura.
Ajustes de la calibración (tono de referencia) (*M)
Pulse el botón CALIB [ ] o [ ] para cambiar el ajuste en el intervalo
de 410 Hz a 480 Hz en pasos de 1 Hz. Mantenga pulsado el botón
para aumentar o reducir el ajuste de forma continua.
Uso del metrónomo
1. Pulse el botón de alimentación/función para activar el metrónomo.
El metrónomo se inicia y el péndulo del metrónomo oscilará de izquierda a
derecha según el tempo.
2. Cada vez que pulse el botón de alimenta-
ción/función, la función cambiará entre me-
trónomo (sin sonido)→ metrónomo (sonido)
→ anador → metrónomo (sin sonido)...
En este punto, los indicadores de ajuste del
metrónomo cambiarán entre: (sin sonido)
→ (sonido) → sin indicador (anador) → (sin sonido)...
3. Con los botones TEMPO [ ] y [ ], ajuste el tempo (*M).
Mantenga pulsado el botón para aumentar o reducir el ajuste de forma continua.
4. Pulse el botón BEAT para seleccionar el ajuste BEAT (*M).
Mantenga pulsado el botón para aumentar o reducir el ajuste de forma continua.
: → → (dosillo) → (tresillo) → → → → → → ...
5. Para detener el metrónomo, pulse el botón de alimentación/función para
activar el anador o mantenga pulsado el botón de alimentación/función
para apagar el Dolceo-V.
CuandoelDolceo-Vestáencendido,elanadorestáactivado.
Colocación en el instrumento e intervalo de movimiento
El sistema Dolceo-V realiza la anación recogiendo las
vibraciones del instrumento. Por ello, asegúrese de colocar
el Dolceo-V en el cabezal del instrumento para poder
anarlo. Además, el Dolceo-V se puede mover libremente
para leer la pantalla con facilidad.
ElDolceo-Vpuederesultardañadosiejerceunafuerzaex-
cesivaensuintervalodemovimiento,osiintentadesplazarlo
másalládesuintervalodemovimientoprevisto.
PorfavorsujeteconcuidadoeDolceo-Vasuinstrumento.
SidejaelDolceo-Vsujetoalinstrumentoduranteunlargo
periodo,puededañarlasuperciedelinstrumento.
Dependiendodevariosfactores,comoelenvejecimientodel
acabadodelasupercie,existelaposibilidaddequesuins-
trumentopuedadañarseporlacolocacióndelanador.
Especicaciones
Anador
Escala: 12-notas, temperamento igual (Cromático),
Quinta pura (Violín, Viola)
Rango (onda sinusoidal): cromático A0 (27,50 Hz)–C8 (4186 Hz)
Precisión: +/-1 centésima
Bezugstonhöhe: A4 = 410–480 Hz (en pasos de 1 Hz)
Metrónomo
Intervalo de tempo: q = 30–252
Precisión de tempo: ±0,1%
Intervalo de tiempo: 0–5 tiempos, dosillo, tresillo
Dimensiones: 56 mm (Anch.) x 49 mm (Prof.) x 34 mm (Alt.)
Peso: 34 g (incluyendo batería)
Vida de la Batería
Anador: Aproximadamente 8 horas
(entrada A4, funcionando continuamente)
Metrónomo: Aproximadamente 8 horas (tempo 120, 4 tiempos,
sonido, funcionando continuamente)
Elementos incluidos: Batería de litio CR2032 (3 V)
*M
Los Ajustes son recordados al apagar la unidad. No obstante, los Ajustes
serán inicializados a reemplazar la batería (valor por defecto, modo de
anador: cromático, calibración: 442 Hz sin transposición (C); metrónomo:
tempo = 120, tiempo = 4).
•
Las especicaciones y el aspecto están sujetas a cambios sin previo aviso por mejora.
3ª cuerda
de Violín
4ª cuerda
de Viola
Pantalla del metrónomo
con ajustes de tempo
120, 4 tiempos y sonido
360°
45°
45°
30°
30°

バイオリン・モード時の音名表示:4G、3D、2A、1E
ビオラ・モード時の音名表示:4C、3G、2D、1A
バイオリン、ビオラ・モードではディスプレイ右上に の表示が表
示され音律が純正5度になります。
キャリブレーション(基準ピッチ)の設定
(*M)
CALIB / ボタンを押して、410Hz ~ 480Hzの範囲を1Hz単位で変更
できます。長押しした場合は連続的に増減させることができます。
メトロノームの操作
1. 電源/機能ボタンを押してメトロノーム動作にします。
メトロノームがスタートし、テンポに合わせて
メトロノームの振り子が左右に動きます。
2. 電源/機能ボタンを押すたびにメトロノーム
(消音)→メトロノーム(発音)→チューナー→
メトロノーム(消音)...と切り替わります。
このときメトロノーム設定表示が (消音)
→(発音)→表示なし(チューナー)→ (消音)...と切り替わります。
3. TEMPO / ボタンを使ってテンポを設定します(*M)。
ボタンを長く押すと連続的に値が増減します。
4.
BEATボタンを押してBEAT(拍子)を設定します
(*M)
。
ボタンを長く押すと連続的に値が増減します。
:→ → (2連符)→ (3連符)→ → → → → →...
5. メトロノームを停止するときは、電源/機能ボタンを押してチューナー
動作にするか、電源/機能ボタンを長押しして電源を切ります。
電源を入れたときは、常にチューナー動作になります。
楽器への取り付けと可動範囲
本機は楽器本体の振動を拾ってチューニングを行
います。そのため、必ずご使用になる楽器のヘッド
部分に取り付けて、チューニングを行ってくださ
い。また、本機は、液晶表示が見やすいように自由
に動かすことができます。
可動範囲内であっても、過度な力で無理に向
きを変えると破損する恐れがあります。
楽器への取り付け、取り外しはていねいに行っ
てください。また、長時間取り付けたままに
すると、取り付け跡が残る場合があります。
楽器の経年変化や塗装などの状態によって
は、本機の装着により損傷を与える恐れがあ
ります。
仕様
チューナー部
音律: 12平均律(クロマチック)、
純正5度(バイオリン、ビオラ)
測定範囲(サイン波): クロマチック A0(27.50Hz)~C8(4186Hz)
測定精度: ±1セント以内
基準ピッチ範囲:
A4=410 ~ 480Hz(1Hz単位)
メトロノーム部
テンポ範囲: q=30 ~ 252
テンポ精度: ±0.1%
拍子範囲: 0 ~ 5拍子、2連符、3連符
外形寸法: 56mm(W)X49mm(D)X69mm(H)
質量: 34g(電池含む)
電池寿命:
チューナー 約8時間(A4入力 連続動作時)
メトロノーム 約8時間(テンポ120、4拍子、発音 連続動作時)
付属品: 動作確認用CR2032型リチウム電池(3V) 1個
*M 各設定は、電源を切っても記憶しています。ただし、電池を交換した
場合は、設定が初期化されます(チューナー・モード:クロマチック、
キャリブレーション:442Hz、メトロノーム:テンポ120、4拍子)。
・ 仕様および外観は、改良のため予告なく変更する場合があります。
テンポ120、4拍子、発音
設定のメトロノーム表示
360°
45°
45°
30°
30°
各部の名称
電池の入れ方
電池を入れるときや交換するときは、本機の
電源を切って行ってください。付属の電池は
機能チェック用ですので、寿命の短い場合が
あります。
電池が消耗してくると、電池表示( )がでます。
しばらくの間は動作しますが、チューニングが正
確にできなくなります。速やかに新しい電池と
交換してください。
1. 本体背面にある電池ホルダーのAの部分を、(
1
)の方向に押しなが
ら、(
2
)の方向に引き出して取り外します。
2. 極性に注意してプラス(+)の表示が見えるように電池を挿入します。
3. 電池ホルダーを元に戻します。
バックライト
音を入力したときと、ボタン操作時または、メトロノーム時はバックライ
トが明るく点灯します。チューナー時は約3秒間、音の入力が無くボタン
操作もしないと、電池消耗を防ぐため、低輝度の点灯になります。
チューナーとメトロノームの切り替え
電源/機能ボタンを押してチューナー、メトロノームを切り替えます。
このときディスプレイは各機能画面に切り替わります。
チューニング
チューニングの方法
1.
電源/機能ボタンを長押しして電源を入れて、機能をチューナーにします。
音の入力がない状態が約20分続くと、自動的に電源が切れます。
電源を切るときは、電源/機能ボタンを長押しします。
2. 必要に応じてキャリブレーション(基準ピッ
チ)とチューナー・モードの設定をします。
以下は、チューナー・モードがクロマチック
(工場出荷時:モード表示なし、平均律)の場
合の説明になります。
3. 楽器を単音で鳴らします。認識した音に一番近い音名が表示されます。
合わせたい音名が表示されるように、楽器をおおまかにチューニング
してください。
4. 楽器を単音で鳴らして、メーターの中央( )の位置が点灯するように
チューニングします。
音が高いときは向かって右側が、低いときは向かって左側が点灯します。
ある音に対して、純正の長3度上、または純正の短3度上にチューニング
するには、メーターをそれぞれ純正長/短3度マークに合わせます。例え
ば、Aの音に対して、純正の長3度上の音にするには、音名表示をC#にして、
メーターを左側の に合わせます。また、Aの音に対して、純正の短3度上
の音にするには、音名表示をCにして、メーターを右側の に合わせます
。
測定範囲内の音程でも、倍音を多く含んだ楽器音や減衰の早い楽器音
については、測定できない場合があります。
周囲の環境によっては振動を拾いメーターが反応する場合があります
が、楽器のチューニングには影響ありません。
チューナー・モードの設定
(*M)
MODEボタンを押すたびにチューナー・モードが切り替わ
り、モード表示に現在のモードが表示されます。
クロマチック(表示なし)→バイオリン( )→ビオラ
()→クロマチック...
なお、バイオリンとビオラ・モードのときは、音名表示の左
横に認識した音に一番近い弦番号が表示されます。
PURE5TH/
メトロノーム設定表示
モード表示
基準ピッチ/
テンポ表示
電池表示
電源/機能
ボタン
MODE/BEATボタン 音名表示
純正長3度 純正短3度
CALIB/TEMPO
ボタン
CALIB/
TEMPO
ボタン
A
チューニングが合った
状態のメーター表示
バイ
オリン
3 弦
ビオラ
4 弦
This manual suits for next models
1
Table of contents
Languages:
Other Korg Tuner manuals