gfm V07TVDVD15 User manual

2
NOTES ON COPYRIGHT
It is forbidden by law to copy, broadcast, show, broadcast on cable, play in public, or rent copyrighted
material without permission.
Apparatus Claims of U.S. Patent Nos. 4,907,093; 5,315,448; and 6,516,132 licensed for limited viewing
uses only.
This product incorporates copyright protection technology that is protected by U.S. patents and other
intellectual property rights. Use of this copyright protection technology must be authorized by
Macrovision, and is intended for home and other limited viewing uses only unless otherwise authorized
by Macrovision. Reverse engineering or disassembly is prohibited.
WARNING:WARNING:
WARNING:WARNING:
WARNING: Should any problems occur, disconnect the AC cord and refer servicing to a
qualified technician.
SAFETY PRECAUTIONS
* SEE REAR OF UNIT FOR GRAPHIC* SEE REAR OF UNIT FOR GRAPHIC
* SEE REAR OF UNIT FOR GRAPHIC
SYMBOLS *SYMBOLS *
SYMBOLS *SYMBOLS *
SYMBOLS *
The exclamation point within a triangle
alerts you to the presence of important
operating, maintenance and servicing
instructions in this user’s manual.
The lightning flash with an arrowhead
within a triangle alerts you to
uninsulated dangerous voltage within
the product's enclosure that could
cause an electric shock.
WARNING : TO REDUCE THE RISK OF ELECTRIC
SHOCK, DO NOT REMOVE COVER (OR BACK). NO
USER-SERVICEABLE PARTS INSIDE. REFER
SERVICING TO QUALIFIED PERSONNEL.
WARNING : TO PREVENT FIRE OR SHOCK HAZARD,
DO NOT EXPOSE THIS UNIT TO RAIN OR MOISTURE.
DO NOT PLACE OBJECTS FILLED WITH LIQUIDS ON
OR NEAR THIS UNIT.
CAUTION : USE OF CONTROLS OR ADJUSTMENTS
OR PERFORMANCE OF PROCEDURES OTHER THAN
THOSE SPECIFIED MAY RESULT IN HAZARDOUS
RADIATION EXPOSURE.
CAUTION : DANGER OF EXPLOSION IF BATTERY IS
INCORRECTLY REPLACED. REPLACE ONLY WITH
THE SAME OR EQUIVALENT TYPE.
The symbol for
Class II
(Double lnsulation)
CAUTIONCAUTION
CAUTIONCAUTION
CAUTION
INVISIBLE LASER RADIATION WHEN
OPEN AND INTERLOCKS DEFEATED.
AVOID EXPOSURE TO BEAM.
This product
contains a low
power laser device.
CLASS 1 LASER PRODUCTCLASS 1 LASER PRODUCT
CLASS 1 LASER PRODUCT
AVIS RISQUE DE CHOC ÉLECTRIQUE NE
PAS OUVRIR
CAUTION
RISK OF ELECTRIC SHOCK
DO NOT OPEN
PLACEMENT INFORMATION
• Do not use this unit in places which are extremely hot, cold, dusty, or humid.
• Do not restrict the air flow of this unit by placing it somewhere with poor air flow, by covering it with
a cloth, or by placing it on bedding or carpeting.
SAFETY INFORMATION
• When connecting or disconnecting the AC cord, grip the plug and not the cord itself. Pulling the cord
may damage it and create a hazard.
• When you are not going to use the unit for a long period of time, disconnect the AC cord.
CONDENSATION INFORMATION
• When left in a heated room where it is warm and damp, water droplets or condensation may form
inside the unit. When there is condensation inside the unit, the unit may not function normally. Let
the unit stand for 1-2 hours before turning the power on, or gradually heat the room and let the unit
dry before use.
FCC INFORMATION
WARNING:WARNING:
WARNING:WARNING:
WARNING: Changes or modifications to this unit not expressly approved by the party responsible for
compliance could void the user authority to operate the equipment.
NOTE:NOTE:
NOTE:NOTE:
NOTE: This equipment has been tested and found to comply with the limits for a Class B digital device,
pursuant to part 15 of the FCC Rules. These limits are designed to provide reasonable protection
against harmful interference in a residential installation. This equipment generates, used in accordance
with the instructions, may cause harmful interference to radio communications.
However, there is no guarantee that interference will not occur in a particular installation. If this
equipment does cause harmful interference to radio or television reception, which can be determined
by turning the equipment does cause harmful interference to radio or television reception, which can
be determined by turning the equipment off and on, the user is encouraged to try to correct the
interference by one or more of the following measures:
• Reorient or relocate the receiving antenna.
• Increase the separation between the equipment and receiver.
• Connect the equipment into an outlet on a circuit different from that to which the receiver is
connected.
• Consult the dealer or an experienced radio/TV technician for help.
Shielded cables must be used with this unit to ensure compliance with the Class FCC limits.
211501S9 - GFM-1.pmd 01/06/2007, 18:302

3
IMPORTANT SAFETY INSTRUCTIONS
1. Read these instructions.
2. Keep these instructions.
3. Heed all warnings.
4. Follow all instructions.
5. Do not use this device near water.
6. Clean only with a dry cloth.
7. Do not block any ventilation openings. Install in accordance with the
manufacturer’s instructions.
8. Do not install near any heat sources such as radiators, heat registers, stoves,
or other device (including amplifiers) that produce heat.
9. Do not defeat the safety purpose of the polarized or grounding-type plug. A
polarized plug has two blades with one wider than the other. A grounding type
plug has two blades and a third grounding prong. The wide blade or the third
prong are provided for your safety. If the provided plug does not fit into your
outlet, consult an electrician for replacement of the obsolete outlet.
10. Protect the power cord from being walked on or pinched particularly at plug,
convenience receptacles, and the point where they exit from the device.
11. Only use attachments/accessories specified by the manufacture.
12. Use only with the cart, stand, tripod, bracket, or table specified by the
manufacturer, or sold with the device. When a cart is used, use caution when
moving the cart/device combination to avoid injury from tip-over.
13. Unplug this device during lightning storms or when unused for long periods
of time.
14. Refer all servicing to qualified service personnel. Servicing is required when
the device has been damaged in any way, such as power-supply cord or plug
is damaged, liquid has been spilled or objects have fallen into the device, the
device has been exposed to rain or moisture, does not operate normally, or
has been dropped.
211501S9 - GFM-1.pmd 01/06/2007, 18:303

4
TABLE OF CONTENTS
SAFETYPRECAUTIONSSAFETYPRECAUTIONS
SAFETYPRECAUTIONS ....................................................................................................
....................................................................................................
.................................................. 22
22
2
IMPORTANTSAFETY INSTRUCTIONSIMPORTANTSAFETY INSTRUCTIONS
IMPORTANT SAFETYINSTRUCTIONS ........................................................
........................................................
............................ 33
33
3
DISCFORMATSDISCFORMATS
DISCFORMATS ..............................................................................................................................
..............................................................................................................................
............................................................... 55
55
5
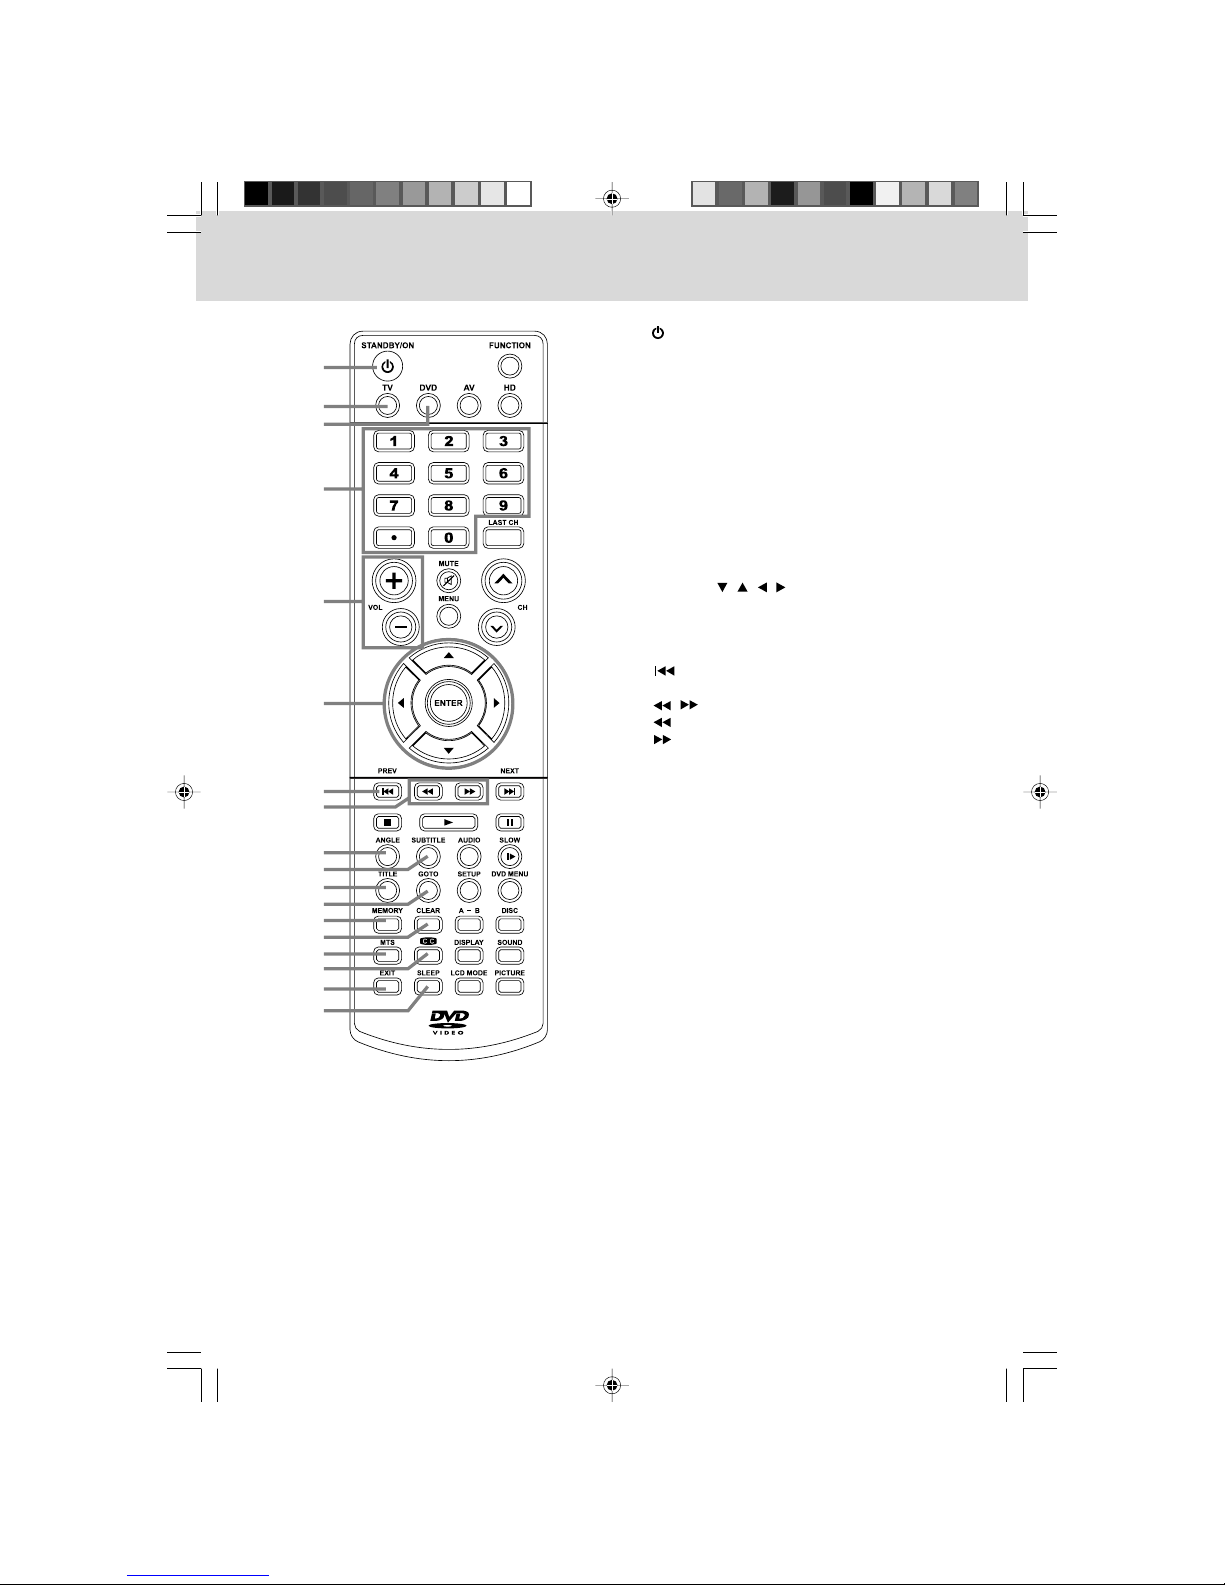
REMOTECONTROLREMOTECONTROL
REMOTECONTROL ................................................................................................................
................................................................................................................
........................................................ 66
66
6
ACCESSORIESACCESSORIES
ACCESSORIES ..................................................................................................................................
..................................................................................................................................
................................................................. 66
66
6
REMOTECONTROL REFERENCEGUIDEREMOTECONTROL REFERENCEGUIDE
REMOTECONTROL REFERENCEGUIDE ..................................
..................................
................. 7 – 87 – 8
7 – 87 – 8
7 – 8
UNITREFERENCE GUIDEUNITREFERENCE GUIDE
UNITREFERENCE GUIDE ..............................................................................................
..............................................................................................
............................................... 99
99
9
CONNECTIONSCONNECTIONS
CONNECTIONS ........................................................................................................
........................................................................................................
.................................................... 10 – 1510 – 15
10 – 1510 – 15
10 – 15
Connectinga TVAntenna/Cable/Satellite ....................... 10
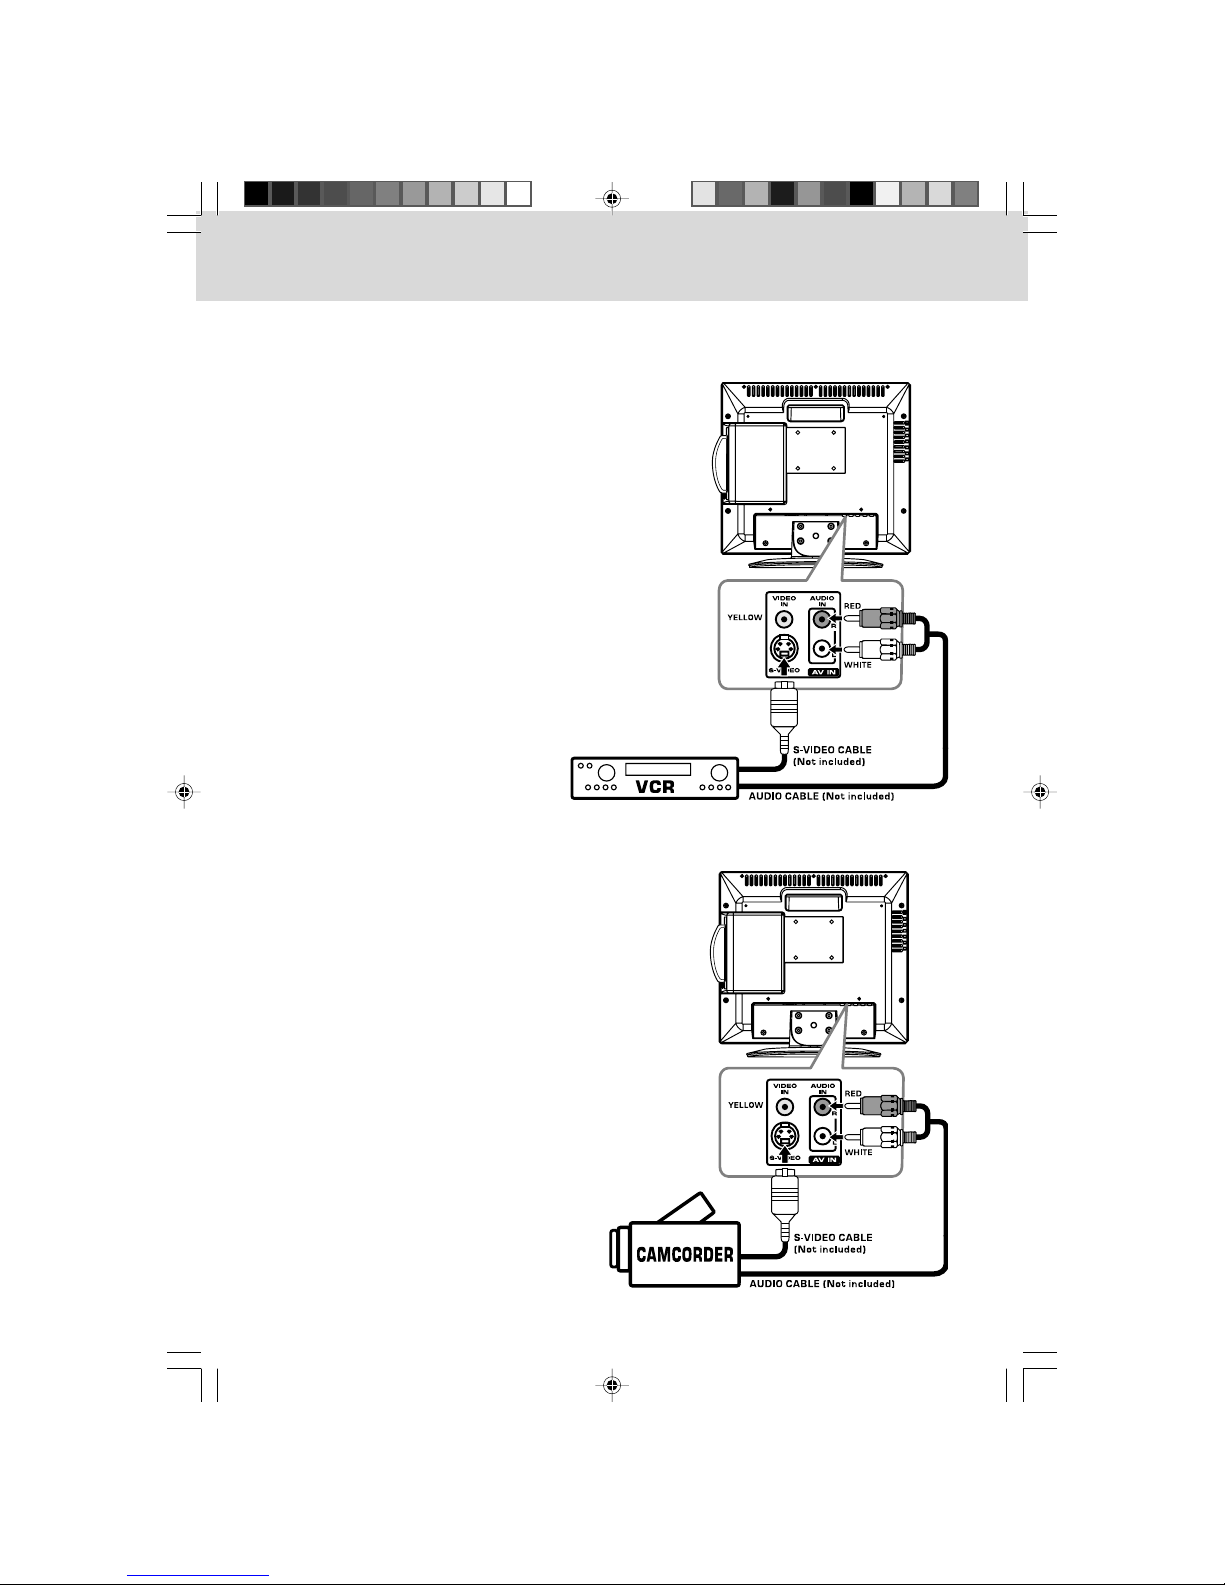
ConnectinganA/V Device (VCR,PVR Camcorder, Game
System,etc.) ..................................................................... 11 –13
Connectinga High-Definition(HD) Source ..................... 14
Connectinga PC ...................................................................... 14
ConnectinganAudio Amplifier ............................................. 15
ConnectingtheAC PowerCord ............................................. 15
INSTALLATIONINSTALLATION
INSTALLATION ..........................................................................................................................
..........................................................................................................................
............................................................. 1616
1616
16
Removingthe BaseStand ..................................................... 16
Mountingon theWall ............................................................ 16
USINGHEADPHONESUSINGHEADPHONES
USINGHEADPHONES ....................................................................................................
....................................................................................................
.................................................. 1616
1616
16
SOUNDSYSTEMSOUNDSYSTEM
SOUNDSYSTEM ......................................................................................................................
......................................................................................................................
........................................................... 1616
1616
16
UNITOPERATIONUNITOPERATION
UNITOPERATION ................................................................................................................
................................................................................................................
........................................................ 1717
1717
17
Turningthe Uniton ................................................................ 17
Turningthe Uniton forthe FirstTime ............................... 17
QuickChannel ListFunction ................................................ 17
CD/DVDOPERATIONCD/DVDOPERATION
CD/DVDOPERATION ....................................................................................
....................................................................................
.......................................... 18 – 1918 – 19
18 – 1918 – 19
18 – 19
Playing aDisc ............................................................................ 18
PausingPlayback (StillMode) .............................................. 18
StoppingPlayback .................................................................. 18
Skip(Forward/Reverse) .......................................................... 18
FastForward/FastReverse .................................................... 18
Slow-motionPlay(DVD) ........................................................ 18
AudioSelection (DVD) ........................................................... 19
SubtitleSelection (DVD) ........................................................ 19
AngleSelection (DVD) ........................................................... 19
SPECIALFUNCTIONSSPECIALFUNCTIONS
SPECIALFUNCTIONS ......................................................................................................
......................................................................................................
................................................... 2020
2020
20
DisplayFunction (DVD) ........................................................ 20
LocatingaSpecific Title(DVD) .............................................. 20
LocatingaSpecificChapter/Track ...................................... 20
LocatingaSpecificTime ....................................................... 20
CD/DVDPROGRAMMABLE MEMORYCD/DVDPROGRAMMABLEMEMORY
CD/DVDPROGRAMMABLE MEMORY ..................................................
..................................................
......................... 2020
2020
20
ProgrammableMemory ........................................................ 20
Title/ChapterProgrammedPlayback(DVD) ....................... 20
TrackProgrammedPlayback(CD) ...................................... 20
REPEATPLAYBACKREPEATPLAYBACK
REPEATPLAYBACK ............................................................................................................
............................................................................................................
...................................................... 2121
2121
21
RepeatingaChapter/Title(DVD) ............................................ 21
Repeatinga SingleTrack/WholeCD (CD) ......................... 21
Repeatinga SpecificSection (DVD)(CD) .......................... 21
PLAYINGAPICTURE FILE DISCPLAYINGAPICTURE FILE DISC
PLAYINGAPICTURE FILEDISC ....................................................................
....................................................................
.................................. 2121
2121
21
CUSTOMIZINGTHE DVDFUNCTION SETTINGSCUSTOMIZINGTHEDVDFUNCTIONSETTINGS
CUSTOMIZINGTHE DVDFUNCTION SETTINGS ..................
..................
......... 2222
2222
22
LanguageSetup ..................................................................... 22
VideoSetup .............................................................................. 22
System Setup ............................................................................ 22
TV Type ..................................................................................... 22
Default...................................................................................... 22
TVSETUPTVSETUP
TVSETUPTVSETUP
TVSETUP ..........................................................................................................................
..........................................................................................................................
.............................................................23 – 2723 – 27
23 – 2723 – 27
23 – 27
VideoMenu .............................................................................. 23
VGASettings inPCMode .................................................... 23
AudioMenu .............................................................................. 24
TV Menu ..................................................................................... 24
ChannelSkipSetting ........................................................... 24
Setup Menu ...................................................................25 – 26
TimeSetup Setting ............................................................... 25
CaptionSetting ...................................................................... 26
RestoreSetting ....................................................................... 26
ParentalMenu ............................................................... 26 – 27
Password .................................................................................. 26
Parental ControlSetting ....................................................... 27
LANGUAGECODE LISTLANGUAGECODELIST
LANGUAGECODE LIST ................................................................................................
................................................................................................
................................................ 2828
2828
28
MAINTENANCEMAINTENANCE
MAINTENANCE ..........................................................................................................................
..........................................................................................................................
............................................................. 2828
2828
28
TROUBLESHOOTINGGUIDETROUBLESHOOTINGGUIDE
TROUBLESHOOTINGGUIDE ..............................................................................
..............................................................................
....................................... 2929
2929
29
LIMTITEDWARRANTYLIMTITEDWARRANTY
LIMTITEDWARRANTY ................................................................................
................................................................................
........................................ 30 –3130 –31
30 –3130 –31
30 –31
211501S9 - GFM-1.pmd 01/06/2007, 18:304

5
This unit can playback:
DISC FORMATS
DVDs
[8cm/12cm disc]
audio cds
[8cm/12cm disc]
CD-R/CD-RW
Compatible
REGION MANAGEMENT INFORMATION
Region Management Information: This unit is designed and manufactured to respond to the Region
Management Information that is encoded on DVD discs. If the region number printed on the DVD disc does
notcorrespondto theregionnumber ofthisunit, thisunitcannot playthatdisc.
The region number of this unit is .
JPG-CD
picture viewer
DISC FUNCTION OR OPERATION THAT IS NOT AVAILABLE
Whenthe symbol appearson the screen,it indicatesthat thefunction oroperation attemptedis notavailableatthat
time.This occursbecausethe DVDdisc manufacturerdetermines the specificfunctions. Certainfunctions maynotbe
availableon somediscs. Besure toread thedocumentation providedwith theDVD.
NOTES ON UNAUTHORIZED DISCS
You may not be able to play some DVD discs on this unit if they were purchased from outside your
geographic area or made for business purposes.
TITLE, CHAPTER AND TRACKS
• DVDs are dividedinto “titles”“titles”
“titles”“titles”
“titles”and “chapters”“chapters”
“chapters”“chapters”
“chapters”.Ifthedisc hasmore
than one movie on it, each movie would be a separate “title”“title”
“title”“title”
“title”.
“Chapters”“Chapters”
“Chapters”aresectionsoftitles.
• Audio CDsare dividedinto “tracks”“tracks”
“tracks”“tracks”
“tracks”.A“track”“track”
“track”“track”
“track”isusuallyone songon
anAudio CD.
Note:Note:
Note:Note:
Note:
Numbersidentifyeachtitle,chapter, andtrackon adisc.Most discshave
thesenumbers recordedon them,but somedo not.
ICONS USED ON DVDS
Sample lcons
Language selections for audio
Language selections for subtitles
Screen aspect ratio
Multiple camera angles
Region code indicator
Note:Note:
Note:Note:
Note:
When playing back a CD-G (Graphics) or CD EXTRA disc, the audio portion will be played, but the
graphic images will not be shown.
LB
2
2
2
1
1. English
2. French
1. English
2. French
1
211501S9 - GFM-1.pmd 01/06/2007, 18:305

6
Many universal remote controls have a “learning” feature, we recommend you use that feature to
program the remote control.
For any questions or problems related to programming a universal remote control, you must contact
the customer service department of the universal remote control manufacturer for assistance, or refer
to the instructions included with the universal remote control. We cannot offer assistance in
programming universal remote controls.
BATTERY REPLACEMENT
When the batteries become weak, the operating distance of the remote control will be greatly
reduced and you will need to replace the batteries.
Note:Note:
Note:Note:
Note:
• If the Remote Control is not going to be used for a long time, remove the batteries to avoid damage
caused by battery leakage corrosion.
• Do not mix old and new batteries. Do not mix ALKALINE, standard (CARBON-ZINC) or rechargeable
(NICKEL-CADMIUM) batteries.
WARNING:WARNING:
WARNING:WARNING:
WARNING:
Do not dispose of batteries in a fire or they may leak and/or explode.
REMOTE CONTROL
ACCESSORIES
PLEASE LOCATE THE INCLUDED ACCESSORIES.
Remote control (with batteries) ............................................................................................................................. x 1
USING THE REMOTE CONTROL
• Point the remote control at the REMOTE SENSOR located on the unit.
• When using this unit in very bright light, the infrared REMOTE CONTROL SENSOR may not work
properly.
• The recommended effective distance for using the remote control is about 16 feet (5 meters).
TO CHANGE THE REMOTE CONTROL BATTERY
1. Open the battery door. 2. Insert two “AAA” batteries.
Specifications and appearance are subject to change without notice.Specifications and appearance are subject to change without notice.
Specifications and appearance are subject to change without notice.
211501S9 - GFM-1.pmd 01/06/2007, 18:306

7
REMOTE CONTROL REFERENCE GUIDE
1)1)
1)1)
1) STANDBY/ONButtonSTANDBY/ON Button
STANDBY/ON ButtonSTANDBY/ONButton
STANDBY/ON Button
Presstoturn ON theunit or putitin STANDBY (OFF)
mode.
2)2)
2)2)
2) TV ButtonTV Button
TV ButtonTV Button
TV Button
Pressto selectTVmode.
3)3)
3)3)
3) DVD ButtonDVD Button
DVD ButtonDVD Button
DVD Button
Pressto selectDVDmode.
4)4)
4)4)
4) Number(0- 9 anddot)ButtonsNumber(0 - 9and dot) Buttons
Number(0- 9 anddot)ButtonsNumber(0 - 9and dot) Buttons
Number(0- 9 anddot)Buttons
In DVD mode, use when creating programs and
locatingatitle/chapter orspecifictime.
InTVand othermodes,usewhen inputtingTVchannel
numberand enteringa parentalcontrol password.
DOT:DOT:
DOT:DOT:
DOT:Digital TVchannels (ie11.3or12.7)
5)5)
5)5)
5) VOLUME(–/+) ButtonsVOLUME (–/+)Buttons
VOLUME(–/+) ButtonsVOLUME (–/+)Buttons
VOLUME(–/+) Buttons
Pressto adjustthe volumelevel.
6)6)
6)6)
6) CURSOR (CURSOR (
CURSOR (CURSOR (
CURSOR ( ,,
,,
, ,,
,,
, ,,
,,
, ) Buttons) Buttons
) Buttons) Buttons
) Buttons
Presstohighlight selections onamenu screen and
adjustcertain settings.
ENTERButtonENTERButton
ENTERButton
Pressto confirmselectionsonamenu screen.
7)7)
7)7)
7) PREV ButtonPREV Button
PREV ButtonPREV Button
PREV Button
Pressto selectprevious chaptersortracksona disc.
8)8)
8)8)
8) //
//
/ButtonsButtons
ButtonsButtons
Buttons
:Fast reverseplayback.
:Fast forwardplayback.
9)9)
9)9)
9) ANGLEButtonANGLEButton
ANGLEButtonANGLEButton
ANGLEButton
Press to switch the camera angle of the video
presentationwhensceneswithmultiplecameraangles
arerecorded onaDVD.
10)10)
10)10)
10) SUBTITLEButtonSUBTITLE Button
SUBTITLEButtonSUBTITLE Button
SUBTITLEButton
Press to select one of the subtitle languages
programmedon aDVD.
11)11)
11)11)
11) TITLEButtonTITLEButton
TITLEButtonTITLEButton
TITLEButton
Pressto selectthetitlemenuscreen.
12)12)
12)12)
12) GOTOButtonGOTO Button
GOTOButtonGOTO Button
GOTOButton
Presstoskip directlytoaspecific locationonaDVD/CD.
13)13)
13)13)
13) MEMORYMEMORY
MEMORYMEMORY
MEMORY
Setpredetermined playback.
14)14)
14)14)
14) CLEARButtonCLEARButton
CLEARButtonCLEARButton
CLEARButton
Presstoclearinputselections.
15)15)
15)15)
15) MTSButtonMTS Button
MTSButtonMTS Button
MTSButton
Press to select MONO sound, STEREO sound and
SecondaryAudioProgram(SAP).
16)16)
16)16)
16) CC ButtonCC Button
CC ButtonCC Button
CC Button
Pressto activatetheClosed Captioningfeature. This
function only works on programs broadcast with
captions.
17)17)
17)17)
17) EXIT ButtonEXIT Button
EXIT ButtonEXIT Button
EXIT Button
Pressto returntoprevious menuorexitthemenu and
returndirectlytonormalviewing.
18)18)
18)18)
18) SLEEPButtonSLEEP Button
SLEEPButtonSLEEP Button
SLEEPButton
PresstosettheSLEEP timer.Theunit willremainon for
the time that is set, and will automatically shut off
afterwards.
2
1
3
4
5
6
7
8
9
10
11
12
13
14
15
16
17
18
211501S9 - GFM-1.pmd 01/06/2007, 18:307

8
19)19)
19)19)
19) FUNCTIONButtonFUNCTIONButton
FUNCTIONButtonFUNCTIONButton
FUNCTIONButton
Pressto switchbetween TV/ AVIN /YUV IN/ DVD/ PC
IN.
20)20)
20)20)
20) HD ButtonHD Button
HD ButtonHD Button
HD Button
Directlyselects YUV IN(componentvideo) mode.
21)21)
21)21)
21) AV ButtonAV Button
AV ButtonAV Button
AV Button
Pressto selectsourceconnected toAVIN.
22)22)
22)22)
22) LASTCHButtonLASTCHButton
LASTCHButtonLASTCHButton
LASTCHButton
Press to switch repeatedly between the last two
channelsdisplayed.
23)23)
23)23)
23) CHCH
CHCH
CH / CH/ CH
/ CH/ CH
/ CH ButtonButton
ButtonButton
Button
Press / tochange theTVchannels.
24)24)
24)24)
24) NEXT ButtonNEXT Button
NEXT ButtonNEXT Button
NEXT Button
Pressto selectnext title,chapter ortrackonadisc.
25)25)
25)25)
25) STOP ButtonSTOP Button
STOP ButtonSTOP Button
STOP Button
Pressto stopplaying adisc.
PLAY ButtonPLAY Button
PLAY Button
Pressto startandresumeplaybackof adisc.
PAUSE ButtonPAUSE Button
PAUSE Button
Pressto pauseplaybackand singleframe advance.
26)26)
26)26)
26) SLOW ButtonSLOW Button
SLOW ButtonSLOW Button
SLOW Button
Pressto playa DVDinslow-motion.
27)27)
27)27)
27) AUDIOButtonAUDIOButton
AUDIOButtonAUDIOButton
AUDIOButton
Pressto selectaudio soundtracksof aDVD orchange
theoutput modeofa CD.
28)28)
28)28)
28) DVDMENUButtonDVDMENUButton
DVDMENUButtonDVDMENUButton
DVDMENUButton
Whileviewing aDVD,press toenter themain menu.
29)29)
29)29)
29) SETUPButtonSETUPButton
SETUPButtonSETUPButton
SETUPButton
Press to enter and exit the SETUP menu of the DVD
player.
30)30)
30)30)
30) REP DISC ButtonREP DISC Button
REP DISC ButtonREP DISC Button
REP DISC Button
Pressto repeatchapterofaDVD orrepeatsingletrack
orwhole CD.
REP A-B ButtonREP A-B Button
REP A-B Button
Pressto performpoint-to-point repeatplayback ona
DVDorCD.
31)31)
31)31)
31) SOUNDButtonSOUNDButton
SOUNDButtonSOUNDButton
SOUNDButton
Pressto selectfrompreset soundsettings (Personal,
Standard,Voice, Music,Theater) tomatch thetype of
showyou arewatching.
32)32)
32)32)
32) DISPLAYButtonDISPLAYButton
DISPLAYButtonDISPLAYButton
DISPLAYButton
Pressto changedisc statusinformation displayedon
thescreen.
33)33)
33)33)
33) PICTUREButtonPICTUREButton
PICTUREButtonPICTUREButton
PICTUREButton
Pressto selectfrompreset screendisplay settingsto
matchthe typeof showyouarewatching(Standard,
Dynamic,Personal, Soft&Movie).
34)34)
34)34)
34) LCDMODE ButtonLCDMODE Button
LCDMODE ButtonLCDMODE Button
LCDMODE Button
Pressto setthesize ofthe LCDdisplay.
35)35)
35)35)
35) MUTEButtonMUTEButton
MUTEButtonMUTEButton
MUTEButton
Pressto mutethe sound.Press againto cancelmute.
36)36)
36)36)
36) MENUButtonMENUButton
MENUButtonMENUButton
MENUButton
Pressto displaythe on-screenTV menu.
REMOTE CONTROL REFERENCE GUIDE
20
19
21
22
23
24
25
26
27
28
29
30
31
32
33
34
35
36
211501S9 - GFM-1.pmd 01/06/2007, 18:308

9
UNIT REFERENCE GUIDE
FRONT & SIDE VIEW
1)1)
1)1)
1) STANDBY/ONButtonSTANDBY/ON Button
STANDBY/ONButtonSTANDBY/ON Button
STANDBY/ONButton
Turnstheunit onandoff.
MENUButtonMENUButton
MENUButton
Entersand exits theTV menu.
FUNCTIONButtonFUNCTIONButton
FUNCTIONButton
SelectsTV, AV IN,YUV IN,DVD, or PCIN.
C HC H
C HC H
C H ButtonsButtons
ButtonsButtons
Buttons
SelectsaTVchanneland highlightselections(Up &
Down)on themenu screen.
–VOL+ Controls– VOL+Controls
–VOL+ Controls
Adjuststhe volumelevel andhighlight selections
(Left& Right) onthe menuscreen.
2)2)
2)2)
2) ColorLCDScreenColorLCDScreen
ColorLCDScreenColorLCDScreen
ColorLCDScreen
3)3)
3)3)
3) STANDBYIndicatorSTANDBYIndicator
STANDBYIndicatorSTANDBYIndicator
STANDBYIndicator
Indicates whether the unit is ON or in STANDBY
(OFF)mode.
LightOn: The unitis in STANDBY.
LightOff:The unit isturned ON.
4)4)
4)4)
4) RemovableBase StandRemovableBase Stand
RemovableBase StandRemovableBase Stand
RemovableBase Stand
5)5)
5)5)
5) REMOTECONTROLSENSORREMOTECONTROLSENSOR
REMOTECONTROLSENSORREMOTECONTROLSENSOR
REMOTECONTROLSENSOR
Donot blockthis sensoror remotecontrolwillnot
work.
6)6)
6)6)
6) Disc DoorDisc Door
Disc DoorDisc Door
Disc Door
7)7)
7)7)
7) PLAY ButtonPLAY Button
PLAY ButtonPLAY Button
PLAY Button
Pressto startor resumeplayback ofa disc.
STOP ButtonSTOP Button
STOP Button
Stopsplaying adisc.
PAUSE buttonPAUSE button
PAUSE button
Pauseplayback andframeadvance.
PREV ButtonPREV Button
PREV Button
PressPREVbutton togoback topreviouschapters/
tracks.
Pressand holdto fastreverse playback.
NEXT ButtonNEXT Button
NEXT Button
PressNEXTbutton toadvance chapters/tracks.
Pressand holdto fastforward playback.
PUSH OPEN ButtonPUSH OPEN Button
PUSH OPEN Button
Pushto open thedisc door.
8)8)
8)8)
8) DiscTrayDiscTray
DiscTrayDiscTray
DiscTray
Pushto closethediscdoor.
9)9)
9)9)
9) Power CordPower Cord
Power CordPower Cord
Power Cord
10)10)
10)10)
10) AVOUTVideo Output JackAVOUTVideo Output Jack
AVOUTVideo Output JackAVOUTVideo Output Jack
AVOUTVideo Output Jack
11)11)
11)11)
11) AVOUTAudio OutputJacks(Left/Right)AVOUTAudio OutputJacks(Left/Right)
AVOUTAudio OutputJacks(Left/Right)AVOUTAudio OutputJacks(Left/Right)
AVOUTAudio OutputJacks(Left/Right)
12)12)
12)12)
12) AV IN Video Input JackAV IN Video Input Jack
AV IN Video Input JackAV IN Video Input Jack
AV IN Video Input Jack
13)13)
13)13)
13) AVINAudio Input Jacks(Left/Right)AVINAudio Input Jacks(Left/Right)
AVINAudio Input Jacks(Left/Right)AVINAudio Input Jacks(Left/Right)
AVINAudio Input Jacks(Left/Right)
14)14)
14)14)
14) PCIN MONITOR/VGA JackPCIN MONITOR/VGA Jack
PCIN MONITOR/VGA JackPCIN MONITOR/VGA Jack
PCIN MONITOR/VGA Jack
15)15)
15)15)
15) PC IN Audio JackPC IN Audio Jack
PC IN Audio JackPC IN Audio Jack
PC IN Audio Jack
16)16)
16)16)
16) YUVIN ComponentVideoInput Jacks (Y/PYUVIN ComponentVideoInput Jacks (Y/P
YUVIN ComponentVideoInput Jacks (Y/PYUVIN ComponentVideoInput Jacks (Y/P
YUVIN ComponentVideoInput Jacks (Y/P
BB
BB
B
/P/P
/P/P
/P
RR
RR
R
))
))
)
17)17)
17)17)
17) YUV IN Audio Input Jacks (Left/Right)YUV IN Audio Input Jacks (Left/Right)
YUV IN Audio Input Jacks (Left/Right)YUV IN Audio Input Jacks (Left/Right)
YUV IN Audio Input Jacks (Left/Right)
18)18)
18)18)
18) AVINS-Video Input JackAVINS-Video Input Jack
AVINS-Video Input JackAVINS-Video Input Jack
AVINS-Video Input Jack
19)19)
19)19)
19) HeadphoneJackHeadphoneJack
HeadphoneJackHeadphoneJack
HeadphoneJack
20)20)
20)20)
20) TVAntenna CableTerminal- CoaxialTVAntennaTVAntenna CableTerminal- CoaxialTVAntenna
TVAntenna CableTerminal- CoaxialTVAntennaTVAntenna CableTerminal- CoaxialTVAntenna
TVAntenna CableTerminal- CoaxialTVAntenna
InputInput
InputInput
Input
5467 82
13
910 11 12
14 15 16 17 18 20
13
19
211501S9 - GFM-1.pmd 01/06/2007, 18:309

10
CONNECTIONS
CONNECTING A TV ANTENNA/CABLE/SATELLITE
To view television channels correctly, a signal must be received from one of the following sources:
- An indoor or outdoor aerial antenna
- A cable system
- A satellite system
CONNECTING A DIGITAL ANTENNA
The tuner in this TV receives ATSC TV signals from an antenna.
This digital TV can receive standard (SDTV) and high definition (HDTV) over the air broadcasts.
CONNECTING AN ANALOG ANTENNA OR DEVICE
The tuner in this TV can receive NTSC TV signals, analog cable signals or the RF output from a satellite
receiver, VCR or cable box.
TV ANTENNA
Satellite, Cable, or
TV antenna cable to
TV ANTENNA
CABLE Terminal
(cable not included)
211501S9 - GFM-1.pmd 01/06/2007, 18:3010

11
CONNECTING TO A/V DEVICES (VCR, PVR, Camcorder, Game System, etc.)
Connecting to Devices with an S-Video Output
To connect to A/V devices such as a VCR or camcorder:
- Connect to a camcorder
Connect the right (red) and left (white) audio output
from the camcorder to the right (red) and left (white)
input on this unit (Audio cable not included).
Connect the S-VIDEO output from the camcorder to
the S-VIDEO input on this unit (S-VIDEO cable not
included).
Make sure you connect both audio and video from the
same camcorder to the same input (AV IN).
Note:Note:
Note:Note:
Note:
Please refer to the user manual for the camcorder for
more information.
- Connect to a VCR
Connect the right (red) and left (white) audio output
from the VCR to the right (red) and left (white) input
on this unit (Audio cable not included).
Connect the S-VIDEO output from the VCR to the S-
VIDEO input on this unit (S-VIDEO cable not included).
Make sure you connect both audio and video from the
same VCR to the same input (AV IN).
Note:Note:
Note:Note:
Note:
Please refer to the user manual for the VCR for more
information.
CONNECTIONS
211501S9 - GFM-1.pmd 01/06/2007, 18:3011

12
Connecting to Devices with a Composite (yellow RCA-type) Video Output
To connect to A/V devices such as a VCR or camcorder:
- Connect to a camcorder
Connect the right (red) and left (white) audio output
from the camcorder to the right (red) and left (white)
input on this unit (Audio cable not included).
Connect the video (yellow) output from the
camcorder to the video input on this unit (Video
cable not included).
Make sure you connect both audio and video from the
same camcorder to the same input (AV IN).
Note:Note:
Note:Note:
Note:
Please refer to the user manual for the camcorder for
more information.
CONNECTIONS
- Connect to a VCR
Connect the right (red) and left (white) audio output
from the VCR to the right (red) and left (white) input
on this unit (Audio cable not included).
Connect the video (yellow) output from the VCR to
the video input on this unit (Video cable not included).
Make sure you connect both audio and video from the
same VCR to the same input (AV IN).
Note:Note:
Note:Note:
Note:
Please refer to the user manual for the VCR for more
information.
211501S9 - GFM-1.pmd 01/06/2007, 18:3012

13
Connecting to Devices with a Composite (yellow RCA-type) Video Input
To connect to A/V devices such as a VCR, PVR or camcorder:
- Connect to a camcorder
Connect the right (red) and left (white) audio input
from the camcorder to the right (red) and left (white)
output on this unit (Audio cable not included).
Connect the video (yellow) input from the camcorder
to the video output on this unit (Video cable not
included).
Make sure you connect both audio and video from the
same camcorder to the same output (AV OUT).
Note:Note:
Note:Note:
Note:
Please refer to the user manual for the camcorder for
more information.
Note:Note:
Note:Note:
Note:
• After connection, please operate in TV/AV mode.
• For the reason of copyright protection, the resulting
copy may have bad picture and/or sound.
- Connect to a VCR/PVR
Connect the right (red) and left (white) audio input
from the VCR/PVR to the right (red) and left (white)
output on this unit (Audio cable not included).
Connect the video (yellow) input from the VCR/PVR
to the video output on this unit (Video cable not
included).
Make sure you connect both audio and video from the
same VCR/PVR to the same output (AV OUT).
Note:Note:
Note:Note:
Note:
Please refer to the user manual for the VCR/PVR for
more information.
Note:Note:
Note:Note:
Note:
• After connection, please operate in TV/AV mode.
• For the reason of copyright protection, the resulting
copy may have bad picture and/or sound.
CONNECTIONS
211501S9 - GFM-1.pmd 01/06/2007, 18:3013

14
CONNECTING A PC
Connect the 15-pin D-SUB PC/VGA connector from
your computer to the 15-pin D-SUB PC/VGA input on
this unit using a monitor cable (not included).
Connect a stereo audio cable (not included) to the PC
AUDIO IN jack on this unit, and the other end to the
AUDIOOUT jackon yourcomputer’ssoundcard.
CONNECTING A HIGH-DEFINITION (HD) SOURCE
High-Definition (HD) Devices with component video output must be connected to the YUV input.
Connect the three video outputs (Y, Pb, Pr) from the source to the corresponding video inputs on this
unit (Component video cable not included).
Connect the right (red) and left (white) audio output from the source to the right (red) and left (white)
input on this unit (Audio cable not included).
Make sure you connect both audio and video from the same source to YUV IN.
Note:Note:
Note:Note:
Note:
When connecting a DVD player to the television, the picture resolution is solely dependent upon the
resolution supported by the DVD player attached. DVD Player resolutions vary from 480i to 1080i, and
this television can support DVD players up to a maximum resolution of 1080i.
*May requirea subscriptionfor
receivingHD channels,check
withyourcable/satellite service
providerfordetails.
HD SOURCEHD SOURCE
HD SOURCEHD SOURCE
HD SOURCE
with component video
output
(Digital Cable Box*, Satellite
Receiver*, or external over-
the-air HD-Tuner)
CONNECTIONS
211501S9 - GFM-1.pmd 01/06/2007, 18:3014

15
CONNECT THE POWER CORD
• Connectthe ACpowercordintoa walloutlet.
• PresstheSTANDBY/ONSTANDBY/ON
STANDBY/ONSTANDBY/ON
STANDBY/ONbuttonontheunitorremotecontrol
toturn on theunit.
CONNECTING AN AUDIO AMPLIFIER
This connection allows you to use an audio amplifier
and external speakers.
Connect the right (red) and left (white) audio OUTPUT
from this unit to the right (red) and left (white) audio
INPUT on your amplifier. Refer to your amplifier’s
user manual for more information.
Note:Note:
Note:Note:
Note:
To control the audio, both the TV and the amplifier
must be turned on, and the volume of the amplifier
must be set above 0, or you will not hear any sound.
If you want to hear the sound from the amplifier only,
press the VOLVOL
VOLVOL
VOL ––
––
– button on the TV to decrease the
volume or press the MUTEMUTE
MUTEMUTE
MUTE button on the remote
control to turn off the sound.
Note:Note:
Note:Note:
Note:
• Be sure the AC power cord is disconnected and all functions are off before making connections.
• Make sure that all the components are connected correctly.
•
To prevent electrical shock, match wide blade of plug to wide slot of wall outlet, then fullyTo prevent electrical shock, match wide blade of plug to wide slot of wall outlet, then fully
To prevent electrical shock, match wide blade of plug to wide slot of wall outlet, then fully
insert.insert.
insert.insert.
insert.
• Whenyou arenot goingto usethe unitforalongperiodoftime, disconnectthe powercord.
CONNECTIONS
To AC outlet
211501S9 - GFM-1.pmd 01/06/2007, 18:3015

16
DOLBY DIGITAL (FOR DVD)
Dolby Digital is a sound system developed by Dolby Laboratories Inc. This unit automatically
recognizes DVDs that have been recorded with Dolby Digital.
Not all Dolby Digital sources are recorded with 6 channels.
Some sources marked Dolby Digital may be recorded in Dolby Surround, a 2 channel system. Look for
this logo on your unit.
Manufactured under license from Dolby Laboratories.
'Dolby' and the double-D symbol are trademarks of Dolby Laboratories.
SOUND SYSTEM
INSTALLATION
MOUNTING ON THE WALL
Thisunitis VESA-compliant, and isdesigned to be wall-
mountedwith a VESA-compliant3” x3” (75mmx75mm)
mountingkit designedforflat-panel TVs(sold separately).
Mountthis unitaccording tothe directionsincluded with
themounting kit.
Note:Note:
Note:Note:
Note:
Youmustremove thebasestand beforemountingthe unit
onthe wall.
REMOVING THE BASE STAND
WARNING:WARNING:
WARNING:WARNING:
WARNING:The LCD Displayisvery fragile,andmust be
protectedat all timeswhen removingthe base stand.Be
surethat nohardor sharp,or anythingthat couldscratch
ordamagethe LCDdisplay,comeincontactwithit. DoNOT
placepressure onthefrontofthe unitat anytime because
thescreen couldcrack.
1. Disconnect anycables orcordsconnectedtothe unit.
2. Lay theunit down on aflat surface, sotheback side is
facingup,making suretoplacea softcushionedmaterial
(such as a pillow or thick piece of foam) beneath the
screen.
3. Remove the four screws and then remove the BASE
STANDfrom theunit.
• Turndownthevolumebefore connectingheadphones
totheunit,thenadjust thevolumeto yourdesiredlevel.
• Whenheadphones areconnected, nosoundwillcome
fromthefront speakers.
USING HEADPHONES
Note:Note:
Note:Note:
Note:
• Avoid listening to sound at high levels for prolonged
periods of time. This may be harmful to you and may
causehearingloss.
Earphone/Headphone
[1/8”(3.5mm) diameterplug]
211501S9 - GFM-1.pmd 01/06/2007, 18:3116

17
UNIT OPERATION
TURNING THE UNIT ON
WhentheACpowercord isconnected,press theSTANDBY/ONSTANDBY/ON
STANDBY/ONSTANDBY/ON
STANDBY/ONbuttonon the unittoturniton. Press
theFUNCTIONFUNCTION
FUNCTIONFUNCTION
FUNCTIONbuttontoselectthedesiredmode(TV/AV IN/YUVIN/DVD/PCIN). IfyouselectDVD,the
DVDlogo willappear onthe screen.
Note:Note:
Note:Note:
Note:
When the unit is not going to be used for a long time, disconnect the AC power cord from AC power
outlet.
QUICK CHANNEL LIST FUNCTION
1. Press the TVTV
TVTV
TV button to select TV mode.
2. Press the ENTERENTER
ENTERENTER
ENTER button to enable Channel List.
3. Use the or button to select a channel from the searched
channels. (Press the button to review the previous page
of the list. Press the to review the next page.)
4. Press the ENTERENTER
ENTERENTER
ENTER button to confirm the selection and switch
to the selected channel.
Press the ENTERENTER
ENTERENTER
ENTER button again to view the channel details if
there are channel details broadcasted.
Channel List Channel Details
xxxxxxxxxxxxxxxxxxxxxxxxxxxxxxxxxxx
xxxxxxxxxxxxxxxxxxxxxxxxxxxxx
2
3
4
6-2
8
12-1
6-1
TURNING THE UNIT ON FOR THE FIRST TIME
The first time for you turning on the unit, the unit will enter Virgin mode. You can easily follow up
prompt message on screen to finish basic settings of the system.
Welcome to the Setup Wizard.
Please press [ENTER] to proceed.
Initial Setup
Welcome
Please select your language:
EXIT Exit
Select
Back Next
Initial Setup Language
English
Español
Français
Please select your input source:
EXIT Exit
Select
Back Next
Initial Setup Tuner
Antenna
Cable
Please make sure your input source
is connected to the Cable and/or
Antenna jack, then press [ENTER] to
scan for channels.
EXIT Exit
Select
Back Next
Initial Setup Channel Scan
Scan
Skip Scan
0%
5. After scaning finished, “Initial setup is Complete.” will appear on the screen. Press the ENTERENTER
ENTERENTER
ENTER button
to finish Initial SetupInitial Setup
Initial SetupInitial Setup
Initial Setup.
After finishing above settings, the system will return to the first TV channel scaned just now.
1. Press the ENTERENTER
ENTERENTER
ENTER button to proceed the InitialInitial
InitialInitial
Initial
SetupSetup
SetupSetup
Setup.
2. Use the / button to select your OSD
language, and press the button to the next
step.
3. Use the / button to select your TV tuner
source (Antenna or Cable), and press the
button to the next step.
4. Make sure RF aerial has been connected
properly to TV ANTENNATV ANTENNA
TV ANTENNATV ANTENNA
TV ANTENNA input jack on the
rear of the system, press the ENTERENTER
ENTERENTER
ENTER or button.
The system will automatically start to scan and
preset all available TV channels.
211501S9 - GFM-1.pmd 01/06/2007, 18:3117

18
CD/DVD OPERATION
This owner’s manual explains the basic instructions of this unit. Some DVDs are produced to limit
operation during playback. For example, many DVDs do not allow users to skip government
warnings, or in some cases previews or other features. This is not a defect in the unit. Refer to the
instruction notes of discs.
“” may appear on the screen during operation. A “ ” means that the desired operation is not
permitted by the unit or disc.
PLAYING A DISC
1. Press the STANDBY/ONSTANDBY/ON
STANDBY/ONSTANDBY/ON
STANDBY/ON button (on unit or remote control) to turn on the unit.
2. Press the FUNCTIONFUNCTION
FUNCTIONFUNCTION
FUNCTION button to select DVD mode.
See CUSTOMIZING THE DVD FUNCTION SETTINGS before proceeding to step 3.See CUSTOMIZING THE DVD FUNCTION SETTINGS before proceeding to step 3.
See CUSTOMIZING THE DVD FUNCTION SETTINGS before proceeding to step 3.
3. Press the PUSH OPENPUSH OPEN
PUSH OPENPUSH OPEN
PUSH OPENbutton toopenthediscdoor.
4. Hold the disc by its sides and carefully press onto the central support of compartment with the printed
sidefacing towardsyou untilyouheara“click”.
5. Push thedisc tray toclosedisc door.
It takes a short while for your unit to load the disc. After loading, the unit will automatically either
bring you to the main menu of the DVD, or start playing the DVD. If the unit does not automatically
start playing the DVD, press the PLAYPLAY
PLAYPLAY
PLAY button.
PAUSING PLAYBACK (STILL MODE)
Press the PAUSEPAUSE
PAUSEPAUSE
PAUSE button. To resume normal playback, press the PLAYPLAY
PLAYPLAY
PLAY button. Each time you press
the PAUSEPAUSE
PAUSEPAUSE
PAUSE button, the picture advances one frame.
SKIP (FORWARD / REVERSE)
• Press the PREVPREV
PREVPREV
PREV button to go back to previous chapters/tracks.
• Press the NEXTNEXT
NEXTNEXT
NEXT button to advance chapters/tracks.
• For an Audio CD, use the number buttons (remote control only) to jump directly to that track number.
STOPPING PLAYBACK
Press the STOPSTOP
STOPSTOP
STOP button at the location where you want to interrupt playback. To resume playback
at the position where the disc was stopped, press the PLAYPLAY
PLAYPLAY
PLAY button.
If you press the STOPSTOP
STOPSTOP
STOP button twice, the unit’s memory will be cleared and pressing the PLAYPLAY
PLAYPLAY
PLAY
button will reset the disc to the beginning.
FAST FORWARD/FAST REVERSE
1. Press the SEARCHSEARCH
SEARCHSEARCH
SEARCH or SEARCHSEARCH
SEARCHSEARCH
SEARCH button when a disc is playing.
• The disc begins fast scan at x2 speed.
• Four speeds are available. Each time the SEARCHSEARCH
SEARCHSEARCH
SEARCH or SEARCHSEARCH
SEARCHSEARCH
SEARCH button is pressed, the speed
of fast scan changes in the following sequence:
X 2X 2
X 2X 2
X 2 X 4X 4
X 4X 4
X 4 X 8X 8
X 8X 8
X 8 X 20X 20
X 20X 20
X 20
2. Press the PLAYPLAY
PLAYPLAY
PLAY button when you reach the desired point to resume playback at normal speed.
SLOW-MOTION PLAY (DVD)
1. Press the SLOWSLOW
SLOWSLOW
SLOW button on remote control in the play mode. Six speeds are available. Each time
the SLOWSLOW
SLOWSLOW
SLOW button is pressed, the speed of slow-motion playback changes in the following
sequence:
SF 1/2SF 1/2
SF 1/2SF 1/2
SF 1/2 SF 1/3SF 1/3
SF 1/3SF 1/3
SF 1/3 SF 1/4SF 1/4
SF 1/4SF 1/4
SF 1/4 SF 1/5SF 1/5
SF 1/5SF 1/5
SF 1/5 SF 1/6SF 1/6
SF 1/6SF 1/6
SF 1/6 SF 1/7SF 1/7
SF 1/7SF 1/7
SF 1/7
2. Press the PLAYPLAY
PLAYPLAY
PLAY button to return to the normal playback speed.
211501S9 - GFM-1.pmd 01/06/2007, 18:3118

19
AUDIO SELECTION (DVD)
On some discs, the sound is recorded in two or more formats. Follow the directions below to select
the type of playback.
1. While a disc is playing, press the AUDIOAUDIO
AUDIOAUDIO
AUDIO button to show the current audio format number.
2. Press the AUDIOAUDIO
AUDIOAUDIO
AUDIO button repeatedly to select the desired audio format.
Note:Note:
Note:Note:
Note:
• If only one audio format is recorded, the number does not change.
• About two seconds later, playback continues in the new audio format.
SUBTITLE SELECTION (DVD)
1. While a DVD is playing, press the SUBTITLESUBTITLE
SUBTITLESUBTITLE
SUBTITLE button to display the current language setting, as shown
in the example below.
2. Press the SUBTITLESUBTITLE
SUBTITLESUBTITLE
SUBTITLE button repeatedly to select the desired subtitle language.
NoteNote
NoteNote
Note:
• If only one language is recorded, the language does not change.
• About two seconds later, playback continues with the new subtitle selected.
• The number of languages recorded differs depending on the disc.
• If no button is pressed within a few seconds, playback continues without changing the current
subtitle.
• This function can only be used for discs on which subtitles have been recorded in multiple
languages.
• On some DVDs, subtitles are activated from the main menu of the DVD. Press the MENUMENU
MENUMENU
MENU button to
activate the main menu.
CD/DVD OPERATION
ANGLE SELECTION (DVD)
Some DVDs contain scenes which have been shot from a number of different angles. For these discs,
the same scene can be viewed from each of these different angles.
Sequence of angle shotsSequence of angle shots
Sequence of angle shots
(Example)
Note:Note:
Note:Note:
Note:
• This function can only be used for discs on which scenes shot from multiple angles have been
recorded.
• If only one angle is recorded, “ : [ 1/1 ][ 1/1 ]
[ 1/1 ][ 1/1 ]
[ 1/1 ] ” is displayed.
1. While you are playing a DVD with different
angles recorded, press the ANGLEANGLE
ANGLEANGLE
ANGLE button to
view the number of current angles available.
2. Press the ANGLEANGLE
ANGLEANGLE
ANGLE button repeatedly to change
the scene to the next angle in those recorded.
• About two seconds later, playback continues
from the new angle selected.
• If no button is pressed within 10 seconds,
playback continues without changing the
current angle.
211501S9 - GFM-1.pmd 01/06/2007, 18:3119

20
CD/DVD PROGRAMMABLE MEMORY
PROGRAMMABLE MEMORY
The two types of programmed playback provided by this Unit are title/chapter programmed playback
and track programmed playback.
TITLE/CHAPTER PROGRAMMED PLAYBACK (DVD)
1. Press the MEMORYMEMORY
MEMORYMEMORY
MEMORY button while the disc is stopped.
2. Enter the title numbers in . Use the or button to move the highlight to
chapter and enter the chapter numbers in .
3. Use the , , or button to move to the other fields.
4. Repeat steps 2 to 3.
5. Press the PLAYPLAY
PLAYPLAY
PLAY button to start the programmed playback.
Note:Note:
Note:Note:
Note: If you press the STOPSTOP
STOPSTOP
STOP button, the programmed selection will be cleared.
TRACK PROGRAMMED PLAYBACK (CD)
1. Press the MEMORYMEMORY
MEMORYMEMORY
MEMORY button while the disc is stopped.
2. Enter the track numbers in .
3. Use the , , or button to move to the other fields.
4. Repeat steps 2 to 3.
5. Press the PLAYPLAY
PLAYPLAY
PLAY button to start the programmed playback.
Title Chapter
PROG
2 - - : - - 6 - - : - - 10 - - : - - 14 - - : - -
3 - - : - - 7 - - : - - 11 - - : - - 15 - - : - -
1 - - : - - 5 - - : - - 9 - - : - - 13 - - : - -
4 - - : - - 8 - - : - - 12 - - : - - 16 - - : - -
T C T C T C T C
PLAY CLEAR
Track
PROG
1 - - - - 5 - - - - 9 - - - - 13 - - - -
2 - - - - 6 - - - - 10 - - - - 1 4 - - - -
3 - - - - 7 - - - - 11 - - - - 1 5 - - - -
4 - - - - 8 - - - - 12 - - - - 1 6 - - - -
PLAY CLEAR
DISPLAY FUNCTION (DVD)
Using DISPLAY, you can check the current settings of the following
items: ANGLE, AUDIO and SUBTITLE.
• While the disc is playing, press the DISPLAYDISPLAY
DISPLAYDISPLAY
DISPLAY button to display
the screen shown below.
SPECIAL FUNCTIONS
LOCATING A SPECIFIC CHAPTER / TRACK
If you know the chapter / track number you want to play, you
can locate a specific chapter / track by directly selecting a
chapter / track number.
1. Press the GOTOGOTO
GOTOGOTO
GOTO button to search for your desired chapter
/ track.
2. Press the or button to highlight a chapter / track and press the corresponding number button(s)
for the chapter you want.
3. Press the ENTERENTER
ENTERENTER
ENTER button to confirm. The unit will start playback about 3 seconds later.
LOCATING A SPECIFIC TIME
You can move to a specific location by entering its
corresponding time (hours, minutes, seconds)
1. Press the GOTOGOTO
GOTOGOTO
GOTO button.
2. Press the or button to highlight time.
3. Press the corresponding number buttons for the setting point you want.
4. Press the ENTERENTER
ENTERENTER
ENTER button to confirm. The unit will start playback about 3 seconds later.
Note:Note:
Note:Note:
Note:
• Some discs may not respond to this process.
• Some scenes may not be located as precisely as specified.
• This method for accessing specific locations is available only within the current title of the DVD video
disc.
LOCATING A SPECIFIC TITLE (DVD)
If a DVD video disc contains title numbers, you can locate a
specific title by directly selecting a title number.
1. In stop mode, press the GOTOGOTO
GOTOGOTO
GOTO button.
2. Press the or button to highlight a specific field and press the corresponding number button(s)
for the title you want.
3. Press the ENTERENTER
ENTERENTER
ENTER button to confirm. The unit will start playback about 3 seconds later.
211501S9 - GFM-1.pmd 01/06/2007, 18:3120

21
You can play a specific title or chapter repeatedly. (Title repeat, chapter repeat, A-B repeat)
REPEATING A CHAPTER (DVD)
You can play the same chapter repeatedly.
1. While the disc is playing, press the REPEAT DISCREPEAT DISC
REPEAT DISCREPEAT DISC
REPEAT DISC button until the indicator displays on the
screen. The current chapter is played repeatedly.
REPEATING A TITLE
You can play the same title repeatedly.
2. While the disc is playing, press the REPEAT DISCREPEAT DISC
REPEAT DISCREPEAT DISC
REPEAT DISC button until the indicator displays on the
screen. The current title is played repeatedly.
TO RESUME NORMAL PLAYBACK
3. While the disc is playing, press the REPEAT DISCREPEAT DISC
REPEAT DISCREPEAT DISC
REPEAT DISC button until the indicator displays on the
screen.
You can play a single track or an entire disc repeatedly.
REPEATING A SINGLE TRACK (CD)
You can play the same track repeatedly.
1. While the disc is playing, press the REPEAT DISCREPEAT DISC
REPEAT DISCREPEAT DISC
REPEAT DISC button until the indicator displays on the
screen. The current track is played repeatedly.
REPEATING AN ENTIRE DISC
2. While the disc is playing, press the REPEAT DISCREPEAT DISC
REPEAT DISCREPEAT DISC
REPEAT DISC button until the indicator displays on the
screen. The entire disc is played repeatedly.
TO RESUME NORMAL PLAYBACK
3. Press the REPEAT DISCREPEAT DISC
REPEAT DISCREPEAT DISC
REPEAT DISC button until the indicator displays on the screen.
REPEATING A SPECIFIC SECTION (DVD) (CD)
You can play a specific section repeatedly.
1. While the disc is playing, press the REPEAT A-BREPEAT A-B
REPEAT A-BREPEAT A-B
REPEAT A-B button at the beginning of the section ( is
displayed) you want to play repeatedly.
2. Press the REPEAT A-BREPEAT A-B
REPEAT A-BREPEAT A-B
REPEAT A-B button again at the end of the section ( is displayed) you want to play
repeatedly.
3. The unit will immediately begin replaying your selection.
TO RESUME NORMAL PLAYBACK
4. While the disc is playing, press the REPEAT A-BREPEAT A-B
REPEAT A-BREPEAT A-B
REPEAT A-B button until the indicator displays on the
screen.
Note:Note:
Note:Note:
Note:
• A-B repeat can only be used within the same title. If the start and end of the section to be repeated
are in different titles, A-B repeat is cancelled.
• The A-B repeat function does not operate in scenes where different camera angles are recorded.
REPEAT PLAYBACK
This unit can play JPG picture files recorded on CD-R and CD-RW discs.
PLAYING A PICTURE FILE DISC
1. Press the PUSH OPENPUSH OPEN
PUSH OPENPUSH OPEN
PUSH OPENbutton toopenthediscdoor.
2. Hold a picture file disc by its edge and gently push it onto the spindle with the label side facing up
until you hear a “click”.
3. Pushthe disctray to closediscdoor.
4. The unit will load the disc and automatically display the contents of the disc on the screen, while
also beginning to play the picture file. These files will then be played back one by one.
5. Press the or button to select a picture file to play.
6. Press the , , or CURSORCURSOR
CURSORCURSOR
CURSOR button to view and select the files that you want to view, then press
the ENTERENTER
ENTERENTER
ENTER button to confirm the selected file.
Note:Note:
Note:Note:
Note:
• This unit only support JPG file format.
• You can press the PAUSEPAUSE
PAUSEPAUSE
PAUSE button to interrupt playback, and press the PLAYPLAY
PLAYPLAY
PLAY button to resume
playback.
• You also can use the GOTOGOTO
GOTOGOTO
GOTO function or use the numbered buttons to enter the image number to
quickly select any image.
• Press the ANGLEANGLE
ANGLEANGLE
ANGLE button on the remote control to rotate the picture orientation by 90°.
PLAYING A PICTURE FILE DISC
211501S9 - GFM-1.pmd 01/06/2007, 18:3121
Table of contents
Other gfm TV DVD Combo manuals