GGM gastro GFK481-16 User manual
Gas Style Fryer
Instruction Manual
GFK481-16 GFK591-40
Model
Description
Dimensions LWH(mm)
Power (KW)
GFK481-16
American Style 3 Tubes
Fryer
405*770*1160mm
9KW*3
Robertshaw Gas Valve Made in USA
Material 439 1.5 Oil Tank
Two Red Handle Baskets
Adjustable Stainless Steel Feet
Oil Capacity: 20 Liters=45LBS
Power: 90,000 BTU, 9KW*3=36KW (9KW for each burner)
Model
Description
Dimensions LWH(mm)
Power (KW)
GFK591-40
American Style 5 Tubes
Fryer
545* 770*1160mm
9KW*5
Robertshaw Gas Valve Made in USA
Material 439 1.5 Oil Tank
Two Red Handle Baskets
Adjustable Stainless Steel Feet
Oil Capacity: 30 Liters=65LBS
Power: 150,000 BTU, 9KW*5=45KW (9KW for each burner)
IMPORTANT FOR YOUR SAFETY
THIS MANUAL HAS BEEN PREPARED FOR PERSONNEL QUALIFIED TO INSTALL
GAS EQUIPMENT, WHO SHOULD PERFORM THE INITIAL FIELD START-UPAND
IMPORTANT
IN THE EVENTA GAS ORDOR IS DETECTED, SHUT DOWN UNITS AT THE MAIN
SHUTOFF VALVE AND CONTACT THE LOCAL GAS COMPANY OR GAS SUPPLIER
FOR SERVICE.
FOR YOUR SAFETY

DO NOT STORE OR USE GASOLINE OR OTHER FLAMMABLE VAPORS OR LIQUIDS
IN THE VICINITY OF THIS OR ANY OTHER APPLIANCE.
WARNING
Improper installation, adjustment, alteration, service or maintenance
can cause property damage, injury or death.
Read the installation, operating and maintenance instructions
thoroughly before installing or servicing this equipment.
This fryer was carefully inspected before leaving the factory. Upon acceptance of the
shipment, the transportation company assumes full responsibility for safe delivery.
Immediately after unpacking the fryer, check for possible shipping damage. If the fryer is
damaged, save the packaging material and contact the carrier within 15 days of delivery.
Check that the following have been included:
Crumb Rack
Basket Hanger
Adjustable Legs (4)
Drain Pipe Extension
Twin Fry Baskets (2)
Manual and Warranty –Retain for future reference.
Do not use the door or its handle to lift the fryer.
INSTALLATION
Before installing the fryer, verify that the type of gas (natural or propane) agrees with the
specifications on the fryer data plate, which is located on the inside of the door panel. Make
sure the fryer is configured for the proper elevation.
Clearances
Minimum clearance from combustible construction:
6” (15 cm) from the sides of the fryer
6” (15 cm) from the back of the fryer
The fryer may be installed on combustible floors
Minimum clearance from noncombustible construction:
0” from the sides of the fryer
0” from the back of the fryer
Between the fryer and any open-top flame units:

16” (41 cm)
Allow space for servicing and operation.
Location
Install fryer in an area with sufficient air supply for gas combustion at fryer burners.
Do not obstruct the flow of combustion and ventilation air.
Provide adequate clearance for air openings into the combustion chamber.
Do not permit fans to blow directly onto fryer.
Avoid wall-type fans, which create cross-currents within a room. Avoid
open windows next to sides or back.
Electrical diagram located on inside of door.
CODES AND STANDARDS
The fryer must be installed in accordance with:
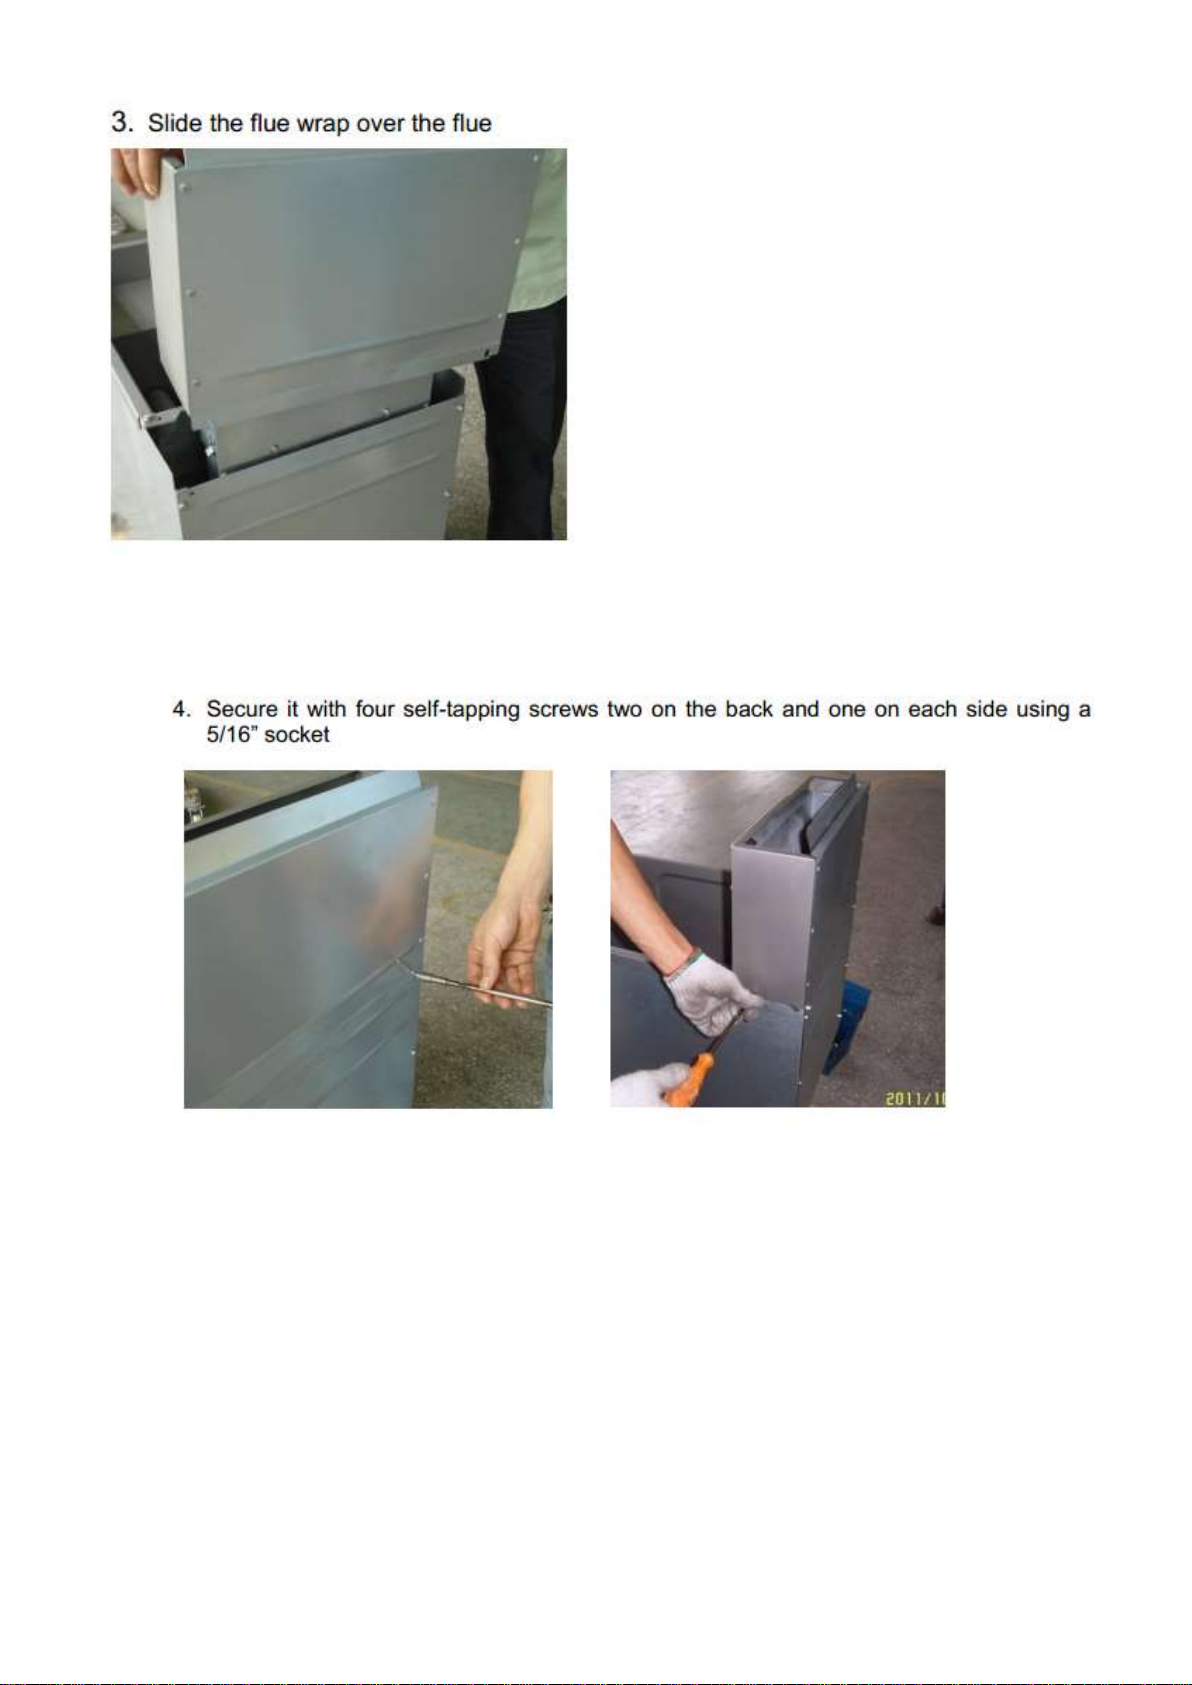
ASSEMBLY
The fryer must be restrained to prevent tipping and the splashing of hot liquid. The means
of restraint may be the manner of installation, such as connection to a battery of appliances,
installing the fryer in an alcove, or by separate means such as adequate ties.
FLUE EXHAUST
Comply with Vapor Removal from Cooking Equipment, ANSI-NFPA
Standard #96 (latest edition), available from the National Fire Protection

Association, Batterymarch Park, Quincy, MA 02269.
Locate the fryer under a hood with adequate connection to an exhaust
duct. The hood must extend 6” (15 cm) beyond fryer on both sides.
Clearance above the fryer should be adequate for combustion byproducts
to be removed efficiently.
An 18” (46 cm) minimum clearance should be maintained between the flue
vent and the filters of the hood venting system.
Never make flue connections directly to the fryer.
Do not obstruct the flow of the gases from the appliance. Proper air balance should
be maintained in the room.
Ensure that your ventilation system does not cause a down draft at the fryer’s flue
opening. Down draft will not allow the fryer to exhaust properly and will cause
overheating which may cause permanent damage. Damage caused by down
draft will not be covered under equipment warranty. Never allow anything to
obstruct the flue or ventilation exiting from the fryer flue. Do not put anything on
top of flue area.
TESTING THE GAS SUPPLY PIPING SYSTEM:
When test pressures exceed ½ PSI (3.45 kPa), the fryer and its individual shutoff valve must
be disconnected from the gas supply piping system.
When test pressures are ½ PSI (3.45 kPa) or less, the fryer must be isolated from the gas
supply piping system by closing its individual shutoff valve.
Fryers with Casters: (Restraining device does not come supplied with fryer or casters).
Separate instructions for installing casters are included with the casters:
disconnect device that complies with the Standard for Quick-Disconnect Devices
for Use with Gas Fuel, ANSI z21.41 or Quick-Disconnect Devices for Use with
Gas Fuel, CANI-6.9.
If an overheating situation persists, contact your local Vulcan-Hart authorized service office.
FILLING TANK WITH SHORTENING
Solid shortening should NOT be used with LG300 or LG400 fryers. Melting solid
shortening will damage the tank and void your warranty.
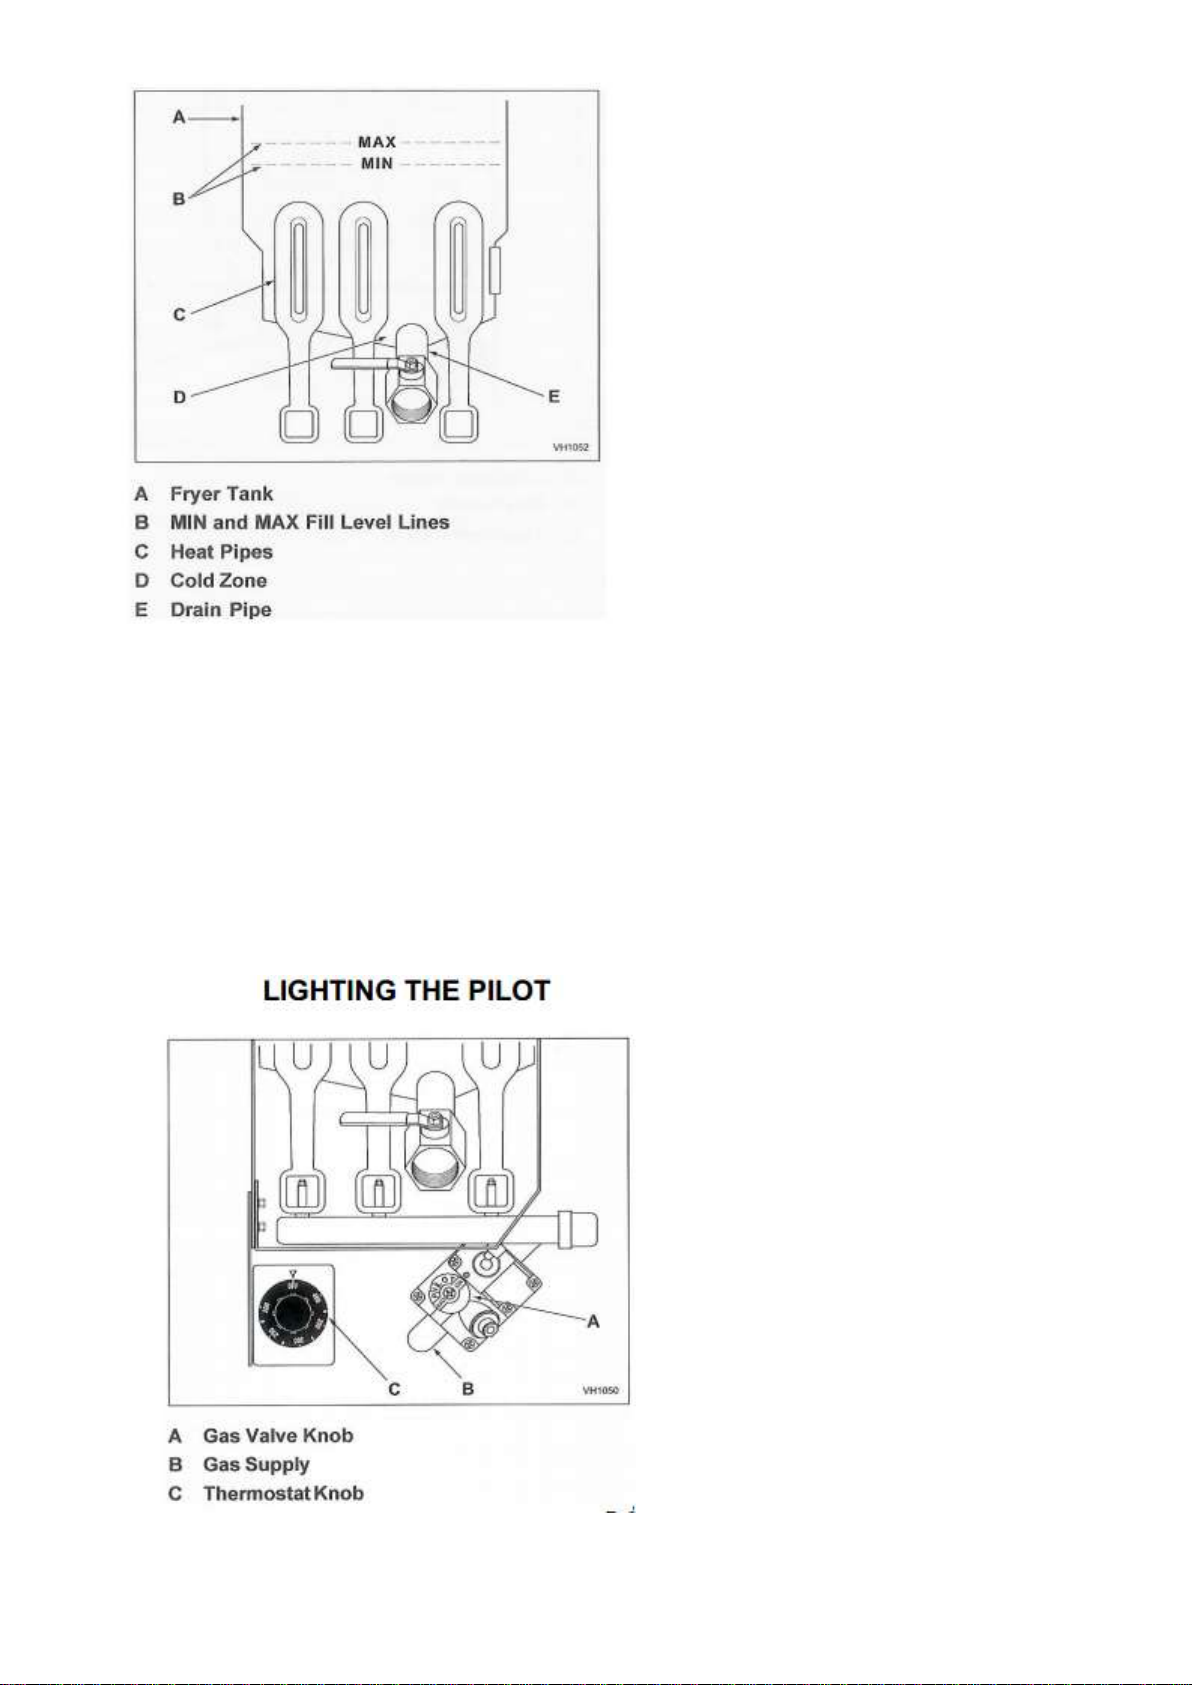
Close the drain valve.
Fill the fryer tank with liquid shortening.
Shortening level should be between the min and max lines in the fryer tank.
Shortening will expand when heated. Do not ill the fryer tank past the MAX line.
Add fresh shortening as needed to maintain oil level.
1. Open the door.

2. Turn the thermostat OFF (see figure below, view A). The thermostat is located
behind the door.
3. Push the gas control valve knob and turn to OFF. Wait 5 minutes for unburned gas
to vent.
4. Push and turn gas control valve knob to the “L” in PILOT (see figure below, view B).
5. While still holding the knob in, light the pilot with a lit flame. Continue to depress the
knob until pilot remains lit when knob is released. If the pilot does not remain lit,
repeat step 3 through 5.
6. Depress and turn gas control knob to ON (See figure below, view C).
7. If gas supply is interrupted, repeat steps 2 through 6.
TURNING ON THE FRYER
Set the temperature knob to desired temperature.
After the set temperature has been reached, the thermostat shuts off the
gas flow to burners.
The pilot remains lit. The burners will cycle on and off, maintaining the set
temperature.
TURNING OFF THE FRYER
1. Turn the thermostat OFF.
2. To keep the pilot lit, turn the gas valve to “L” in Pilot.
3. To shut off all gas to the system, including the pilot, turn the gas valve
knob to OFF.
EXTENDED SHUTDOWN

1. Turn the thermostat knob to OFF.
2. Push in the pilot knob and turn to OFF.
3. Thoroughly drain the fryer. Refer to DRAINING THE FRYER.
4. Clean the fryer according to CLEANING.
5. Turn off the main gas shutoff valve.
When frying is completed, remove basket or product. Hang basket on rear
hanger.
Fry Basket Capacity:
Basket for 3 and 4 tubes fryer: Recommended pounds per basket are 1.5 lbs. (0.7 kg).
Basket for 5 tubes fryer: Recommended pounds per basket are 3.0 lbs. (1.4 kg).
EXTENDING SHORTENING LIFE
Shortening life can be extended by the following guidelines:
Do not salt foods over the fryer.
Use good-quality shortening.
Filter shortening daily (at a minimum).
Replace shortening if it becomes poorly flavored.
Keep equipment and surrounding clean.
Set thermostat correctly.
Remove excess moisture and particles from food products before placing on fryer.
DRAINING THE TANK
1. Turn the thermostat to OFF.
2. To keep the pilot lit, turn the gas valve to PILOT.
3. Direct the drain spout into the container that you want to drain the shortening into.
4. Open the drain valve. The oil will drain into the container. When the container is full
or the fryer tank is empty, close the drain valve. Repeat this step until the fryer is
empty.
5. If desired, perform the weekly clean-out as described under CLEANING.
6. Once tank is completely empty, add new shortening and set thermostat to desired
temperature.
MAINTENANCE
Hot oil and hot parts can cause burns. Use care when operating,
cleaning, and servicing the fryer.

Spilling hot fryer compound can cause severe burns. Do not
move fryer without draining all frying compound from the tank.
This manual suits for next models
1
Table of contents
Other GGM gastro Fryer manuals


Popular Fryer manuals by other brands


Kogan
Kogan SMARTERHOME KASM12DGFYA user guide

Taurus
Taurus AF1001 manual

Dean
Dean Super Runner Series Service & parts manual

Maxi-matic
Maxi-matic Elite Bistro EUC-1031DB instruction manual

PERFECT FRY COMPANY
PERFECT FRY COMPANY PFC Series Installation-Inspection-Maintenance

Ninja
Ninja FOODI SP100 Series owner's guide

ElectrIQ
ElectrIQ HOV17D user manual

DS Produkte
DS Produkte XJ-2K960S instruction manual

Morphy Richards
Morphy Richards MRAF72BK instruction manual

Wells
Wells WFGA-60FS Operation manual

DeLonghi
DeLonghi RAPID CRISP FH2133 Get started

Lang
Lang CLF-15-E Installation, operation, maintenance, & troubleshooting