GIA DE-GIA0785 User manual

Electric Towel Rail
Instruction Manual
GIA

Table of contents
1. Safety & Warnings
2. Technical Specifications
3. Installation Instructions
4. Control Panel
5. Connecting to WiFi
6. Using the APP
7. Device Setting
8. Disposal
4.1 Standby Mode
4.2 Mode Switch
4.3 Child lock
4.4 Supplementary functions
4.5 Reset to Defaults
5.1 Downloading the App
5.2 Connecting to the App
5.3 Adding Devices
6.1 Home Overview
6.2 Control Interface
6.3 Choose Mode
7.1 Child Lock
7.2 Temperature Compensation
7.3 Open Window Detection
7.4 Temperature Unit
2
3.1 Fixings
3.2 Installation

Read this manual carefully before using or installation the device.
Keep the manual for future reference.
INSTRUCTION MANUAL
1. SAFETY & WARNINGS
•This appliance can be used by children aged from 8 years and above and persons with reduced physical,
sensory or mental capabilities or lack of experience and knowledge if they have been given supervision or
instruction concerning the use of the appliance in a safe way and understand the hazards involved.
Children shall not play with the appliance. Cleaning and user maintenance shall not be made by children
without supervision.
•Children of less than 3 years should be kept away unless continuously supervised. Children aged from 3
years and less than 8 years shall only switch on/off the appliance provided that it has been placed or
installed in its intended normal operating position and they have been given supervision or instruction
concerning use of the appliance in a safe way and understand the hazards involved. Children aged from 3
years and less than 8 years shall not plug in, regulate, or clean the appliance, or perform maintenance.
•Do not use the device in enclosed spaces if persons are present who cannot leave the room independently
and are not under constant supervision
•In order to avoid overheating, do not cover the radiator.
•In order to avoid a hazard due to inadvertent re-setting of the thermal cut-out, this appliance must not be
supplied through an external switching device, such as a timer, or connected to a circuit that is regularly
switched on and off by the utility.
•Some parts of this product can become very hot and cause burns. Do not touch the surface when in
operation. Do not install close to curtains or other combustible materials. Particular attention should be
given where children and vulnerable adults are present.
•Keep the power cable away from all hot parts of the appliance.
•Do not use the device if you detect damage to the mains plug or power cable. If the supply cord is
damaged, it must be replaced by the manufacturer, its service agent or similarly qualified persons to avoid
a hazard.
•All repairs and servicing must be carried out by a qualified person. To avoid danger any repairs must be
completed by the manufacturer, a service agent of the manufacturer or a similarly qualified person.
•Make sure the voltage indicated on the rating plate for this appliance corresponds to your power outlet.
•Do not use this device in the immediate surroundings of a bath, shower, swimming pool or any other water
container. Risk of electric shock.
•The device must not be located immediately below an electrical socket outlet.
•Do not use the device with wet or damp hands.
•No part of the appliance should be submersed in any type of liquid.
•Cleaning should be carried out using a damp cloth only. No abrasive chemicals or materials should be used.
•Never insert fingers or other objects or body parts into the device. Risk of electric shock or injury.
•Do not use any accessories with this device. Use of accessories may cause damage or danger.
•Keep the device at a minimum distance of one metre from curtains and other flammable materials.
3
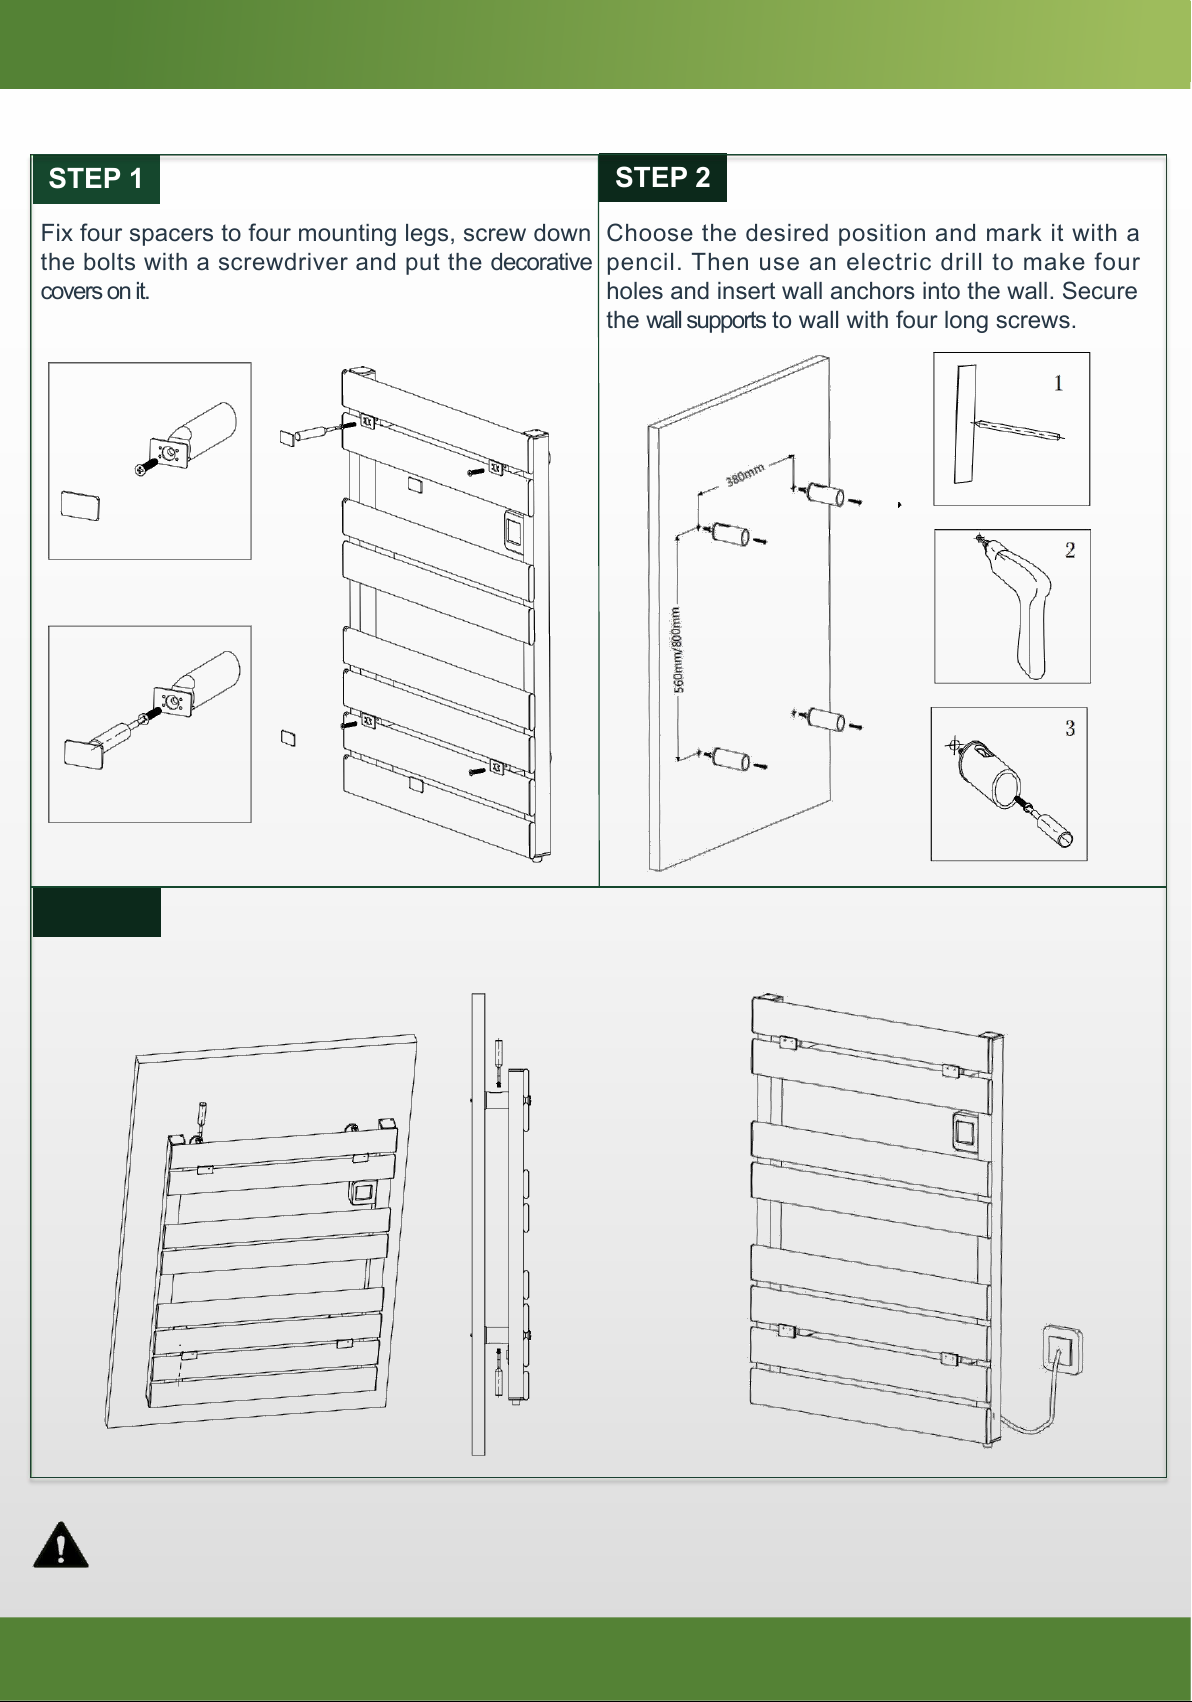
Warning: This device must be installed by a licensed electrician.

•The device must only be installed in an upright and fixed position in accordance with national installation
rules.
•The device is for indoor use only.
•Do not use the radiator with a programmer, timer, separate remote control system or any other device that
switches the heater on automatically, since a fire risk exists if the heater is covered or positioned incorrectly.
•Make sure the minimum safety distances from walls and objects stated in the installation instructions are
observed at all times. This is very important to prevent damage to walls, furniture and soft furnishings and
to prevent the product overheating.
•Do not use the device in rooms where contact with flammable or potentially explosive materials like dust,
gas or vapour cannot be avoided.
•Do not use in rooms or environments that have a corrosive atmosphere.
•Do not operate the device when wet. If the device gets wet during cleaning, allow it to dry out before using.
•Do not expose the device to water jets.
•Do not transport the device during operation.
•Do not sit on the device.
•Do not overload the socket used to power the device.
•Before carrying out maintenance, care or repair work on the device, ensure the device is unplugged. Do not
use the cable to tug the plug from the socket. Hold the plug by its housing and pull.
•Switch the device off and disconnect the power cable from the mains socket when the device is not in use.
•Allow the device to cool down before touching or transporting the device, or attempting maintenance work.
•The device must be placed where the switches and controllers cannot be touched by a person in a bathtub
or shower.
4
Series
GIA
Model No.
DE-GIA0785 (780*550mm)
DE-GIA1025 (1100*550mm)
Voltage
230V AC / 50Hz
Wattage
500W, 750W
Temperature setting
7–30 °C
IP rating
IP24
Appliance class
Class I
Power cable length
1.5m
WiFi frequency (2.4G band)
Operation frequency
Max RF power transmitted
2400-2483.5MHz
17.21dBm (52.6mW) < 20dBm (100mW)
2. TECHNICAL SPECIFICATIONS
INSTRUCTION MANUAL

3 INSTALLATION
Before installing, check that all fixings are complete, and the product is intact. The towel rail should only be
wall mounted with the manufacturer’s fixings.
3.1 Fixings
5
Wall support x 4
Bolt x 4
Spacer x 4Decorative cover x 4
Small screw x 4
INSTRUCTION MANUAL
Product x 1 Wall Anchor x 4
Mounting leg x 4
Long screw x 4
Distance between the center points of each wall bracket tube.
DE-GIA0785
DE-GIA1025

6
INSTRUCTION MANUAL
STEP 1
Fix four spacers to four mounting legs, screw down
the bolts with a screwdriver and put the decorative
covers on it.
STEP 2
Choose the desired position and mark it with a
pencil. Then use an electric drill to make four
holes and insert wall anchors into the wall. Secure
the wall supports to wall with four long screws.
STEP 3
Mount the towel rail to the wall and tighten the small screws in the wall supports.
3.2 Installation
Warning: To prevent potential safety hazards, it is recommended that
grounding and short circuit measurements be performed after installation
of the device. This should be done by a licensed electrician.

4. CONTROL PANEL
Boost Mode
Heating Mode
Mode Change
Open Window Detected
Program Mode
Connected to WiFi
The controller has below functional modes:
4.1 Standby Mode
4.2 Mode Switch
4.2.1 Heating Mode
4.2.2 Boost Mode
4.2.3 Program Mode
4.2.4 Comfort Mode
4.2.5 Eco Mode
4.2.6 Anti-Freeze Mode
Device is heating
Up Button
7
INSTRUCTION MANUAL
On/Off
Anti-freeze
Set Frame Temp&Timing
Down Button
Ambient Temperature
Comfort Mode
Child Lock
ECO Mode
Temperature Symbol
4.3 Child unlock
4.4 Supplementary functions
4.4.1 Temperature Compensation
4.4.2 Open Window Detection
4.4.3 °C/°F switch
4.4.4 WIFI on/off
4.5 Reset to Defaults
4.1 Standby Mode
After the heater has been plugged in, press the button to power on state.
4.2 Mode Switch
Press the button to change the mode.
Cycle through: Heating mode→Boost mode→Program mode→Comfort mode→ECO mode
•Set temperature can be adjusted by using the and buttons. The range is 30-70°C
in steps of 5°C. Press and hold the button to speed up.
4.2.1 Heating Mode--Frame Temp
•Symbol will be displayed in orange when heating and disappear when it is not
heating.
•Press the button to enter the heating mode. The default set temp is 50°C.

4.2.2 Boost Mode
8
INSTRUCTION MANUAL
•Set time can be adjusted by using the and buttons. The range is 1-8H in steps of
1H. Press and hold the button to speed up.
•Press the button to enter the boost mode. The device will stay working at the setting
boost hours at maximum performance 70°C. The default set is 2H.
•Symbol will be displayed in orange when heating and disappear when it is not heating.
4.2.3 Program Mode
•Press the button to select the program mode. When the icon displays on the
screen, you are in program mode.
•The default set is ECO mode for each day. It can be programmed only by the App.
•Symbol will be displayed in orange when heating and disappear when it is not heating.
•Set temperature can be adjusted by using the and buttons. The range is 7-30°C
in steps of 1°C. Press and hold the button to speed up.
4.2.4 Comfort Mode--Ambient Temp
•Symbol will be displayed in orange when heating and disappear when it is not heating.
4.2.5 Eco Mode--Ambient Temp
•Press the button to enter the comfort mode. The default set temp is 19°C.
•Set temperature can be adjusted by using the and buttons. The range is 7-30°C
in steps of 1°C. Press and hold the button to speed up.
•Press the button to enter the Eco mode. The default set temperature is 19°C.
4.2.6 Anti-Freeze Mode
When the sensor detects the temperature below 7°C while the device is powered off, it will enter anti-freeze
mode and heat up to 7°C to prevent frost.
•Frame temperature limit: If the internal temperature of the frame reaches 70°C, the
device will stop heating.
•Symbol will be displayed in orange when heating and disappear when it is not heating.
•Frame temperature limit: If the internal temperature of the frame reaches 55°C, the
device will stop heating.
•After heating at the setting hours, the device will be power off.
4.3 Child Lock
Use this function to prevent any change in the thermostat setting.
Press and hold the and buttons for 3 seconds to lock the display. The icon will
appear and all buttons will be locked except the standby button . Repeat the same
procedure to unlock it.

4.4.2 Open Window Detection (F1)
•Press the or button to select, there are three options for the open window
detection function: oF, 60 minutes and 90 minutes (The default set is oF).
•If the device detects a sudden drop in temperature (2°C or more within 5 minutes),
it will switch to anti-freeze temperature(fixed 7°C) for 60/90 minutes to prevent
energy wastage as heat escapes through the window.
•It will revert back to the previous mode after heating for 60/90 minutes. If the
temperature drops by 2°C within 5 minutes again, the device will continue to switch
to anti-freeze temperature(fixed 7°C), then cycle through.
The settings menu allows you to enable, disable and configure all the device’s supplementary functions.
Press to put thetowel rail into standby mode and hold down for 10 seconds to enter the settings menu.
Press button to to switch functions: Temperature compensation(F0)→Open window detection(F1)→°C/°F
switch(F2)→WiFi on/off(F3)
The temperature compensation setting allows users to adjust for any discrepancy
between the average room temperature and the temperature sensed by the
thermostat. For instance, if the temperature in the room is 18°C, but the radiator is
sensing 16°C, a compensation factor of +2°C will offset the difference.
•Press the or to adjust. The setting range is from -5~5°C in steps of 1 °C (The
default set is 0°C).
4.4 Supplementary functions
4.4.1 Temperature Compensation (F0)
This function enables the automatic detection of an open window when the device is
working.
9
4.4.3 °C/°F switch (F2)
INSTRUCTION MANUAL
This function enables to switch between Celsius and Fahrenheit.
•Press the or to switch. Press to select °F, and press to select °C. (The
default set is °C).
•Press the or to switch. Select “oN” to enable and “oF” to disable. (The
default set is oN).
This setting allows you to enable or disable the device’s connection to WiFi. Disabling
the connection is temporary: if you have already added the device to your app account,
disabling the connection will not remove it. You will be able to control via the app as
soon as you re-enable the connection.
4.4.4 WIFI on/off (F3)

4.5 Reset to Defaults
Press to put the device in standby mode. Press and hold the key for 10 seconds to restore the device
to default settings. The full screen will be displayed for 3 seconds and enter to power off state. Press to
turn on. The heating mode temperature is 50°, the boost mode is 2H, the program mode restores to the
default setting, the comfort mode temperature is 19°C, the Eco temperature is 19°C, the temperature
compensation is "0", and the open window detection is "oF", the temperature symbol is "°C", WIFI function
is "on".
10
5.1 Downloading the App
Download the APP onto your smart phone. You can find the app by scanning the QR code below or searching
“INOW” in the Google Play or Apple app store. Install and follow the app’s instructions to create an account.
5. CONNECTING TO WIFI
5.2 Connecting to the App
To put the device in pairing mode, press to enter power off mode and hold down button for 3
seconds until the screen switches to the connection screen. This begins a 99 seconds count down, giving
you 99 seconds to make the connection on the app.
5.3 Adding devices
Click “Add device” Click “Auto scan” Click “Add”
INSTRUCTION MANUAL

6.2 Control Interface
Set frame temperature
Current frame temperature
Set Program
Setting
PowerON/OFF
Choose mode
Adjust set temperature
11
6. USING THE APP
You can use the INOW app to control multiple devices. All devices are displayed on the home screen with
their status.
Possible statuses:
• Online – Heater will respond to app commands.
• Offline – Device is turned off at wall or power switch. It cannot be controlled by the app.
6.1 Home Overview
If the device successes to connect, “PS” will be shown on the display.
If the device fails to connect, “FL” will be shown on the display.
Troubleshooting
Problem
Action
the thermostat sensor has become
disconnected
Er is displaying
Enter your WiFi passwor Begin connecting and added
successfully
INSTRUCTION MANUAL
Up Button
Down Button
Current mode

12
6.3 Choose Mode
Tap the mode button on the interface to choose mode. The five options correspond
to the five modes on the control panel. Hot, Boost, Program, Comfort, Eco mode.
6.3.1 Heating mode, Comfort mode & Eco Mode
In heating, comfort and Eco mode, simply use the sliding dial to adjust the set room
temp.
6.3.3 Program Mode
Tap the program data icon on the control interface to configure a program.
INSTRUCTION MANUAL
6.3.2 Boost Mode
If you need a short boost maximum heating performance, then select the boost
mode, 1-8 hours options are available. Under the boosting, the mode can not be
changed and the temperature will be fixed at 70°C. After complete the working set
hours, it will come back to previous working mode automatically.
The icon will appear and the device will switch to anti-freeze temperature to
prevent energy wastage as heat escapes through the window.
7. DEVICE SETTINGS
Tap the setting icon to view and adjust the device’s settings. This menu allows you to configure several
settings not available through the control dial.
7.1 Child Lock
7.2 Temperature Compensation
Use the toggle switch to lock or unlock the radiator display. displays on the
screen when the device is locked.
You can adjust the temperature compensation in steps of 1 °C, from -5 ~5 °C.
7.3 Open Window Detection
7.4 Temperature Unit
You can select the temperature scale between Celsius and Fahrenheit.
A program consists of 24 hourly intervals for each day, which you can set to Comfort,
Eco or Anti-freeze temperature.
Tap the interval to choose Comfort (yellow bar), Eco (green bar) or Anti-freeze (blue
bar). You can drag the start and end times of each mode block to make setting your
program quick and easy.
8. DISPOSAL
In accordance with WEEE Directive 2012/19/EU, the icon with the crossed-out
waste bin on electrical or electronic equipment stipulates that this equipment must
not be disposed of with household waste at the end of its life. You will find collection
points for free return of waste electrical and electronic equipment in your vicinity.
The addresses can be obtained from your local authority.
The separate collection of waste electrical and electronic equipment enables the re-use, recycling and other
forms of recovery of waste equipment, and prevents any negative effects for the environment or human health.
This manual suits for next models
3
Table of contents
Popular Bathroom Fixture manuals by other brands

Signature Hardware
Signature Hardware KNOX 931416 instructions

Homewerks Worldwide
Homewerks Worldwide 3070-250-CH-B-WS manual

ExBrite
ExBrite JS-MC-1526 Installation and operating manual

Franke
Franke RODAN RODX672E Installation and operating instructions

Gessi
Gessi VENTI2O 65115 manual

KEUCO
KEUCO IXMO 59551 019501 Mounting instruction

Grohe
Grohe Lineare 32 109 manual

Hans Grohe
Hans Grohe Raindance Duschpaneel 27005000 Instructions for use/assembly instructions

Felton
Felton H2HSKCSRW installation guide

Franke
Franke ZSHOW0008 Installation and operating instructions

Gessi
Gessi Venti20 65001 manual

Ronbow
Ronbow E032439-WH Installation and care guide