Gigaset s79h User manual

S79H
Issued by
Gigaset Communications GmbH
Schlavenhorst 66, D-46395 Bocholt
Gigaset Communications GmbH is a licensee of the Siemens trademark
©Gigaset Communications GmbH 2009
All rights reserved. Subject to availability.
Rights of modification reserved.
www.gigaset.com
Bedienungsanleitung: (Mittelgrau) - BA_Phones_C-class
(Orange) - BA_Broadband
(Rot) - BA_Phones_VoIP
(Hellgrau) - BA_Phones_Essential
(Weiß) - BA_Home Media
20.01.09 V7
BlackCyan Magenta Yellow

1
Gigaset S79H – more than just a telephone
Gigaset S79H / IM1 EN / A31008-M2151-R101-1-4N19 / introduction.fm / 24.06.2009
Version 4, 16.09.2005
Gigaset S79H – more than just a telephone
Your telephone sets new standards for the way you communicate at home.
The configuration and user interface of the cordless phone are excellent,
providing you with first-class voice quality in speaker mode, while the USB port
offers you enormous flexibility.
The large TFT display, user-friendly keypad and clearly laid out menu are very
simple to use.
Your phone can do a whole lot more:
uYou can synchronise your Directories on your telephone, mobile phone and
PC via the USB port using the Gigaset QuickSync software (¢page 51).
uYou can save appointments (¢page 34) and anniversaries, e.g., birthdays
(¢page 29), in your phone and it will remind you of them in advance.
uYou can designate important people as VIPs to identify important calls from
the ringtone (¢page 27).
uYou can assign a picture to entries in the Directory – in future the picture will
appear every time you receive a call from this number (¢page 27).
uIf you do not want to take calls where the caller has withheld their number,
just set your handset to only ring if Calling Line Identification has not been
withheld (¢page 42).
uIf you do not wish to be disturbed, you can simply set up a time control so
that your phone will only ring when it is convenient (¢page 41). VIP calls
are still connected.
uYou can assign important numbers to the number keys on your phone.
The number is then dialled by simply pressing a key (¢page 39).
uYou can set the display to large font to increase readability in particularly
important situations (e.g., the Directory and lists) (¢page 40).
uYou can adapt the menu display to suit your individual requirements so
that only the most important functions (standard mode) or all functions
(expert mode) are displayed (¢page 23).
uGigaset Green Home – Be environmentally aware when using your phone.
Details about our ECO DECT products can be found at
www.gigaset.com/customercare.
You can find additional information about your phone at
www.gigaset.com/gigasets79h.
Have fun using your new phone!

2
The handset at a glance
Gigaset S79H / IM1 EN / A31008-M2151-R101-1-4N19 / overview.fm / 24.06.2009
Version 4, 16.09.2005
The handset at a glance
Illustration of handset on a base with SMS
functionality.
1Display in idle status
2Battery charge status (¢page 14)
3 Side keys
Set call (¢page 41) or
ringtone volume (¢page 41)
4Display keys (¢page 18)
5Message key (¢page 32)
Access to Call and Message Lists;
Flashes: new message or new call
6End call key, On/Off key
End call, cancel function, go back one menu
level (press briefly), back to idle status
(press and hold), activate/deactivate hand-
set (press and hold in idle status)
7Hash key
Keypad Lock on/off (press and hold in
idle status);
Toggles between upper/lower case
and digits
8Mute key (¢page 26)
Mute the microphone
9Microphone
10 Recall key
- Consultation call (flash)
- Insert a dialling pause (press and hold)
11 Star key
Ringtone on/off (press and hold);
with an open connection: switch between
pulse dialling/tone dialling (press briefly);
text input: open table of special characters
12 Headset socket (¢page 15)
13 Key 1
Dial Network Mailbox (press and hold)
14 Talk key
Flashes: incoming call;
Accept a call; open Redial List (press briefly);
start dialling (press and hold);
When writing an SMS: send SMS
15 Speaker key
Switch between earpiece and speaker mode
16 Control key (¢page 17)
17 Signal strength (¢page 14)
Green: Eco Mode (¢page 34) activated
iV
07:15
INT 1 14 Oct
Calls SMS
2
4
6
5
7
8
16
14
9
1
15
17
11
13
3
10
12

3
Display symbols
Gigaset S79H / IM1 EN / A31008-M2151-R101-1-4N19 / overview.fm / 24.06.2009
Version 4, 16.09.2005
Display symbols
The following symbols are displayed dependent on the settings and the operating status
of your telephone:
Ø«Ú
Signalling
External call (¢page 25)
ØåÚ
Internal call (¢page 26)
ió˝
Û08:00 07:15
INT 1 14 Oct
Ù¾
02 10 09 08
Calls SMS
ØðÚ
Anniversary (¢page 35)
ØìÚ
Alarm (¢page 36)
Signal strength i(¢page 34)
or Eco Mode+ icon ¼(¢page 34)
Ringtone switched off (¢page 42)
Keypad Lock switched on (¢page 20)
ØáÚ
Appointment (¢page 35)
Batteries are charged (¢page 14)
Charge status of the batteries (¢page 14)
Alarm switched on and wake-up time set (¢page 36)
Current time (¢page 13)
Current day and month (¢page 13)
Name of the handset
Number of new messages:
uÃon the Network Mailbox (¢page 32)
u™in the Missed Calls List (¢page 32)
u¾in the SMS List (dependent on base,¢page 31)
uin the Missed Alarms List (¢page 32)
V

4
Contents
Gigaset S79H / IM1 EN / A31008-M2151-R101-1-4N19 / S79hivz.fm / 24.06.2009
Version 4, 16.09.2005
Contents
Gigaset S79H – more than just a telephone . . . . . . . . . . . . . . . . . 1
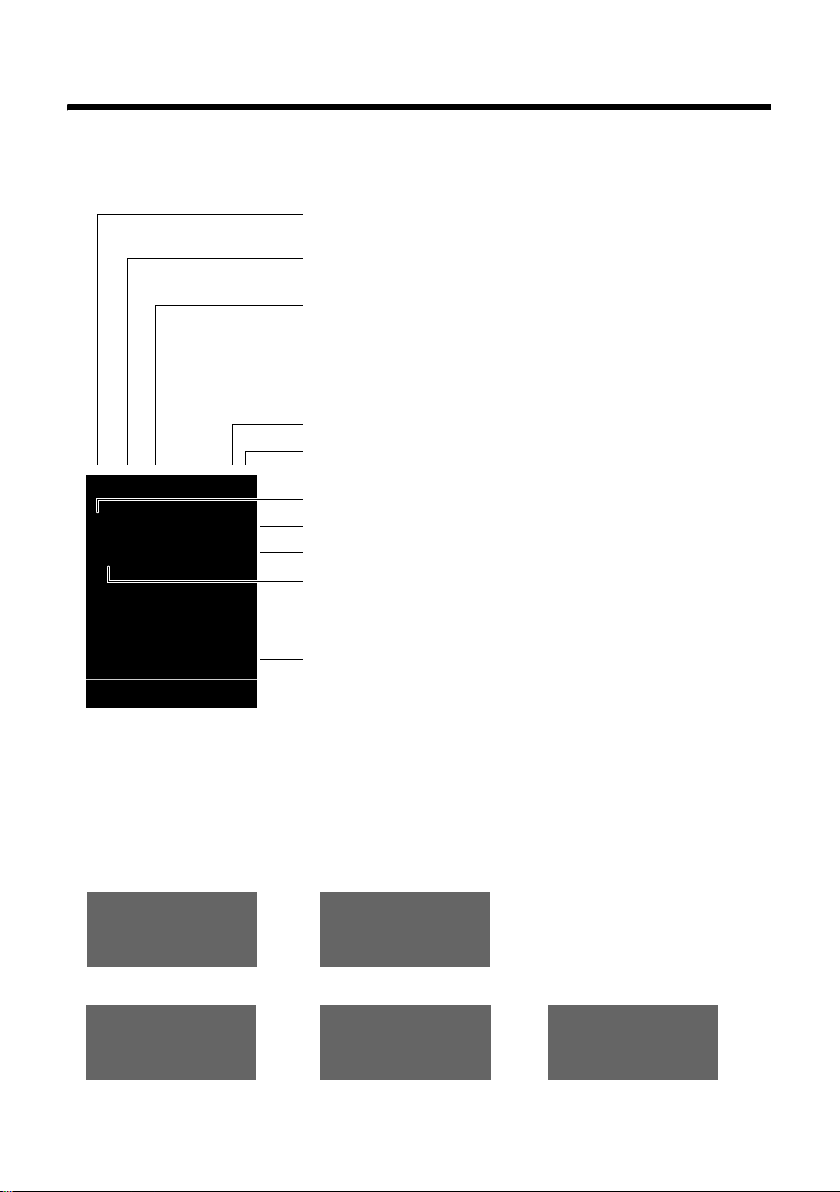
The handset at a glance . . . . . . . . . . . . . . . . . . . . . . . . . . . . . . . . . 2
Display symbols . . . . . . . . . . . . . . . . . . . . . . . . . . . . . . . . . . . . . . . . . 3
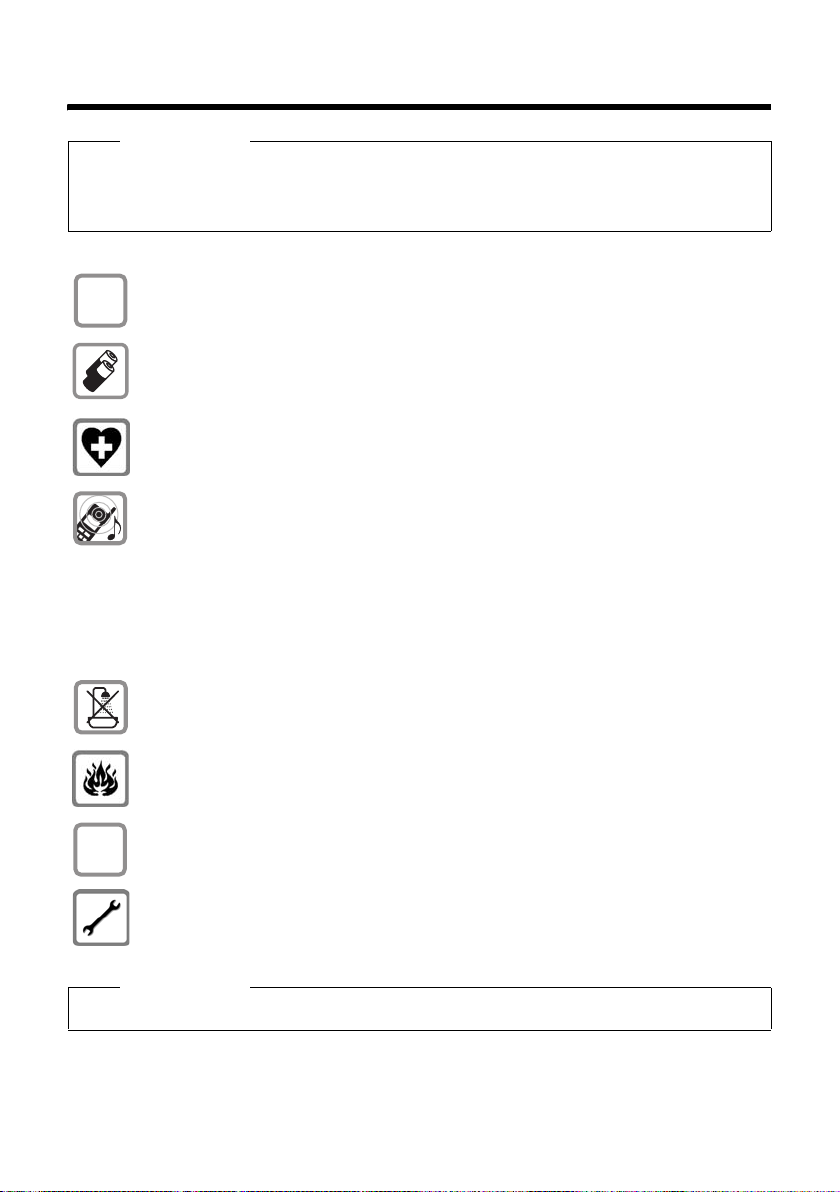
Safety precautions . . . . . . . . . . . . . . . . . . . . . . . . . . . . . . . . . . . . . . 6
First steps . . . . . . . . . . . . . . . . . . . . . . . . . . . . . . . . . . . . . . . . . . . . . 7
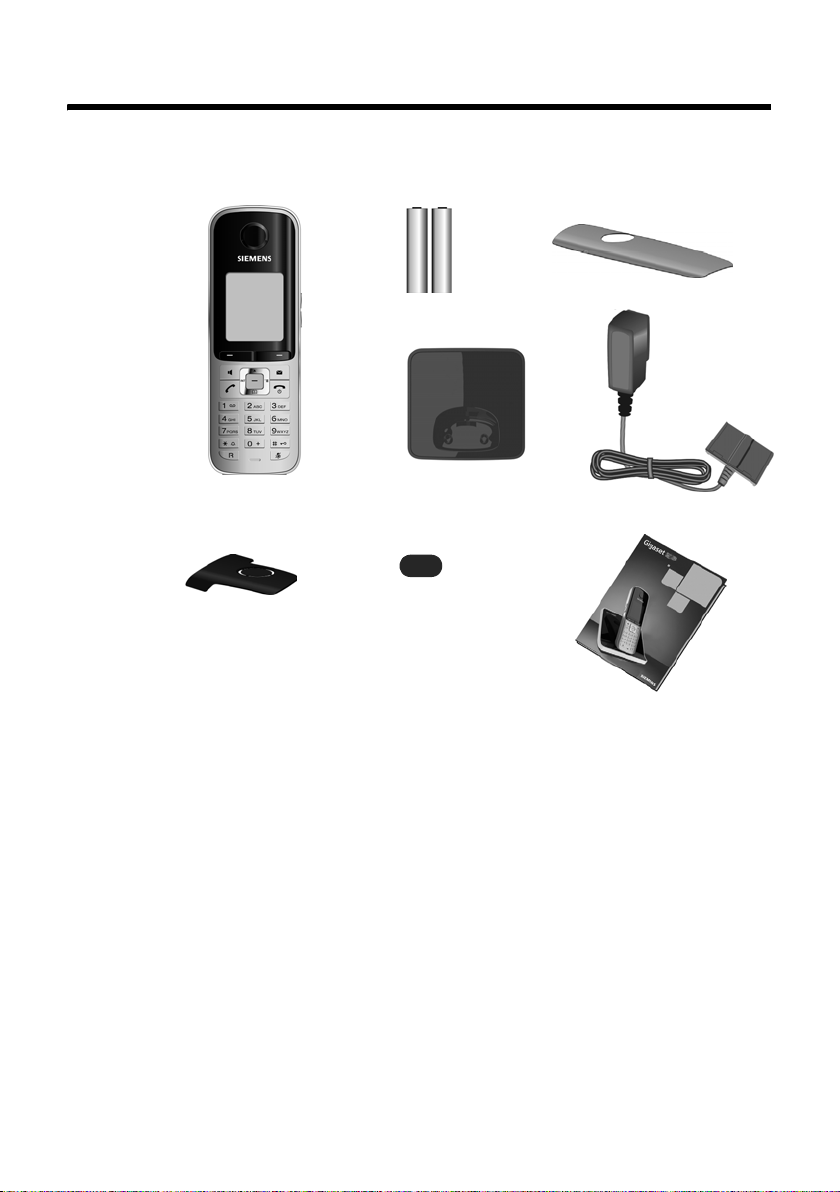
Checking the package contents . . . . . . . . . . . . . . . . . . . . . . . . . . . . . . . . . . . 7
Setting up the charger . . . . . . . . . . . . . . . . . . . . . . . . . . . . . . . . . . . . . . . . . . . 8
Connecting the charger . . . . . . . . . . . . . . . . . . . . . . . . . . . . . . . . . . . . . . . . . . 8
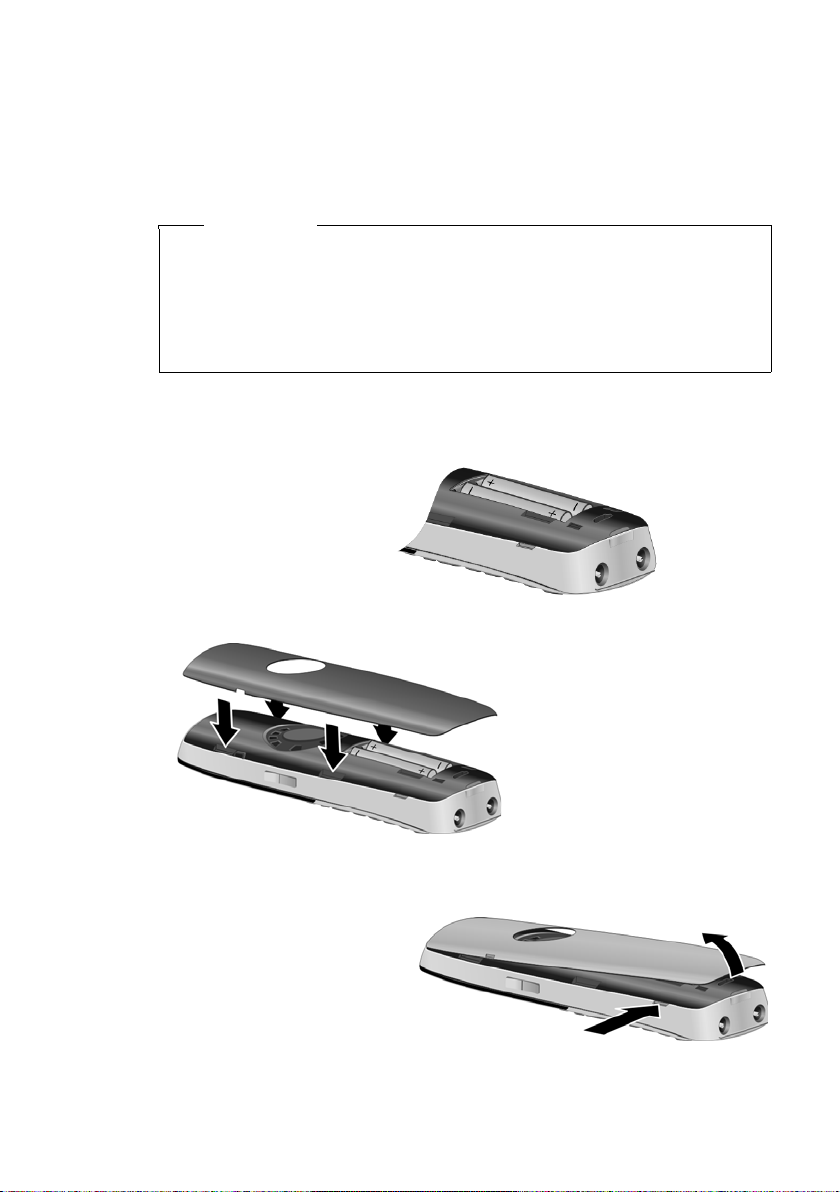
Setting up the handset for use . . . . . . . . . . . . . . . . . . . . . . . . . . . . . . . . . . . . 9
Registering the handset . . . . . . . . . . . . . . . . . . . . . . . . . . . . . . . . . . . . . . . . . 11
Setting the date and time . . . . . . . . . . . . . . . . . . . . . . . . . . . . . . . . . . . . . . . 13
Connecting the headset . . . . . . . . . . . . . . . . . . . . . . . . . . . . . . . . . . . . . . . . 15
Connecting the USB data cable . . . . . . . . . . . . . . . . . . . . . . . . . . . . . . . . . . . 15
What would you like to do next? . . . . . . . . . . . . . . . . . . . . . . . . . . . . . . . . . . 16
Using the phone . . . . . . . . . . . . . . . . . . . . . . . . . . . . . . . . . . . . . . . 17
Using the control key . . . . . . . . . . . . . . . . . . . . . . . . . . . . . . . . . . . . . . . . . . . 17
Using the display keys . . . . . . . . . . . . . . . . . . . . . . . . . . . . . . . . . . . . . . . . . . 18
Using the keys on the keypad . . . . . . . . . . . . . . . . . . . . . . . . . . . . . . . . . . . . 18
Using the side keys . . . . . . . . . . . . . . . . . . . . . . . . . . . . . . . . . . . . . . . . . . . . 18
Correcting incorrect entries . . . . . . . . . . . . . . . . . . . . . . . . . . . . . . . . . . . . . . 18
Using the menus . . . . . . . . . . . . . . . . . . . . . . . . . . . . . . . . . . . . . . . . . . . . . . 19
Activating/deactivating the handset . . . . . . . . . . . . . . . . . . . . . . . . . . . . . . . 20
Activating/deactivating Keypad Lock . . . . . . . . . . . . . . . . . . . . . . . . . . . . . . . 20
Using this guide . . . . . . . . . . . . . . . . . . . . . . . . . . . . . . . . . . . . . . . . . . . . . . . 21
Menu overview . . . . . . . . . . . . . . . . . . . . . . . . . . . . . . . . . . . . . . . . 23
Making calls . . . . . . . . . . . . . . . . . . . . . . . . . . . . . . . . . . . . . . . . . . 25
Making an external call . . . . . . . . . . . . . . . . . . . . . . . . . . . . . . . . . . . . . . . . . 25
Ending a call . . . . . . . . . . . . . . . . . . . . . . . . . . . . . . . . . . . . . . . . . . . . . . . . . 25
Accepting a call . . . . . . . . . . . . . . . . . . . . . . . . . . . . . . . . . . . . . . . . . . . . . . . 25
Using speaker mode . . . . . . . . . . . . . . . . . . . . . . . . . . . . . . . . . . . . . . . . . . . 25
Switching to mute . . . . . . . . . . . . . . . . . . . . . . . . . . . . . . . . . . . . . . . . . . . . . 26
Making internal calls . . . . . . . . . . . . . . . . . . . . . . . . . . . . . . . . . . . . . . . . . . . 26
Using the Directory and lists . . . . . . . . . . . . . . . . . . . . . . . . . . . . . 27
Using the Directory . . . . . . . . . . . . . . . . . . . . . . . . . . . . . . . . . . . . . . . . . . . . 27
Using the Redial List . . . . . . . . . . . . . . . . . . . . . . . . . . . . . . . . . . . . . . . . . . . 30
Using the Incoming SMS Message List (dependent on base) . . . . . . . . . . . . 31
Using the Call Lists . . . . . . . . . . . . . . . . . . . . . . . . . . . . . . . . . . . . . . . . . . . . . 31
Opening lists with the message key . . . . . . . . . . . . . . . . . . . . . . . . . . . . . . . 32
Using the Missed Alarms List . . . . . . . . . . . . . . . . . . . . . . . . . . . . . . . . . . . . . 32

5
Contents
Gigaset S79H / IM1 EN / A31008-M2151-R101-1-4N19 / S79hivz.fm / 24.06.2009
Version 4, 16.09.2005
Using the Network Mailbox . . . . . . . . . . . . . . . . . . . . . . . . . . . . . 33
Configuring fast access for the Network Mailbox . . . . . . . . . . . . . . . . . . . . . 33
Viewing the Network Mailbox message . . . . . . . . . . . . . . . . . . . . . . . . . . . . 33
ECO DECT . . . . . . . . . . . . . . . . . . . . . . . . . . . . . . . . . . . . . . . . . . . . . 34
Setting an appointment (Calendar) . . . . . . . . . . . . . . . . . . . . . . . 34
Displaying missed appointments, anniversaries . . . . . . . . . . . . . . . . . . . . . . 36
Setting the Alarm Clock . . . . . . . . . . . . . . . . . . . . . . . . . . . . . . . . . 36
Using a handset as a Room Monitor . . . . . . . . . . . . . . . . . . . . . . 37
Setting up the handset . . . . . . . . . . . . . . . . . . . . . . . . . . . . . . . . . 39
Quickly accessing numbers and functions . . . . . . . . . . . . . . . . . . . . . . . . . . 39
Changing the display language . . . . . . . . . . . . . . . . . . . . . . . . . . . . . . . . . . . 40
Setting the display . . . . . . . . . . . . . . . . . . . . . . . . . . . . . . . . . . . . . . . . . . . . . 40
Activating/deactivating Auto Answer . . . . . . . . . . . . . . . . . . . . . . . . . . . . . . 41
Changing the speaker/earpiece volume . . . . . . . . . . . . . . . . . . . . . . . . . . . . 41
Changing ringtones . . . . . . . . . . . . . . . . . . . . . . . . . . . . . . . . . . . . . . . . . . . . 41
Using the Resource Directory . . . . . . . . . . . . . . . . . . . . . . . . . . . . . . . . . . . . 42
Activating/deactivating Advisory Tones . . . . . . . . . . . . . . . . . . . . . . . . . . . . 43
Setting your own area code . . . . . . . . . . . . . . . . . . . . . . . . . . . . . . . . . . . . . 44
Restoring the handset default settings . . . . . . . . . . . . . . . . . . . . . . . . . . . . . 44
Service (Customer Care) . . . . . . . . . . . . . . . . . . . . . . . . . . . . . . . . . . . . . . . . 45
Questions and answers . . . . . . . . . . . . . . . . . . . . . . . . . . . . . . . . . . . . . . . . . 45
Authorisation . . . . . . . . . . . . . . . . . . . . . . . . . . . . . . . . . . . . . . . . . . . . . . . . . 46
Guarantee Certificate
United Kingdom . . . . . . . . . . . . . . . . . . . . . . . . . . . . . . . . . . . . . . . . . . . . . . . 46
Guarantee Certificate
Ireland . . . . . . . . . . . . . . . . . . . . . . . . . . . . . . . . . . . . . . . . . . . . . . . . . . . . . . 47
Caring for your environment . . . . . . . . . . . . . . . . . . . . . . . . . . . . 48
Appendix . . . . . . . . . . . . . . . . . . . . . . . . . . . . . . . . . . . . . . . . . . . . . 49
Caring for your telephone . . . . . . . . . . . . . . . . . . . . . . . . . . . . . . . . . . . . . . . 49
Contact with liquid . . . . . . . . . . . . . . . . . . . . . . . . . . . . . . . . . . . . . . . . . . . . 49
Specifications . . . . . . . . . . . . . . . . . . . . . . . . . . . . . . . . . . . . . . . . . . . . . . . . . 49
Writing and editing text . . . . . . . . . . . . . . . . . . . . . . . . . . . . . . . . . . . . . . . . . 50
Accessing additional functions via the PC interface . . . . . . . . . 51
Accessories . . . . . . . . . . . . . . . . . . . . . . . . . . . . . . . . . . . . . . . . . . . . 53
Mounting the charger on the wall . . . . . . . . . . . . . . . . . . . . . . . . . 53
Index . . . . . . . . . . . . . . . . . . . . . . . . . . . . . . . . . . . . . . . . . . . . . . . . 54

6
Safety precautions
Gigaset S79H / IM1 EN / A31008-M2151-R101-1-4N19 / security.fm / 24.06.2009
Version 4, 16.09.2005
Safety precautions
Warning
Be sure to read this user guide and the safety precautions before using your telephone.
Explain their content and the potential hazards associated with using the telephone to
your children.
Use only the power adapter supplied, as indicated on the underside of the base.
Use only rechargeable batteries that correspond to the specification pro-
vided on page 49, as this could otherwise result in significant health risks
and personal injury.
Using your telephone may affect nearby medical equipment. Be aware of the
technical conditions in your particular environment, e.g., doctor's surgery.
Do not hold the rear of the handset to your ear when it is ringing or when
speaker mode is activated. Otherwise you risk serious and permanent damage
to your hearing.
Your Gigaset is compatible with the majority of digital hearing aids on the mar-
ket. However, perfect function with all hearing aids cannot be guaranteed.
The handset may cause an unpleasant humming or whistling noise in hearing
aids or cause them to overload. If you require assistance, please contact the
hearing aid supplier.
Do not install the charger in bathrooms or shower rooms. The charger is not
splashproof (¢page 49).
Do not use your phone in environments with a potential explosion hazard
(e.g., paint shops).
If you give your Gigaset to a third party, make sure you also give them the
user guide.
Remove faulty bases from use or have them repaired by our Service, as they
could interfere with other wireless services.
Please note
Not all of the functions described in this user guide are available in all countries.
$
ƒ

7
First steps
Gigaset S79H / IM1 EN / A31008-M2151-R101-1-4N19 / starting.fm / 24.06.2009
Version 4, 16.09.2005
First steps
Checking the package contents
1One Gigaset S79H handset
2Two batteries
3One battery cover
4One charger
5One power adapter
6One belt clip
7One plastic headset socket cover
8One user guide
213
45
76 8

8
First steps
Gigaset S79H / IM1 EN / A31008-M2151-R101-1-4N19 / starting.fm / 24.06.2009
Version 4, 16.09.2005
Setting up the charger
The charger is designed for use in dry rooms in a temperature range of +5°C
to +45°C.
¤Place the charger on a level, non-slip surface or mount it on the wall
(¢page 53).
The phone's feet do not usually leave any marks on surfaces. However, due to
the multitude of different varnishes and polishes used on today's furnishings,
the occurrence of marks on the surfaces cannot be completely ruled out.
Please note:
uNever expose the telephone to the influence of heat sources, direct sunlight
or other electrical devices.
uProtect your Gigaset from moisture, dust, corrosive liquids and fumes.
Connecting the charger
Please note
Pay attention to the range of the base.
This is up to 300 m in unobstructed outdoor areas and up to 50 m inside
buildings. The range is reduced when Eco Mode (¢page 34) is activated.
¤Plug the power adapter into the plug
socket 2.
¤Connect the flat plug from the power
adapter 1.
To disconnect the plug from the charger,
press the release button 1and disconnect
the plug 2.
1
2
1
2

9
First steps
Gigaset S79H / IM1 EN / A31008-M2151-R101-1-4N19 / starting.fm / 24.06.2009
Version 4, 16.09.2005
Setting up the handset for use
The display and keypad are protected by plastic films.
Remove the protective films!
Inserting the batteries and closing the battery cover
Warning
Use only rechargeable batteries recommended by Gigaset Communications
GmbH * (¢page 49), i.e., never use a conventional (non-rechargeable)
battery, as this could result in significant health risks and personal injury.
For example, the outer casing of the batteries could be damaged or the
batteries could explode. The phone could also malfunction or be damaged
as a result of using batteries that are not of the recommended type.
* Gigaset Communications GmbH is a licensee of the Siemens trademark.
¤Insert the batteries
with the polarity in the
correct direction.
The polarity is indi-
cated in/on the battery
compartment.
¤First insert the battery
cover at the top a.
¤Then press the cover b
until it clicks into place.
T
o open the battery cover, for
instance to replace the batter-
ies, insert a coin into the cav-
ity on the left-hand side of the
casing, then pull the battery
cover in an upward direction.

10
First steps
Gigaset S79H / IM1 EN / A31008-M2151-R101-1-4N19 / starting.fm / 24.06.2009
Version 4, 16.09.2005
¤Insert the plastic cover provided for the
headset socket to ensure optimum sound
in speaker mode.
Attaching the belt clip
The handset has notches on each side to attach the belt clip.
¤To attach – press the belt clip
onto the back of the handset so
that the protrusions on the belt
clip engage with the notches.
¤To remove – press the centre of
the belt clip firmly with your
right thumb, push the fingernail
of your left index finger up
between the clip and the hous-
ing and pull the clip in an
upward direction.
Placing the handset in the charger
¤Place the handset in the charger with its display facing forward.
To charge the batteries, leave the handset in the charger.
Please note
Only place the handset in the charger that is intended for it.

11
First steps
Gigaset S79H / IM1 EN / A31008-M2151-R101-1-4N19 / starting.fm / 24.06.2009
Version 4, 16.09.2005
Registering the handset
A Gigaset S79H handset can be registered on up to four bases. You must initiate
handset registration on the handset and on the base.
When the registration process has completed successfully, the handset
returns to idle status. The handset's internal number is shown in the display,
e.g., INT 1. If not, repeat the procedure.
On the handset
On the base
Within 60 sec. press and hold the registration/paging key on the base
(approx. 3 sec.).
¤Press the key below §Register§ on
the display screen.
A message appears stating that the
handset is searching for a base that
is ready for registration.
Register
Please note
If the handset is already registered to at least one base, start the registra-
tion process as follows:
v¢Ï¢Registration ¢Register Handset
If the handset is already registered to four bases, select the required base.
Please note
For instructions on deregistering the handsets, please consult the base user
guide.

12
First steps
Gigaset S79H / IM1 EN / A31008-M2151-R101-1-4N19 / starting.fm / 24.06.2009
Version 4, 16.09.2005
Initial charging and discharging of the batteries
The correct charge level can only be displayed if the batteries are first fully
charged and discharged.
¤Charge the handset for 8.5 hours in the
charger.
¤Then remove the handset
from the charger and do
not replace it until the bat-
teries are fully discharged.
8.5 hrs
Please note
uAfter the first battery charge and discharge, you may place your handset
in the charger after every call.
uAlways repeat the charging and discharging procedure if you remove the
batteries from the handset and reinsert them.
uThe batteries may warm up during charging. This is not dangerous.
uAfter a while, the charge capacity of the batteries will decrease for tech-
nical reasons.

13
First steps
Gigaset S79H / IM1 EN / A31008-M2151-R101-1-4N19 / starting.fm / 24.06.2009
Version 4, 16.09.2005
Setting the date and time
Set the date and time so that the correct date and time can be assigned to
incoming calls, and so that the alarm can be used.
Date/Time
Date:
14.10.2009
Time:
00:00
Back Save
¤Press the key below §Time§ on the dis-
play screen to open the input field.
(If you have already set the time and
date, open the input field via the
menu, ¢page 24.)
The Date/Timesubmenu is shown on the
display.
¤The active input position flashes.
Enter day, month and year as an
8-digit number via the keypad,
e.g., 4Q2Q
QO for 14/10/2009.
Date/Time
Date:
31.01.2009
Time:
00:00
Back Save
Calls Time
Press the right or left control
key to change the input posi-
tion and correct an entry.
¤Enter the hours and minutes as four
digit numbers via the keypad,
e.g., QM5
for 07:15 am.
Change the input position with
the control key if necessary.
¤Press down on the control key to switch
to the Time input field.

14
First steps
Gigaset S79H / IM1 EN / A31008-M2151-R101-1-4N19 / starting.fm / 24.06.2009
Version 4, 16.09.2005
Display in idle status
Once the phone is registered and the time is set, the idle status is shown as in
this example.
Displays
uReception between the base and the handset:
–Poortogood:ÐiÑÒ
–Noreception:|flashes
Green: Eco Mode (¢page 34)
uCharge status of the batteries:
–yy{{(empty to full)
–yflashes red: batteries almost empty
–xyx{x{(charging)
uINT 1
Internal name of the handset
If Eco Mode+ (¢page 34) is activated, the ¼icon is displayed in the top left
corner of the display.
Your phone is now ready for use!
¤Press the key below §Save§ on the dis-
play screen to confirm your entry.
The display shows Saved. You will hear
a confirmation tone and the handset
will automatically return to idle status.
Back Save
Date/Time
‰
Saved
i V
07:15
INT 1 14 Oct
Calls SMS

15
First steps
Gigaset S79H / IM1 EN / A31008-M2151-R101-1-4N19 / starting.fm / 24.06.2009
Version 4, 16.09.2005
Connecting the headset
After removing the plastic cover, you can connect a
headset to the left-hand side of your handset with the
2.5 mm jack connector. HAMA and Plantronics M40,
MX100 and MX150 headsets are all suitable.
The headset volume corresponds to the settings for the
handset volume (¢page 41).
After using the headset, replace the plastic cover to
enable optimum sound in speaker mode.
A compatibility list of tested headsets can be found on
the Internet at:
www.plantronics.com/productfinder.
Connecting the USB data cable
To connect the handset to a PC, you can connect a standard USB data cable with
a mini-B connector to the back of your handset (¢page 51).
¤Remove the belt clip (if attached)
(¢page 10).
¤Remove the battery cover (¢page 9).
¤Connect the USB data cable to a
USB socket 1.
1

16
First steps
Gigaset S79H / IM1 EN / A31008-M2151-R101-1-4N19 / starting.fm / 24.06.2009
Version 4, 16.09.2005
What would you like to do next?
Now you have successfully set up your Gigaset, you will certainly want to adapt
it to your personal requirements. Use the following guide to quickly locate the
most important subjects.
If you are unfamiliar with menu-driven devices such as other Gigaset tele-
phones, read the section entitled "Using the phone" first (¢page 17).
If you have any questions about using your phone, please read the tips on
troubleshooting (¢page 45) or contact our Customer Care team (¢page 45).
Information on ... ... is located here.
Setting the ringtone and volume page 41
Setting the earpiece volume page 41
Setting Eco Mode / Eco Mode+ page 34
Transferring Directory entries from existing Gigaset
handsets to new handset(s) page 29
Connecting the phone to the PC page 51
g
g
g
g
g

17
Using the phone
Gigaset S79H / IM1 EN / A31008-M2151-R101-1-4N19 / starting.fm / 24.06.2009
Version 4, 16.09.2005
Using the phone
Using the control key
The side of the control key that you must press in the respec-
tive operating situation is marked in black below (top, bot-
tom, right, left, centre), e.g., vfor "press right on the control
key" or wfor "press the centre of the control key".
The control key has a number of different functions:
When the handset is in idle status
sOpen the Directory.
vOpen the main menu.
uOpen the Handsets list.
In the main menu
t, s, vor u
Navigate to the required function.
In submenus and lists
t/ sScroll up/down line by line.
In input fields
Use the control key to move the cursor up t, down s, right vor left u.
Press and hold vor uto move the cursor word by word.
During an external call
sOpen the Directory.
uInitiate an internal consultation call.
tAdjust the loudspeaker volume for earpiece and speaker mode.
Functions when pressing the middle of the control key
Depending on the operating situation, the key has different functions.
uIn idle status, the key opens the main menu.
uIn submenus, selection and input fields, the key takes on the function of
the display keys §OK§, §Yes§, §Save§, §Select§ or §Change§.
Please note
These instructions demonstrate the main menu being opened by pressing
the right of the control key and functions being actuated by pressing the
appropriate display key. However, if you prefer, you can use the control key
as described above.

18
Using the phone
Gigaset S79H / IM1 EN / A31008-M2151-R101-1-4N19 / starting.fm / 24.06.2009
Version 4, 16.09.2005
Using the display keys
The functions of the display keys change depending on the particular operating
situation. Example:
Some important display keys:
Open a menu for further functions.
Confirm selection.
Delete key: delete character by character/word by word from right
to left.
Go back one menu level or cancel operation.
Store entry.
Open the Redial list.
Using the keys on the keypad
c/ Q/ *etc.
Press the matching key on the handset.
~Enter digits or letters.
Using the side keys
ø/ ÷Press the keys on the right of the handset to set the volume for the
handset, ringtone, speaker, alarm, signalling of appointments
and the headset depending on the situation.
Correcting incorrect entries
You can correct incorrect characters in the input fields by navigating to the
incorrect entry using the control key. You can then:
uDelete the character to the left of the cursor with the display key Ñ
(press and hold to delete the word)
uInsert characters at the cursor position
uOverwrite the highlighted (flashing) character, e.g., when entering time and
date.
Back Save Current display key functions.
Display keys
Options
OK
Û
Back
Save
Þ

19
Using the phone
Gigaset S79H / IM1 EN / A31008-M2151-R101-1-4N19 / starting.fm / 24.06.2009
Version 4, 16.09.2005
Using the menus
Your telephone's functions are accessed using a menu that has a number
of levels.
The menu display can be complete (expert mode) or restricted (standard
mode). Standard mode is the active default setting.
Settings or functions that are only available in expert mode are marked in these
instructions with the •icon.
Switching between standard mode/expert mode and the menu overview
(¢page 23).
Main menu (first menu level)
¤When the handset is in idle status, press the right control key vto open the
main menu.
The main menu functions are shown in the display
with icons. The icon for the selected function is high-
lighted and the name of the associated function
appears in the display header.
To access a function, i.e., to open the corresponding
submenu (next menu level):
¤Use the control key pto select the required func-
tion and press the display key §OK§.
Briefly press the display key §Back§ or the end call
key ato revert back to idle status.
Submenus
The functions in the submenus are displayed as lists
(example on the right).
To access a function:
¤Scroll to the function with the control key qand
press §OK§.
Briefly press the display key §Back§ or the end call
key ato return to the previous menu level/cancel
the operation.
Settings
Ç·É
ÊËÌ
á Â Ï
Back OK
Settings
Date/Time
Audio Settings
Display
Language
Registration
Back OK
Other manuals for s79h
1
Table of contents
Other Gigaset Cordless Telephone manuals

Gigaset
Gigaset E260 User manual

Gigaset
Gigaset C67H User manual

Gigaset
Gigaset E295 User manual

Gigaset
Gigaset Gigaset A155 User manual

Gigaset
Gigaset Gigaset A16 User manual

Gigaset
Gigaset A1000 User manual

Gigaset
Gigaset AS300 User manual

Gigaset
Gigaset A420 User manual

Gigaset
Gigaset E560 A User manual

Gigaset
Gigaset Gigaset A24 User manual

Gigaset
Gigaset A400 User manual

Gigaset
Gigaset A540H PRO User manual

Gigaset
Gigaset SL910 User manual

Gigaset
Gigaset C575 User manual

Gigaset
Gigaset S820A User manual

Gigaset
Gigaset AS285 User manual

Gigaset
Gigaset A540h User manual

Gigaset
Gigaset M34 USB User manual

Gigaset
Gigaset C300H User manual

Gigaset
Gigaset C610ip User manual