Ginger Electronic ZXmore User manual

ZXmore & ZXmaster
User manual
designed by ginger-electronic.com
V1.9 - 06/2016 ZXmore & ZXmaster – user manual age 1 from 29

Contents
ZXmore & ZXmaster.......................................................................................................1
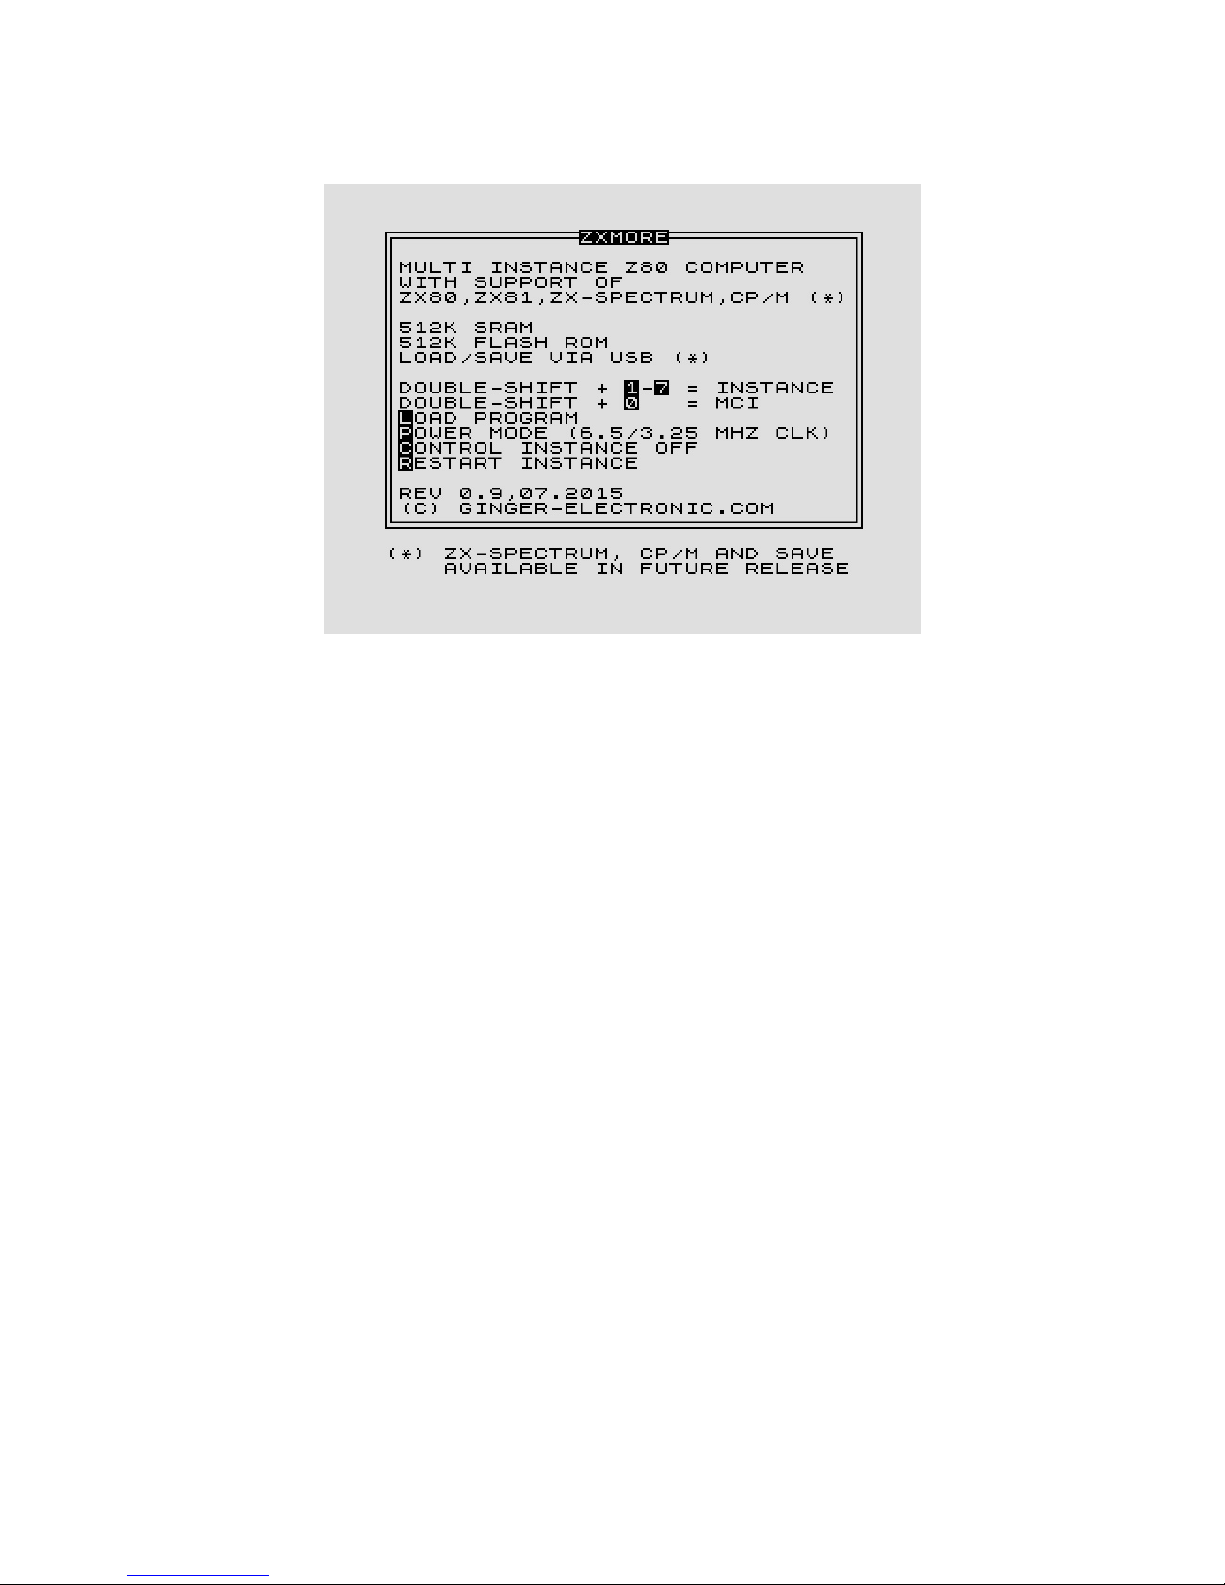
User manual..........................................................................................................1
Description:...................................................................................................................3
Connectors:...........................................................................................................4
Keyboard:.............................................................................................................5
First steps ith ZXmore:.................................................................................................6
ROM S itch...........................................................................................................6
Reset s itch..........................................................................................................6
Handling ith double-shift (DS)...............................................................................7
S itch to instance (DS-0 to DS-7)............................................................................7
Reset, arm boot, cold boot (DS-R).........................................................................8
Po er Mode (DS-P)................................................................................................8
Compatibility mode (DS-C)......................................................................................8
LOAD via USB (DS-L)..............................................................................................9
Debug functions:..........................................................................................................10
Test mode (DS-T).................................................................................................10
USB load test (DS-L).............................................................................................10
Update function:..........................................................................................................11
Update USB firm are............................................................................................11
Update ZXmaster through external update utility......................................................12
Recover of broken ZXmaster instance (emergency update)........................................13
Changes in release 1.7:.................................................................................................14
Speed optimization...............................................................................................14
ASCII mode / 128 char display mode......................................................................14
Load utility (load via USB).....................................................................................15
Debug monitor (DS-D)..........................................................................................16
Changes in release 1.8:.................................................................................................17
Configuration of instances......................................................................................17
Tools (load, save, debug)......................................................................................18
Changes in release 1.9:.................................................................................................19
Multitasking Mode.................................................................................................19
Extended SAVE.....................................................................................................20
System backup and restore....................................................................................20
VDRIVE interface..................................................................................................20
Appendix.....................................................................................................................22
Technical data ZXmore (hard are).........................................................................22
Features ZXmaster firm are..................................................................................22
Hard are concept of ZXmore.................................................................................23
Hints for programming the latches..........................................................................27
Legal notices........................................................................................................29
Disclaimer...........................................................................................................29
V1.9 - 06/2016 ZXmore & ZXmaster – user manual age 2 from 29

Descri tion:
This manual describes the operation of ZXmore ith the supplied firm are ZXmaster.
ZXmore is an 8 bit computer system hich is compatible to many systems based on the Z80
processor, especially to the Sinclair systems ZX80, ZX81 and ZX Spectrum plus the CP/M
system developed Digital Research (*). Programs and data can be stored on and read from a
simple USB flash medium (USB drive).
It is possible to use a serial terminal via an optional USB/RS232 adapter or just use the inbuild
keyboard and connected monitor or TV to the video connector in 40 char mode. An USB flash
medium ill also be used as disk drive to store and read data via CP/M.
The ZXmore is equipped ith an inbuild keyboard ith 40 keys, a video (RCA) connector for
use ith monitors or a TV (composite video monochrome) and 2 USB host ports for connection
of USB mass storage devices and other peripherals. Original hard are modules for ZX80 or
ZX81 can be used via the build-in expansion port (slot edge connector).
The ZXmore has 512k flash ROM and 512k RAM hich is divided into eight separate instances
ith 64k ROM and 64k RAM hich overlaps in the 64k address room. The border bet een ROM
and RAM can be moved in steps of 4k in any direction. The first instance (0) maintains all
other instances and deals ith additional hard are like USB peripherals, video output and
keyboard input.
The other seven instances can be configured ith different options and different operating
systems (firm are ROMs) hich can be operated in parallel changed by keypress or even in
multitasking mode. Several systems or firm are ROMs can be used concurrently ithout
starting them ne hen they are s itched. The memory layout can be configured individually
per instance and any additional driver can be loaded during startup.
The firm are ZXmaster handles the configuration and operation of all instances or operating
systems. The available ROM images to be used ith the ZXmore are published under GPL or
CC (creative commons) and may be used freely by the user. These additional firm are ROMs
are not part of ZXmaster and ZXmaster is not based on these ROMs. ZXmaster can clone any
Z80 system and is not fixed on some special ROM as long as hard are drivers for dealing ith
video display and keyboard are available or adapted.
More technical information on ZXmore, ZXmaster and available firm are ROMs to use or
supported are available in the appendix.
The manual refers to the first release 0.9 of ZXmaster ith basic functionality hich ill be
improved ith ne er versions from time to time.
(*) The current available release 0.9 of ZXmaster supports only programs for the systems ZX81 and ZX80 and loading
programs from a USB flash medium. Further releases support saving program and data on USB as ell as support of
ZX Spectrum ith monochrome display and use of CP/M.
V1.9 - 06/2016 ZXmore & ZXmaster – user manual age 3 from 29

Connectors:
In the picture belo you ill find all connectors of ZXmore:
Reset allo s reset of the current instance and return to the ZXmaster control soft are.
Power is a 3.5mm audio jack for connection of a po er supply ith 9V DC, 250mA.
Polarity is plus at the tip and minus at the ring of the plug. Alternatively the ZXmore can be
supplied ith po er ith a USB po er supply (5V).
USB represents t o host ports and can be used to connect flash drives or other peripherals
Video is a RCA jack for connecting a monitor or TV as display ith corresponding input.
The signal is of type composite video monochrome.
EAR is used to connect an audio cassette recorder to load a program from an original ZX80 or
ZX81 cassette (for compatibility). Optional for ZXmore V2.
MIC is used to save programs or data to an audio cassette ith audio signals instead of USB.
Optional for ZXmore V2.
Slot edge connector is the expansion port for using ZX80 oder ZX81 hard are add-on's.
ROM Switch can be used to s itch the instances manually in
position 1-7 or by control of the ZXmaster soft are in position 0.
Positions 1-7 can be used ith ZX80 or ZX81 only (corresponding
firm are ROM programmed in flash ROM assumed) due to a
suitable default configuration.
ZXmaster can configure the ZXmore for some more firm are
ROMs like for ZX Spectrum or CP/M.
Optional for ZXmore V2.
J12 can be used to choose a base i/o address for the additional
hard are features provided. Default address to be used should be
0x7C up to 0x7F but may be changed by the user hen additional
hard are requires this address. More information on usage of i/o
addresses can be found in the appendix of this manual.
V1.9 - 06/2016 ZXmore & ZXmaster – user manual age 4 from 29

Keyboard:
The ZXmore is equipped ith a keyboard ith 40 keys in a matrix of 4 x 10 keys.
The allocation ith key ords and functions differs from the chosen ROM in the instance (for
example ZX80 or ZX81) und is only for the letters, numbers and some special chars identical.
During construction of ZXmore you have to decide hether to use the ZX80 or ZX81 keyboard
layout.
The firm are ZXmaster allo s translation of one keyboard layout into another to use the same
layout for different ROMs. Loading and starting programs do not require special key ords.
LOAD and RUN are identical for both layouts. Different layout is a matter only during active
programming.
Layout ZX80:
Layout ZX81:
V1.9 - 06/2016 ZXmore & ZXmaster – user manual age 5 from 29

First ste s with ZXmore:
The ZXmore can be operated as desired ith manual s itching of the ROMs or alternatively
ith soft s itching via the keyboard ith ZXmaster.
ROM Switch
Position 1-7 choose a specific ROM firm are hich
must have been programmed before in the flash
ROM.
Only 8 positions are used from that s itch, 8-F have
the same function as 0-7. Position 0 selects the
ZXmaster control soft are hich allo s soft s itching
and even multitasking on request.
Position 1-7 are useful only for ZX80 and ZX81
compatible ROMs because of a default setup after
s itch on for RAM and ROM size and position and
some other control signals. Manual programming of
the internal registers is described in the appendix.
A colored LED (rgb) sho s the active instance ith a different color regardless if the instance
is running from the manual s itch or from ZXmaster control soft are:
0 = dark/off
1 = blue
2 = green
3 = cyan
4 = red
5 = violet
6 = yello
7 = hite
Manual s itching has the highest compatibility because the ZXmaster control routines are not
used and can not disturb any unkno n program ith some maybe hidden feature / hard are
control. But some functions are not available in manual operation liek change of keyboard,
s itching of instances, USB drivers for loading/saving data and some special display modes are
maybe not available.
Additionally the parallel operation of several instances is not available and after every s itch
the system is reset and does a ne po er-up (clear of RAM, etc.).
Reset switch
The reset s itch functions different depending on the context used. In manual operation
(position 1-7) the s itch does a cold start of the running instance. When pressing in position 0
the ZXmaster s itches back to instance 0 and does a arm start only. In this context the
instance information, status, RAM contents, etc. are not destroyed and can be continued hen
s itching back to these instances later. The last running program ill be continued.
It is possible and likely that the last running instance here reset as pressed is lost or
crashed as the last status could not be catched by the ZXmaster firm are and a restart may
fail. But all other instances are „frozen“ and can be continued after s itch back safely. Due to
the concept ith o n and dedicated RAM areas the other instances can not be disturbed under
normal circumstances.
V1.9 - 06/2016 ZXmore & ZXmaster – user manual age 6 from 29

Handling with double-shift (DS)
After s itching on you should be elcomed ith the start screen:
All control commands of ZXmaster function ith a double-shift key (DS shortened in the
manual) by shortly pressing the shift key t ice consecutively and a second key after (sho ed
invers in the start screen.
The key have to be pressed short and fast – the maximum timeout bet een t o keys may not
exceed 1 second for save detection. The reason for this control keys is that the normal ROMs
like ZX80 or ZX81 ouldn't influenced ith this key combination (double-shift has no special
meaning).
All double-shift keys are processed from the ZXmaster only and not detected by the
running instance.
Switch to instance (DS-0 to DS-7)
With DS and 0 to 7 you can s itch to the desired instance. If the instance is first used it ill be
automatically initialized and a second call ill just continue the program in the instance. The
firm are ZXmaster saves the information for all instances and stores all registers in memory
and the instruction pointer.
Instances can be interrupted any time by s itching to another instance and are continued after
s itching back. Technical the s itching is based on NMI hich are catched automatically from
instance 0 hich handels all necessary action. Even the keyboard processing is done by
instance 0 only and ill be injected to the current instance.
V1.9 - 06/2016 ZXmore & ZXmaster – user manual age 7 from 29

Reset, warm boot, cold boot (DS-R)
Additionally to the reset s itch it is possible to perform a reset by soft are through pressing
DS-R key combination. Used in instance 1-7 the current instance ill be restarted. Pressing the
reset s itch ill do a change to instance 0 but only ith a arm boot. There are circumstances
here a cold start is required hich can be forced by pressing DS-R in instance 0 hich ill
reset all other instances as ell.
A short interrupt of the po er supply results in a arm start only. There maybe situations
here an instance may hang or crashed and pressing DS-R for a single instance on't ork
because the display file is corrupt for example. In this case the instance 0 doesn't get control
back and all double-shift commands on't ork anymore. It is recommended to press the
reset key follo ed by a DS-R combination in instance 0 to solve this.
Power Mode (DS-P)
The default clock speed is 3.25 MHz for ZX80 or ZX81 hard are.
The effective clock speed is
much lo er ith approx. 0.81
MHz because the display
routines require much time of
the cpu and the user program
is interrupted many times.
The ZXmore can compensate
this disadvantage by doubling
the clock speed outside the
video routines to 6.5 MHz. The
resulting speed increases a bit
more than double due to some
more hard are optimizations.
The imaged screenshot sho s
the unofficial benchmark for
ZX81 systems and the speed
increase ith ZXmaster in
version 0.9
Sometimes a program may not ork correctly or maybe too fast. If this annoying the speed
can be changed to 3.25 MHz only hich is handled per instance. It is possible to active a fast
and a slo instance for example. Every DS-P key combination changes speed in current
instance from lo to fast or fast to lo consecutively.
Com atibility mode (DS-C)
The firm are ZXmaster supports the smooth operation of ZX81 instances. There may be
situations here a program used ith ZX81 does not behave in the same ay as on real
hard are. The compatibility mode may be chosen by the user in these cases to get a most
compatible environment by the price of losing control through ZXmaster hich can be
reactivated by pressing the reset s itch hen needed. Especially HRG programs executed in
version 0.9 may not display an image as the video handling is different.
Whenever programs do crash or not behave in the same ay as expected there may be a good
choice for the compatibility mode for these programs to run better. If the speed should be
decreased or a program loaded via USB flash disk this can be done first and then pressing
DS-C after.
V1.9 - 06/2016 ZXmore & ZXmaster – user manual age 8 from 29

LOAD via USB (DS-L)
The USB loader can be started ith DS-L from any instance (in version 0.9 only for ZX81).
The loader message appears
ith its version and the name
of the desired program can be
typed in. In the current release
the loader orks only for files
in the root system and 8.3
format file names (no LFN
support in this release).
The loading speed is about
150kByte / second and due to
technical reasons in FAST
mode only. So the screen may
flicker shortly hen loading
data or programs. The USB
flash medium should be
formatted ith FAT32 and file
names my entered ith chars,
digits and the point separator
for file names only.
Even long programs should be loaded instantly or at least ith a delay of a fe hundred
milliseconds only because programs normally should be smaller than 16kByte. So loading ill
be finished in pretty less than a second. The very first acces on a ne inserted USB flash
medium/drive may have a bit more latency.
If the requested file could not be found the error code 65535 ill appear (maybe just a typo).
If the USB medium/drive is not inserted or maybe rong formatted, the error code 65534 is
displayed. The loading can be aborted by pressing DS-L again in the enter mode. The
displayed error has to be confirmed by pressing any key.
If the instance 0 is called after loading data in another instance there may be displayed some
status information like the loaded filesize.
V1.9 - 06/2016 ZXmore & ZXmaster – user manual age 9 from 29

Debug functions:
Test mode (DS-T)
ZXmaster does not respong to normal key presses but to double-shift combinations. With DS-T
a test mode can be activated for keyboard testing.
The proper function of any key
is possible in this mode hich
ill just over rite the screen
ith the pressed character.
Only the base characters are
printed like 0-9, A-Z, dot and
space.
A press on NEWLINE ill put a
dash on the screen (-) and
SHIFT ill print the inverted
char. Additionally the scan
code of the key is displayed in
the first screen line plus some
status information.
USB load test (DS-L)
In instance 0 the load
command does not load a file
into the instance memory as
program but sho s the
information found hile
displaying the first and the last
128 chars as hex values on
screen.
First the status code is
displayed (FF00 for file found
on disk) follo ed by the size in
bytes and follo ed by the first
and last datablock.
Possible timing or loading
problems could be investigated
ith this feature. Normally a
file ill end ith a $80 char as
mark of End of VARS section
(E_LINE).
V1.9 - 06/2016 ZXmore & ZXmaster – user manual age 10 from 29

U date function:
As soon as an update for ZXmaster is available or a ne USB firm are to be loaded onto the
FTDI chip it should be installed for further use.
U date USB firmware
The USB chip can be updated or maybe do ngraded ith a special file on the USB flash drive.
These update files can be
stored permanently on the
stick and are installed only
manually on request by
activation the loader ith DS-L
and entering the corresponding
ROM file name. This orks only
in instance 0.
Update files are named ith
ZXMUSB plus a version number
and file extension „.ROM“.
Wrong rom files ill be ignored
from the USB chip and not
loaded.
After starting the update
procedure you should ait for
at least 10 seconds and do
nothing further – the USB chip
ill be flashed/reprogrammed in this time period. After 10 seconds the ZXmore should be
s itched off for at least additional 10 seconds (by s itching off po er – not just pressing
reset) and the system ill be ready to use after startup.
If the update succeeded a ne version message ill be displayed hen starting the loader
again ith DS-L. The first t o digits sho the version number, the follo ing 6 digits sho the
version date.
Attention:
It is recommended to use a dedicated USB flash medium only ith the ZXmore or ZXmaster
hich does not contain important or valuable data hich is not backed up first on a safe place.
You may find additional information in the appendix ith legal information and assumed
liability.
V1.9 - 06/2016 ZXmore & ZXmaster – user manual age 11 from 29

U date ZXmaster through external u date utility
There are t o different ays to update the ZXmaster firm are, through an external program
executed in a ZX81 instance or through the internal loader soft are of ZXmaster in future.
Updating from the very first version 0.9 requires the external program. Additionally the
external program allo s to recover an accidently broken or missprogrammed instance 0.
See additional instructions in chapter „emergency update“.
An instance of choice ith ZX81 compatible ROM has to be started like instance 1 in this
example. The led colour indicates the choosen instance (blue for instance 1). The update utility
can be loaded via the USB loader from the USB flash stick like ZXMORE17.P hile the last t o
digits indicate the version of the soft are (1.7). The BASIC program is started ith RUN. More
hints about loading programs are listed in the corresponding chapter.
It is necessary to add an additional
capacitor of 47pF to the ZXmore main
board bet een pin 27 and 29 of CPU
for models from 2015 or alternatively a
changed CPLD (12/2015).
Additionally the I/O base address has
been changed so the jumper at J12 has
to be moved from A7 to A3 after (!)
the update completed.
The further update process is supported
ith a text dialogue and asks for
several details about the system
configuration hich are necessary for
updating. The update is started by
entering the ord UPDATE in the input
line.
Next the number of the current (running) instance is required – in this example instance 1 ith
blue led colour. After the number of instance to program has to be entered, usually ould this
be instance 0 for ZXmaster.
It ould be possible to enter instance 7
for example to check the update
utility/process first on an uncritical
instance. If update process on instance
fails to any reason it ould be possible
to execute an „emergency update“ on
request as ell (see next section).
The third value required is the I/O base
address (J12). In release 0.9 the
address as fixed to A7, in current
release 1.7 this as changed to A3 due
to better compatibility and less hard are
conflicts and in future release this
maybe choosen by user individually as
ell.
Finally the update mode (normal or
emergency) may be choosen – normally
„N“ has to be entered here.
V1.9 - 06/2016 ZXmore & ZXmaster – user manual age 12 from 29

Some additional hints are sho n hat to
do last and after reading the process can
be initiated hile entering the ord
„START“ at the last input line.
The led is blinking in different colours
and the programming of the flash rom is
done as soon as space is pressed,
sho ing the led in hite colour for a fe
seconds.
When the colour flashes again in
different colours the programming is
finished and the ZXmore can be
restarted hile shortly removing po er
and pressing shift key hile po ering on
for a cold boot ith ne ram init.
Don't forget to change the I/O base address jumper J12 and take note of the required
capacitor if no CPLD ith date >12/2015 is used. The start screen in instance 0 comes back
and sho s the current version and release date (e.g. Rev. 1.7, 12/2015).
Recover of broken ZXmaster instance (emergency u date)
It could happen to break instance 0 accidently through rong programming commands inside
the loader soft are. There is a ay to recover a broken master instance (0) hen at least one
instance ith ZX81 rom is still running hen directly selected via the rom s itch. This ay the
update program has to be loaded in a different ay as the USB loader is not orking.
It is possible to load programs via the EAR input of the ZXmore as ell using audio equipment
like a PC soundcard playing a WAV file like provided in the update archive ith every ne
version (ZXMORE17.WAV for example). Loading via audio is quite slo ith about 38 bytes/s
and ould take up to 5 minutes for a 10kB program. Take note that a mono audio cable is
necessare ith 3.5mm connectors or a stereo cable ith mono adapters on both sides of the
cable. The output volume should be set maximum.
After entering the LOAD „“ statement in ZX81 basic a strip pattern is displayed hich changes
it's charateristics as soon as audio data is received correctly. This pattern may not be seen on
modern TV's ith lcd technology but sho n from old crt tubes. If you can not see you have to
ait the required time (about 5 minutes) to finish the program load. It is started ith RUN like
using the normal update but ith entering „Y“ for emergency update hile running instance
and instance to program and I/O base address have to be entered in the same ay as
described above.
But after first flashing of the coloured led the instance has to be s itched manually back to
instance 0 ( hen program startet by entering the ord START) and press space after s itching
to instance 0 to start the program procedure of flash rom. During programming the led colour
appears in hite for a fe seconds and begin flashing in different colours again. Then you
remove the po er, set the jumper like required (and remember/check the capacitor) and
repo er again hile shift key is pressed for initiating a cold boot ith cleared ram area.
If no ZX81 instance is available and Zxmaster is not running the flash rom has to be
programmed ith an external programmer.
V1.9 - 06/2016 ZXmore & ZXmaster – user manual age 13 from 29

Changes in release 1.7:
There are follo ing main changes from revision 0.9 to 1.7:
S eed o timization
The ne release 1.7 is quite faster
(271% speed instead of 236%) and
in comparison to a usual ZX81 ith
3.25 MHz it is speeded up by factor
2,7.
This speed as achieved through
changing NMI handling from many
short NMI's to just one NMI period
ith 31 or 55 interrupts depending
on video mode.
Through this speed optimization up
to 3 instances can later be run
concurrently ithout significant
speed loss.
ASCII mode / 128 char dis lay mode
Release 1.7 supports ASCII char set and display of 128 different chars ith upper and lo er
case and all ASCII special chars. The special chars are supported no during entering
filenames using the loader routine only (DS-L or double-shift-L).
All special chars display on the keyboard directly can be choosen ith the shift key. All
additional chars can be choosen ith shift-ne line combination.
The follo ing table sho s the char map in up to 4 different key layers:
By default only upper chars are active. The special chars sho n as ctrl can be reached
together ith shift and the additional alt chars can be reached ith shift-ne line and an
additional key hile leaving shift pressed.
$ can be choosen ith shift-U, ! ith shift-1, etc.
# can be choosen ith shift-ne line-L, @ ith shift-ne line-U, \ ith shift-ne line-V
The lo er chars can be choosen ith shift-9 (like graphics mode on ZX81) and lo er case is
active by default and upper case together ith shift hile special chars of the first layer (ctrl)
are available ith shift-ne line and the second special char layer (alt) ith shift-ne line-
ne line. This mode is quite useful hen using a text editor for example under operating
system CP/M. A second shift-9 deactivate the lo er case shift mode again for upper chars
ithout shift.
V1.9 - 06/2016 ZXmore & ZXmaster – user manual age 14 from 29
lo er => bnm. hjkl yuiop6789054321trewqgf savcxz+
upper=> BNM. HJKL YUIOP6789054321TREWQGFDSAVCXZ+
ctrl => <>,&%-+= "$()* ! '/?;:
alt => `~^_ # '@[] {} \! |

Load utility (load via USB)
The load utility as revised from the first 0.9 release and allo s entering filenames ith all
allo ed special chars but still restricted to 8.3 filename rule (8 chars for name and 3 chars for
extension).
A bug in the loader soft are as remove hich prevented loading some files ith $ff at the
end of datablocks/chunks. Additionally it is possible to reset the USB communication if a
loading process as interrupted ithout removing po er. Simply an empty entered line resets
the USB chip (ne line ithout any filename/char).
While adding an exclamation mark at the end of the filename input line the instance ill
automatically started ith this program and removed instance control like DS-C does.
An example ould be TESTBILD.P!
From release 1.7 on the loader supports loading data to different address areas in memory
(RAM) like drivers or similar. At the end of the filename the loading address is added ith a
colon and the address decimal or hexadecimal ith leading $.
DRIVER.BIN:$2000
DATA.BIN:32768
Additionally loading of data can be done for other/foreign instances as ell or prior loading any
program. The loader can be executed in instance 0 and load files to any address of any
instance hile adding the instance number ith a colon.
DRIVER.BIN:$2000:1
DATA.BIN:32768:2
The example loads driver.bin in instance 1 at address $2000 and data to address 32768 of
instance 2.
The loader supports additionally programming of binary rom code in the flash of instances to
maybe choose a different or modified rom.
DRIVER.BIN:$2000:3#
ZX81.ROM:0:1#
SPECIAL.ROM:0:2#
The first example loads a driver not in ram but in flash rom at address $2000 of instance 3.
The ZX81 rom is programmed to address 0 of instance 1 and a modified custom rom is
programmed to address 0 of instance 2. To distinct ram and rom a hash sign # is added for
flash programming (# can be entered ith shift-ne line-L).
When programming flash you should take care of un anted typos hich may destroy contents
of an instance accidently.
The loader test function has been changed and loads a file from USB flash stick into memory at
address $8000 by default. This ay it is possible not just to check the first and last 128 bytes
but check the hole contents ith the debug utility for example (see next section).
V1.9 - 06/2016 ZXmore & ZXmaster – user manual age 15 from 29

Debug monitor (DS-D)
A debug monitor as introduced in release 1.7 and can be activated ith shift-shift-d and
allo reading of ram areas of any instance. An address can be choosen ith A either decimal
or hexadecimal and the memory area can be inspected easily hile bro sing up and do n ith
the keys 6 and 7. The instance can be choosen ith I.
In this release it is possible to sho ram contents properly only. When choosing rom address
areas there is only the rom contents of instance 0 sho n. Future versions may have more
functionality on request.
V1.9 - 06/2016 ZXmore & ZXmaster – user manual age 16 from 29

Changes in release 1.8:
The update to release 1.8 could be easily done ith the program ZXMORE18.P in the same
ay like the update to release 1.7 (see section 1.7 for more details). The update can be done
either from version 1.7 or from the very first release 0.9.
In release 1.8 you may use not just one address line
like A7,A6.A5,A4 or A3. If required you may combine
several or address lines and enter a specific io address
hich can be entered ith a leading zero.
The actual used io address is required as ell as the
possibly ne (changed) address. Every time you ant
to change the io address you have to use the update
utility ZXMORE18.P and do a ne update as the
address has to be patched in several rom addresses
and could not be determined automatically during
start.
Configuration of instances
After updating the po er should be removed shortly and (!) the io address must be changed to
the ne given address. When doing a cold boot, the ne version 1.8 should be printed on
screen and any keystroke ill sho the (default) configuration of the instances. The cold boot
can be forced hile pressing shift key during po er-up or hen pressing the reset s itch.
Any instance can be started directly ith
any digit 1-7 on the keyboard or alternately
using the double-shift key. Returning to
ZXmaster is possible ith DS-0 only or hen
pressing the reset s itch.
Pressing reset ill restart the last active
instance automatically. So the best choice
ould be using DS-0 to return to ZXmaster
rather than pressing reset. Any ay the reset
key is needed in ZX80 instances or hen the
Ctrlbit is set off (CtrlOff) to remove control
of ZXmaster.
The default configuration after updating can
be changed ith E (edit). The navigation in the instance table is quite easy ith the arro
keys. First the desired entry should be selected using arro up/do n and arro right activates
the edit mode for this dataset. Options can be changed alternately hile pressing arro
up/do n hile arro right moves to the next option field. At the end of line the mode returns
to select an instance.
An asterisk in front of any instances sho s if it as started already. In edit mode an instance
can be reset ith R or it can be reset ith DS-R in the active instance. Pressing DS-R in
instance 0 (ZXmaster) ill force a cold boot of the hole system.
V1.9 - 06/2016 ZXmore & ZXmaster – user manual age 17 from 29

W ( rite) allo s to rite the individual configuration data into the flash rom of ZXmaster to
store there for the next cold boot or po er-up. If there should be any problem ith rong data
the default configuration can be forced hile pressing reset, shift and „C“ (clear) together. The
configuration can be changed any time on the fly ithout changing the configuration ritten to
the flash rom loaded during a cold boot.
The first option allo s to use the type of operating system (ZX80 or ZX81). Please take note
that this does not program any rom file to the instance flash – this has to be done manually
like described in release 1.7 using the loader hile the loader moved to the tools menu in 1.8.
Speed may be changed on request (6.5 or 3.25 MHz). Memory configuration is done hile first
using the start address of RAM (8k, 12k or 16k) and than toggling the second value if memory
is mirrored ith a limit of 32k – resulting in 40k, 44k or 48k – or using full memory till 64k.
The last Ctrlbit selects if control of ZXmaster should be active or not. It is deactivated
automatically for ZX80 but can be deactivated for one or more instances on request to have
more compatibility to specific ZX81 applications anting a real ZX81 ith no modifications. It
is not possible to use USB load or save hen control is off. There is also the chance to load a
program first in a started ZX81 instance ith DS-L and remove control right in the moment
hen ZXmaster s itches back to the instance. This can be done hile adding an exclamation
mark at the end of the filename – like „ZX81PROG.P!“.
Tools (load, save, debug)
Load, save and debug have been moved to the tools menu.
To save data to USB using DS-S in ZX81 instances you have to update the release of the USB
controller chip to release 1.8 as ell hile loading it ith the follo ing syntax:
ZXMUPD18.ROM:U#
The file ZXMUPD18.ROM has to be copied first to the USB flash medium and after this
command you should ait at least 3 minutes to give enough time to the USB controller to
re rite it's o n configuration in the internal USB flash. The programming is not finished hen
it returns back to the instance configuration screen. Please don't use the ZXmore during this
timespan and don't s itch it off as this could possibly prevent a restart of the ZXmore. After 3
minutes the system can be rebooted ith a ne po er on and the update of the ne version
can be checked hile activating the loader ne via the tools menu:
The release sho n should be 18/01.2016 (release 1.8, january 2016).
The loader can be quit hile entering an empty line (NEWLINE only).
In the ZX81 instance the loader can be used ith DS-L (load) or DS-S (save) directly and
allo s saving of partly RAM data as ell.
Changes & bugfixes:
•NTSC display mode orks correctly ith the NTSC/PAL jumper
•flash rom allo s partly data ritten to a 4k sector hile holding existing data
V1.9 - 06/2016 ZXmore & ZXmaster – user manual age 18 from 29

Changes in release 1.9:
The update to release 1.9 can be easily done ith the program ZXMORE19.P in the same ay
like the update to release 1.7 or 1.8 (see section 1.7 for more details). The update can be
done either from version 1.7 or 1.8 directly.
From release 1.8 you may use not just one address
line like A7,A6.A5,A4 or A3. If required you may
combine several or address lines and enter a specific
io address hich can be entered ith a leading zero.
The actual used io address is required as ell as the
possibly ne (changed) address. Every time you ant
to change the io address you have to use the update
utility ZXMORE19.P and do a ne update as the
address has to be patched in several rom addresses
and could not be determined automatically during
start.
Multitasking Mode
Ne in release 1.9 is the multi tasking mode hich allo s parallel execution of several
instances at the same time (quasi-parallel). The screen of the foreground task is displayed and
gets the keyboard input hile all background tasks run ithout display and keyboard input.
Multi tasking mode can be s itched on and off ith DS-M (toggle mode). S itching on is
possible only if more than one instance is running. The foreground instance gets al ays 50%
of cpu time hile the other instances share the other 50% of cpu time hile they are executed
in a round-robin manner. The foreground task is executed al ays in the top margin hile all
other instances are executed in the bottom margin. Background tasks change every frame.
When running 2 instances, all background task get 50% cpu time, hen running 3 instances
this ill result in 25% and ith 4 instances in 16.5% and so on. A specific configuration is not
possible ether necessary. Multi tasking can be s itched off any time ith DS-M (double shift-
M). Additional it's possible to change the active foreground instance ith DS-1 to DS-7 hile
running multi tasking mode to maybe proof the progress of any background task.
There are follo ing restrictions for the multi tasking mode:
* only running ith PAL (no NTSC)
* only ith RAM mirror set (max. 32k RAM) or CPLD version 06/2016
* only text is displayed (no HRG)
* frame counter does not correspond to time or frames elapsed
Multi tasking is not reliable ith NTSC display and may result in instance crash due to strong
timing requirements. If many or fast changes from FAST to SLOW and back there may be also
crashes possible. This can be prevented ith reducing memory to 32k RAM hile turning RAM
mirror on or ith a ne er CPLD (version 06/2016). Choosing RAM mirror is a reliable
orkaround. The reason for this behaviour is the video mode detection necessary during video
display and A15 handling together ith the extended M1 NOT mode over the complete address
area. There maybe situations in FAST mode here video display is not detected and reading
DFILE from the upper 32k instead of the lo er 32k.
Due to technical reasons only text display is sho n during multi tasking mode. Programs ith
high resolution graphics can be run but the result in the display is not sho n. A suitable ork
around is to temporarily s itch off this mode ith DS-M, check the graphics content and
continue multi tasking again ith DS-M.
V1.9 - 06/2016 ZXmore & ZXmaster – user manual age 19 from 29

The colour LED may flicker during multi tasking and sho a mixed colour depending on the
active background instances.
Extended SAVE
From release 1.9 the user can store a complete instance rather ith hole RAM content (56k
from 8192-65535) and load such a complete instance later and continue at the interrupted
instruction. Normally ZX81 programs are saved only partly ith a part of system variables,
program and defined variables but no further memory areas or stack or similar.
Storing a complete instance can be done ith the normale „SAVE“ (DS-S) and choosing a file
extension ith .BAK. In the same ay instances can be loaded ith DS-L and ill be
automatically continued right after loading. This is an easy ay to do complete instance
backups and save the ork completely.
Especially after complex or time-consuming configurations ith loading different drivers to
different memory areas or during testing this may be a very comfortable feature. It is even
possible to clone complete instances hile storing instance 2 and load it into instance 3 in
parallel or to store a game not finished yet or similar tasks.
System backu and restore
In the same ay as described for single instances it is possible to do a complete system
backup of ZXmore ith all instances and to easy restore after po er-on. There are 2 ne
options in tools menu in instance 0 (ZXmaster), named backup and restore.
The data is stored into a single file ith fixed name (ZXMASTER.BAK) and ill be restored on
request. Only active (running) instances ill be stored resulting in 56 to 392 kByte size
depending on the configuration. Backup is available in tools menu only in instance 0.
Restore is possible either ith selecting restore from the tools menu or even a bit faster hile
pressing NEWLINE during reset or hile po ering-on. If a cold start as requested or after a
longer time po er-off the screen ith version info is printed first. If NEWLINE is pressed as
any key the restore is called, if pressing any other key it ill not be restored automatically.
Storing ill take some time depening on speed of USB flash media as ell but can be
calculated ith approx. 2 seconds per instance or up to 15 seconds for all instances or maybe
even longer. There is no video display available during backup or restore due to technical
reasons (FAST mode). Loading sytem backup (restore) ill take about half of that time, so 1 to
7 seconds depending on ho many instances are choosen for backup.
VDRIVE interface
Release 1.9 has a very first implementation of the VDRIVE interface hich requires a small
driver (ZXMVDRIV.ROM). This driver has to be loaded manually to address 8192 at RAM or
programmed in flash ROM and supports 3 entry points:
8192 (BASIC interaktiv)
8195 (BASIC program)
8198 (machine program /USR)
The syntax for all 3 entry points identically and supports follo ing commands:
L FILE.P
L DRIVER.BIN,32768
S FILE.P
S MEMORY.BIN,$8000,$4000
V1.9 - 06/2016 ZXmore & ZXmaster – user manual age 20 from 29
This manual suits for next models
1
Table of contents