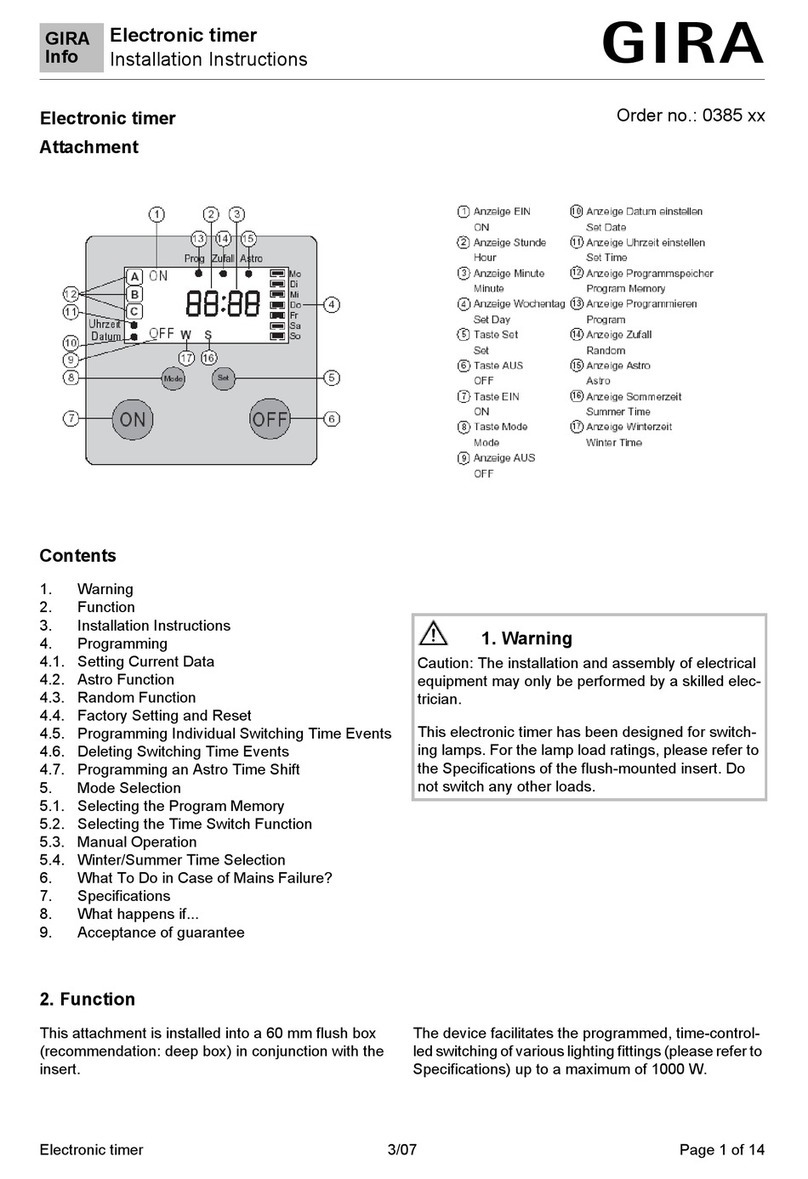
Gira 0385 Series User manual

GIRA
Info Electronic Timer
Installation Instructions
Electronic Timer 12/96 Page 1 of 8
Electronic Timer Order No.: 0385 ..
Einstellen Enter
Man/Auto
AutoManuell Zufall Astro
Tag Prog
Di
Mi
Do
Fr
Sa
So
Mo
Woche
EIN AUS
ON
OFF
1. Description of Functions
The Electronic Timer supported by a Microprocessor is placed into
a 58 mm recessed box and free of maintenance.
A reted load of max. 1000 VA can be controlled. The Timer is
equipped with 9 memory registers free programmable for one
Switch-on respectively one Switch-off Time each. These times can
be coordinated to any combination of weekdays.
The Timer is equipped with 4 types of operation:
1.) Manual Mode (see chap. 4.1)
Connected loads can be switched by means of keys.
2.) Automatic Mode (see chap. 4.2)
Programmed Switch Times are being realized.
3.) Operation with Random Generator (see chap. 4.3)
Programmed Switch Times will be varied up to ±15 min. to
simulate presence of persons.
4.) Operation with Astro Mode (see chap. 4.4)
Programmed Switch Times will be adjusted to times of sunrise and
sunset.
Combinations of various modes are possibles.
Programmed Switch Times will not be activated during manual operation.
Manual operation is superior to automatic types of operation.
Power failure clears the display. In case of power failure of up to 2 hours all programmed data remain.
Should failure last longer than 2 hours, controller switch to manual operation after return of power,
display flashes until pushing any optionalkey. Following a re-setting of the actual time, calendar week
and weehday is essential (see chap. 3.1 - 3.5).
Should the Timer not react on pushing keys (due to false operation), pull off the plugged-on
controller unit for at least 20 minutes. By doing so a reset for the internal microprocessor is garanteed.
Programmed data remain uneffected.
2. Installation and Starting
2.1 Wiring Diagram
Caution: The installation and assembly of electrical equipment
may be carried out only by a skilled person.
Neutral conductor required!
Attention, warning of danger:
The electronic timer was developed for automatic switching of lighting fixtures. In case that they are
used for other purposes which might cause risks (e.g. switching of heaters), the user should prevent
such risks by applying additional appropriate safetly measures.

GIRA
Info Electronic Timer
Installation Instructions
Electronic Timer 12/96 Page 2 of 8
Selection of
maual-/auto-
matic mode
Automatic
mode on Time
Display
Summertime
Display
Wintertime
Display
Day
Programming
of Switch TimeTime
Calendarweek Day
Summer-/Wintertime
On
Off
Switch Time No.
Manual mode
A
utoManuell Zufall
A
stro
Tag Prog
Di
Mi
Do
Fr
Sa
So
Mo
Woche
Einstellen Enter
Man/Auto
OffOn
Selection of adjustment mode Enter
Random
mode on Astro
mode on
EIN AUS
ON
OFF
Adjustment of
2.2 Original Setting
After switching on to mains for the very first time, the activation of the LCD-display may take up to
60 s, showing:
Monday 00:00, Wintertime, Calendarweek 1, Manual Mode
2.3 Programmed Switch Times ex work
Switch Times 1 and 2 are pre-programmed and individually variable:
Switch Time 1: mon - fri 7.00 Uhr On 22.00 Uhr Off
Switch Time 2: sat - sun 8.30 Uhr On 22.00 Uhr Off
Flashing displays and all keys required for activating the respectivefunctions appear in red.
3.1 Transition to Setting Mode
Touch key Einstellen (Adjustment), then touch key Enter within
2 s.
Should there be no key activities for 5 minutes, the setting mode
will automatically be left. Key Einstellen (Adjustment) interrupts
setting mode any time.
All dates confirmed with Enter remain.
Basically all dates can be changed via keys EIN (ON) or AUS (OFF). Dates are being transferred
to the Timer with with key Enter, followed by next point of menu.

GIRA
Info Electronic Timer
Installation Instructions
Electronic Timer 12/96 Page 3 of 8
Einstellen Enter
Man/Auto
AutoManuell Zufall Astro
Tag Prog
Di
Mi
Do
Fr
Sa
So
Mo
Woche
ON
OFF
3.2 Setting of Summertime/Wintertime
Symbol is marked (dot under ), adjusted symbol flashes.
Set Summertime/Wintertime via key EIN or AUS.
Confirm with Enter.
Einstellen Enter
Man/Auto
AutoManuell Zufall Astro
Tag Prog
Di
Mi
Do
Fr
Sa
So
Mo
Woche
ON
OFF
3.3 Calendarweek
Dot is forwarded to „Woche“ (week), adjusted calendarweek
flashes. Set with key EIN or AUS.
For rapid motion press key for approx. 3 s. Confirm with Enter.
Please see calendar for actual calendarweek (KW), as this date may vary from year by few days.
For further explanations please see fig. 1 and 2 of chapter 4.
Einstellen Enter
Man/Auto
AutoManuell Zufall Astro
Tag Prog
Di
Mi
Do
Fr
Sa
So
Mo
Woche
ON
OFF
3.4 Present day
Dot is forward to „Tag“ (day), mark is flashing for indicating day of
week.
Set with key EIN or AUS.
Confirm with Enter.
Mo = Monday
Di = Tuesday
Mi = Wednesday
Do = Thursday
Fr = Friday
Sa = Saturday
So = Sunday
Einstellen Enter
Man/Auto
AutoManuell Zufall Astro
Tag Prog
Di
Mi
Do
Fr
Sa
So
Mo
Woche
ON
OFF
3.5 Present time
Dot is forward to "¡", time is flashing.
Set with key EIN or AUS.
For rapid motion press key for approx. 3 s.
Confirm with Enter.

GIRA
Info Electronic Timer
Installation Instructions
Electronic Timer 12/96 Page 4 of 8
Einstellen Enter
Man/Auto
AutoManuell Zufall Astro
Tag Prog
Di
Mi
Do
Fr
Sa
So
Mo
Woche
ON
OFF
3.6 Programming of Switch Times
3.6.1 Setting of Switch Time Number
Dot is forward to „Prog“, symbol for Switch-on Time 1 flashes. For
further Switch Time Numbers please touch keys EIN or AUS.
For changing Switch-on or Switch-off Times of a Switch Time
Number press Enter.
All Switch Times of Switch Time Numbers programmed prior to
that point remain uneffected when setting or altering Switch Time.
Please note a minimum of one minute between all programmed switching operations!
Einstellen Enter
Man/Auto
AutoManuell Zufall Astro
Tag Prog
Di
Mi
Do
Fr
Sa
So
Mo
Woche
ON
OFF
3.6.2 Programming of Switch-on Time
Switch-on time of a Switch Time Number flashes and can be
changed ba pressing EIN or AUS.
For rapid moition press key approx. 3 s.
Confirm Switch-on Time with Enter.
Einstellen Enter
Man/Auto
AutoManuell Zufall Astro
Tag Prog
Di
Mi
Do
Fr
Sa
So
Mo
Woche
ON
OFF
3.6.3 Programming of Switch-off Time
Switch-off Time of a Switch Time Number flashes and can be
changed by pressing EIN or AUS.
For rapid moition press key approx. 3 s.
Confirm with Enter.
Einstellen Enter
Man/Auto
AutoManuell Zufall Astro
Tag Prog
Di
Mi
Do
Fr
Sa
So
Mo
Woche
OFF
ON
3.6.4 Programming of Weekdays
Should there be no day programmed, Mo (Monday), Mi
(Wednesday), Fr (Friday), So (Sunday) flash in exchange with Di
(Tuesday), Do (Thursday), Sa (Saturday) Programmed days flash
continuously.
Confirm with Enter.

GIRA
Info Electronic Timer
Installation Instructions
Electronic Timer 12/96 Page 5 of 8
Einstellen Enter
Man/Auto
AutoManuell Zufall Astro
Tag Prog
Di
Mi
Do
Fr
Sa
So
Mo
Woche
ON
OFF
Alterations of setting realize with key AUS. Flashing mark is
forward to Mo (Monday). Enter programms day, AUS leaves a day
out. A programmed day is indicated permanently, the flashing mark
moves a day further. In case So (Sunday) is programmed or left
out, the next Switch Time can be programmed (see chap. 3.6). In
case of programming errors of previous Switch times, re-call with
key AUS.
For no further programming of Switch Times interrupt with key
Einstellen (Adjustment). Automatic interruption occurs after Switch
Time 9. Time appears after interruption.
3.6.5 Checking of set Dates
Touche Einstellen (Adjustment), then touch key Enter within 2 s. A further touching of key Enter shows
all dates without altering them. By reaching the first Switch Time Number, a quick check of Switch
times is possible by pressing key EIN or AUS.
An interruption is permanently possible by pressing key Einstellen (Adjustment) or automatically after
5 minutes, display showing present time.
3.6.6 Clearing of Switch Times
Two alternativ ways of clearing Switch times exist:
1. Clearing of programmed weekdays.
Leave all days out by touching key AUS (see chap. 3.6.4). Switch-on and Switch-off Times remein.
2. Programm Switch-on and Switch-off Time equal hours (see chap 3.6.2 and 3.6.3). Programmed
weekdays remain uneffected.
Einstellen Enter
Man/Auto
AutoManuell Zufall Astro
Tag Prog
Di
Mi
Do
Fr
Sa
So
Mo
Woche
ON
OFF
4. Types of Operation
4.1 Manual Mode
Dot indicates „Manuell“ (Manual). Connected load can be activated
or deactivated by touching key EIN or AUS. Relevant symbol
appears in display.
By using this type of operation, preprogrammed Switch Times will
not be carried out (see chap. 1).
Einstellen Enter
Man/Auto
AutoManuell Zufall Astro
Tag Prog
Di
Mi
Do
Fr
Sa
So
Mo
Woche
ON
OFF
4.2 Automatic Mode
Change from manual to last set automatic mode with key
Man/Auto.
By pushing key Enter after Man/Auto die within 2 s, the random
generator and/or astro mode can be selected by EIN or AUS.
Confirm with Enter.
Selected mode is activated and Switch Times are being realized
according to programming.

GIRA
Info Electronic Timer
Installation Instructions
Electronic Timer 12/96 Page 6 of 8
4.3 Random Generator
Programmed Switch Times will vary up to ± 15 minutes when Random Generator is being switched to
Automatic Mode. All Switch Times of a day will be changed to the same random time to avoid
overlapping of switching operations.
3
4
5
6
7
8
9
5 101520253035404550 4
5
6
7
8
9
10
Jan. Jul. Dez.Apr. Okt.
WZ SZ
Bild 1: Times of sunrise
KW
15
16
17
18
19
20
21
5 101520253035404550 16
17
18
19
20
21
22
Jan. Jul. Dez.Apr. Okt.
WZ SZ
Bild 2: Times of sunset
KW
4.4 Astro Mode
If lighting is requested to be
switched off at sunrise (SA) and
of at sunset (SU), programmed
Switch Times have to be made
conform to the changing
astronomical calendar
constantly. By activating the
Astro Mode Switch Times
programmed between sunrise
(SA) and 12.00 hours are
already being carried out at
sunrise (SA). Switch
programmed between 12.00
hours and sunset (SU) are
carried out no until sunset (SU).
This is why all times of sunrise
and sunset are being stored
permanently (see fig. 1 and 2).
Switch Times programmed to
be carried out within darkness
of a day remain unchanged
from the Astro Mode.
Note: Do not programme more
than max. one paire of Switch
Times (e.g. 1 ON, 1 OFF) per
half day (morning/afternoon)
when Astro Mode is activated.
If it is required to switch on
lighting at sunset (SU) and off
at 22.00 hours, following
programming may be used
(consider Astro Mode needs to
be activated):
Switch Time 1: Mon-Sun
16.00 h ON;
22.00 h OFF.
WZ = Wintertime,
SZ = Summertime

GIRA
Info Electronic Timer
Installation Instructions
Electronic Timer 12/96 Page 7 of 8
If it is required to switch on lighting at 03.00 hours in the morning and off at sunrise (SA), use following
programming:
Activate Astro Mode, Switch Time 1: Mon-Sun 03.00 h ON; 10.00 h OFF.
If it is required to switch on lighting always at sunset (SU) and off at sunrise (SA), use following
programming:
Activate Astro Mode, Switch Time 1: Mon-Sun: 16.00 h ON; 08.30 h OFF.
Fig. 3: Example - Astro mode achtivated
Daylight
Calendarweek
programmed switch-off time 06.30 h
programmed switch-on time 19.10 h
realized switch-off time
realized switch-on time
am
pm
4
5
6
7
8
9
10
5101520253035404550
15
16
17
18
20
21
19
Darkness
Darkness
4
5
6
7
8
9
10
3
4
5
6
7
8
9
4.5 Combination of Random and Astro Mode
If Astro and Random Mode are activated, Switch Times are being made conform to times of sunrise
and sunset (see chap. 4.4) and additionally varied with a random time of up to ±15 minutes.
(see chap. 4.3)
5. Technical Data
Rated Voltage: 230 V, 50Hz
Neutral conductor required
Rated Load: max. 1000 VA
Not suitable for switching free of mains
Time-keeping quality: ± 1 min./month
Operation reserve: 2 hours
Switch times: 9 Switch-on and Switch-off
times each
Shortest period
between switches: 1 minute between 2
switching operations
Random Generator: max. ± 15 min.
Astro Mode: internal stored times of
sunrise and sunset
Relay Output: 1 NOC
Connexion: srew clamps for max.
2,5 mm²
Self-consumption: < 2W
Fuse: T 6,3A / 250 D
Ambient Temperature: -10°C to + 40°C

GIRA
Info Electronic Timer
Installation Instructions
Electronic Timer 12/96 Page 8 of 8
6. Planning Aid
Following table may be used for clarifying programmed dates.
Switch Time No.
(SN) ON OFF Mon Tue Wed Thu Fri Sat Sun
Example (SN) No. 2 08.30 22.00 X X
1
2
3
4
5
6
7
8
9
Acceptance of guarantee
We accept the guarantee in accordance with the corresponding legal provisions.
Please return the unit postage paid to our central service department giving a brief description
of the fault:
Gira
Giersiepen GmbH & Co. KG
Service Center
Dahlienstrasse 12
D-42477 Radevormwald
The CE sign is a free trade sign addressed exclusively to the authorities and does not include
any warranty of any properties.
Gira
Giersiepen GmbH & Co. KG
Postfach 1220
D-42461 Radevormwald
Telefon: +49 / 21 95 / 602 - 0
Telefax: +49 / 21 95 / 602 - 339
Internet: www.gira.de
Table of contents
Other Gira Timer manuals
Popular Timer manuals by other brands

Intermatic
Intermatic SS5 Installation and operating instructions
Lafayette Instrument
Lafayette Instrument 51013 User instructions
Component Design
Component Design PT1A instructions

Beckmann
Beckmann EMS 135 M Product Deion & Operating Manual
claber
claber AQUAUNO VIDEO-2 user manual
GE
GE 15163 quick start guide
