GlassOuse KF-1M User manual

www.glassouse.com
GlassOuse with Bluetooth and 9 axis (KF-1M)

GlassOuse User Manual
1
GlassOuse Assistive Device
SIMPLE USER MANUAL
1. Bluetooth Connection
a. Activate your tablet’s Bluetooth conection of your tablet or other device (except
iOS systems)
b. Press the “Connect”button. The LED light will start to flash.
c. Find and link to the “CEBA GlassOuse”device using your tablet’s Bluetooth
scan screen.
d. If the link is successful, the LED will flash blue continuously. If the LED does
not flash, the device is in “sleep” mode. If there has been a connection before,
press the “Click” button and try to connect again.
e. To use with another devices, erase “GlassOuse” from your tablet or turn off
your tablet’s Bluetooth functionality.
2. Mouse Use
After you put Glassouse on your head, the cursor moves according to your head
movements. When your head is in a centered and comfortable position, the cursor
should be in the middle of the screen. To move the cursor left or right, move your head
from side to side. You use same method to slide the cursor up and down.

GlassOuse User Manual
2
GlassOuse Assistive Device
3. Setting Mouse Sensitivity
II. You can set the sensitivity in two ways:
3.1 Navigate to the tablet’s “Menu Settings Controls Language and Access
Mouse/trackpad Marking speed” and set the desired cursor speed.
3.2 Using the GlassOuse unit:
a. Press the “Click” and “Reset” buttons at the same time.
b. First, release the “Reset” button. After that, release the “Click” button. The
LED should begin to flash red.
c. Select the desired pointer speed (slow, medium, or fast) by pressing the
“Click” button according to the speed of the red LED light. On the “slow”
setting, the LED will flash slowly. On the “medium” setting, it will flash
faster, and on the “fast” setting, it will flash the fastest.
d. After making your choice, press “Reset” and activate GlassOuse.
1. The “Click” Button
The “Click” button is made of a certified waterproof material. There is no
cancerogenic material inside, and it does not carry any health risks. The “Click”button

GlassOuse User Manual
3
GlassOuse Assistive Device
can esily be set to an appropriate angle for your mouth with the flexible cable after you
put GlassOuse on your head. The “Click” function is used by biting or pressing with
the lips.
This button has been tested 50,000 times under 3 tons. The additional rubber case
inside the package is intended for a second user or for replacement after extensive use.
To wash and disinfect the outer rubber case, first separate it from the product and
ensure that it is dry before reconnecting.
2. LED Indication
Charging: Red LED is seen continuously on the device (Charger adapter light is red)
Charging is complete: No LED light on the device (Charger adaptor light is green)
Bluetooth is searching for a connection: The LED flashes blue
Bluetooth connection is active: The LED is continuously blue
Low Battery: The LED flashes red
3. Operating System Compatibility
PC (Windows, Linux, Mac)
Tablet (Android, Windows)

GlassOuse User Manual
4
GlassOuse Assistive Device
Mobile (Android, Windows)
4. Sleep mode
To extend battery life and not disturb you while you are watching films or listening to
music, GlassOuse enter “Sleep”mode if the “Click” is not pressed for 3 minutes.
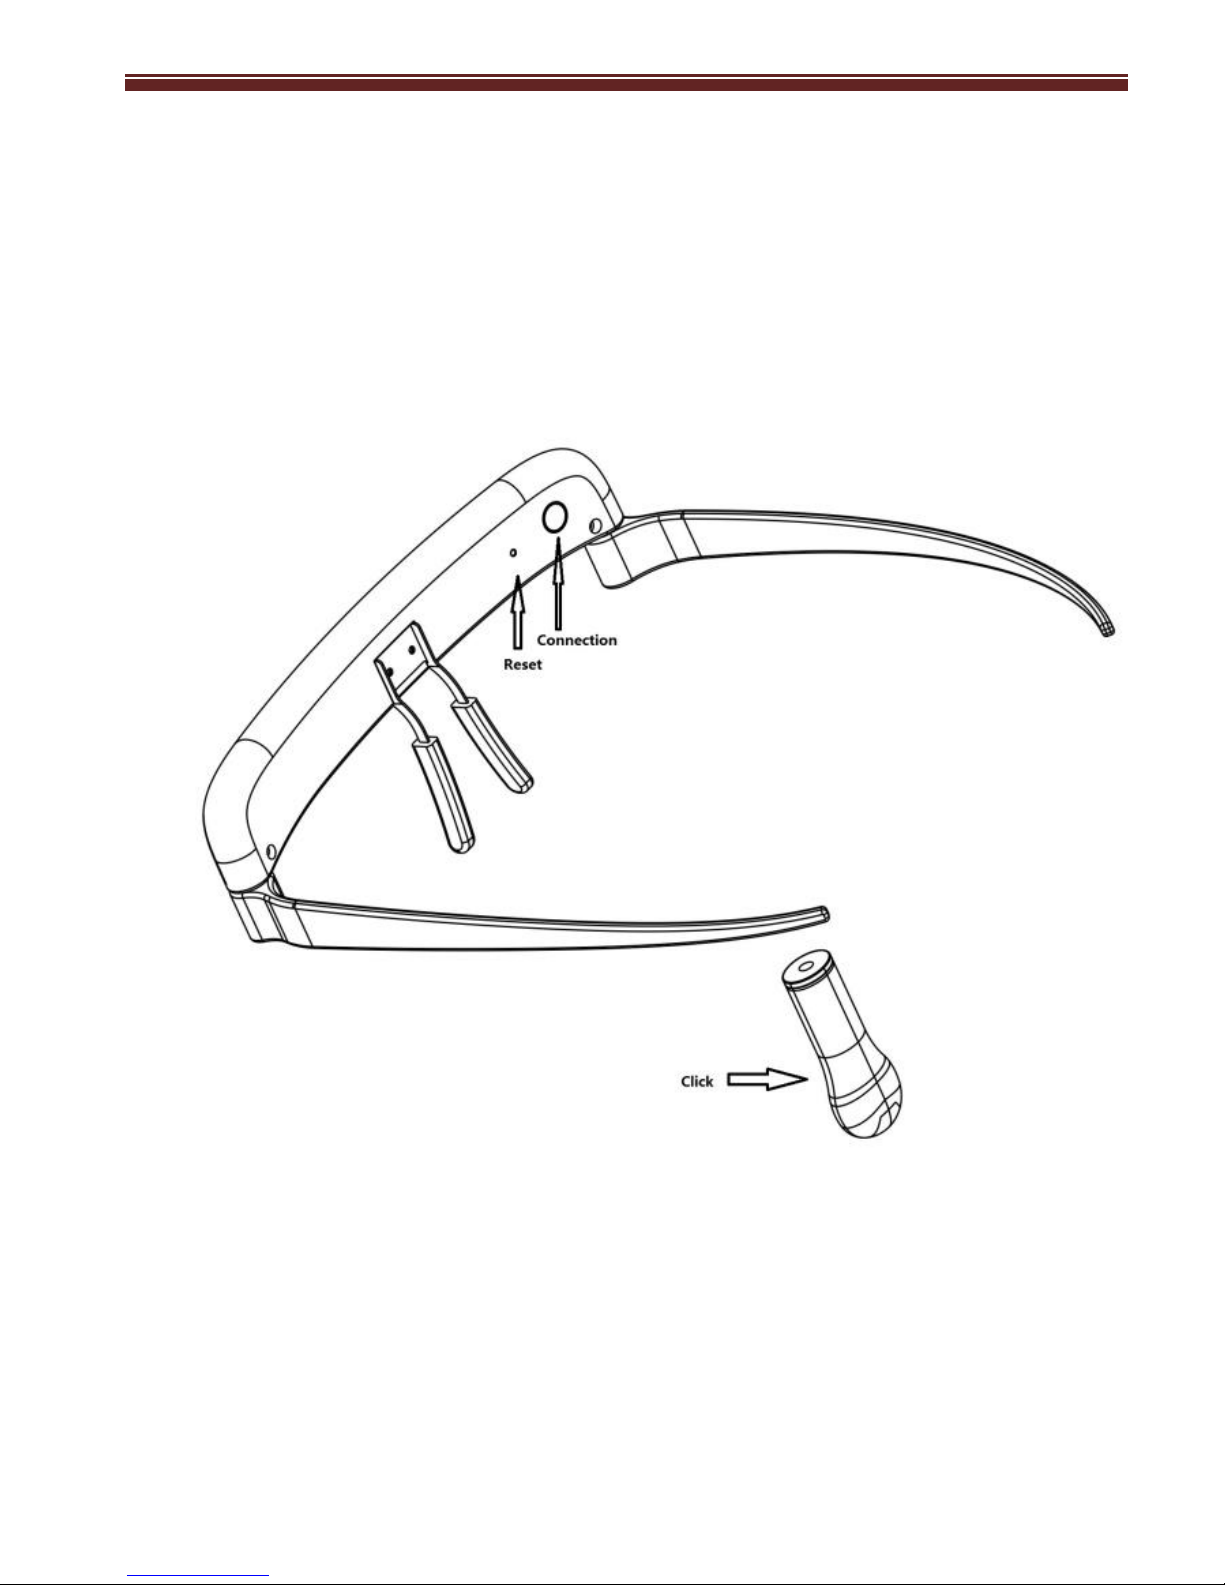
5. Reset to Factory Settings
If GlassOuse does not respond properly, the battery indicator does not work accurately,
or you encounter a similar problem, you can press “Reset” to return the device to
factory settings. Pressing it for 1 second is enough.
6. Calibration
If the cursor moves abnormally (e.g. vibration, sliding), calibration is recommended.
Calibration is also advisable before first use. It should take a maximum of three
minutes to complete the entire process. To calibrate GlassOuse:
a. Make the Bluetooth connection with your tablet. Press the “Reset” button.
b. Put GlassOuse on a flat, steady table. The“Click” cable should be in a
suspended position.
c. During calibration, the LED will alternate between blue and red for about 1
second at a time. When the red colour is sustained, the calibration is
completed, and you can start using the device.

GlassOuse User Manual
5
GlassOuse Assistive Device
7. Battery
A 330mAh 3.7v Li-Po CEBA cell is used for GlassOuse. This cell provides nearly 15
hours of use. Charge the cell fully before first use.
8. Angle of Use
CEBA GlassOuse can be used in a 180ᵒhorizontal or 160ᵒvertical angle.
Please do not use it while reclining fully or looking at the ground.

GlassOuse User Manual
6
GlassOuse Assistive Device
9. Warnings
a. Keep CEBA GlassOuse away from magnets.
b. Don’t fold and flex CEBA GlassOuse.
c. CEBA GlassOuse was designed for disabled citizens; do not use it for other
purposes.
d. As the CEBA GlassOuse “Click” button is used in direct contact with the mouth,
keep it in an appropriate and safe place.
e. When you want to clean or wash it, separate the rubber case from the GlassOuse
device. After that, dry it. Never use it on “GlassOuse” if it is wet or damp.
f. Do not use the product unless the waterproof coating is fully intact, with no
holes or tears.
g. Use the CEBA GlassOuse charger only for this product.
h. Users who cannot use their hands should be fully instructed in device operation.
i. Do not bite mouthpiece hard; teeth can penetrate the coating if excessive force is
used.
j. Before the first use, charge and calibrate the device.

GlassOuse User Manual
7
GlassOuse Assistive Device
10. Button names
Table of contents