GLITZHOME GH20403 User manual

ASSEMBLY INSTRUCTION
Glitzhome, LLC
SOLAR DUAL HEAD SECURITY LIGHT
HOW THE SOLAR LIGHT WORKS:
During the day, the solar panel converts solar power into energy and stores it in the rechargeable battery. At night, the light
turns on automatically and using the energy stored when motion is detected. The duration of the illumination will depend on
your geographical location, weather conditions and seasonal light availability.
FEATURES
PASSIVE INFRARED (PIR) MOTION SENSOR:
1. Up to 8 meters and 120° detection range
2. Note: the vertical height of PIR sensor from the ground should be 1.8m to 2m.
SOLAR PANEL
1. Attach to 5cm cable length, your solar panel can be easily positioned in an area that will receive maximum sunlight each
day to fully charge the batteries.
2. The solar panel is an amorphous solar panel, which has a high shadow tolerance and is able to charge in cloudy
conditions. However, for optimum charge, the panel must be placed in an area that receives a maximum amount of direct
sunlight every day. It should be exposed to at least 8 hours of direct sunlight each day to fully charge the batteries.
3. Built-in photo sensor controls when your solar security light will begin to activate, according to the surrounding natural
light level.
CHOOSE AN IDEAL LOCATION:
1. Choose an outdoor location where the solar panel can receive at least 8 hours of full and direct sunlight each day.
Shaded locations will reduce the battery charge and shorten the operating time at night.
2. Avoid placing solar security light near bright light sources, such as street lights. The bright light sources may cause the
solar light to turn off automatically. Solar lights are ideal for night time lighting in the garden, lawn, etc. You can also place
the solar lights outdoor during the day and then place them indoor, garage, shed, corridor or caravans for lighting.
IMPORTANT: DOUBLE CHECK CONTENTS BEFORE DISCARDING THE PACKAGING TO
PREVENT LOSING PARTS THAT ARE NEEDED FOR ASSEMBLY

ASSEMBLY INSTRUCTION
Glitzhome, LLC
1
3. When choosing a location, remember that there is 5m cable length attached to the solar panel, which means that your
light can be installed anywhere within 5m of the chosen location for the solar panel.
4. When locating a suitable position for the device, remember that the PIR sensor detects an area of approximately 120
degrees horizontally within a range of up to 8 meters.
5. The recommended mounting height for your security light is approximately 2m.
6. Your security light should be located in a semi-protected area where it will not be exposed to excessive rain.
ASSEMBLY INSTRUCTIONS:
This pack should come complete with the following:
1 x solar security light (Part A)
1 x solar panel (Part B)
5 x mounting screws (Part C)
5 x wall plugs (Part D)
PRECAUTIONS BEFORE INSTALLATION
Select a preferred location for your security light and solar panel
At this point check to ensure:
1. The distance between the solar panel and security light is maximum 5 meters.
2. The position chosen for your solar panel is an area that will receive a maximum amount of full direct sunlight each day.
3. The location chosen for the security light is within the specified detection range to meet your security lighting needs,
e.g. close enough to an entrance way, garage door, etc, see figure 1.
SOLAR PANEL INSTALLATION:
Step 1: Hold solar panel (B) with wall mounting bracket against the mounting surface and place marks through the 3
mounting holes.
Step 2: Place solar panel down to one side and drill holes at each of the 3 points marked, large enough to fit the plastic wall
plugs (D) inside.
Step 3: Place plastic wall plugs into the holes. NOTE: IF YOU ARE INSTALLING PANEL ONTO A WOODEN SURFACE,
PLASTIC WALL PLUGS ARE NOT REQUIRED.
Step 4: Secure the solar panel mounting bracket onto the surface, by aligning the mounting holes with the 3 wall plugs
installed in step 3.
Step 5: Using a screwdriver, insert 3 screws (C) over the 3 mounting holes on the bracket and into the mounting surface,
and tighten to secure.
Step 6: Adjust the angle of the solar panel for maximum sun exposure.

ASSEMBLY INSTRUCTION
Glitzhome, LLC
2
SECURITY LIGHT INSTALLATION:
Step 1: Choose a location for the light (A), remembering that it must be within a 5m distance to where you have installed
the solar panel.
Step 2: Use the drill template to mark drilling holes onto the mounting surface.
Step 3: Remove template and drill holes at each of the 2 points marked and insert wall plugs (D) into each hole. Before
drilling holes, it is recommended that you first check that the marks you have made are straight. NOTE: IF YOU
ARE INSTALLING LIGHT BODY ONTO A WOODEN SURFACE, PLASTIC WALL PLUGS ARE NOT REQUIRED.
Step 4: Insert screws (C) into the wall plugs leaving approximately 5mm to project from the wall.
Step 5: Mount the light onto the wall by hooking the 2 keyholes at the back of the light over the screws installed in the
above step.
Step 6: Using a screwdriver and the adjustment screw located at the side of PIR housing, adjust the angle of the PIR sensor
so it is directed towards your detection area.
CONNECTING YOUR SOLAR SECURITY LIGHT AND SOLAR PANEL
Step 1: Locate the male plug attached to the 5m cable length on the solar panel.
Step 2: Locate the connection socket near the AUTO/OFF push button and connect the solar panel with the security light.
ATTENTION FOR FIRST TIME USE:
1. Keep the security light and solar panel connected, the batteries in your security light must be fully charged before the first
time to use. (Note: When you disconnected the security light and solar panel, the security light will light all the time until the
energy stored in the battery used up.)
2. To charge batteries, expose the solar panel to direct sunlight for 36-48hours, and at this point please ensure the
"AUTO/OFF" button is at the ''OFF'' position.
3. After you have fully charged the batteries, push the "AUTO/OFF" button to the ''AUTO'' position, it will automatically turn
on when motion is detected at night and automatically charge during the day.
4. Please note the solar light is designed to work when the environment gets dark. If there are strong light sources nearby,
the solar light may illuminate dimly or not light up at all.
5. Surface of the solar panel must be kept clean. Dusty surface will reduce charging efficiency.
90mm
DRILL TEMPLATE FOR
SOLAR LIGHE:
Horizontal level

ASSEMBLY INSTRUCTION
Glitzhome, LLC
3
TROUBLESHOOTING :
If your solar security light does not turn on automatically when motion is detected at night after fully charged, please check
the following:
1. Make sure the power switch is at the the "AUTO" position.
2. Check that the male plug attached to the solar panel has been connected securely to the light body to enable batteries
to charge.
3. Batteries may need charging or replacing. Ensure solar panel is positioned in an area that receives maximum sunlight
each day to fully charge batteries.
4. Make sure solar panel is not being affected by other night time light sources.
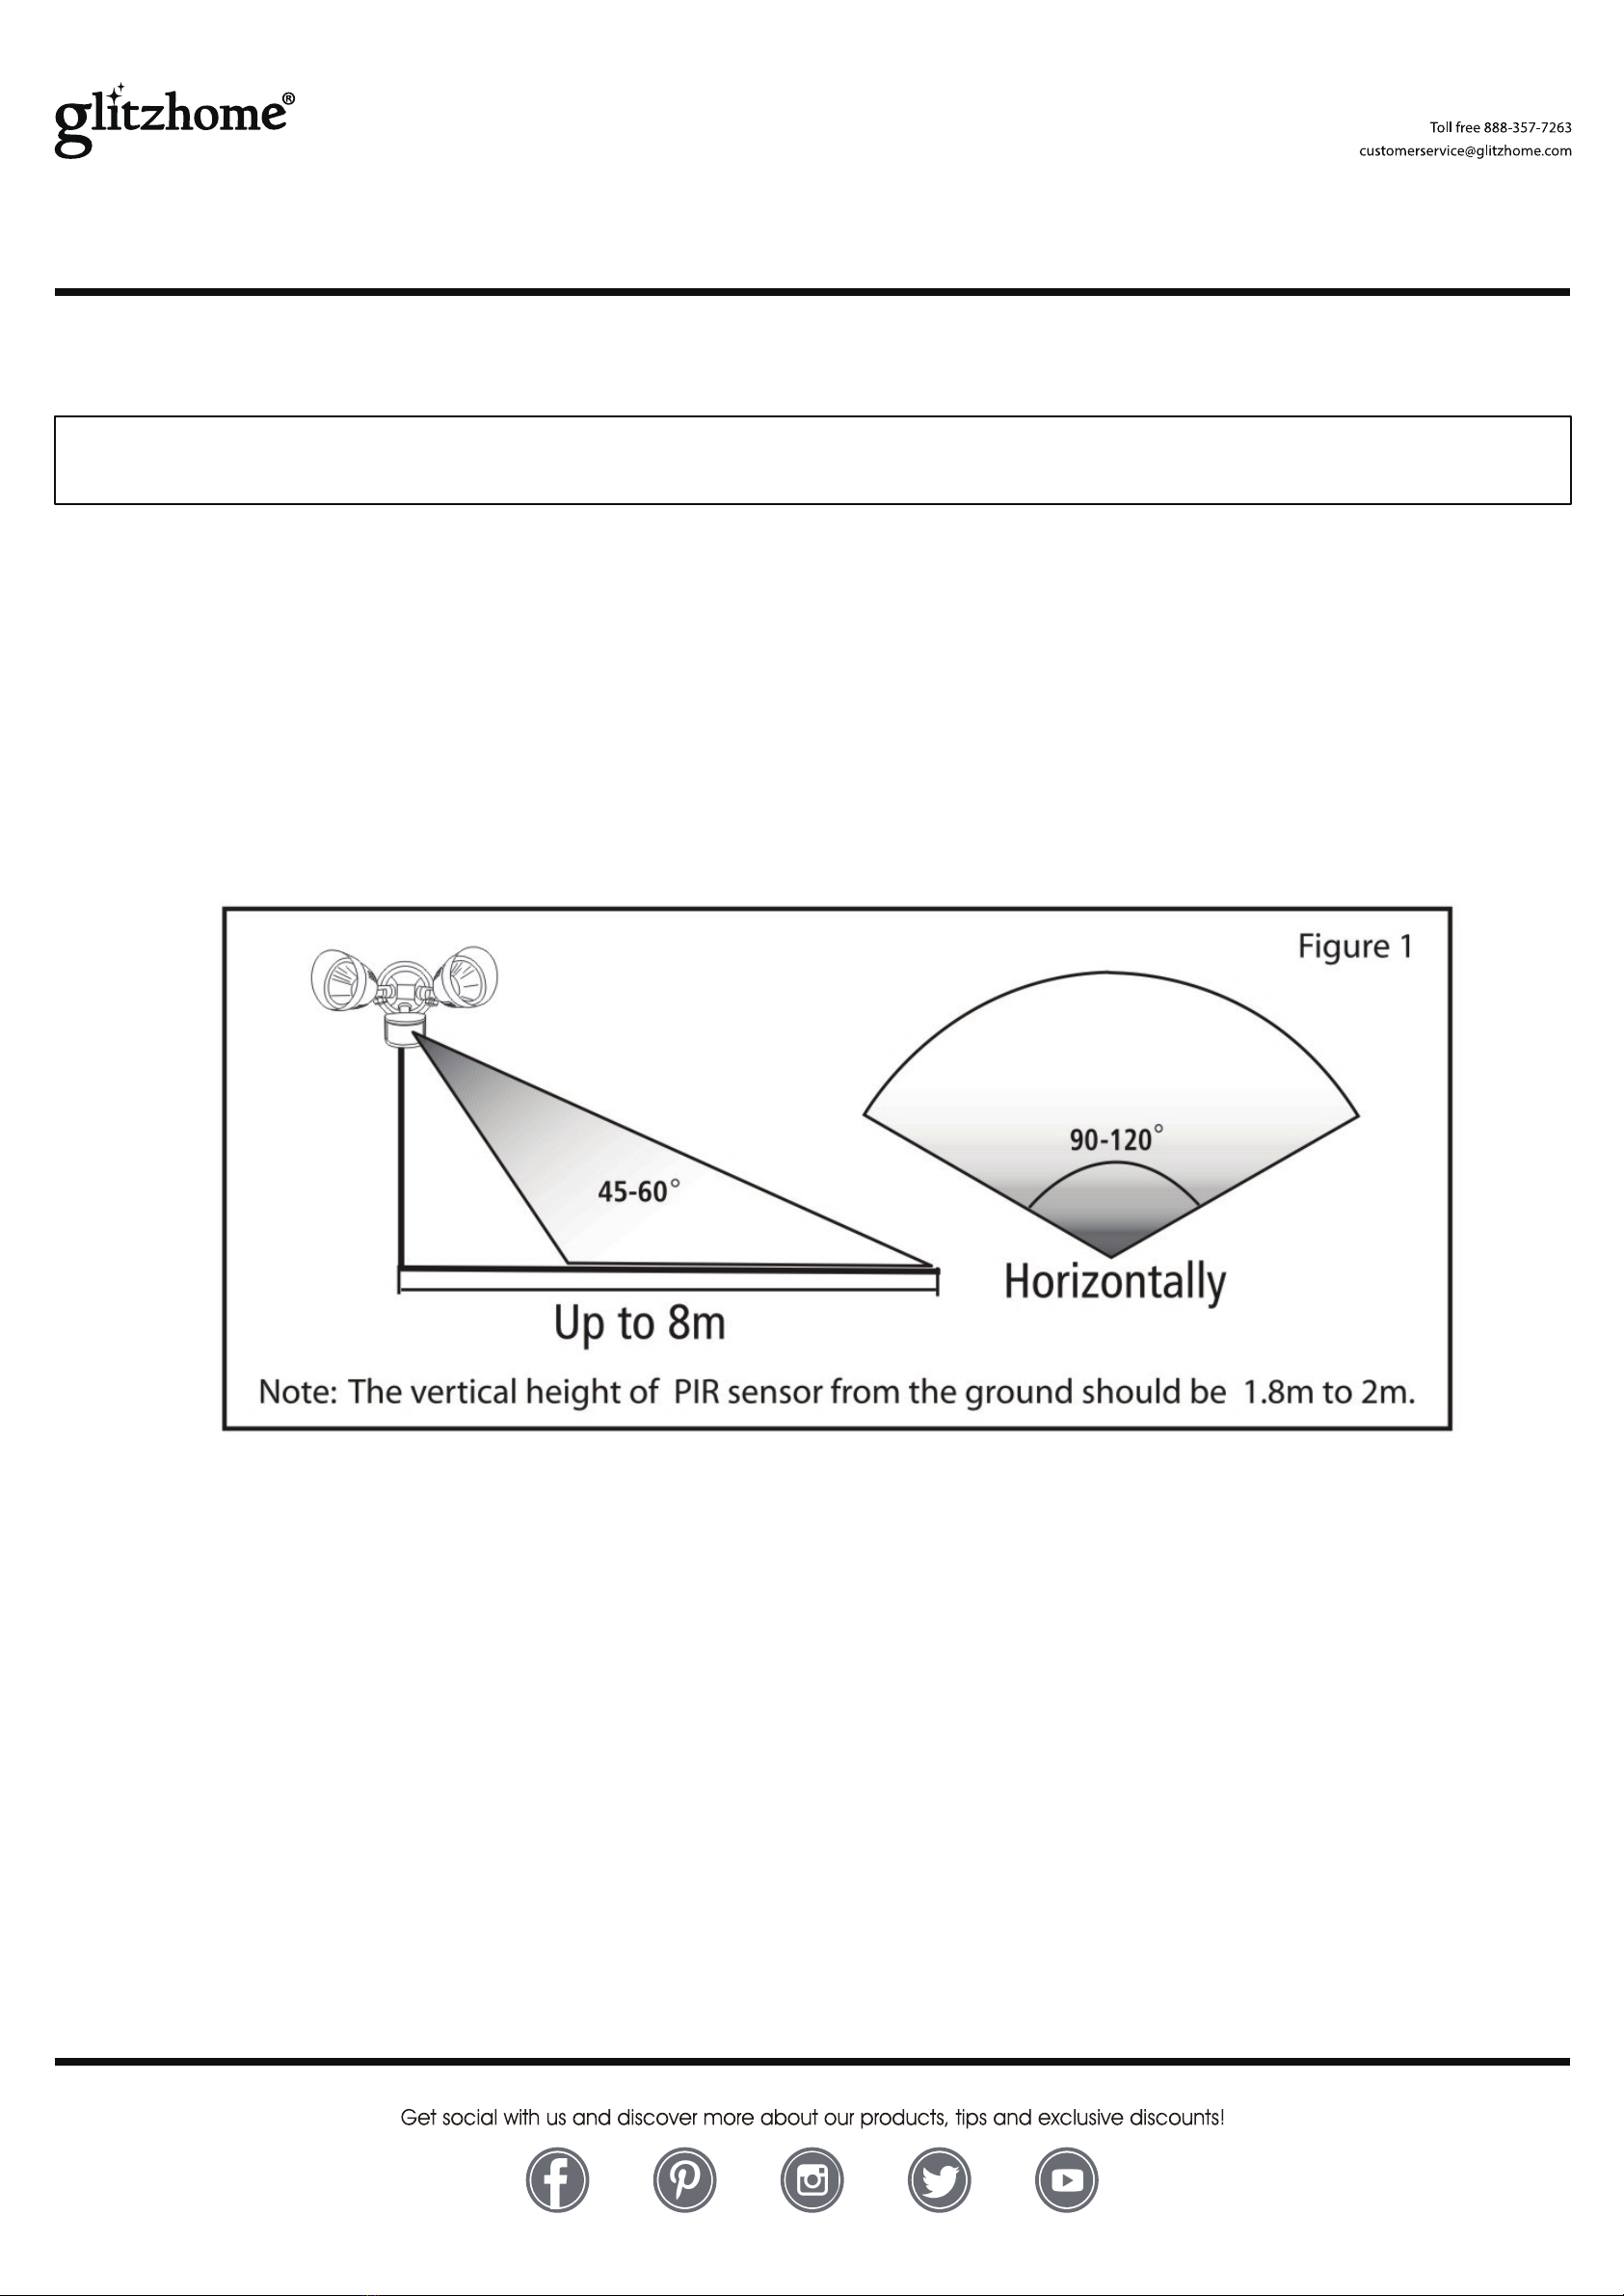
5. Check to ensure that the PIR sensor has been directed towards the detection area. Refer to figure 1 and re-direct PIR
sensor if required.
6. The standard sensor detective time is 30 seconds per time, it may have a tolerance of +/- 5 seconds in actual use.
7. To manage false triggering and conserve battery life, the activation time will last only a few seconds if moving quickly
past the PIR sensor.
REPLACE BATTERIES:
If the solar light stops working after it has been used for a long time, the battery may need to be replaced. You may open
the battery cover and replace it with a new rechargeable battery. 3pcs 1.2V AA 600MAH, Ni-MH rechargeable batteries
(included), same equivalent type as recommended must be used.
Step1: Remove the light from the wall by lifting it off the supporting screws and turn it to make sure the base of the light
is facing upwards.
Step2: Using a Philips head screwdriver remove the 4 screws securing the battery lid and replace old batteries with new
rechargeable AA batteries.
Step3: Replace battery cover, screw it back into position and make sure is properly sealed.
Step 4: Fully charge the batteries by repeating the steps under the "First Time Use" section.
1. Keep batteries away from children. This product is not a toy.
2. Ensure battery contacts are clean and free of debris.
3. Install batteries according to correct polarity (+/-).
4. DO NOT mix old and new batteries.
5. DO NOT mix alkaline, standard (carbon-zinc) or rechargeable batteries (Ni-Cd, Ni-MH, etc.).
6. Remove batteries when consumed or when product is not in use for an extended period of time.
7. Contains Ni-MH battery. Batteries must be recycled or disposed of properly, in accordance with all state and local
regulations. DO NOT crush, puncture, or incinerate.
WARNING
SAVE THESE INSTRUCTIONS - THIS MANUAL CONTAINS IMPORTANT SAFETY AND
OPERATING INSTRUCTIONS FOR POWER UNITS.
This manual suits for next models
1
Table of contents
Other GLITZHOME Outdoor Light manuals
Popular Outdoor Light manuals by other brands

Adesso
Adesso Astoria Arc 5170-21 Assembly instruction

Vaxcel
Vaxcel T0241 Assembly and installation instructions

OVE
OVE ALICE COACH 15LCO-ALIC12-ALUXI installation manual

Festool
Festool KAL operating manual

Lighting Technologies
Lighting Technologies FREGAT LED 100 (W) RU 5000K manual

Fixpoint
Fixpoint 77452 user manual

Simx Lighting
Simx Lighting Ruapehu LHT1131 installation instructions

Faro Barcelona
Faro Barcelona 70151 quick start guide

WAC Lighting
WAC Lighting dweLED WS-W37612 Installation instruction

LIGMAN
LIGMAN HAMILTON4 installation manual

WAC Lighting
WAC Lighting 5222 installation instructions

Portfolio Outdoor
Portfolio Outdoor POST HURRICANE LIGHT manual