GLOBAL FITNESS & LEISURE EVOLT User manual

Global Fitness and Leisure Pty Ltd
23-25 Maygar Blvd
Broadmeadows, VIC 3047, Australia
Ph: 1300 169 600

PARTS LIST M15 SPANNER
M6 ALLEN KEY
CHARGER

TABLE OF CONTENTS
NOTES FOR USERS
PREPARATION BEFORE RIDING
CHARGE & BATTERY
IMPORTANT TIPS & ADVICE
ASSEMBLY & FOLDING INSTRUCTIONS
CLEANING & LUBRICATION
WARRANTY
TROUBLESHOOTING
NOTES FOR USERS
PREPARATION BEFORE RIDING
CHARGE & BATTERY
IMPORTANT TIPS & ADVICE
CLEANING & LUBRICATION
WARRANTY
TROUBLESHOOTING

NOTES FOR USERS
Like any other moving products , cycling can be a hazardous activity and it is possible to get into dangerous situations.
Always wear proper protective equipment such as an Australian standards approved helmet, elbow pads,
knee pads, long sleeve shirt, gloves, long pants.
Always wear fully enclosed shoes making sure they are done up properly before riding. You must not ride
barefoot or in sandals.And make sure you carefully inspect our bike before riding again if you fall.
This bike is intended to be used on urban roads. It is not intended for use on unpaved ground or for off-
road use. Failure to follow these warnings could result in a fall or accident and permanently and irreversibly damage
the condition of your power assisted bicycle.
Children below 14 years old should not play with the product. DO NOT LET CHILDREN
INFLATE TYRES.
Charging, cleaning and maintenance should not be performed by children without adult supervision.
Maximum rider weight: 100kg ( Including rear carrier 15kg loading)
DETACHABLE POWER UNIT- CAUTION
- To recharge the battery, please use only the charger supplied with the appliance.
- The external flexible cable of this transformer cannot be replaced: If the cord is damaged, the transformer shall
be scrapped. Use of a universal charger voids the guarantee.
- Never pull the electric cord to disconnect the charger.
- Always switch off the bike before maintenance or cleaning.
- The plug and the power adapter must be used indoor.
BATTERY:
- Battery can only be replaced by professionnal repairer.
- The battery must be removed and discarded before disposal of the bike
- Please ensure that the bike is unplugged before taking out the battery
- Please ensure the battery is disposed of safely.

PREPARATION BEFORE RIDING
Always double check your bike before riding it (tighten the handlebars and stem, check the saddle, wheels,
and brakes, etc.)
Check tyre pressure. Tyre pressure is indicated on the sidewall of the tyre.
Check your tyre pressure before each ride by squeezing the tyre between your thumb and fingers.
It should feel very firm, but not hard, when you sit on your bicycle, the tyre sidewalls should not
compress very much under your body weight.
Use a hand or foot pump to inflate your tyres. NEVER inflate your tyres with an air compressor at a
petrol station.
Adjust the seat height and handlebar height Please check the FOLDING&ASSEMBING INTRODUCTION
IMPORTANT TIPS & ADVICE
(I)STRONGLY RECOMMEND THAT SIGNIFICANT MECHANICAL REPAIRS SHOULD BE
CARRIED OUT BY A SKILLED BICYCLE MECHANIC.
(III)When you are riding on the road , make sure that you are always visible to other vehicles .
Please respect the rules of the road in all circumstances.
(IV)Speed must be slowed down in rainy and snowy days and in slippery areas. Braking distance
should be increased to ensure safety.Use the rear brake lever FIRST then the front brake lever
(V)Cyclists must wear a reflective vest at night outside urban areas.
(VI)This product may be used by children 14 years of age or older. Those with reduced
physical, sensory or mental capacity, or lack of experience or knowledge, should be properly
supervised or given instructions for safe use of this bike.
(II)The tyre pressure range of this Ebike is 250-300kpa(36.3-43.5psi) which marked on the tyre.
Please ensure that the tyre pressure is within the range to avoid accidents.(1psi=6.895kPa)

(VII)Strongly recommend to establish and respect periodic maintenance schedule, which will
be determined by the frequency and length of your rides,your style of riding, as well as the
terrain on which you most often ride.
(VIII)Recommended torque requirements in newton meters for the following:
(A) Front axle nuts. 15-25NM
(B) Back axle nuts. 20-30NM
(C) Handlebar clamp nut/bolt. 8-12NM
(D) Handlebar stem expander bolt. 35-45NM
(E) Seat pillar clamp nut/bolt. 18-22 NM (K) Pedal. 35-40NM
(F) Brake cable anchor bolt. 1.5-4NM
(G) Brake mounting bolt. 8-12NM
(H) Seat clamp nuts. 18-22NM
(I) Crank attachment systems. 40-60NM
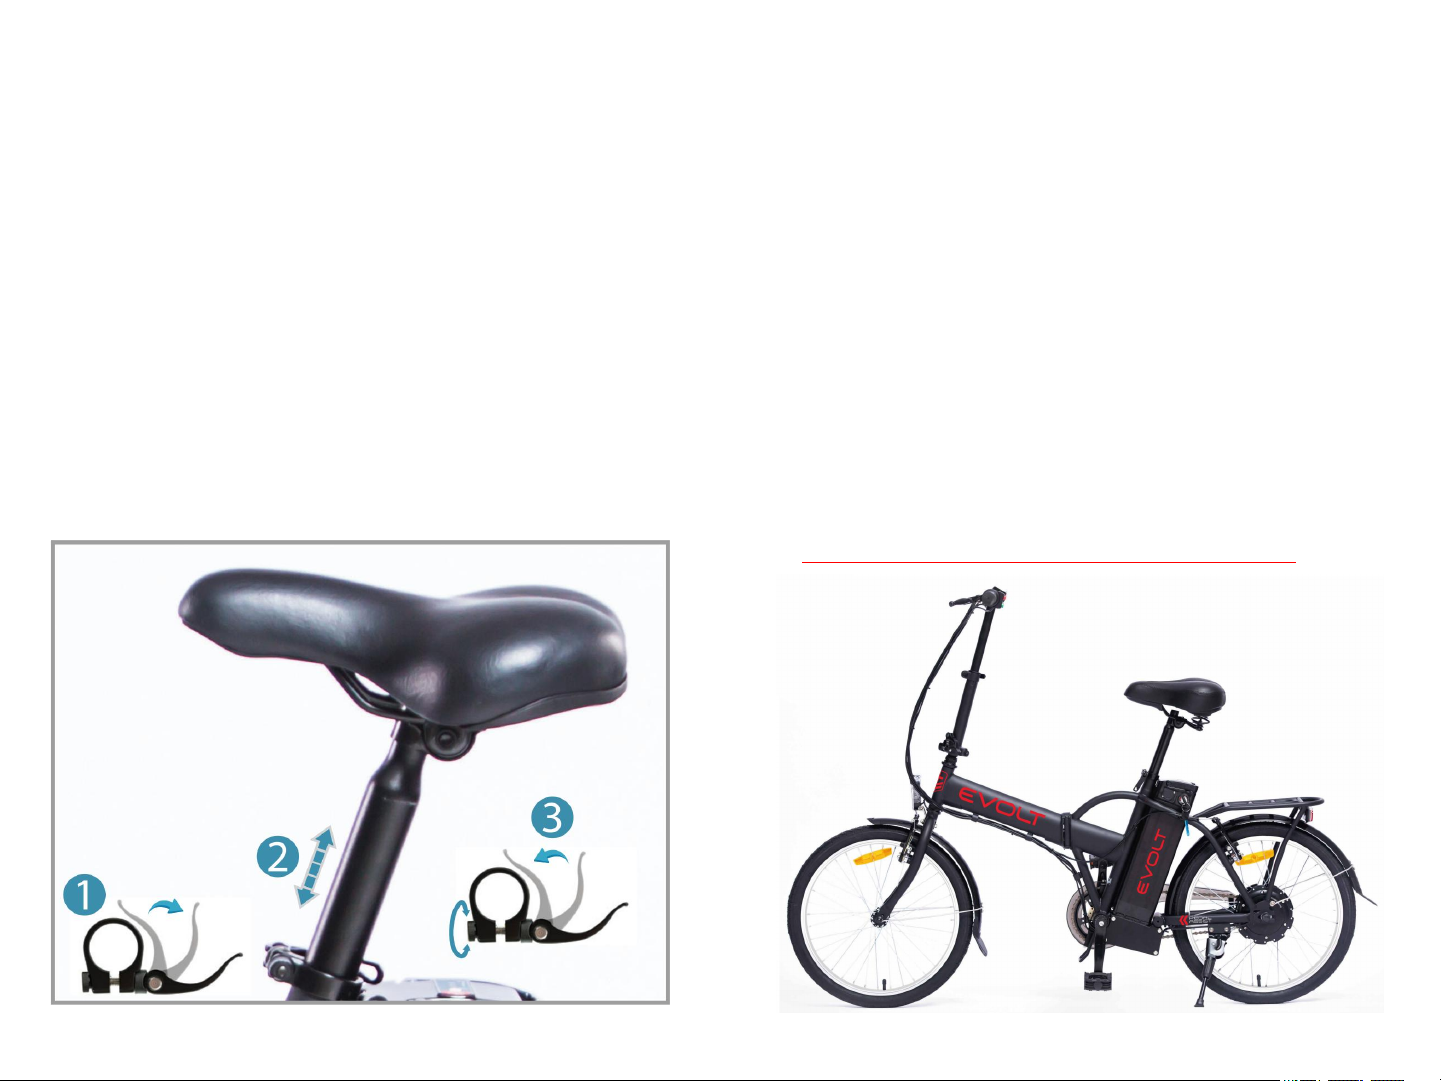
(IX)HOW TO CHOOSE SAFE SIZE OF THE BIKE Rider must be able to straddle bicycle with
at least 1 inch (2.54cm) clearance above the horizontal bar when standing.
(X)Please check before riding
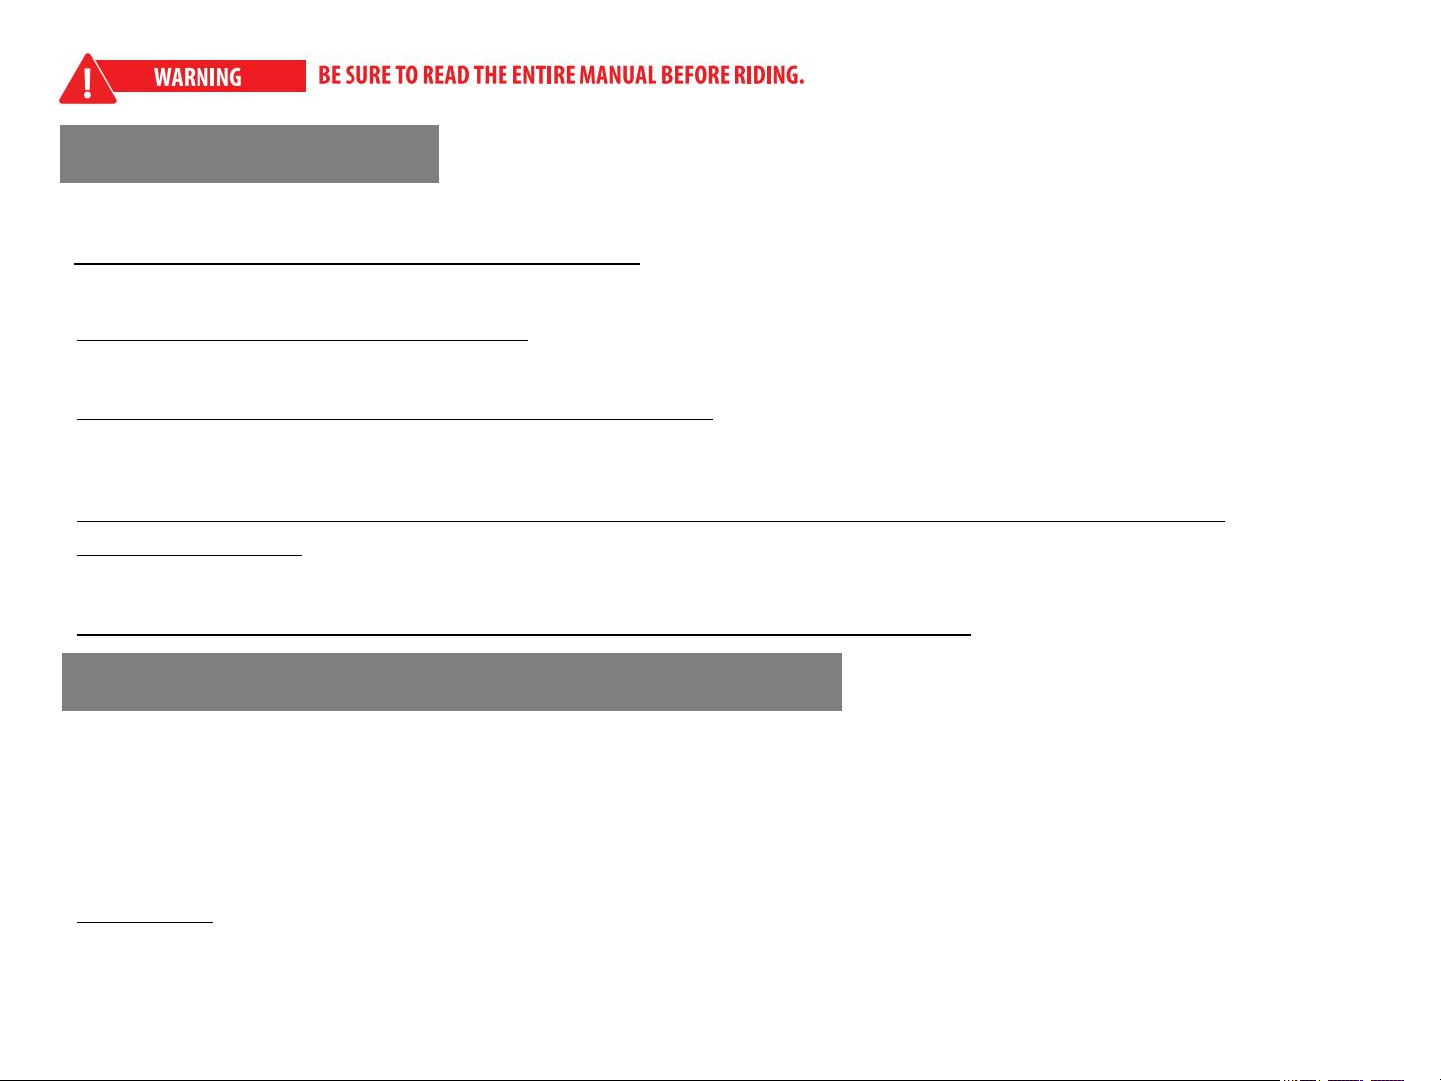
1. STEERING: Make certain that the stem is inserted into the head tube to at least
the minimum insertion line. Check the clamp nut and stem bolt to make sure they
are tightened securely.
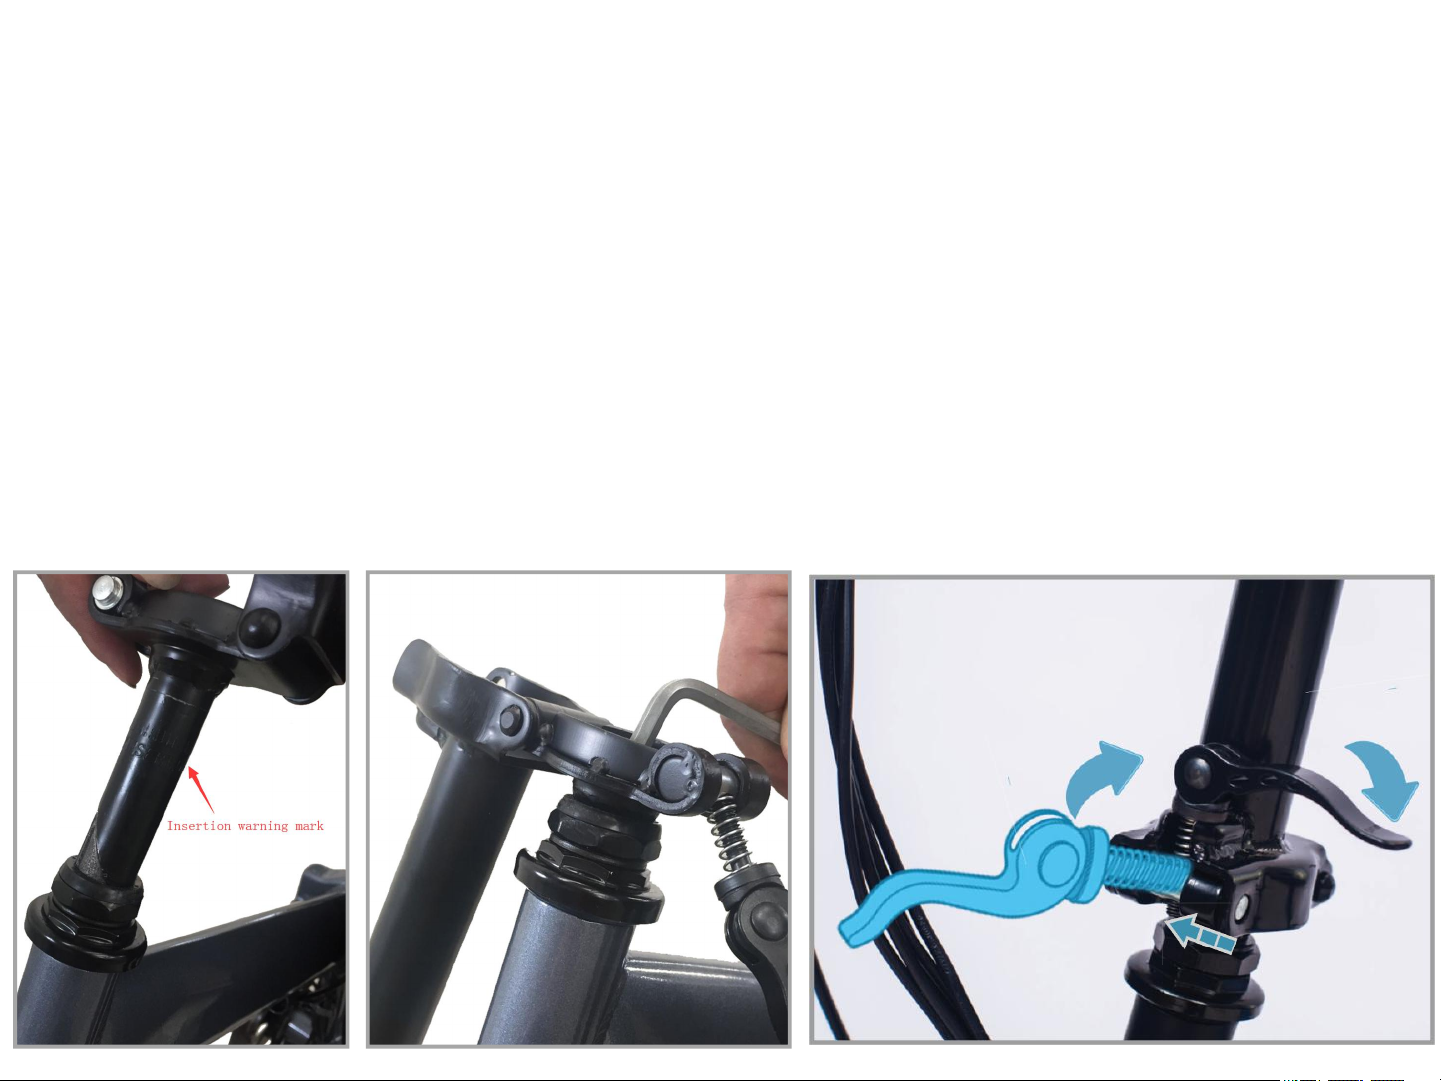
2. SEAT: Check for tightness of seat clamp and seat post clamp and that the
minimum insertion line is inside the frame. See that the seat is at the proper
height for the intended rider.
Perform each check list below after all assembly instructions and any necessary
adjustments have been completed. Warning: Failure to perform these checks could
result in serious injury to yourself and others.
3.GENERAL INSPECTION: See that all reflectors have been properly installed.
Replace any missing or damaged reflectors. Check all fasteners and tighten if
necessary.

REMOVE BIKE FROM CARTON
Be sure all parts are removed from carton. Check before you discard the
carton. Remove all protective packing material.
TOOLS REQUIRED FOR ASSEMBLY
M6 Allen Key, M15 Spnner, Torque Wrench Set(not provided)
ASSEMBLY INSTRUCTIONS
STEP# 1 – OPEN THE BIKE
1. Unfold the bike.
2. Lift up the frame quick release(A), open the front frame(B) to make sure the front frame
can connect rear half part.
3. Lock the quick release.
① ② ③
B
A

STEP# 2 – HANDLEBAR ASSEMBLY
WARNING: For safe operation, the clamp bolts must be securely tightened.
NOTE: your handlebar has been pre-assembled to the stem at our factory. For 4-7 please use this information for
adjustment and future reference.
1. Insert stem into head tube and tighten the bolts by M6 Allen Key (Recommended torque is 35-45 Newton
Metres), especially pay attention to the insertion warning mark.
2. Check steering by straddling the front wheel and trying to turn the handlebar. If you can turn the handlebar
without turning the front wheel, the stem is too loose. Adjust the handlebar angle which is perpendicular to
front wheel. Retighten the stem pillar bolt.
3. Lift up the quick release of stem(A) in order to close the top stem(B), then lock the clamp(C).
4. Loose clamp on stem.
5. Adjust handlebar to desired angle.
6. Securely tighten clamp. (Recommended torque is 8-12 Newton Metres)
7. Check handlebar for tightness. If you can move it forward or backward, the clamp are not tight enough.
WARNING: HANDLEBAR GRIPS OR TUBE END PLUGS SHOULD BE REPLACED IF DAMAGED, AS
BARE TUBE ENDS HAVE BEEN KNOWN TO CAUSE INJURY.
①
② ③
B
A
C

STEP# 3 – INSTALLING PEDALS
WARNING: For safe operation, the pedal spindle must be securely tightened against
the crank arm.Always replace damaged pedals, and always wear closed toe shoes or
sneakers when riding a bicycle.
1. Look for the letters ''R'' or ''L'' stamped on the pedal spindle.
2. Thread the pedal marked ‘’R‘’ into the crank arm on the ‘’chain side‘’ of the
bike.Turn the pedal spindle in a clockwise direction. Securely tighten the pedal
spindle by M15 tool.
3. Thread the pedal marked ‘’L‘’ into the crank on the left side of the bike. Turn
the pedal spindle in a counter clockwise direction. Securely tighten the pedal
spindle by M15 tool.
NOTE: Both pedals should be tightened towards the front of the bicycle.
TORQUE REQUIREMENTS 35-40 Newton Metres.

STEP# 4 – INSTALLING SADDLE
Tighten the quick release seat post binder bolt securely at desired height. Turning the
tension adjusting nut clockwise while keeping the cam lever from rotating increases
clamping force, turn it counterclockwise while keeping the cam lever from rotating reduces
clamping force. Less than half a turn of the tension adjusting nut can make the difference
between safe clamping force and unsafe clamping force.
Adjust angle of seat so that top of seat is parallel the ground and comfortable to the rider.
Retighten seat clamp nuts securely with an adjustable wrench.
NOTE: Especially pay attention to the insertion warning mark
NOTE: Test the seat to pedal distance by having the rider sit on the seat. When the rider‘s leg is slightly bent, the ball of
the foot should rest on the pedal when it is in its lowest position and the feet of a seated rider can reach the ground. If it
does not, adjust the seat height as necessary. Check for tightness by attempting to twist the seat. If the seat is loose, be
sure to tighten the clamp nut and binder blot nut securely.
After step 4, the Ebike has been assembled

① ② ③
④
A
B
A
C
B
D⑤ ⑥
FOLD THE EBIKE

FOLD THE EBIKE
1. Unlock the quick release on frame.
2. Release the quick release.
3. Lift up the quick release(A) and fold the front frame(B).
4. Unlock the quick release on stem(A), release it(B) and lift it up(C), then fold the top
stem(D).
5. Push the pedal inside.
6. Fold the pedal.
7. Fold the frame and stem.
After step 7, the Ebike has been folded
⑦

ADJUSTMENT INTRODUCTION
# 1 –FRONT WHEEL
NOTE: This Ebike has preassembled front and rear
wheels. Please use this information for adjustment and
future reference.
1. Turn the fork until the fork Plate points
to the front of the Bicycle. (See illustration
A)
2. Insert the wheel into the fork.
3. Install an axle nut to each side of the
axle.(see illustration B)
4. Tighten the axle nuts by hand. Make
sure there is an equal distance between
each fork tube and the wheel. Then use a
wrench and securely tighten the axle nuts.
(See illustration C & D)
REFER TO THIS INFORMATION IN CASE YOU
NEED THEM FOR FUTURE ADJUSTMENT

# 2 – SEAT POST AND SEAT
1. Loosen seat clamp nuts.
2. Insert the top portion of seat post into the seat clamp. Be
sure seat post is completely inserted into the seat clamp and
butted tightly against the end stop.
3. Retighten seat clamp nuts on both sides (Hand tight).
These nuts will be tightened later with an adjustable wrench.
NOTE: your saddle has been pre-assembled to the seat post at our factory.
Please use this information for adjustment and future reference.
1.Slide each V-Brake assembly onto the appropriate cantilever
boss and secure by tightening the cantilever blot with a 6 mm
hex key. You may hand tighten at this point as you will need to
readjust the tension later. (See illustration A)
2.Install the inner brake cable by pushing it through the cable
routing tube (or “noodle”) note that we offer two noodle angles
(90 degrees and 135 degrees) depending on your bike setup.
Now tighten the cable fixing bolt to a torque that does not exceed
3-6 Newton Metres. (See illustration B)
WARNING: Replacement of brake pads in time
# 3 – V-BRAKE
NOTE: your V-brakes have been pre-Installed at the factory, please use this information
for adjustment and future reference.
NOTE: as AU/NZS standard, left brake lever control rear brake, right brake lever control
front brake, please use both brakes when braking. The electric system will be cut off
automatically when braking.

BRAKE RUBBER REPLACEMENT
The brake rubbers will be damaged or worn-out after continued use.
Loosen the anchor bolt nut and the rubber bolt nuts. Replace the damaged rubbers.
Re-tighten the bolt nuts and then re-tighten the anchor bolt nut.
WARNING: Be sure the anchor bolt and the rubber bolts are fully tightened. Do not ride your
bicycle if the rubber has been damaged or has worn-out.
3. To ensure maximum leverage the two brake arms must
be nearly parallel to each other. To make this adjustment,
hold the brake shoes so that they are touching the rim
and measure the distance between points a and b.(See
illustration C)
4. Adjust the spring tension in each brake arm so that
both sides are equally tensioned. Do this by holding the
cantilever bolt with a 6mm hex key and turning the spring
tension nut with a 23mm spanner.(See illustration D)
5. After ensuring that the total clearance between both
brake pads and the rim is 2-3mm stretches the cable by
squeezing the brake lever 5-10 times. (See illustration E)
Then readjust the brakes as necessary.

The battery is 60% pre-charged, it’s a smart lithium battery no special action needs to be taken when first
charging. We provide a dedicated smart charger that has a charge protection function.
1. Insert the AC plug
2. Remove the cover on battery and insert DC plug into battery.
3. When the battery is charging the light is red color
4. When charged about 80% the light will turn to green color, please charge it about 1 more hour then will
be100% charged, and the charger will automatically stop charging. From 0% charge to 100% takes about 5
hours.
5. Press the button on the battery the LED light will be illuminated to show battery percent.
6. Use the Ebike(battery) in a proper environment, do not use in the rain or waterlogged area, applicable
temperature from -10℃ to 50℃. The best temperature from 0 ℃ to 40℃, too cold or too hot will affect battery
efficiency and life.
7. Only use the charger supplied to charge the battery, charge the battery only in a well-ventilated area. Do not
expose the battery to heat or charge it in direct sunlight or in the rain.
CHARGE & BATTERY
③ ④
⑤⑥
⑦

ENVIRONMENT
- CORRECT DISPOSAL OF THE BATTERY:
This marking indicates that this product should not be disposed of with other household waste
throughout Australia. To prevent possible harm to the environment or human health from
uncontrolled waste disposal, recycle it responsibly to promote the sustainable reuse of material
resources. To recycle your used device, please use the return and collection systems or contact
Global Fitness and Leisure Pty Ltd for safe recycling of this battery.
Do not disassemble or modify the battery, do not connect the (+) and (-)connections of the battery with
a metal object, do not expose the battery to liquids.
In the event of non-use, infrequent use or storage, recharge the battery at least every month to ensure
that it will work properly, and keep in a dry and cool environment.
OPERATION
SEE PICTURE ATTACHED AS BELOW
1. START:
Insert the key into the battery and turn it to the ON position, the Ebike will have electricity, LED light next
to throttle will be illuminated to show battery percentage.
Use the pedals to start pedal assistance mode. In accordance with the current standard, assistance is
cut at 25 km/h, the engine stops automatically when you stop pedaling(freewheel)or brake.
OFF:
Turn the battery key to the OFF position, the power supply will be cut off.
2. EV MODE:
Turn the throttle will provide 6km/h EV mode.
3. TAKE OFF/PUT IN BATTERY:
Take off: Turn the battery key to the UNLOCK position, pull out the battery by the handle.
Put in: Put battery in the frame, turn the battery key to the OFF position.

①
②
③

Troubleshooting
Problems
Possible Causes
Solutions
When turned on, the indicator light
won’t turn on;
The motor won’t work, the display
won’t turn on;
And there is no electric power to the
bike.
The battery is completely discharged.
The electric cable which connects the
battery is loose.
The fuse has burnt
Charge the battery
Contact Global Fitness and
Leisure Pty Ltd to fix the cable
firmly
Contact Global Fitness and
Leisure Pty Ltd to change the
fuse
The travelling distance has been
reduced.
Insufficient battery capacity.
The battery is becoming old and
needs replacement.
Braking frequently, riding uphill or
running against the wind continuously.
Charge the battery fully
Change the battery
Use more pedaling
The indicator light does not
illuminate when charging
The connecting cable is getting loose
The fuse has burnt out
The charger is damaged
Insert the socket firmly
Contact Global Fitness and
Leisure Pty Ltd to change the
fuse
Change the charger
Other issues
Problems with electrical components
Contact Global Fitness and
Leisure Pty Ltd

After each ride, wash your bike with soapy water (liquid dish soap is recommended for its ability to remove
grease without damaging the bike), do not wash electrical parts. AVOID USING HIGH-PRESSURE
WASHERS. Dry your bike with a soft cloth in order to avoid rust and corrosion. While carefully drying your
entire bike, you will also be able to inspect all the different parts and detect any potential problems.
Lubrication is an important part of maintenance of electric vehicles. The front axle, middle axle flywheel, front
fork shock absorber pivot and other components should be scrubbed by butter or oil every six months.
CLEANING & LUBRICATION
CHECK THE CHAIN TENSION AFTER EVERY RIDE. The correct chain tension is 8036 N
Bike has a freewheel you can do this by spinning the pedals backwards. The chain needs to be
as tight as possible without creating friction that will waste energy and wear the chain and cogs
prematurely.
Professionals are required to operate the following steps:
To adjust the rear wheel's position, loosen one side and push the rim between the chain stays
to one side to move the loose end of the axle a short distance back or forward. Retighten the
nut. Loosen the other side and ease the rim in the other direction so the rear wheel is once
again straight in the frame.
Test again and repeat the process, moving the rear wheel a short distance forward or back until
the tension is in the target zone. You need to test by spinning pedals because neither cogwheel
will be a perfect circle so the chain tension will vary as the cranks spin.
Once the chain tension is acceptable, tighten both nuts fully.
During the whole process please pay attention to motor cable, do not damage it or make the
cable loose.
Table of contents