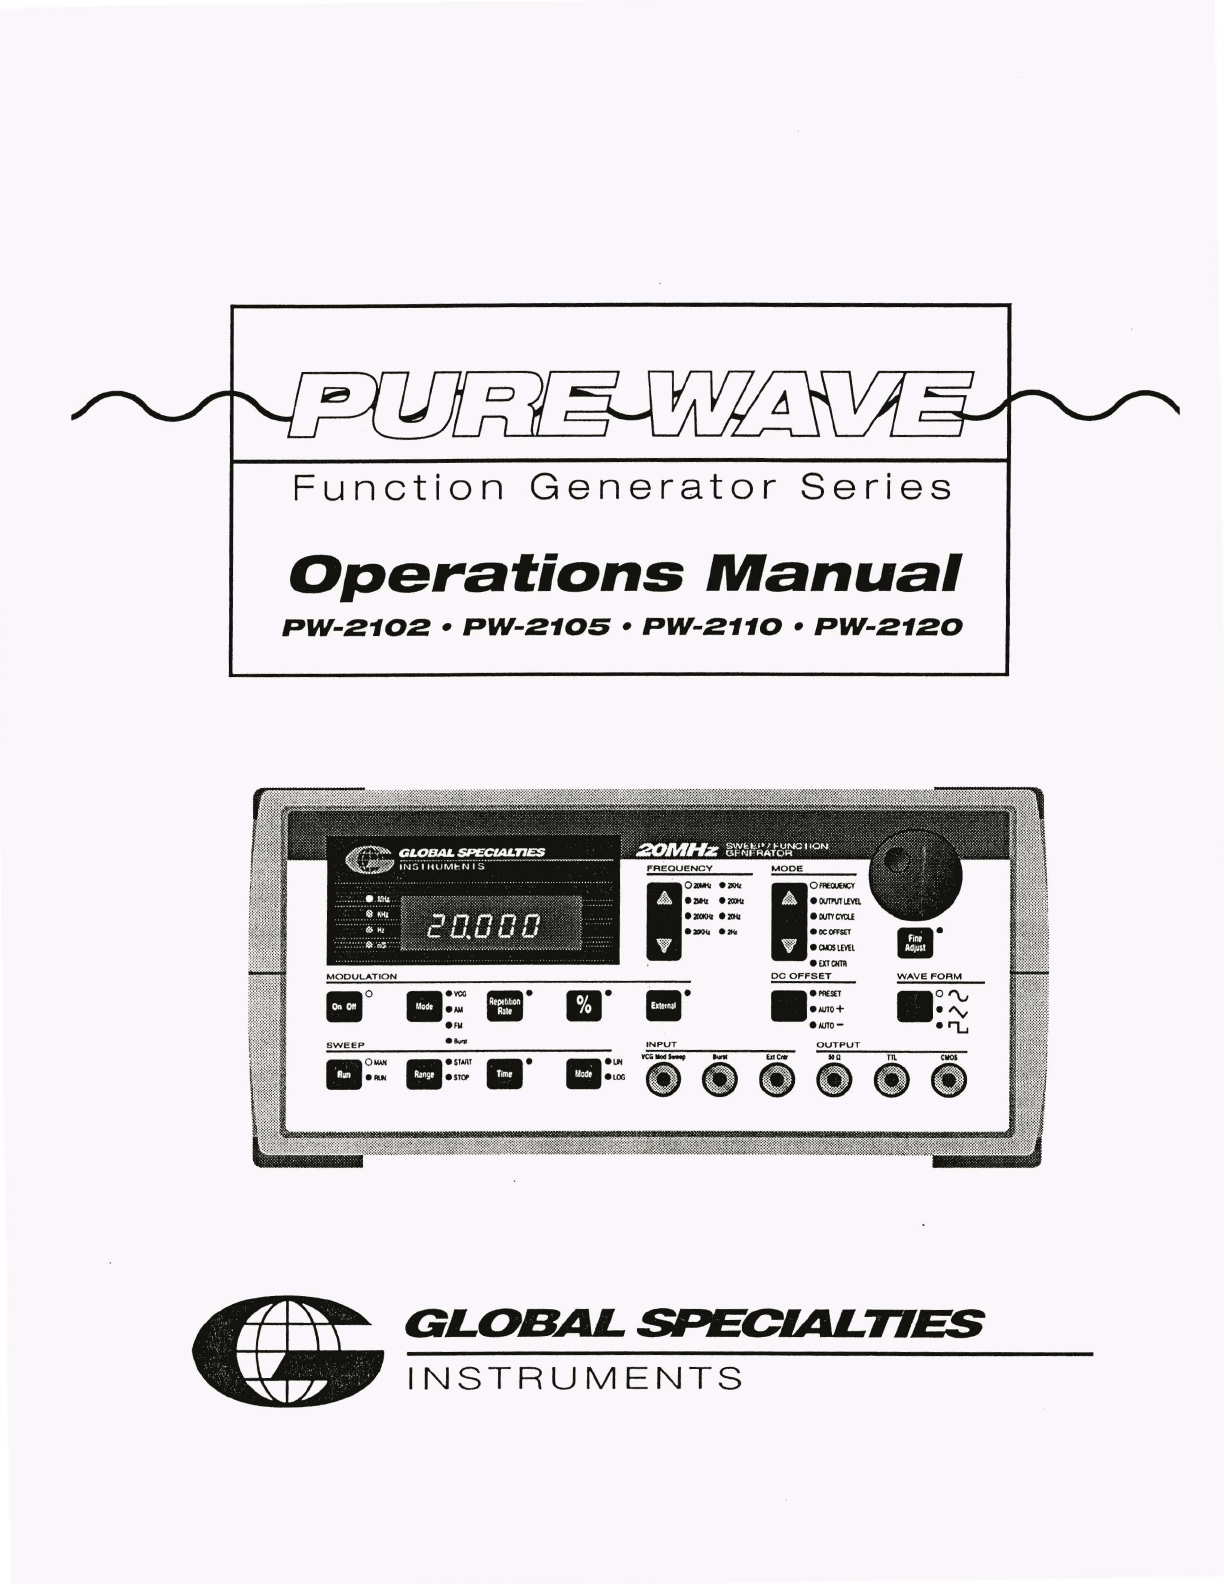
Global Specialties PURE WAVE PW-2102 User manual

Function
Generator
Series
Operations
Manual
PW-2102
•
PW-2105
•
PW-2110
•
PW-2120
S
WEEP
....
1
~=::
~~=
•JXlKXI•m
eDUTYCttU
•31104&
•2KI
eocOf'Fs:ET
.
eca.ost.Mt
.
...,"""
OC
OFFSET
WAVE
FORM
-·
ll
ei'IUT
•-+
eAUTo-
11
0'\,.
•"'y
•
'"L
INPUT
~OUT~PUT
---=----==-
• o
...........
,
••
eu
·. ··
esror
•=:··
••••
GLOBAl
Sl
'LCU't
TIES
INSTRUMENTS


©Copyright
1999 lnterplex Electronics, Inc.
All rights reserved.
No
part of this book shall be reproduced, stored
in
a retrieval
system, or transmitted by any means, electronic, mechanical, photocopying, re-
cording, or otherwise, without written permission from the publisher.
No
patent
liability is assumed with respect to the use of the information contained herein.
While every precaution has been taken
in
the preparation of this book, the pub-
lisher assumes no responsibility for errors or omissions. Neither
is
any liability
assumed for damages resulting from the use of the information contained herein.
Printed
in
the United States of America.
GLOBAL
SPECIAL77ES
1486 HIGHLAND AVENUE
.TM
CHESHIRE, CT 06410
an
lnterp/ex
www.
g Io
ba
Is
pee
ia Iti
es.
corn
/Jndustries company


Table
of
Contents
Specification for
20
MHz Function Generator........................................................................2
Controls
and
Indicators .........................................................................................................4
Front Panel .................................................................................................................4
Back Panel.................................................................................................................. 7
Operating Instructions ...........................................................................................................8
Frequency Selection ...................................................................................................8
Output LevelAdjustment ............................................................................................9
Waveform Selection....................................................................................................9
Duty Cycle Adjustmentand Obtaining Ramp
and
Pulse Waveforms ......................... 9
DC
OffsetAdjustment...............................................................................................
10
CMOS Level Adjustment ..........................................................................................
10
External Counter.......................................................................................................
10
Modulation Modes ....................................................................................................
12
Voltage Controlled Frequency Operation .......................................................
12
AM
Operation.................................................................................................
13
FM Operation .................................................................................................
14
Burst Operation..............................................................................................
16
Sweep Operation ........................................................................................... 17
DC Offset Compensation ....................................................................................................
18
Settings Storage..................................................................................................................
19
Data Communications .........................................................................................................20

Specifications
1.
Frequency
Characteristics
Waveforms sine, triangle, square,
+1-
pulse,
+1-
ramp
Range 0.2 Hz to
20
MHz
in
8 ranges
Resolution 5 digits
Frequency stability +1 - 0.01% for ranges 20 Hz to 20 MHz, +1 - 0.1% for range
2Hz
(excluding VCG, FM modulation, manual sweep, stop
sweep frequency setting and external counter modes)
Tuning range coarse and fine 0.09
to
1.1
times of the selected range, fine
1/1
Oath
of coarse setting speed
Variable duty cycle 15% to 85% continuously variable
Operating modes normal, sweep, VCG, AM,
FM,
burst
2.
Output
Characteristics
Impedance 50 Q
±1
0%
Amplitude Level 20 V p-p open circuit, 10 V p-p into
50
Q variable
DC
offset Preset
±0.1
V
3.
Sine Wave
Distortion
Flatness
4.
Square Wave
Symmetry
Rise time
5.
Triangle Wave
Linearity
6.
TTL
Output
Level
Rise time
7.
CMOS
Output
Max. frequency
Level
Rise time
Auto + negative peak of waveform 0 V ±
Auto-
0.1V
Variable positive peak of waveform 0 V
±0.1
V
±1
0 V open circuit,
±5
V into 50 Q
Signal plus offset not
to
exceed 1
OV
<1% (at 1 kHz, duty cycle 50%)
±5% (.45 dB) at 10
Hz
to 10 MHz,
±10% (1.0 dB) at
10
MHz to
20
MHz
±3% (at 0.2
Hz
to 100kHz)
<20 ns
>98% (at 0.2 Hz to
100kHz)
0.8 V to 2.4 V
<20 ns
2 MHz
0-4V to 0-14 V continuously variable
<120 ns
8.
VCG (Voltage
Controlled
Generator)
Input
Input voltage 0
to
10
V
±IV
, 0-10 V causes a 1 to
tOO
frequency change
Impedance 10 k ±5%
~
GLOBAL
SPECIALT7ES
~INSTRUMENTS

9.
Sweep
Operation
Mode Linear or logarithmic
Width 1 to 100 continuously variable
Rate
Sweep output
Start/stop
20 ms to 30 s continuously variable.
0-2V
Adjustable
10.
Amplitude
Modulation
Characteristics
Source Internal or external
Modulation depth 0 to 100 %
Internal modulation 1 to
15kHz
modulation
DC
500 kHz
External sensitivity 1
0 V p-p for 100%
11.
Frequency
Modulation
Characteristics
Internal or
0 to 5%
1
15
DC
kHz
carrier signal
modulation
modulation
sensitivity 10 V p-p for 5% deviation
or
than
V)
Continuously variable from 1 ms to burst repetition time
minus 1 ms
50
as
main frequency
Always integer number starting finishing at zero
0 ±
5 digit
5 to
0.005% automatically switched
on
input frequency
mV rms.
mm
1
MQ
1 5 at output V
Square
Divide
by
10
or
100
Auxiliary square wave outputs i/1
Oth
and
1/1
OOth
of the main frequency-
GLOBAL
SPECIALTIES
INSTHUMENTS

Front
Panel
The generator's front panel
is
shown
in
Figure
1.
14
13
15
16
1-3.
4-6.
32 33 2 1 3 4 5
23 24 25
26
27
28 29 30 34 35 36
17 18
19
21
22
Figure 1:
Front
Panel.
Frequency
Group
6
37 38 39
9
10
31
8
4
12
11
1
,2.
FREQUENCY RANGE selection keys. The selected range
is
indicated by the LED
indicators (3).
3.
FREQUENCY RANGE
LED
indicators. 8
LED
indicators determine maximum frequency
of each range -20 MHz, 2 MHz, 200 kHz,
20
kHz, 2 kHz, 200 Hz,
20
Hz,
2
Hz.
Mode
Group
4,5. MODE selection keys. Selects one of six available operating modes.
6. MODE LED indicators. There are 6 LED indicators- FREQUENCY, OUTPUT LEVEL,
DUTY CYCLE,
DC
OFFSET, CMOS LEVEL, EXT CNTR. The lighted LED indi-
cates the parameter, which value
is
being displayed (33), and can
be
adjusted
by
rotation of the tuning knob (31).
7. FINE ADJUST
key.
Switches on/off fine adjustment of frequency, burst repetition
rate, tone burst time and sweep time.
Note: The FINE ADJUST key
(7)
has three additional functions
-see
Output
Level Adjustment (page
9,
item 4), Sweep Operation (page 18, item 19) and
DC
Offset Compensation (page 19).
8.
FINE ADJUST LED indicator. When the LED indicator
(8)
is
on,
rotation of the
tuning knob (31) causes fine adjustment of the above mentioned parameters, oth-
erwise -coarse adjustment prevails.
~
GLOBAL
SPECIALT7ES
~INSTRUM
ENTS

DC Offset Group
9.
DC
OFFSET
key.
Selects one of three possible preset values of
DC
offset.
10. DC
OFFSET
LED indicators. There are 3 LED indicators -PRESET, AUTO+, and
AUTO- that indicate the preset value selected by the
DC
OFFSET key (9). When
the PRESET LED indicator is on, the DC offset is set to zero. When AUTO+ LED
indicator is on, the DC offset
is
set to be equal to output level value, and when
AUTO- LED indicator
is
on, the DC offset is set to be equal to minus the output level
value.
Waveform Group
11. WAVEFORM
key.
Selects sine, triangle or square waveforms at the 50Q output
jack (37).
12. WAVEFORM LED indicators. There are 3 LED indicators -SINE, TRIANGLE,
SQUARE, which indicate the selected waveform.
Modulation Group
13.
ON/OFF
key.
Switches modulation on/off. Modulation
is
on
when lit.
14. ON/OFF LED indicator. When the LED indicator (14)
is
on,
modulation mode shown
by the LED indicator (16)
is
on.
Otherwise all LED indicators (16), (18), (20) and
(22) are off and keys (15), (17), (19) and (21) will be disabled.
15. MODULATION
MODE
key.
Selects one of four possible modulation modes.
Modulation must be
on
to enable.
16. MODULATION
MODE
LED indicators. There are 4 LED indicators- VCG, AM,
FM, BURST, which indicate the selected modulation mode.
17. REPETITION RATE
key.
Enables adjustment of the repetition rate of the internal
signal
in
the burst gate
in
the burst modulation mode. Enables adjustment of the
frequency of the internal modulating signal for AM/FM modulation modes.
18. REPETITION RATE LED indicator. When the LED indicator (18)
is
on
and internal
BURST mode
is
selected, the repetition period value
in
milliseconds is displayed
(33) and can
be
adjusted by rotation of the tuning knob
(31
).
When the LED indica-
tor (18)
is
on
and internal
AM
or
FM
mode
is
selected, the frequency of internal
modulating signal
is
displayed (33) and can
be
adjusted by rotation of the tuning
knob
(31
).
19. %
key.
Enables the percentage of internal AM/FM modulation or the duty cycle of
internal burst gate adjustment- according to the selected modulation mode (AM,
FM
or BURST). Enabled only if the ON/OFF LED indicator (14)
is
on
and the
EXTERNAL LED indicator (22)
is
off.
20. % LED indicator. When the LED indicator (20)
is
on,
and internal
AM
or
FM
or
BURST mode
is
selected, the
AM
or
FM
modulation percentage or the duty cycle
of
burst modulation
is
displayed (33), and can
be
adjusted by rotating of the tuning
knob
(31
).
21.
EXTERNAL
key.
Selects whether modulation
is
from
an
internal source or from a
signal applied to the VCG MOD input jack (34) (for
AM
or
FM
modulation), or from
BURST input jack (35) (for burst modulation mode). Enabled only if the LED indi-
cator (14)
is
on
and the VCG LED indicator (16)
is
off.
22.
EXTERNAL
LED indicator. When the LED indicator (22)
is
on,
the modulating
source will
be
a signal applied to the VCG MOD input jack (34) (for VCG,
AM
or
FM
~
GLOBAL
SPECIALT7ES
~INSTRUMENTS

modulation) or to the BURST input
jack
(35) (for burst modulation mode). Other-
wise the modulating source will be an internal signal.
If
VCG modulation mode is
selected, the LED indicator (22) is always on.
Sweep
Group
23. RUN
key.
Switches sweep modes between Normal Sweep, Manual Sweep, and
Sweep off.
24. RUN/MAN LED indicators. Indicate the sweep mode, selected by the RUN key. If
the RUN and MAN LED indicators (24) are both off, the sweep mode is off. If the
RUN LED indicator (24) is on
-the
generator sweeps between the start and stop
frequencies. If the MAN LED indicator (24) is on, some intermediate frequency will
be continuously present at the output with its value fixed
on
the specific value the
moment the RUN key is pressed.
The
frequency value will be displayed (33) and
can be adjusted in the range between the start and stop frequencies by rotation of
the tuning knob
(31
).
25. SWEEP RANGE
key.
Enables the adjustment of the sweep start and/or stop fre-
quencies. This switch also switches sweep or modulation on and off.
26. START/STOP LED indicators. Indicates whether sweep start or stop is enabled.
Start or stop frequencies can be adjusted by rotating tuning knob
(31
).
27. TIME key. Enables sweep time adjustment.
28. TIME LED indicator. When the LED indicator (28) is on, the value of sweep time
is
displayed
in
milliseconds and can be adjusted by rotating the tuning knob
(31
).
29. SWEEP MODE key. Selects linear
or
logarithmic sweep operation.
30. LIN/LOG LED indicators. Indicates sweep mode of operation.
31. TUNING KNOB. Adjusts the parameterselected by one of the following keys listed
below:
32.
33.
• MODE (4,
5)
• REPETITION RATE (17)
• % (19)
• SWEEP RANGE (25)
• TIME (27)
Clockwise rotation ofthe tuning knob changes the selected parameterfrom its mini-
mum to maximum value, and vice versa for counter-clockwise rotation. Units of
measure, excluding volts, are indicated by the UNITS of MEASURE LED indicators
(32).
UNITS
of
MEASURE LED indicators. There are 4 LEOs, which indicate the units
of measure corresponding to the operation mode selected.
DISPLAY. Displays the appropriate numerical value corresponding to the param-
eter selected by one of the keys listed below: MODE (4,5), REPETITION RATE
(17), % (19), SWEEP RANGE (25), TIME (27). When frequency
is
displayed, the
value is updated every 0.5s.
~
GLOBAL
SPECIALT7ES
~INSTRUMENTS

Input
Group
34. VCG (VOLTAGE CONTROLLED GENERATOR) MOD input jack. Becomes the
Modulation signal source, or the VCG input once selected by the Mode key (15).
The VCG allows external control of the generator output frequency by a voltage
applied to this jack.
35. BURST input jack. Input for the external gating signal for the burst operation.
36. EXT CNTR input jack. Input for external frequency measurements.
Output
Group
37. 50Q output jack. Function generator output.
38. TTL output jack. TTL-level square wave output with adjusted duty cycle
in
the
FM,
VCG or Sweep Modulation modes.
39. CMOS output jack. Square wave output with adjusted CMOS level and duty cycle,
with
FM,
VCG or sweep modulation (if selected) for frequencies less than 2 MHz.
43
44
45
40
41
42 46
Figure
2:
Back
Panel
40. GCV output jack. Generator Control Voltage output. Output voltage proportional
to
the generator frequency. When the sweep mode
is
selected, a sweep voltage
output
is
available at this jack for connection
to
an
oscilloscope.
41. TTU1 0 output jack. TTL level square wave output at
1/1
Oth
of tuned frequency.
42. TTU1 00 output jack. TTL level square wave output at
1/1
Oath
of tuned frequency.
43. RS-232 interface.
44. Fuse.
45.
Power
switch.
46.
Power
cord.
~
GLOBAL
SPECIALT7ES
~INSTRUMENTS

Operating
Instructions
Frequency Selection
Range
name
2Hz
20Hz
200Hz
2kHz
20kHz
1.
Select FREQUENCY by depressing the MODE keys (4,5). Once selected, the main
output frequency will
be
displayed along with the appropriate units of measure.
2.
Select the desired maximum frequency range by depressing the FREQUENCY
RANGE keys
(1
,2). Table 1 lists the features of each frequency range.
range range range range Units measuring measurement measurement
nominal nominal real real time resolution resolution
minimum maximum minimum maximum at MIN**** at MAX****
frequency frequency frequency frequency
MIN
MAX
Fmin' F
max'
approx. approx.
0.2 2.0000 0.1800 2.2000 Hz 5
..
0.5 s* 4*10·6Hz 4*10-4Hz
2 20.000 01.800 22.000 Hz 5
..
0.5 s** 4*10-5Hz 4*10-3 Hz
20 200.00 018.00 220.000 Hz 0.5
..
0.05 s** 4*10-4 Hz 4*10-2 Hz
0.2 2.0000 0.1800 2.2000 KHz 0.5
..
0.05 s*** 4*10-5kHz 4*10-4 kHz
2 20.000 01.800 22.000 KHz 1 s
10-
3kHz
10-
3kHz
200kHz
20 200.00 018.00 220.000 KHz
0.1
s
10-
2kHz
10-
2kHz
2 MHz 200 2000.0 0180.0 2.2000 KHz 0.5 s 6.4*1
0-
1 kHz 6.4
*1
o-
2 kHz
20
MHz
2000 20000 01800 22000 KHz 0.05 s 6.4*1
o-
1 kHz 6.4*1
o-
1 kHz
Table 1 -Main Features
of
Generated Frequency Ranges.
* For the 2 Hz range, measurement time is equal to 1 period of the measured frequency.
** For the 20 Hz and 200 Hz ranges, measuring time
is
equal to 10 periods of the mea-
sured frequency.
*** For the
2kHz
range, measurement time is equal to 100 periods of measured frequency.
**** Displayed resolution
is
limited by the 5 digit display.
3.
Switch fine adjustment
on
or off by the FINE ADJUST key (7).
4.
Rotate the tuning knob for coarse adjustment to the approximate desired output
frequency value. Coarse adjustment adjusts the output
in
steps of 1/202th of (Fmax
-F
min}.
5.
Turn
on
the FINE ADJUST key
(7).
6.
Rotate the tuning knob for fine adjustment of the output frequency to the specific
desired value. Fine adjustment provides 1/100 of coarse setting speed.
7.
The function generator output
is
available
in
several places:
TTL output jack (38).
50 Q output jack (37)
CMOS output jack (39) (at frequencies less than 2Mhz)
TTU1 0 & TTU1
00
(for signals at
1/1
Oth
and
1/1
OOth
of main frequency)
8.
Frequency stability is provided
by
automatic frequency regulation.
Note: The display value
is
updated every 0.5
s.
However, if the measurement time
(see Table
1)
exceeds 0.5
s,
the value
is
updated once every measuring period.
~
GLOBAL
SPECIALT7ES
~INSTRUMENTS
f*
I

Output
Level
Adjustment
1.
Select the DC OFFSET PRESET key (9) for zeroing the DC component.
2.
Select OUTPUT LEVEL via the MODE key (4,5). The output level in volts is dis-
played (33), while the UNITS
of
MEASURE indicators (32) are off.
3.
Rotate the tuning knob to adjust for the desired output amplitude. The output level
can be varied from
0.1
V to 1 V in
0.01
V steps (-20 dB), and from 1 V to 10 V
in
0.1
V steps (0 dB). The output may also be set to
OV.
The -20 dB and 0 dB pads are
indicated
in
the first position of the display (33)
by"_"
or
u-ll
symbol respectively.
IMPORTANT: Changes
in
amplitude can affect the DC offset because ampli-
tudes below
1.1
V warrant a -20
dB
attenuation, which limits the offset to
-1
V to 1
V.
Therefore, if previous to an amplitude change, the amplitude was
1.1
V and the
DC
offset was 6 V and then the amplitude was changed to 1
V,
the offset would be
changed to 0.6
V.
Changing the amplitude back to
1.1
V would bring the offset
back to 6
V.
In
order to avoid the unwanted
DC
offset change, switch the attenua-
tion pad as indicated
in
step
4.
4.
When the amplitude is forced to exceed 1 V the message,
"Odb"
is
displayed (33)
and the FINEADJUST key (7) must be pressed to confirm the change
in
the attenu-
ation pad as well as the corresponding change
in
the DC offset. Respectively,
when the amplitude is forced to decrease below 1
.1
V,
the message "-20db" ap-
pears, and the FINE ADJUST key (7) must be pressed
in
order to change ampli-
tude to 1
V.
5.
The signal at the desired amplitude is available at the 50 Q outputjack (37). Adjust-
ing the output level will not affect the
TIL
and CMOS output jacks (38), (39), (41)
and (42).
Waveform
Selection
1.
Select the desired waveform (SINE, TRIANGLE or SQUARE) by using the WAVE-
FORM key
(11
).
The appropriate LED indicator will light and the desired signal will
be present at the 50 Q output jack (37).
2.
Waveform selection will not affect the
TIL
and CMOS output jacks (38), (39), (41)
and (42).
3.
Ramp and pulse waveforms can be obtained by adjusting the duty cycle (see be-
low).
Adjusting
the
Duty
Cycle
and
Obtaining
Pulse
and
Ramp Waveforms
Sine
1.
2.
3.
4.
Select the sine waveform.
Select DUTY CYCLE via the MODE keys (4,5). The duty cycle (as ratio of "high"
time to whole period
in
percentage terms) is displayed (33), with the % LED (32)
illuminated.
Rotate the tuning knob to adjust the duty cycle appropriate for the desired wave-
shape. The duty cycle can be varied from 15% to 85%
in
0.35% steps.
The desired waveshape will now be available at the 50Q output jack (37). The
square or pulse signal at adjusted duty cycle is present at the
TIL
(38) and CMOS
(39) output jacks. Adjustment of the duty cycle does not affect the
TIU1
0 (41) and
TIU1
00 (42) output jacks, which always provide a square wave with a 50% duty
cycle.
~
GLOBAL
SPECIALT7ES
~INSTRUMENTS

Triangle
5.
Select triangle waveform.
6.
Adjust the duty cycle with the tuning knob to obtain the desired ramp waveform,
otherwise a triangle wave will be present with a 50% duty cycle.
7.
The desired waveshape is available at the 50 Q output jack (37), at the
TIL
(38)
and CMOS (39) output jacks. Adjustment of the duty cycle does not affect the
TIU
10 (41) and
TIU100
(42) output jacks, which always provide a square wave with a
50% duty cycle.
Square
8.
Select square waveform.
9.
Adjust the duty cycle via the tuning knob. For a duty cycle equal to 50%, a square
wave is obtained, otherwise a pulse signal
is
obtained.
1
0.
The square or pulse signal at the adjusted duty cycle
is
available at the 50 Q output
jack (37), as well as at the
TIL
(38), and CMOS (39) output jacks.
11.
Varying the duty cycle has no effect on the output frequency.
DC
Offset
Adjustment
There are two ways to set the
DC
offset -preset to one of three values by the
DC
OFFSET key
(9)
or continuous adjustment by the tuning knob (see below).
1.
Select DC OFFSET via the MODE keys (4,5). The
DC
offset
in
volts is displayed
(33), however, the Unit of MEASURE LED indicators (32) will be off.
2.
Rotate the tuning knob to add a positive or negative
DC
component to the output as
desired. The
DC
offset can be varied independently from the output level control,
ranging from -10 V to 10 V
in
0.1
V steps or from
-1
V to 1 V
in
0.01
V steps
depending
on
the attenuation pad
(0
dB or -20 dB). The attenuation pad is deter-
mined by the amplitude value and
is
indicated
in
the first position of the display (33)
by the
"_"or"-"
symbol respectively (see Output Level Adjustment (page 9)).
3.
The signal at the required DC offset will now be available at the 50 Q output jack
(37). Adjustment of the
DC
offset does not affect the
TIL
and CMOS output jacks
(38), (39), (41) and (42).
Note: The output signal cannot exceed ± 10
V,
and therefore excessive
offsets will be cut off.
CMOS
Level
Adjustment
1.
Select CMOS LEVEL via the MODE keys (4,5). CMOS levels
in
volts are displayed
(33) and all UNIT of MEASURE LED indicators (32) will be off.
2.
Rotate the tuning knob to the desired CMOS output level. A positive CMOS level
with respect to ground can be varied from 4 to 14 V
in
0.1
V steps.
3.
The adjusted signal will now be available at the CMOS output (39). Adjustment of
the CMOS level does not affect the 50 Q output jack (37) and
TIL
output jacks (38),
(41) and (42).
External
Counter
1.
Select EXT CNTR via the MODE keys (4,5). If no signal
is
applied to the EXT
CNTR input jack (36), five "dashes" will appear
on
the
display"--",
indicating no
frequency measurement has been obtained.
2.
The tuning knob
is
disabled
in
this mode.
~
GLOBAL
SPECIALT7ES
~INSTRUMENTS

range
name
2Hz
20Hz
200Hz
2kHz
20kHz
200kHz
2MHz
20 MHz
*
3.
Apply the signal to be measured to the EXT CNTR input jack (36).
4.
The frequency range corresponding to the measured frequency will be automati-
cally selected to fulfill the correlation:
Flow<Finp<Fhigh•
where
Finp
is
input frequency,
F1ow
and
Fhigh
are the lowest and the highest permis-
sible frequency for selected range according to Table
2.
range range range range measuring resolution resolution
lowest highest lowest highest time at MIN at MAX
permissable permissible measureable measureable (see table
1)
(see table 1)
frequency frequency frequency frequency•
y,
Flow
I
Fhigh
*,
Fmf
• F
mh
0.1526 Hz 2.2 Hz 0.1526 Hz 6.5535 Hz 5
..
0.5 s 4*10-6Hz 4*10-4 Hz
1.8 Hz 22.0 Hz 1.526 Hz 65.535 Hz 5
..
0.5 s
4*1
o-s
hz 4*10-3 Hz
18Hz
220Hz
15.26 Hz 655.35 Hz 0,5
..
0,0 5 s 4*10-4Hz 4*10"2 Hz
0.18 kHz 2.2 kHz 0.1526 kHz 6.5535 kHz 0,5
..
0,0 5 s 4*10-5 kHz 4*1o-• kHz
1.8 kHz 22.0 kHz 0.001 kHz 65.535 kHz 1 s
10·
3 kHz
10-
3kHz
18kHz
220kHz
0.01 kHz 655.35 kHz
0.1
s 10·2 kHz
10·
2 kHz
180kHz
2.2 MHz
0.1
kHz 4194.3 kHz 0.5 s 6.4*1
o-
2 kHz 6.4*1
0-
2 kHz
1.8 MHz 41.943 MHz 1.0 kHz 41943 kHz 0.05 s 6.4*10·1 kHz 6.4*10-1 kHz
Table 2. Main features
of
ranges
for
external
frequency
counter.
The lowest and highest range of measurable frequencies, F
ml
and F
mh
is limited by the
counter capacity.
If the inputfrequency is lowerthan 0.1526 Hz, five "underscores" message"
_____
"
are displayed. This indicates that the measured frequency
is
lower than range
lowest measurable frequency. If the input frequency
is
higher than 41.943 MHz,
five "overscores" "
_____
, will be displayed. This indicates that the measured
frequency is higher than highest measurable frequency. If the input frequency ex-
ceeds
Fhigh
or F1
ow•
the next higher or the next lower frequency range respectively
would be automatically selected, and at that moment five "dashes" message
"-----"may
be
displayed during
<1
s after range switching, while the first mea-
suring period passed.
5.
The next lower or higher frequency range may be selected via the FREQUENCY
RANGE keys
(1
,2).
6.
Disconnect the input signal from the EXT CNTR jack. Seven seconds (maximum)
after the input signal
is
disconnected, five "dashes"
"-----"
will appear on the
display (33).
7.
Selecting EXTERNAL COUNTER does not stop signal generation at any output,
and does not any affect output signal parameters, however automatic output fre-
quency regulation is not provided
in
this mode.
~
GLOBAL
SPECIAL77ES
~INSTRUMENTS

Modulation Modes: Voltage ControlledFrequency Operation
1.
Select the desired starting frequency range.
2.
Select FREQUENCY via the MODE keys (4,5).
3.
To
achieve the maximum possible frequency variation, set the starting frequency
value to be near the minimum of the range (see Table 1
).
4.
Switch modulation
on
via the MODULATION ON/OFF key (13).
5.
Select VCG by the MODULATION MODE key (15).
6.
Apply a positive DC voltage to the VCG MOD input jack (34) to increase the fre-
quency. Avoltage from 0 to 10 V ± 1 V will cause the resulting frequency to increase
by a factor from 1 to 100.
7.
If FREQUENCY is selected via the MODE keys (4,5), the resulting output frequency
is
displayed (33) along with the appropriate units of measure. Rotating the tuning
knob does not affect the value of the frequency
in
the VCG mode.
8.
If the resulting frequency exceeds Fhigh of the selected range (see Table 2), the
following range will be automatically selected
in
order to display the measured fre-
quency at the proper resolution.
range name absolute maximum
frequency limit, F1
;m
2Hz
20Hz
20Hz
200Hz
200Hz
2kHz
2kHz
20kHz
20kHz
200kHz
200kHz
2 MHz
2MHz 20 MHz
20 MHz 20 MHz
Table
3.
Absolute
maximum
frequency
limits
of
ranges.
9.
To
select another start frequency range, switch modulation off using the ON/OFF
key (13), select the desired range via the FREQUENCY RANGE keys
(1
,2), and
then switch modulation
on
using the MODULATION ON/OFF key (13).
10.
To
adjust the start frequency, switch the modulation off via the MODULATION ON/
OFF key (13), adjust the frequency, and then switch modulation
on
again via the
ON/OFF key (13).
11.
There
is
no need to switch the modulation off
in
order to adjust the output level,
duty cycle,
DC
offset or CMOS level -simply select the desired parameter with the
MODE keys (4,5) and adjust it via the tuning knob.
12. Adjustment of modulation depth via the generator controls
is
not available for the
VCG modulation mode.
13.
Automatic frequency regulation
is
not provided
in
the VCG modulation mode.
14.
The signal at the voltage-controlled frequency
is
available at the 50Q (37), TTL
(38), and CMOS (39) output jacks.
15.
The
VCG
operation can be used to obtain
an
external controlled sweep signal. For
this purpose, apply a positive-going ramp signal to the VCG MOD input jack (34).
~
GLOBAL
SPECIALT7ES
~
INSTRUMENTS

As the ramp voltage increases, the frequency will increase as well. The sweep rate
can be adjusted by varying the frequency of the ramp signal.
IMPORTANT: Do
not
apply
signals
with
levels
higher
than
10 V
or
lower
than
oV
to
the VCG MOD
input
jack
(34). It
will
not
cause
any
frequency
shift
and can dam-
age
the
generator.
AM
Operation
The 50 Q output can be amplitude-modulated, either by an internal signal
(1
Hz to 15
kHz) or by an external signal (DC to
500
kHz, less than 10 V p-p), applied to the VCG
MOD input jack (34).
1.
Switch modulation on via the ON/OFF key (13).
2.
Select AM via the MODULATION MODE key (15).
3.
Select internal modulation via the EXTERNAL key
(21
).
The EXTERNAL LED
indicator (22) must be off.
4.
If the FREQUENCY parameter is selected via the MODE keys (4,5), the carrier
frequency will be displayed (33). Rotating the tuning knob will adjust the frequency
value.
5.
Depress
the%
key (19). The percentage of modulation (ratio of double amplitude
of the modulating signal to amplitude of carrier signal
in
percentage terms) will
be
displayed (33) while the % LED (32)
is
illuminated.
m% =(2Arr/A0)*100% =m*100%,
Where:
m%-
percent of modulation,
m - modulation factor,
Am-
amplitude of modulating signal,
A0 -amplitude of carrier signal.
6. Rotate the tuning knob to set the percentage of modulation. The percentage of
modulation can by varied from 0 to 100%
in
1% steps.
7.
Depress the REPETITION RATE key (17). The REPETITION RATE LED indicator
(17) will be
on
and the frequency of internal modulating signal will be displayed
(33).
8. Rotate the tuning knob to set the appropriate modulation frequency, which can
be
varied from 1 Hz to 15000 Hz
in
steps of 1 Hz to
150Hz
in
1 Hz steps, and from 150
Hz to 15 kHz steps is determined by the formula:
F
mod
=30000/N,
where F
mod
-modulating frequency
in
Hz,
N
-cod,
which is varied from 200 (150 Hz) to 2 (15000 Hz) with step of
1.
9.
Select external modulation by the EXTERNAL key
(21
).
10. Connect a suitable modulating signal to the VCG MOD input jack (34).
11.
Adjust the amplitude and frequency of the external signal as desired. Modulating
the signal with amplitude exceeding half of the carrier signal amplitude will cause
over-modulation.
12. Do
not
apply
signals
exceeding
±5
V
or
frequencies
higher
than 500 kHz
to
the
VCG MOD
input
jack
(34).
This
could
damage
the
generator
or
distort
the
resulting
signal.
~
GLOBAL
SPECIAL77ES
~INSTRUMENTS

13. Both internal and external modulating signals affect the resulting signal
in
accor-
dance to the correlation: A(t)= A0
(1
+m*cos(2n*F*t)),
Where:
A(t) -instant amplitude of the resulting signal,
A0-carrier signal amplitude
m - modulation factor, m=2
Am
I A0,
F - modulating signal frequency
(1
Hz to 15 kHz for internal,
DC
to 500 kHz for
external),
t-
time.
14. The resulting signal will be cut if the following correlation
is
not fulfilled:
ABS(A0+2 Am)+ABS(DC offset)>10
V,
Where:
ABS -absolute value,
A0-amplitude of carrier signal,
Am- amplitude of modulating signal,
DC offset -DC offset level.
15. There
is
no need to switch the
AM
modulation off to adjust the carrier frequency,
output level, duty cycle,
DC
offset or CMOS level -simplyselect the desired param-
eter via the MODE keys (4,5) and adjust it by rotating the tuning knob. The output
level adjustment does not affect the percent of modulation
in
the internal modula-
tion mode.
16. Automatic frequency regulation
is
provided
in
AM modulation mode.
17.
An Amplitude Modulated (AM) signal is available at the
50
Q output jack (37) while
in
AM modulation mode.
FM
Operation
The 50 Q output can
be
frequency-modulated by
an
internal signal
(1
Hz
to
15
kHz) or
an
external signal (DC
to
500
kHz,
less than 10 V p-p) applied to the VCG
Mod
inputjack (34).
1.
Select the desired frequency range.
2.
Select FREQUENCY via the MODE keys (4,5).
3.
Set the carrier frequency via the tuning knob.
4.
Switch modulation
on
via the MODULATION ON/OFF key (13).
5.
Select
FM
by the MODULATION MODE key {15).
6.
Select internal modulation via the EXTERNAL key
(21
).
Internal modulation will
be
enabled when the indicator (22)
is
off.
7.
If the FREQUENCY parameter
is
selected via the MODE keys (4,5), a frequency
value close to carrier frequency will be displayed. Rotating the tuning knob will not
affect the frequency value
in
this mode.
8.
Depress
the%
key (19). The percent of deviation will be displayed (33), while illu-
minating
the%
LED indicator (32). The output
is
achieved
by
the following formula:
m%
= (0.01*Am)*100% = m*100%,
Where:
m%-
percent of deviation,
m - modulation factor,
Am
-amplitude of modulating signal
in
volts
~
GLOBAL
SPECIAL77ES
~INSTRUMENTS

9.
Rotate the tuning knob to adjust the percent of deviation, which can be varied from
0 to 5%
in
0.05% steps.
10.
Depress the REPETITION
RATE
key (17). The REPETITION
PATE
LED indicator
(17) will illuminate and the frequency of the internal modulating signal will be dis-
played (33)
11.
Rotate the tuning knob to set the modulating frequency, which
is
in
the range 1 -
15
kHz. The modulation frequency can be set
in
1Hz steps from 1Hz to 150Hz.
In
the range 150Hz to 15kHz the available steps are set by the formula f=30000/
N where N can vary from 2 for 15kHz (30000/2) to 200 for 15kHz (300000/200).
12. Select external modulation via the EXTERNAL key (21)
13. Connect a suitable modulating signal
to
the VCG MOD input jack (34).
14.
Adjust the amplitude and frequency of the external signal as desired.
15. Do
not
apply
signals
exceeding
±5
V
or
frequencies
higher
than
500 kHz
to
the
VCG MOD
input
jack
(34), as
this
can cause damage
to
the
generator
or
signal
distortion.
16. Both the internal and external modulating signals affect the carrier signal
in
accor-
dance to the relation: F(t)
=Fa
(1
+m*cos ( 2n*Fm*t),
Where:
F(t) -instantaneous frequency of the resulting signal,
Fa- carrier frequency,
m-
modulation factor, m=
O.OI*A
ml
Am
-modulating signal amplitude
in
volts,
Fm- modulating signal frequency
(1
Hz
to
15
kHz for internal,
DC
to 500 kHz for
external),
t-
time.
17.
To
select another frequency range, switch modulation off via the ON/OFF key (13),
select the desired range via the FREQUENCY RANGE keys
(1
,2), and then switch
modulation
on
via the MOD ON/OFF key (13).
18.
To
adjust the carrier frequency, switch modulation off using the ON/OFF key (13),
adjust the frequency, and then switch modulation
on
using the ON/OFF key (13).
19.
There
is
no
need
to
switch modulation off to the adjust output level, duty cycle,
DC
offset or CMOS
level-
just select the desired operation via the MODE keys (4,5)
and adjust
it
by
turning the tuning knob.
20. Automatic frequency regulation
is
not provided
in
FM
modulation mode.
21. The
FM
signal
is
present at
50
Q (37), TTL (38) and CMOS (39) output jacks.
~
GLOBAL
SPECIALT7ES
~
INSTRUMENTS

Burst
Operation
In
the Burst mode, the generator output is switched
on
and off (gated), either by an
internally generated signal or by an externally applied signal. Both the repetition rate and
the tone burst duty cycle are variable. The tone burst always contains
an
integer number
of periods of carrier frequency, starting and finishing at zero.
1.
Switch modulation
on
via the ON/OFF key (13).
2.
Select BURST by depressing the MODULATION MODE key (15).
3.
Select internal modulation via the EXTERNAL key
(21
),
the EXTERNAL LED indi-
cator (22) should be off.
4.
If the FREQUENCY operation
is
selected via the MODE keys (4,5), the carrier
frequency will be displayed. Rotation of the tuning knob will adjust this frequency
value.
5.
Press the REPETITION RATE key (17). This will display the repetition period
in
milliseconds along with the MS LED indicator (32).
6.
Rotate the tuning knob to adjust the repetition period. The repetition period can be
varied from 20 ms to 2000 ms. Coarse adjustment will vary the repetition period
in
10
ms steps, and fine adjustment
in
1 ms steps (when the FINE ADJUST key (7)
is
selected).
7.
Press the % key (19). Now the duty cycle of the internal gating signal (as ratio of
tone burst time to the repetition period
in
percentage terms) will be displayed (33)
along with
the%
LED indicator (32).
8.
Rotate the tuning knob to set the burst width (tone burst time). The burst width can
be adjusted from 1 ms
up
to the repetition period minus 1ns; the appropriate tone
burst duty cycle will
be
calculated and displayed.
9.
Adjustment of the repetition rate does not affect the burst width value unless the
repetition period
is
more than the tone burst time, but the tone burst duty cycle will
be re-calculated after each adjustment. If the repetition period becomes equal to,
or less than, the tone burst time, the tone burst time will
be
set equal to the repeti-
tion period minus 1 ms.
10.
Select external modulation using the EXTERNAL key
(21
),
thus illuminating the
EXTERNAL LED indicator (22).
11.
Connect a TTL gating signal (DC to
500kHz)
to the BURST input jack (35).
12.
Adjust the frequency and duty cycle of external input signal
as
required.
13. Do
not
apply
signals
with
frequencies
higher
than 500 kHz
to
the
BURST
input
jack
(35).
It
can cause
distortion
of
the
resulting
signal.
14. The repetition rate and the burst tone duty cycle are not controlled for external burst
operation.
15.
There
is
no need to switch the burst operation off to adjust the carrier frequency,
output level, duty cycle, offset or CMOS level. Simply select the desired parameter
via the MODE keys (4,5) and adjust with the tuning knob.
16.
Automatic frequency regulation is provided
in
burst mode.
17.
The burst signal
is
present at the
50
Q outputjack (37), and the unmodulated signal
at the carrier frequency
is
present at the
TIL
(38), and CMOS (39) output jacks.
Signals at
1/1
Oth
and
1/1
Oath
of the carrier frequency are present at the
TIU1
0
(41) and
TIU1
00
(42) output jacks respectively.
~
GLOBAL
SPECIAL77ES
~
INSTRUMENTS
This manual suits for next models
3
Table of contents
Other Global Specialties Portable Generator manuals
Popular Portable Generator manuals by other brands

Rato
Rato R8500D-3 owner's manual

Troy-Bilt
Troy-Bilt 030475-0 Wiring diagram

Parks
Parks HP2000 XTREME Series Installation and operator's manual

Winco
Winco 27PTOC4-03 Installation and operator's manual

Absolute Ozone
Absolute Ozone NANO 15 Operator's manual

Beckhoff
Beckhoff EP1957-0022 operating instructions