Global BD-300G User manual

IR Camera Recorder
Manual

Manual
Contents
Attention!
使用说明书Manual
Attention
Accessories
1. Introduction
1.1 Front side
1.2 Inside & cable
2 . Screen icons instruction
3 . Setting
3 .1 Operating DVR with IR remote control
3 .2 Image setting
3 .3 Recording setting
3 .4 Recording mode setting
3 .5 Playback and delete video files
3 .6 System setting
4 . Specifications
5. F. A. Q.
1
1
2
3
3
4
4
5
7
13
14
16
19
20
1. Don’t take SD card out when DVR is running.
2. Use 12V 2A power adapter.
3. Format SD card by DVR system on your first use.
4. Install the unit in dry location and make sure enclosure is sealed.
5. Use genuine SD card.
6. Warranty and free maintenance will be invalidated if you disassemble
the unit.
Description
This Camera Recorder is used for indoor & outdoor surveillance, which
is combined with DVR board and lens with IR leds; with remote control
for operation and SD for data storage.
It is waterproof, easy-operation camera recorder.
Accessories
使用说明书
Remote control
Manual
BNC
Power Adapter
(optional)
Bracket
(optional)
1

Manual
1.Introduction
1.1 Front side
IR receiver
使用说明书Manual
2. Screen Icons Instruction
2.1 Standby Mode
*The following pictures are for references only
Local date & time
Under video mode
2010/10/24 19:25:47
Reading SD card
SD Card Init.
Lens
IR leds
Detecting
SD card inserted
00:47:40
SD
Recording time remaining
(approx.)
DVR is working under
motion detection mode
1.2 Camera inside & cable
2.2 Recording Mode
Recording time
Insert
SD card
No SD card detected
00:00:33
!
Insert SD card
DVR is recording
Camera inside
REC
Local date & time
2010/10/24 19:25:47
Power port
Video output
2
3

Manual
3.Set Up
* You need to connect the DVR to a TV or monitor before set-up
3.1 Operating DVR with IR Remote Control
3.2 Image Setting
3.2.1 Image Quality
SET UP
Image Setting
REC. Setting
使用说明书Manual
Buttons
▲
▲
Functions
Up/volume up(during playback)
Down/volume down(during playback)
Left/fast backward(during playback)
Right/fast forward(during playback)
Set/record(during playback)
Menu
Play/pause/delete files
Stop
Return to last menu/playback
A. Press “MENU” key to enter into
system SET-UP.
REC. Mode
Playback
System Setting
EXIT
OK
MENU
STOP
ESC
MENU
P/P
STOP
ESC
▲
▲
PLAY
DEL.
Image Setting
Quality
Frame Rate
Resolution
B. Press “OK” to set
Main Operations:
Enter into system menu: press “MENU” on remote
Image Setting
Choose items to set up: press direction keys
Confirm your choice: press “OK”
Return to last menu: press “ESC”
Quality
Frame Rate
Resolution
H: best image quality
High
Med
Low
M: normal image quality
L: low image quality
* The lower the image quality, the longer
the recording time
4
5

Manual
3.2.2 Video Frame Rate
3.3 Recording Setting
3.3.1 Scheduled Time
Image Setting
Quality
Frame Rate
Resolution
使用说明书Manual
SET UP
30fps: smooth image
30fps
15fps
5fps
Image Setting
REC. Setting
A.Press “MENU” key to enter into
system SET-UP.
15fps: not so smooth image
5fps: jerky image
*The lower the frame rate, the longer
the recording time
REC. Mode
Playback
System Setting
EXIT
REC. Setting
Scheduled Time
Overwrite
Section
Motion Detection
3.2.3 Image Resolution
B. System starts and stops recording
automatically according to the scheduled
time period
Image Setting
Quality
Frame Rate
Resolution
D1: 704X576
D1
VGA
QVGA
VGA: 640X576
QVGA: 320X288
*The lower the resolution, the longer
the recording time
Scheduled Time
C. Press “OK” for 4 groups
Group1
Group2
Group3
Group4
Press UP/DOWN to choose
Press “OK” to enter into each group
6
7

Manual
*Weekly
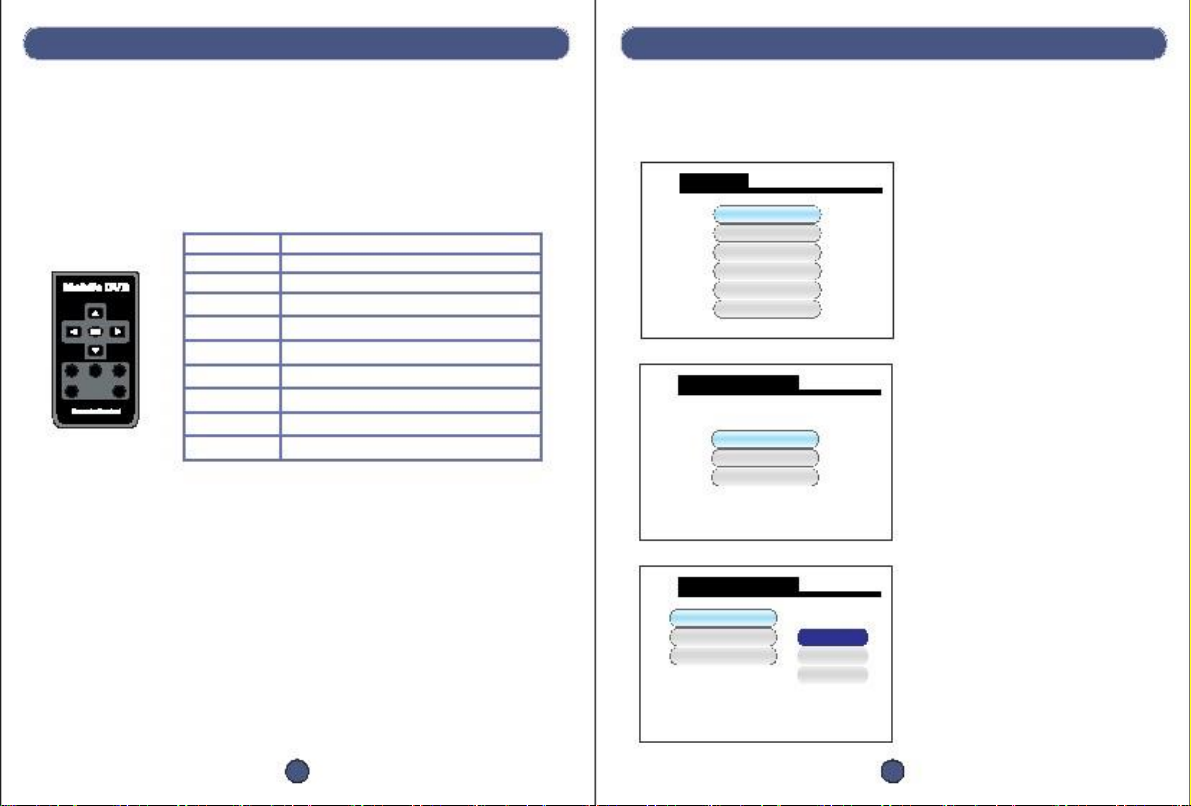
A. Press LEFT/RIGHT to choose modes:
Weekly
Once
Off
Weekly: auto record weekly
Once: auto record once
Off: switch off this group
Start Time
B. e.g. to choose “Weekly” mode, press
UP/DOWN, “Weekly” mode is confirmed
when it’s in blue;
press “OK” to the next step, select Start
Time & End Time
End Time
: 2011/01/01 07 : 00
: 2011/01/01 13 : 00
Weekly
使用说明书Manual
*Once(Daily)
移动侦测
Once
Off
A. Choose “Once”, press UP/DOWN, “Once”
mode is confirmed when it’s in blue
B. Press “OK ” to move on, please refer to
“Weekly” set-up
Start Time
End Time
: 07 : 00
: 13 : 00
SUN MON TUE WED THU FRI SAT
*Off
Weekly
Once
Off
C. Press UP/DOWN to change time; and
RIGHT to move on and select days that
Start Time
End Time
: 07 : 00
: 13 : 00
is needed
Weekly
Once
Off
A. Choose “off”, press UP/DOWN, the group
is switched off when it’s in blue
B. Press “ESC” to switch off this group
SUN MON TUE WED THU FRI SAT
Note:
Weekly
Once
Off
D. e.g. to choose MON, press UP/DOWN
to select/dis-select it;
Refer to the picture on the left, MON-FRI
are all selected
Note: purple font means selected, black
font means dis-selected
E. Press “OK” to finish weekly set-up, the
2 yellow triangle will go back onto
“Weekly”(in blue)
F. Press “ESC” to save and return to group
list for other groups set-up
A. In each group, only one mode can be selected among “Weekly”, “Once” and
“Off”;
B. If scheduled period in “Weekly” overlaps with those in “Once”, system will auto
choose to record under the longer period; the same method applies to overlaps
in between different groups;
C. Press UP/DOWN to select each mode in a group, blue font means mode selected;
Start Time
End Time
: 07 : 00
: 13 : 00
SUN MON TUE WED THU FRI SAT
8
9

Manual
3.3.2 Overwrite
REC. Setting
Scheduled Time
Overwrite
Section
Motion Detection
使用说明书Manual
3.3.4.1 Mask Area
Motion Detection
Mask Area
A. Enter into “Mask Area”, the screen will be
shown in a grid pattern as shown below.
“Mask Area” will allow the DVR to record
video based on motion detected in any
area that is selected as blue. The entire
image will be recorded if any motion is
detected in the grid for an area marked
with blue.
Yes
No
Sensitivity
A. System will delete the first 300MB
files once the SD card is full to
save new files
Speed
Noise Margin
3.3.3 Section Recording Time Set Up
REC. Setting
Scheduled Time
Overwrite
Section
Motion Detection
1min
15分钟5min
15min
30min
1hr
B. Press the arrow keys to move the cursor to
choose the area that should be detected.
B. Set up section recording time
*Only available under “Manual”,
“Scheduled” and “Power Up Rec.”
modes
*2.5 min section recording time is
fixed under “Motion Detection” mode
C. Press “OK” to confirm.
D. Each area in the grid that is marked in
blue will trigger the motion detection.
If the area in the grid is not marked in blue,
it will not trigger motion detection.
3.3.4 Motion Detection
REC. Setting
Scheduled Time
Overwrite
Section
Motion Detection
3.3.4.2 Sensitivity
Motion Detection
Mask Area
Sensitivity
Speed
Noise Margin
C. Set motion detection details
High
Med
Low
High level
Medium level
Low level
* System will be triggered very easily if
sensitivity is set lower than High level
*Low level setting is recommended.
10
11

Manual
3.3.4.3 Speed
3.4 Recording Mode Set Up
使用说明书Manual
Motion Detection
Mask Area
Sensitivity
Speed
Noise Margin
SET UP
A. Different speed levels to trigger system
Image Setting
REC. Setting
High
Med
Low
*System will be triggered very easily if
speed is set in low level.
*Low level setting is recommended.
Set the recording mode for the system.
REC. Mode
Playback
System Setting
EXIT
3.3.4.4 Noise Margin
3.4.1 Recording Modes
Choose a mode first:
Motion Detection
Mask Area
Sensitivity
Speed
Noise Margin
SET UP
Image Setting
Manual:
Under this mode, press “OK ” to start recording,
and “STOP” to stop recording.
Scheduled:
System starts and stops recording according
to the scheduled period preset.
Motion Detection:
System starts recording automatically by
detecting motions in the area preset;
*2.5min section recording time is fixed.
Power Up Rec.:
System starts to record as soon as the power
is on.
High
Med
Low
B. “Noise Margin” has been disabled.
This feature is not available.
*Low level setting is recommended.
REC. Setting
REC. Mode
Playback
System Setting
EXIT
Manual
Scheduled
Motion Detection
Power Up Rec.
12
13

Manual
3.5 Playback and Delete Video Files
SET UP
Image Setting
REC. Setting
REC. Mode
Playback
System Setting
EXIT
32 GB
SD
使用说明书Manual
3.5.2 Playback Video Files on Computer
*Playback via Media Player (ASF Format)
A. Press “OK” to enter into file list
SD card
3.5.3 Icons Instructions under Playback Mode
3.5.1 Under File List Mode
File Name
ASF
ASF
ASF
ASF
ASF
ASF
ASF
ASF
Date
2010/10/24
2010/10/24
2010/10/24
2010/10/25
2010/10/25
2010/10/25
2010/10/26
2010/10/26
Start Time
06:57:54
08:11:31
13:53:24
07:27:05
07:28:35
08:11:04
22:55:14
22:56:54
Page 01/14
00000001
00000002
00000003
00000004
00000005
00000006
00000007
00000008
Delete:
A. Press UP/DOWN to choose the file(s)
you want to delete
B. Press “P/P” or “DEL.” to delete
Play:
A. Press UP/DOWN to choose and “OK”
to open the file
B. Press “P/P” to play
A. Playback on TV Set or Monitor
Video playing time/file length
00:00:13/00:14:53
Playback mode is
active (if present)
Existing file number
total files, quantity
Video status
0001/0088
Video...
SD
2010/10/24 06:57:53
SD card
inserted
Fast forward/backward:
Press RIGHT/LEFT to fast forward/rewind. Each additional press increases playback
speed in increments of 2X, 4X, 8X and 16X.
Local date & time
B.Playback on Computer
Volume up and down
Press UP/DOWN to turn volume up/down. Highest volume level is 8.
Pause:
Press “P/P” to pause, press it again to start.
Stop:
Press “STOP” to stop playing.
Exit playing mode:
Press “ESC” to return to file list.
Video...
2011/05/09 23:05:36
Time stamp format
year/month/day/ hour/minute/second
14
15

Manual
3.6 System Setting
SET UP
Image Setting
REC. Setting
REC. Mode
Playback
System Setting
EXIT
使用说明书Manual
3.6.2.1 Date and Time
Time
*Press LEFT/RIGHT to move the cursor
*Press UP/DOWN to adjust the values
*System set-up
2010/10/24 07:30
*Press “OK” to save the setting
3.6.1 Language
System Setting
Language
Time
Format
Card Info.
Alarm Period
Timestamp
3.6.3 Format
System Setting
Language
*Choose “Yes” to format SD card
Yes
No
English
繁體中文
简体中文
*Choose your language
Time
Format
Card Info.
Alarm Period
Timestamp
Attention!
All files can not be restored after being
formatted from SD card
3.6.2 Date and Time
System Setting
Language
Time
Format
Card Info.
Alarm Period
Timestamp
3.6.4 Memory Card Information
System Setting
Language
Time
*Set local date & time
Format
Card Info.
Alarm Period
*Check SD memory capacity
Timestamp
16
17

Manual
3.6.4 Memory Card Information
Card Info
Total Size
Used Size
: 30784MB
: 98.6%
使用说明书Manual
4. Specifications
Specs
Power
Current
Sensor
TV Lines
Lens
Infrared leds
Video output resistant
TV system
Record modes
Video compression
Video format
Resolution
Frame
Memory support
32GB recording time
Remote control distance
Camera unit size
Package size
G.W.
G.W. with bracket
Data
12V
260MA-550MA
1/3 SONY CCD
420TVL, higher lines customerized
8mm fixed lens(optional)
35pcs F8 leds
75Ω
PAL/NTSC
Power-up, manual, motion detection, scheduel time record
MPEG-4
ASF
704*576 640*576 320*288(selectable)
30fps(selectable)
SD/SDHC
32hrs-25 days for reference
3-5 meters
240*145*110mm
265*175*155mm
1000g
1350g
*Check card memory
*Press “ESC” to exit
Remain Size : 1.4%
3.6.5 Alarm Period
System Setting
Language
Time
Format
Card Info.
Alarm Period
Always OFF
10Sec
20Sec
30Sec
* Choose alarm ON/OFF, and length
* System outputs a 12V voltage for external
alarm devices when motion detection is
triggered
Timestamp
3.6.6 Time Stamp
System Setting
Language
Time
Format
Card Info.
Alarm Period
YES
NO
* Choose Timestamp ON/OFF
Timestamp
18
19

Manual
5. Frequently Asked Questions (F.A.Q.)
Q: DVR cannot read SD card.
A : Please use 1GB to 32GB genuine SD card.
Q: No recorded files can be located on the SD card after the system records.
A: 1. Please check if the SD card works with DVR normally;
2. Please use 1GB to 32GB genuine SD card.
Q: Camera system crashes when it is on.
A: 1. Do NOT remove or insert an SD card when the system is powered on.
2. Please make sure it is a genuine SD card.
Q: Camera does not record video when motion detected.
A: 1. Confirm that “Recording mode” is set to “Motion Detection” .
2. Set “Sensitivity”,“Speed” and “Noise Margin” according to the suggestions on
page 13-14.
Q: Remote control is not working.
A: 1. Check whether the remote’s battery is flat and securely connected
2. Connect the camera to the camera and monitor. Press
any buttons on remote with the remote LED facing the camera. A light should appear
on the monitor from the end of the remote. If no light is visible from the remote on the monitor,
place battery in the remote with CR2025.
B. Remote control only works in an open area and when pointed directly at the infrared
receiver on the camera.
www.global-export-import.eu
20
Table of contents
Other Global Security Camera manuals