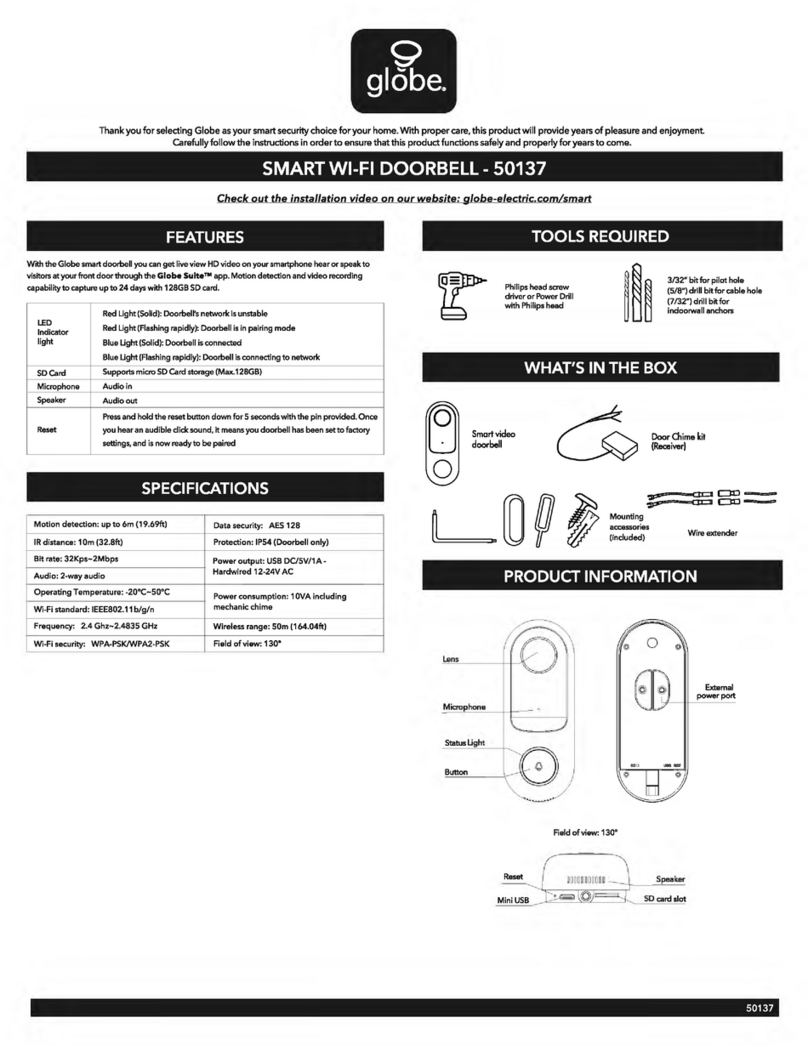
Globe 50138 User manual

9
globe~
Thank
you
for
selecting
Globe
as
your
smartsecuritychoice
for
your
home.
With
proper
care,this
product
will provideyears of pleasure and enjoyment.
Carefully
follow
the
instructions in
order
to
ensure
that
this
product
functionssafelyand
properly
for
years
to
come.
SMART WIFI DOORBELL-
50138
Check
out
the
installation
video
on our
website:
globe-electric.
com/smart
FEATURES
With
the
Globesmartdoorbell you can
get
live
view
HD
video onyoursmartphone hear
or
speak
to
visitors
atyourfrontdoorthrough
the
Globe
SuiteTM app. Motion detection and video recording
capability
to
capture
up
to
24
days with 128GB
SD
card.
Red Light (Solid): Doorbell's network
is
unstable
LED
Red Light (Flashing rapidly): Doorbell
is
in
pairing
mode
Indicator
light Blue Light (Solid): Doorbell
is
connected
Blue Light (Flashing rapidly): Doorbell
is
connecting
to
network
SDCard
Supports micro SD Card storage
(Max.
128GB)
Microphone
Audio
in
Speaker
Audio
out
Press
and
hold
the
reset button down for 5 secondswith
the
pin provided.
Reset
Once
you
hear
an audibleclick sound,
it
meansyou doorbell has
been
settofactorysettings,
and
is
now ready
to
be
paired
Charging
Red indicatoron: Battery
is
charging. Located
at
the
bottom beside
USB
Blue indicatoron: Batter
is
fully
charged. Located
at
the
bottom beside
USB
SPECIFICATIONS
Motion detection:
up
to
6m
(19.69ft) Data security:
AES
128
IR
distance:
1Om
(32.8ft) Wireless range:
50m
(164.04ft)
Bit
rate:
32Kps-2Mbps
Stanby current: 200uA
Audio: 2-way
audio
Working current:
220mA
Operating
Temperature:
-20"C-50"C
Protection: IP65
Wi-Fi
standard:
IEEE802.11
b/g/n
Battery life:
250
cycles
Frequency:
2.4
Ghz-2.4835
GHz Power input:
Wi-Fi security: WPA-PSKIWPA2-PSK • 2x
18650
batteries included.
• 3.6V
battery
Field
of
view:
140"
•
3350mAh
each
Standby
battery life: •
USB
port:
DC
5V1
A
Can last 3
months
if
doorbell
is
pushed
•
Screws
terminal
in
the
3
times
per
day
back
(12-24VAC)
DOORBELL
Charging
indicator
Micro
USB
NOTE:
TOOLS REQUIRED
Philips headscrew
driver
or
Power
Drill
with Philips
head
3/32" bitfor pilot hole
(5/8")
drill
bitfor cable hole
(7
/32") drill bitfor
indoorwall anchors
WHAT'S IN THE
BOX
Smartvideo
doorbell
USB
wireless
~
N/CPiate
~
chime
kit
Mounting
accessories
(included)
PRODUCT
INFORMATION
Lens
External
powerport
SDcard slat
Reset Field ofview: 140"
The
"+"
on
the
battery
and
the
batterycompartment should keep
the
same
direction.
WIRELESS
CHIME
Speaker
Status light Power interface Reset
50138

1
2
3
4
5
CONNECTING INSTRUCTIONS • INSTRUCTION DE
CONNEXION
••
GET STARTED
f)
(i;iJ
0
0
0
....
6
'•'
~
...
0
o Download
the
Globe
SuiteTM
app
from
the
App
Store
or
Google
Play
to
your mobile device.
o Launch
the
Globe
SuiteTM
app.
o
To
register,
enter
your mobile
phone
number
or
email
address.
Create
a
password,
then
login
to
the
app.
OR
o Login
if
you
already
have an account.
VERIFY
YOUR
NETWORK
o Verify your network
and
ensure
your mobile device
is
connected
to
a 2.4
GHz
Wi-Fi channel".
o Consultyour
router
documentation
for
detailed
instructions
on how
to
change
wireless
settings.
o
Once
your devices have
been
successfully paired, you can
switch back
to
mixed
mode
or
use a cellular
data
network
to
control your
smart
products.
POWER
ON
THE DOORBELL
WITH
THE INCLUDED BATTERIES
o
You
will
hear
an
audible
click
and
the
Red led
will
be
flashing rapidly.
o
lfthe
doorbell
is
not
flashing rapidly.
-Press
and
hold
the
reset
button
down
for
5
seconds
with
the
pin provided.
Once
you
hear
an
audible
click
sound,
it
means
you doorbell has
been
set
to
factory
settings
and
is
now
ready
to
be
paired.
ADD
A DEVICE
o
Select
the"+"
symbol on
the
top
right-hand corner.
o
Select
smart
doorbell
and
follow
the
instructions
within
the
app.
o
lfthe
connection fails,
try
using
QR
code.
ADD
A DEVICE:
QR
CODE
o On
the
"add
a device
page"
select
the
smart
camera
right-hand
corner
and
follow
the
instructions within
the
app.
o
Select
QR
code
on
the
top
right-hand
corner
and
follow
the
instructions within
the
app.
o You're
good
to
go!
ENSURE
CONNECTIVITY
o Before mounting
the
doorbell
ensure
the
doorbell
can
connect
to
the
Wi-Fi.
Check
to
ensure
its
streaming
video
on
the
Globe
SuiteTM
app.
o
If
you
do
not
see
a
video
stream,
please
check
yourWi-Fi connection.
*DID
YOU
KNOW?
Most
modern
routers
are
dual
band
meaning
they
support
both
2.4
GHz
and
5
GHz
channels.
The
most
common
wireless
options
are:
o
Mixed:
The
router
will
broadcast
both
2.4
GHz
and
5 GHz
simultaneously
under
the
same
SSID.
The device
will
choose
which
to
connect
to
based
on
multiple variables (congestion,
distance
to
router
etc.).
o
2.4
GHz: Broadcastonly on this channel.
o 5 GHz: Broadcast only on this channel.
o
Dual2.4
and
5
GHz
using
separate
SSIDs: Routerwill
broadcast
both
channels
and
user
manually
decides
which
to
connect
to.
POUR
COMMENCER
o Teh!chargez !'application
Globe
SuiteTM
sur un appareil
mobile apartir
de
I'App Store ou
de
Google
Play.
o Lancez !'application
Globe
SuiteTM.
o Entrez votre
numero
de
telephone
cellulaire ou votre
adresse
courriel
pour
s'inscrire.
o
Creer
un mot
de
passe
et
se
connecter
a!'application.
ou
o
Se
connecter
a!'application avec un
compte
existant.
VERIFIEZ VOTRE RESEAU
o Verifier le
reseau
Wifi
et
s'assurer
que
l'appareil mobile
est
connecte
aun canal
sur
Ia
bande
2.4
GHz".
o Consulter
Ia
documentation
qui
accompagne
le
routeur
pour
des
instructions
detaillees
sur
Ia
fac;on
de
modifier les
parametres
sans
fil.
o Une fois
que
vos
appareils
ont
bien
ete
couples, vous pouvez revenir
en
mode
mixte ou utiliser un
reseau
de
donnees
cellulaires
pour
controlervos
appareils
intelligents.
PLACEZ LA SONNETTE SOUS TENSION AU
MOYEN
DES PILES PREVUES ACET EFFET
o Vous
entendrez
un declic
et
le
temoin
rouge
clignotera
rapidement.
o
Si
le
temoin
de
Ia
sonnette
ne clignote
pas
rapidement
:
-Appuyez
sur
le
bouton
de
reinitialisation
et
maintenez-le
enfonce
pendant
5
secondes
au moyen
de
Ia
tige
prevue
a
cet
effet. Lorsque vous
entendez
un declic, cela signifie
que
votre
sonnette
a
accepte
les
reglages
de
l'usine
et
qu'elle
est
maintenant
prete
ajumeler.
AJOUTEZ
UN
APPAREIL
•0
Selectionnez
le
symbole
<<+»dans le coin
superieur
droit.
o Choisissez
votre
type
de
produit
et
suivez
les instructions
dans
!'application.
o Si Ia connection
ne
marche
pas, essayer
code
QR
.
AJOUTEZ
UN
APPAREIL: CODE
QR
o Sur
Ia
page
de
<<Ajoutez
un appareil»
selectionnez
camera
intelligente
o
Selectionner
code
OR
en
haut a
droite
et
suivez les instructions
dans
!'application.
o Vous
etes
prets
acommencer!
ASSUREZ-VOUS DE LA CONNECTIVITE
o Avant
de
monter
Ia
sonnette,
assurez-vous qu'elle
peut
se
connecter
au
reseau
Wi-Fi. Verifiez
si
Ia
lecture
en
continu
s'execute
dans
!'application
Globe
SuiteTM.
o
Si
vous ne pouvez apercevoir
Ia
video, verifiez votre connexion Wi-Fi.
*LE SAVIEZ-VOUS?
La
plupart
de
routeurs
modernes
sont
bi-bandes,
ceux-ci
supportent
les
frequences
2.4
GHz
et
5 GHz.
Les
options
sans
filles plus
courantes
sont
les
suivantes:
o
Mixtes:
Le
routeur
diffuse les
frequences
2.4
et
5GHz
simultanement
so
us le meme
SSID.
Le
produit
choisira a
quelle
frequence
se
connecter
en
mesurant
quelques
variables (achalandage,
distance
au
routeur
etc).
o
2,4
GHz
: Diffuse
uniquement
a
cette
frequence.
o 5
GHz:
Diffuse
uniquement
a
cette
frequence.
o
Mixtes
2,4
et
5
GHz
utilisant
des
SSIDs
separes:
Le
routeur
diffusera les
deux
frequences
et
l'utilisateurfera
son
choix
de
connexion.
50138

MOUNTING
INSTRUCTIONS -BATTERY INSTALLATION
BEFORE
MOUNTING
YOUR
DOORBELL. ENSURE POWER
GOING
TO
THE DOORBELL IS OFF
-Remove yourexisting doorbell.
Hide
or
remove
the
wiring.
-Use a pencil
to
markwhereyou
will
be
drilling.
-Install
the
doorbell
into
the
bracket.
-Use a 3132"
drill
bit
to
drill
pilot holes
in
the
desired
location.
*Ensure there
are
no pipes
or
wires
in
the mounting
location.
-Insert
the
nail
expansion
screws ifscrewing into
stone
or
other
hard
materials.
-Tighten
the
screw.
-Align
the
bracket
and
secure
the
mounting screws
or
tape.
Fix
the
mounting bracketwith screws
or
tape
(No
need
screwswhen install tape).
-Insert included batteries
if
you have
not
already.
Check
the
videostream
in
the
Globe
Suite•M
app.
MOUNTING
INSTRUCTIONS
-WIRED
INSTALLATION
BEFORE
MOUNTING
YOUR
DOORBELL. ENSURE POWER
GOING
TO
THE DOORBELL IS OFF
12-24VAC
-
Usea3132"
drill bit
to
drill
pil
~'
holes
in
the
desired location.
-Removeyour existing doorbell.
The wiring must
be
exposed.
-Usea pencil
to
markwhere you
will
be
drilling.The wires must
come
through
the
top
half of
the
wall
plate's hole.
If
they
don't
it
will
prevent
the
wall platefrom
mounting
to
the
doorbell securely.
-Install
the
doorbell
into
the
bracket.
*
Ensure
there
are
no
pipes
or
wires
in
the mounting
location.
-Insert
the
nail expansion screws
if
screwing into
stone
or
other
hard materials.
-Tighten
the
screw.
-Align
the
bracket
and
secure with mounting
screws.
-Wire
the
doorbell
and
place
in
the
bracket.
*Note:
the
wire
location
does
not
matter.
-Turn
the
power
to
the
doorbell backon.
-Check
the
video stream
in
the
Globe
Suite•M
app.
WIRELESS
CHIME
PAIRING
1.
Click
the
"RESET"
button,
the
blue
light blinks and
enter
the
configuration mode.
2. Enter
the
"Settings" ofyour
app,
press
"Ring
Setting".
3.
Press "Add" button,
the
device
will
be
connected
about
2s.
4.
Select
the
ringtone,
adjust
the
volume.
5.
Complete
the
configuration,
the
blue light
is
on.
*Wireless
chime can only
be
used
with
battery
installation,
the chime
will
not
work
with
wired
installation.
Since 1932,
Globe
has
taken
pride
in
offering
products
ofthe
highest quality,
and
a level
ofservice
unparalleled
in
the
industry.
Should you
encounter
anydifficulties, have any
questions
or
simplywish
to
offer usyourvaluable
feedback,
you may
contact
us
in
the
following ways:
Toll
FreeTelephone: 1-888-S43-1388 (North America Only) I
Toll
Free Fax:
1-800-668-4562
(NorthAmerica Only)
E-Mail: [email protected]I
Mail:
Globe
Electric
Customer
Service
Department
150
Oneida,
Montreal,
Quebec,
Canada
H9R
1A8
Pleasevisit
our
website
to
discover
other
quality
Globe
products: http://www.globe-electric.com
50138

9
globe~
Nous
vous
remercions
de
choisir
Globe
com
me
choix
de
securite
intelligent
pour
votre
maison.
Moyennant
un
entretien
adequat,
ce
produit
vous
foumira
un
eclairage
plaisant
et
agreable.
Suivez
attentivement
les
instructions
afin
d'assurer
le
fonctionnement
convenable
et
securitaire
de
ce
produit
durant
des
annees.
SONETTE WI-FI INTELLIGENTE -
50138
Regardez
Ia
video
d'installation surnotre
site
web:
globe-electric.
com/smart
CARACTERISTIQUES
La
sonnetteintelligente
Globe
vous
permet
d'afficher
Ia
video
HD
sur
votre
telephone
intelligent,
d'ecouter
ou
de
parlerauxvisiteurs a
Ia
porte
avantgracea !'application
Globe
Suite•M.Capacite
de
detection
des
mouvements
et
d'enregistrement
video
sur
un
maximum
de
24
joursavec
Ia
carte SD
de
128
Go.
Temoin Lumiere rouge (fixe): le
reseau
de
Ia
sonette estinstable
lumineux
Lumiere rouge (dignatant rapidement):
Ia
sonette est
en
moded'appairage
a
DEL
Lumiere bleue(fixe):
Ia
sonette estconnectee
Lumiere bleue(dignote rapidement):
Ia
sonette est
en
train de
se
connecter
au
reseau
SDCard
Prend
en
charge une carte memoirs micro
SD
(128 Go maximum)
Microphone
Entree audio
Speaker Sortie audio
Reset Appuyezsur le bouton dereinitialisation
et
maintenez-le enfonce pendant5 secondes
al'aide de
Ia
brochefoumie.
Des
quevous entendez un declic audible, cela signifie que
votre camera aete reglee sur
les
parametres d'usine
et
qu'elle est maintenant prete a
etre appairSe.
Chargement
remain
lumineux rouge
allume:
La
pile esten train
de
se charger.
Situe sur
Ia
partieinferieure, pres de
Ia
prise
USB.
remain
lumineux
bleu
allume :
La
pile
est
chargee
au maximum.
Situe sur
Ia
partieinferieure, pres de
Ia
prise
USB.
SPECIFICATIONS
Detection demouvement:jusqu'a 8 m (26,25 pi) Secume des donnees:
AE5
128
Capteur
IR:
1Om
(32,8 pi) Plage
sans
fil
:50
m(164,04 pi)
Vrtesse
detransmission :32 Ko/s a2 Mo/s Courantd'attente : 220 uA
Audio:
Transmission
audio
bidirectionnelle
Courant
de
travail : 220 rnA
Temperature
de
fonctionnement: -20
•c
a55
•c
Protection :
IP65
NormeWi-Fi:
IEEE802.11
b/g/g/n
Duree
de
vie de
Ia
pile : 250 cycles
Frequence: 2.4
GHz
a2.4835
GHz
Courant d'entree :
SecumeWi-Fi: WPA-PSK/WPA2-PSK • 2x 18650 piles indus.
• 3.6Vpiles
Duree devie de
Ia
pilede reserve : • 3350mAh chaques
Cette pile peutdurer3 mois
si
on appuie
sur
Ia
sonnette 3 fois parjour. •
port
USB:
DC
5V1
A
• Barnes avis al'arriere
(12 a
14
Vc.a.)
OUTILS NECESSAIRES
Tournevis
cnuciforme
ou
perceuse electrique
aembout
cnuciforme
Foret
de
0,23 em
pour
le
trou
pilate
foret
(1,58 em)
pour
le
trou
de
cable
foret
(0,55 em)
pour
les
ancrages muraux interieurs
CONTENU
DE
LA
BOiTE
SoneHe
WI-FI
intelligente
Carillon
sons Iii
l\
PlaqueNC
~
Accessoires
de
montage
(indus)
INFORMATIONS
SUR
LE
PRODUIT
SONETTE
lndicateur
decharge
Micro
USB
REMARQUE:
Lentille
Reinitialisation
Interface
d'alimentation
Fente
pour
carteSD
Le
symbole
«+»sur
Ia
pile
et
sur
le
compartiment
de
Ia
pile
devrait
etre
place dans
Ia
meme
direction.
CARILLON
SANS
FIL
Lampe d'etat
Haut·parleur
Port
d'alimentation
externe
Reinitialisation
50138

INSTRUCTIONS DE
MONTAGE
-INSTALLATION DE LA
PILE
AVANT
DE
MONTER
VOTRE SONNETTE,ASSUREZ-VOUS
QUE
LE
COURANT
QUI
L'ALIMENTE
EST
DESACTIVE.
-Enlevezvotresonnette actuelle
Dissimulez ou enlevez lesfils.
-Marquezle
point
de
pe~ge
au
moyen d'uncrayon.
-lnstallez
Ia
sonnette
dans
Ia
ferrure.
-Au
moyen
d'une
mechede
~
t
3
/32
po, percez des IJ.-,.'::;:::::
avant-trousa l'endroitdesire.
*Assurez-vous qu'il
nya
pasde
tuyaux ou de
fils
au
pointde
montage.
-lnserezdes vis d'expansion
pour
visser dans
Ia
pierre ou d'autres
materiauxdurs.
-Serrez
Ia
vis.
-Alignez
Ia
ferrure
et
retenez-la au moyen
de
vis
de
montageou
de
ruban. Fixez
Ia
ferrure
de
fixation au
moyen
de
vis ou
de
ruban (il n'est pas necessaire
d'utiliserdes vis lorsqu'on installe un ruban).
-lnserez
les
piles comprises
si
vous ne l'avez pas dejafait.
Regardez lefil
video
sur
!'application
Globe
Suite•M
INSTRUCTIONS DE
MONTAGE
-INSTALLATION
cABLI~E
AVANT
DE
MONTER
VOTRE SONNETTE,ASSUREZ-VOUS
QUE
LE
COURANT
QUI
L'ALIMENTE
EST
DESACTIVE.
12-24Vc.a.
-Enlevezvotresonnette actuelle.
Les
fils doiventetre exposes.
-Au
moyen d'un crayon, marquezle
point
de
pe~ge.
Les
fils doivent
provenir
de
Ia
moitiesuperieure
du
trou sur
Ia
plaque murale.
Si
tel
n'est pas le cas, vous
ne
pourrez
fixer
Ia
plaque muralesolidement
sur
Ia
sonnette.
-lnstallez
Ia
sonnette
dans
Ia
ferrure.
-Au
moyen d'une
mechede
~
t
3132
po,percez desavant-trous
a l'endroitdesire.
*Assurez-vousqu'il
nya
pasde
tuyauxou de
fils
au
pointde
montage.
-Alignez
Ia
ferrure
et
retenez-la au moyen
de
vis
de
fixation.
-lnserez desvis d'expansion
pour
visserdans
Ia
pierre
ou
d'autres
materiauxdurs.
-Serrez
Ia
vis.
-Reliez lesfils
de
Ia
sonnette
et
placez-la sur
Ia
ferrure.
*Remarque: L'emplacement
des
fils
na pas d'importance.
-Retablissez le courantqui alimente
Ia
sonnette.
-Regardez lefil
video
sur !'application
Globe
Suite•M,
JUMELAGE
D'UN
CARILLON SANS FIL
1.
Cliquezsur le
bouton«
Reinitialisation
».
Le
temoin bleu clignotera
et
vous
pourrez accederau
mode
de
configuration.
3.
Appuyezsur le bouton«AjouteZ»
L'appareil sera branche pendant
environ
2
sec.
5.
Completez
Ia
configuration.
Le
temoin
bleuest allume
..
2.
Accedeza l'option «Parametres»
de
votre application
et
appuyez
sur«
Parametres
de
sonette».
4.
Selectionnez
Ia
tonalite
et
ajustez le
volume.
*Carillon
sans
fit
peutseulement
i!tre
utilise
avec
/'installation
de
Ia
batterie.
Le
carillon
ne
fonctionnera pasavec
/'installation
cab
lee.
Depuis 1932,
Globe
met
sa
fierte
a
offrir
des
produits
d'eclairage
de
Ia
plus haute
qua
lite
et
un niveau
de
service
inegalable
dansson secteur.
En
cas
de
difficultes
ou
de
questions,
ou
si
vous desirez
simplement
no
us
faire
part
de
voscommentaires, vous
pouvez
communiquer
avecnous
par
les
coordonnees
suivantes:
Telephonesans frais
d'interurbain
: 1-888-543-1388
(Amerique
du
Nord
seulement)I Telecopie sans frais
d'interurbain
:
1-800-668-4562
(Amerique
du
Nord
seulement)
Courriel:
Courrier:
Globe
Electric,Service
du
soutien
de
Ia
clientele
150
Oneida,
Montreal.
Quebec,
Canada H9R 1A8
Visitezaussi
notre
site
Web
pour
decouvrir
d'autres
produits
Globe
de
qua
lite,a l'adresse
http://www.globe-electric.com
50138
Table of contents
Languages:
Other Globe Intercom System manuals
Popular Intercom System manuals by other brands

Nortek Security & Control
Nortek Security & Control MIGHTY MULE MM136 Instructions for wired and wireless installations

2N
2N Helios IP Configuration manual

Toa
Toa TOAEXES-5OOO troubleshooting guide

Dahua
Dahua KTA02 quick start guide

Toa
Toa N-XC65-W user manual

Equitel
Equitel E451 Technical and installation manual