GMATIC Rotan 155 BTX User manual

SCRUBBER DRYER
Operating Manual
V.4.0.4

Table of Contents
1. Important machine elements................................................................................................................................5
2. Warning notes...........................................................................................................................................................8
3. Installation charger................................................................................................................................................10
4. Battery instructions...............................................................................................................................................10
5. Commissioning .......................................................................................................................................................11
6. Operation....................................................................................................................................................................12
7. Hygiene maintenance ...........................................................................................................................................15
8. Hygiene plan ............................................................................................................................................................18
9. Troubleshooting......................................................................................................................................................19
10. Overview of wear parts ........................................................................................................................................20
11. Change suction lips...............................................................................................................................................21
12. Brush change...........................................................................................................................................................22
13. CE-Certificate............................................................................................................................................................23

5
1. Important machine elements
4
1. Emergency switch
2. Horn
3. Rotary switch (forward/backward)
4. Head lights (on/off)
5. Signal light fresh water (empty)
6. Signal light waste water (full)
7. Key switch (on/off)
8. Brush unit (up/down)
9. Suction motor switch (on/off)
10. Steering wheel
11. Brush unit
12. Battery tray
13. Fuel cap
14. Water tank
15. Suction unit
10
11 15
14
13
12
4
3
56
7
8
9
1
2

6 7
16. Drain tap fresh water
17. drain tap waste water
18. Suction hose
19. Rubber lip (back)
20. Foot throttle
21. Head light
22. Signal lights
23. Seat position (forward/backward)
24. Weight adjuster for seat
25. Machine plug
26. Machine connector
37. Water adjustment
16 17
18
19
21
22
20
24
27
23 25
26

8 9
2. Warning Notes
●This machine is not suitable for removing dust that
presents a health hazard!
●This machine is only intended for wet cleaning of
non-textile floors!
●This machine is not approved for use on public paths
or roads!
●This machine may only be used by persons, who
have been instructed in and expressly familiarised
with its use!
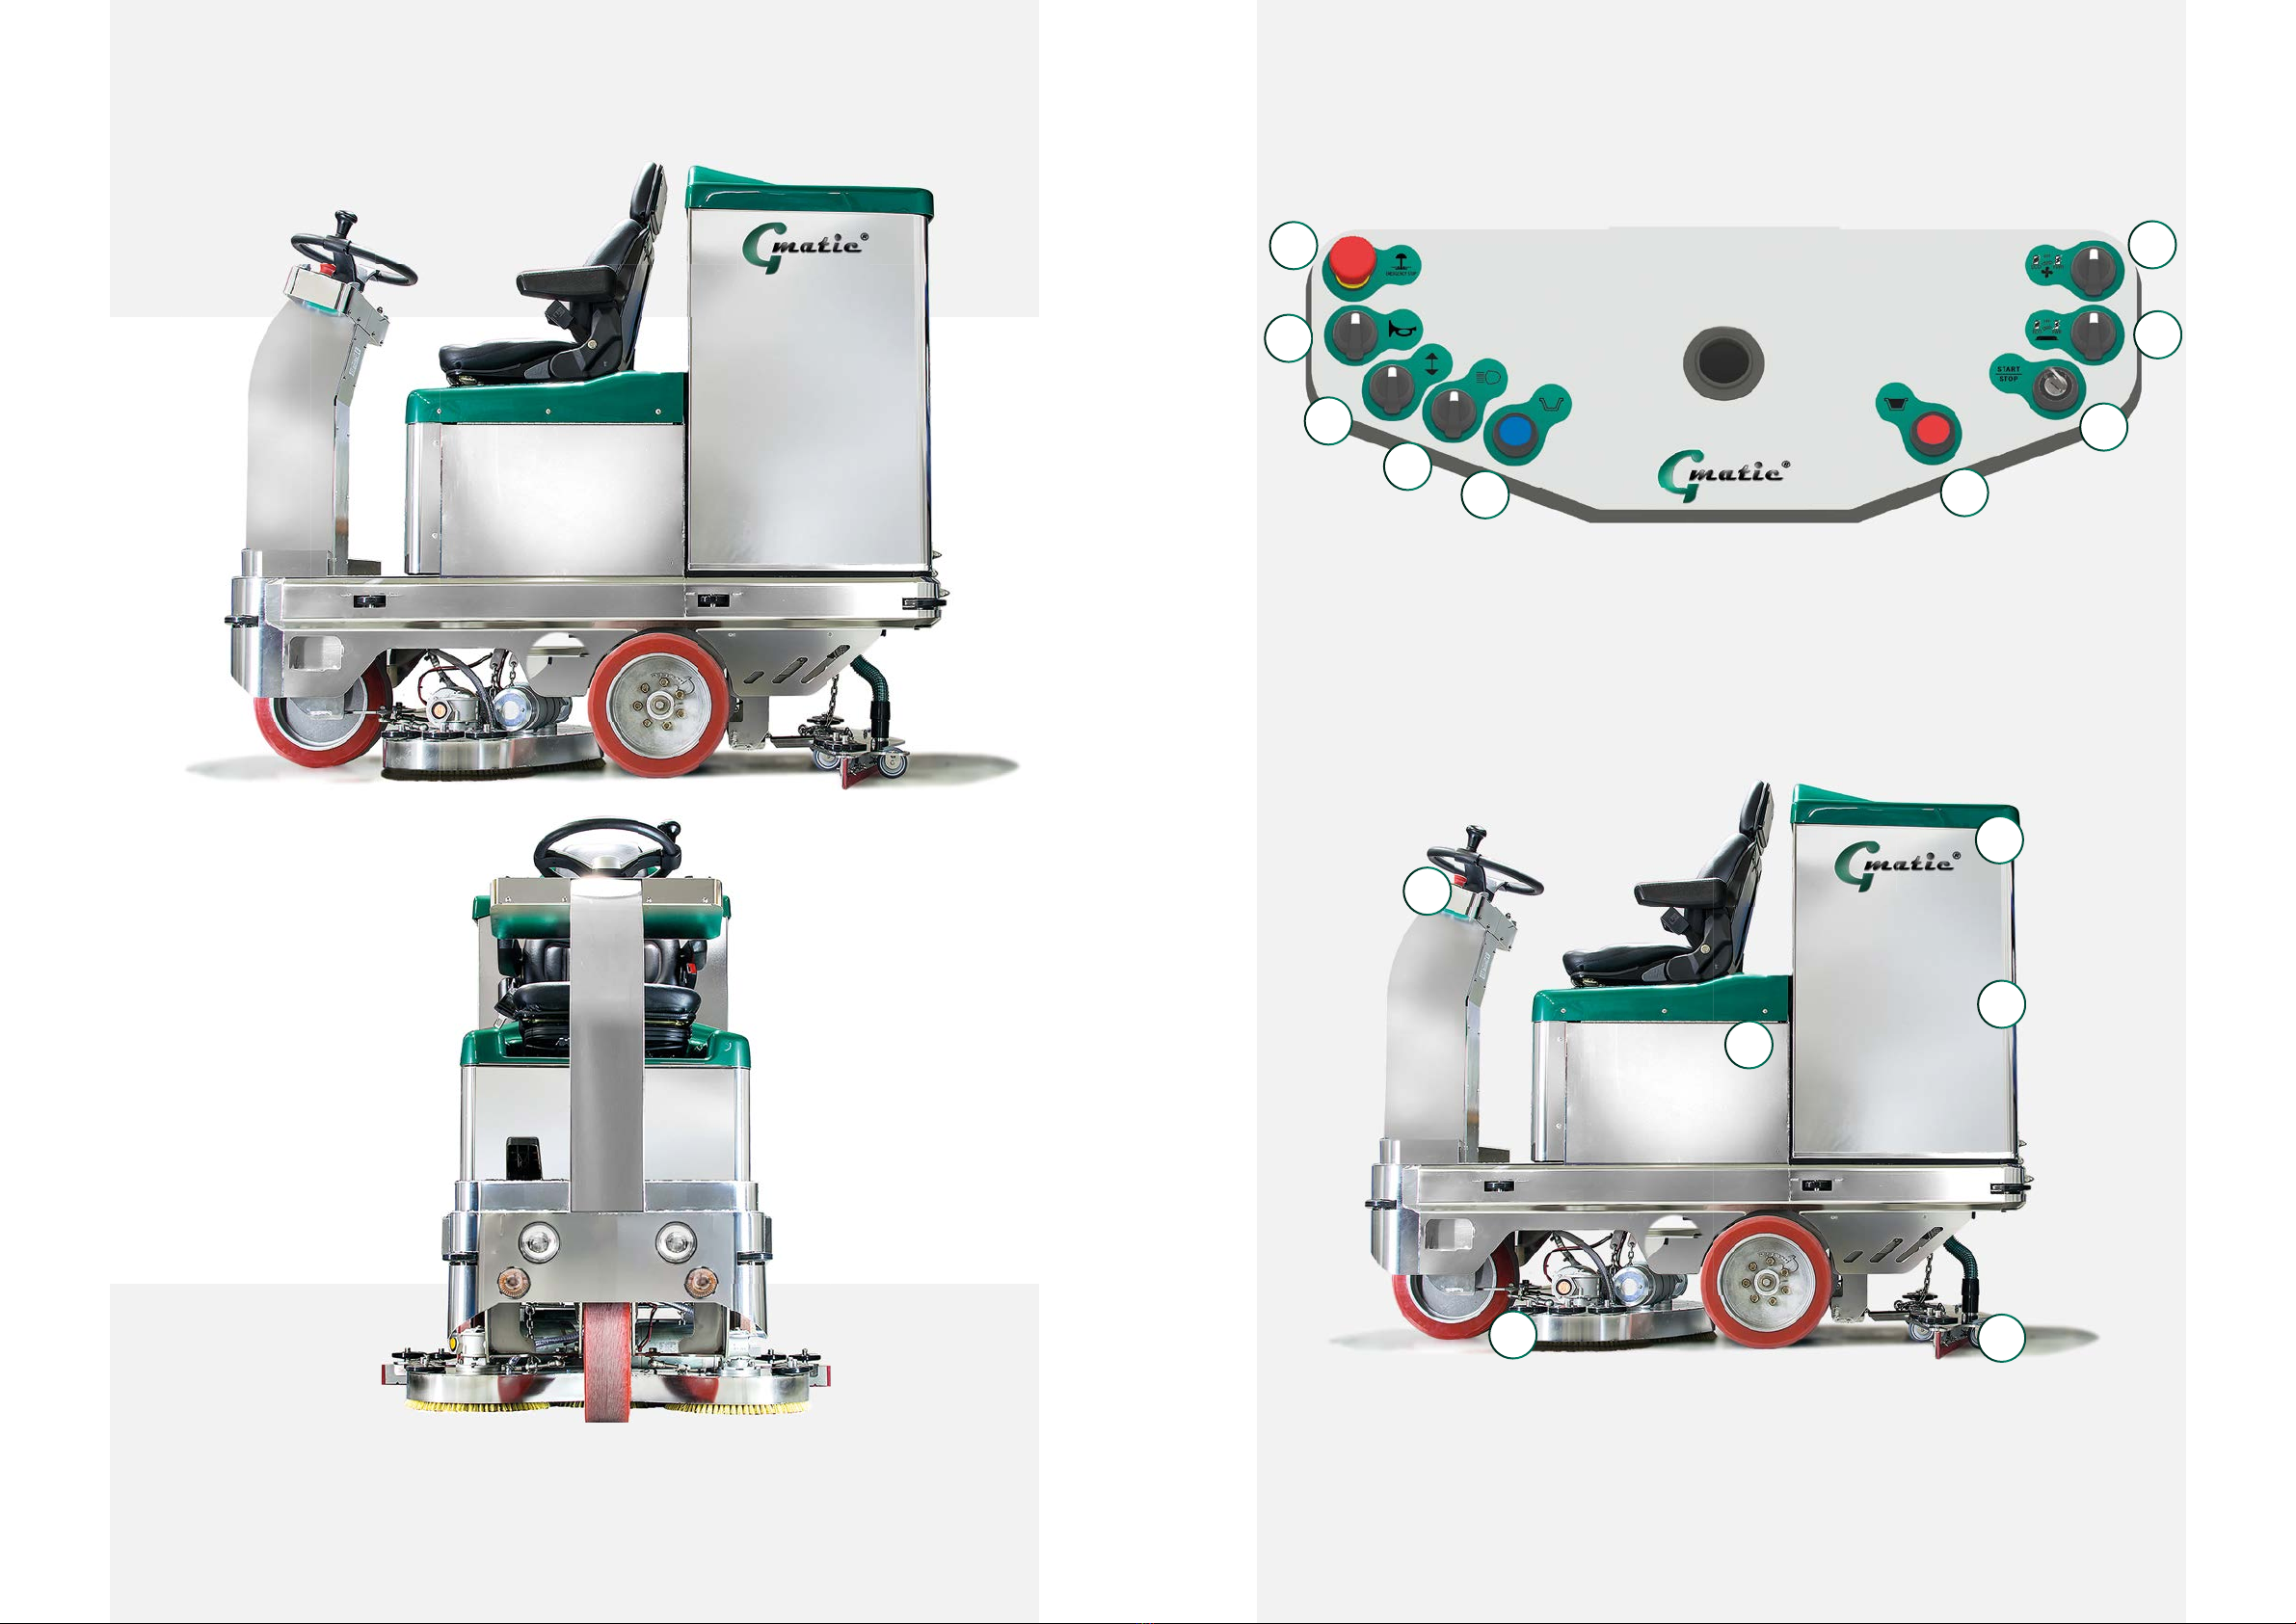
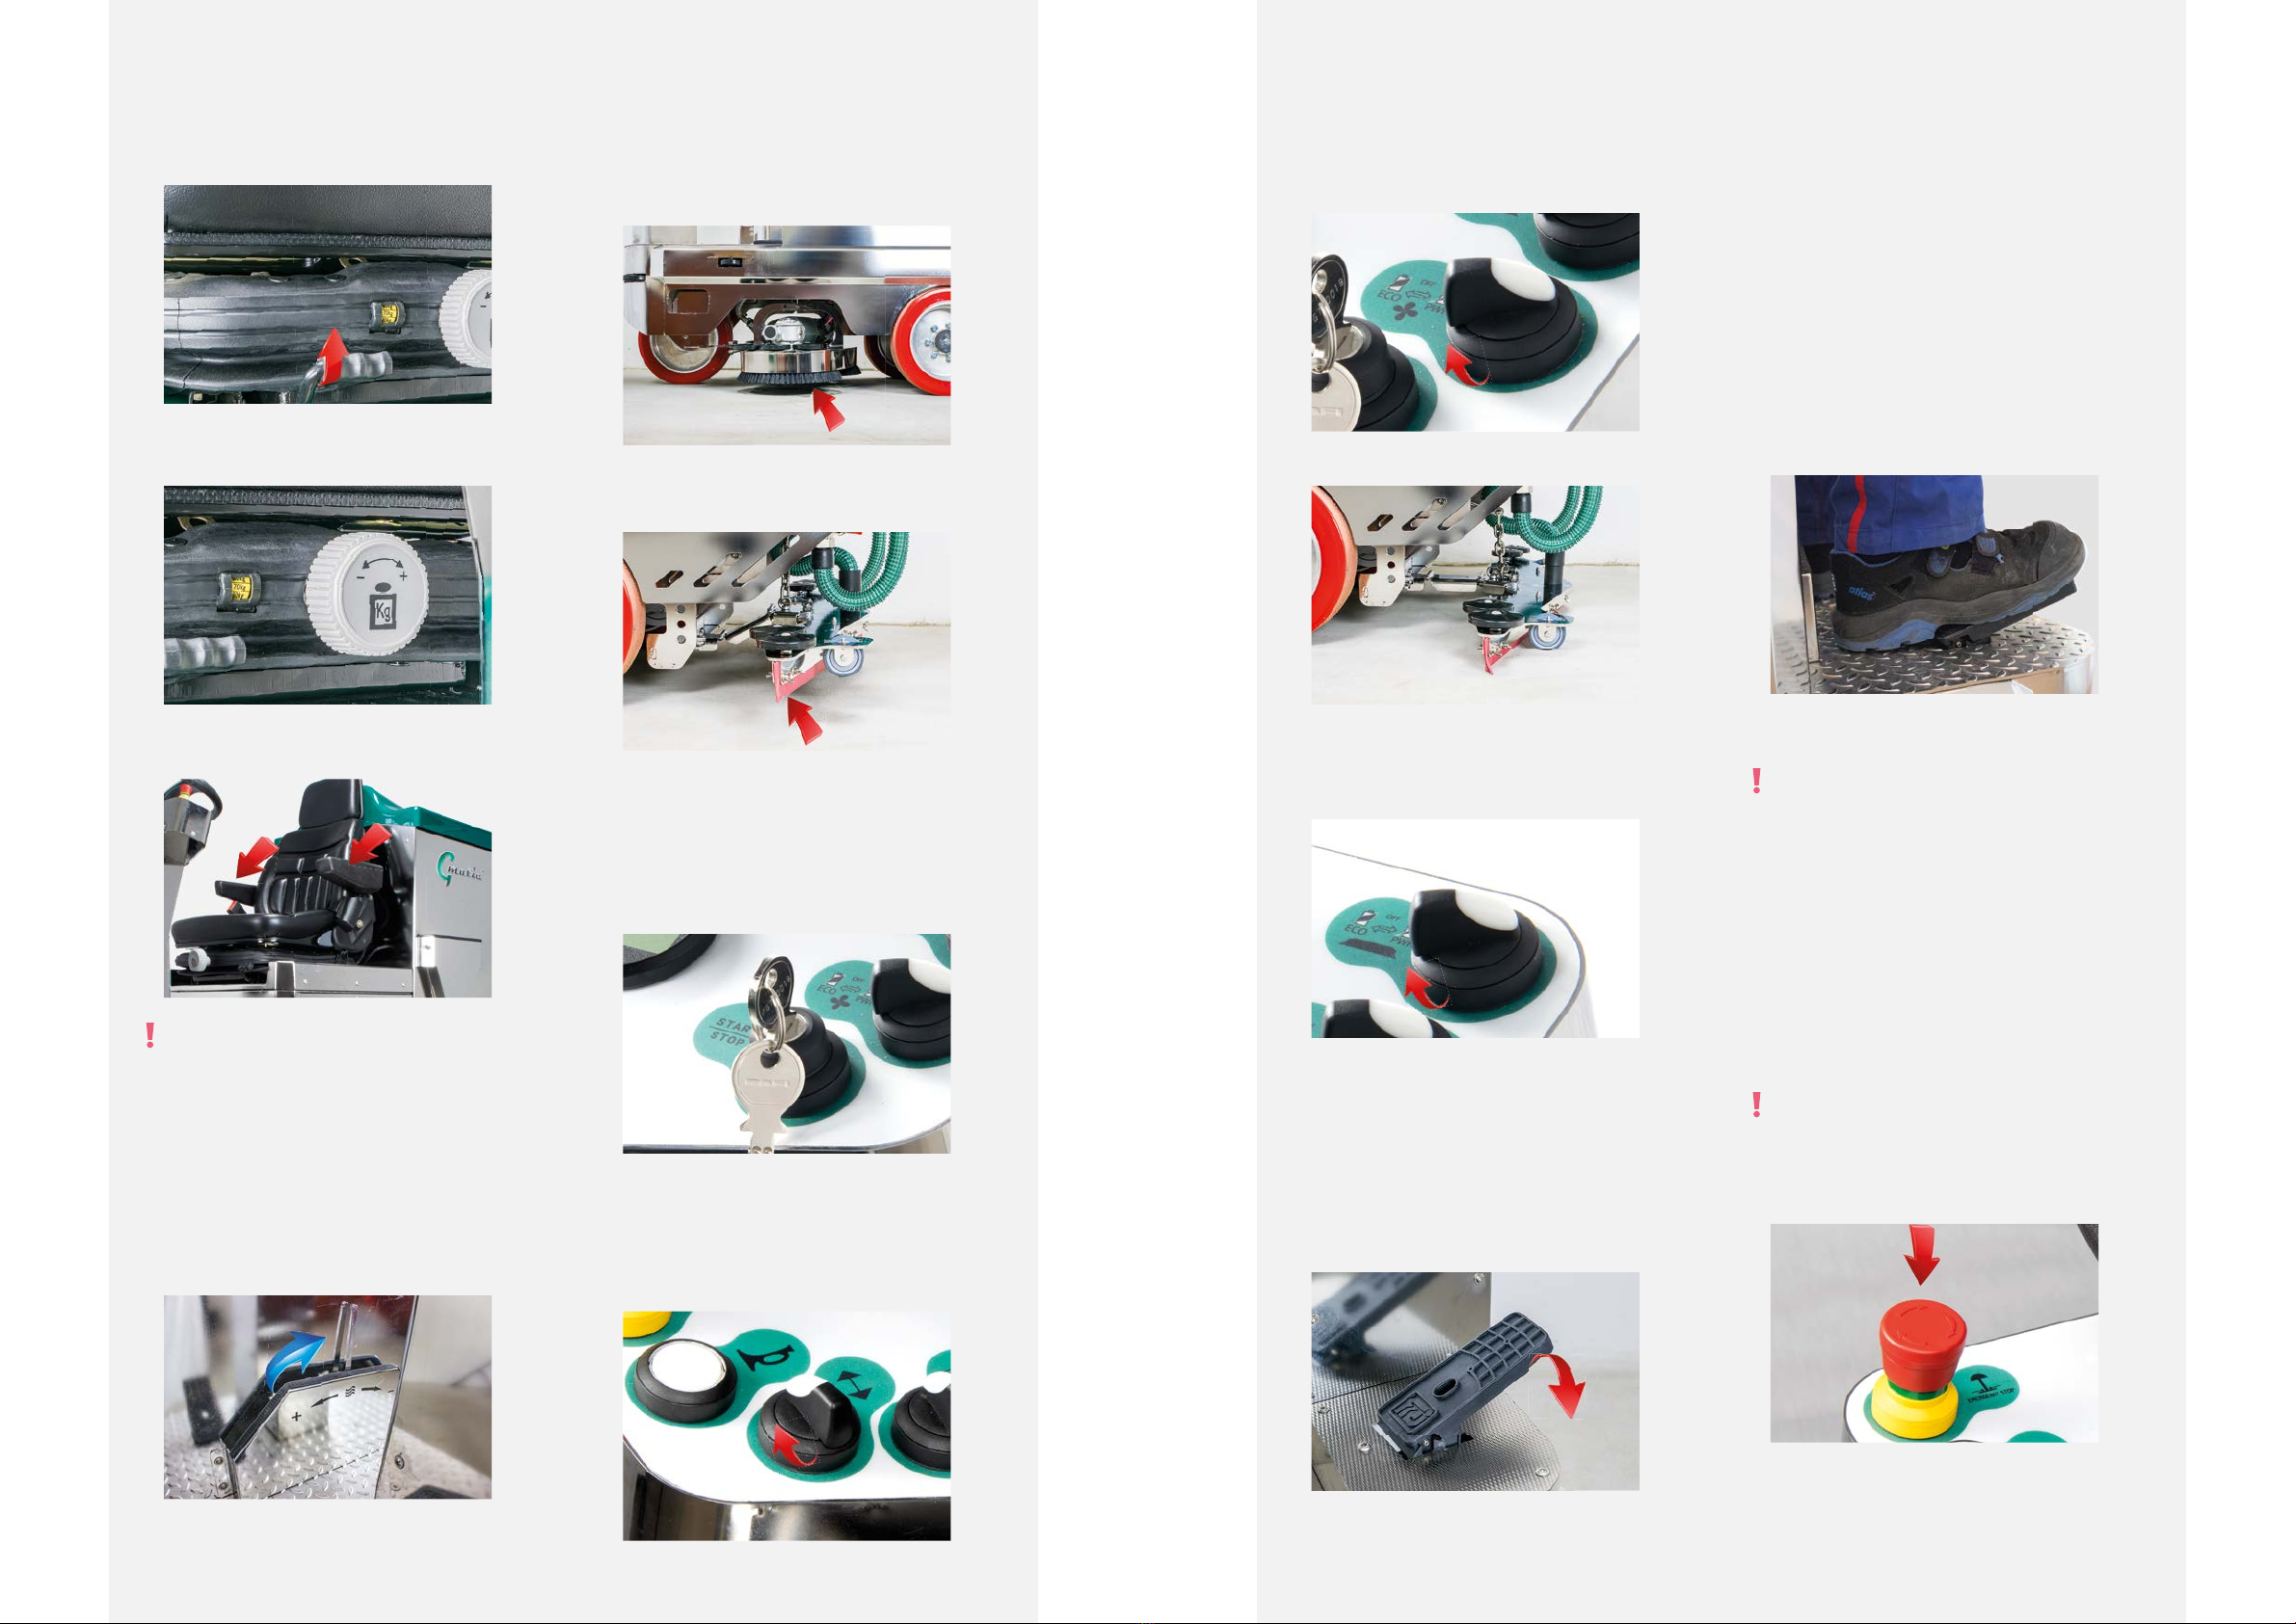
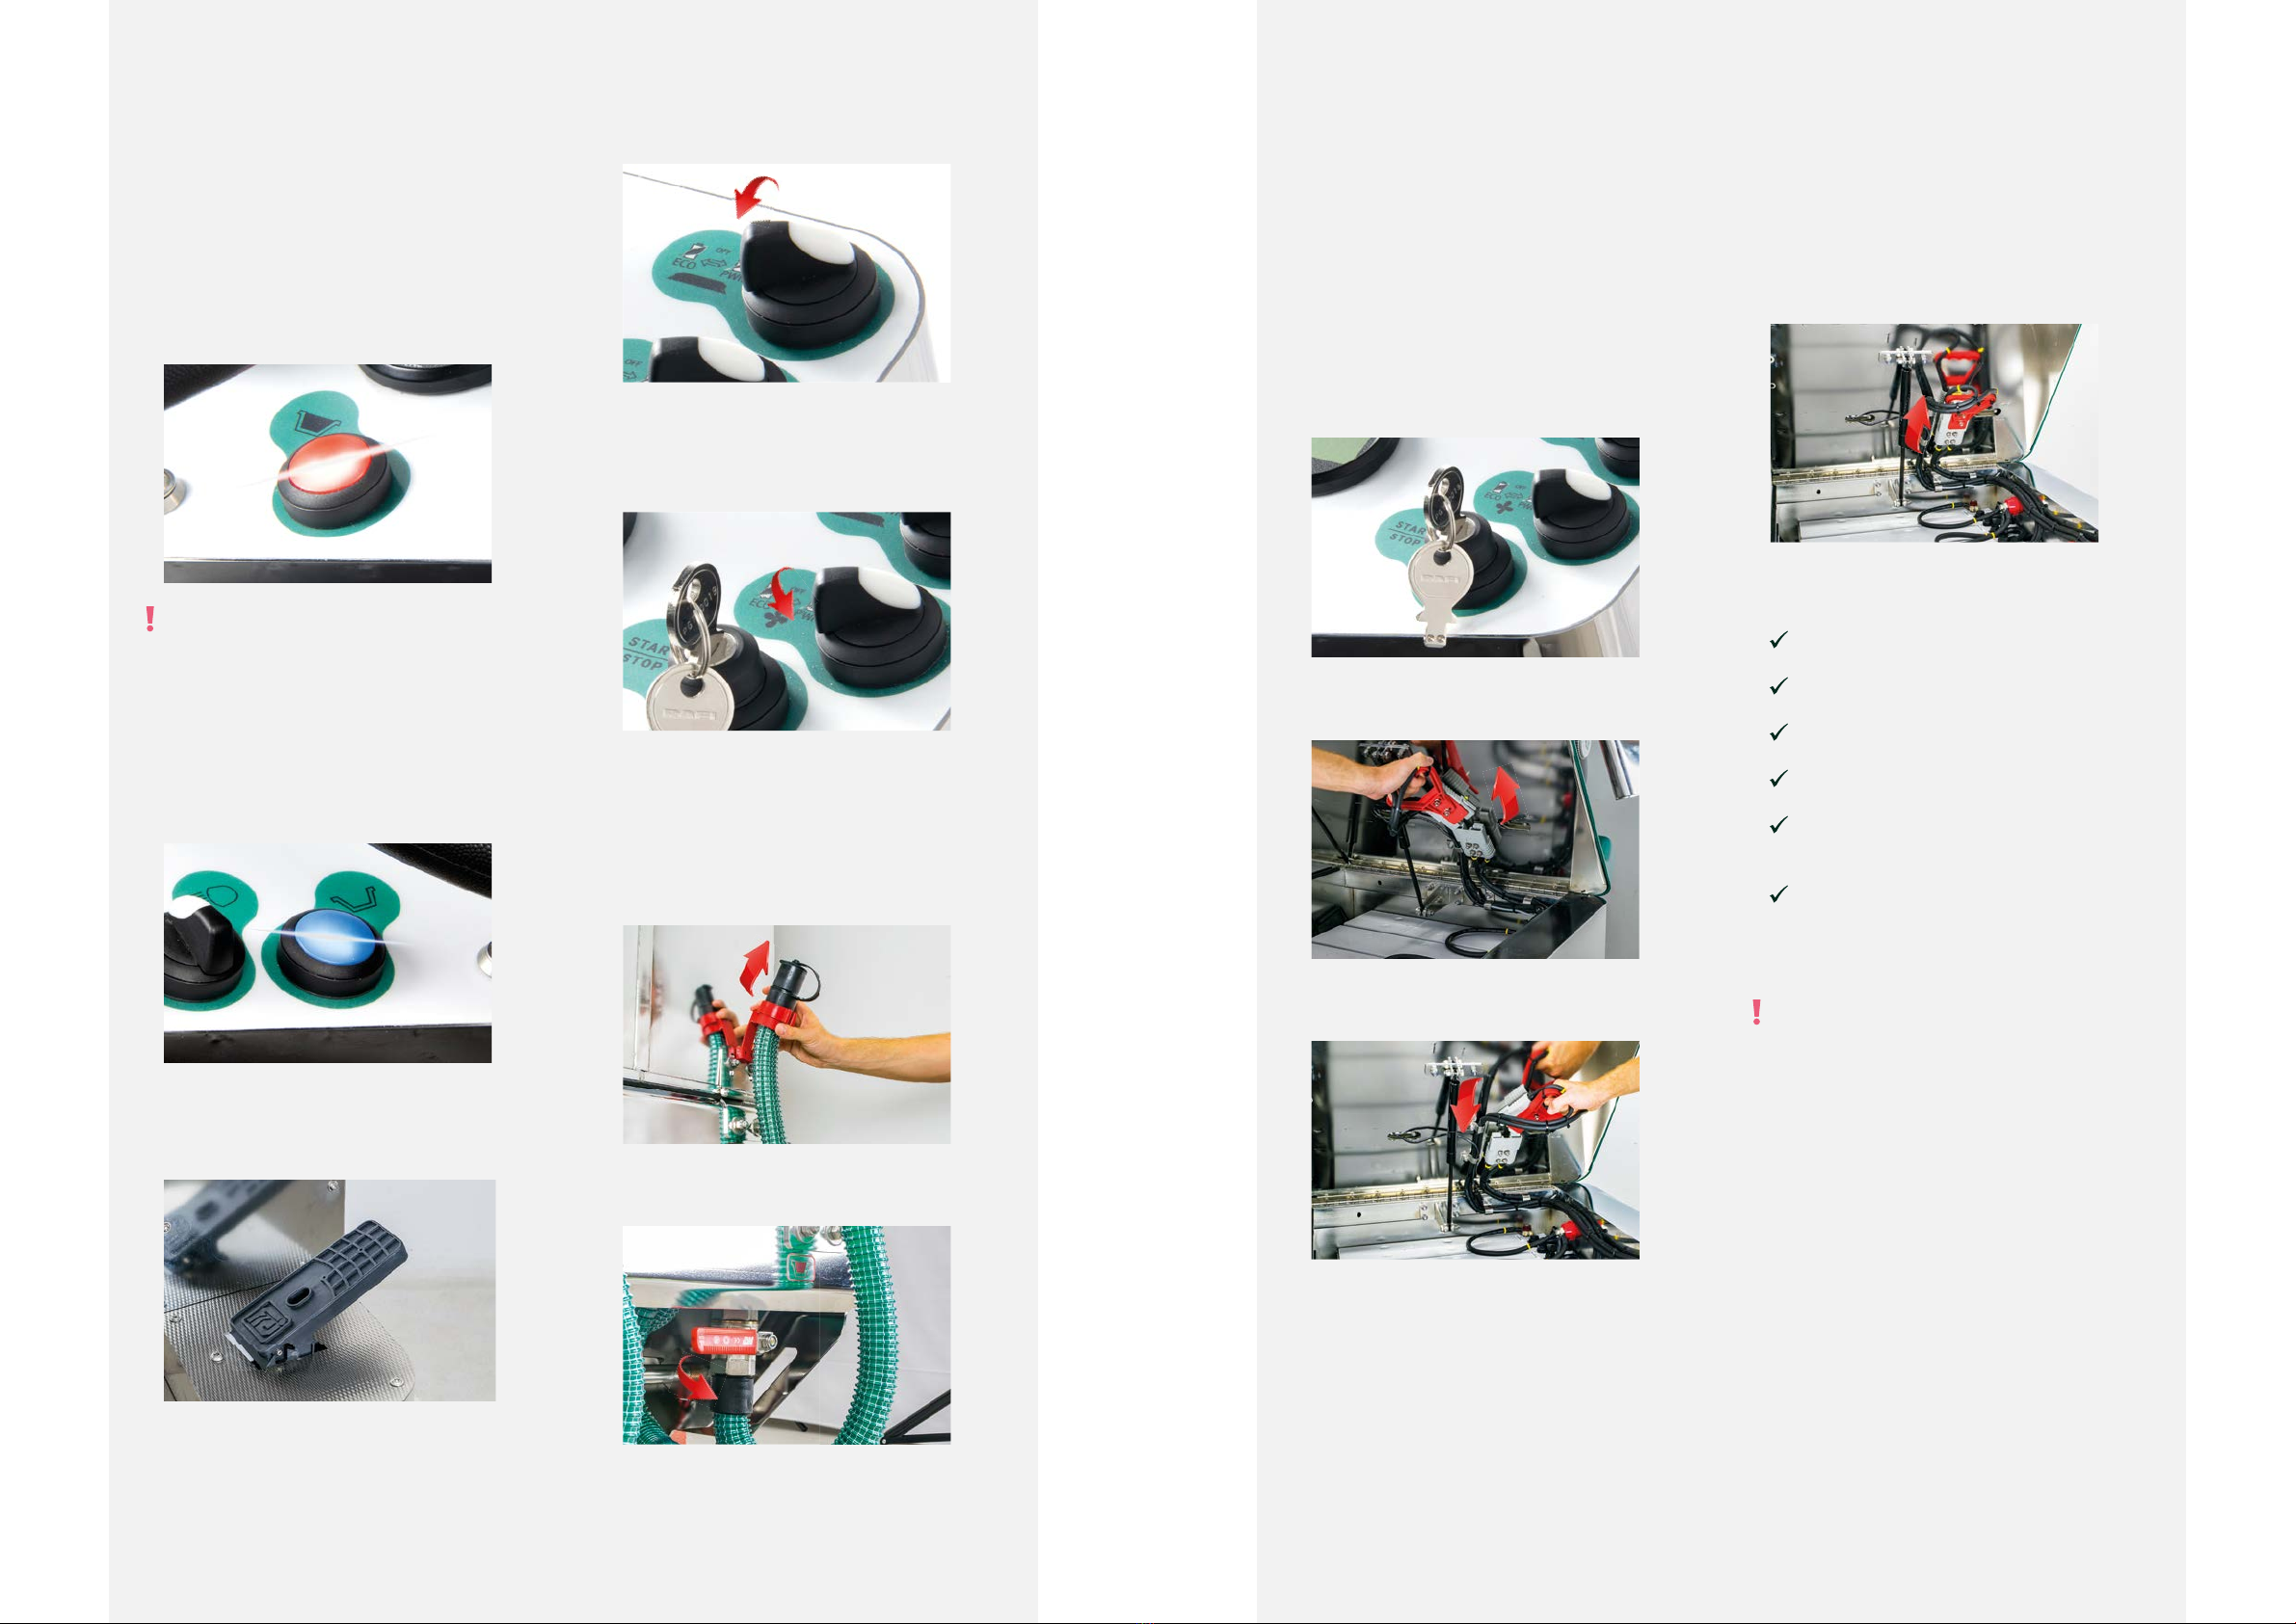
●To prevent unauthorised use, the key must always be
removed from the key switch [7] when leaving the
machine unattended!
●The machine must be secured against accidental
movements when left unattended by operating the
foot brake.
●Always watch for others, and in particular children,
when working with the machine!
●The machine is only approved for use on flat
surfaces up to a maximum inclination of 2%!
Note: The installation and / or the use of other
than Rotan™ original parts and accessories can
negatively change the design characteristics or
even impair the active and / or passive driving sa-
fety of your cleaning machine! The manufacturer
excludes any liability for damage caused by the
use of parts and accessories other than Rotan™!
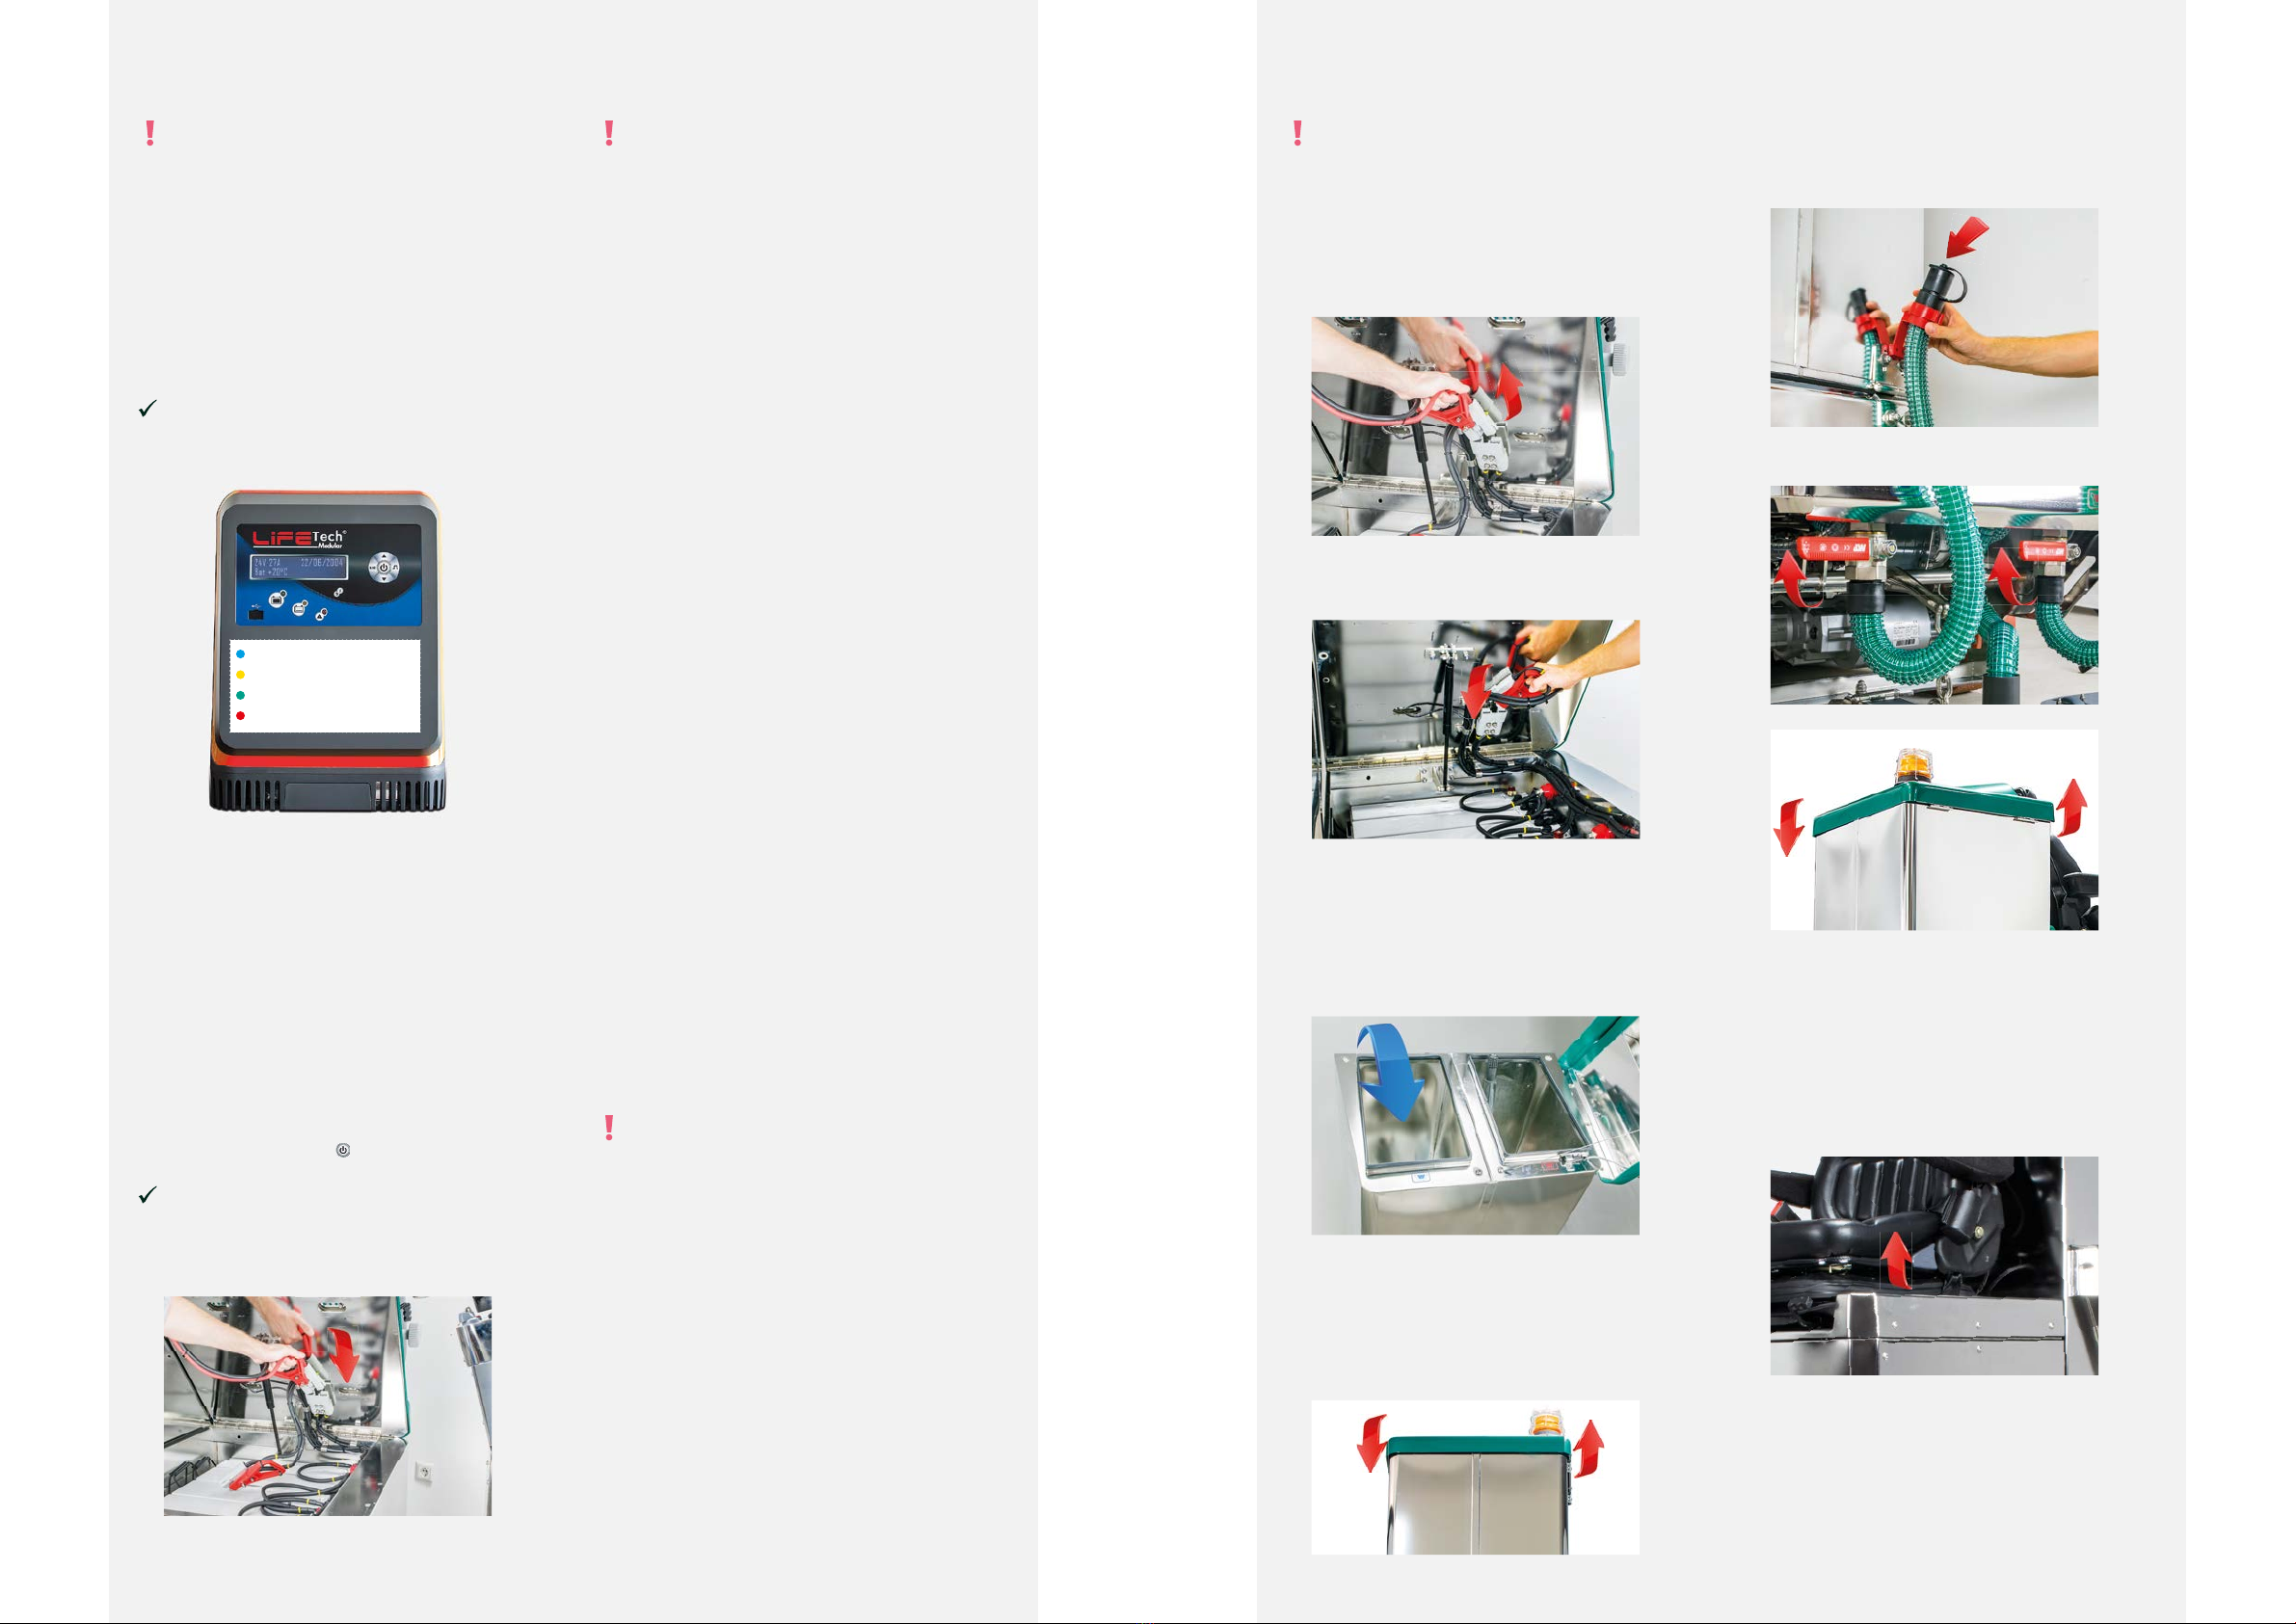
●When cleaning and performing maintenance on the
machine and when replacing parts:
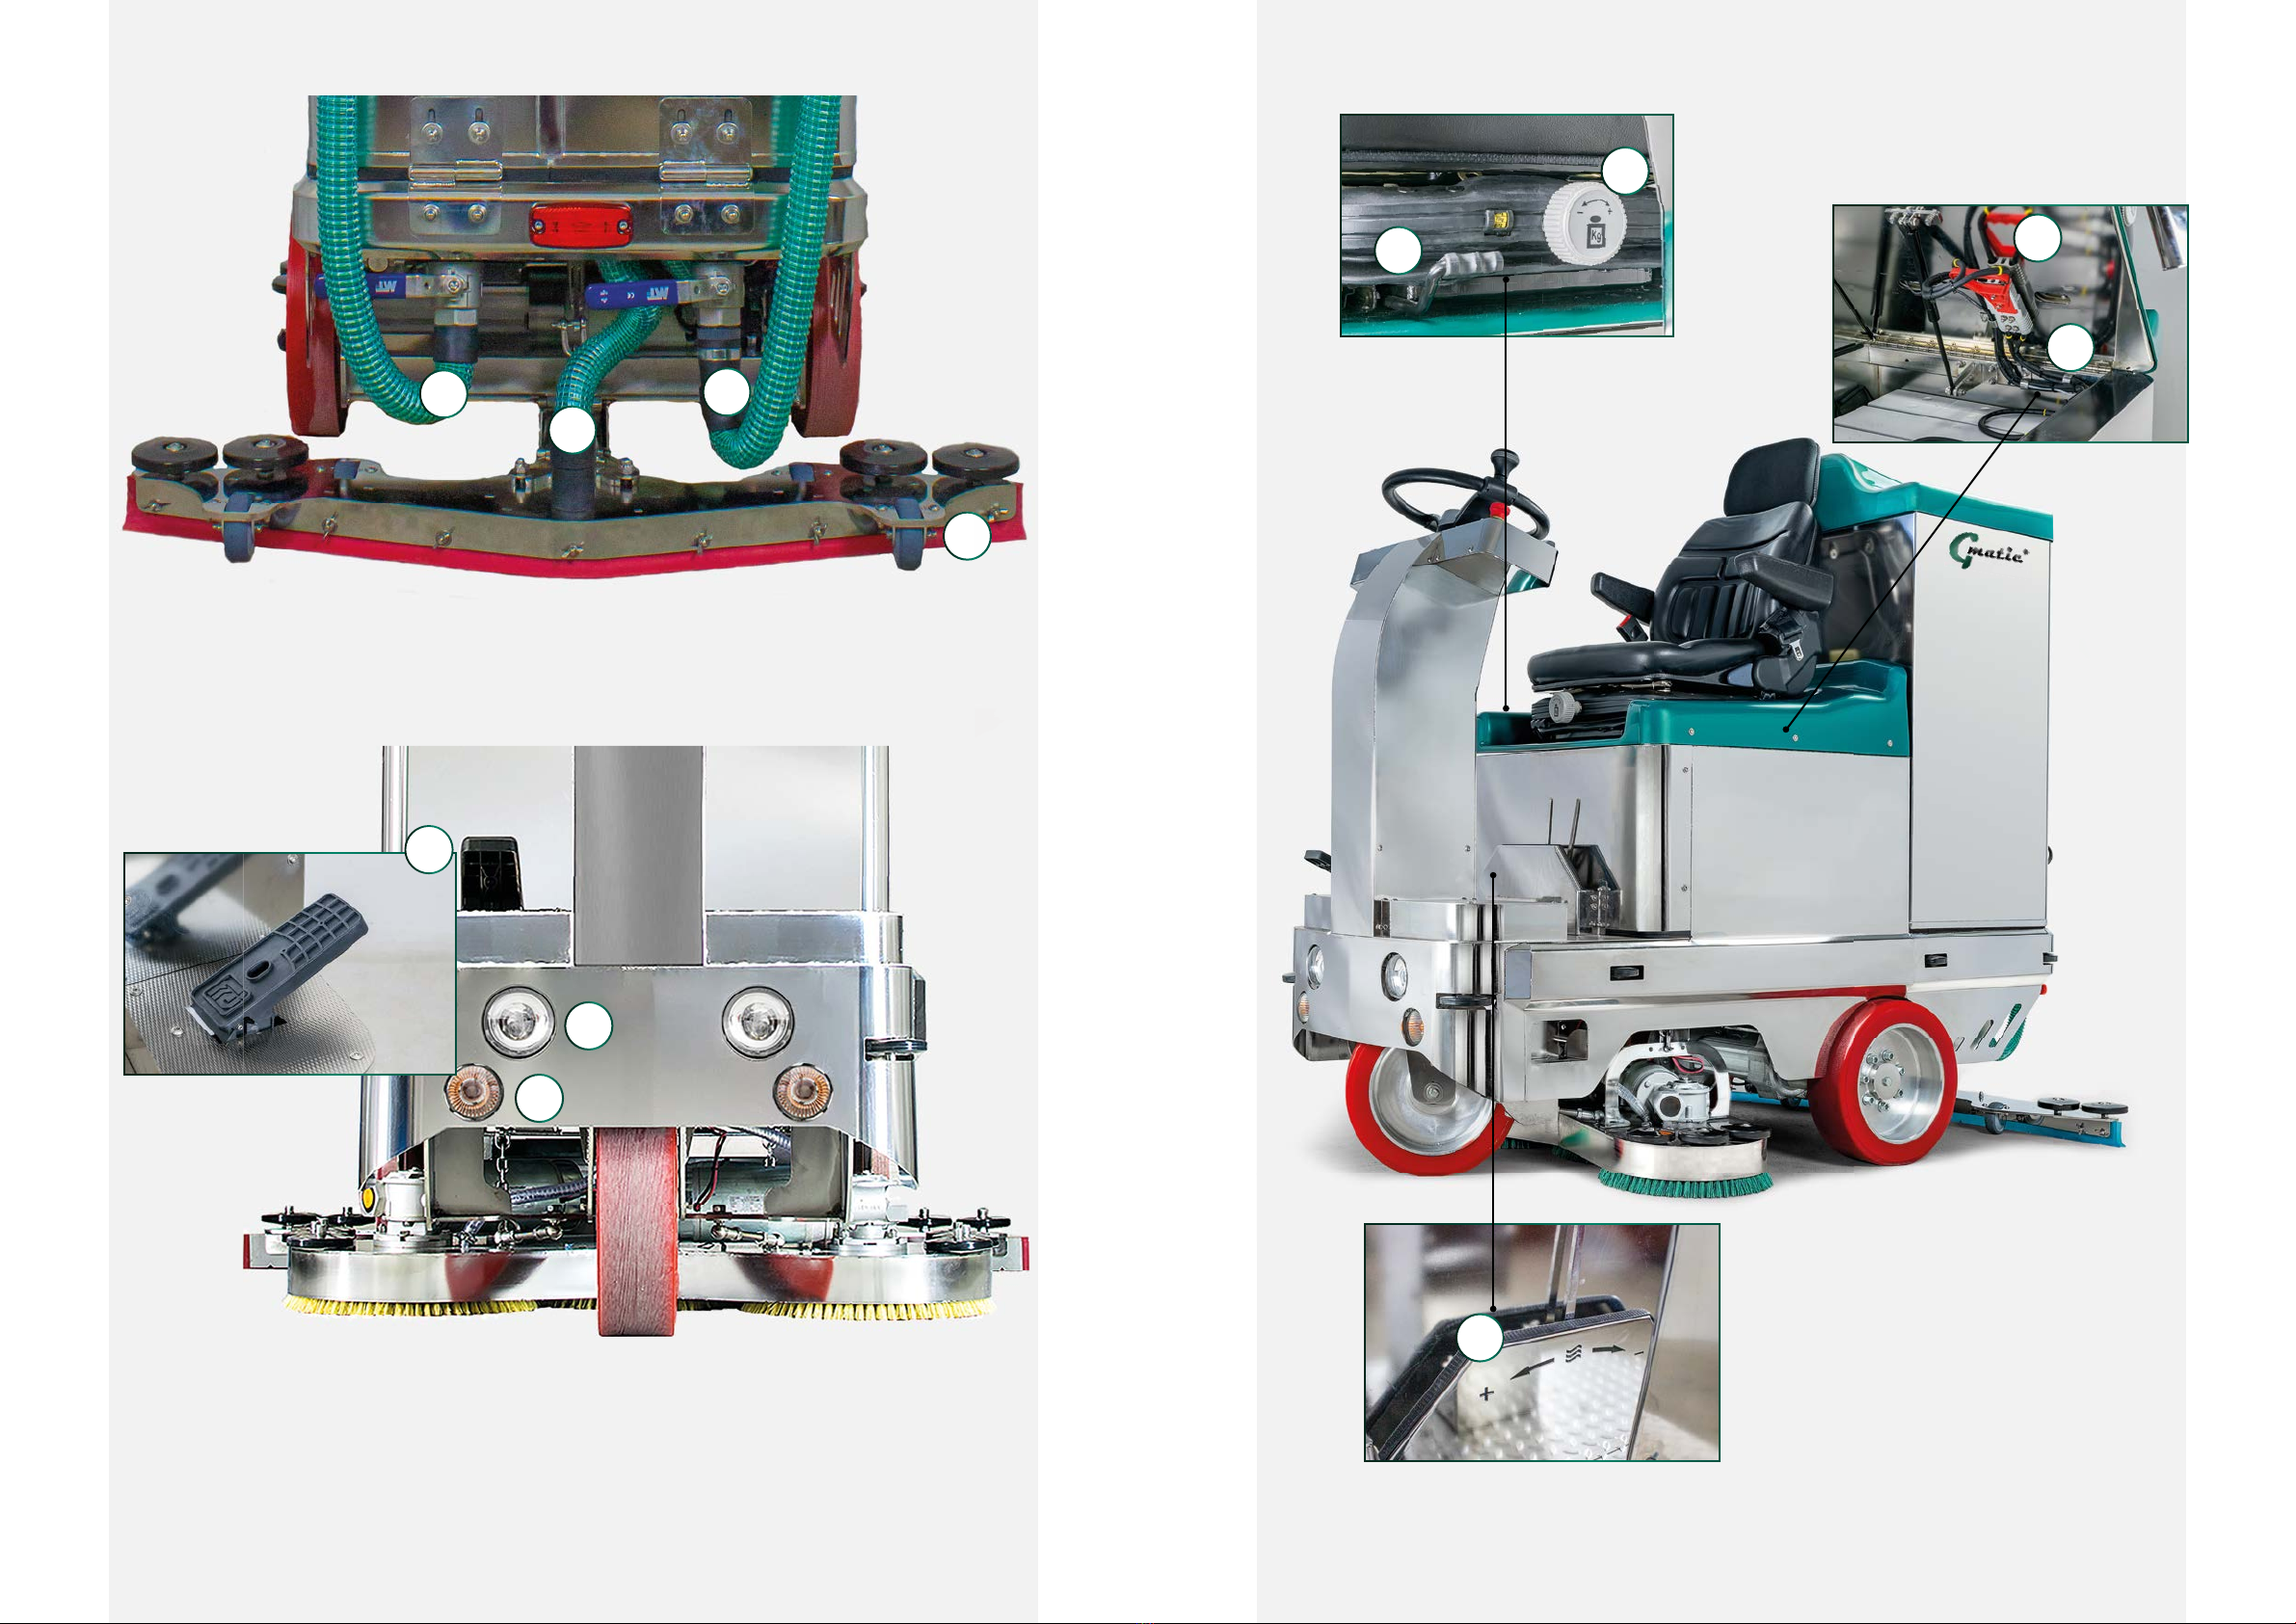
-the red machine plug [25] must be removed from
the battery socket outlet [26] (on the back of the
machine)
-the key must be removed from the key switch [7].
●Charging cables (connection cable from the charger
to the machine) must not be modified, in particular
not extended!
●Brand new batteries can not deliver the full power
yet, but only after activating the first 8 to 10 charging
or discharging cycles. Therefore do not use the
machine for an over-extended period of time.
●Never cover the top lid [13] with heavy objects for an
extended period of time (to protect the sealings, as
well as to avoid warping)!
●Before using the batteries, read the enclosed
documents:
-Operating instructions for the batteries
(see 4. Batteries).
-Operating instructions for the charger
(see 3. Charger)
2.1 Wet Batteries:
Note: Always pay attention to the use of supplied
wet batteries (does not apply to maintenance-free
batteries):
-Battery gases from wet batteries are highly
explosive! Avoid sparking and open flames
near the battery!
-Good air circulation must be ensured in
rooms in which wet batteries are charged!
-To avoid gas formation during the charging
process of the batteries, please note: Always
keep the water tanks folded up as far as they
will go!
2.2 questions and answers
Tel. +49 2389 40 30 20
AS OF
08/2020 OPERATING INSTRUCTIONS
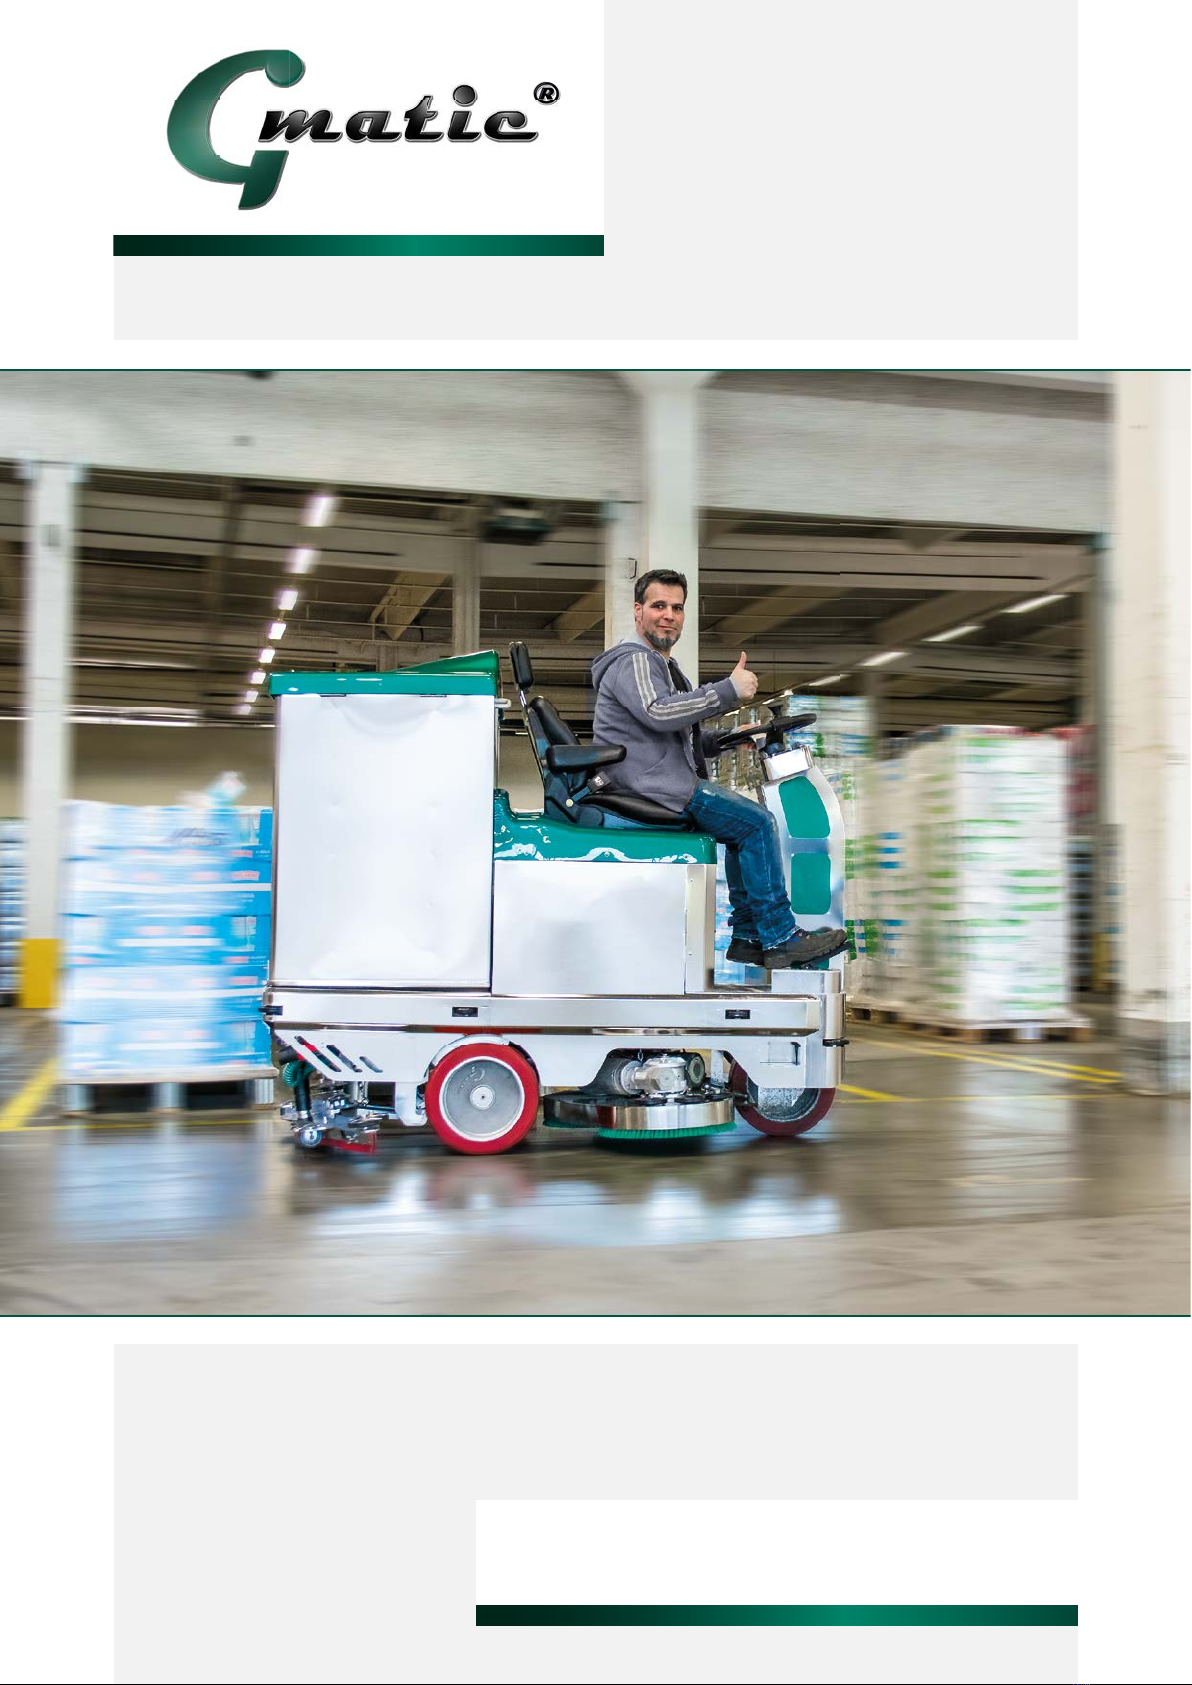
Scope of application
Gmatic®scrubber drier (ride-on)
Dangers for humans and the envirnoment
Injuries caused by collision with people and damage to objects.
Fall injuries. In the event of irregular and / or improper maintenance, there is a risk of injury from residual
moisture behind the squeegee.
Crash Injuries. Do not use the scrubber drier on the ramp table and keep a safety distance of 30cm to pre-
vent people and machines from falling down.
Hand injuries due to pinching or crushing. If the water tank has been folded up for emptying, there is a risk
of injury by folding or squeezing your fingers between the tank and the machine chassis while folding back
into the starting position.
Protective measures and rules of conduct
Use only by trained personnel. Observe the manufacturer‘s operating instructions.
Wear sturdy shoes.
For hygienic reasons, wash hands before and after use.
Do not park the scrubber drier on escape routes or in front of emergency exits.
Park securely against rolling away. In the case of machines without a parking brake, the brush head must
be lowered for safety.
The tank is only emptied into a designated floor drain and not over the ramp table into the outside area.
Response to malfunctions
When detecting malfunctions, do not use the scrubber drier and secure it against any further use. Remove
the key and do not leave it to unauthorized persons. Pull the machine plug. Inform responsible persons. Call
hotline if you have any questions: 02389 403020
First aid
Keep Calm. Consult first aider. CALL EMERGENCY: 112
Inform those responsible. To report an accident.
Serving and maintenance
Servicing and maintenance only by trained personnel or a specialist company. Work gloves must be worn
during maintenance work (especially changing brushes).
After each use: Empty the dirty water tank and rinse it thoroughly (including the float switch). Remove
blockages in suction and drain hoses. Clean the underside of the squeegee. If the suction power drops,
the suction lips must be turned. Wear parts such as tank seals, suction lips, hoses and brushes must be
requested in the workshop in good time.

10 11
3. Installation Ladegerät
Note: The instructions for use enclosed with the
outer packaging of the charger also apply and
must be observed!
3.1 Installation
●The charger must be mounted on the wall in an
upright position and free of vibrations.
●Connection to a 1-phase power supply with 230V
(3-phase, 400V with Rotan ™ 245 BTX).
Blue LED lights up
3.2 Start the charging process
●Pull the machine plug [25] out of the machine socket
[26].
●Connect the charging plug to the machine socket
[26].
The loading process starts automatically.
3.3 Interrupt the charging process
●Press the stop button ( )
The yellow charging LED goes out.
●Remove the charging plug from the machine socket
[26], connect the machine plug [25].
4. Battery information
Warning: Connect the machine with XFC batte-
ries to the charger after each use, i.e. continuous-
ly charge them. Never park the machine deeply
discharged for longer than 2 days.
●Always pull the machine plug out of the machine
socket after the end of operation.
●The full battery capacity is reached after about 8
charge / discharge cycles.
●Batteries supplied by Gmatic®are maintenance-free
as standard. There is no need to refill distilled water.
●The machine sockets (SBE160) are mechanically
coded; accidental charging with other existing
chargers is thus prevented.
●Battery life: optimal temperatures are between
20 ° C and 25 ° C. Higher temperatures reduce
the lifespan, lower temperatures the capacity,
temperatures below + 10 ° C and above 35 ° C must
be agreed with the manufacturer!
●The batteries are low in gassing, but not gassing-
free. Make sure that the gases are removed properly
during the charging process; especially in the battery
room do not place any objects.
●Deeply discharged batteries can freeze.
●The battery life is measured in the number of
discharge or charge cycles - the deeper the battery
discharge, the lower the number of cycles.
●Check plugs and cables for damage every week
●Loss of stored energy in all batteries due to creeping
self-discharge without a charging connection.
●Always keep batteries clean and dry to avoid external
leakage currents between the battery terminals.
Carry out cleaning accordance to the ZVEI leaflet
„Cleaning batteries“.
Report faults on the battery or charger immedia-
tely:
Hotline: +49 2389 40 30 20
5. Installation
Warning: Batteries require before the fi rst Com-
missioning a full initial charge!
5.1 End the charging process
●Remove the mainsplug from the socket.
●Pull the charging plug out of the machine socket [26]
●Insert the machine plug [25] into the machine socket
[26].
5.2 Filling the fresh water tank
●Open the fuel cap [13].
●Fill fresh water tank with cleaning liquor up to max.
10 cm below the top of the container.
We recommend the use of the canister dispenser
KD-12 (Art. No. 260102CS) to fill the fresh water
tank.
●Carefully close the tank cap [13] by lifting the
compensation hinges.
5.3 Close attachments (ensure vacuum)
●Close the drain hose [17] tightly with the plug.
●Tur off ball valves (fresh and dirty water).
●Check that the tank cap [13] lies flat and is seated
correctly.
5.4 Adjust seating position
●Adjust the inclination angle of the backrest to the
posture of the machine operator by actuating the
backrest adjuster.
blue Electricity supply
yellow Battery is charging
green Battery full charged
red Error

12 13
●Adjust the horizontal distance to the steering column
by pulling up the lever.
●Adjust the spring travel of the seat to the driver‘s
body weight using the adjusting wheel [24].
●Fold down armrests for side stabilization and arm
rest.
Note: fasten the seat belt before starting the
cleaning journey!
The driver‘s seat is equipped with a switch that
only activates the drive control when the load
exceeds 44 kg.
5.5 Amount of water
●Adjust the required amount of liquid depending on
the floor covering with water regulation [27].
5.6 Tillage tools
●Check that the brushes [11] are correctly seated and
worn.
●Check that the suction lips [19] are correctly seated
and worn.
6. Operation
6.1 Turn on
●Press key switch [7].
6.2 Select the dirction of travel
●Set the travel direction switch [3] to the desired
travel direction. (forward/backward)
6.3 Activate the naturally aspirated engine
●Activate the suction motor switch [9].
-The squeegee is lowered automatically.
6.4 Activate brushes
●Operate the brush switch [8].
Brush head is lowered automatically.
The fresh water is fed to the brushes automatical-
ly while driving forward.
6.5 Machine travel
●Press the accelerator pedal [20] with your food.
Electric parking brake is released automatically.
●Floor cleaning in parallel lines with 10cm overlap;
guided edge-to-edge cleaning using deflection rollers
on the brush head [11] and squeegee [15].
●Waste water is extracted from the floor into the
waste water tank by vacuum created in it.
Suction foot [15], which can be swiveled on both
sides ans which avoids any obstacle; swings back
into the middle position after curves and turns.
6.6 Brake
●Slightly withdrawing the accelerator pedal [23]
results in a moderate braking effect.
●If the accelerator pedal accelerates, the brakes are
applied hard.
Note: A sufficient braking effect is only guaran-
teed on slopes of up to 2%.
Energy gaines during the braking process is auto-
matically supplied to the battery.
6.7 Machine guidance via steering wheel
●Perform steering and turning maneuvers by turning
the steering wheel.
●Steering wheel knob makes steering movements
easier during the day.
Attention: Press the emergency button [2] in emer-
gency situations - the vehicle‘s emergency stop
becomes effective.
Speed reduction recommended when cornering

14 15
6.8 Red indicator light
●The red indicator light [6] comes on as soon as the
dirty water tank is filled to the maximum upper limit.
Float switch prevents tank overfilling and dirty
water from entering the naturally aspirated
engine. Floating to the maximum water level
automatically switches off the naturally aspirated
engine with a 2 second delay
Attention: Always keep the float in the dirty water
tank clean.
6.9 Blue indicator light
●Illumination of the blue light [5] on the fresh water
tank: The cleaning solution is almost used up, filling
up with cleaning solution is not immediate, but will
soon be necessary.
●Stop vehicle operation.
●Release the accelerator pedal [20].
●Move the brush switch [8] to the „Off“ position.
●Residual waste water is absorbed in the next 2 - 3
meters forward.
●Switch off the suction motor switch. [9]
-The squeegee starts up automatically.
6.10 Emptying the dirty water tank
●Pull the drain hose [17] out of the holder, remove the
plug from the sleeve, place the hose end in the gully
or bucket.
●Open the right ball valve gently. (Press lever in
vertical position = on)
●Cleaning the dirty water tank after the cleaning work
has been rinse it out, if neccessary fold up the tank
completely
●The tank cap [13] remains open to dry out after the
tank cleaning is complete. If necessary, also clean
the pure water tankas described above.
Recommendation for extending the lifespan of
the naturally aspired engine: with the fuel cap
open [13] let us the naturally aspiered continue to
run for approc. 1 minute.
6.11 Charge batteries
●Switch off key switch[7] (Pos. 0)
●Pull the machine plug [25] out of the machine socket
[26].
●Connect the charging plug of the charger to the
machine socket. [26]
●Connect the mains olug of the charger to the socket.
(see chapter 3.2)
7. Hygiene maintenance
7.1 Preparations
●Observe the hazard and safety instructions for the
cleaning agents used. (see safety data sheet)
●Before maintenance and servicing work as well as
changing parts, pull the machine plug [25]out of the
machine socket! [26]
●Personal hygiene and safety measures:
Remove hand jewelry (rings, bracelets,...).
Wash and disinfect hands thoroughly.
Thoroughly clean fingernails.
Bandaging open wounds.
Optionally put on disposable gloves or finger
cots.
People with gastrointestinal diseases must avoid
any contact with the scrubber drier.
7.2 Waste water tank
Carry out after every use of the machine; prevents
rotting and nucleation. Cleaning process with a
disinfectant Support tel, stainless steel stain and
hot water.
●Drain waste water completely.
●Remove coarse dirt and deposits manually. (Wear
gloves)
●Use the ball valve to crush solid dirt (e.g. wood
splinters) by opening and closing it several times.
●Completely rinse out the dirty water tank from
the inside with a fresh water hose (e.g. canister
dispenser KD-12).
●Remove deposits from the tank walls with a clean
cloth.

16 17
●Always keep the float switch in the dirty water tank
clean and easy to operate.
●Apply disinfectant or stainless steel stain generously
to the interior of the tank and let it work for 30
minutes.
●Repeat the rinsing process with a fresh water hose.
(Use high pressure device if possible)
●Leave the tank cap [13] open to let the tank dry out.
7.3 Fresh water tank
Depending on the aggressiveness of the cleaning
agent, do this once a week.
●Drain fresh water completely.
●Keep the strainer and float switch on the bottom of
the fresh water tank clean.
●Apply disinfectant or stainless steel stain generously
to the interior of the tank and let it work for 30
minutes.
●Repeat the rinsing process with a fresh water hose.
Warning: Leave the tank cap [13] open to let the
tank dry out.
7.4 Fuel cap
●Clean the stainless steel plate on the underside of
the tank cap with a clean cloth.
●Apply disinfectant or stainless steel stain generously
to the stainless steel plate and leave for 30 minutes.
●Clean the stainless steel plate with a clean
cloth. Remove disinfectant / stainless steel stain
completely
Warning: residues of the cleaning agent can
attack the sealing profile of the tank collar - leave
the tank cap [13] open to dry out.
7.5 Outside surfaces
●Wipe the outside of the machine after cleaning.
Spray outer surfaces with glass cleaner or - if
there are traces of lime - e.g. treat with sanitary
cleaning agent (acidic); Wipe with microfiber or
paper towels.
Warning: Never use high pressure cleaners.
7.6 Suction cup
Note: Check the condition of the suction lips [19]
weekly, if necessary turn or replace the suction
lips. The resting edge of the rear suction lip must
be sharp-edged / right-angled.
●Remove the front and rear suction lips from the
squeegee (see chapter 11)
●Wash the suction lips [19] under running water and
remove any coarse dirt.
●Spray on disinfectant cleaner or insert suction lip in
it.
●Then dry the suction lips completely.
●Put the suction lips back into the squeegee.
7.7 Brush head
Warning: wear work gloves!
●Raise the brush head [11] by operating the brush
lifter [8].
●Remove the brushes and pull them out from under
the brush head [11]. (see chapter 12 Brush change)
●remove coarse dirt from under the brushes.
●Rinse the brushes thoroughly.
●Disinfect the brush plate and bristles.
●Fold up the brush head and remove any coarse dirt
from the underside with a water hose.
●Clean the top and bottom of the brush head with a
cloth and then disinfect.
●Let the brushes and brush head [11] dry.
●Use brushes.(see chapter 12 Brush change)
7.8 Hoses
Check drain hoses [16, 17] and suction hose [18]
daily for coarse dirt and blockages after using the
machine.
●Remove the suction hose and drain hoses from the
machine.
●Remove coarse dirt from the hoses.
●Place hoses in disinfectant and leave for 30 minutes.
●Let the hoses dry and reattach them to the machine.
7.9 Splash guard
●Remove coarse dirt from the drive motor‘s splash
guard.
●Apply disinfectant cleaner and let it work.
7.10 Steering wheel
●Clean the steering wheel [10] with a cloth.
●Apply disinfectant and let it work.

18 19
9. Troubleshooting
9.1 No water is running
●Blue indicator light [5] lights up
●The cleaning solution has been used up.
●Clean the clogged strainer in the fresh water tank.
●Fill the fresh water tank.
●Check the water hoses for possible kinks.
●Check water regulation [27].
9.2 sution motor doesn‘t run
●The red indicator lamp [6] lights up.
●The waste water tank is overfilled.
●Float switch in the waste water tank is stuck in an
upright position; Check the vertical mobility of the
float and clean it if necessary.
9.3 Water is not sucked up
●Insert the plug completely into the drain hose
sleeve], then close the right ball valve: lever
horizontal = closed.
●Check possible blockage in the suction hose 18].
●Remove possible blockage in the riser pipe of the
waste water tank: Pull the suction hose off the tank
neck, insert the water hose up to the upper gray
elbow, push out the blockage.
●Close the fuel cap [13] carefully. (Raise the
compensating hinge so that it lies flat - the tank cap
must remain movable - do not screw tight!)
●Check the correct seating and condition of the
sealing profiles on both tank collars. (Note the hole
spacing on the fresh water tank!)
9.4 Squeegee leaves streaks
●Reason: Accumulations of fluff, small pieces of
wood, etc. under the rear lip.
●Solution: Now and then briefly raise the sueegee [15]
while driving forwards and remove the accumulated
dirt particles
●In the case of large accumulations of coarse dirt,
etc. Disassemble the squeegee (see chapter 11
Changing the suction lip) and clean the underside
thoroughly.
●If necessary, the rear suction lip [19] should be
turned or replaced: The rear and front suction lip can
be used on all 4 edges and can be turned 3 times in
total. (see chapter 11 Suction lip change)
9.5 Brush motor switch off
●Stop cleaning work immediately and connect
the machine to the charger (see chapter 3.2):
The battery voltage is too weak, the batteries are
exhausted.
Month: _________________ Year: ______________
Component Cleaner 1. 2. 3. 4. 5. 6. 7. 8. 9. 10. 11. 12. 13. 14. 15. 16. 17. 18. 19. 20. 21. 22. 23. 24. 24. 25. 26. 27. 28. 29. 30. 31.
daily
Waste water tank
Fresh water tank
Float switch
steering wheel
Fuel cap
Hoses
weekly
Outside surfaces
Squeegee
Brush head
Splash guard
Notes / incidents
Datet last name, first name
8. Hygiene plan

20 21
10. Overview of wear parts
A
B
CC
D
E
A. Sealing profi le, with steel spring core
B. Brush, depending on the model on request
C. Drain hose, NW38x760mm, PU,
threaded sleeve, with plug
D. Suction hose, NW38x530,
sleeves on both sides
E. Suction lip (front + rear),
depending on the model on request
11. Suction lip change
●Switch on the key switch [7].
●Activate the suction motors switch [9].
-The sqeegee is automatically lowered.
●Switch off key switch [7].
-Suction motor function is interrupted.
●Remove the suction hose [18] from the squeegee.
●Looseb the screw connection of the squeegee bridge
and pull the squeegee[15] out of the fastening.
●Turn the squeegee [15] over.
Thoroughly clean the underside of the squeegee
with a glass or disinfectant cleaner, especially
remove coarse dirt.
●Remove wing nuts, clamping rings and washers from
the threaded bolt.
●Remove the stainless steel clamping strip ans
suction lips [9] from the squeegee.
In case of turning, rinse the suction lip under clear
water.
●Insert new or turned suction lips [19].
●Place the terminal block back in the threaded bolts.
●Install washers, spring washers ans lastly wing nuts.
●Insert the squeegee back into the squeegee bridge
and screw it together.
●Push the suction hose [18] onto the squeegee.
●Switch on the key switch [7].
●Deactivate the suction motor switch [9].
-The squeegee starts up automatically.

22 23
12. Brush change
Attention: wear work gloves!
12.1 Remove brushes
●Deactivate the brush switch [8].
-Brush head [11] starts up automatically.
●Try out each brush suddenly, with both hands,
against the respective direction of rotation.
●Slightly lift the brush head [11], then pull the brushes
out from under the brush head.
12.2 Mount brushes
●Place the brush plate under the raised brush head
[11] .
●Switch on the brush switch [8].
-Brush head [11] shuts down automatically.
12.3 Lock the brushes
●Lock the brushes using the accelerator pedal [20] by
activating the brush motors.
Supplier Dr. Gansow Gmatic AG
Marie-Curie-Straße 6
D-59192 Bergkamen (Rünthe)
herewith declares that the product
Scrubber Dryer
Type
corresponds to the
CE-Standards 89/392/CEE 93/44/CEE
91/368/CEE 93/68/CEE
D.P.R. 459 EN 292-2
CE-Regulations EN 60335-1 plus A11, September 1994
Safety of Electric Household Appliances and Similar Products, General
Rules and further Alterations 2, 5, 6, A51, A52, A53, A54, A55
EN60335-2-67, Dezember 1998
Safety of Electric Household Appliances and Similar Products, special
Arrangements, Specific Requirements for Scrubber Dryer
EN60335-2-72, Dezember 1998
Safety of Electric Household Appliances and Similar Products, special
Arrangements, Specific Requirements for Scrubber Dryer
Bergkamen, 13th August, 2020
City, Date Dr. Peter Gansow, President
Dr. Gansow Gmatic AG President Telephone +49 (2389) 40 30 2 - 0
Register Court Hagen HRB 6840 Dr. Peter Gansow Telefax +49 (2389) 40 30 2 - 39
D-59192 Bergkamen Online www.gmatic.eu
CE-Declaration of Confirmity
According to the EN-Regulations
Arrangements, Specific Requirements for Scrubber Dryer
Dr. Peter Gansow, President
Rotan™ 155 BTX / 145 BTX / 245 BTX

Marie-Curie-Straße 6
DE-59192 Bergkamen
Gmatic®Competence Center for
●3D-CAD design
●inox sheet manufacturing
●components manufacturing and assembly
●final assembly
●machine and spare parts logistics
●training, seminars
Tel.: +49 (2389) 40302-0
Fax: +49 (2389) 40302-39
Mail: info@gmatic.eu
https://www.gmatic.eu
This manual suits for next models
2
Table of contents
Popular Scrubber manuals by other brands

Ghibli & Wirbel
Ghibli & Wirbel RACER R 85 FD 65 Use and maintenance

COMAC
COMAC OPTIMA 85 Use and maintenance manual

Nobles
Nobles Ultra B Specifications

Fimap
Fimap iMx 50BT Use and maintenance manual

bokar
bokar XTRACTOR XF-300 Series instruction manual

Nelson-Jameson
Nelson-Jameson Clean Logix BLX-600 user manual

Nilfisk-Advance
Nilfisk-Advance CA 430 S Use and maintenance manual

U.S. Products
U.S. Products HHP-150 Information & operating instructions

Diamond Products
Diamond Products CARBON SPOT 55 Operator's manual

HAKO
HAKO Scrubmaster B 120 R Service booklet

Axminster
Axminster WORKSHOP AW118CE Original instructions

IPC
IPC BT55 Operator's manual