GMC SIERRA 1500 2024 Assembly instructions

1
Review this quick reference guide for an overview of some important features in your GMC Sierra 1500. Some
equipment described in this guide may not be included in your vehicle. Contact your dealer for details on a specic
vehicle. All information contained in this guide is based on the latest information available at the time of printing and
is subject to change without notice. More information can be found in your Owner’s Manual and at gmc.com/owners.
For easy reference, keep this guide in your glove box.
gmc.com
Certain restrictions, precautions and safety procedures apply to your vehicle.
Please read your Owner’s Manual for complete instructions.
2024 SIERRA 1500
GETTING TO KNOW YOUR

2
INSTRUMENT PANEL
Cruise Control/Forward
Collision Alert
F
/Super
Cruise
F
/Heated Steering
Wheel
F
Buttons
Electric
Parking
Brake
Switch
Power
Mirror
F
/
Window
Buttons
Audio Volume
Controls
(on back
of steering
wheel)
Power Steering
Wheel
Adjustment
Control
F
(on steering
column)
Audio Next/
Previous Favorite
Station Controls
(on back of
steering wheel)
Exterior/
Instrument
Panel/Cargo
Lamp Controls
4WD
Controls
F
/
Traction Select
Controls
F
Turn Signal/
Windshield Wipers
Lever/IntelliBeam
Control
Driver
Information Center
Controls
F
/Voice
Recognition Buttons
Driver
Information
Center
HUD Controls
F
(behind
steering wheel)
Low Fuel
Traction Control Off
Brake System
Cruise Control
StabiliTrak Active
StabiliTrak Off
Forward Collision Alert
Security
PARK Electric Parking Brake
Electric Parking Brake Service
Lights On Reminder
Airbag Readiness
Engine Oil Pressure
Check Engine
Lane Keep Assist
Symbols
Gasoline model shown.
Due to current supply-chain shortages, certain features shown have limited or late availability, or are no
longer available. See the window label or your dealer regarding the features on an individual vehicle.

3
Read your Owner’s Manual to
learn about the information being
relayed by the lights, gauges and
indicators on the instrument cluster.
See Introduction in your
Owner’s Manual.
Infotainment
System
Touchscreen
Infotainment
System Power-
Volume Control/
Home Page Button Upper Glove
Box Release
Climate Controls/Driver's
& Passenger's Heated &
Ventilated
F
Seat Buttons
USB
Ports
Engine
Start/Stop
Button
Electronic
Precision Shift
Lever
F
Lane Keep Assist
F
/
Park Assist
F
/Auto Engine
Stop-Start Disable
F
/Power
Release Tailgate
F
/Hazard
Warning Flashers Buttons
Traction Control-StabiliTrak
Off/Hill Descent Control
F
/
Power Windows
F
/Locking Front
& Rear Axle
F
Buttons
Vehicle Ahead
Antilock Brake System
Low Tire Pressure
Door Ajar
Charging System
Driver Seat Belt Reminder
2
Passenger Seat Belt
Reminder
4WD Modes
Denali Ultimate model shown.
F
Optional equipment Some equipment shown may not be included in your vehicle.

4
KEYLESS ACCESS SYSTEMF
REMOTE KEYLESS ENTRY TRANSMITTER (KEY FOB)
The Keyless Access System enables operation of the doors and tailgate without
removing the Remote Keyless Entry transmitter (key fob) from your pocket or bag.
The key fob must be within 3 feet of the tailgate or the door being unlocked/locked.
KEYLESS UNLOCKING
With the key fob within range:
Press the button on the driver’s door to
unlock the driver’s door or all doors and
tailgate.
Press the button on a passenger door
handle to unlock all doors and tailgate.
Press the lower button on the tailgate to
lower the standard tailgate.
KEYLESS LOCKING
With the ignition o, the key fob removed from the vehicle, and all doors closed:
Press the button on any door handle to lock all doors and tailgate immediately.
If Passive Locking is turned on in the Settings menu, all doors will lock automatically
after a short delay.
Note: To change the lock settings, go to Settings > Vehicle > Remote Lock, Unlock and Start on
the infotainment screen.
See Keys, Doors and Windows in your Owner’s Manual.
Lock
Press to lock all doors
and tailgate.
Unlock
Press to unlock the
driver’s door or all doors
and tailgate.
Remote WindowsF
Press and hold the
Unlock button until the
windows are fully open. To enable, go to
Settings > Vehicle > Remote Lock, Unlock
and Start on the infotainment screen.
Remote Mirror FoldingF
To turn the automatic mirror folding on
or o, go to Settings > Vehicle > Comfort
and Convenience on the infotainment
screen.
Vehicle Locator/Panic Alarm
Press and release to locate your vehicle.
The exterior lamps ash and the horn
chirps 3 times
Press and hold to activate the alarm.
Press again to cancel the alarm.
Power Release TailgateF
Press twice to lower the tailgate.
Remote Vehicle StartF
Press twice to start the engine from out-
side the vehicle. After entering the vehicle,
press the ENGINE START/STOP button.
To cancel a remote start, press and hold
the button until the parking lamps
turn o.
Note: To change the remote settings, go to
Settings > Vehicle > Remote Lock, Unlock and
Start on the infotainment screen.
See Keys, Doors and Windows in your Owner’s Manual.
F
Optional equipment Some equipment shown may not be included in your vehicle.

5
The Remote Keyless Entry transmitter (key fob)
must be in the vehicle to turn on the ignition.
STARTING THE ENGINE/ON
With the transmission in Park or Neutral,
press and hold the brake pedal and then
press the ENGINE START/STOP button to
start the engine. The green button indicator
will illuminate.
Note: If the key fob battery is weak, place the key
fob in the pocket in the center storage compartment (under the bench seat) or center console
cupholders (bucket seats) to start the engine. Replace the key fob battery as soon as possible.
STOPPING THE ENGINE/OFF
Shift to Park and then press the ENGINE START/STOP button to turn o the engine.
ACCESSORY MODE
With the engine o and the brake pedal not applied, press the ENGINE START/STOP
button to place the ignition in Accessory Mode. The amber button indicator will illu-
minate. Press and hold the ENGINE START/STOP button for several seconds to place
the ignition in Service Mode to operate additional systems.
See Driving and Operating in your Owner’s Manual.
KEYLESS (PUSH-BUTTON) START
F
Optional equipment Some equipment shown may not be included in your vehicle.
AUTO ENGINE STOP/START OPERATIONF
The fuel-saving Engine Stop/Start system automatically turns o the engine, referred to
as an Auto Stop, when the brake pedal is pressed and the vehicle is at a complete stop,
if certain operating conditions are met. In Auto Stop mode, the tachometer will read
AUTO STOP. When the brake pedal is released or the accelerator pedal is pressed, the
engine will restart. After parking the vehicle and turning o the engine, the tachometer
will read OFF.
The engine may remain running or restart when the vehicle is stopped, depending on
current operating conditions.
Press the
$
Auto Stop button on the center of the instrument panel when the
engine is running to disable the system. The button indicator will turn o.
The Engine Stop/Start system is enabled each time the vehicle is started.
See Driving and Operating in your Owner’s Manual.
BUCKLE TO DRIVE
Buckle to Drive prevents the vehicle from shifting out of Park if the engine is running,
the brake pedal is pressed, and the driver’s seat belt is not buckled. Buckle the seat belt
to shift out of Park. If the seat belt remains unbuckled, the vehicle can be shifted out of
Park after several seconds. Shifting from Park is prevented once each ignition cycle.
To turn o or on again, go to Settings > Vehicle > Buckle to Drive on the infotain-
ment screen. The vehicle may need to be restarted to register the setting change.
See Seats and Restraints in your Owner’s Manual.

6
DRIVER INFORMATION CENTER
The Driver Information Center (DIC) on the instrument cluster displays a variety of
vehicle messages and system information.
MID-LEVEL AND UPLEVEL DIC CONTROLSF
Use the controls on the right side of the
steering wheel to view the various menus.
Press the or button to highlight
a menu.
Press the thumbwheel to open a menu,
or to select or reset an item.
Rotate the thumbwheel up or down to
move through a menu.
SELECT INFO PAGES
F
1. Open the Info or Options menu.
2. Scroll to Info Page Options. Press the
thumbwheel to enter the menu.
3. Scroll through the list of items.
4.
Press the thumbwheel to select or deselect
an item to display in the Info menu.
See Instruments and Controls in your Owner’s Manual.
F
Optional equipment Some equipment shown may not be included in your vehicle.
ELECTRONIC PRECISION SHIFT TRANSMISSIONF
The electronic transmission shift lever always starts in a center position. The selected
gear position illuminates in red. After shifting, the shift lever returns to the center
position.
Park – Press the P button (A) on the top of
the lever to shift into Park. To shift out of
Park, press the brake pedal and then press
and hold the shift lock button (B) while
selecting the desired gear.
Reverse – Press the brake pedal and then
press and hold the shift lock button (B) on
the side of the lever while moving the lever
forward completely, past the detent, to
shift into Reverse.
Neutral – Move the lever forward (to the detent) to shift into Neutral.
Note: The vehicle will not stay in Neutral for an extended period. It will automatically shift into Park.
Drive – Move the lever rearward to shift into Drive.
Low – With the transmission in Drive, move the lever rearward to shift into Low. Pull the
left (-) paddle on the back of the steering wheel to downshift and the right (+) paddle
to upshift. If engine speed is too high or low for the requested gear, the shift will not
occur. Move the lever rearward again to return to Drive.
See Driving and Operating in your Owner’s Manual.
B
A

7
SET MEMORY POSITIONS
1. With the vehicle in Park, adjust the driver’s seat and power outside mirrors
F
to the
desired positions.
2. Press and release the SET button on the driver’s door. A beep will sound.
3. Immediately press and hold button 1or 2until two beeps sound. Use the button that
matches the Driver Information Center welcome message indicating driver 1 or 2 (key
fob 1 or 2).
To store a seat position for more clearance when exiting the vehicle, repeat these steps
using the Exit button instead of button 1or 2.
RECALL MEMORY POSITIONS
Press and hold button 1or 2or Exit
until the set position is reached.
To enable the memory positions to be
recalled automatically when the ignition
is turned on/o (for exit recall, the
driver’s door must be opened), go to
Settings > Vehicle > Seating Position >
Seat Entry Memory and Seat Exit
Memory on the infotainment screen.
MASSAGE FEATURES
F
Turn the feature select knob (A) on
the side of the seat to view massage
settings on the infotainment screen.
Use the 4-way control on the knob to
adjust the selected setting.
Press the small button (B) on the side
of the seat to activate the most recent
massage setting.
See Seats and Restraints in your Owner’s Manual.
POWER FRONT SEATSF
MULTICOLOR HEAD-UP DISPLAYF
The Head-Up Display (HUD) projects some operating information on the windshield. The
HUD controls are located on the left side of the instrument panel.
HUD Position
Lift up or press down to adjust the position
of the image.
INFO
Press to select from four display views.
Brightness
Lift up to brighten or press down to dim the
display. Hold down to turn o the display.
See Instruments and Controls in your Owner’s Manual.
F
Optional equipment Some equipment shown may not be included in your vehicle.
Denali Ultimate model shown .
A
B

8
VEHICLE CUSTOMIZATIONF
Some features can be turned on/o or
customized using the Settings menus on
the infotainment screen, including Remote
Start, Auto Heated/Ventilated Seats
F
,
Mirror Folding
F
, Power Running Boards
F
and others.
1. Select Settings on the Home page.
2. Select the desired menu.
3. Select the desired feature and setting.
4. Press
Back to exit each menu.
See Infotainment System in your Owner’s Manual.
CLIMATE CONTROLS/VEHICLE CONTROLSF
AUTO/Air Delivery
Modes/SYNC
Automatic operation/
Defog, Vent, Floor
modes/Synchronize
all settings to
driver’s setting
Driver’s
Temp.
Control
Passenger’s
Temp.
Control
AC/
Air
Conditioning/
Recirculation
Mode
Fan
Speed/
On/Off
/
Defrost Mode/
Rear Window-
Heated Outside
Mirror Defog
F
Park
Assist
On/Off
F
Lane Keep
Assist
On/Off
F
Driver's
Heated/
Ventilated
Seat
F
/Heated
Steering
Wheel
F
Controls
Passenger's
Heated/
Ventilated
Seat
F
Controls
Hill Descent
Control
On/Off
F
Power
Windows
F
$
Auto Engine
Stop/Start
Disable
F
Press to
lower the
tailgate
Hazard
Warning
Flashers
On/Off
Traction
Control/
StabiliTrak
On/Off
See Introduction in your Owner’s Manual.
F
Optional equipment Some equipment shown may not be included in your vehicle.

9
INFOTAINMENT SYSTEM
The infotainment system uses a Bluetooth or USB connection to link to a compatible
device, such as a smartphone or portable audio player/iPod®, and oers hands-free
voice control. For additional information, visit gmc.com/support.
MANAGING HOME PAGE ICONS
1. Press the Home button.
2. To enter edit mode, touch and hold the Home page icon to move.
3. Continue holding the icon and drag it to the desired position, and then release.
STORING FAVORITES
Radio stations from all bands (AM, FM or SiriusXM
F
) can be stored in any order.
1. Tune in a radio station. The sources menu is at the top of the Audio page.
2. Select a desired page of favorite buttons.
3. Touch and hold one of the favorite buttons until a beep is heard.
See Infotainment System in your Owner’s Manual.
Read your Owner’s Manual for important information about using the infotainment system while
driving.
Additional Pages:
Swipe to display overview
page or additional pages
of apps (if available)
Applications
F
:
Touch a screen icon
to access an app
Applications Tray:
Shortcuts to
commonly
used apps
Power/
Volume/Mute
Home
Page
F
Optional equipment Some equipment shown may not be included in your vehicle.

10
INFOTAINMENT SYSTEM
SIRIUSXM WITH 360L†F
The personalized content of SiriusXM with 360L oers more than 200 channels, includ-
ing ad-free music, sports, comedy, talk and news, along with access to On Demand
shows, performances and interviews. Certain features require a SiriusXM subscription
and a Connected Access plan. See siriusxm.com and onstar.com for details.
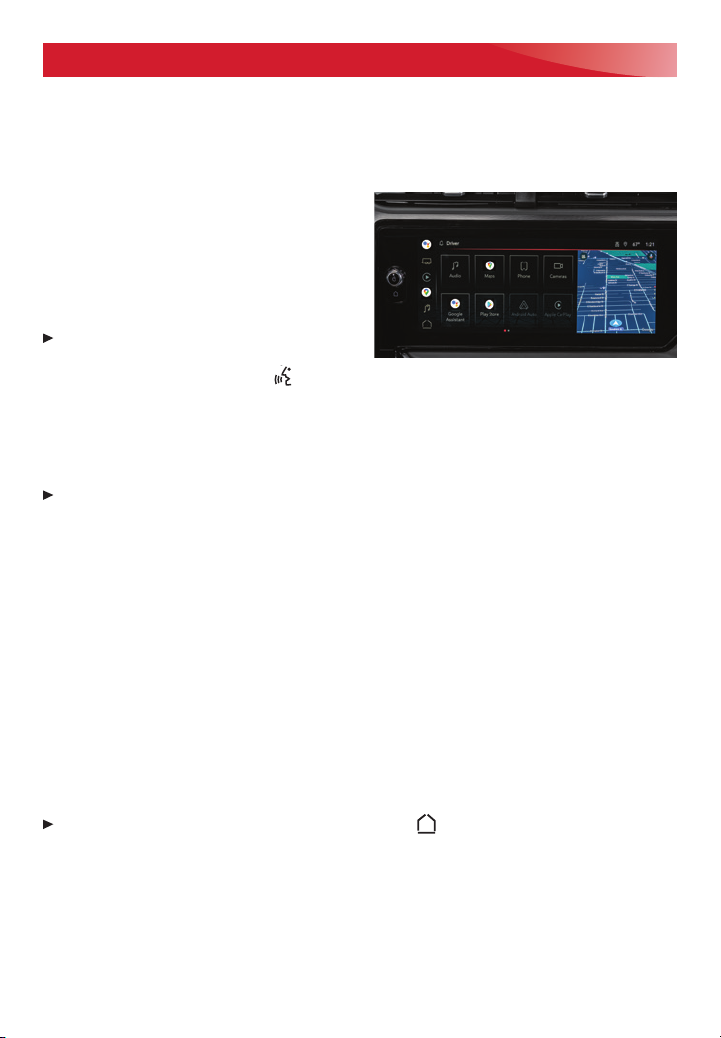
GOOGLE BUILT-IN†F
Google built-in provides access to your
favorite apps, including Google Assistant,
Google Maps and Google Play.
Google Assistant – Talk to Google to get
hands-free help. Easily get directions, play
media, control vehicle functions and more.
To start, say “Hey Google,” tap the
Google Assistant icon in the App Tray on
the Home page, or press the Push to Talk button on the steering wheel.
Google Maps – Reach your destination faster with real-time trac information, auto-
matic rerouting and voice control. Sign in for personalized maps with home and recent
locations.
Google Play – Download some of your favorite apps in your vehicle just as you would
on your phone to listen to music, podcasts, audiobooks and more.
Sign in to your Google Account to get your apps, messages, custom directions and
more in your vehicle.
Note: Google built-in services are subject to limitations and availability may vary by vehicle,
infotainment system and location. Select service plan required. Certain Google actions and
functionality may require account linking. User terms and privacy statements apply.
APPLE CARPLAY® AND ANDROID AUTO™†F
Apple CarPlay or Android Auto capability is available through a compatible phone using
the Apple CarPlay or Android Auto icon on the Home page.
1. There are two ways to set up device projection:
• Wireless Connection – Connect your phone by pairing it to the in-vehicle Bluetooth
system. Turn on wireless Apple CarPlay or Android Auto in your phone’s settings.
• Wired Connection – Connect your phone to a USB data port using the USB cable
provided with your phone. Aftermarket USB cables may not work.
2. Follow the instructions on the infotainment screen and the phone.
3. The Apple CarPlay or Android Auto icon will illuminate when connected. Touch the
icon to have your apps displayed.
To exit Apple CarPlay or Android Auto, press the Home button. To return to
Apple CarPlay or Android Auto, press and hold the Home button.
See Infotainment System in your Owner’s Manual.
F
Optional equipment Some equipment shown may not be included in your vehicle.
†Android, Android Auto, Google, Google Play and Google Maps are trademarks of Google LLC; Apple CarPlay
is a trademark of Apple Inc.; SiriusXM is a trademark of Sirius XM Radio Inc.

11
BLUETOOTH® SYSTEMF
Read your Owner’s Manual for important information about using the Bluetooth system while
driving.
Before using a Bluetooth-enabled device in the vehicle, it must be paired with the in-
vehicle Bluetooth system. The vehicle must be stopped to pair a device. Not all devices
will support all functions.
PAIR A PHONE
1. To use voice recognition, press the Push to Talk button; after the beep, say “Pair
my phone.” To use the infotainment screen, select the Phone icon > Manage Phones
> Add Phone.
2. Start the pairing process on your phone. From the phone’s Bluetooth settings, select
the name shown on the infotainment screen.
3. Follow the pairing instructions.
4. When pairing is complete, the phone screen is displayed.
FIRST TO CONNECT
Multiple phones can be paired to the Bluetooth system. The system connects to the
phone that is set to First to Connect.
To set the First to Connect phone, select the Phone icon > Settings > Connected
Phone or Options.
See Infotainment System in your Owner’s Manual.
4G LTE WI-FI® HOTSPOTF
With the vehicle’s available built-in 4G LTE Wi-Fi hotspot, up to 7 devices (smartphones,
tablets and laptops) can be connected to high-speed internet.
To retrieve the name and password for the hotspot, select the Wi-Fi Hotspot icon or
go to Settings > Connections > Wi-Fi Hotspot on the infotainment system.
For more information, visit gmc.com/support.
See Infotainment System in your Owner’s Manual.
WIRELESS PHONE CHARGINGF
The Wireless Phone Charging system for
smartphones is located on the center con-
sole. Visit gmc.com/support to check device
compatibility. See your phone retailer for any
required phone accessories.
1. The vehicle must be On, or Retained
Accessory Power must be active.
2. Remove all objects from the charging pad.
3. Place the phone, screen up, on the pad.
4. The charging symbol will appear on the infotainment screen when charging. If not
charging, remove the phone for 3 seconds, and rotate it 180 degrees.
See Instruments and Controls in your Owner’s Manual.
F
Optional equipment Some equipment shown may not be included in your vehicle.

12
LIGHTING
LAMP CONTROLS
Rotate the knob to activate the exterior
lamps.
O/On
AUTO
Automatically activates the exterior lamps,
depending on outside lighting conditions.
Parking Lamps
Headlamps
Fog LampsF
Press to turn the fog lamps on/o.
Instrument Panel Brightness
Press and hold the +/– buttons to adjust
the instrument panel lighting.
Task LightingF
Press to turn the forward-facing outside
mirror lamps on/o.
Cargo LampF
With the vehicle in Park, Reverse or
Neutral, press to turn the cargo bed/hitch
lamps and/or rear-facing mirror lampsF
on/o. The button indicator illuminates
when the cargo bed lamps are on.
INTELLIBEAM SYSTEM
The IntelliBeam system automatically
turns the high-beam headlamps on/
o based on trac conditions at night
when the lamp control is in the AUTO or
position and the system is activated,
indicated by a green on the instru-
ment cluster. A blue appears when
the high-beam headlamps are on.
To turn the IntelliBeam system on or
o, press the button on the end of
the turn-signal lever with the lamp
control in the AUTO or position.
Note: IntelliBeam activates the high-beam
headlamps only when driving more than 25
mph. The fog lamps must be o.
See Lighting in your Owner’s Manual.
ADAPTIVE CRUISE CONTROLF
The system enhances regular Cruise
Control to maintain a driver-selected
following gap — the time between your
vehicle and a vehicle detected directly
ahead — by accelerating or braking auto-
matically while you continue to steer.
Press and hold the Cancel button to
switch between regular Cruise
Control and Adaptive Cruise Control.
Use the RES+ and SET- controls to set/adjust Cruise Control or Adaptive Cruise Control.
With Adaptive Cruise Control active, press and release the Following Gap button
to select a targeted gap setting of Far, Medium or Near.
Note: Refer to the Getting to Know Super Cruise guide for information on Super Cruise
F
functionality.
F
Optional equipment Some equipment shown may not be included in your vehicle.
See Driving and Operating in your Owner’s Manual.

13
TRACTION SELECT MODES
The Traction Select (Driver Mode) settings
automatically adjust various vehicle con-
trol systems based on driving preferences,
weather and road conditions. The modes
are displayed on the Driver Information
Center.
Rotate the control knob (A) to select a
mode. Modes may include:
Normal – Use for normal driving.
Sport – Use for enhanced
responsiveness on paved roads.
Snow (2WD only) – Use for enhanced traction during slippery conditions.
O-Road (4WD only) – Use for enhanced control on unpaved roads or trails
at moderate speeds.
Terrain (4WD only) – Use for enhanced control in low-speed o-road
conditions in . The system automatically provides light vehicle
braking to simulate engine vehicle braking.
Tow/Haul – Press the button to reduce shift cycling when towing or
hauling heavy loads in stop-and-go trac, on rolling hills or in busy parking
lots.
FOUR-WHEEL DRIVE
Use the four-wheel-drive buttons (B) on
the left side of the instrument panel to
shift into and out of four-wheel drive.
The Driver Informa tion Center displays
the current status of the transfer case.
AUTO Automatic Four-Wheel Drive High –
Use when traction conditions vary for auto-
matic shifting between 2WD and 4WD. Shift
into this mode at any speed except when
shifting from .
Two-Wheel Drive High – Use for most
streets and highways. Shift into this mode
at any speed except when shifting from .
Four-Wheel Drive High – Use when extra
traction is needed or in most o-road driving. Shift into this mode at any speed except
when shifting from .
Four-Wheel Drive LowF – Use when driving o-road in deep sand, mud or snow, or
on steep hills. Shift into or out of this mode when the vehicle is stopped or moving less
than 3 mph with the transmission in Neutral.
N Neutral – Use to dolly or dinghy tow the vehicle behind an RV. Neutral is not avail-
able with the single-speed transfer case. Refer to your Owner’s Manual for the shift
procedure.
See Driving and Operating in your Owner’s Manual.
TRACTION SELECT SYSTEMF/FOUR-WHEEL DRIVEF
4WD model shown.
F
Optional equipment Some equipment shown may not be included in your vehicle.
B
A
Uplevel 4WD model shown.

14
DRIVER ASSISTANCE SYSTEMS
Safety or driver assistance features are not a substitute for the driver’s responsibility to operate
the vehicle in a safe manner. The driver should remain attentive to trac, surroundings and
road conditions at all times. Read your Owner’s Manual for important feature limitations and
information.
To turn the following driver assistance systems on/o or to change system settings,
go to Settings > Vehicle > Collision/Detection Systems on the infotainment screen.
SAFETY ALERT SEATF – The driver’s seat pulses — left side, right side or both sides —
to alert the driver of the direction of potential hazards. Audible alerts may be selected
instead.
FORWARD COLLISION ALERT – The Vehicle Ahead Indicator is green when a vehicle
that you’re following is detected and is amber when you’re following a vehicle ahead
much too closely. When approaching a vehicle directly ahead too rapidly, a red alert
ashes on the windshield and the Safety Alert Seat pulses or rapid beeps sound (if
selected).
Press the Forward Collision Alert button on the steering wheel to set the alert
timing to Far, Medium or Near.
FOLLOWING DISTANCE INDICATOR – The following distance to the vehicle ahead is
indicated in seconds under the Info menu on the Driver Information Center. If no vehicle
is detected ahead, dashes are displayed.
AUTOMATIC EMERGENCY BRAKING – The system works with Forward Collision Alert
to help you avoid or reduce the severity of front-end collisions with a detected vehicle
you’re following. The system works at speeds below 50 mph. Camera technology is used
to automatically provide hard emergency braking or enhance the driver’s hard braking.
FRONT PEDESTRIAN BRAKING – During daytime driving below 50 mph, the system can
detect pedestrians directly ahead and displays an
amber indicator. When approach-
ing a detected pedestrian too quickly, a red alert ashes on the windshield and the
Safety Alert Seat pulses or rapid beeps sound (if selected). The system may automati-
cally provide hard emergency braking or enhance the driver’s hard braking. Nighttime
and low-visibility performance are limited.
REAR PEDESTRIAN ALERTF – During daytime driving with the vehicle in Reverse, the
system can detect pedestrians directly behind the vehicle and will display an amber
indicator on the infotainment screen. When a pedestrian is detected close to the
vehicle, the indicator ashes red and the Safety Alert Seat pulses or rapid beeps sound
(if selected). Nighttime and low-visibility performance are limited.
LANE CHANGE ALERT WITH SIDE BLIND ZONE ALERTF/TRAILER SIDE BLIND ZONE
ALERTF – While driving, the system displays a
warning symbol on the left- or right-
side mirror when a moving vehicle is detected rapidly approaching or is in that side
blind zone, including the extended blind zone along the side of a trailer.* The warning
symbol ashes if a turn signal is activated when a vehicle has been detected on the
same side.
See Driving and Operating in your Owner’s Manual.
F
Optional equipment *Not compatible with all trailers. Some equipment shown may not be included in your vehicle.

15
DRIVER ASSISTANCE SYSTEMS
LANE KEEP ASSIST WITH LANE DEPARTURE WARNING – The system may help you
avoid collisions due to unintentional lane departures. The
Lane Keep Assist indicator
is green if the system is available to assist. If the vehicle approaches a detected lane
marking, the system may assist by gently turning the steering wheel to help prevent
lane departure and displays an amber . If active driver steering is not detected,
the amber
may ash and the Safety Alert Seat may pulse or beeps may sound (if
selected) on the side of the departure direction as the lane marking is crossed. The
system does not continuously steer the vehicle; the driver needs to steer and be in
complete control of the vehicle. Alerts do not occur when using the turn signal in the
lane departure direction or intentional lane departure is detected.
To turn on or o, press the
Lane Keep Assist button on the instrument panel.
FRONT AND REAR PARK ASSISTF – During
low-speed parking maneuvers, the system
provides “distance to closest object” infor-
mation on the Driver Information Center
and the Safety Alert Seat pulses or a beep
sounds (if selected). When an object is very
close, the Safety Alert Seat pulses or a
continuous beep sounds (if selected).
To turn on or o, press the Park
Assist button on the instrument panel.
REAR CROSS TRAFFIC BRAKINGF– When in Reverse, the system warns of detected
cross trac approaching in either direction and provides alerts and hard emergency
braking to help reduce the severity or help avoid collisions at very low speeds.
See Driving and Operating in your Owner’s Manual.
REAR CAMERA MIRRORF
The rear camera mirror provides a wider, less-obstructed eld of view than a traditional
mirror to assist when driving, changing lanes and checking trac conditions.
A. On/O
Pull or push the lever at the bottom of the
mirror to turn the video display on or o.
B. Selection Control
Press and release the button to select the
brightness, zoom or tilt setting.
C. Adjustment Controls
Press and release either button to adjust
the selected setting.
ABC
See Keys, Doors and Windows in your Owner’s Manual.
F
Optional equipment Some equipment shown may not be included in your vehicle.

16
CAMERA SYSTEM FEATURES
The available camera systems feature up to 8 camerasF with up to 14 viewsFto help
make it easier to hitch a trailer and provide better visibility while towing.
REAR VISION CAMERA
When the vehicle is in Reverse, a view of the area directly behind the vehicle displays on
the infotainment screen. Camera view buttonsFare on the screen.
Touch the
Guidance Lines/
Hitch
Guidance button to change guidelines.
Touch the Hitch View button for a zoomed-in view of the hitch area.
SURROUND VISION
F
The system uses multiple cameras to display
a high-resolution image of the area around
your vehicle along with front- and rear-camera
views on the infotainment screen. Camera view
buttons
F
are on the screen.
Touch the Guidance Lines/
Hitch Guidance button to change
guidelines.
Touch the Bed View button to check
cargo. Zoom functionality also available.
To check the available camera views when in
Drive above 8 mph, touch the Camera icon on
the infotainment screen and select the
desired view. Touch X to exit the view.
ADDITIONAL TRAILER CAMERA VIEWSF
Multiple views to aid in trailering are shown
on the infotainment screen using the vehicle
cameras and up to two additional wired GMC
accessory trailer camerasFmounted on the rear
or interior of the trailer.
Touch the Rear Side View button for a
biased split view of each side of the trailer
(more of the left or right side will be shown
based on trailer position).
Touch the Transparent Trailer View
button for a view behind the trailer.
Compatible with most conventional box
trailers*; requires accessory cameraF.
Jack-Knife AlertF
*
– The Jack-Knife Alert
displays a warning symbol when the truck/
trailer angle is in a possible jack-knife position
and there is a potentially imminent collision
situation. The Safety Alert SeatFmay pulse or beeps may sound (if selected).
Note: The GMC accessory trailer camera system is compatible with most trailer and hitch types.
See Driving and Operating in your Owner’s Manual.
Surround View screen
Bed View screen
Transparent Trailer View screen
F
Optional equipment required. *Not compatible with all trailers. Some equipment shown may not be included in your vehicle.

17
POWER MIRRORSF
POWER MIRROR ADJUSTMENT
Press the Mirror Selector button
to select the driver or passenger side
mirror; use the four-way control pad to
adjust the mirror.
POWER FOLDING MIRROR
Press the Folding Mirror button to
fold or unfold the mirrors.
HILL DESCENT CONTROLF
LOCKING FRONT AND REAR AXLESF
The system maintains vehicle speed from 1–14 mph while descending a steep incline in
a forward or reverse gear. Vehicle speed must be below 31 mph to enable the system.
1. Press the Hill Descent Control button on the instrument panel. The current speed
will be the set speed. The symbol will illuminate on the instrument cluster.
2. Adjust speed by applying the accelerator or brake pedal, or use the Cruise Control
+/– buttons on the steering wheel. The adjusted speed becomes the new set speed.
The symbol ashes when the system is actively applying the brakes.
See Driving and Operating in your Owner’s Manual.
Lock the front and rear axles using the /
Locking Axle switches on the instrument
panel to gain additional traction in o-road
conditions. The vehicle must be stopped to
lock either axle. The transfer case must be in
4 Low to lock the front axle. Do not drive the
vehicle on pavement with the axles locked.
See Driving and Operating in your Owner’s Manual.
TRUCK TIRE PRESSURE MONITORING SYSTEM
The Low Tire Pressure warning light on the instrument cluster illuminates when one
or more of the vehicle’s tires is signicantly underinated. Fill the tires to the proper tire
pressures listed on the Tire and Loading Information label, located below the driver’s
door latch. Current tire pressures can be viewed on the Driver Information Center.
With the ignition On or in Accessory mode, the Tire Fill Alert provides visual and audible
alerts to help with inating a tire to the recommended tire pressure (does not apply to
spare tire). When the recommended pressure is reached, the horn sounds and the turn
signals change from a ashing light to a solid light.
Note: Refer to your Owner’s Manual for accessory trailer tire pressure monitoring information.
See Vehicle Care in your Owner’s Manual.
F
Optional equipment Some equipment shown may not be included in your vehicle.
See Keys, Doors and Windows in your Owner’s Manual.

18
The tailgate has 6 functional positions to improve
loading, unloading and access to the cargo box. To
operate the tailgate, it must be unlocked or the key
fob must be within 3 feet of the tailgate.
1. Primary Gate
Open the primary gate for access to the cargo box.
2. Primary Gate Load Stop
With the primary gate open, the load stop helps
keep longer items secure in the cargo box.
3. Easy Access
The inner gate folds down for easier reach into the
cargo box to access items near the cab.
4. Full-Width Step
With the primary gate open, the inner gate folds
into a sturdy step (up to 375 lbs.) with a conve-
nient handle for easy cargo box entry and exit.
5. Inner Gate Load Stop
With the primary gate closed, fold the inner gate
for two-tier storage and open the load stop to
help keep longer items secure.
6. Inner Gate Work Surface
With the primary gate closed, fold the inner gate
for two-tier storage or for use as a standing-
height work surface.
OPEN THE INNER GATE
Press the upper button (A) on the tailgate.
Note: Do not lower the inner gate with the primary gate
open if a hitch ball or trailer is attached.
ENABLE/DISABLE THE INNER GATE
The inner gate can be disabled to prevent it from
being opened when a
hitch or other equipment
is installed.
To disable or enable
inner gate operation,
press and hold the
upper button (A) for
3 seconds.
OPEN THE PRIMARY GATE
Press the lower button (B) on the tailgate.
Press the Power Tailgate button twice on the
key fob.
GMC MULTIPRO TAILGATE OPERATIONF
See Keys, Doors and Windows in your Owner’s Manual.
A
B
F
Optional equipment Some equipment shown may not be included in your vehicle.
1
2
3
4
5
6

19
OPEN THE PRIMARY GATE AND INNER GATE
Press the lower button (B) and then upper button (A)
on the tailgate consecutively.
OPEN THE LOAD STOP OR STEP
Press the release bar (C).
See Keys, Doors and Windows in your Owner’s Manual.
GMC MULTIPRO TAILGATE OPERATIONF
PROGRADE TRAILERING SYSTEMF
IN-VEHICLE TRAILERING APP
The in-vehicle trailering app on the info-
tainment screen allows customized trailer
proles with a variety of helpful towing
assistance features, including a hitching
and setup checklist, trailer tire pressure
and temperature monitoringF, trailer light
testing, Gross Combined Weight Alert
*
F,
trailer theft detection and more. Trailering
app information also is available with the
myGMC mobile app.
Note: The trailering app will monitor trailer presence, even while the vehicle is o, by periodically
checking the trailer lighting circuits. On trailers equipped with LED lights, these periodic checks may
cause the trailer lights to ash. This ashing will become more frequent if Theft Alert is enabled.
HITCH AREA LIGHTING
Press the
Cargo Lamp button on the left side of the instrument panel to turn
the cargo bed lamp or conventional hitch lamp on/o.
TRAILERING INFORMATION LABEL
The Trailering Information Label, located
on the pillar between the driver and rear-
passenger doors, provides vehicle-specic
weight and capabilities ratings.
INTEGRATED TRAILER BRAKE
CONTROL (ITBC)
F
The ITBC system can be used to adjust the
power output, or Trailer Gain, to the trailer
brakes. The control panel is on the center console. ITBC information is displayed on the
ITBC page on the Driver Information Center.
Squeeze the control together to manually apply the trailer brakes.
Adjust the Trailer Gain by pressing the +/– adjustment buttons.
See Driving and Operating in your Owner’s Manual.
C
F
Optional equipment required. *Not compatible with all trailers. Some equipment shown may not be included in your vehicle.

20
Download the myGMC app to your compatible smartphone (or device) and, if your
vehicle is properly equipped, you can use your device to start or turn o your engine,
lock or unlock your doors, view key diagnostic information, see your parking location
and more.
The app is available on select Apple and Android devices. Service availability, features and
functionality vary by vehicle, device and data plan. Device data connection required. Visit
onstar.com for more details. Download the mobile app from the App Store or Google Play Store.
ROADSIDE ASSISTANCE
1-888-881-3302 TTY Users: 1-888-889-2438
As the owner of a new GMC, you are automatically enrolled in the GMC Roadside
Assistance program for up to 5 years/60,000 miles, whichever occurs rst, at no
expense to you. The GMC Roadside Assistance toll-free number is staed by a team of
trained advisors who are available 24 hours a day, 365 days a year, to contact a ser-
vice provider for light services (fuel delivery, jump start, at tire and lock out) or make
arrangements to tow your vehicle to the nearest GMC dealer for any repairs.
ONSTAR®ROADSIDE ASSISTANCE
If you have a current OnStar Safety & Security plan, press the blue OnStar button or
red Emergency button (for emergencies only) to get the help you need. An OnStar
advisor will use GPS technology to pinpoint your vehicle location and contact the
nearest service provider.
To learn more about OnStar services, press the blue OnStar button, visit onstar.com,
call 1-888-4-ONSTAR (1-888-466-7827), or refer to your Owner’s Manual.
MY GMC ACCOUNT
Get to know your vehicle as well as view your plans, services and
rewards with your GMC account. Check out an online Owner’s
Manual and how-to videos, track your service history and warranty
status, manage your OnStar and Connected Services vehicle plans,
review your current Vehicle Diagnostics report (active service account
required) and more. Create an account today at gmc.com/owners.
MYGMC MOBILE APP
Some equipment described in this guide may not be included in your vehicle. Contact your dealer for details on a specic
vehicle. All information contained in this guide is based on the latest information available at the time of printing and is
subject to change without notice. Certain restrictions, precautions and safety procedures apply to your vehicle. Please
read your Owner’s Manual for complete instructions. Copyright 2023 General Motors LLC. All Rights Reserved.
85516383 A
We recommend always using
ACDelco or GM Genuine Parts.
Table of contents
Other GMC Automobile manuals

GMC
GMC 2007 Sierra 1500 Pickup User manual

GMC
GMC 2010 Tahoe User manual

GMC
GMC YUKON DENALI User manual

GMC
GMC GMC Canyon 2023 User manual

GMC
GMC 2002 Safari User manual

GMC
GMC Envoy 2006 User manual

GMC
GMC Sierra Denali 2015 User manual

GMC
GMC Canyon User manual

GMC
GMC Chevrolet Cavalier 2022 User manual

GMC
GMC 2011 GMC Sierra User manual

GMC
GMC 2011 Terrain User manual

GMC
GMC 2000 Yukon XL User manual

GMC
GMC Chevrolet SSR 2003 User manual

GMC
GMC 2004 YUKON DENALI User manual

GMC
GMC 2000 Jimmy User manual

GMC
GMC 2011 Yukon/Yukon XL User manual

GMC
GMC ACADIA 2017 Assembly instructions

GMC
GMC 1999 Sonoma User manual

GMC
GMC HUMMER EV 2022 User manual

GMC
GMC SIERRA DENALI Parts list manual