GME AccuSat MT610G PLB User manual

MT610G PLB
PERSONAL LOCATOR BEACON
ARTWORK SUMMARY
DRAWING # 51460-4
PART # 311126-01
JIRA REFERENCE GRA-2802
ECO #
SUPPLIER WK
MPE #
INSTRUCTION MANUAL

MT610G
2
OWNER DETAILS:
Name ............................................................
Address ........................................................
......................................................................
Tel: ................................................................
UIN (Hex ID) # ...............................................
DISTRIBUTED BY:

MT610G 3
CONTENTS
OWNER DETAILS .................................................................................. 2
DISTRIBUTED BY .................................................................................. 2
INTRODUCTION..................................................................................... 5
GENERAL INFORMATION....................................................................... 5
KEY FEATURES OF THE MT610G PLB .................................................... 5
GLOSSARY ............................................................................................ 6
HOW THE PLB WORKS.......................................................................... 7
ABOUT THE COSPAS-SARSAT SYSTEM ........................................................ 7
REGISTRATION AND TRANSFER OF OWNERSHIP ........................................ 8
REGISTERING YOUR PLB .............................................................................. 8
TRANSFERRING OWNERSHIP OF A PLB....................................................... 9
REGISTRATION CONTACTS............................................................................ 9
PREVENTING ACCIDENTAL ACTIVATION............................................... 10
CONTACTS FOR REPORTING ACTIVATIONS................................................. 11
PARTS OF THE PLB ............................................................................. 12
PLB PARTS & FUNCTIONS ................................................................... 13
OPERATION AND STORAGE CONDITIONS............................................. 13
OPERATION................................................................................................. 13
STORAGE..................................................................................................... 14
MAINTENANCE ........................................................................................... 14
BATTERY REPLACEMENT ........................................................................... 15
TESTING YOUR PLB............................................................................. 16
GENERAL SELF-TEST PROCEDURE ............................................................. 16
GENERAL SELF-TEST INDICATION SCHEME ............................................... 18
GPS SELF-TEST PROCEDURE ...................................................................... 19
GPS SELF-TEST INDICATION SCHEME ........................................................ 20
ACTIVATING THE PLB .......................................................................... 21
IDEAL CONDITIONS FOR ACTIVATION......................................................... 21
BEST PRACTICES WHEN USING YOUR PLB ................................................ 22
PLB ACTIVATION PROCEDURE.................................................................... 23
PLB ACTIVATION INDICATORS .................................................................... 23

MT610G
4
DEACTIVATING THE MT610G............................................................... 24
IN CASE OF UNSUCCESSFUL DEACTIVATION:........................................ 24
TRANSPORTING / TRAVELLING WITH PLBS.......................................... 25
DISPOSAL ........................................................................................... 25
SPECIFICATIONS* ................................................................................ 26
MODES OF OPERATION .............................................................................. 26
OPERATION................................................................................................. 26
COSPAS-SARSAT ......................................................................................... 26
BATTERY ..................................................................................................... 27
PHYSICAL.................................................................................................... 27
GPS/GALILEO RECEIVER ............................................................................. 28
OTHER FEATURES....................................................................................... 28
REFERENCES....................................................................................... 28
NOTICES & WARNINGS........................................................................ 29
COPYRIGHT NOTICE.................................................................................... 29
WARNING.................................................................................................... 29
GME WARRANTY ........................................................................................ 29
WARRANTY PERIOD ................................................................................... 32
NATIONAL AUTHORITY INFORMATION................................................ 32

MT610G 5
INTRODUCTION
Congratulations on purchasing your new Accusat Pocket Series Personal Locator
Beacon (PLB). A GPS equipped GME Accusat MT610G is one of the most advanced
406 MHz digital satellite beacons available today. Using new digital frequency
generation technology, GME have developed and approved world wide, a new
family of aordable high performance 406 MHz Personal Locator Beacons.
GENERAL INFORMATION
The GME MT610G beacon is designed for use when life is endangered and you
have no other means of communication. The beacon can save your life and the
lives of others by leading an air, land or sea rescue to your precise location.
Beacons are an excellent choice to provide added safety while participating in any
outdoor or remote area activity.
The MT610G beacons are fully sealed units and will not sink in water, making them
equally suitable for use on land, marine and aviation applications.
The PLB is distinctively dierent to an EPIRB and the requirement for either is
determined by personal situation and intended usage. The MT610G PLB is not
designed to operate in water. However, in the event that PLB operation in water
is unavoidable, ensure that the antenna is vertically oriented and kept clear of the
water’s surface. In addition, ensure that the GPS has unobstructed exposure to
the sky.
KEY FEATURES OF THE MT610G PLB
• Suitable for aviation and land applications
• GPS-equipped
• 7-year battery life*, 6-year warranty
• Typical GPS accuracy: better than 100 m
• High visibility ashing light
• No warm-up period
• Feather-weight, compact and robust construction
• Digital 406 MHz, 5 watt transmission plus 121.5 MHz homing signal
• COSPAS-SARSAT worldwide operation
• National and international approvals
• Buoyant and waterproof design (exceeds IP67)

MT610G
6
• Simple two-step activation
• MT610G PLB comes with a lanyard and Instruction Manual
*Prolonged storage at temperatures higher than 20°C will result in reduced useful life of the
battery.
For Approval Certicates, please visit
https://www.gme.net.au/beacon-information
GLOSSARY
This section provides a list of acronyms and their expansions/descriptions that are
used in this manual.
Term Meaning
COSPAS-SARSAT An international satellite-aided search and rescue system to detect and
locate radio beacons activated in distress.
DG Declaration Dangerous Goods Declaration
EPIRB Emergency Position Indicating Radio Beacon
GALILEO Global Navigation Satellite System (GNSS); created by the European
Union.
GPS Global Positioning System
IATA International Air Transport Association
LUT Local User Terminal
MCC Mission Control Centre
PLB Personal Locator Beacon
RCC Rescue Coordination Centre
UIN Unique Identication Number

MT610G 7
HOW THE PLB WORKS
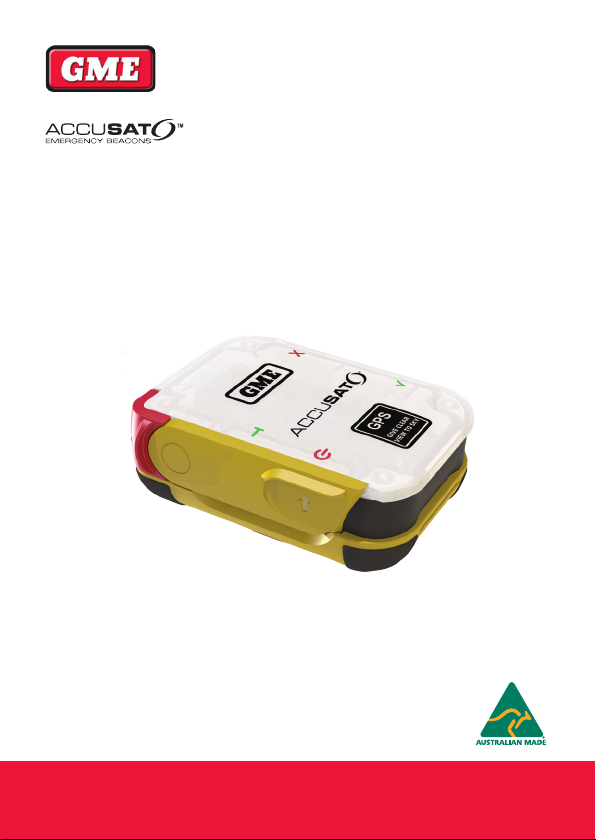
Your MT610G PLB is a self-contained 406 MHz digital radio transmitter that emits
an internationally-recognized distress signal on a frequency monitored by the
COSPAS-SARSAT satellite system. The MT610G contains a unique identity code
which can be cross-referenced to a database of registered 406 MHz beacons,
allowing the beacon’s owner to be immediately identied in the event of an
emergency. The PLB includes a high-performance, solid-state light and 121.5 MHz
VHF homing signal to assist in leading rescuers to your precise location.
The MT610G also features an integrated GPS Receiver which when activated, will
automatically acquire a position and relay the latitude and longitude of the PLB
along with the personal identier and emergency signal.
The section below explains how your PLB utilizes the COSPAS-SARSAT system to
identify your exact location in case of an emergency.
ABOUT THE COSPAS-SARSAT SYSTEM
[1]The COSPAS-SARSAT is an international, humanitarian search and rescue system
that uses satellites to detect and locate emergency beacons carried by ships,
aircraft or individuals. The system consists of a network of satellites, ground
stations, mission control centres, and rescue coordination centres.
When an emergency beacon is activated, the signal is received by a satellite
and relayed to the nearest available ground station. The ground station, called
a Local User Terminal, processes the signal and calculates the position from
which it originated. This position is transmitted to a mission control centre where
it is joined with identication data and other information on that beacon. The
mission control centre then transmits an alert message to the appropriate rescue
coordination centre based on the geographic location of the beacon. If the location
of the beacon is in another country’s area of responsibility, then the alert is
transmitted to that country’s mission control centre.
The COSPAS-SARSAT system provides a tremendous resource for protecting the
lives of aviators and mariners that was unthinkable prior to the space age. With
a 406 MHz beacon, a distress message can be sent to the appropriate authorities
from anywhere on earth, 24 hours a day, 365 days a year.

MT610G
8
REGISTRATION AND TRANSFER OF OWNERSHIP
Your MT610G PLB has been programmed with a unique identifying code which will
be transmitted by the PLB in an emergency.
You must register your PLB to provide authorities with immediate access to your
details when the PLB is detected. Registering your PLB also allows authorities to
identify you and your emergency contacts. In situations where the PLB may be
accidentally activated, the authorities can also contact you before eliminating your
PLB activation as an emergency signal.
REGISTERING YOUR PLB
Registration of your 406 MHz satellite PLB with the Registration Section of your
National Authority is important, and now mandatory in most countries because of
the global-alerting nature of the COSPAS-SARSAT system.
• Fill in your Owner Registration Forms: These forms are generally
supplied with your PLB package. You can also contact your National
Authority to access the correct forms, which are often available online.
The information provided in the registration is used for search and
rescue purposes only.
• Mail, fax or email your Owner Registration Form to your National
Authority. If you need to use the PLB immediately, it is recommended
that you fax or email the completed form.
• You can complete Australian Registration of your PLB online at
www.beacons.amsa.gov.au

MT610G 9
TRANSFERRING OWNERSHIP OF A PLB
If you transfer ownership of your PLB, you must inform your National Authority by
email, fax, letter, telephone or online of the following details:
• Name of new owner
• Address of new owner
The new owner is also required to provide their National Authority with the
information as required on the registration form. This obligation transfers to all
subsequent owners.
For Approval Certicates, please visit https://www.gme.net.au/beacon-information.
REGISTRATION CONTACTS
Australian Users New Zealand Users
Beacon Registration Section,
Australian Maritime Safety Authority
GPO Box 2181, Canberra ACT 2601
Online: www.beacons.amsa.gov.au
Email: [email protected].au
Fax Local: 1800 406 329
International: +61 2 9332 6323
Phone Local: 1800 406 406
International: +61 2 6279 5766.
Rescue Co-ordination Centre (RCCNZ),
PO Box 30050, Lower Hutt 5040, New Zealand
Online: www.beacons.org.nz
Email: [email protected]
Fax: +64 4 577 8041
Phone (Local): 0800 406 111
International: +64 4 577 8042
Ensure information is current. Notify the appropriate authority if ownership of the
beacon is transferred.
Other areas: Please contact your Country Distributor. If you have a beacon coded
with a foreign country code, or if you do not know what country code has been
used, then you will need advice. Please contact the relevant authority on one of
the numbers shown above, or visit https://www.406registration.com/

MT610G
10
PREVENTING ACCIDENTAL ACTIVATION
The signal from a PLB is regarded by authorities as an indication of distress and is
given an appropriate response. It is the responsibility of every owner of a PLB to
ensure that it is not activated unintentionally, or in situations that do not justify
its use.
NOTE: It is highly important to store and handle PLBs responsibly. Most cases of
accidental transmission result from poor/inappropriate storage or failure to totally
disable an old model PLB before disposal.
The MT610G will not commence transmitting until approximately 50 seconds after
activation, providing a period of visual warning. If the PLB is ashing while it is
being carried or stowed, you may still be able to deactivate it during this time
period without actually transmitting a distress signal. If in doubt, it is best to
report the incident to your local authorities.
To minimise the possibility of accidental activation, PLB owners are urged to pay
careful attention to the following points:
1. Follow the self-testing procedures.
2. Educate your traveling companions on how and when to correctly
operate the PLB.
3. Avoid stowing the PLB where it will be exposed to continuous direct
sunlight. This could cause the internal temperature of the PLB to
exceed the maximum storage temperature of +70°C. Long-term
stowage under these conditions could result in reduced battery-life,
poor performance or degradation of the plastics due to excessive UV
light exposure.
4. Do not allow children to interfere with the PLB.

MT610G 11
CONTACTS FOR REPORTING ACTIVATIONS
If you suspect that a PLB has been activated inadvertently, you MUST turn it o
and report it immediately to your National Authority‘s Rescue Coordination Centre
to prevent an unnecessary search.
When reporting, you should include the following:
• 15 character Unique Identier Number (UIN), which is marked on the
unit body (e.g. “UIN: XXXXXXXXXXXXXXX)
• Date, time and duration of activation
• Cause of activation
• Location at time of activation
Search and Rescue authorities will not penalize a beacon owner or operator in
cases of genuine accidental activation.
CONTACT NUMBERS:
Country Contact Number
Australia 1800 641 792
New Zealand 0508 472 269
United States of America 1800 851 3051
United Kingdom 01326 211 569

MT610G
12
PARTS OF THE PLB
The graphics below display the main parts of the PLB with the antenna closed
(undeployed) and raised (deployed).
PLB with Antenna Raised
Antenna
Bracket
Red LED Indicator
Green LED Indicato
r
PLB with Antenna Closed
Antenna
Latch
Antenna
Strobe Light Area
Antenna
Latch
GPS Receiver

MT610G 13
PLB PARTS & FUNCTIONS
The table below provides details about the functions of specic PLB parts.
Part Function
Antenna Latch Holds the antenna in a locked position. When unclipped, the
antenna can be raised, revealing the Test and On/O buttons.
Antenna Wraps around the PLB unit, covering/protecting the Test and
On/O buttons from damage and accidental use.
Strobe Light Activates when the PLB is turned on, and at the beginning of
each self-test.
Red LED
Indicator
Visual indicator of PLB activity.
Green LED
Indicator
Visual indicator of PLB activity.
GPS/Galileo
Receiver
Location of the GPS/Galileo receiver antenna. Keep the GPS/
Galileo receiver unobstructed with a clear exposure to the sky.
On/O Button Activates the PLB when pressed for 2 seconds.
Turns the PLB o when pressed for 5 seconds.
Test Button Used to initiate test on the PLB. For details, refer the section
‘Testing your PLB’.
OPERATION AND STORAGE CONDITIONS
OPERATION
• The MT610G PLB is guaranteed*to operate for a minimum of 24 hours.
• It is recommended that PLB be operated at a temperature between
-20°C to +55°C (-4°F to +131°F).
*If used in accordance with the general/GPS self-tests, storage and maintenance
instructions provided in this manual.

MT610G
14
STORAGE
• The MT610G PLB must be stored at a temperature between -30°C to
+70°C (-22°F to +158°F).
• Avoid exposure to the chemicals and organic solvents listed below
(this list includes but is not limited to the listed items):
• Fuel
• Engine oil
• Exhaust gas
• Hand cream
• Sunscreen
• Paint
MAINTENANCE
The MT610G PLB is generally maintenance-free. However, it is recommended that
you routinely follow the steps below to ensure that your PLB is operationally ready
when required:
• Test the PLB at the recommended interval. For details, refer to the
section ‘Testing the PLB’.
• Ensure that the device is not past its expiration date.
• Inspect the MT610G PLB for physical damage or deterioration.
• To keep the unit clean, rst wipe the PLB over with a damp cloth
(warm water is suitable), and then allow it to dry.
NOTE: DO NOT OPEN YOUR PLB.
Your PLB does not contain user-serviceable parts. Opening the PLB
will void the warranty.

MT610G 15
BATTERY REPLACEMENT
The MT610G is tted with the very latest in high capacity primary lithium battery
technology. These non-rechargeable batteries are designed to operate within a
temperature range of -20°C to +55°C.
The batteries have a nite shelf life, and full operational capability of your beacon
may not be available if the batteries have exceeded their replacement date, which
is clearly marked inside the booklet label on the bottom of the unit.
Prior to reaching this date, make arrangements to have your PLB returned for
service. Service includes replacement of the battery and o-ring(s), testing the
water seal and electrical properties, and inspection of overall unit integrity.
If the red and green LED lights ash simultaneously three times when you run
the Self-Test, the PLB has detected that battery capacity may be insucient for
continuous 24 hours operation. It is recommended that you make arrangements to
have your PLB returned for service and battery replacement as soon as possible.
NOTE:
The MT610G batteries are not user replaceable. Battery replacement requires that the beacon be
returned to a manufacturer-approved service facility. The replacement of batteries due to expiry or
after usage is not covered by the product’s warranty.
If there is any doubt as to the PLB’s serviceability, contact your local dealer,
authorised service centre or GME Customer Support (GME Pty Ltd, PO Box 96,
Winston Hills NSW 2153, Australia; Tel: (02) 8867 6000,

MT610G
16
TESTING YOUR PLB
By testing your PLB, you can ensure that your unit is fully functional, particularly
prior to an extended journey. This section details the 2 tests that you can perform
on your MT610G PLB.
• General Self-Test
Checks the digital message and memory integrity, 121.5 MHz and
406 MHz carrier RF power, communication with GPS receiver, and the
battery health.
• GPS Self-Test
Switches the GPS receiver on, performs the real-time position
acquisition and transmits the position data (coordinates) in the digital
self-test message.
The sections that follow explain the procedures for the tests in detail.
GENERAL SELF-TEST PROCEDURE
Follow the steps below to perform a self-test on your PLB:
1. Push the antenna latch at the top of the PLB to release the antenna.
Refer the image that follows.
NOTE:
- GME recommends a maximum of 2 self-tests per month.
Do not over-test as each test consumes battery power.

MT610G 17
2. Unwrap the antenna until fully extended.
3. Lift the antenna until it clicks into place (at a 90°angle perpendicular
to the body of the PLB).
4. Briey press and release the Test button (marked ‘T’) to begin the
test.

MT610G
18
a. The strobe light will light up briey to indicate that the test has begun.
b. During the test, a green LED will ash twice to indicate that 121.5
MHz and 406 MHz RF power is being emitted.
c. Next, a long green LED ash indicates that the test is successful.
For more details on the test indication scheme, refer the ‘General Self-Test
Indication Table’.
GENERAL SELF-TEST INDICATION SCHEME
Visual Indicator Description Indication
Short strobe light at the
beginning of the test.
PLB is undergoing a General
Self-Test.
OR
and
Long strobe together with
red LED at the beginning
of the test.
PLB is undergoing a General
Self-Test. However, this PLB
was previously activated.
Contact GME for advice.
Red and Green LEDs ash
3 times simultaneously.
PLB is undergoing a General
Self-Test; however, the PLB
has detected that Battery
Capacity is insucient for
continuous 24 hours operation.
You should limit further Self-
Tests to the recommended
intervals to conserve battery
capacity.
or
2 Green or Red LED
ashes during the test
indicate the status of
121.5 MHz and 406 MHz
signals.
1st light Green = 121.5MHz is
emitted;
1st light Red = 121.5 MHz is
not emitted;
2nd light Green = 406 MHz is
emitted;
2nd light Red = 406 MHz is not
emitted;
Long Green LED ash at
the end.
Long Green LED ash indicates
the PLB has passed all the
tests and is OK to use.

MT610G 19
Visual Indicator Description Indication
Long Red LED ash at
the end.
Long Red LED ash indicates
the PLB has failed one or
more tests and may require
servicing.
Contact GME for advice.
GPS SELF-TEST PROCEDURE
A GPS self-test allows you to perform a complete GPS satellite acquisition check
of your PLB. It is recommended that you perform a GPS self-test up to 2 times
per year. Testing more than 2 times a year is not recommended as each test
consumes battery power.
While the general self-test veries the GPS receiver’s circuitry, the full test will
include the operation of the special GPS antenna as well.
As the GPS Self-Test consumes signicantly more power than a general self-test,
choose a test location with good visibility of the open sky above. A quick satellite
acquisition means a short test, and less power consumed from the PLB battery.
1. Perform steps 1-4 of the ‘General self-test’.
2. Press and hold the Test (marked ‘T’) button for 4 seconds. When the
green LED light appears, release the Test button.
3. Your PLB will continue to ash the red LED while it searches for
satellites. This may continue for up to 2 minutes depending on the
number and location of the satellites in view. Note that distress
signals are NOT emitted as part of this test.
4. Once the GPS position is acquired, the green LED will ash 8 times
to indicate successful completion of the test and a digital self-test
message with actual location will be transmitted.
For details on the GPS test indication scheme, refer the ‘GPS Self-Test Indication
Scheme’ that follows.

MT610G
20
GPS SELF-TEST INDICATION SCHEME
Visual Indicator Description Indication
Short green ash
after pressing and
holding the Test
button for 4 seconds.
PLB is undergoing a
GPS Self-Test.
Red LED ashing in
regular time intervals
of 1.5 seconds.
During the GPS acquisition
mode (searching for position
x), PLB will keep ashing
the red LED indicator.
OR
Long red LED ash
after the green LED.
Indicates the GPS Self-Test
limit has been reached. No
further GPS tests can be
performed .
8 short green LED
ashes at the end.
Test Summary:
GPS Self-Test is successful.
Eight short green ashes at
the end of the test indicates
that the PLB has obtained
the GPS position.
8 short red LED
ashes at the end.
Test Summary:
GPS Self-Test has failed.
Eight short red ashes at
the end of the test indicate
that the PLB has not
obtained the GPS position.
Ensure that you follow the
GPS self-test instructions,
and repeat the test. If
the test continues to fail,
contact GME for advice.
Table of contents
Popular Measuring Instrument manuals by other brands

Fieldpiece
Fieldpiece SMAN SM380VINT Operator's manual

Niigata seiki
Niigata seiki GDCS Series user manual

Hanna Instruments
Hanna Instruments HI 110 instruction manual

Tektronix
Tektronix A622 instructions

Sper scientific
Sper scientific 801038 instruction manual

Akron
Akron 3578 STREAMMASTER Installation, operating and maintenance instructions

WAGNER
WAGNER MMC 205 instruction manual

ITALON
ITALON GS.01.00.00.000 IM Installation, Adjustment and Connection Manual

Craind Impianti
Craind Impianti KPO Installation, operation and maintenance manual

AFLOWT
AFLOWT BUF Operation manual

Vega
Vega VEGAFLEX 81 operating instructions

PCB Piezotronics
PCB Piezotronics IMI Sensors 600A12 Installation and operating manual