GN Danalogic Ambio BRIE User manual

User guide
Receiver-In-Ear hearing aids
danalogic Ambio

2 3
Le Hearing Aid Right Hearing Aid
Serial number Serial number
Model Model
Receiver type Medium Power
High Power
Ultra Power
Receiver type Medium Power
High Power
Ultra Power
Receiver tube
length
0 1 2
3 4 1 2 3 4
Baery size 312 13
Specic features supported by your hearing system:
Smart Start on page 11
Telecoil on page 18
Phone Now on page 20
Direct Audio Input on page 22
Tinnitus Sound Generator on page 34
Hearing aid type designaons for models included in this user guide are:
BRIE, FOC ID: X26BRIE, IC: 6941C-BRIE
VE312, FCC ID: X26VE312, IC: 6941C-VE312
Please see page 52 for a list of models referring to these types.
Open/
standard
ng:
Small
Medium
Large
Tulip Small
Medium
Large
Earmould
Open dome Power dome

4 5
It may take as long as several months for your brain to get used to all the
“new” sounds around you. Following these suggesons will give your brain
me to learn how to interpret amplicaon and increase the benets you
get from using hearing aids.
4 i Hearing aid expectaons
A hearing aid will not restore normal hearing and will not prevent or
improve a hearing impairment resulng from organic condions.
Consistent use of the hearing aid is recommended. In most cases,
infrequent use does not permit you to aain full benet from it.
The use of a hearing aid is only part of hearing rehabilitaon and may need
to be supplemented by auditory training and instrucons in lip-reading.
1 Introducon
Congratulaons on the purchase of your new hearing aids. The innovave
sound technology and design, combined with the customized programming
selected by your hearing care professional, will make hearing a more
enjoyable experience.
Please read this manual carefully in order to wholly benet from the use of
your hearing aids. With proper care, maintenance, and usage, your hearing
aids will aid you in beer communicaon for many years.
Ask your hearing care professional if you have any quesons.
2 Intended use
Generic air-conducon hearing aids are wearable sound-amplifying devices
intended to compensate for impaired hearing. The fundamental operang
principle of hearing aids is to receive, amplify, and transfer sound to the
eardrum of a hearing-impaired person.
3 Becoming accustomed to amplicaon
While purchasing hearing aids is a major step, it is only one step in a
process toward more comfortable hearing. Successfully adapng to the
amplicaon of your hearing aids takes me and consistent use.
You will enjoy more benets from your hearing aids by taking the following
acons:
• Wear the hearing aids regularly in order to get comfortable with using
them
• lt takes me to get used to hearing aids. Ask your hearing care
professional to design a schedule tailored just for you
• As you get more comfortable with your hearing aids, increase
the wearing me and wear them in mulple types of listening
environments

6 7
5 Contents
1 Introducon ............................................................................. 4
2 Intended use ............................................................................ 4
3 Becoming accustomed to
amplicaon ............................................................................ 4
4 Hearing aid expectaons .......................................................... 5
5 Contents .................................................................................. 6
6 Get to know your hearing aids .................................................. 9
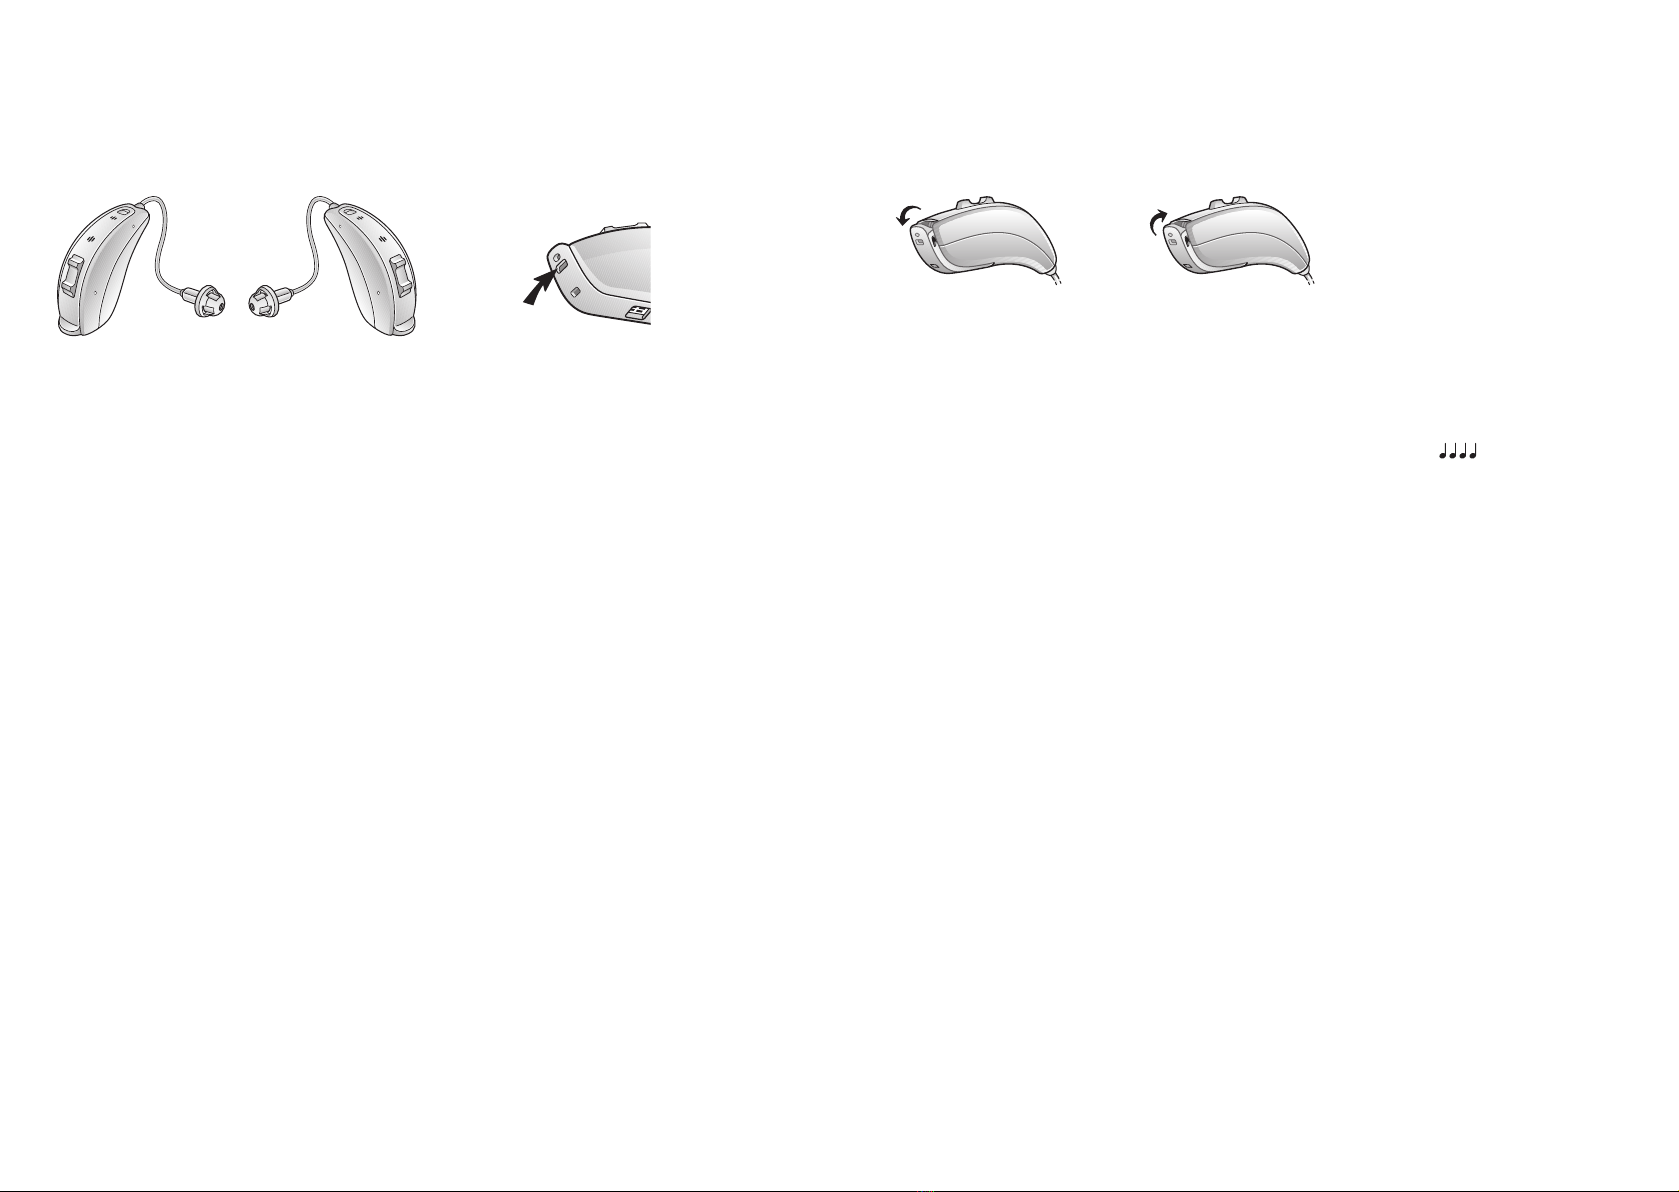
6.1 Your hearing aid............................................................................... 9
6.1.1 Ambio, model 61 and model 62...................................................... 9
6.2 Recognizing le and right hearing aid........................................... 10
7 Geng started ....................................................................... 11
7.1 Turn o / Turn on...........................................................................11
7.1.1 Smart Start.....................................................................................11
7.2 Operaon of hearing aid ...............................................................11
7.2.1 Push buon and Mul-funcon buon........................................ 11
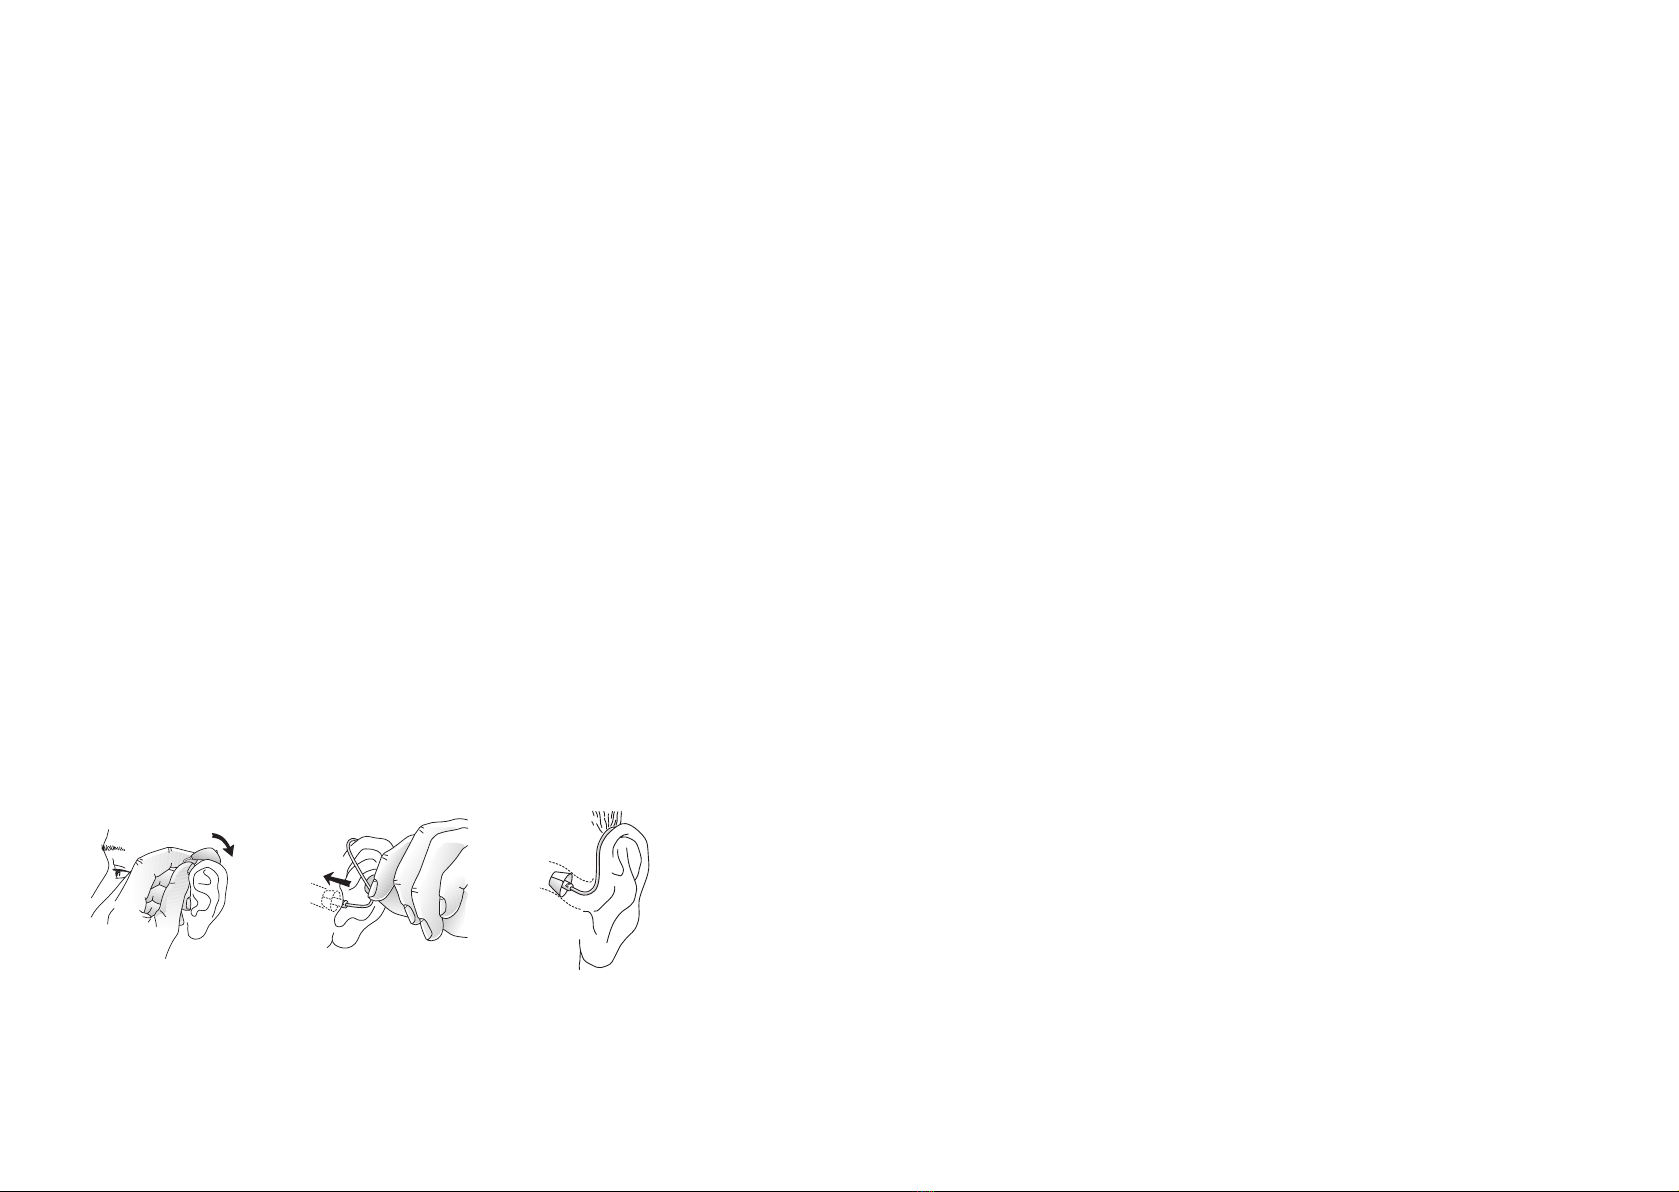
7.3 Insert/remove hearing aid.............................................................13
7.3.1 Insert earmould.............................................................................13
7.3.2 Remove earmould .........................................................................14
7.3.3 Insert receiver with dome ............................................................. 14
7.3.4 Remove receiver with dome .........................................................15
7.3.5 Sport Lock ......................................................................................15
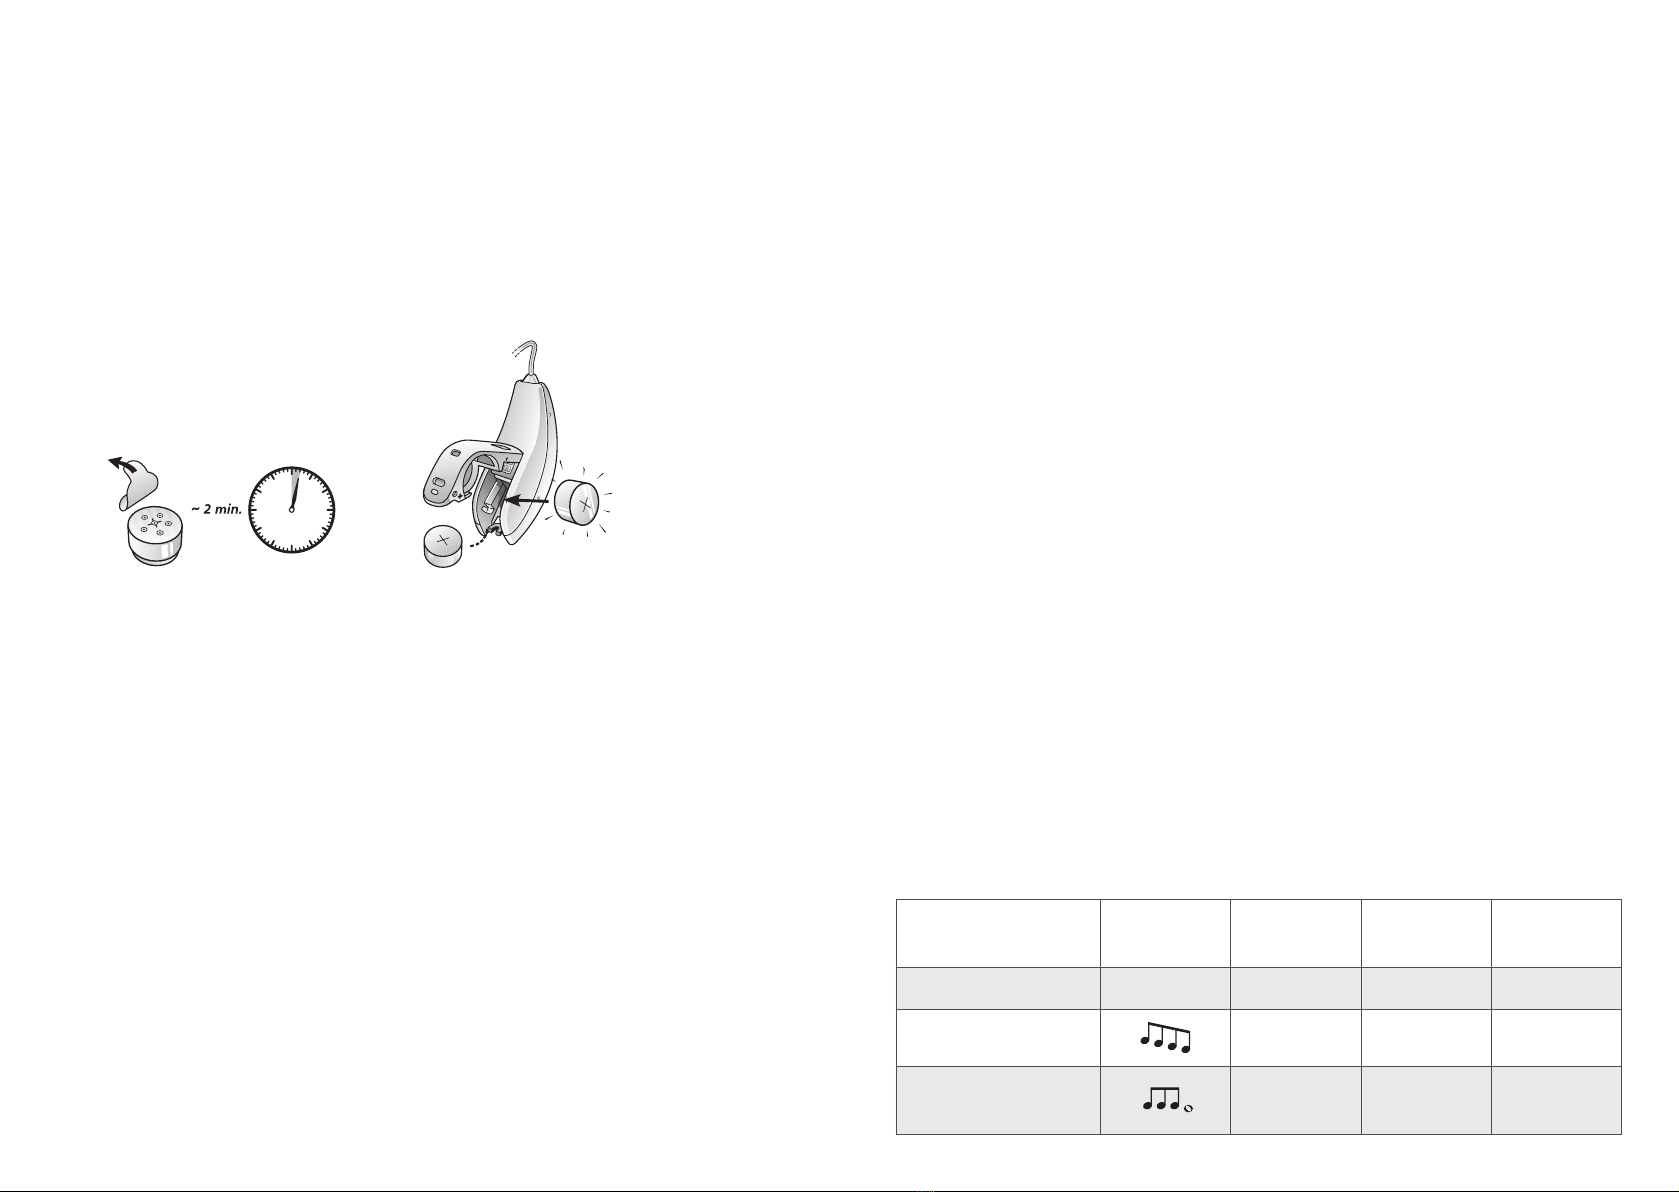
7.4 Insert/replace the baery .............................................................16
7.4.1 Low baery indicator ....................................................................17
7.4.2 Low baery indicator when paired with wireless accessories ..... 17
8 Telephone use ....................................................................... 18
8.1 Normal use .................................................................................... 18
8.2 Telecoil ...........................................................................................18
8.2.1 Hearing loop systems ....................................................................19
8.2.2 HAC telephone...............................................................................19
8.3 Phone Now ....................................................................................20
8.3.1 Place the Phone Now magnet.......................................................21
8.3.2 How to use Phone Now.................................................................22
8.4 Direct Audio Input (oponal) ........................................................22
8.4.1 Connect DAI................................................................................... 23
8.4.2 Disconnect DAI ..............................................................................23
8.5 Flight Mode (oponal)................................................................... 24
8.6 Smartphone apps ..........................................................................24
9 How to change domes ............................................................ 25
9.1 Standard domes............................................................................. 25
9.2 Tulip domes ...................................................................................26
10 Baery door lock .................................................................... 27
10.1 Ambio, model 61 and model 62....................................................27
11 Daily maintenance ................................................................. 28
11.1 Brush (oponal)............................................................................. 28
11.2 Cleaning earmoulds.......................................................................29
11.3 Change wax guard on RIE receiver................................................ 30
11.4 Cleaning thin tubes and domes.....................................................32
11.5 Care and maintenance .................................................................. 32
12 Wireless accessories ............................................................... 33
13 Tinnitus Sound Generator module .......................................... 34
13.1 Intended use for TSG module .......................................................34

8 9
13.2 User instrucons for TSG...............................................................34
13.2.1 Descripon of the device .............................................................. 34
13.2.2 Explanaon of how the device funcons...................................... 34
13.2.3 The scienc concepts that form the basis for the device........... 35
13.2.4 TSG volume control .......................................................................36
13.2.5 Using TSG with smartphone apps ................................................. 36
13.3 Technical specicaons .................................................................37
13.3.1 Audio signal technology ................................................................37
13.3.2 Available sounds............................................................................37
13.3.3 Prescripon use of a Tinnitus Sound Generator hearing aid........ 37
13.3.4 Important noce for prospecve sound generator users ............ 38
13.4 Tinnitus Sound Generator warnings ............................................. 38
13.4.1 Tinnitus Sound Generator precauons ......................................... 38
13.4.2 Tinnitus Sound Generator warning to hearing care professionals.. 39
14 General Warnings ................................................................... 40
15 General precauons - Wireless hearing aids ........................... 41
16 Phone Now warnings ............................................................. 41
16.1 Phone Now precauons ................................................................ 41
17 Baery warnings .................................................................... 42
18 Intended use of smartphone apps .......................................... 42
19 Important points for FM ......................................................... 43
20 Troubleshoong guide ............................................................ 44
21 Technical specs secon ........................................................... 46
22 Warnings for hearing care professionals ................................. 50
23 Statement .............................................................................. 50
24 Warranes and repairs ........................................................... 53
25 Temperature test, transport, and storage informaon ............ 53
26 Advisories .............................................................................. 54
27 Acknowledgments .................................................................. 55
6 Get to know your hearing aids
6.1 Your hearing aid
6.1.1 Ambio, model 61 and model 62
1. Push buon (model 61)
2. Baery door and On/O
3. Receiver
4. Open dome
5. Receiver tube
6. Microphones
7. Mul buon (model 62)
8. Manufacturer
9. Baery door lock (model 62)
10. L/R indicator
11. Serial number
12. MP receiver tube
13. HP receiver tube
14. UP receiver tube
15. Tulip dome
16. Closed dome
17. RIE mould
4
5
3
1
9
2
10
11
6
7
8
AM 61-DRW
AM 62-DRW
13 14
15 16 17
12

10 11
6.2 Recognizing le and right hearing aid
If you have two hearing aids, they may be tuned dierently. One for your
le ear, the other for your right. Do not swap them.
Ambio, model 62.
Le Right
Colored side indicator:
Le is blue and Right is
red.
7 Geng started
The hearing aids always start in programme 1 and with the pre-set volume.
7.1 Turn o / Turn on
Turn your hearing aid o. Turn your hearing aid on.
7.1.1 Smart Start
Smart Start delays the me before the hearing aid turns on aer you close
the baery door. With Smart Start, you will hear a beep ( etc.) for each
second of the delay period (5 or 10 seconds delay).
iNOTE: If you want to turn on the hearing aids without delay, ask
your hearing care professional to de-acvate Smart Start.
7.2 Operaon of hearing aid
7.2.1 PushbuonandMul-funconbuon
If you have a hearing aid with a push buon or mul-funcon buon, this
will allow you to use up to four dierent listening programmes, each of
them suitable for certain situaons.
1. Tap the push buon to switch between programmes
2. You will then hear one or more beeps. The number of beeps indicates
which programme you have selected (one beep = programme one,
two beeps = programme two, etc.)
3. When you turn the hearing aids o and then back on, they always
return to the default seng (programme one and pre-set volume).

12 13
Programme buon (61 models only)
Mul-funcon buon (62 models only)
It should not be necessary to control the volume manually. However, in
addion to controlling listening programmes, the mul-funcon buon
(62-DRW only) provides you with the ability to adjust the amplicaon to
your liking. The mul-funcon buon is designed to change the volume
or listening programmes of the hearing aid, based on dierent ways it is
pressed.
If necessary, your hearing care praconer can change the default sengs
for the mul-funcon buon and ll in the following table to indicate the
new sengs:
Mul-funcon buon
acon Default seng New seng
Short press up Increase volume
Short press down Decrease volume
Long press up (3 sec.) Change programme
Long press down (3 sec.) Acvate streaming
7.3 Insert/remove hearing aid
For comfort, always turn o your hearing aids before you insert or remove
them.
7.3.1 Insert earmould
1. Hold the earmould between your thumb and index nger and posion
its sound outlet in your ear canal
2. Slide the earmould all the way into your ear with a gentle, twisng
movement
3. Turn the top part of the earmould gently backwards and forwards so
that it tucks behind the fold of skin above your ear canal
4. Move the earmould up and down and gently press it to place it
correctly in the ear
5. Make sure the hearing aid sits rmly behind the ear
Slide and twist the
earmould all the way
into the ear canal.
Tuck the earmould
behind the fold of skin
above the ear canal.
Place the hearing aid
rmly behind the ear.

14 15
With proper inseron, hearing aids should t snugly but comfortably.
iCAUTION: NEVER ATTEMPT TO MODIFY THE SHAPE OF THE HEARING
AID, EARMOULDS, OR TUBING YOURSELF.
iNOTE: It may be helpful to pull your ear up and outward with your
opposite hand during inseron.
iNOTE: By experimenng, you may discover an easier method.
7.3.2 Remove earmould
1. Li the hearing aid from behind the ear
2. Using your thumb and index nger, take hold of the earmould or the
removal cord (not the hearing aid or the tubing)
3. Gently, twist and pull the earmould to remove it from the ear
7.3.3 Insertreceiverwithdome
1. Hang the hearing aid over the top of the ear
2. Hold the thin tube where it bends and gently place/push the dome into
the ear canal
3. Push the dome far enough into the ear canal so that the thin tube lies
ush with the head (check with a mirror)
i
CAUTION: NEVER ATTEMPT TO BEND OR MODIFY THE SHAPE OF THE
RECEIVER.
iNOTE: To avoid whistling, it is important that the tube and the
dome t correctly into your ear. For other possible reasons, check with the
Troubleshoong guide.
7.3.4 Removereceiverwithdome
1. Hold the receiver with your thumb and forenger and remove it
2. For receiver custom earmoulds, grasp the removal string and pull the
earmould outward
7.3.5 SportLock
If you lead an acve life, your hearing aids may come loose. To avoid that,
your hearing care professional can aach and adjust a sport lock.
To insert a hearing aid with sport lock:
1. Insert the hearing aid as usual
2. Tuck the sport lock in the concha
iNOTE: Sport locks may become s, brile, or discoloured over
me. Contact your hearing care professional regarding changing the
sport lock.
iNOTE: The sport lock comes in two dierent sizes:
M (medium power) and H (high power). See page 2 for receiver
size.

16 17
7.4 Insert/replace the baery
1. Prepare the new baery. Remove the protecve foil to acvate the
baery - wait for 2 minutes before inserng the baery into the
hearing aid
2. Open the baery door completely by using your ngernail
3. Insert the new baery with the posive side (+) facing upwards.
Always insert the baery in the door: never directly into the hearing
aid
4. Gently close the baery door
iWARNING: BATTERIES MAY LEAK. REMOVE THE BATTERY IF YOU LEAVE
THE HEARING AIDS UNUSED FOR LONGER PERIODS.
WARNING: DO NOT RECHARGE ZINK-AIR BATTERIES - THEY MAY LEAK
OR EXPLODE.
WARNING: BATTERIES CONTAIN DANGEROUS SUBSTANCES AND
SHOULD BE DISPOSED OF CAREFULLY IN THE INTEREST OF YOUR
SAFETY AND FOR THE ENVIRONMENT. ALSO, KEEP BATTERIES AWAY
FROM CHILDREN, MENTALLY DISABLED PERSONS, AND PETS.
i
Please observe the following:
1. Always use new Zinc-Air baeries that have a minimum remaining shelf
life of 1 year.
2. To save baery, turn o your hearing aids when they are not in use.
3. At night, switch o the hearing aid and open the baery door
completely to allow moisture to evaporate. This prolongs the lifespan
of the hearing aid.
4. If the hearing aids frequently lose connecon to wireless accesso-
ries, contact your hearing care professional for a list of appropriate
baeries.
7.4.1 Lowbaeryindicator
When the baeries are low on power, your hearing aids reduce the
volume, and play a melody every 15 minutes unl they are empty and turn
o.
iNOTE: Keep spare baeries on hand.
7.4.2 Lowbaeryindicatorwhenpairedwithwirelessaccessories
The baeries drain faster when you use wireless funconalies like
streaming from your smartphone or from your TV with our TV Streamer 2.
As the baery power goes down, the dierent wireless funcons stop
working. A short melody every ve minutes indicates that baery power is
too low.
The table below shows how the funconality shis with the power level of
the baery.
Baery level Signal Hearing aid Remote
Control Streaming
Fully charged P P P
Low P P O
Depleted
(change baery) P O O

18 19
8 Telephone use
With a hearing aid you are able to use a phone in a number of ways.
8.1 Normal use
To nd the best way to use a telephone or smartphone while wearing
your hearing aids may require pracce. One or more of the following
suggesons may be helpful:
1. Hold the telephone towards the ear (close to the hearing aid’s
microphone)
2. If whistling occurs, it may take a few seconds of holding the telephone
in the same posion before the hearing aid eliminates the whistling
3. Whistling may also be stopped by holding the telephone slightly away
from the ear
iNOTE: Depending on your individual needs, your hearing care
professional may acvate a programme specically for telephone use.
8.2 Telecoil (only Ambio model 62)
Your hearing aids contain a telecoil. The Telecoil programme may help
to improve speech understanding with Hearing Aid Compable (HAC)
telephones and in theaters, cinemas, houses of worship etc. that have a
hearing loop installed.
When you switch on the Telecoil programme, your hearing aids pick up
signals from the hearing loop or HAC telephone.
Your hearing care professional can acvate the Telecoil programme.
iNOTE: The telecoil cannot work without a hearing loop
(aka inducon-loop) or a HAC telephone.
NOTE: If you are having trouble hearing with the hearing loop, ask you
hearing care professional to adjust the programme.
NOTE: If there is no sound from the hearing aids in a hearing loop
system and an acve Telecoil programme, the hearing loop system
may not be turned on or is not operang correctly.
NOTE: The sound from the hearing loop and the hearing aids’
microphones can be mixed to your preference- either during the
ng session or via your smartphone app or your Remote Control 2.
8.2.1 Hearingloopsystems
To use hearing loop systems, follow these steps:
1. Switch your hearing aid to the Telecoil programme
2. Find a good spot. Recepon is not clear in all locaons; it depends on
the hearing loop. Look for signs or nd another spot to sit
3. If needed, adjust the volume
4. When you leave, switch to your preferred programme
8.2.2 HAC telephone
Some smartphones are hearing aid compable (HAC). The HAC phone
establishes a small hearing loop that your hearing aids connect to.
Switch to the Telecoil programme if you want to use a HAC phone.
The telecoil picks up the HAC telephone’s signal and converts it to sound.
To use the HAC telephone, follow these steps:
1. Switch your hearing aid to the Telecoil programme
2. Pick up the telephone and place a call or answer a call
3. Hold the telephone close to the hearing aid, and lt it slightly
outwards
4. Listen to the dial tone and move the telephone to get the best
recepon
5. If needed, adjust the volume
6. When you hang up, switch to your preferred programme

20 21
iNOTE: If the phone has a poor telecoil signal, use the microphone
programme. To avoid whistling, do not hold the handset too ghtly
against your ear.
NOTE: Ask your hearing care professional to enable the Telecoil
programme in your hearing aids.
NOTE: If you see a “M3”, “M4”, “T3”, or “T4” on the box, then the
smartphone is HAC compliant.
NOTE: If you nd it dicult to obtain a good result while using your
smartphone, your hearing care professional will be able to give
you advice on available wireless accessories to enhance listening
capabilies.
NOTE: Ask your smartphone dealer or hearing care professional for
advice regarding HAC smartphones.
8.3 Phone Now
By placing a magnet on the telephone receiver, your hearing aids
automacally switch the telephone programme on when the receiver is
close to your ear.
When you remove the receiver from your ear, the hearing aids
automacally return to the previous listening programme.
iNOTE: Ask your hearing care professional to enable Phone Now as
one of your programmes.
Clean the telephone
thoroughly.
Remove foil from
magnet.
Place the magnet.
8.3.1 PlacethePhoneNowmagnet
Follow these steps in order to place the Phone Now magnet properly:
iWARNING: IF A MAGNET IS SWALLOWED, SEEK IMMEDIATE
ASSISTANCE FROM A MEDICAL PRACTITIONER.
iNOTE: Ask your hearing care professional to enable Phone Now as
one of your programmes.
NOTE: Do not cover the loudspeaker opening with the magnet.
NOTE: If Phone Now does not work to your sasfacon, moving the
magnet to another posion may improve ease of use and comfort
while speaking.
NOTE: If the hearing aids do not switch to the telephone
programme every me, you can reposion the Phone Now magnet
or add addional magnets.
NOTE: Use a recommended cleaning agent.

22 23
8.3.2 HowtousePhoneNow
1. Li the telephone to your ear
2. When you hear a short melody, the phone programme is acve
iNOTE: You may need to move the telephone receiver slightly to
nd the best posion for reliable Phone Now acvaon and good
hearing on the telephone.
NOTE: If your hearing aids have enabled Comfort Phone
funconality, the hearing aid on the non-phone ear automacally
aenuates.
8.4 Direct Audio Input (only Ambio model 62)
You can connect a DAI boot accessory to the boom of the hearing aids.
Once properly clicked into place, the hearing aids automacally switch to
DAI (Direct Audio Input).
Direct Audio Input adapter
The sound source is connected to the hearing instruments by a cable or a
wireless FM system1 to the audio boot.
To improve spaal sense and being able to hear colleagues, fellow students
etc., the DAI input can be mixed with the microphone input.
iNOTE: Using the DAI funconality results in increased baery
consumpon.
8.4.1 ConnectDAI
1. Align the p of the DAI click-on adapter with the groove above the
baery door
2. Once in place, move the click-on adapter in the direcon of the
baery door
3. Gently click the DAI click-on adapter onto the hearing aid
Aaching the DAI click-on adapter to Ambio, model 62.
8.4.2 DisconnectDAI
1. Slide the latch downwards with your ngernail
2. Gently remove the click-on adapter from the hearing aid
Remove the DAI click-on adapter from Ambio, model 62

12
24 25
8.5 Flight Mode (oponal)
iWARNING: WHEN BOARDING A FLIGH OR ENTERING AN AREA
WHERE RF TRANSMITTERS ARE PROHIBITED, DEACTIVATE WIRELESS
FUNCTIONALITY.
Turn on Flight Mode:
1. For each hearing aid, open and close the baery door three mes
within a 10-second period close (open-close, open-close, open-close)
2. Double-dings for ten seconds ( etc.) indicate that your hearing
aid is in Flight Mode, i.e. you cannot control it remotely
Deacvate Flight Mode:
1. For each hearing aid, open and close the baery door once
2. Single dings for ten seconds ( etc.) indicate that your hearing aid is in
wireless mode
iNOTE: Both hearing aids must be set in Flight Mode- even with
synchronizaon enabled.
NOTE: It is important to wait an addional 15 seconds aer wireless
funcon resumes before opening and closing the baery door again
for any reason. Flight Mode will resume if you open and close the
baery door during this 15-second window.
8.6 Smartphone apps
The app must only be used with hearing aids for which they are intended,
and manufacturer takes no responsibility if the app is used with other
hearing aids.
Use with smartphone apps:
• Do not disable app nocaons.
• Install updates to keep the app working correctly.
iNOTE: For assistance with pairing and using these products with
your hearing aids, please contact your hearing care professional.
NOTE: If you have a Bluetooth enabled smartphone, you are able to
answer the telephone if you use Phone Clip+.
9How to change domes
iNOTE: It is recommended that your hearing care professional
shows you how to change the domes. Incorrect dome replacement
could result in the dome being le in the ear when you remove the
hearing aid.
9.1 Standard domes
Follow these steps to mount domes:
3. Push the new dome over the anges on the receiver
4. Make sure that the new dome is properly and securely mounted

9.2 Tulip domes
The tulip domes are mounted in a similar manner to the ordinary domes,
but a few extra steps are required. The tulip domes consist of two “petals”.
Follow these steps to mount tulip domes:
Wrong! Correct!
iNOTE: Make sure that the new dome is properly and securely mounted.
Bend the largest petal forwards
to open the tulip dome.
Push the ng tube over the
anges.
Check that the anges are complete-
ly covered by the ng tube.
Then move the largest petal to
its original posion.
26 27
Open the baery door to
the OFF posion.
From the le side, push the
slider to the right.
10 Baery door lock
Your hearing aid can be equipped with a lock on the baery door.
If you lock the baery door, you will minimize the risk of accidentally
dropping the baery.
Once you lock the baery door, you can turn the hearing aid on and o.
You have to unlock the baery door to replace the baery.
iNOTE: Children and mentally disabled persons may benet from
a safer baery door lock system. Ask your hearing care professional for
advice.
10.1 Ambio, model 61 and model 62
Use the tool to lock or unlock the baery door.
To lock the baery door:
To unlock the baery door (to replace the baery):
Now, open the baery door completely to replace the baery.
Open the baery door to
the OFF posion.
From the right side, push the
slider to the le.

1
2
3
28 29
11 Daily maintenance
It is important to keep your hearing aid clean and dry.
On a daily basis, clean the hearing aids using a so cloth or ssue.
If the microphone inlets are clogged, gently brush across the microphone
inlets with a small, clean brush.
iNOTE: Do not use force to press the hairs of the brush into the
inlets, because the microphones may be damaged
NOTE: Do not use alcohol or other solvents to clean your hearing
aids; the protecve coang will be damaged.
11.1 Brush (oponal)
Use the three-in-one brush for daily cleaning and baery handling.
1. Brush - cleaning: Use the brush on all surfaces and orices
2. Wire loop- cleaning: Use the wire loop to clean the earmould
3. Magnet - baery handling: Use the magnet to li and replace the
baery
iNOTE: Do not use the wire loop to clean the microphone openings.
If the micro-phone openings clog up, visit your hearing care
professional.
NOTE: The wire loop is only intended for BTE earmoulds.
11.2 Cleaning earmoulds
1. Detach the earmold and tubing from the hearing aid before cleaning
2. Use a mild soap to clean the earmould and rinse with lukewarm water
3. Dry the earmould thoroughly. Use the airbulb and cleaning wire to
remove residual water and debris from the tubing.
iNOTE: Earmould tubing may become s, brile, or discoloured
over me. Contact your hearing care professional regarding tube
changes.

30 31
11.3 Change wax guard on RIE receiver
To replace wax lters on receivers and earmoulds, follow these steps:
1. Carryingboxwitheightwaxguardtools
2. Thewaxguardtoolhastwofuncons:
• A removal p to collect the used lter
• A replacement p with a white lter
Insert the removal p of the tool into the used wax guard so that the sha
touches the rim of the wax guard.
Slowly pull the wax guard straight out.
Insert the replacement p of the tool into the sound outlet.
Gently press the replacement p straight into the sound outlet unl the
outer ring lies ush with the sound outlet.
Pull the tool straight out- the new wax guard will remain in place.
iNOTE: To ease removal and inseron, it may help to twist the wax
guard tool.
To insert the new wax lter, follow these steps:

32 33
12 Wireless accessories
Wireless eco-system features a comprehensive range of seamlessly
integrated wireless accessories. This allows you to control and stream high
quality stereo sound and speech directly to your hearing aids.
Please nd the list of available wireless accessories below:
TV Streamer 2 allows you to stream the audio from TV sets and virtually
any other audio source to your hearing aids at a volume level that suits
you.
Remote Control 2 allows you to adjust the volume or mute your hearing
aids, change programmes, and see all your sengs at a glance on its crystal
clear display.
Phone Clip+ streams phone conversaons and stereo sound directly to
both hearing aids, and it doubles as a simple remote control.
Micro Mic is a body worn microphone for your friend or colleague. It
signicantly improves speech understanding in noisy situaons.
Mul Mic works like the Micro Mic but doubles as a table microphone.
Connects with loop and FM systems1, and has a mini-jack input for
streaming audio from a computer or music player.
iNOTE: Ask your hearing care professional for more informaon on
the range of wireless accessories.
NOTE: For use of wireless funconality only use manufacturers
wireless accessories. For further guidance regarding e.g. pairing,
please refer to the user guide of the relevant wireless accessory.
11.4 Cleaning thin tubes and domes
1. Unscrew the thin tubes from the HA counter clockwise before
cleaning them.
2. Use a damp cloth to wipe down thin tubes, domes and hearing aid.
3. Push the black cleaning wire through the thin tube to clear out
moisture and debris. Insert the
cleaning wire opposite the dome.
iNOTE: We recommend that you change the thin tube and the dome
system every three months. If the parts get s or brile, change them
sooner.
11.5 iCare and maintenance
Please follow the advices below to have the best user experience and to
prolong the life of your hearing aids.
1. Keep your hearing aids dry and clean
2. Open the baery door to dry out your hearing aids when you are not
wearing them
3. Wipe the hearing aids with a so cloth aer use to remove grease or
moisture
4. Do not wear your hearing aids when pung on cosmecs, perfume,
aer-shave, hair spray, loon etc. These might discolour the hearing
aid or get into the hearing aid causing damage
5. Do not immerse your hearing aid in any liquid
6. Keep your hearing aids away from excessive heat and direct sunlight.
The heat may deform the shell, damage the electronics and
deteriorate the surfaces
7. Do not swim, shower or steam bathe while wearing your hearing aids

34 35
If you have two wireless hearing aids that support ear-to-ear
synchronizaon this funconality can be enabled by your hearing care
professional. This will cause the Tinnitus Sound Generator to synchronize
the sound in both hearing aids.
If your nnitus troubles you only in quiet environments, your doctor,
audiologist or hearing care professional can set the TSG module so that it
becomes audible exclusively in such surroundings. The overall sound level
can be adjusted via an oponal volume control. Your doctor, audiologist or
hearing care professional will review with you the need for having such a
control.
For hearing aids where ear to ear synchronizaon is enabled, your
hearing care professional can also enable environmental monitoring
synchronizaon so that the TSG noise level is automacally adjusted
simultaneously in both hearing aids dependent on the background
sound level. Addionally, if the hearing aid has a volume control, then
the background noise level monitored by the hearing aid and the volume
control can be used simultaneously to adjust the generated noise level in
both hearing aids.
13.2.3 Thesciencconceptsthatformthebasisforthedevice
The TSG module provides sound enrichment with the aim of surrounding
the nnitus sound with a neutral sound, which is easily ignored. Sound
enrichment is an important component of most approaches to nnitus
management, such as Tinnitus Retraining Therapy (TRT).
To assist habituaon to nnitus, this needs to be audible. The ideal level of
the TSG module, therefore, should be set so that it starts to blend with the
nnitus, and so that you can hear both your nnitus as well as the sound
used.
In a majority of instances, the TSG module can also be set to mask the
nnitus sound, so to provide temporary relief by introducing a more
pleasant and controllable sound source.
13 Tinnitus Sound Generator module
13.1 Intended use for TSG module
Your hearing aid includes the Tinnitus Sound Generator (TSG) module, a
tool for generang sounds to be used in nnitus management programmes
to relieve suering from nnitus.
The TSG can generate sounds adjusted to the specic therapeuc needs
and your personal preference as determined by your doctor, audiologist, or
hearing care professional.
13.2 User instrucons for the TSG module
13.2.1Descriponofthedevice
The Tinnitus Sound Generator (TSG) Module is a soware tool that
generates sounds to be used in nnitus management programmes to
relieve suering from nnitus.
Depending on the selected hearing aid programme and the environment
you are in, you will somemes hear the therapeuc sound resembling a
connuous or uctuang noise.
13.2.2 Explanaonofhowthedevicefuncons
The TSG module is a frequency and amplitude shaped white-noise
generator. Noise signal level and frequency characteriscs can be adjusted
to the specic therapeuc needs as determined by your doctor, audiologist
or hearing care professional.
Your doctor, audiologist or hearing care professional can modulate the
generated noise with the purpose of making it more pleasant. The noise
can then resemble, for example, crashing waves on a shore.
Modulaon level and speed can also be congured to your likes and needs.
An addional feature can be enabled by your hearing care professional that
allows you to select predened sounds that simulate sounds from nature,
such as breaking waves or running water.

36 37
13.3 Technical specicaons
13.3.1Audiosignaltechnology
Digital.
13.3.2 Available sounds
White noise signal which can be shaped with the following conguraons:
The white noise signal can be modulated in amplitude with an aenuaon
depth of up to 14dB.
High-pass lter Low-pass lter
500 Hz 2,000 Hz
750 Hz 3,000 Hz
1,000 Hz 4,000 Hz
1,500 Hz 5,000 Hz
2,000 Hz 6,000 Hz
13.3.3PrescriponuseofaTinnitusSoundGeneratorhearingaid
The TSG module should be used as prescribed by your doctor, audiologist
or hearing healthcare professional. In order to avoid permanent hearing
damages, the maximum daily usage depends on the level of the generated
sound.
Should you develop any side eects from using the sound generator, such
as dizziness, nausea, headaches, perceived decrease in auditory funcon
or increase in nnitus percepon, you should disconnue use of sound
generator and seek medical evaluaon.
The target populaon is primarily the adult populaon over 18 years
of age. This product may also be used with children 5 years of age or
older. However, children and physically or mentally challenged users will
require training by a doctor, audiologist, hearing healthcare professional
or the guardian for the inseron and removal of the hearing instrument
containing the TSG module.
13.2.4 TSGvolumecontrol
The sound generator is set to a specic loudness level by the hearing
healthcare professional. When switching the sound generator on, the
volume will have this opmal seng. Therefore, it might not be necessary
to control the volume (loudness) manually.
However, the volume control provides the ability to adjust the volume, or
amount of smulus, to the liking of the user.
The volume control is an oponal feature in the TSG module used for
adjusng the sound generator output level. To prevent unintended usage
by pediatric or physically or mentally challenged users, the volume control
must, if enabled, be congured to only provide a decrease of the sound
generator output level.
13.2.5 UsingTSGwithsmartphoneapps
The nnitus sound generator control via hearing aid push buons can be
enhanced with wireless control from a TSG control app on a smartphone
or mobile device. This funconality is available in supported hearing aids
when a hearing healthcare professional has enabled the TSG funconality
during ng of the hearing aid.
To use smartphone apps the hearing aid must be connected with the
smartphone or mobile device.
i NOTE: To use smartphone apps, the hearing aid must be connected
with the smartphone or mobile device.
iNOTE: To use smartphone apps, the hearing aid must be connected
with the smartphone or mobile device.

38 39
13.4.2 iTinnitusSoundGeneratorwarningtohearingcareprofessionals
A hearing care professional should advise a prospecve sound generator
user to consult promptly with a licensed physician (preferably an ear
specialist) before geng a sound gen-erator.
If the hearing care professional determines through inquiry, actual
observaon, or review of any other available informaon concerning
the prospecve user that the prospecve user has any of the following
condions:
1. Visible, congenital or traumac deformity of the ear
2. History of acve drainage from the ear within the previous 90 days
3. History of sudden or rapidly progressive hearing loss within the
previous 90 days
4. Acute or chronic dizziness
5. Unilateral hearing loss of sudden or recent onset within the previous
90 days 6.
6. Audiometric air-bone gap equal to or greater than 15 dB at 500 hertz
(Hz), 1,000 Hz, and 2,000 Hz
7. Visible evidence of signicant cerumen accumulaon or a foreign
body in the ear canal
8. Pain or discomfort in the ear
iCAUTION: THE MAXIMUM OUTPUT OF THE SOUND GENERATOR
FALL INTO THE RANGE THAT CAN CAUSE HEARING LOSS
ACCORDING TO OSHA REGULATIONS. IN ACCORDANCE WITH NIOSH
RECOMMENDATIONS, THE USER SHOULD NOT USE THE SOUND
GENERATOR FOR MORE THAN EIGHT (8) HOURS A DAY WHEN SET TO
S LEVEL OF 85 DB SPL OR ABOVE. WHEN THE SOUND GENERATOR
IS SET TO LEVELS OF 90 DB SPL OR ABOVE, THE USER SHOULD NOT
USE THE SOUND GENERATOR FOR MORE THAN TWO (2) HOURS PER
DAY. IN NO CASE SHOULD THE SOUND GENERATOR BE WORN AT
UNCOMFORTABLE LEVELS.
13.3.4Importantnoceforprospecvesoundgeneratorusers
A nnitus masker is an electronic device intended to generate noise of
sucient intensity and bandwidth to mask internal noises. It is also used as
an aid in hearing external noises and speech.
Good health pracce requires that a person with a nnitus condion have
a medical evaluaon by a licensed physician (preferably a physician who
specializes in diseases of the ear) before using a sound generator. Licensed
physicians who specialize in diseases of the ear are oen referred to as
otolaryngologists, otologists or otorhinolaryngologists.
The purpose of medical evaluaon is to assure that all medically treatable
condions that may aect nnitus are idened and treated before the
sound generator instrument is used.
The sound generator instrument is a tool to generate sounds to be used
with appropriate counseling and/ or in a nnitus management programme
to relieve paents suering from nnitus.
13.4 iTinnitus Sound Generator warnings
1. Sound generator can be dangerous if improperly used
2. Sound generators should only be used as advised by your doctor,
audiologist, or hearing care professional
3. Sound generators are not toys and should be kept out of reach of
anyone who might cause themselves injury (especially children and
pets)
13.4.1 iTinnitusSoundGeneratorprecauons
Should the user develop any side eects from using the sound generator,
such as dizziness, nausea, headaches, perceived decrease in auditory
funcon or increase in nnitus percepon, the user should disconnue use
of the sound generator and seek medical evaluaon.
To prevent unintended usage by paediatric or physically or mentally
disabled users, the volume control must, if enabled, be congured to only
provide a decrease of the sound generator output level.
This manual suits for next models
7
Table of contents
Other GN Hearing Aid manuals