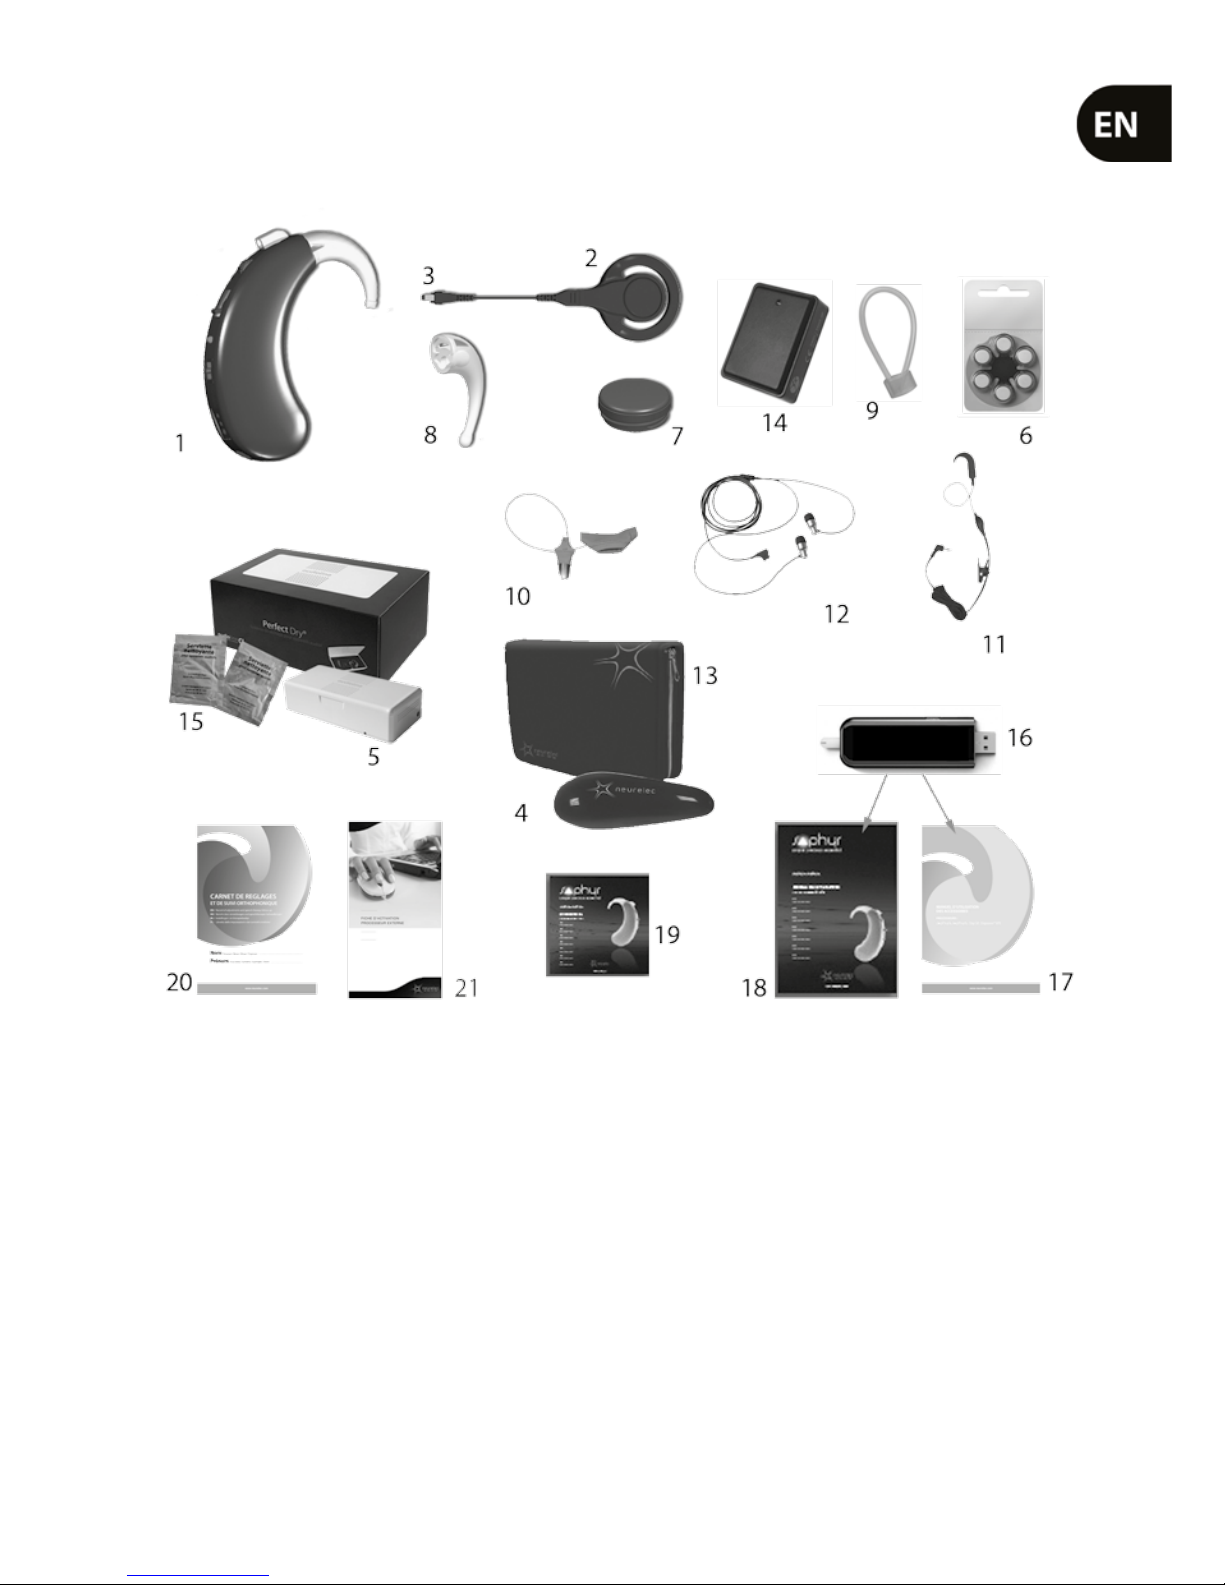
Saphyr CX User manual

0459
®
USER’S MANUAL
Behind The Ear Processor
MANUEL DE L’UTILISATEUR
Processeur contour d’oreille
BEDIENUNGSANLEITUNG
HdO-Prozessor
MANUALE DELL’UTENTE
Processore retroauricolare
MANUAL DE USUARIO
Procesador retroauricular
POUŽÍVATEĽSKÁ PRÍRUČKA
Záušný procesor
INSTRUKCJA OBSŁUGI
Zauszny procesor mowy
MANUAL DO UTILIZADOR
Processador retroauricular
MANUALUL UTILIZATORULUI
Procesor retroauricular
HANDLEIDING VOOR DE GEBRUIKER
Achter-het-oor processor
KULLANIM KILAVUZU
Kulak Arkası İşlemci
ΕΓΧΕΙΡΙΙΟ ΧΡΗΣΗΣ
Οπισθοωτιαίο επεξεργαστή
РУКОВОДСТВО ПОЛЬЗОВАТЕЛЯ
Заушный процессор
® ®
,
1

EN - Instructions in English are found on pages 03-24
FR - Les instructions en français se trouvent pages 25 à 46
DE - Anweisungen in deutscher Sprache nden Sie auf den
Seiten 47 bis 68
IT - Le istruzioni in italiano sono presenti nelle pagine da 69 a 90
ES - Las instrucciones en español se pueden encontrar entre
la página 91 y 112
SK - Návod v slovenčine sa nachádza na stranách 113 až 134
PL - Instrukcje w języku polskim znajdują sie na stronach od
135 do 156
PT - Poderá encontrar instruções em português da página
157 à página 178
RO - Instrucţiunile în limba română se regăsesc de la pagina
179 la pagina 200
NL - Instructies in het Nederlands vindt u op pagina’s 201
tot222
TR - Türkçe talimatlar 223 ile 244 sayfaları arasında yer
almaktadır
ΕL - Οι οδηγίε στα Ελληνικά βρίσκονται στι σελίδε 245
έω 266
RU - Инструкциинарусскомязыкенаходятсянастраницах
267 - 288
289
300
2

CONTENTS
INTRODUCTION 4
Indications 4
Contraindications 4
Reliability – Quality 4
Compatibility with Older Implant Generations
4
HOW IT WORKS 6
The External Part 6
The Internal Part 6
CONTENTS OF THE SAPHYR® BOX 7
DESCRIPTION OF THE
SAPHYR®PROCESSOR 8
Saphyr® SP 8
Saphyr® CX 9
USING THE SAPHYR®PROCESSOR 10
1 CONNECTING THE COMPONENTS 10
2 ENSURING THE BEST FIT 10
- Magnet 10
- Hook 11
- Holding Buckle 11
3 POWER SOURCE OF THE PROCESSOR 11
- Type of Batteries 11
- Battery Lifespan 11
- User Recommendations 11
- Private Warning Sound - Changing the Batteries 12
- To replace the batteries 12
4 TURNING ON/OFF 13
5 PROGRAM SELECTOR 13
6 SELECTOR WHEEL 13
7 INDICATOR LIGHT 14
ASSISTIVE LISTENING DEVICES 14
1 INTEGRATED TELECOIL 14
2 OTHER DIRECT AUDIO INPUT DEVICES 14
MAINTENANCE AND USER
RECOMMENDATIONS 15
1 MAINTENANCE 15
- Precautions 15
- Cleaning 15
- Storage 16
- Drying Unit 16
- Recycling 16
2 RISKS AND USER RECOMMENDATIONS 16
- Accessories 16
- Playing Sports 167
- Medical Examinations 17
- Settings 17
- Electrostatic Discharge 17
- Passing Through Security Gates 17
- Travelling by Air 17
TROUBLESHOOTING: TOOLS PROBLEMS
AND SOLUTIONS 18
1 TESTING TOOLS 18
- Using the Tester 18
- Microphone Earphones 18
2 PROBLEMS AND SOLUTIONS 19
- No Sound is perceived 19
- Intermittent sound 19
- Reduced or distorted sound 19
- Insucient battery life (<2 days) 19
- Problem keeping the antenna in place 20
MISCELLANEOUS 21
1 TECHNICAL SPECIFICATIONS 21
2 SYMBOLS 21
3 OPERATOR PROFILE 21
4 MANUFACTURER’S DECLARATION 22
2
3

INTRODUCTION
You have just received a Saphyr
®
processor that is designed, developed, and manufactured by
Neurelec.
This Saphyr®manual provides information on how to use the device, as well as the
precautions you need to take.
The processor model (Saphyr®SP or Saphyr®CX) will be specied in this manual when it is
necessary to provide information specic to that model. We recommend that you carefully
read this manual before using your processor.
If you have diculty reading the information contained in this manual or in the Saphyr®
processor packaging, or if the information provided is incomplete, please contact your
manufacturer or your local distributor.
Indications
The Saphyr®processor is designed for adults and children with 2nd degree severe to profound
bilateral perceptive hearing loss—assessed by inadequate level of speech audiometry even
with a hearing aid--who have received a Neurelec Digisonic®DX10/Convex, Digisonic®DX10,
Digisonic®SP, Digisonic®SP ABI or Digisonic® SP Binaural cochlear implant.
Contraindications
The Saphyr®processor is not indicated in patients who have received an implant other than
those specied in the indications paragraph above. It is also not suitable for children who
have an auricle that is too small or too exible to support the external device. These patients
will be oered a remote battery-operated micro-processor (Digi SP’K processor).
Reliability – Quality
The cochlear implant system is an active implantable medical device. To ensure your safety,
the Saphyr
®
processor is designed and manufactured in accordance with the requirements
laid down in European Directive 90/385/EEC. The device complies with the standard EN 45502-
2-3:2010 on Active Implantable Medical Devices (AIMDs) - cochlear and auditory brainstem
implant systems, and with Medical Device safety standards.
Compatibility with Older Implant Generations
The Saphyr® processor is available in two dierent models (Saphyr® SP and Saphyr® CX) to go
with the implanted receivers shown in the diagram below.
Note:It is important to always carry the cochlear implant owner ID card given to you by
your implantation center and to present it prior to any medical examination or treatment.
The remainder of this document will only refer to the Digisonic
® SP
cochlear implant system, even
though the Saphyr
®
processor is also compatible with the dierent implants mentioned above.
For bilateral cochlear implantation: patients with two cochlear implant systems are urged not to
wear the processor on one ear that was t by your audiologist to the implant system of the other
ear. Each processor is congured for a specic implant.To easily dierentiate between the left and
the right processor and to avoid getting them mixed up, stickers in dierent colors are supplied in
the product packaging. The Left/Right stickers should be placed on the part of the processor that
is not in contact with the skin. In the event one of the sound processors stops working, contact
Neurelec to obtain a temporary device.
4

In the event one of the sound processors stops working, contact Neurelec to obtain a temporary
device.
Saphyr® SP PROCESSOR
compatible with the implants shown
ontheright:
Digisonic® SP
Cochlear implant
Digisonic® SP Evo®
Cochlear implant
Digisonic® SP Binaural
Binaural cochlear implant
Digisonic® SP ABI
Brainstem implant
Saphyr®CX PROCESSOR
compatible with the implants shown
ontheright:
Digisonic® DX10 and Digisonic® Convex
Cochlear implants
Digisonic® ABI
Brainstem implant
5

HOW IT WORKS
The cochlear implant system is made up of an external part and an internal part.
The External Part
• A miniature signal processor inside a Saphyr®behind-the-ear contour (1) containing two
microphones.
• An external antenna (2) connected to the processor by an antenna wire (3).
The sound picked up by the microphones is only processed by the processor.
The antenna then transmits the stimulation signal to the implant through the skin.
The Internal Part
The implant consists of a small ceramic shell (4) that is placed under the skin. It contains an
electronic stimulator that distributes the sound to the 20 electrodes (5) placed in the cochlea.
Antenna wire
Saphyr®processor
Antenna
Implant
Electrodes
To the brain
6

CONTENTS OF THE SAPHYR®BOX
The Saphyr®processor is delivered in a box that contains:
Photos for information only
• 1 Saphyr® (1) processor
• 1 Antenna with 5/4 strength magnet (2)
• 1 Antenna wire (3)
• 1 Case(4)
• 1“Perfect Dry”heating drying box (5)
• 1 Pack of zinc-air batteries (6)
• 1 Accessories box containing:
- 1 Spare antenna wire
- 1 Additional 4/3 strength magnet (7)
- Additional hook (8)
- 1 Holding buckle (9)
- 1 Clip-on cover (10)
- 1 Silhouette (11)
- 1 Set of earphones (12)
• 1 Bag organizer (13) containing:
- 1 Tester (14)
- 1 Pack of 6 batteries
- 2 Cleaning wipes (15)
- 1 Desiccant packet
- 1 Storage media (16) containing:
- 1
Accessories User’s Manual
(17)
- 1 User’s Manual (18)
• Other Documents:
- 1 Pocket Guide (19)
- 1 Settings and speech therapy record
book (20)
- 1
Activation/warranty registration form
(21)
- Others (warranty certicate
for the processor, etc.)
7

DESCRIPTION OF THE SAPHYR®PROCESSOR
• Microphone 1 (A)
• Microphone 2 (B)
• Selector wheel with switch (C)
0: Turn o - 1: Position 1 - 2: Position 2 - 3: Position 3
• 4-position program selector (D):
P1: Program 1 - P2: Program 2 - P3: Program 3 - P4: Program 4
• Two-color indicator light (E)
• “ANT” socket (F): for connecting the antenna wire
• “AUX” socket (G): for connecting external accessories (FM system, earphones, etc.)
• Connection socket in order to program settings (H)
The Saphyr® SP and Saphyr® CX processors are visually distinguishable by their markings, how
the serial numbers are identied, and some of their accessories (antenna, magnet, and antenna
wire). The illustrations and descriptions of each product below explain these dierences.
Saphyr®SP
Antenna with keyed connector
Antenna wire with keyed connector
Saphyr® SP processor
The serial number for your Saphyr®SP processor is located inside the battery compartment:
“N1495” for example (N = processor generation / XXXX = manufacturing no.).
You should write this number down and save it, as you may be asked for it later.
8

Saphyr®CX
Saphyr® CX processor
Antenna wire without keyed connector
Antenna without keyed connector
The serial number for your Saphyr® CX processor is located inside the battery compartment:
“M1245”for example (M = processor generation / XXXX = manufacturing no.).
You should write this number down and save it, as you may be asked for it later.
9

5/4
-
5/4
+
USING THE SAPHYR® PROCESSOR
1 CONNECTING THE COMPONENTS
To avoid any confusion for the user, both ends of the antenna wire are exactly the same.
Toconnect the components:
• Connect the antenna to the antenna wire
• Plug the antenna wire into the“ANT”socket on the processor.
There is a keyed connector on both ends of the antenna wire and on the Saphyr®SP processor’s
antenna. Therefore, when plugging the antenna wire into either the processor or the antenna,
make sure that the keyed connector is facing the right way as you insert it into the socket (see
the paragraph“Description of the Saphyr® Processor”).
Important: The antenna wire connectors are designed to be handled only under specic
circumstances (replacement of a defective wire, etc.). To extend the life of these connectors,
we recommend that you store your Saphyr®processor in its case without disconnecting
theantenna wire.
2 ENSURING THE BEST FIT
Magnet
A magnet holds the antenna in place against the skin on the other side of the implanted receiver.
You can change the distance between the skin and the magnet at any time by tightening
orunscrewing the magnet.
To tighten or unscrew the magnet:
- Hold the antenna by pressing both sides of the magnet cover between two ngers, as shown
in the rst image below.
- To unscrew and remove the antenna magnet, turn the magnet clockwise, as shown in the
second image.
- To tighten the magnet, turn it counterclockwise.
The underside of the magnet provides information about the magnet strength (5/4 strength is
standard) and which processor model it is compatible with, as shown below:
Saphyr® SP – Underside
ofmagnet
Saphyr® CX – Underside
ofmagnet
Photo 2
Photo 1
10

If the magnet strength is not strong enough, it may cause the antenna to not stay in place on
the skin.
If the magnet strength is too strong, skin irritation or redness may appear. In both of these
cases, we recommend replacing the magnet. If skin redness persists, replace the magnet with
a weaker one (a 5/4 strength magnet is supplied in the box). Do not hesitate to consult your
implantation center if the magnet does not seem suitable to you. They will help you determine
which magnet strength you should use and order from your local distributor or Neurelec
customer service department.
Hook
The processor comes with a hook to hold it in place over your ear. Since every pat
ient is
dierent, the box includes a second type of hook that can be retrotted to the
Saphyr®processor.
To change the hook:
• Remove the old hook
• Snap on a new hook until you hear a“click”
Holding Buckle
To help maintain the processor’s position on the ear (such as for use in children), we recommend
using the silicone holding buckle provided in the Saphyr®box. Refer to the user instructions
provided with this accessory, or the “Accessories User’s Manual”, for directions on how to put
it on.
Note: the processor can also be held in place with a custom tip made by an audioprosthologist.
3 POWER SOURCE OF THE PROCESSOR
Type of Batteries
Your Saphyr®processor is powered by 2 non-rechargeable #675 zinc-air batteries. It is important
that you use only type“675”(European name) or“PR44”(international name) zinc-air batteries,
as recommended by Neurelec or your implantation center. Using any other type of battery
may result in your Saphyr®not working properly (e.g., reduced battery life, power failure).
To re-order batteries, contact your local distributor directly, or Neurelec’s customer service
department. You will nd the specially priced parts and part numbers for the dierent types
of batteries recommended (for cold and dry or hot and humid weather) on the Saphyr®
accessories order form.
Battery Lifespan
Battery life varies from one patient to another, ranging anywhere from 2 to 8 days, depending
on your program settings, the sound environment, and daily use of the device. It is important
to follow user recommendations. If you experience low battery life, we recommend that
you contact your implantation center, local distributor, or the Neurelec customer service
department.
User Recommendations
The batteries should be stored in a dry place away from variations in temperature, and should
be used by the expiration date indicated on the package. Both batteries used to power the
Saphyr®should be of the same type and be changed at the same time. It is important toremove
the batteries when your processor is turned o for an extended length of time (atnight, for
example).
11

Important: The batteries may be hazardous if swallowed. Please keep the batteries out of the reach
of children.
Zinc-air batteries are non-rechargeable and for single use only. After use, do not throw them
away; rather take them to a collection point (e.g. retail outlet, waste disposal site) or place them
in specially designated containers. Please refer to applicable laws.
Private Warning Sound - Changing the Batteries
The Saphyr®processor lets you know when the batteries are dying by beeping 3 times (private
warning wound), which cannot be heard by anyone else. In order to take advantage of this
private warming sound, your audiologist must rst congure this feature during a tting
session. The rst three beeps are to warn you when the batteries are dying, and the next three
beeps indicate when the batteries are completely dead.
We strongly recommend that you change both batteries whenever you hear the rst three
beeps, or when the sound disappears or is less than ideal. Discharged batteries may leak
corrosive uid that can damage your processor.
To replace the batteries:
1- Remove the protective lm from the new batteries
2- Turn o the processor (turn the wheel to“0”)
3- Remove the old batteries and place the new batteries into the compartment, making sure
they are properly aligned according to the polarity indicated on the battery compartment (they
can only be inserted one way).
It is important to clean the battery compartment regularly to prevent any build-up.
You may now turn on the processor (turn the wheel upward to the appropriate position).
12

4 TURNING ON/OFF
To turn the device on, rst choose the program congured by your implantation center (P1,
P2, P3 or P4), then turn the selector wheel upward to power it on.
Adjust the wheel’s position set by your audiologist to the most comfortable listening level,
depending on the sound environment you’re in.
To turn the device o, turn the wheel down to“0”. You should be able to feel a click.
If the device will be turned o for an extended period of time, such as overnight, we recommend
you do the following:
• Turn o the device
• Open the battery compartment and remove both batteries
• Place your Saphyr®in the drying box according to the instructions in the corresponding
product insert or in the “Accessories User’s Manual”, and keep it closed until the next time you
use your processor.
Doing so will absorb any residual moisture, dry out the battery contacts, and prevent possible
malfunction of the processor.
Note: This processor includes an automatic restart feature in case of malfunction, resulting in
a momentary loss of power.
5 PROGRAM SELECTOR
The Saphyr®processor can store up to four dierent programs (P1, P2, P3, P4).Youraudiologist
willdenethese programsaccordingtodierentusage conditions(normal sound environment,
noisy environment, use of an FM system, Telecoil, etc.)
Simply move the position of the program selector to select the appropriate program for your
needs. If you wish, you can ask your audiologist to lock the selector wheel to make it easier
touse your device.
Or, your audiologist can activate a feature on the processor to beep privately whenever
aprogram change has been made. You will hear one beep when the selector wheel switches
to program P1, two beeps on position P2, etc.
6 SELECTOR WHEEL
This programmable function allows you to adjust your listening level according to the sound
environment you’re in by selecting a pre-dened program. Your audiologist will work with you
to dene the most appropriate program for your everyday needs, and will explain the proper
settings for each of these programs.
Change the position of wheel to nd the most comfortable listening level. Your audiologist
can also lock this feature, which is especially useful for young children, in order to prevent user
errors or to simply make the device easier to use.
13

7 INDICATOR LIGHT
The indicator light is activated during a tting session. The Saphyr®’s two-color (green/red)
indicator light makes it easy to tell what the status is of the processor.This is particularly helpful
for those who are not accustomed to how the device works (teachers, educators, etc.).
Startup Test
When powering on, the indicator light shines green for a few seconds, then turns o.
Stimulation indicator
The light ashes green when the microphone is picking up sound. At your request, this
indicator light can be disabled by your audiologist.
Low battery indicator
The light slowly ashes red (every 2 seconds) for 1 minute.
This is the time to turn o the processor and change the batteries. This indicator can also be
disabled by your audiologist.
Detection of any other error
The indicator light ashes red rapidly for 1 minute, then automatically restarts the processor.
There will be a momentary loss of power. If the problem continues, contact your local
distributor or Neurelec’s customer service department. Your audiologist will work with you to
congure your device according to your everyday needs.
ASSISTIVE LISTENING DEVICES
Assistive listening devices improve speech comprehension in noisy environments by making
the sound source seem closer to the user.
1 INTEGRATED TELECOIL
A magnetic induction loop (or telecoil) assists hearing by transmitting sounds, by
electromagnetic induction, between a transmitter and a receiver connected to the user. The
Saphyr® processor has an integrated telecoil that lets you listen in public places equipped
with a transmitter (theater, conference hall, etc.), or use accessories that require the use of a
telecoil (e.g., amplier). The telecoil is activated simply by turning the Saphyr® selector to the
appropriate program congured by your implantation center (P1, P2, P3 or P4).
2 OTHER DIRECT AUDIO INPUT DEVICES
The Saphyr®processor can be connected directly to various commercially available auxiliary
aids, such as the device shown below.
Compatibility
FM system
14

Before using this type of device, your audiologist must rst dene a new, dedicated program.
Once this is done, all you need to do is connect your auxiliary device to the Saphyr®processor’s
“AUX” socket and select the program dened by your audiologist (P1, P2, P3 or P4). For more
information about the FM system, contact your audiologist.
MAINTENANCE AND USER RECOMMENDATIONS
1 MAINTENANCE
Precautions
The Saphyr®processor contains high-performance electronic components that can be
damaged. It should be handled with care and be kept away from extreme temperatures. For
your information, the temperature (T°C) of your processor may reach as high as 42°C during
use, instead of 39°C (temperature at normal operation). You may therefore feel your processor
getting hot. If this happens, remove the external part from your ear and turn it o.
Ifit is dropped, check to be sure the device is still working properly. If you are unsure, do
not try to repair it. None of the components in the device can be repaired by the user or the
implantation center. Attempting to
open the device will automatically void the warranty.
If you
are experiencing any problems, please contact the Neurelec customer service department, as
they are the only ones authorized to perform maintenance on these products.
Do not submerge your processor in water to avoid damage to the electronic components.
Likewise, do not wear the device in the shower, bathtub, or while swimming. If it is dropped
into salt water, turn the processor o, remove the batteries, and immediately rinse the device
in fresh water. Let dry for 24 hours.
Be sure to never yank the antenna wire while disconnecting it, but instead, grasp the connector
with two ngers. You could damage the wire if you pull directly on it. We strongly advise that
you to have one or more spare antenna wires on hand. To extend the life of your device,
we recommend that you have it checked annually to ensure it is working properly and the
microphones are calibrated.
IMPORTANT: It
is strongly advised to take out insurance to cover any loss, theft, or
irreparable
damage. Ask your implantation center for information.
Cleaning
Regularly and very gently clean your processor with a cotton pad or, preferably, a sti-bristled
brush lightly moistened with alcohol. Protect the microphones from dust, dirt, sweat, and
moisture.
The cleaning wipes provided in the box are saturated with an antibacterial and antifungal
solution that eectively dissolves ear wax and removes dust and sweat residues. For more
information, see the“Accessories User’s Manual”included on the storage media inside this box.
15

16
Storage
Keep the entire device away from direct sunlight, heat, dust, moisture, vibrations, and shocks.
Your case is designed to store the processor whenever you are not using it. Just remove the
batteries before placing the device in its mold impression. For more information, see the
“Accessories User’s Manual” included on the storage media inside this box.
Drying Unit
If the device will be turned o for an extended period of time, such as overnight, we recommend
you remove both batteries and place the Saphyr®in its drying unit. This will absorb any residual
moisture. Please read the drying unit instructions before use, or refer to the“Accessories User’s
Manual” included on the storage media inside this box.
The batteries should be stored in a cool (< 20°C), dry place away from direct sunlight and heat.
Recycling
The 2002/96/EC (WEEE) directive sets out to reduce electronic waste, and to promote the
reuse, recycling, and other forms of recovery of such wastes so as to reduce the amount of
waste. The“crossed-out trashcan” symbol shown on page 21 of this manual indicates that
the equipment should not be discarded with everyday trash, but should be taken to the
appropriate collection point for processing. In doing so, you are helping to preserve natural
resources and protect human health.
2 RISKS AND USER RECOMMENDATIONS
- The processor should be removed when you are near a strong magnetic eld.
Accessories
- The use of incompatible accessories may cause uncontrolled electromagnetic interference
or a leakage current to ow through the patient. This may happen if an accessory plugged
directly into the mains electrical outlet and then connected to the processor with no electrical
shock isolation. For this reason, it is imperative that the processor only be used with accessories
supplied by Neurelec or with compatible accessories, as determined by Neurelec.
-The processor is made up of small parts, including cables, magnets, and batteries. Families
with small children should make sure to keep these parts out of the reach of children in order
to prevent inhalation or ingestion.
Playing Sports
- The cochlear implant system allows you to participate in most athletic activities. Some
precautions should be taken, however, and depending on the sport, it may be necessary to
wear a protective helmet, support gear to help hold the processor in place, or to remove the
processor altogether. Since a violent blow to the head could damage your cochlear implant
system, participation in contact sports is not advised.
- We also advise against scuba diving at depths below 20 m.
- The clip-on cover provided in the box is designed to t the Saphyr®processor. It helps
protect your device from moisture and perspiration, and provides additional security when
participating in certain athletic and outdoor activities. For more information, please refer to
the“Accessories User’s Manual”.

17
Medical Examinations
- The processor should be removed before any medical examination (e.g., radiation therapy,
MRI, ultrasound, CT scan).
- Your implanted receiver contains a permanent magnet that is sensitive to electrical currents.
You must rst consult your implantation center and Neurelec before undergoing any treatment
using electrical currents or before exposure to intense radiation.
- Yo
ur implant system is compatible with MRI exams at 1.5 Tesla.
The MRI exam request form
(available at www.neurelec.com) must be lled out by the radiologist and returned to Neurelec
before undergoing any examination.
Settings
Every processor is programmed by a Neurelec-certied audiologist for personal use only,
and should never be loaned to or exchanged with anyone else. Using someone else’s processor
may cause you to experience very loud or poor quality sounds.
Electrostatic Discharge
Electrostatic discharge (ESD) are sparks caused by contact between two people or between
a person and an object. These sparks are more common in cold and dry conditions. Some
situations,suchas gettingoutofacar,orcontact withcertain typesofmaterialssuch assynthetic
fabrics, a plastic slide, computer or television screens, and carpets are common triggers of such
discharges. The Saphyr®processor provides a strong level of protection against ESD events,
in compliance with standard EN 60601-1-2: 2007, to avoid possible damage to the device or
corruption of programs. To prevent exposing your processor to such discharges, we advise you
to take additional precautions, such as being extra careful when taking o a sweater or getting
out of a vehicle. Furthermore, anyone who may come into contact with the processor should
rst touch the person wearing the implant before touching the device. This will help eliminate
any residual static electricity.
Passing Through Security Gates
Security gates (at airports, shopping centers, etc.) generate powerful electromagnetic elds.
Passing through or near these gates can set o the detector alarm or interfere with the sound
perceived by the implant wearer. We therefore advise you to turn o your processor and notify
security guards by showing your owner ID card.
Travelling by Air
As with all electronic equipment, you must turn o your processor during take-o and landing.

18
TROUBLESHOOTING TOOLS PROBLEMS
ANDSOLUTIONS
1 TESTING TOOLS
Var
ious features and tools are available to ensure your Saphyr®processor and its accessories are
working
properly:
• Operating mode indicator light
• Private warning sound for detecting dying batteries
• Tester
• Earphones
It is important to understand how these tools work for daily management of your device.
Using the Tester
The tester allows you to verify that your
Saphyr
®
processor and its accessories are working properly,
and that the antenna is transmitting signals to the implant
through the skin. To perform the test:
• Place the processor’s antenna on the indicator light side of
the tester. A magnet holds them together.
• The processor should be operating on the program most
often used.
• Thetesterlightshouldlightupforanysoundbeingproduced.
If the light doesn’t come on, the signal is not being received
by the implant (and no sound would be perceived by the
user). See the“Problems and Solutions”chapter.
Note: the transparent light on the tester that comes with the Saphyr®SP processor lights up
yellow, whereas the light on the Saphyr®CX processor’s tester lights up green.
Microphone Earphones
The Saphyr®processor includes an earphone output jack to allow a hearing person listen to
the audio signals entering the processor. This allows problems with the microphone, such as
a clogged microphone input or a defective microphone, to be diagnosed. Note: the sound
quality heard through the earphones is not representative of the sound heard by the patient
using the processor.
To use this testing tool:
• Turn o the processor
• Carefully plug the earphones into the auxiliary socket marked“AUX”on your processor,
making sure they are plugged in the right direction
• Turn the processor on to your usual program to check the perceived sound quality
• Once you are done, turn the processor o again before disconnecting the microphones
Note: If the earphones are too close to the microphone, it may produce a Larsen eect
(audio feedback). The sound level perceived by another person using the earphones is not
representative of the sound level perceived by the patient.

19
2 PROBLEMS AND SOLUTIONS
-The Saphyr® behind-the-ear processor requires numerous settings to achieve thebest sound
quality. Checking the settings at least once a year is recommended to ensure the implant
system is working properly. For young children, parents and teachers are advised to monitor
the behavior of the child when they are using the processor. If pain or odd sensations are felt
during use, immediately disconnect the antenna and call your implantation center.
- Using the various testing tools and following the recommendations below will help you solve
most problems. If the problem persists, we recommend that you contact your implantation
center, local distributor, or the Neurelec customer service department.
No sound is perceived
1 - Check that the antenna wire is properly connected, that the battery compartment is closed,
and that the position of the selector wheel is set to the correct position
2 - Change both batteries
3 - Check the microphone quality using the earphones
4 - Use the tester to check that the antenna wire and the antenna are working properly
5 - Replace the antenna wire or the antenna
6 - Contact your implantation center, local distributor, or the Neurelec customer service
department
Intermittent sound
1 - Check that the selector wheel position and the program selected are appropriate for
thelistening conditions
2 - Change both batteries
3 - Make sure the maintenance recommendations have been followed
4 - Use the tester to check the condition of the antenna wire and the antenna
5 - Contact your implantation center, local distributor, or the Neurelec customer service
department
Reduced or distorted sound
1 - Check that the selector wheel position and the program selected are appropriate for
thelistening conditions
2 - Try another program
3 - Change both batteries
4 - Check the microphone quality using the earphones
5 - Contact your implantation center, local distributor, or the Neurelec customer service
department
Insufficient battery life (<2 days)
1 - Change both batteries
2 - Check the type of battery used
3 - Make sure the maintenance recommendations have been followed (see page 15)
4 - Contact your implantation center, local distributor, or the Neurelec customer service
department

Problem keeping the antenna in place
A magnet holds the antenna in place against the skin on the other side of the implanted
receiver.
If the antenna does not stay on:
1 - Tighten the magnet by turning it clockwise
2 - Ask your implantation center for a stronger magnet
If it is too tight:
1 - Loosen the magnet by unscrewing it in a counterclockwise direction
2 - Ask your implantation center for a new magnet
(a 5/4 strength magnet is supplied in the Saphyr®box)
Important: A detailed description of the problem must be included with any equipment
returned to your local distributor or Neurelec’s customer service department.
Note: If skin irritation or redness appears while using the device, we recommend changing
thestrength of the magnet.
20
This manual suits for next models
1
Table of contents
Languages:
Popular Hearing Aid manuals by other brands

oticon
oticon miniRITE Alta2 Instructions for use

ReSound
ReSound V 70 operating instructions

Clearly Hearing
Clearly Hearing SmartAid Digital Platinum operating guide

Widex
Widex Mind 330 Series User instructions

Creaties ? Techniek
Creaties ? Techniek Club quick start guide

Phonak
Phonak Audeo V90-R user guide