Goclever SPORT GOLD User manual

GOCLEVER DVR
SPORT GOLD
OWNER’S MANUAL
GOCLEVER DVR
SPORT GOLD
INSTRUKCJA OBSŁUGI
ODWIEDŹ NASZĄ STRONĘ
WWW.GOCLEVER.COM
ABY ZAPOZNAĆ SIĘ Z INNYMI PRODUKTAMI TAB, NAVIO, DVR, DVB-T
Przed skorzystaniem z urządzenia zapoznaj się z niniejszą instrukcją obsługi
oraz zachowaj ją na przyszłość

2
Contents / Spis treści
English
3
Polski
15
Warunki gwarancji
28

3
Functions
This user's manual has referred to the latest information we had when this user’s manual
was made. The screen display and illustrations are used in this user's manual for the
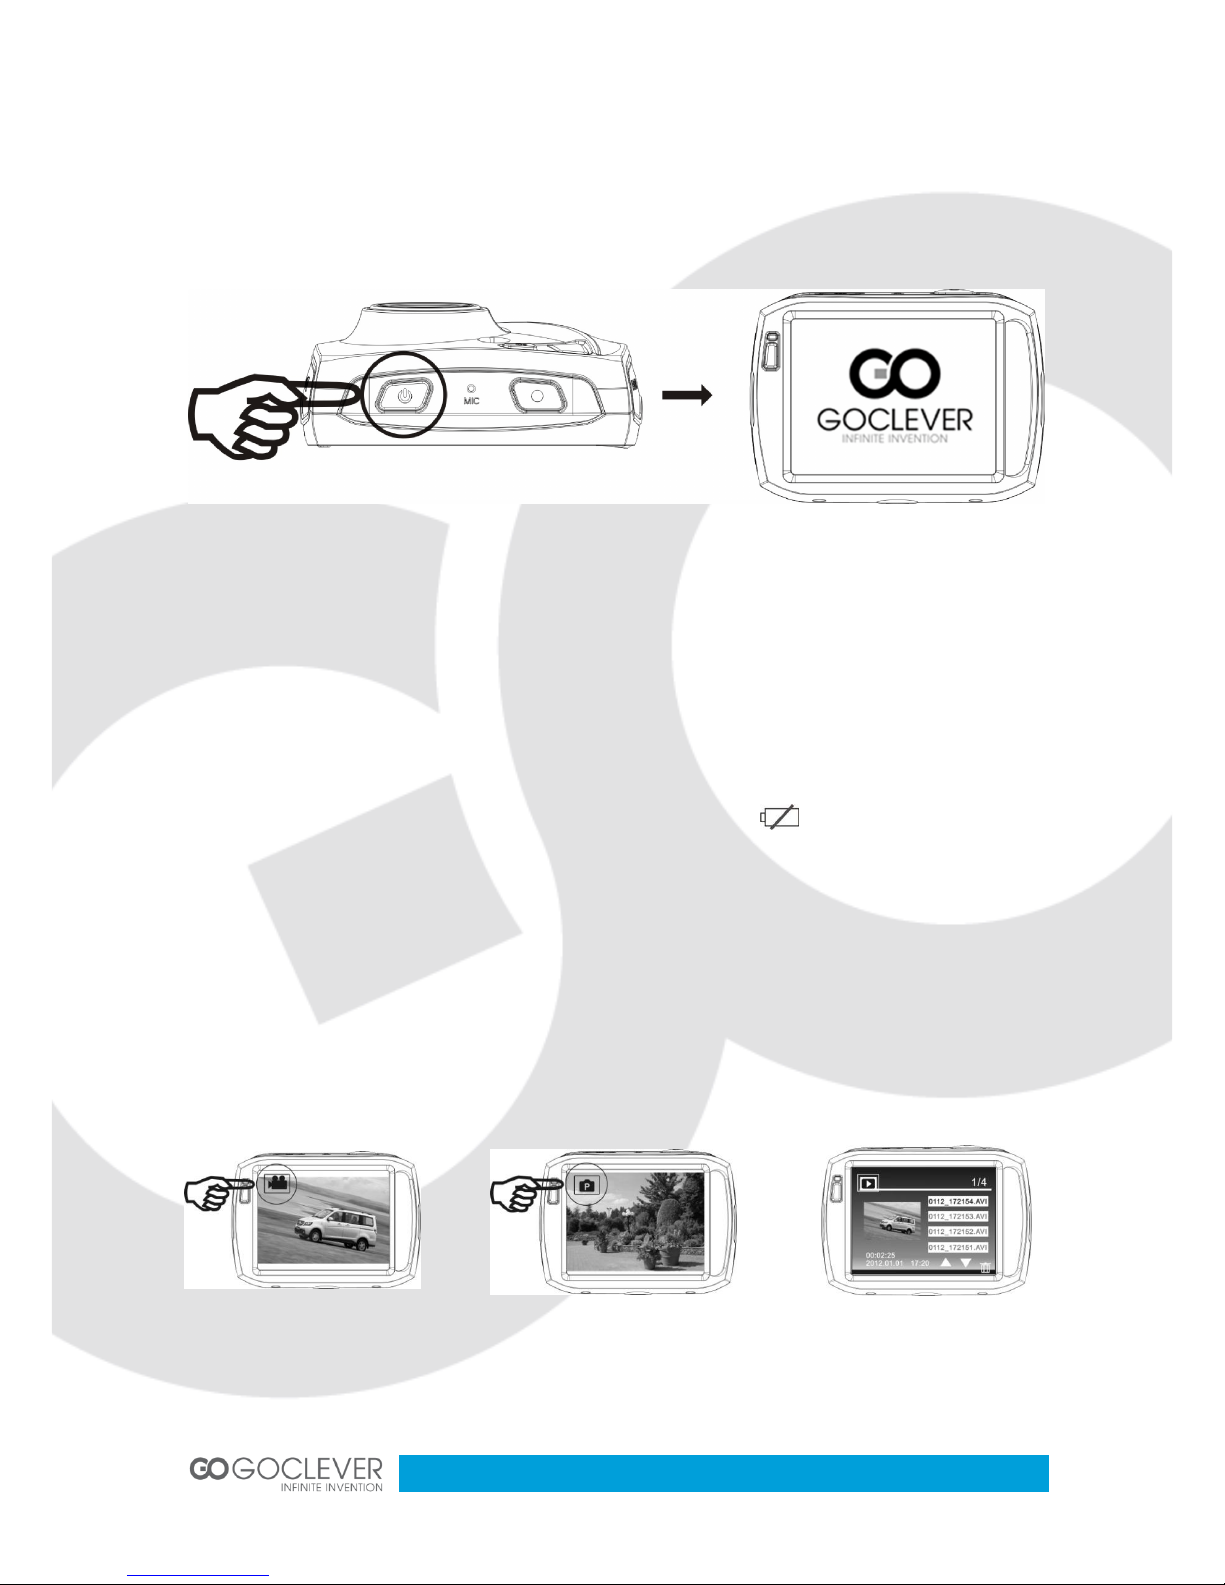
purpose of introducing details of this digital camera in a more specific and direct way.
Difference may arise between these displays and illustrations and the digital camera actually
available for you due to difference in technological development and production batch, under
which case, the actual functions of this video camera shall prevail.
Announcements
Please read the Announcements carefully before using this video camera for proper and safe
operation, so as to bring its optimum performance into play and extend its service life.
Do not expose the video camera to sunshine directly, nor point its lens to sunlight.
Otherwise, the image sensor of the video camera may be damaged.
Take good care of the video camera and prevent water or sand particles from entering
the video camera when it is used on the beach or water, because water, sand particles,
dust or component containing salt may damage the video camera.
Keep the video camera contaminated free of dust and chemical materials. Place it in a
cool, dry and well ventilated place. Do not place the video camera in a high
temperature, moist or dusty place.
Please check if the video camera can operate normally before use.
If dirt or stain is accumulated on the video camera or on its lens, use soft, clean and
dry rag to wipe it away gently. If the video camera or its lens is stained with sand
particles, blow them away gently. Do not use cloth to wipe arbitrarily. Otherwise, it may
scratch the surface of video camera or its lens.
If it is required to clean camera surface, firstly blow away the sand dust accumulated
on this surface, and then wipe the camera gently with rag or tissue applicable to optical
equipments. Please use the cleaning agent of video camera for wiping if necessary.
Do not use organic solvent to clean the video camera.
Do not touch the lens surface with fingers.
Please back up the data if the memory card inside this video camera is used for the
first time.

4
The external SD memory card is made of precise electronic components. Data may be
lost or damaged under the following circumstances:
a. Improper use of the memory card, the memory card is bent or dropped.
b. Place it under high temperature or moist environment or expose to sunshine
directly.
c. Electrostatic or electromagnetic field exists around the memory card.
d. This memory card is taken out or power supply is interrupted when this video
camera or computer is connected to the memory card (i.e. during reading, writing
and formatting).
e. Touch the metal contact surface of the memory card with fingers or metal materials.
Waterproof Case
Before sealing the waterproof case, keep the camera housing’s rubber seal clean, a single hair
or grain of sand can cause a leak. You can test by closing the case without inserting the
camera. Submerse the case completely in water for about a minute. Remove the case from
the water, dry off its exterior with a towel, then open the case. If the entire interior is dry, the
case is safe for use under water.
Remember to put the Mode Switch in your desired recording position before inserting
the camera in the waterproof case. There is no external button for the Mode Switch.
After every use in salt water you will need to rinse the outside of the housing with non-
salt water and dry. Not doing this can eventually cause corrosion of the hinge pin and
salt buildup in the seal, which can cause failure.

5
Product Introduction
This product is small in size and easy for installation.
With high-performance chips, this product can produce high-definition videos with
excellent continuity of dynamic images, even under low illumination conditions, and
supports H.264 HD video format.
The video mode supports four modes, i.e. VGA (120FPS), HD (60FPS), HD (30FPS)
and FHD (1920x1080 30FPS).
The photo mode supports four sizes, i.e. 12M, 10M. 8M and 5M.
Support high-speed USB2.0
It supports a mini SD card with a capacity expansion up to 32G.
This product supports video output and live playback functions. Videos can be output
to high-definition TVs for playing clear and sharp pictures.
System Requirements
System Requirements
Operating System
Microsoft Windows2000, XP, Vista, 7
CPU
Intel Pentium III of more than 800MHz or other CPU with
equivalent performance
Internal Memory
Larger than 512MB
Sound Card and Display Card
The sound card and display card shall support DirectX8 or
higher version.
CD Driver
Speed of 4 times or faster
Hard Disk
Free space of more than 500MB
Others
One standard USB1.1 or USB2.0 port

6
Introduction to Appearance and Keypad

7
Usage
Charge the built-in lithium battery
Connect the video camera with computer for charging in the shutdown state. The indicator
light (red) for charging is on at this time and will be off after charging. In general, it can be fully
charged after 2-4 hours.
Use of Memory Card
Push the memory card into the card slot according to the concave lettering beside the
slot of memory card till it is completely inserted.
To take out the memory card, gently press the end of the memory card inward and it
will pop up.
Note: No built-in memory is
available in this video camera.
Make sure to insert memory
card before using.
USB Cable
Indicator Light for
charging is on
o
on
n

8
Startup/Shutdown
Startup: Press the POWER button for 3 seconds, the screen is displayed and the
camera is on.
Shutdown: Press the POWER Key, and the camera will be shut down.
Automatic shutdown: when the idle time of the video camera reaches the time for
automatic shutdown, it will be shut down automatically to save power. The default time
of this camera for automatic shutdown is 5 minutes.
Shutdown in case of power shortage: when the power of the battery is insufficient, the
LCD display screen will display the low power icon . Please charge it in time.
When indicate light turns red and flickering, the video camera will be shut down
automatically.
Conversion between Function Modes
The camera has three modes: video recording mode, photo mode and playback mode. These
modes can be switched over by clicking the icon in the upper left corner of the LCD display
after startup.
Video recording mode Photo mode Playback mode

9
Indicator light
Busy light (blue): when the camera is busy (such as, recording a film, taking photos, automatic
off-screen), the busy light will be on.
Charging light (red): when the light is on for a long time, it prompts the user that the camera is
charging.
Video recording mode
When the mode switch is turned to video recording mode, press the shutter button once to
begin recording under previewing state; press the shutter button once again if you want to stop
recording, and the camera will also stop recording, automatically when the memory card is full
or the power is insufficient.
1. Mode icon: indicating currently in the AVI mode.
2. Video size: available in FHD / HD / VGA.
3. Recording time: indicating the length of remaining time to be recorded.
4. Icon of setting the time and date.
5. Battery icon: indicating the current capacity of the battery.
6. Digital zoom-in icon: to zoom in by clicking it.
7. Digital zoom magnification (x).
8. Digital zoom-out icon: to recove by clicking it.
9. Menu icon: to be activated by clicking other icons.
10. Playback icon: to activate the corresponding menu by clicking it.

10
Photo mode
After turning on the DV camera, it will directly get to the video recording mode. To switch to the
photo mode, click the mode icon in the upper left corner of the LCD display. You can shoot a
photo by pressing the shutter button in the preview state.
1. Mode icon: indicating currently in the photo mode.
2. Photo size: available in 5M/8M/10M/12M.
3. Counter: Indicating the number of photos to be taken.
4. Indicating the face detection function is activated.
5. Icon for setting the time and date.
6. Battery icon: indicating the current capacity of the battery.
7. Digital zoom-in icon: to zoom in by clicking it.
8. Digital zoom magnification (x).
9. Digital zoom-out icon: to recove by clicking it.
10. Menu icon: to be activated by clicking other icons.
11. Playback icon: to activate the corresponding menu by clicking it.

11
Playback mode
After starting up and entering the previewing state, click the playback icon ( ) at the lower
right corner of the LCD to switch to the playback mode.
Click to pause playing, click to play forward, and click to play backward.
Click to stop the playback.
File deletion
Press icon, and then
click YES to delete the current file immediately, or click NO to cancel the request of deletion.
Connecting the Camera to a High Definition TV

12
Connect the camera to a high-definition TV with a HD cable (as shown below). Then video
signals from the camera will be automatically output to the high-definition TV, and you can
enjoy HD videos and photos that you have recorded on the high-definition TV.
Connection With Personal Computer
The camera is provided with the plug and play function. Connect the device to the computer
with USB line under turning-on state, then it will be switched into the movable hard disk mode.
Icon of movable disk will appear on the window of “my computer”. The photos you have taken
can be saved in the removable disk under the file folder I:\jpg (“I” is the removable disk of the
camera). Your video files will be saved under the folder of I:\video.Note: if movable disk
function is used in windows 2000 or windows operating system with a higher edition, it is
unnecessary to install drivers.

13
Remote Control
Using the remote control will help you realize video recording, photo snapping and shutting
down functions without operating the camera itself.While using the remote control, place its
signal transmitter port toward the infrared signal receiver light of the camera. Then you can
record videos, take photos or shut down the camera by pressing the corresponding buttons.
Standard Packaging
Camera User manual USB cable Remote control
OFF key
REC key
SNAP key
Signal transmission port
Infrared receiver light

14
Technical Parameters
Image sensor
5 million pixel (CMOS)
Function mode
Video recording, photo, removable disk
Camera lens
F3.1 f=2.3mm
Digital zooming
4x
Shutter
Electronic shutter
LCD display screen
2.4-inch touch screen
Image resolution
12M (4000 × 3000), 10M (3648x2736), 8 M
(3264x2448), 5M (2560×1920)
Video resolution
VGA: 640x480 (120 frames / sec), HD: 1280x720 (60
frames/sec.) HD: 1280x720 (30 frames/sec), FHD:
1920x1080 (30 frames/sec.)
White balance
Automatic
Exposure
Automatic
File formats
Image
JPEG
Video
AVI
Storage medium
Micro SD card (Supporting up to 32GB), (without built-
in flash memory)
USB interface
High-speed USB 2.0 interface
Power Supply
Built-in 3.7V rechargeable lithium
Dimension (length × width ×
height)
74 x 52 x 33mm
Weight
Approx. 72g
This marking indicates that this product should not be disposed with other
household wastes throughout the EU. To prevent possible harm to the
environment or human health from uncontrolled waste disposal, recycle it
responsibly to promote the sustainable reuse of material resources.

15
GOCLEVER DVR
SPORT GOLD
INSTRUKCJA OBSŁUGI
ODWIEDŹ NASZĄ STRONĘ
WWW.GOCLEVER.COM
ABY ZAPOZNAĆ SIĘ Z INNYMI PRODUKTAMI TAB, NAVIO, DVR, DVB-T
Przed skorzystaniem z urządzenia zapoznaj się z niniejszą instrukcją obsługi
oraz zachowaj ją na przyszłość

16
Funkcje
Niniejsza instrukcja została stworzona w oparciu o najnowsze informacje jakie były dostępne
w trakcie tworzenia instrukcji. Ilustracje zawarte w instrukcji, które pomagają zrozumieć
obsługę urządzenia, mogą różnić się od rzeczywistego wyglądu kamery lub wyświetlacza.
Proszę kierować się rzeczywistym wyglądem wyświetlacza lub urządzenia, jeżeli występują
różnice.
Informacje
Przed skorzystaniem z urządzenia przeczytaj poniższe informacje, aby móc w pełni
wykorzystać potencjał urządzenia oraz przedłużyć jego sprawne działanie.
Nie wystawiaj urządzenia na bezpośrednie działanie promieni słonecznych. Chroń
soczewkę kamery przed długotrwałym kontaktem z promieniami słonecznymi.
Chroń urządzenie przed piaskiem, pyłem lub żwirem, który może dostać się do
urządzenia i uszkodzić je.
Chroń urządzenie przed kurzem oraz substancjami chemicznymi. Dbaj, aby urządzenie
było suche. Chroń je przed zbyt wysoką lub zbyt niską temperaturą.
Sprawdź poprawność działania kamery przed jej użyciem.
Wszelkie zabrudzenia usuwaj przy pomocy suchej, miękkiej szmatki. Piach lub kurz
powinien zostać zdmuchnięty z soczewki urządzenia. Nie używaj szmatek, które mogą
porysować powierzchnię urządzenia.
Nie używaj rozpuszczalników organicznych, aby oczyścić urządzenie. Staraj się
zdmuchiwać zabrudzenia z kamery lub używać miękkiej szmatki, aby usunąć
zanieczyszczenia.
Nie dotykaj powierzchni soczewki palcami.
Wykonaj kopię zapasową plików na karcie pamięci, jeżeli jest ona umieszczana w
urządzeniu po raz pierwszy.
Karty pamięci pochodzące od innych producentów są produktami podatnymi na
uszkodzenia. Karta pamięci może zostać uszkodzona gdy:
f. Zostanie wygięta, upuszczona lub niewłaściwie umieszczona w urządzeniu.
g. Zostanie wystawiona na działanie promieni słonecznych, wilgoci lub wysokiej
temperatury
h. Zostanie umieszczona w pobliżu pola elektromagnetycznego.

17
i. Zostanie wyciągnięta z urządzenia (lub urządzenie utraci zasilanie) podczas
zapisu/odczytu danych (np. nagrywania wideo)
j. Metalowe styki na karcie będą dotykane metalowymi przedmiotami lub palcami.
Używanie Wodoodpornej Obudowy
Przed zamknięciem gumowej obudowy upewnij się, że jest ona czysta. Pojedynczy włos albo
ziarnko piasku mogą spowodować przeciek wody. Przetestuj obudowę bez umieszczania
kamery w środku. W tym celu zanurz pustą obudowę w wodzie i trzymaj ją tam przez minutę.
Następnie wyciągnij obudowę, wysusz ją ręcznikiem i otwórz. Jeżeli obudowa jest sucha od
środka, oznacza to, że jest gotowa do użytku.
Pamiętaj o przełączeniu trybu kręcenia kamery przed umieszczeniem jej w wodzie.
Zmiana trybu kręcenia nie może odbyć się zdalnie.
W razie kontaktu obudowy z słoną wodą, pamiętaj, aby umyć ją w czystej wodzie. Sól
morska może doprowadzić do korozji wrażliwych części obudowy.

18
Opis Produktu
Urządzenie jest wyjątkowo małe i wygodne w montażu
Kamera wyposażona jest w system high definition, który zapewnia wysoką jakość
obrazu, nawet przy słabym oświetleniu. Urządzenie rejestruje filmy w formacie
H.264 HD.
Dostępne tryby wideo to VGA (120FPS), HD (60FPS), HD (30FPS) i FHD (1920x1080
30FPS).
Dostępne tryby wytonowania fotografii to 12M, 10M. 8M i 5M.
Urządzenie obsługuje standard USB2.0
Urządzenie obsługuje karty mini SD o pojemności do 32G.
Urządzenie obsługuję nagrywanie i podgląd na żywo. Kamera może zostać
podłączona do telewizora obsługującego standard HDMI.
Wymagania Systemowe
Wymagania Systemowe
System operacyjny
Microsoft Windows2000, XP, Vista, 7
Procesor
Intel Pentium III z taktowanie większym niż 800MHz lub
inny procesor z podobną wydajnością
Pamięć wewnętrzna
Więcej niż 512Mb
Karta dźwiękowa i graficzna
Karty powinny obsługiwać DirecX w wersji 8.0 lub wyższej
Napęd CD
Napęd z szybkością 4x lub szybszą
Twardy dysk
Wolna przestrzeń dyskowa: 500Mb lub więcej
Inne
Jeden port USB 1.1 lub 2.0

19
Wygląd i Przyciski Urządzenia

20
Obsługa
Ładowanie wbudowanej baterii litowej
Podłącz kamerę do komputera za pomocą kabla USB, aby ładować urządzenie podczas gdy
jest ono wyłączone. Dioda ładowania powinna świecić ciągłym światłem. Gdy dioda zgaśnie,
ładowanie zostanie zakończone. Ładowanie baterii trwa od 2 do 4 godzin.
Używanie karty pamięci
Wciśnij kartę pamięci do gniazda karty zgodnie z wklęsłym napisem obok gniazda
karty pamięci, dopóki nie zostanie całkowicie włożona.
Aby wyciągnąć kartę pamięci, delikatnie na nią naciśnij. Gdy karta odskoczy, można ją
wyjąć.
Uwaga: Urządzenie nie
posiada wbudowanej
pamięci wewnętrznej. Upewnij się,
ze umieściłeś kartę pamięci
przed skorzystaniem z urządzenia.
Kabel USB
Dioda ładowania
o
on
n
This manual suits for next models
1
Table of contents
Languages:
Other Goclever Action Camera manuals