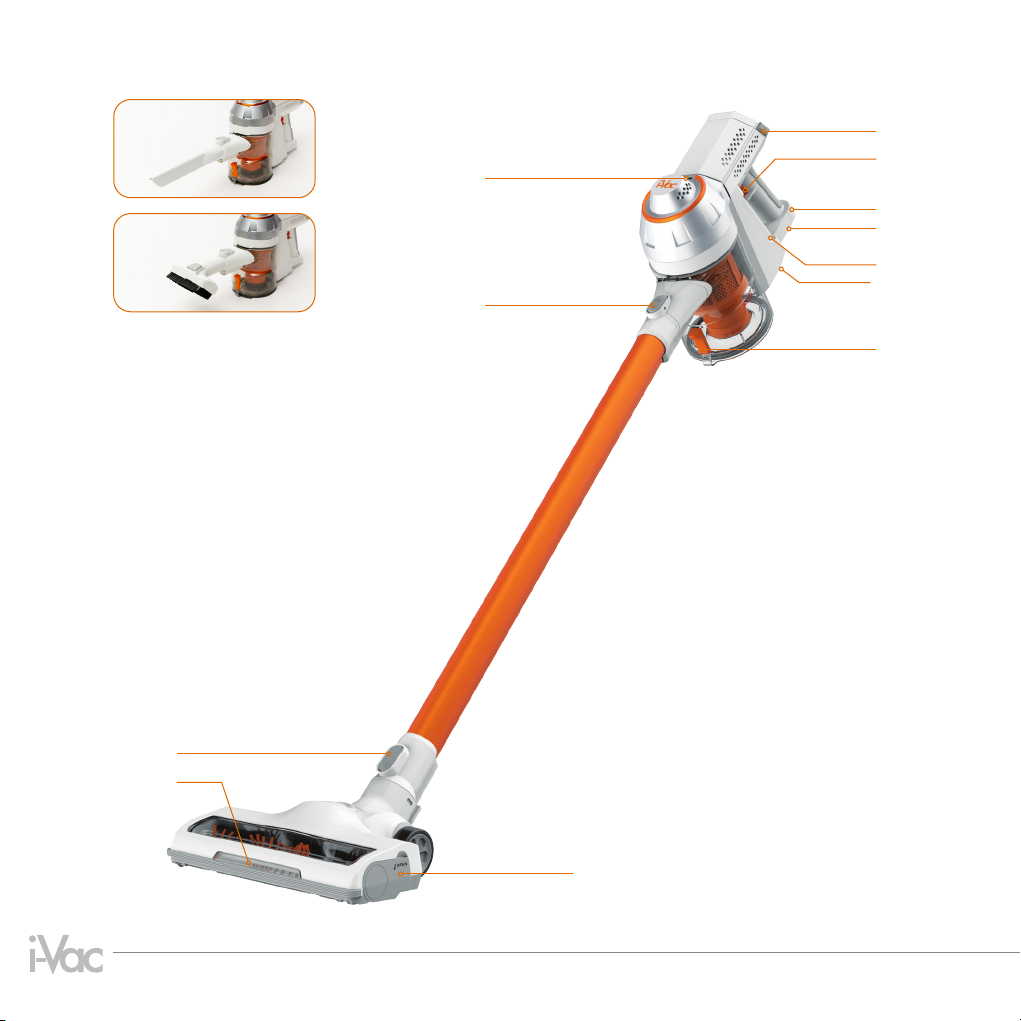
Godfreys i-Vac S10 ULTRA LIGHT PLUS User manual

ULTRA LIGHT PLUS
CORDLESS STICK VACUUM
Ultra Lightweight
Swivel Powerhead
Lithium Performance

2.
15
14
3
6
9
12
1
2
10
11
8
7
5
4
2-in-1 Cleaning Tool
Crevice Tool

3
Specications:
Voltage: 21.6V DC
Power: 130W
Dust capacity: 400mL
Battery type: 2000mAh Li-ion
Features:
1. Charging Indicator
2. Rod Release Button
3. Exhaust Filter Release Button
4. On/Off Button
Continuous Mode Switch (not shown)
5. Charging Port
6. Battery Release Button (not shown)
7. Battery
8. Dust Bin Release Button (not shown)
9. Dust Bin Lid Release Button
10. Power Head Release Button
11. Powerhead Lights
12. Roller Brush Release
Please contact Godfreys Customer Care 1800 815 270, NZ 0800 282 288 to nd
your local spare parts provider.
S10 Ultra Light Plus
Congratulations on the purchase of your new i-Vac Stick Vacuum. There are many useful features
built into your cleaner and we recommend that you carefully read this instruction manual to take
the best advantage of these features.
Features
Accessories:
13. Charger (not shown)
14. Crevice Tool
15. 2-in-1 Cleaning Tool
16. Wall Storage Bracket (not shown)
Note: Wall mounting screws are not included.

4
Before You Begin
This cleaner must be operated in accordance with these instructions and used only for domestic
household cleaning to remove DRY dirt and dust from household carpets, ooring, walls and fabrics.
This cleaner is not t to be used as an industrial cleaner and will void the manufacturer’s warrant y if used
inappropriately.
Please read these instructions thoroughly
This will ensure you obtain full benet from your new cleaner. Keep this Instruction Manual in a handy
place for future reference.
Important
Always switch off the appliance before cleaning, when not in use, attempting any maintenance task,
tting or removing accessories. The charger must only be connec ted to an AC power supply at the
voltage shown on the rating label. This cleaner should only be charged with the charger provided. This
cleaner should only be used for its intended purpose as described in these instructions.
Precautionary measures:
1. Do not operate the vacuum cleaner too close to heaters, radiators or other
hot surfaces.
2. Before inserting the plug into the wall, make sure your hands are dry.
3. Before turning on the vacuum cleaner, safely remove any large objects from the
oor or cleaning sur face in order to prevent damage to the lter.
4. When you want to remove the plug from the power socket, do not use the power cable,
gently pull the plug from the power socket.
5. Do not use this vacuum cleaner to pick-up water or liquids.

5
When using your vacuum cleaner, basic
precautions should always be observed,
including the following;
1. This appliance is not intended for use by
persons (including children) with reduced
physical, sensory or mental capabilities
or lack of experience and knowledge,
unless they have been given supervision or
instruction concerning use of the appliance
by a person responsible for their safety.
2. Children should be supervised to ensure
that they do not play with the appliance.
3. To prevent electrical shock, do not immerse
the appliance, battery, or power plug into
water or other liquids.
4. To prevent electrical shock, do not use
the vacuum cleaner outdoors or on wet
surfaces.
5. Always check the power cord before use, the
power cord and the plug should be in a good
condition and must not be damaged. If the
power supply cord is damaged or defective,
it must be replaced by the manufacturer, its
service agent or similarly qualied persons
in order to avoid a hazard.
6. The appliance and charging base are
intended for domestic indoors use only.
7. Do not unplug by pulling on the power cord.
To unplug, grasp the plug, not the power
cord. Use only Australian and New Zealand
electrical safety approved extension cords.
8. Do not pull or carry the appliance by the
power cable, use the power cable as a
handle or pull the power cable around
sharp edges or corners. Avoid running the
appliance over
the power cable.
9. Do not handle or operate the appliance
with wet hands and follow electrical safety
precautions at all times.
10. Extreme caution should be exercised when
using the appliance on stairs.
11. Do not attempt to change the attachments
while the appliance is switched on. Use only
manufacturer’s recommended accessories.
12. Do not operate the vacuum cleaner too
close to heaters, radiators and other hot
surfaces.
13. Do not use the appliance to pick up
ammable items or combustible liquids (i.e.
gasoline, hot ashes, cigarettes, matches,
explosive materials or anything burning)
or use in areas where such substances and
items may be present.
Safety Precautions & Warnings
IMPORTANT! Always switch off the appliance before cleaning, when not in use or
attempting any maintenance task. The charger must only be connected to an AC
power supply at the voltage shown on the rating label. This cleaner should only
be used for its intended purpose as described in this instruction manual.
Never operate the vacuum cleaner without lters.
Read the manual attentively before using the appliance for the rst time.
Before You Begin

6
14. Do not use the appliance to pick up toxic
materials (i.e. chlorine bleach, ammonia).
15. Never operate or use the appliance without
the lters in place.
16. Before vacuuming, remove any large or sharp
objec ts from the oor or cleaning surface in
order to prevent damage to the lter.
17. If the air inlet or oor head is blocked, switch
off the cleaner straight away. First, clear the
blocked object before attempting to start the
vacuum cleaner again.
18. Before carrying out any maintenance service
or cleaning the lters, always switch off the
vacuum cleaner.
19. Keep openings away from your face and body.
20. Do not use the vacuum cleaner if it is damaged
or broken. If connection cables are damaged,
have them replaced immediately.
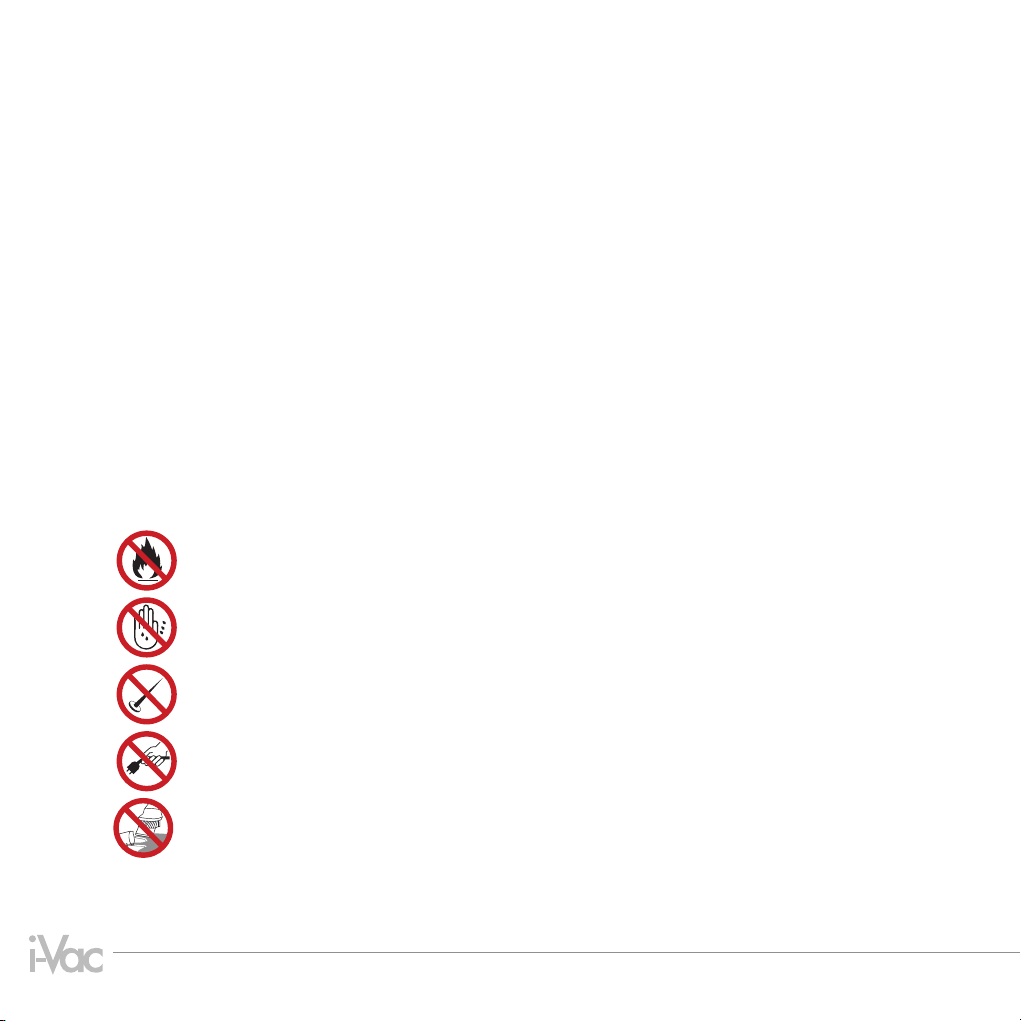
21. Never clean the vacuum cleaner or any of
the electrical parts, especially the electrical
connections with water or liquid cleaners.
22. Never attempt to make any modications
electrically to the vacuum cleaner and
charging base.
23. Always store the appliance and charger
indoors in a cool and dry place.
24. Do not pick up water, for dry household use
only.
25. Use the electric power head only for
vacuuming dust and dry substances in the
home.
26. Never run over the power cable with the
power head as this may cause damage to the
power cable.
27. Never touch the roller brush while the vacuum
cleaner is switched on.
28. To prevent unnecessary wear on the power
head, keep it moving while in operation.
29. Damage caused by improper use or by not
observing the instructions in this manual
will void the warranty.
Battery use and care
1. The appliance is only to be used with the
charger uniquely provided with the appliance.
2. Only charge the battery inside the product
and only use the specically designated
charger to charge the product.
3. When appliance is not in use, keep it away
from other metal objects, like paper clips,
coins, keys, nails, screws or other small metal
objects that can make a connection from one
terminal to another. Shorting the appliance
terminals together may cause burns or a re.
4. Under abusive conditions, liquid may be
ejected from the battery; avoid contact. If
contac t accidentally occurs, ush with water. If
liquid contacts eyes, additionally seek medical
help. Liquid ejected from the battery may
cause irritation or burns.
5. Do not charge or store the appliance outdoors
or inside the car. Only charge or store the
battery in a dry indoor area where the
temperature is more than 5oC but less than
45oC. The charger is for indoor used only.
6. Never attempt to open the battery for any
reason. If the plastic housing of the battery
casing breaks or cracks, immediately
discontinue use and do not recharge.
7. The charger is not a serviceable part.
8. Before disposal of your battery, fully discharge
your battery by running the product until it
stops.
9. The cleaner contains a Li-Ion battery. Do not
dispose the appliance with your local garbage.
Contact your local council for instructions on
how to safely dispose of the battery.
10. Do not use the charger to charge a
non-chargeable battery.

7
IMPORTANT! Always remove the battery from the appliance before tting or
removing accessories.
Assembly
1. Align the sliding slot of the battery with the guide rail
on the machine body.
2. Insert the battery into the machine (as shown) until a
“click” sound is heard.
Insert the Swivel Powerhead into the rod. You will hear a
“click” sound when it is securely in place.
Warnings & Assembly
Installing the Battery
Connecting the Swivel Powerhead

8
Assembly (continued)
During installation of the rod, insert the plug end into the
air inlet of the cleaner. Once securely in place, you will
hear a “click” sound.
Connecting the rod to the unit
When inserting accessories into the cleaner you will hear a “click”
sound when it is securely in place.
To dissemble, press the rod release button on the cleaner and
then pull the accessory out from the air inlet.
Connecting accessories to the unit

9
Instructions for Use
Continuous Mode
1. To enable Continuous Mode, turn the switch towards
the handle until it ‘clicks’ into place.
2. To disable Continuous Mode, push the switch away
from the handle until it ‘clicks’ into place.
Assembly & Instruction for Use
Attention:
After each use, please ensure that the Continuous Mode switch is disabled.
Failure to do so may cause battery failure.
It is recommended to charge your product after each use to maintain maximum
performance.

10
Accessories
2-in-1 Cleaning Tool
The 2-in-1 Cleaning Tool can be used as a soft dusting
brush for cleaning a variety of surfaces or as an
upholstery tool for cleaning furniture.
Crevice Tool
The Crevice Tool can be used to clean in between hard to
reach places or in tight spaces.
Ideal for daily cleaning on
carpets and hard oors.
Carpet Hard Floors
Swivel Powerhead
NOTE: If the Swivel Powerhead is blocked, the motor switches off automatically.
If this occurs, switch off the vacuum cleaner and remove the battery. Remove any
object that has blocked the Swivel Powerhead, and switch on again. If the Swivel
Powerhead does not start again after cleaning, do not try to dismantle the Swivel
Powerhead. Please contact your local Godfreys store.
2-in-1 Cleaning Tool
Crevice Tool

11
Accessories & Maintenance
Maintenance
Charging the vacuum cleaner
Insert the charger into the charging port on the vacuum cleaner.
When the charging indicator light is ashing red, the vacuum
cleaner is being charged.
When the charging indicator light turns from red to green, the
vacuum cleaner battery is fully charged.
When the charging indicator light is ashing in between red and
green intermittently, the battery has not been inserted correct.
Please make sure the battery is clicked into place.
Storage
1. Remove the extension rod and place the cleaner onto the
wall storage bracket.
2. Place the rod and accessories into the corresponding
hooks.
NOTE: Product needs to be charged for 5-6 hours although during the rst three
applications of use, twelve hours of continuous charging is required.
NOTE: When the charging indicator light is ashing red during use, it means the
battery is running low and requires charging.
CAUTION! Do not try to open the battery and repair it yourself.
NOTE: As a safety precaution, the vacuum cannot be switched on while the
vacuum is charging.
Note: If you are not going to use the machine for a long period of time, please
remove the battery from the machine to maintain the battery life.

12
Maintenance (continued)
IMPORTANT! Turn off the cleaner and remove the battery before conducting any
maintenance tasks. It is recommended to clean the dust canister after each use
or when dust reaches the max ll line.
Emptying the Dust Canister
Press the Dust Bin Lid Release button to open the
bottom cover of the vacuum to empty the dust canister.
Cleaning the Dust Canister and Filters
1. Press the Dust Bin Release button, while also pulling the
canister away in a downward and outward direction.
2. To remove the mesh lter, turn the lter clockwise to unlock and
release the lter.
Dust Bin Release Button

13
Maintenance
Cleaning the Roller Brush
1. Slide the Roller Brush Release button in the direction
of the arrow shown on the button.
2. At the same time, gently pull out the roller brush as
shown, and clean as required.
3. To remove the cyclone separator, turn the cyclone separator
anticlockwise to unlock and release the separator.
4. To remove the exhaust lter, press the Exhaust Filter Release
button and remove it from the cleaner. Then, pull the lter
out from the lter holder.
5. The lters can be washed by washing under lukewarm water.
Dried for at least 24 hours before it can be reinstalled.
Note: The exhaust lter is recommenced into be replaced every 6 months.

14
Spare Parts
Please contact Godfreys Customer Care: 1800 815 270, NZ: 0800 282 288 to nd your local
spare parts provider.
Part Part Number
Exhaust Filter 32201730
Battery 33201770
Dust Bin 33156293
Agitator 33788071
Powerhead 31155563
Charger Adaptor 33201771

15
Troubleshooting
Spare Parts & Troubleshooting
Fault Cause Solution
Cleaner doesn’t start Flat battery Charge the vacuum cleaner
Reduced suction The dust canister is full of dust Empty the dust canister
Filter is blocked Clean or replace the lter
The air way is blocked Clear the air way
The charging indicator light
fails to turn red during charging
(“red” indicates the status of
charging)
The cleaner is not fully inserted
to the charger
Remove the cleaner from the
charger and reinsert the cleaner
to the charger again
The charger is not connected to
mains power
Connect the charger to the mains
power
Insufcient application time after
charging
Insufcient charging time Fully charge the battery
according to the instruction
described in the charging section
Normal discharge reduction
in battery
Purchase a new battery
Light ashes from red to green
intermittently.
Battery is not inserted/clicked
into the machine properly.
Check to make sure the battery
has clicked into the machine.
Take the battery out and reinsert
into the machine until you hear it
click in.
Problems and solutions
If you come across a problem, please use the checklist of troubleshooting tips before
contacting Godfreys Customer Care.

Your cleaner, in the case of domestic use, has a two year parts
and labour warranty against product defects and failures when the
product is used in accordance with the terms and conditions of
this warranty statement. Two year warranty on parts and labour
excluding the battery which has a one year warranty.
This warranty commences from the original date of purchase and
is not transferable; please retain your original proof of purchase
for any warranty claims. This warranty is valid only in the country
where the cleaner is purchased.
The cleaner must be operated in accordance with these instructions
and used only for domestic household cleaning to remove DRY
dirt and dust from household carpets, ooring and fabrics. This
cleaner is not t to be used as an industrial cleaner, and is not
designed for the collection of vitreous building material including
particle board, construction products and similar products such
as wood/bres, cement, llers, bre glass etc or excessive or
frequent sand. The infrequent pick-up of these materials in these
circumstances may be harmful to your cleaner and may void the
manufacturer’s warranty.
Accessories and consumables including dust bags and lters,
unless defective in manufacture, are not subject to this warranty. In
order to prolong the life of accessories and consumables, regular
care and maintenance is recommended.
When properly used and cared for, your cleaner will render
excellent service; refer to the instruction manual for further details,
as misuse or failure to follow the instructions makes this warranty
void.
In the event of service or advice being needed, please contact
Electrical Home-Aids Pty Ltd, Level 1, Building 3, Brandon
Business Park, 530 Springvale Road, Glen Waverley Victoria 3150,
or on 1800 815 270 (AUS) or 0800 282 288 (NZ), Monday-Friday
9am-5pm EST. The decision to repair or replace the cleaner is at
the sole discretion of Electrical Home-Aids Pty Ltd. If Electrical
Home-Aids Pty Ltd decide to repair or replace the cleaner, it will
do so at its own cost.
Electrical Home-Aids Pty Ltd is unable to accept responsibility
under this warranty for any repair work not carried out by an
authorised Service Agent or from the use of non-genuine parts.
If any part is no longer available or manufactured, Electrical
Home-Aids Pty Ltd will replace it with a genuine functional
replacement part. This warranty does not apply to the cost of
replacing any parts of the product due to normal wear and tear,
alterations, improper installation, physical abuse, misuse or
accidental damage. Any transportation costs involved in the repair
of defective parts shall be borne by the claimant.
If proof of purchase cannot be provided at the time of a warranty
claim or service, any work carried out on the cleaner is chargeable.
The repair of the cleaner under this warranty does not extend the
original period of warranty.
The benets conferred by this warranty are in addition to all other
rights and remedies in respect of the product as outlined under
the Competition and Consumer Act and other State and Territory
laws.
“Our goods come with guarantees that cannot be excluded in
the Australian Consumer Law. You are entitled to a replacement
or refund for a major failure and for compensation for any other
reasonably foreseeable loss or damage. You are also entitled to
have the goods repaired or replaced if the goods fail to be of
acceptable quality and the failure does not amount to a major
failure.”
*Two year warranty on parts and labour excluding the battery which has a one year warranty.
Conditions of warranty
Call Godfreys Customer Care
with any product queries
Australia 1800 815 270
New Zealand 0800 282 288
To nd out more about our range,
visit: www.godfreys.com.au
www.godfreys.co.nz
email: [email protected]
V1 05/20
ULTRA LIGHT PLUS
CORDLESS STICK VACUUM
Table of contents
Other Godfreys Vacuum Cleaner manuals
Popular Vacuum Cleaner manuals by other brands

Royal
Royal cnister ry3000 owner's manual

Bosch
Bosch 3931A - 13 Gallon Wet/Dry Vacuum Cleaner Operating/safety instructions

EINHELL
EINHELL TE-VC 18/10 Li - Solo Original operating instructions

Narex
Narex VYS 21-01 Original operating manual

Xiaomi
Xiaomi roborock user manual

iHome
iHome AUTOVAC LUNA owner's guide