golden interstar Hypro User manual

Golden Interstar Hypro
4K Android Set Top Box
User Manual
1GB
DDR3
8 GB
EMMC-Flash

1
CONTENTS
CONTENTS ........................................................................................................................................ 1
1 SAFE CAUTION ........................................................................................................................ 3
2 UNPACKING AND SETUP HARDWARE ............................................................................... 5
2.1FRONT PANEL ............................................................................................................................. 5
2.2 REAR PANEL ............................................................................................................................... 5
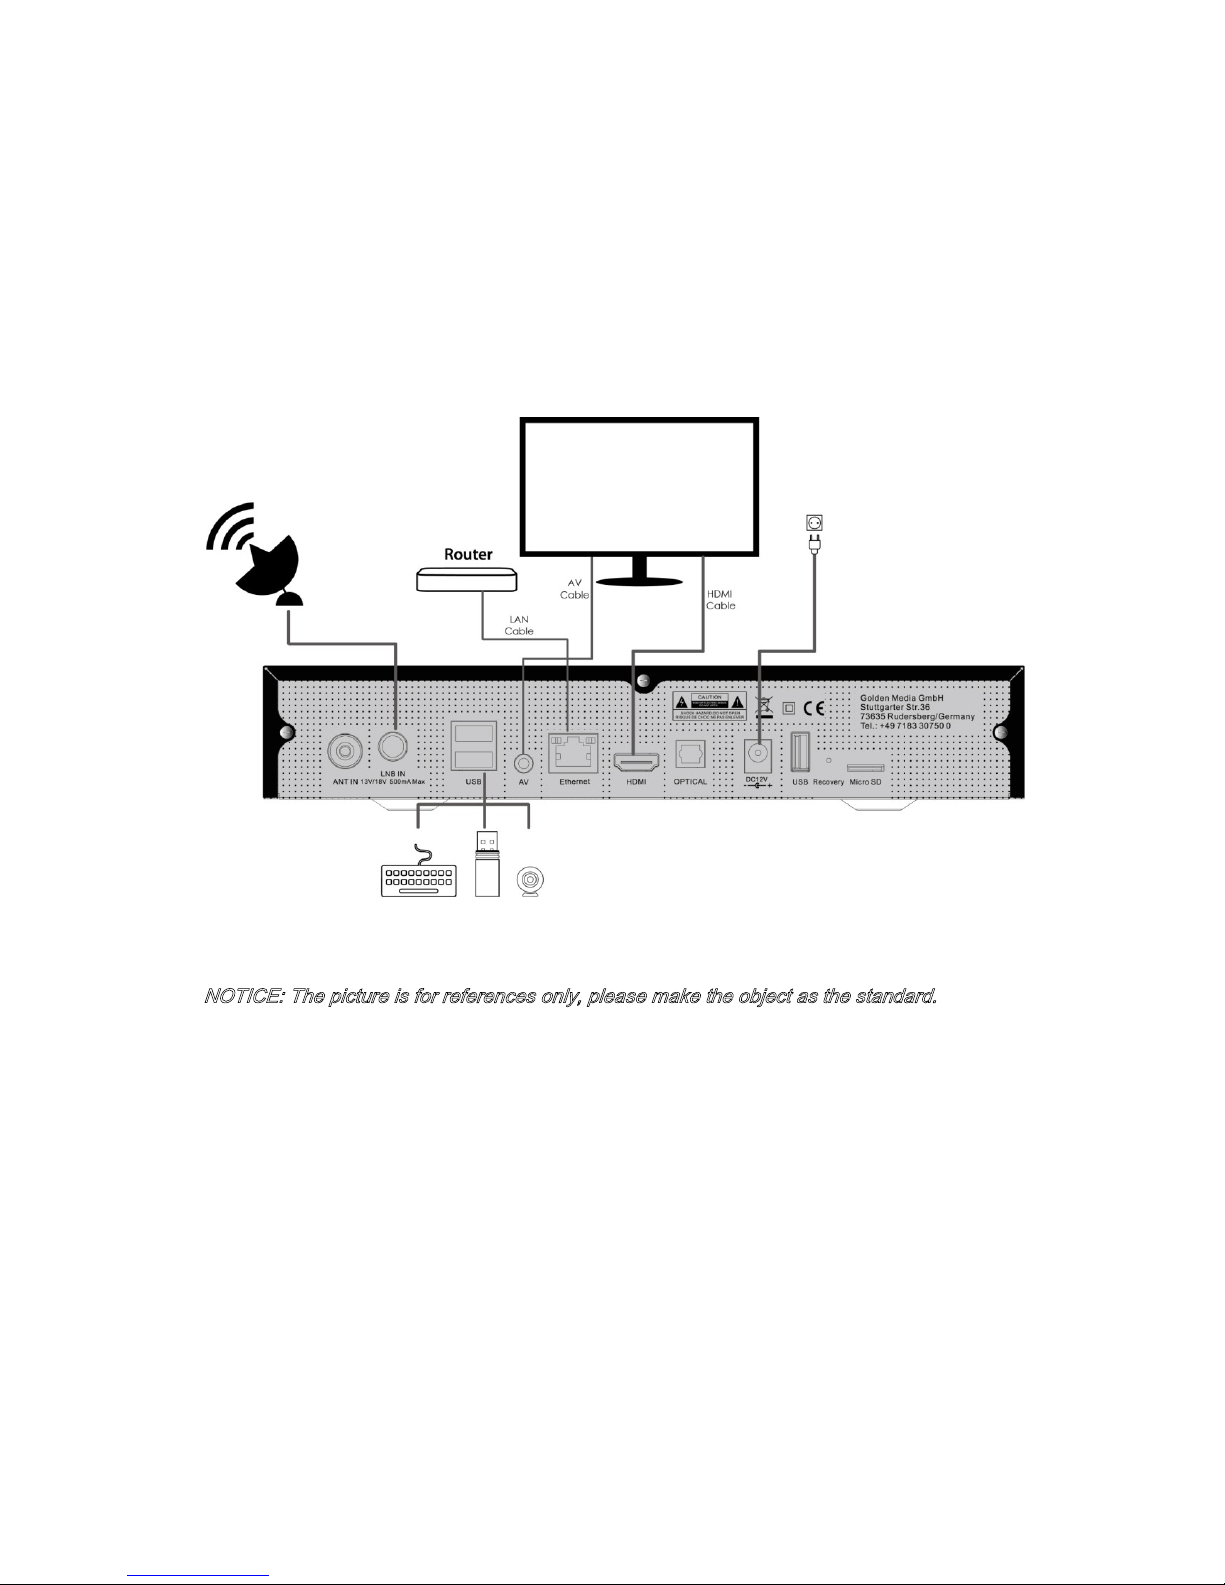
2.3 HARDWARE INSTALLATION ......................................................................................................... 6
3 REMOTE CONTROL ................................................................................................................ 7
4 SOFTWARE INSTALLATION ................................................................................................... 8
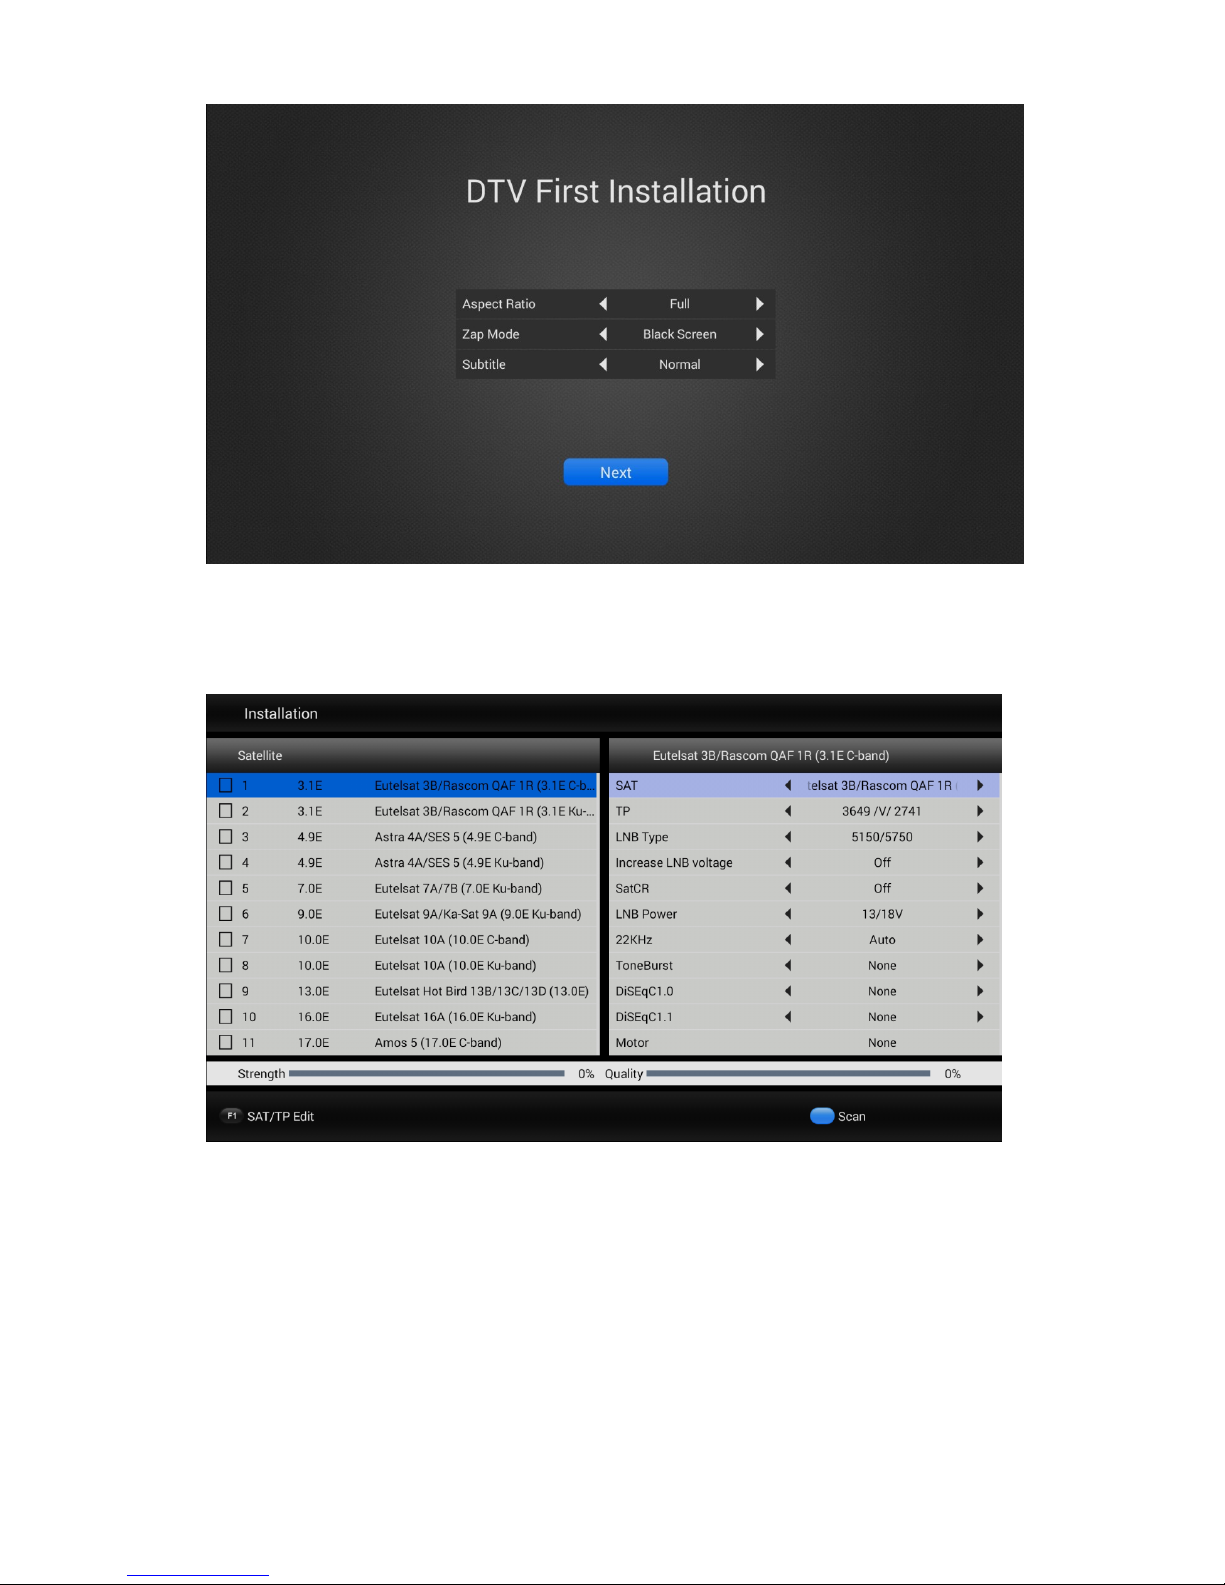
4.1 FIRST INSTALLATION GUIDE ....................................................................................................... 8
4.2 SEARCH DIGITAL SATELLITE TV................................................................................................. 8
5 WATCHING LIVE TV ............................................................................................................ 10
5.1 DTV MENU .............................................................................................................................. 11
5.2 PVR (PERSONAL VIDEO RECORD) .......................................................................................... 11
5.3 TIME-SHIFT .............................................................................................................................. 12
5.4 EPG (ELECTRONIC PROGRAM GUIDE) .................................................................................... 13
5.5 TIMER ....................................................................................................................................... 14
5.6 CHANNEL MANAGER ................................................................................................................ 15
5.7 DTV SETTINGS MENU .............................................................................................................. 16
5.8 INSTALLATION........................................................................................................................... 17

2
6 ENTERTAINMENT ON ANDROID MEDIA BOX .................................................................. 18
6.1 INSTALL APP FROM GOOGLE PLAY STORE ............................................................................. 18
6.2 INSTALL APP FROM EXTERNAL USB/SD CARD STORAGE ....................................................... 19
6.3 INSTALL APP FROM TV APP STORE ....................................................................................... 20
6.4 CUSTOMIZE YOUR LAUNCHER .................................................................................................. 20
6.5 MIRACAST/AIRPLAY/DLNA ...................................................................................................... 21
6.6 NESTV BRINGS NEW ENTERTAINMENT EXPERIENCE ............................................................... 22
7 SYSTEM SETTINGS AND UPGRADE ................................................................................. 33
7.1 SYSTEM SETTINGS ................................................................................................................... 33
7.2 SYSTEM UPGRADE ................................................................................................................... 34
8 TROUBLESHOOTING ............................................................................................................ 36
8.1 NO SIGNAL ON THE HDTV........................................................................................................ 36
8.2 CANNOT TURN ON YOUR MEDIA BOX. ....................................................................................... 36
8.3 CANNOT CONNECT TO NETWORK ............................................................................................. 36
8.4 SOME HDTV CAN NOT DISPLAY THE ENTIRE PICTURE .............................................................. 37
8.5 THE REMOTE CONTROL DOES NOT WORK ................................................................................. 37
8.6 NO PICTURE OR SOUND ............................................................................................................ 37

3
1 Safe Caution
NOTICE: To prevent fire and electric shock, do not expose this receiver to
rain or moisture. In order to avoid any possible risk of electric shock, never
attempt to open the unit. In case of the unit breaking down, repair of the unit
should be carried out by qualified technicians. No part of this unit should be repaired by users.
WARNING!
Presence of live parts inside the unit! Do not open. Risk of electric shock! No part should
be repaired by users.
The maintenance of the receiver should be carried out exclusively by qualified persons.
If the power cord is damaged, it must be replaced or repaired by the manufacturer, its
after-sales service, qualified electrician or persons of similar qualification in order to avoid
possible danger.
The product must be installed in accordance with national regulations.
The used batteries must be disposed of safely. Throw them in appropriate rubbish bins in
order to protect the environment.
Proper Installation
Place the receiver on a flat, firm and stable surface. Do not put it on a carpet or rug.
Do not place the receiver on top of another device, such as an amplifier. This may lead to
overheating.
Do not put anything above the unit (for example, CDs or magazines).
Sufficient Ventilation
Place the receiver in a well-ventilated location to prevent accumulation of internal heat.

4
Allow a gap of at least 10cm to the rear and the top of the unit, as well as a space of 5cm
to both sides to avoid overheating.
Do not obstruct any ventilation openings with items such as newspapers, tablecloths,
curtains, etc.
Protecting the Receiver from High Temperatures, Humidity, Water and Dust
The receiver should not be exposed to dripping water or splashing.
No objects filled with liquids, such as vases, shall be placed on the unit.
Do not place any objects that might damage your unit near it (e.g. liquid filled objects or
candles).
Do not place any source of flames such as lit candles on the receiver.
Electricity Supply
Please unplug the receiver in case of prolonged non-use.
If the power cord is damaged, it must be replaced or repaired by the manufacturer, its
after-sales service, qualified electrician or similar qualifications to those to avoid possible
danger.
The plug must remain readily accessible after the installation of the product.

5
2 Unpacking and setup hardware
The pictures shows what our product looks like and how to setup the hardware.
2.1 Front panel
2.2 Rear panel
NOTICE: The pictures are for references only; please make the object as the standard.

6
2.3 Hardware installation
As shown, connect the interfaces on the television with the corresponding interfaces on
the product (such as connect the product with TV sets through the HDMI cable), then after
the power is connected, turn on the switch and you can use the product.
NOTICE: The picture is for references only, please make the object as the standard.

7
3 Remote control
NOTICE: The picture is for references only, please make the object as the standard.

8
4 Software Installation
Notes: The default password is 0000 for this media box.
All the Instructions and pictures here are for reference only, please make the product you
have as the standard and refer to the actual items.
4.1 First Installation Guide
First installation guide helps you to choose prefer menu language, HDMI output resolution,
screen size and configure internet connection through Ethernet or Wi-Fi.
4.2 Search Digital Satellite TV
DTV First Installation helps you to search digital Satellite TV/Radio channel automatic.
Setup Aspect ratio output, subtitle and then choose next button to scan satellite
TV/Radio channel. Please contact customer service center for help if you have any
question when search TV/Radio channel list manually.

9
Choose Satellite and configure LNB parameters and then press Blue button to search
channel automatic.

10
5 Watching Live TV
Enjoy TV after search TV channel. Uses the VOL+/VOL-button to control the volume
output. Uses the CH+/CH- to change the channel.
Press OK button to show channel list and choose channel. You could Sort channel by
alphabet, FTA(Free To Air)/CAS(Scrambled), HD/SD etc... You could also find channel
quickly or filter channel by group in channel list.

11
5.1 DTV Menu
Press MENU button to display DTV menu for more option. You could choose subtitle,
audio track, turn on TELETEXT, add channel to Favorites group etc...
5.2 PVR (Personal Video Record)
The media box support instant PVR, timer PVR and EPG booking PVR. Please configure
the storage device in DTV settings before start PVR. You could record your prefer live TV
program to external USB storage and playback anytime anywhere. Press REC button
again to open menu for change default recording duration. You could also change the
default recording duration in DTV settings menu. See chapter 6.4.

12
The user could manage recorded files; you can delete the files you’ve recorded by
pressing the RED key.
5.3 Time-Shift
The media box support auto Time-Shift and manual Time-Shift when plug in
external USB storage. Benefit by Time-shift feature, you could pause live TV if
you want to leave TV set temporary. You could catch up the live TV when you

13
back to watching TV. Auto Time-Shift feature is turn off by default, you could
turn on auto Time-Shift feature in DTV Settings menu when you plug external
USB storage into the media box.
5.4 EPG (Electronic Program Guide)
Benefit by EGP(Electronic Program Guide) feature, you could find out when
your prefer program is available in live TV. You could add schedule recording
event by EPG. The media box supports present/following EPG and 21 days EPG. Press
information button to show present/following EPG when watching TV. Press information
twice to show the detail information about present program.

14
Press the EPG button to show the 21 days EPG menu. Press Left/Right, Up/Down key to
look for EPG in the next 21 days, press blue button to reserve play program or record
program. Press OK key to get detail information of the program. You could also change
multilingual EPG by press Yellow button if multilingual EPG are available from operator.
5.5 Timer
Media box could helps you to record your prefer program automatic anytime with timer

15
feature. You can choose what time to start recording and the duration time. Before this, of
course, you must ensure your USB/SD card/ hard drive is connected to the Box and its
storage capacity would be sufficient to store the recorded TV programs.
5.6 Channel Manager
Channel manager support delete channel, move channel, hide channel, lock/unlock
channel and rename channel. You could add your prefer TV/Radio channel to variety
favorites group. The default password of channel manager is 0000. All channel manage
operation are available in on one page.

16
5.7 DTV Settings Menu
DTV Settings Menu is design for professional configures global parameters of DTV
application. You could setup some global settings were illustration as below.
1) AV output Settings
2) Default Languages --- Helps you to setup default Subtitle language, TELETEXT
language and Audio track.
3) OSD Settings --- Helps you to setup DTV OSD settings.
4) Parental Control --- Parental control feature helps to block the TV program that you don’
t allow your children to watching it alone.
5) DB Management --- Helps you to backup TV/Radio channel list to external USB
Storage or restore TV/Radio channel list from external USB storage.
6) PVR Settings --- Helps you to setup which external USB storage for PVR and
Time-Shift. You could also turn on/off auto Time-Shift feature in this menu.
7) System Settings --- Helps you to check the version number of the DTV application,
reset DTV application to factory settings.

17
5.8 Installation
Installation feature in DTV menu helps professional search satellite TV/Radio channel
manually. You could configure LNB parameters(LNB Type/DisEqC1.0/1.1/Motor) and
manage Satellites/TP list in installation menu.

18
6 Entertainment on Android Media Box
Thanks to the power full Android platform, the media box convert your TV set to smart
screen. You could enjoy more entertainment on your TV set such as watching YouTube
video on your TV set, video chat with your friends on TV set, browse news, social network
APP by connect Air mouse and play games on your TV set by connect Android compatible
game-pad to the media box. Please contact customer service or access to our website to
get more information about compatible accessories.
6.1 Install APP from Google Play Store
Press Home button to show home page and go to All APPs menu to launch Google Play
Store.
Login to the Google Play Store with your account and then you could install your prefer
APP for entertainment on your TV set.

19
6.2 Install APP from external USB/SD Card storage
Download APP install file(*.apk) on the computer and copy to USB/SD card storage. Plug
USB/SD Card storage in to the media box and press Home button to show launcher. You
could choose install APP from USB/SD card storage with AppInstaller or FileBrowser in All
APP list.
Launch FileBrowser to choose USB/SD card storage and browse APK file, press OK
button to install it.
Table of contents