Golfomania Fairway Buddy User manual

Fairway Buddy
Bedienungsanleitung
Manuel d’utilisation
Manuale d’uso
User manual


Fairway Buddy:
Elektro-Golftrolley mit Lithium-Batterie
Inhalt und Bestandteile
■Transporttasche mit separatem Räderfach
■2 Antriebsräder
■Längsachse mit Vorderrad
■Antriebsachse mit Doppelrohrmotor
■ Faltbarer Caddyrahmen mit Steuergri und Bedienungseinheit
■Scorecardhalter mit Schrauben und Inbusschlüssel
■Schirmhalter
■Getränkehalter
■ Lithium-Ionen-Akku 10 Ah (Batterie)
■Ladegerät
■Ersatzdichtungen
■ Schlüssel zum einfachen Lösen der Steckverbindungen (T-Tool)
■ Achsenschutz (mit Gummiband verbunden)
■ Bedienungsanleitung mit Ersatz-O-Ringen
3

Zusammenfügen des Trolleys:
■Zusammenfügen von Längsachse und Antriebsachse
(Abb. 1).
■Einsetzen der Antriebsräder: dabei Stift an Radnabe
eindrücken und Rad einrasten (Abb. 2).
Achtung: Erste Einraststufe = Freilaufmodus
(leichtgängiger manueller Betrieb).
Zweite Einraststufe = Motorbetrieb.
Stellen Sie sicher, dass die Räder korrekt (hörbar)
eingerastet sind. Das Prol der Pneus soll in die
Laufrichtung zeigen (wie Vorderrad) (Abb. 2).
■Caddyrahmen einsetzen und auf persönliche
Höhe einstellen (Abb. 3).
■ Baghalterung unten: hochziehen und in Fahrt-
richtung drehen.
■ Baghalterung oben: in der gewünschten Position
einrasten und xieren.
■ Batterie auf Vorrichtung befestigen (2 Bänder mit
Klettverschluss) und Kabel einstecken (Abb. 4).
■Scorecardhalter: an Caddyrahmen festschrauben.
Schrauben mit Inbusschlüssel festziehen (Abb. 5).
■ Schirmhalter (bei Bedarf): die Halterung über die
Vorrichtung am Steuergri schieben und durch Drehen
im Uhrzeigersinn befestigen. Das Gummiband dient
zur Sicherung des Schirms bei Wind (Abb. 6).
■Getränkehalter: an Caddyrahmen festschrauben.
Schrauben mit Inbusschlüssel festziehen (Abb. 7+ 8).
■Golfbag aufsetzen und an beiden Halterungen
mittels Gummiband befestigen.
Erste Inbetriebnahme
4
1
2
3
4
5678

Laden und Warten der Batterie
Wichtig:
Laden Sie die Batterie beim ersten Mal ununterbrochen während mindestens 6 Stunden.
■Rotes Lämpchen = Akku wird geladen
■Grünes Lämpchen = Akku geladen
■ Laden Sie die Batterie nach jeder Golfrunde so rasch als möglich wieder komplett auf,
auch wenn noch genügend Restladung für einen weiteren Einsatz vorhanden wäre.
Gehen Sie nur mit voll aufgeladener Batterie auf die Golfrunde.
■ Lagern Sie die Batterie liegend an einem warmen Ort. Nach der Auadung Batterie
vom Netz nehmen. Wichtig: Lagern Sie die Batterie immer in aufgeladenem Zustand.
■ Nach längerer Nichtbenutzung, z. B. nach der Winterpause, schliessen Sie die Batterie
nochmals ans Netz an und wiederholen die Auadung. Ist die Pause länger als
3 Monate, führen Sie unbedingt eine Zwischenladung durch.
■ Bitte verwenden Sie ausschliesslich das mitgelieferte Ladegerät.
Einstellen Geradeauslauf
Bei einer allfälligen Abweichung vom Geradeauslauf
kann dies ganz einfach justiert werden:
1. Lösen Sie die Radmutter leicht auf der linken Seite
(in Fahrtrichtung).
2. Durch Drehen der zwei kleinen Inbusschrauben auf
der Vorder- und Rückseite der Radaufhängung kann
die Position des Rades justiert werden.
3. Nach erfolgter Justierung die Radmutter wieder
anziehen.
5
Sicherheitshinweise
■Laden Sie den Akku nur mit dem dafür vorgesehenen Ladegerät. Die Verwendung
eines nicht zugelassenen Ladegeräts kann für den Akku zu folgenschweren
Beschädigungen führen.
■ Bewahren Sie den Akku an einem trockenen Ort auf und vermeiden Sie extreme
Temperaturen.
■ Bei langer Nichtbenutzung (über 3 Monate) unbedingt Zwischenladung vornehmen.
■Halten Sie Ihren Trolley unter Kontrolle: Lassen Sie Ihre Hand während der Fahrt
immer am Gri, damit Sie bei Bedarf rechtzeitig stoppen oder ausweichen können.
■Stellen Sie den Trolley in steilem Gelände immer quer zum Gefälle ab, um ein
selbständiges Losrollen zu verhindern.
■Achten Sie beim Durchqueren von Wasserhindernissen darauf, dass die Motorachse
nicht eintaucht. Sollte Wasser in die Achse eindringen, können Motoren und
Elektronik Schaden nehmen.

■LED-Anzeige:
■ Kein Licht = kein Strom/Batterie nicht eingesteckt
■ Anzeige brennt konstant = in Betrieb
■ Anzeige ackert = Standby, Parkbremse
eingeschaltet
■Start: Knopf A drücken. Der Trolley fährt in der
letztmals gewählten Geschwindigkeit.
■Stopp: Knopf A drücken. Die automatische
Parkbremse verhindert ein Weiterrollen.
■Distanztimer: Bei Stillstand Knopf B 2 Sek.
drücken, bis LED-Anzeige schnell blinkt,
dann loslassen. Trolley fährt während 10 Sek.
in der eingestellten Geschwindigkeit und
stoppt dann automatisch.
■ Knopf B 5 Sek. drücken = 20 Sek. Laufzeit
■ Knopf B 10 Sek. drücken = 30 Sek. Laufzeit
■Geschwindigkeit einstellen: Durch Drehen
des Potentiometers (Rädchen C) können Sie
die Geschwindigkeit stufenlos einstellen.
■Drehen in Laufrichtung = schneller
■Drehen rückwärts = langsamer
Reinigung/Pege/Lagerung
■Reinigen Sie den Trolley am besten mit einem feuchten Tuch und/oder Druckluft.
Vermeiden Sie das Abspritzen mit Wasser.
■Lagern Sie Ihren Trolley immer in trockenen Räumen bei Zimmertemperatur.
6
Bedienung
LED
B A
C
Transport
■ Bitte benutzen Sie für den Transport die Transporttasche. Diese hat unten ein Fach
für die Hinterräder und im oberen Stauraum Unterteilungen für 3 Fächer. Um
Beschädigungen beim Transport zu vermeiden (z. B. Kratzer), legen Sie die Motorachse,
den Steuerarm und die Vorderachse mit Rad jeweils in ein separates Abteil.
■Achtung: Der Reissverschluss des Radfaches soll nur geönet und geschlossen werden,
wenn das darüber liegende Fach leer ist, er könnte sonst reissen.

Fairway Buddy:
Caddy de golf électrique avec batterie lithium
Contenu et pièces
■Sac de transport avec compartiment séparé pour les roues
■2 roues motrices
■ Axe longitudinal avec roue avant
■ Axe d’entraînement avec deux moteurs tubulaires
■Cadre pliable avec poignée de commande et unité de commande
■Support de carte de score avec vis et clé Allen
■Support de parapluie
■Support de boissons
■ Batterie lithium-ion 10 Ah
■Chargeur
■ Joints de remplacement
■ Clés de desserrage rapide des connecteurs (T-tool)
■ Protection d’axes (reliées par un cordon en caoutchouc)
■ Mode d’utilisation avec anneaux O
7

8
Assemblage du chariot:
■ Assemblage de l’axe longitudinal et de l’axe
d’entraînement (ill. 1).
■
Mise en place des roues motrices: glisser le moyeu de
la roue sur l’axe et appuyer pour l’enclencher (ill. 2).
Attention: 1er niveau d’enclenchement = mode roue
libre (utilisation manuelle plus souple), 2eniveau
d’enclenchement = mode motorisé. S’assurer que
les deux roues sont correctement enclenchées
(«clic» audible). Le prol des pneus doit être dans
le sens de la marche (comme la roue avant) (ill. 2).
■ Fixer le cadre du caddy et ajuster la hauteur (ill. 3).
■ Partie inférieure de la xation de sac: soulever et
tourner dans le sens de la marche.
■ Partie supérieure de la xation de sac: enclencher
dans la position souhaitée et xer.
■ Fixer la batterie sur son support (2 sangles avec
attaches de type Velcro) et connecter les câbles (ill. 4).
■ Support de carte de score: se xe sur le cadre du
caddy. Utiliser la clé Allen pour serrer les vis (ill
. 5)
.
■ Support de parapluie: (si nécessaire) glisser le support
sur le dispositif de la poignée de commande et xer
en le tournant dans le sens des aiguilles d’une montre.
Le cordon en caoutchouc permet d’assurer le parapluie
en cas de vent (ill. 6).
■ Support de boissons: se xe sur le cadre du caddy.
Utiliser la clé Allen pour serrer les vis (ill
. 7+ 8)
.
■ Positionner le sac de golf et le xer aux deux
supports à l’aide d’un cordon en caoutchouc.
Première mise en route 1
2
3
4
5678

9
Charge et entretien de la batterie
Important:
Avant la première utilisation, charger la batterie pendant 6 heures ininterrompues minimum.
■Témoin rouge = batterie en cours de charge
■Témoin vert = batterie chargée
■ La batterie doit être rechargée au plus tôt après chaque partie de golf, et cela même
si la charge restante est susante pour une autre utilisation. La batterie doit être
complètement chargée avant chaque partie de golf.
■ Entreposer la batterie à plat dans un endroit susamment chaud. La charge terminée,
débrancher la batterie du secteur. Important: la batterie doit toujours être entreposée
chargée.
■
Après une période de non-utilisation prolongée, telle que la pause hivernale, brancher
la batterie sur le secteur pour une charge complète. En cas de pause supérieure à 3 mois,
procéder impérativement à une charge intermédiaire.
■ Utiliser exclusivement le chargeur fourni.
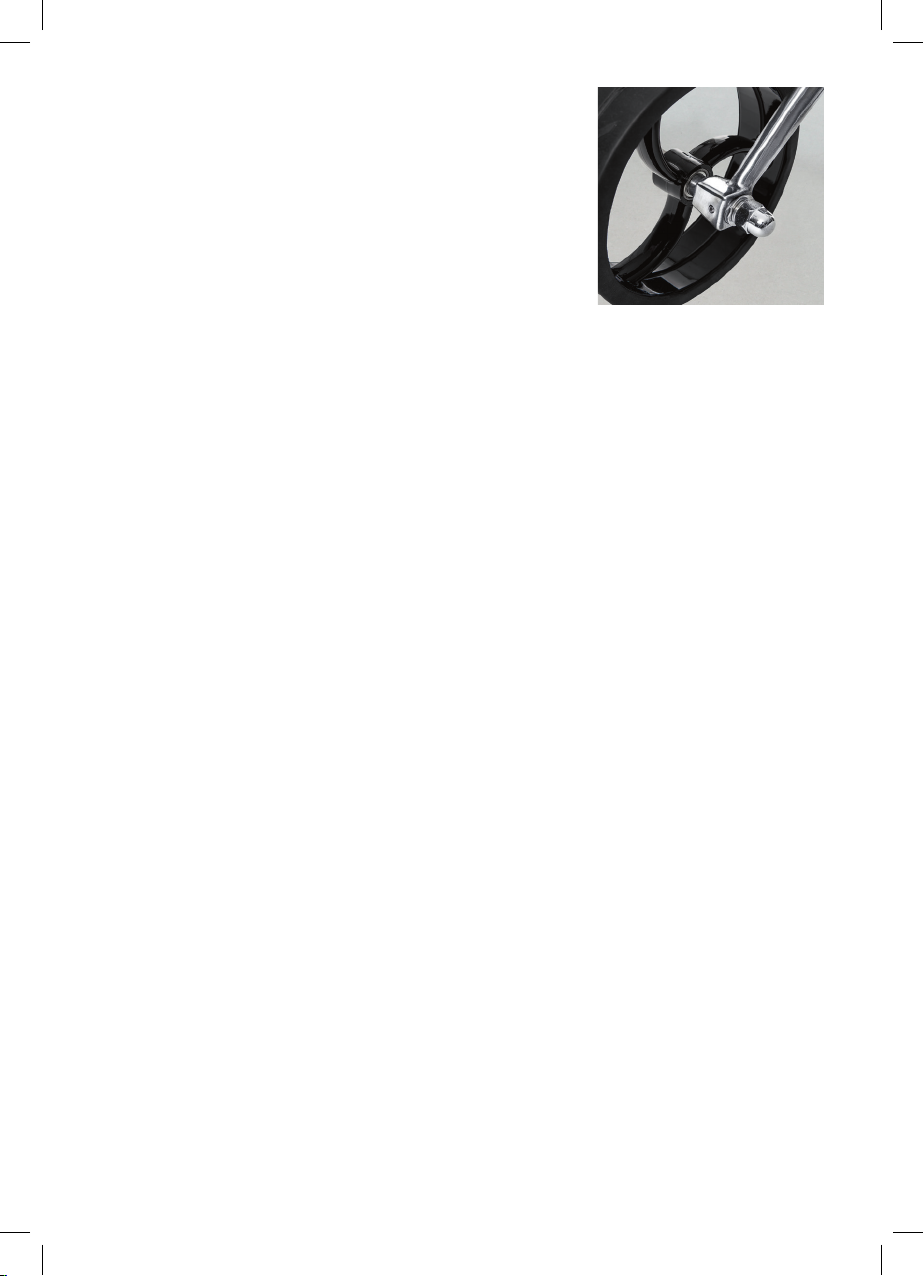
Réglage du déplacement en ligne droite
Toute variation du déplacement en ligne droite est très
simple à ajuster:
1. Desserrez légèrement l’écrou de la roue sur le côté
gauche (dans le sens de la marche).
2. La position de la roue peut être ajustée en tournant
les deux petites vis à six pans creux sur l’avant et
l’arrière de la suspension de roue.
3. L’ajustage terminé, resserrer l’écrou de la roue.
Instructions de sécurité
■ Chargez la batterie uniquement à l’aide du chargeur prévu à cet eet. L’utilisation
d’un chargeur non autorisé est susceptible d’endommager fortement la batterie.
■ Conservez la batterie dans un endroit sec, à l’abri des températures extrêmes.
■ En cas de non-utilisation prolongée (supérieure à 3 mois), procédez impérativement
à une charge intermédiaire.
■ Veillez à toujours garder le contrôle de votre chariot: gardez toujours une main
sur la poignée pendant la marche du chariot an de pouvoir, au besoin, l’arrêter
ou le dévier à temps.
■ Sur les terrains en pente, placez toujours le chariot de travers an d’éviter toute
marche autonome.
■ En traversant les obstacles d’eau, veillez à ne pas immerger l’axe moteur. Toute
inltration d’eau dans l’axe pourrait endommager le moteur et l’électronique.

10
■Achage LED:
■Diode éteinte = pas de courant/batterie non
enclenchée
■Diode allumée = en marche
■Diode clignotante = stand-by, frein parking
enclenché
■Démarrage: appuyer sur le bouton A. Le chariot
avance à la vitesse précédemment sélectionnée.
■Arrêt: appuyer sur le bouton A. Le frein parking
automatique immobilise le chariot.
■Distance d’éloignement: à l’arrêt, appuyer 2 sec.
sur le bouton B jusqu’au clignotement rapide de
la LED, puis relâcher. Le chariot avance pendant
10 sec. à la vitesse réglée puis s’arrête auto-
matiquement.
■ Pression de 5 sec. sur le bouton B = 20 sec. de
marche avant
■ Pression de 10 sec. sur le bouton B = 30 sec. de
marche avant
■Réglage de la vitesse: tourner le potentiomètre
(molette C) pour régler la vitesse en continu.
■Rotation dans le sens de la marche = plus rapide
■Rotation dans le sens inverse = plus lent
Nettoyage/entretien/entreposage
■ Nettoyez de préférence le chariot à l’aide d’un chion humide et/ou à l’air comprimé.
Evitez de l’asperger d’eau.
■ Entreposez toujours votre chariot dans un endroit sec à température ambiante.
Utilisation
Transport
■ Veuillez utiliser le sac de transport prévu à cet eet. Il dispose, dans sa partie inférieure,
d’un compartiment pour les roues arrière et d’un emplacement de stockage de 3 com-
partiments dans sa partie supérieure. Pour éviter tout dommage pendant le transport
(rayures, p. ex.), veuillez ranger l’axe moteur, le bras de commande ainsi que le train
avant et sa roue dans des compartiments distincts.
■
Attention: pour éviter tout risque de déchirure, la fermeture à glissière du compartiment
à roue ne doit être ouverte ou fermée que si le compartiment placé juste au-dessus est vide.
LED
B A
C

Fairway Buddy:
Carrello da golf elettrico con batteria al litio
Contenuto e componenti
■ Borsa per il trasporto con scomparto separato per le ruote
■2 ruote motrici
■Asse longitudinale con ruota anteriore
■Asse motore con motore a doppio tubo
■Telaio caddy pieghevole con maniglia e unità di comando
■Supporto segnapunti con viti e chiave a brugola
■Supporto portaombrello
■Supporto portabibite
■ Batteria agli ioni di litio 10 Ah
■Caricatore
■Guarnizioni di ricambio
■ Chiave per la facile rimozione dei connettori ad innesto (utensile a T)
■ Protezione per asse (ssata con fascetta elastica)
■ Manuale d’uso con guarnizioni O-ring di ricambio
11

Assemblaggio del carrello:
■ Assemblaggio dell’asse longitudinale e dell’asse
motore (g. 1).
■Montaggio delle ruote motrici: spingere il perno sul
mozzo della ruota e far scattare la ruota in posizione.
Attenzione: prima posizione = folle (modalità
manuale più maneggevole). Seconda posizione =
modalità motorizzata. Assicurarsi che le ruote si
inseriscano in posizione corretta (si sente lo scatto).
Il prolo del pneumatico deve essere rivolto in
direzione di marcia (come la ruota anteriore) (g. 2).
■ Montare il telaio del caddy e regolarlo all’altezza
desiderata (g. 3).
■Supporto sacca inferiore: sollevare e girare in
direzione di marcia.
■Supporto sacca superiore: inserire ad incastro nella
posizione desiderata e ssare.
■Fissare la batteria sul dispositivo (2 fascette con
chiusura a velcro) e inserire il cavo (g. 4).
■Supporto segnapunti: avvitare sul telaio del caddy
(serrare le viti con la chiave a brugola) (g. 5).
■ Supporto portaombrello: spingere (all’occorrenza)
il supporto sul dispositivo presente sulla maniglia e
ssarlo girandolo in senso orario. La fascetta elastica
serve a tenere fermo l’ombrello in caso di vento (g. 6).
■Supporto portabibite: avvitare sul telaio del caddy
(serrare le viti con la chiave a brugola)
(g. 7+ 8).
■ Applicare la sacca da golf e ssarla sui due supporti
tramite la fascetta elastica.
Prima messa in funzione
12
1
2
3
4
5678

13
Carica e manutenzione della batteria
Importante:
Prima del primo utilizzo, lasciare la batteria in carica per almeno 6 ore consecutive.
■Spia rossa: la batteria è in carica
■Spia verde: la batteria è carica
■Ricaricare completamente la batteria quanto prima dopo ogni partita di golf, anche
quando la carica residua sarebbe suciente ad un altro utilizzo. Iniziare la partita solo
con la batteria completamente carica.
■Riporre la batteria in orizzontale in un luogo caldo. A carica avvenuta, staccare la
batteria dalla rete elettrica. Importante: prima di riporre la batteria, assicurarsi che
sia sempre carica.
■Dopo un periodo prolungato di non utilizzo, ad esempio dopo la pausa invernale,
riattaccare la batteria alla rete elettrica e ripetere il procedimento di carica.
Se la pausa è superiore a 3 mesi, provvedere assolutamente a una carica intermedia.
■Utilizzare esclusivamente il caricatore fornito in dotazione.
Impostazione della marcia in linea retta
In caso di un eventuale spostamento dalla linea retta,
la regolazione è semplice da eettuare:
1. Allentare leggermente il dado della ruota sul lato
sinistro (in direzione di marcia).
2. Girando le due viti a brugola piccole sul lato anteriore
e posteriore della sospensione della ruota è possibile
regolare la posizione della ruota.
3. A regolazione ultimata, ristringere il dado della ruota.
Avvertenze di sicurezza
■ Caricare la batteria esclusivamente con l’apposito caricatore. L’uso di un caricatore non
omologato può provocare danni ingenti alla batteria.
■Conservare la batteria in un luogo asciutto ed evitare di esporla a temperature estreme.
■
In caso di periodo prolungato di non utilizzo (più di 3 mesi) eseguire obbligatoriamente
una carica intermedia.
■
Tenere il carrello sotto controllo: durante la marcia tenere sempre la mano sulla maniglia
in modo da avere il tempo, se necessario, di fermare il carrello o di scansare un ostacolo.
■Sui terreni in pendenza disporre sempre il carrello di traverso in modo da evitare che si
metta in movimento.
■ Nell’attraversare ostacoli con acqua, fare sempre attenzione a non immergere l’asse
motore. La penetrazione di acqua nell’asse può provocare danni al motore e all’elet-
tronica.

14
■Spia LED:
■ Spenta = non c’è corrente/la batteria non è inserita
■ Spia accesa ssa = in funzione
■Spia lampeggiante = standby, freno di
stazionamento inserito
■Avvio: premere il tasto A. Il carrello si muove all’ultima
velocità selezionata.
■Stop: premere il tasto A. Il freno di stazionamento
automatico blocca l’avanzamento.
■
Timer di distanza: a carrello fermo, premere il tasto B
per 2 secondi, tenere premuto nché la spia LED
non lampeggia velocemente, poi rilasciare il tasto.
Il carrello avanza per 10 secondi alla velocità impo-
stata e poi si ferma automaticamente.
■ Pressione del tasto B per 5 secondi = 20 secondi
di avanzamento
■ Pressione del tasto B per 10 secondi = 30 secondi
di avanzamento
■Impostazione della velocità: girando il potenzio-
metro (manopola C) è possibile regolare la velocità
in continuo.
■Giro in direzione di marcia = accelerazione
■ Giro all’indietro = decelerazione
Pulizia/Cura/Riponimento
■Pulire il carrello preferibilmente con un panno umido e/o con aria compressa.
Evitare di spruzzarvi acqua.
■Riporre il carrello sempre in locali asciutti a temperatura ambiente.
Utilizzo
Trasporto
■ Per il trasporto si prega di utilizzare l’apposita borsa. Tale borsa è dotata nella parte
inferiore di uno scomparto per le ruote posteriori e nello spazio di riponimento supe-
riore di 3 scomparti separati. Per evitare danni durante il trasporto (es. gra), riporre
l’asse motore, il braccio di controllo e l’asse anteriore con la ruota in scomparti
separati.
■Attenzione: aprire e chiudere la chiusura lampo dello scomparto della ruota solo
quando lo scomparto superiore è vuoto, altrimenti potrebbe rompersi.
LED
B A
C

Fairway Buddy:
Electric Golf Caddy with Lithium Battery
Contents and components
■Transport bag with separate wheel compartment
■ 2 drive (rear) wheels
■ Longitudinal axis with front wheel
■ Drive axle with double-tube motor
■Collapsible caddy frame with control handle and panel
■Scorecard holder with screws and Allen key
■Umbrella holder
■ Beverage holder
■Lithium-ion 10 Ah battery
■Charger
■Replacement seals
■ Wrench for easy dismantling (T tool)
■ Axis protection (connected with an elastic strap)
■ Instructions for use with extra O rings
15

16
Assembling the trolley:
■ Fit the longitudinal axis to the drive axis (Fig. 1).
■ Fit the drive (rear) wheels: push in the pin on the
wheel hub and click the wheel into place.
Note: Click once = freewheel mode (smooth manual
operation). Click twice = motor mode. Ensure that
both wheels have been correctly tted by listening
for the number of clicks. The tire proles should face
the direction of travel (like front wheel) (Fig. 2).
■ Attach the caddy frame and adjust to desired height
(Fig. 3).
■Lower bag rest: lift and turn in the direction of travel.
■Upper bag rest: click into desired position and secure.
■Attach the battery to the trolley (using the 2 Velcro
straps) and plug in the cable (Fig. 4).
■Scorecard holder: screw on to the caddy frame.
Tighten the screws using the Allen key (Fig
. 5)
.
■Umbrella holder: slide the holder over the mechan-
ism on the steering handle (when needed) and turn
clockwise to tighten. The elastic strap secures the
umbrella in the wind (Fig
. 6)
.
■ Beverage holder: screw on to the caddy frame.
Tighten the screws using the Allen key (Fig
. 7+ 8)
.
■Place your golf bag on the trolley and secure it
to the two holders using the elastic strap.
Initial start-up 1
2
3
4
5678

17
Charging and servicing the battery
Important:
Before using the battery for the first time, it should be charged continuously for at least
6 hours.
■Red lamp = battery charging
■Green lamp = battery charged
■Charge the battery fully as soon as possible after each round of golf, even if there is
still enough charge left in the battery for further use. Always begin a round of golf
with a fully charged battery.
■ The battery should be stored at in a warm place. Once the battery is charged,
disconnect it from the power supply. Important: Always ensure the battery
is charged before storing it.
■ If the battery has not been used for a long period of time, for example over winter,
connect the battery to the power supply and charge it again. If it is not used for
more than 3 months, recharge it during this period.
■ Only use the charger supplied with the trolley.
Setting wheel alignment
If the cart veers away when driving straight ahead,
this can be easily adjusted:
1. Loosen the lug nut on the left side slightly
(in the direction of travel).
2. The wheel position can be adjusted by turning
the two small Allen screws at the front and back
of the wheel suspension.
3. After adjusting, tighten the lug nut again.
Safety information
■Use only the intended charger to charge the battery. Using an unapproved charger
can cause severe damage to the battery.
■ Store the battery in a dry location away from extreme temperatures.
■ If it is not used for a longer period (more than 3 months), recharge it during this period.
■Keep your trolley under control: always keep your hand on the handle when driving
so you can stop or avoid objects in time.
■Always park the trolley crosswise in steep terrain to prevent it from rolling away.
■ When crossing water hazards, make sure the axle is not immersed. If water gets into
the axle, the motor and electronics can be damaged.

18
■LED display:
■ No light = no power/battery not plugged in
■Display constantly illuminated = in operation
■ Display ickers = standby, parking brake
activated
■To start: Press button A. The trolley will run at
the last speed selected.
■To stop: Press button A. The automatic parking
brake prevents the trolley from rolling forward.
■Distance timer: While the trolley is stationary,
press button B for 2 seconds until the LED display
ashes quickly, then release it. The trolley will
move forward for 10 seconds at the set speed
and then stop automatically.
■ Press button B 5 seconds = trolley will
move for 20 seconds
■ Press button B 10 seconds = trolley will
move for 30 seconds
■Setting the speed: Speed can be set variably
by turning the potentiometer (cog C).
■Turn in the direction of travel = faster
■Turn backwards = slower
Cleaning/Care/Storage
■Clean the trolley with a damp cloth and/or compressed air. Avoid spraying it with water.
■Always store the trolley in a dry location at room temperature.
Operating
Transport
■Please use the transport bag to transport the caddy. This bag has a compartment for
the rear wheels at the bottom and dividers for three compartments in the upper storage
area. To prevent damage during transport (e. g. scratches), put the motor axle, the
control arm, and the front axle with wheel in separate compartments.
■Important: The zipper for the wheel compartment should be opened and closed only
when the compartment above is empty to prevent it from tearing.
LED
B A
C


golfomania
jaron.direct GmbH
Alte Landstrasse 32
CH-8800 Thalwil
T +41 43 377 99 02
F +41 43 377 99 05
www.golfomania.ch
Gültig ab/Valable dès le/Valido da/Valid from: 1.1. 2018
Änderungen vorbehalten/Sous réserve de modications/Con riserva di modiche/Subject to change
This manual suits for next models
1
Table of contents
Languages:
Other Golfomania Golf Trolley manuals