manuals.online logo
Brands
  1. Home
  2. •
  3. Brands
  4. •
  5. GORMAN-RUPP
  6. •
  7. Water Pump
  8. •
  9. GORMAN-RUPP SM SERIES User manual

GORMAN-RUPP SM SERIES User manual

PUBLICATION NUMBER MR-04427
March 6, 1996
Rev. A 12‐18‐12
THE GORMAN‐RUPP COMPANY DMANSFIELD, OHIO
www.grpumps.com
GORMAN‐RUPP OF CANADA LIMITED DST. THOMAS, ONTARIO, CANADA Printed in U.S.A.
e1996 The Gorman‐Rupp Company
SM SERIES PUMPS
SM2F
All Materials And Voltages
Register your new
Gorman‐Rupp pump online at
www.grpumps.com/register.
Valid serial number and e‐mail address required.
MR-04427 SM SERIES PUMPS
PAGE I - 1INTRODUCTION
INTRODUCTION
Thank You for purchasing a Gorman‐Rupp SM
Series Pump. Read this manual carefully to learn
how to safely maintain and service your pump. Fail
ure to do so could result in personal injury or dam
age to the pump.
A set of three manuals accompanies your pump.
The Installation/Operation Manual contains essen
tial information on installing and operating the
pump, and on making electrical connections. The
Parts List Manual provides a performance curve, a
pump model cross‐section drawing, and parts list
for your pump.
This Maintenance and Repair Manual provides
troubleshooting and maintenance instructions re
quired to properly diagnose operational problems,
and to service the pump components. Pump motor
maintenance may be performed only by a Gor
man‐Rupp authorized Submersible repair facility,
or the factory. Otherwise, the pump warranty will be
negated, and damage to the pump, and injury or
death to personnel can result. Contact the factory
for the authorized repair facility closest to you.
As described on the following page, this manual
will alert personnel to known procedures which re
quire special attention, to those which could dam
age equipment, and to those which could be dan
gerous to personnel. However, this manual cannot
possibly anticipate and provide detailed precau
tions for every situation that might occur during
maintenance of the unit. Therefore, it is the respon
sibility of the owner/maintenance personnel to en
sure that only safe, established maintenance pro
cedures are used, and that any procedures not ad
dressed in this manual are performed only after es
tablishing that neither personal safety nor pump in
tegrity are compromised by such practices.
If there are any questions regarding the pump
which are not covered in this manual or in other lit
erature accompanying the unit, please contact
your Gorman‐Rupp distributor or the Gorman‐
Rupp Company:
The Gorman‐Rupp Company
P.O. Box 1217
Mansfield, Ohio 44901-1217
Phone: (419) 755-1011
or:
Gorman‐Rupp of Canada Limited
70 Burwell Road
St. Thomas, Ontario N5P 3R7
Phone: (519) 631-2870
CONTENTS
SAFETY - SECTION A
TROUBLESHOOTING - SECTION B
ELECTRICAL TESTING PAGE B - 2........................................................
Test Equipment PAGE B - 3...........................................................
Voltage Imbalance PAGE B - 3........................................................
Motor and Power Cable Continuity PAGE B - 3..........................................
Insulation Resistance PAGE B - 4......................................................
PUMP MAINTENANCE AND REPAIR - SECTION C
GENERAL INFORMATION PAGE C - 1.....................................................
Lifting PAGE C - 1....................................................................
TYPICAL PUMP ASSEMBLY PAGE C - 2....................................................
PUMP ASSEMBLY PARTS IDENTIFICATION LIST PAGE C - 3.................................
PUMP END DISASSEMBLY PAGE C - 4....................................................
PUMP END REASSEMBLY PAGE C - 6.....................................................
MOTOR DISASSEMBLY PAGE C - 10......................................................
MOTOR REASSEMBLY PAGE C - 13.......................................................
FINAL ASSEMBLY PAGE C - 17...........................................................
VACUUM TESTING PAGE C - 17..........................................................
LUBRICATION PAGE C - 19...............................................................
MR-04422SM SERIES PUMPS
PAGE I - 2 INTRODUCTION
RECORDING MODEL AND
SERIAL NUMBERS
Please record the pump model, serial number, volt
age, and motor frame size in the spaces provided
below. Your Gorman‐Rupp distributor needs this
information when you require parts or service.
Pump Model:
Serial Number:
Voltage:
Phase:
WARRANTY INFORMATION
The warranty provided with your pump is part of
Gorman‐Rupp's support program for customers
who operate and maintain their equipment as de
scribed in this and the other accompanying litera
ture. The integral electric motor must be operated
through the control furnished with the pump as
standard equipment and approved by MSHA.
Please note that should the equipment be abused
or modified to change its performance beyond the
original factory specifications, the warranty will be
come void and any claim will be denied.
All repairs to the pump motor must be performed
by a Gorman‐Rupp authorized Submersible repair
facility or the factory. Any repairs to the motor as
sembly performed by the customer or an unautho
rized repair facility negates motor warranty.
The following are used to alert personnel to procedures which require special attention, to those which
could damage equipment, and to those which could be dangerous to personnel:
Immediate hazards which WILL result in
severe personal injury or death. These
instructions describe the procedure re
quired and the injury which will result
from failure to follow the procedure.
Hazards or unsafe practices which
COULD result in severe personal injury
or death. These instructions describe
the procedure required and the injury
which could result from failure to follow
the procedure.
Hazards or unsafe practices which COULD
result in minor personal injury or product or
property damage. These instructions de
scribe the requirements and the possible
damage which could result from failure to
follow the procedure.
NOTE
Instructions to aid in installation, operation, and
maintenance or which clarify a procedure.
MR-04427 SM SERIES PUMPS
PAGE A - 1SAFETY
SAFETY - SECTION A
The following information applies
throughout this manual to Gorman‐
Rupp SM Series submersible motor
driven pumps.
This manual will alert personnel to
known procedures which require spe
cial attention, to those which could
damage equipment, and to those which
could be dangerous to personnel. How
ever, this manual cannot possibly antici
pate and provide detailed instructions
and precautions for every situation that
might occur during maintenance of the
unit. Therefore, it is the responsibility of
the owner/maintenance personnel to
ensure that only safe, established main
tenance procedures are used, and that
any procedures not addressed in this
manual are performed only after estab
lishing that neither personal safety nor
pump integrity are compromised by
such practices.
This manual contains essential informa
tion on troubleshooting and maintain
ing the pump. In addition to this manual,
see the separate literature covering in
stallation and operation, pump parts,
and any optional equipment shipped
with the pump.
Before attempting to open or service the
pump:
1. Familiarize yourself with this man
ual.
2. Lock out incoming power to the
control box to ensure that the
pump will remain inoperative.
3. Allow the pump to completely cool
if overheated.
4. Close the discharge valve (if
used).
This pump is not designed to pump vol
atile, explosive, or flammable materials.
Refer to the chart in Installation, Section
B for the basic materials of construction
for each pump covered in this manual.
Do not attempt to pump any liquids for
which your pump is not approved, or
which may damage the pump or endan
ger personnel as a result of pump fail
ure. Consult the factory for specific
application data.
Before connecting any cable to the con
trol box, be sure to ground the control
box. Refer to the Control Box manual for
the suggested grounding methods.
The pump is designed to be operated
through the control box furnished with
the pump. The control box provides
overload protection and power control.
Do not connect the pump motor directly
to the incoming power lines.
When installing or servicing the pump
or controls, follow all requirements for
the installation of wiring or electrical
equipment as outlined in MSHA Sched
ule 2G. Follow all MSHA safety require
SM SERIES PUMPS MR-04427
PAGE A-2 SAFETY
ments. Failure to observe these require
ments could result in injury or death to
personnel.
The electrical power used to operate
this pump is high enough to cause inju
ry or death. Obtain the services of a qu
alified electrician to make all electrical
connections. Make certain that the
pump and enclosure are properly
grounded; never use gas pipe as an
electrical ground. Be sure that the in
coming power matches the voltage and
phase of the pump and control before
connecting the power source. Do not
run the pump if the voltage is not within
the limits. If the overload unit is tripped
during pump operation, correct the
problem before restarting the pump.
The electrical power used to operate
this pump is high enough to cause inju
ry or death. Make certain that the control
handle on the control box is in the OFF
position and locked out, or that the pow
er supply to the control box has been
otherwise cut off and locked out, before
attempting to open or service the pump
assembly. Tag electrical circuits to pre
vent accidental start‐up.
Any control box used to operate the
pump must be approved by the MSHA
and the Gorman‐Rupp Company for the
application.
Never attempt to alter the length or re
pair any power cable with a splice. The
pump motor and cable must be com
pletely waterproof. Injury or death may
result from alterations.
All electrical connections must be in ac
cordance with MSHA Schedule 2G. If
there is a conflict between the instruc
tions provided and MSHA specifica
tions, MSHA specifications shall take
precedence. All electrical equipment
supplied with this pump was in confor
mance with MSHA requirements in ef
fect on the date of manufacture. Failure
to follow applicable specifications, or
substitution of electrical parts not
supplied or approved by the manufac
turer, can result in severe injury or
death.
After the pump has been installed, make
certain that the pump and all piping or
hose connections are secure before op
eration.
Approach the pump cautiously after it
has been running. Although the motor is
cooled by the liquid being pumped, nor
mal operating temperatures can be high
enough to cause burns. The tempera
ture will be especially high if operated
against a closed discharge valve. Never
MR-04427 SM SERIES PUMPS
PAGE A - 3SAFETY
operate against a closed discharge
valve for long periods of time.
Do not attempt to lift the pump by the
motor power cable or the piping. Attach
proper lifting equipment to the lifting
device fitted to the pump. If chains or
cable are wrapped around the pump to
lift it, make certain that they are posi
tioned so as not to damage the pump,
and so that the load will be balanced.
Obtain the services of a qualified elec
trician to troubleshoot, test and/or ser
vice the electrical components of this
pump.
MR-04427 SM SERIES PUMPS
TROUBLESHOOTING PAGE B - 1
TROUBLESHOOTING - SECTION B
Review all SAFETY information in Section A.
The following precautions should be
taken before attempting to service the
pump; otherwise, injury or death could
result.
1. Familiarize yourself with this man
ual and with all other literature
shipped with the pump.
2. Lock out incoming power to the
pump or control box to ensure that
the pump will remain inoperative.
3. Allow the pump to completely cool
if overheated.
4. Check the temperature before
opening any covers, plates or
plugs.
5. Close the discharge valve (if
used).
The electrical power used to operate
this pump is high enough to cause inju
ry or death. Obtain the services of a qu
alified electrician to troubleshoot, test
and/or service the electrical compo
nents of this pump.
NOTE
Many of the probable remedies listed below re
quire use of electrical test instruments; for specific
procedures, see ELECTRICAL TESTING following
the chart.
Table B‐1 Troubleshooting Chart
TROUBLE CAUSE REMEDY
PUMP FAILS TO
START, CIRCUIT
BREAKER NOT
TRIPPED
Power source incompatible
with control box.
No voltage at line side of cir
cuit breaker.
Open circuit in motor wind
ings or power cable.
Defective motor power cable.
Correct power source.
Check power source for blown fuse, open
overload unit, broken lead, or loose connec
tion.
Check continuity.
Check for and replace defective unit.
CIRCUIT BREAKER
TRIPS
Low or high voltage, or exces
sive voltage drop between
pump and control box.
Defective insulation in motor
windings.
Impeller jammed due to de
bris or insufficient clearance.
Bearing(s) frozen.
Measure voltage at control box. Check that
wiring is correct type, size, and length. (See
Field Wiring Connections, Operations And
Maintenance Manual.
Check insulation resistance; check continuity.
Disassemble pump and check impeller.
Disassemble pump and check bearing(s).
SM SERIES PUMPS MR-04427
TROUBLESHOOTINGPAGE B - 2
Table B‐1 Troubleshooting Chart (continued)
TROUBLE CAUSE REMEDY
MOTOR RUNS, BUT
PUMP FAILS TO DE
LIVER RATED DIS
CHARGE
Discharge head too high.
Low or incorrect voltage.
Discharge throttling valve par
tially closed; check that valve
is installed improperly.
Discharge line clogged or re
stricted; hose kinked.
Liquid being pumped too
thick.
Strainer screen or impeller
clogged.
Insufficient liquid in sump or
tank.
Worn impeller vanes; exces
sive impeller clearance.
Pump running backwards.
Reduce discharge head, or install staging
adaptor and additional pump.
Measure control box voltage, both when
pump is running and when shut off.
Open discharge valve fully; check piping in
stallation.
Check discharge lines; straighten hose.
Dilute liquid if possible.
Clear clog(s). Stop pump; back flow may
flush away debris.
Stop pump until liquid level rises.
Check impeller and clearance. See PUMP
END REASSEMBLY.
Check direction of rotation and correct by in
terchanging any two motor leads at control
box. (See Pump Rotation, Section C).
PUMP RUNS WITH
EXCESSIVE NOISE
OR VIBRATION
Pumping entrained air.
Damaged or unbalanced im
peller.
Discharge piping not properly
supported.
Impeller jammed or loose.
Pump cavitation.
Motor shaft or bearings defec
tive.
Check liquid level in sump; check position of
pump and liquid level sensing device(s).
Replace impeller.
Check piping installation.
Check impeller.
Reduce discharge head, or restrict flow on
low head applications.
Disassemble pump and check motor and
bearings.
ELECTRICAL TESTING
If you suspect that pump malfunctions are caused
by defects in the motor, power cable or control box,
perform the following checks to help isolate the de
fective part.
Obtain the services of a qualified elec
trician to troubleshoot, test and/or ser
vice the electrical components of this
pump.
MR-04427 SM SERIES PUMPS
TROUBLESHOOTING PAGE B - 3
Be certain to refer to the wiring diagram(s)
in the Installation Section of this manual be
fore reconnecting any electrical compo
nents which have been disconnected.
Test Equipment
A volt/amp/ohmmeter and megohmeter of ade
quate range and quality will be required to conduct
the following electrical tests. The suggested equip
ment indicated below is commercially available, or
an equivalent substitute may be used.
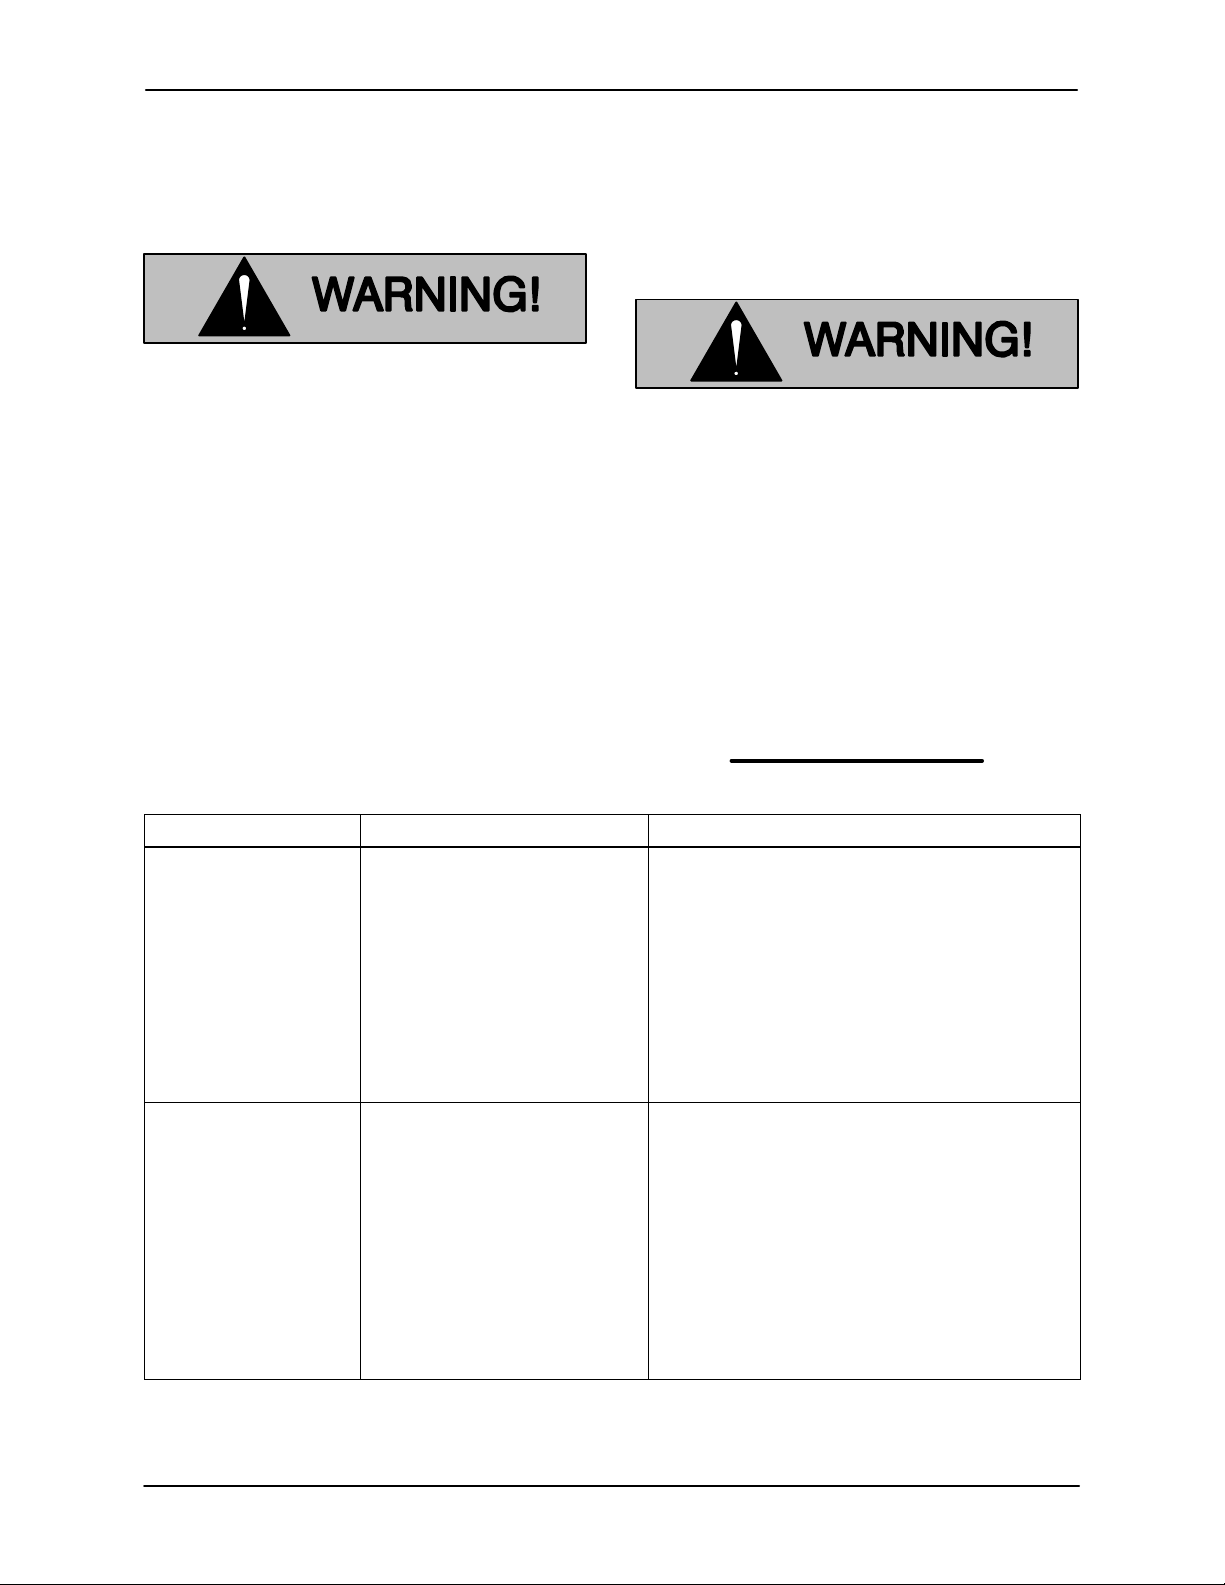
Equipment Use
Ammeter To check AC Voltage
and current (amperage)
Ohmeter To measure resistance
(ohms) to ground
Voltage Imbalance
Each phase of the incoming three‐phase power
must be balanced with the other two as accurately
as a commercial voltmeter will read. If the phases
are balanced, check out the motor as described
below. If the phases are out of balance, contact
your power company and request that they correct
the condition.
a. Use a voltmeter, amprobe, or equivalent me
ter to read the voltage across terminals 1 &
2, 2 & 3, and 1 & 3 in the control box. All three
measured voltages must be the same, as
accurately as the meter will read. If possible,
measure the voltage with the pump off, with
the pump running but out of the water, and
with the pump running in the water at full
load. All the measured voltages at each con
dition must be the same.
b. Use an amprobe or equivalent meter to
measure the current draw of each phase
while the pump is running at full load and at
no load. All three amperage readings must
be the same at each condition, as accurate
ly as the meter will read. Nominal amperage
values are listed in Table 1, but these apply
only when the actual voltage at the site is the
nominal voltage listed.
c. If the voltages are balanced with the pump
off, but are unbalanced when the pump is
running, a thorough check of the power
source, all interconnecting cables, and the
pump motor is required to isolate the defect.
Motor And Motor Power Cable Continuity
To check continuity, zero‐balance the ohmmeter
set at the RX1 scale, and test as follows:
a Disconnect the motor power cable leads
from the control box and connect the test
leads to any two of the three power cable
leads (not to the green ground lead or yellow
ground check lead). If there is a high resis
tance reading on the ohmmeter, there is an
open or broken circuit cause a break in the
power cable or motor windings, or by a bad
connection between the motor and the pow
er cable. Switch one test lead to the third
power lead, and test again.
b. If an open or broken circuit is indicated,
check the power cable for obvious damage,
and replace as necessary (see MAINTE
NANCE AND REPAIR). If there is no appar
ent damage to the motor cable, remove the
terminal housing (see MAINTENANCE
AND REPAIR) and check the continuity of
each power cable lead at the terminal posts.
c. If an open circuit still exists after each lead
(terminal) has been tested and tightened,
then the entire motor power cable must be
replaced. Splicing or other means of repair
are not recommended.
d. If no break is found in the power cable,
check the motor leads for continuity. If the
test reading indicates an open or broken cir
cuit, there is an open circuit in the motor.
NOTE
It is recommended that a pump with a defective mo
tor be returned to Gorman‐Rupp, or to one of the
Gorman‐Rupp authorized Submersible Repair
Centers.
SM SERIES PUMPS MR-04427
TROUBLESHOOTINGPAGE B - 4
Insulation Resistance
To check insulation, zero‐balance the ohmmeter
set at the RX100K scale, and test as follows:
a. Disconnect the motor power cable leads
from the control box. Connect one test lead
to the power cable green ground lead, and
touch the other test lead to each of the three
power leads in turn.
b. The reading obtained will indicate resis
tance values in both the power cable and the
motor windings. If the resistance reading is
infinity (1), the insulation is in good condi
tion. If the reading is between infinity (1)
and 1 megohm, the insulation is acceptable
but should be rechecked periodically. If the
reading is less than 1 megohm, the insula
tion should be checked more closely; a
reading of zero indicates that the power
cable or the motor is grounded.
c. To determine whether the power cable or
the motor is grounded, remove the terminal
housing (see MAINTENANCE AND RE
PAIR), disconnect the motor leads from the
motor terminals, and test the power cable
leads and motor leads separately.
MR-04427 SM SERIES PUMPS
PAGE C - 1MAINTENANCE AND REPAIR
PUMP MAINTENANCE AND REPAIR - SECTION C
GENERAL INFORMATION
Review all SAFETY information in Section A.
Do not attempt to service the pump as
sembly unless all power to the motor
has been shut off at the control box;
otherwise, injury or death could result.
Use a lifting device with sufficient ca
pacity. If slings or chains are used to
move the pump or components, make
sure that the load is balanced; other
wise serious personal injury or death
could result.
The maintenance and repair instructions in this
manual are keyed to the sectional view, Figure
C-1, and the corresponding parts identification
list. Refer to the separate Parts List Manual for re
placement parts.
Select a suitable location, preferably indoors, to
perform required maintenance. All work must be
performed by qualified personnel.
All repairs to the pump motor must be per
formed by a Gorman‐Rupp authorized
Submersible repair facility or the factory.
Any repairs to the motor assembly per
formed by the customer or an unautho
rized repair facility negates the warranty.
This Maintenance and Repair Manual provides
troubleshooting and maintenance instructions re
quired to properly diagnose operational problems,
and to service the pump components. Pump motor
maintenance may be performed only by a Gor
man‐Rupp authorized Submersible repair facility,
or the factory. Otherwise, the pump warranty will be
negated, and damage to the pump, and injury or
death to personnel can result. Contact the factory
for the authorized repair facility closest to you.
Check TROUBLESHOOTING, Section B to deter
mine causes and remedies of pump problems.
Disassemble the pump only as far as required.
Lifting
Use lifting equipment with a capacity of at least
five times the weight of the pump, including the
weight of any options or customer‐installed acces
sories. The approximate maximum weight for this
group of pumps is 60 lbs. (27,5 kg.), not including
the cable. Discharge hose or piping must be re
moved before attempting to lift the pump.
SM SERIES PUMPS MR-04427
MAINTENANCE AND REPAIRPAGE C - 2
SECTION DRAWING
Figure C-1. Typical SM2F Series Pump Assembly
ITEM
NO.
PART NAME ITEM
NO.
PART NAME
MR-04427 SM SERIES PUMPS
PAGE C - 3MAINTENANCE AND REPAIR
Typical SM2F Series Pump Assembly
Parts Identification List
Refer to the separate Parts List Manual for serviceable parts, part numbers and quantities.
1 SUCTION CASING
2 IMPELLER
3 SEAL ASSEMBLY
4 MECHANICAL SEAL ASSEMBLY
5 UPPER SEAL SHIM SET
6 SNAP RING
7 IMPELLER ADJUSTING SHIM SET
8 SEAL PLATE
9 CASING GASKET
10 SEAL PLATE O‐RING
11 RETAINING RING
12 INTERMEDIATE O‐RING
13 INTERMEDIATE
14 MOTOR BUSHING
15 MSHA PLATE
16 DRIVE SCREW
17 STATOR
18 ROTOR/SHAFT ASSEMBLY
19 NAME PLATE
20 DRIVE SCREW
21 DISCHARGE FLANGE GASKET
22 DISCHARGE FLANGE
23 STUD
24 HEX NUT
25 HEX HEAD CAPSCREW
26 LOCKWASHER
27 FLAT WASHER
28 HANDLE
29 BUSHING
30 HEX HEAD CAPSCREW
31 LOCKWASHER
32 T‐TYPE LOCKWASHER
33 ROUND HEAD MACHINE SCREW
34 50 FT. CABLE ASSEMBLY
35 HOSE CLAMP
36 CABLE GRIP ASSEMBLY
37 ALLEN HEAD SETSCREW
38 TERMINAL HOUSING
39 MOTOR HOUSING O‐RING
40 CONNECTOR
41 MOTOR HOUSING
42 SPRING WASHER
43 UPPER BALL BEARING
44 ALLEN HEAD SETSCREW
45 PIPE PLUG
46 LOWER BALL BEARING
47 PIPE PLUG
48 STUD
49 LOCKWASHER
50 HEX NUT
51 STRAINER SCREEN ASSEMBLY
52 HEX NUT
53 FLAT WASHER
54 IMPELLER KEY
55 NYLOCK CAPSCREW
56 LOCK CLIP
57 NYLOCK CAPSCREW
58 FLAT WASHER
59 SEALING WIRE
60 LEAD SEAL
61 ALLEN HEAD SETSCREW
62 CERTIFICATION PLATE
63 DRIVE SCREW
SM SERIES PUMPS MR-04427
MAINTENANCE AND REPAIRPAGE C - 4
PUMP END DISASSEMBLY
References are to Figure C-1.
Review all SAFETY information in Section A.
Follow the instructions on all tags, label and decals
attached to the pump.
All functions performed by the customer on the
pump or control must be done in accordance with
MSHA, schedule 2G regulations to ensure the ex
plosion‐proof integrity. No alterations of original
design may be made without the consent of the
Gorman‐Rupp Company and MSHA.
The electrical power used to operate
this pump is high enough to cause inju
ry or death. Make certain that the control
handle on the control box is in the off po
sition and locked out, or that the power
supply to the control box has been
otherwise cut off and locked out, before
attempting to open or service the pump
assembly. Tag electrical circuits to pre
vent accidental start‐up.
Do not open the control box in an explo
sive atmosphere. When sealed, the con
trol box is explosion proof to prevent the
ignition of combustible gases. Opening
the box in an explosive atmosphere
could result in fire or explosion.
Before attempting to service the pump or control,
terminate the power supply to the control box.
Close the discharge throttling valve, if so
equipped.
Use the hoisting bail to remove the pump from the
wet well or sump, and move it to a location where
the discharge line can be removed. It is not neces
sary to disconnect a flexible discharge hose before
removing the pump. If rigid discharge piping is
used, disconnect the piping before attempting to
move the pump.
Do not attempt to lift the pump by the
motor power cable or the piping. Attach
proper lifting equipment to the lifting
device fitted to the pump. If chains or
cable are wrapped around the pump to
lift it, make certain that they are posi
tioned so as not to damage the pump,
and so that the load will be balanced.
Select a suitable location, preferably indoors, to
perform the degree of maintenance required. If the
motor housing is to be opened, the work must be
done in a clean, well‐equipped shop. All mainte
nance functions must be done by qualified person
nel.
Check the chart in TROUBLESHOOTING, Section
B of this manual, to determine the nature of the
pump problem. If the problem is mechanical in na
ture, such as worn pump parts, seal replacement,
lubrication, etc., refer to PUMP END DISASSEM
BLY for instructions.
If the problem is electrical, complete disassembly
may not be required. Refer to Electrical Testing in
TROUBLESHOOTING, Section B, and have a
qualified electrician check the control box, cable
and terminal housing. If the problem is determined
to be in the motor, proceed with PUMP END DIS
ASSEMBLY, followed by MOTOR DISASSEMBLY.
Otherwise, see Terminal Housing And Power Ca
ble Disassembly.
Carefully inspect any O‐rings or gaskets before re
moval and cleaning to determine if a proper seal
and compression existed prior to disassembly. If
sealing was faulty or questionable, the cause must
be determined and corrected before reassembly.
All gaskets and most O‐rings must be replaced if
disturbed. Repair gaskets and O‐rings are listed in
the Parts List manual.
MR-04427 SM SERIES PUMPS
PAGE C - 5MAINTENANCE AND REPAIR
PUMP END DISASSEMBLY
Strainer Removal
To remove the strainer assembly (51), raise the
pump slightly, or lay it on its side and disengage
the capscrews (55) securing the strainer to the suc
tion casing (1). If the impeller (2) is clogged, the de
bris can usually be removed without further disas
sembly.
Draining Oil From Seal Cavity
If any further disassembly is to be performed on the
pump, the seal oil cavity must be drained.
Let the pump cool before removing the
seal cavity drain plug. Pressure built up
within a hot pump could cause the oil to
spray out when the plug is removed. Re
move the plug slowly and permit pressure
to vent to atmosphere.
With the pump in a vertical position, clean any dirt
from around the seal cavity drain plug (47). Re
move the drain plug, and install a short 1/4‐inch
NPT nipple in the hole. Tip the pump and drain the
seal oil into a clean container. Inspect the oil for
water, dirt, or cloudy condition which could indi
cate lower seal failure or poor gasket seal.
Positioning Pump For Disassembly
It is recommended that the pump be positioned
upside‐down during disassembly. To hold the
pump in the inverted position, screw a pipe in the
discharge flange (22) and clamp it in a large vise.
Be careful not to damage the terminal housing and
cable assembly (34) while in this position. Use ade
quate equipment and personnel to safely handle
the pump until it is secured. If inverting the pump is
not practical, lay the pump on its side and secure it
to prevent rolling.
Suction Casing Removal
To remove the suction casing (1), disengage the
hardware (49 and 50) securing the suction casing
to the motor housing (41). Remove the suction cas
ing. Remove and discard the casing gasket (9).
Impeller Removal
Wedge a piece of wood between the vanes of the
impeller (2) and the motor housing studs (48). Re
move the impeller nut (52) and washer (53).
Remove the wood and pry the impeller off the shaft
using two screwdrivers. Use caution when remov
ing the impeller; tension on the seal spring will be
released. Retain the impeller key (54). The seal
plate (8) will become a free part.
Remove the impeller adjusting shim set (7). For
ease of reassembly, tie and tag the shims or mea
sure and record their thickness.
Lower Seal Removal
Carefully remove the seal spring. Lubricate the ro
tor shaft (18) and work oil under the bellows as
sembly. Carefully pull the rotating portion of the
lower seal assembly off the shaft.
To remove the stationary portion of the seal, sepa
rate the seal plate (8) from the motor housing (41).
Remove and discard the seal plate O‐ring (10).
Place a clean cloth on a flat surface and place the
seal plate on the cloth with the impeller side down.
Use a drift pin or screwdriver to press on alternate
sides of the stationary seat until the stationary ele
ment and seat are removed.
If no further disassembly is required, proceed to
the appropriate areas in PUMP END REASSEMB
LY.
Upper Seal Removal
The intermediate (13) and upper seal assembly (4)
must be removed as a unit to determine if the upper
seal assembly is leaking, and to replace the seal if it
is leaking.
Use large snap ring pliers to remove the retaining
ring (11). Carefully pull straight up on the impeller
end of the rotor shaft until the assembled interme
SM SERIES PUMPS MR-04427
MAINTENANCE AND REPAIRPAGE C - 6
diate, seal, bearings (43 and 46), and shaft and ro
tor assembly (18) are free from the motor housing.
Inspect the rotor, stator, and inside of the motor
housing for evidence of upper seal leakage. If no
leakage is observed, the seal can be reused. How
ever, if leakage is apparent, the intermediate and
seal assembly must be separated from the rotor
and shaft assembly. Cover the motor housing with
a clean cloth after inspection to prevent contami
nation.
If the seal assembly does not require replacement,
proceed to Cleaning And Inspection Of Pump
Parts, followed by Upper Seal Installation.
If seal replacement is required, place the interme
diate, seal, bearings, and shaft and rotor assembly
on a clean, dry work surface, and remove the re
taining ring (6) using snap ring pliers. Use caution
when removing the retaining ring; tension of the
seal spring will be released. Remove the adjusting
shims (5). Tie and tag the shims, or measure and
record their thickness for ease of reassembly.
Carefully slide the intermediate and seal assembly
off the shaft as a unit.
NOTE
It may be necessary to tap lightly on the impeller
end of the shaft with a soft‐faced mallet to separate
the lower bearing (46) from the intermediate.
Use a hammer and punch (or other suitable tool) to
tap the seal assembly out of the intermediate from
the back side.
NOTE
The seal assembly will be damaged or destroyed
during removal.
Remove the intermediate O‐ring (12).
NOTE
If the motor housing components are to be serv
iced, see MOTOR DISASSEMBLY in this section.
Do not reassemble the pump end components at
this time.
If no further disassembly is required, proceed to
PUMP END REASSEMBLY.
PUMP END REASSEMBLY
NOTE
Reuse of old O‐rings, gaskets, or shaft seal parts
will result in premature leakage or reduced pump
performance. It is strongly recommended that new
gaskets and shaft seal assemblies be used during
reassembly (see the parts lists for numbers).
Cleaning And Inspection Of Pump Parts
Carefully inspect any O‐rings or gaskets before re
moval and cleaning to determine if a proper seal
and compression existed prior to disassembly. If
sealing was faulty or questionable, the cause must
be determined and corrected before reassembly.
Replace any parts as required.
NOTE
The upper seal assembly will be damaged or de
stroyed if removed from the intermediate. If the seal
was not removed from the intermediate, clean and
inspect all pump end parts as follows, then reinstall
the seal assembly and intermediate as a unit.
Thoroughly clean all reusable parts with a soft cloth
soaked in cleaning solvent. Use a clean cloth
lightly dampened with solvent to clean the lower
end of the motor housing, intermediate, and seal
plate. Do not allow the solvent to enter the motor.
Most cleaning solvents are toxic and
flammable. Use them only in a well ven
tilated area free from excessive heat,
sparks, and flame. Read and follow all
precautions printed on solvent contain
ers.
Remove all O‐rings and gaskets, and clean the
sealing surfaces of dirt or gasket material. Be care
ful not to scratch gasket surfaces.
Inspect the rotor shaft for damaged threads, scor
ing, or nicks. Remove nicks and burrs with a fine
MR-04427 SM SERIES PUMPS
PAGE C - 7MAINTENANCE AND REPAIR
file or emery cloth to restore original contours. If the
shaft is bent or severely damaged, the rotor and
shaft must be replaced as an assembly (see MO
TOR DISASSEMBLY).
Upper Seal Installation
(Figure C-1 and C-2)
If the upper seal assembly was not removed from
the intermediate at disassembly, replace the inter
mediate O‐ring (12) and lightly lubricate it with oil.
Check to insure that the wavy spring washer (42)
and motor bushing (14) are properly positioned,
and slide the rotor and shaft assembly, bearings,
intermediate, and seal assembly into the motor
housing until the upper bearing (43) is fully seated
against the wavy washer. Install the retaining ring
(11).
If a new seal is to be installed, do not unwrap it until
time of installation. Cleanliness of seal compo
nents is critical, especially the seal faces.
Clean the rotor shaft and seal cavity area of the in
termediate (13). Be sure the area is dry and free of
lint and dirt. Do not permit cleaning solvent or de
bris to fall into the motor cavity.
Check to ensure that the spring washer (42) and
motor bushing (14) are properly positioned, and
slide the assembled rotor and shaft and bearings
into the motor housing until the upper bearing (43)
is fully seated against the wavy washer.
Install a new O‐ring (12) in the groove in the inter
mediate and lightly lubricate it with oil. Carefully
slide the intermediate onto the shaft until it is fully
seated over the lower bearing (46), and install the
retaining ring (11).
RETAINING
RING
ROTOR
SHAFT
ADJUSTING
SHIMS
SEAL
ASSEMBLY
LOWER
MOTOR
HOUSING
.579 - .609
[14,7 - 15,5]
INCHES
[MILLIMETERS]
WORKING
HEIGHT
SEAL
Figure C-2. Upper Seal Assembly
This seal is not designed for operation at
temperatures above 160_F. Do not use at
higher operating temperatures.
If all of the original motor parts are being reused,
the same thickness of shims (5) as previously re
moved may be installed. However, if new motor
parts are being installed that will affect parts
“stackup”, or if the thickness of shims removed at
disassembly is unknown, it will be necessary to
measure the seal bore in the intermediate to deter
mine the required shim thickness. This distance is
SM SERIES PUMPS MR-04427
MAINTENANCE AND REPAIRPAGE C - 8
measured from the bottom of the bore in the inter
mediate to the motor side of the retaining ring (6).
Select the required combination of shims to obtain
a seal working height of 0.579 to 0.609 inches (14,7
to 15,5 mm) as shown in Figure C-2.
New seal assemblies are equipped with retaining
clips for storage purposes. These clips must be
removed before installing the seal assembly.
New seal assemblies are equipped with
spring holding clips for storage pur
poses. Remove and discard these clips
before proceeding with seal reassemb
ly. When removing the clips, use caution
so that they do not pop off abruptly and
cause personal injury. Failure to remove
these clips can result in seal failure and
pump damage.
Lubricate the shaft and the outer edge of the seal
assembly with a light coating of oil, and press the
seal assembly into the intermediate bore until fully
seated. Use a suitably sized sleeve which contacts
only the outer metal edge to press the seal into
place. Exert even pressure around the metal edge
to prevent cocking or damage.
Press only on the outer edge of the seal as
sembly to prevent damage to the polished
surfaces of the rotating and stationary seal
faces.
Install the required thickness of shims (5), and se
cure with the retaining ring (6).
Seal Plate Installation
Thoroughly clean the seal plate with cleaning sol
vent. The seal seat bore must be free of burrs and
nicks which could damage the seal seat O‐rings.
Coat the O‐ring (10) with light oil, and install it on
the seal plate pilot. Press the seal plate into the mo
tor housing until fully seated. Be careful not to dam
age the O‐ring.
Lower Seal Installation
(Figures C-1 and C-3)
Do not unwrap a new seal assembly until time of
installation. Cleanliness of seal components is criti
cal, especially the seal faces.
Be sure the bore in the seal plate (where the sta
tionary seat fits) and rotor shaft are clean, dry, and
free of dirt or lint. Inspect the bore for burrs or nicks
that might cut the seal O‐ring or prevent a good
seal. Apply a light coating of oil to the shaft and
seal plate bore.
The lower seal is not normally reused because
wear patterns on the finished faces cannot be re
aligned during reassembly. This could result in pre
mature failure. If necessary to reuse an old seal in
an emergency, carefully wash all metallic parts in
fresh cleaning solvent and allow to dry thoroughly.
Handle the seal parts with extreme care to prevent
damage. Be careful not to contaminate precision
finished faces; even fingerprints on the faces can
shorten seal life. If necessary, clean the faces with a
non‐oil based solvent and a clean, lint‐free tissue.
Wipe lightly in a concentric pattern to avoid
scratching the faces.
Inspect the seal components for wear, scoring,
grooves, and other damage that might cause leak
age. If any components are worn, replace the com
plete seal; never mix old and new seal parts.
If a replacement seal is being used, remove it from
the container and inspect the precision finished
faces to ensure that they are free of any foreign
matter.
To ease installation of the seal, lubricate the bel
lows and O‐rings with water or a very small
amount of light lubricating oil, and apply a drop of
light lubricating oil on the finished faces. Assemble
the seal as follows (see Figure C-3).
MR-04427 SM SERIES PUMPS
PAGE C - 9MAINTENANCE AND REPAIR
ROTOR
SHAFT
STATIONARY
SEAT
STATIONARY
ELEMENT
ROTATING
ELEMENT
BELLOWS
RETAINER
SPRING
INTERMEDIATE
IMPELLER SHAFT
KEY
ADJUSTING
SHIMS
BELLOWS
STATIONARY
O‐RINGS
Figure C-3. Lower Seal Assembly
This seal is not designed for operation at
temperatures above 160_F. Do not use at
higher operating temperatures.
NOTE
When pressing seal components onto the rotor
shaft, use hand pressure only. A push tube cut from
a length of plastic pipe will aid in installing seal
components. The I.D. of the push tube should be
approximately the same as the I.D. of the seal
spring.
Unpack the stationary seal seat and element. Sub
assemble the element into the seat, and place a
clean tissue over the seal face. Apply a light coat of
oil to the seat O‐ring, and use your fingers to press
the seat and element into the bore. Apply equal
pressure on opposite sides of the seat until the as
sembly bottoms against the bore shoulder. Re
move the tissue and inspect the seal face to ensure
that it is clean and dry. If cleaning is necessary, use
a clean tissue to wipe lightly in a concentric pattern.
Position the seat in the bore with the sealing face
up and cover it with a clean tissue. Use your
thumbs to press the seat into the bore. Apply equal
pressure on opposite sides of the seat until it con
tacts the bore shoulder. Remove the tissue and
check the sealing face to ensure that it is clean and
dry. If cleaning is necessary, use clean tissue to
wipe lightly in a concentric pattern.
Unpack the rotating portion of the seal. Be certain
the sealing face of the rotating element is free of grit
or surface damage. Place a small amount of
grease at equal spaces on the back of the element,
and assemble the drive grooves of the rotating ele
ment into the drive lugs of the bellows retainer. The
grease should hold the element in position until the
seal is installed.
Apply a light coating of oil to the seal seating sur
face on the shaft and I.D. of the bellows. Position
the rotating seal portion on the shaft with the seal
face down. Apply firm, steady pressure, with clean
hands, on the seal retainer until it slides down the
shaft and the seal faces contact.

Other manuals for SM SERIES

2

This manual suits for next models

1

Other GORMAN-RUPP Water Pump manuals

GORMAN-RUPP VGH Series User manual

GORMAN-RUPP

GORMAN-RUPP VGH Series User manual

GORMAN-RUPP 80 SERIES User manual

GORMAN-RUPP

GORMAN-RUPP 80 SERIES User manual

GORMAN-RUPP AMT 316A-95 User manual

GORMAN-RUPP

GORMAN-RUPP AMT 316A-95 User manual

GORMAN-RUPP SUPER T SERIES User manual

GORMAN-RUPP

GORMAN-RUPP SUPER T SERIES User manual

GORMAN-RUPP 60 Series User manual

GORMAN-RUPP

GORMAN-RUPP 60 Series User manual

GORMAN-RUPP PA6F60 ---4045D User manual

GORMAN-RUPP

GORMAN-RUPP PA6F60 ---4045D User manual

GORMAN-RUPP 04B3-B Application guide

GORMAN-RUPP

GORMAN-RUPP 04B3-B Application guide

GORMAN-RUPP AMT 3680 Series Assembly instructions

GORMAN-RUPP

GORMAN-RUPP AMT 3680 Series Assembly instructions

GORMAN-RUPP 12D-1B20 FT4 Application guide

GORMAN-RUPP

GORMAN-RUPP 12D-1B20 FT4 Application guide

GORMAN-RUPP AMT 4S13XZR User manual

GORMAN-RUPP

GORMAN-RUPP AMT 4S13XZR User manual

GORMAN-RUPP S8A1-E95 460/3 Application guide

GORMAN-RUPP

GORMAN-RUPP S8A1-E95 460/3 Application guide

GORMAN-RUPP GHA SERIES User manual

GORMAN-RUPP

GORMAN-RUPP GHA SERIES User manual

GORMAN-RUPP SUPER T SERIES User manual

GORMAN-RUPP

GORMAN-RUPP SUPER T SERIES User manual

GORMAN-RUPP SUPER T SERIES User manual

GORMAN-RUPP

GORMAN-RUPP SUPER T SERIES User manual

GORMAN-RUPP 16A20-B User manual

GORMAN-RUPP

GORMAN-RUPP 16A20-B User manual

GORMAN-RUPP 6500 Series User manual

GORMAN-RUPP

GORMAN-RUPP 6500 Series User manual

GORMAN-RUPP 62-1/2E13-4A084 User manual

GORMAN-RUPP

GORMAN-RUPP 62-1/2E13-4A084 User manual

GORMAN-RUPP 02F1?GR User manual

GORMAN-RUPP

GORMAN-RUPP 02F1?GR User manual

GORMAN-RUPP SELF-PRIMING CENTRIFUGAL PUMPS Operating instructions

GORMAN-RUPP

GORMAN-RUPP SELF-PRIMING CENTRIFUGAL PUMPS Operating instructions

GORMAN-RUPP T8C60SC-B User manual

GORMAN-RUPP

GORMAN-RUPP T8C60SC-B User manual

GORMAN-RUPP AMT 2S5P User manual

GORMAN-RUPP

GORMAN-RUPP AMT 2S5P User manual

GORMAN-RUPP AMT 4782-95 Assembly instructions

GORMAN-RUPP

GORMAN-RUPP AMT 4782-95 Assembly instructions

GORMAN-RUPP AMT 489 Series Assembly instructions

GORMAN-RUPP

GORMAN-RUPP AMT 489 Series Assembly instructions

GORMAN-RUPP AMT 5586-H6 User manual

GORMAN-RUPP

GORMAN-RUPP AMT 5586-H6 User manual

Popular Water Pump manuals by other brands

Dover PSG Wilden PS800 Engineering, operation & maintenance

Dover

Dover PSG Wilden PS800 Engineering, operation & maintenance

Ebsray E Series Installation, operation & maintenance instructions

Ebsray

Ebsray E Series Installation, operation & maintenance instructions

DH Instruments VACUUM PUMP KIT FOR MOLBLOC-S instruction sheet

DH Instruments

DH Instruments VACUUM PUMP KIT FOR MOLBLOC-S instruction sheet

KIRLOSKAR RKBV Instruction on installation, operation and maintenance

KIRLOSKAR

KIRLOSKAR RKBV Instruction on installation, operation and maintenance

Trotec TGP 1025 ES operating manual

Trotec

Trotec TGP 1025 ES operating manual

Beckett Fountain Pump M60AUL Specifications

Beckett

Beckett Fountain Pump M60AUL Specifications

Grundfos UPS 15-40 130 manual

Grundfos

Grundfos UPS 15-40 130 manual

Affetti Pumps MSP-E user manual

Affetti Pumps

Affetti Pumps MSP-E user manual

webtrol WTE Series Installation & operating manual

webtrol

webtrol WTE Series Installation & operating manual

Calpeda Unimat-E Series Installation, operation & maintenance instructions

Calpeda

Calpeda Unimat-E Series Installation, operation & maintenance instructions

MULTIQUIP MQ41TDH Operation and parts manual

MULTIQUIP

MULTIQUIP MQ41TDH Operation and parts manual

superior pump 94505 owner's manual

superior pump

superior pump 94505 owner's manual

Grundfos SCALA1 Installation and operating instructions

Grundfos

Grundfos SCALA1 Installation and operating instructions

Parkside PBZS 5 A1 Original instructions

Parkside

Parkside PBZS 5 A1 Original instructions

TLV PowerTrap GP10L instruction manual

TLV

TLV PowerTrap GP10L instruction manual

Lincoln 1340 quick start guide

Lincoln

Lincoln 1340 quick start guide

K2 Pumps SPI03303TPK owner's manual

K2 Pumps

K2 Pumps SPI03303TPK owner's manual

Smiths Medical CADD Solis VIP 2120 Clinicians Guide

Smiths Medical

Smiths Medical CADD Solis VIP 2120 Clinicians Guide

manuals.online logo
manuals.online logoBrands
  • About & Mission
  • Contact us
  • Privacy Policy
  • Terms and Conditions

Copyright 2025 Manuals.Online. All Rights Reserved.